Technical white paper
Configuring HP LeftHand Storage with
Microsoft Windows Server
Table of contents
Introduction
3
Target audience
3
Connecting Windows server to HP LeftHand volumes
3
Assigning a VIP to the HP LeftHand Storage Cluster
3
Installing the Microsoft iSCSI Initiator 2.0x for Windows Server 2003
4
Configuring the Microsoft iSCSI Initiator
4
Configuring the Microsoft iSCSI Initiator on Windows Server Core
5
Adding server connections to a HP LeftHand management group
6
Assigning volumes to the server
7
Entering target portal information
8
Mounting a volume to a server
8
Enable multipath to volumes
10
Mounting a volume through the command line
12
Using quick commands
14
Using CHAP authentication
14
Registering a server and target portal with CHAP
14
Setting up the initiator secret
15
Setting up the initiator secret through the command line
15
Mounting a volume to a server with CHAP
16
Mounting a volume to a server with CHAP through the command line
16
Creating NTFS volumes on HP LeftHand volumes
16
HP LeftHand thin provisioning and volume formatting options
16
Creating NTFS volumes with Windows Disk Management
17
Creating NTFS volumes with DiskPart
20
Dynamic disks on HP LeftHand Storage
21
Setting the disk partition alignment for optimal performance in
Windows Server 2003
22
Expanding volumes
23
Increasing the volume size via the CMC
24
Expand the volume in Windows Disk Management
25
Shrinking volumes
27
Shrinking the file system in Windows Disk Management
28
Shrinking volumes via command line
30
Shrinking the volume via CMC
31
Application-Managed Snapshots
32
Appendix: Verifying the iSCSI Initiator version
35
Using the Windows Device Manager to determine iSCSI Initiator version 35
Introduction
HP and Microsoft have a global partnership to work toward the common goal of simplifying the use of storage area networks (SANs) in Microsoft® Windows® environments. We collaborate to help customers achieve an enhanced environment with world-class performance, scalability, high availability, and data protection. The components of HP LeftHand Storage are certified for Windows Server 2003, 2008, and 2008 R2—designed to power the next generation of networks, applications, and Web services.
HP LeftHand Storage is a scalable data storage system that helps you to simplify management, reduce customer costs, and improve virtual environments. Easy to deploy and maintain, HP LeftHand Storage helps you make sure that crucial business data remains available. It is an innovative approach to storage that provides unique double-fault protection across the entire storage environment, reducing vulnerability without driving up costs the way traditional SANs can. This white paper is a compilation of many best practices, guides that HP LeftHand Storage experts have compiled over years of implementing and selling iSCSI storage networks. Although this is not a complete list of best
practices, it details the most common items seen in the field using the Microsoft iSCSI Initiator and HP LeftHand Storage. This document pertains only to LeftHand operating system (LeftHand OS; formerly known as SAN/iQ Software)
version 8.1 or higher.
Target audience
System administrators who want to use HP LeftHand Storage in Microsoft Windows Server deployments.
Connecting Windows server to HP LeftHand volumes
While detailed information follows in later sections, the basic steps in connecting a volume from the storage cluster to a server are listed here:
1. Assign the HP LeftHand Storage Cluster with a Virtual IP (VIP) Address. 2. Create volumes on the storage cluster.
3. Create a server connection for the specified Windows server. 4. Assign volumes to the server connection.
5. To discover the volumes assigned in step 4, go Discovery tab and add the Virtual IP Address to the list of Target Portals in the iSCSI Initiator, enter the virtual IP address.
6. Log on/connect to the volume in the iSCSI Initiator under the Targets tab, and make the following choices:
a. Use multipath for increased resiliency (and possibly bandwidth).
b. Make the connection persistent through reboots of the server, if required. 7. Format the volume.
8. Set the service dependencies and create persistent bindings for the devices, if required.
Assigning a VIP to the HP LeftHand Storage Cluster
The VIP address provides a single-client access point to the storage cluster for iSCSI sessions. It is assigned to the storage cluster during its initial setup. The VIP moves transparently between nodes, if the node holding the VIP becomes inaccessible. The VIP allows for increased availability and performance (through VIP load balancing).
To edit a VIP, follow the steps below:
1. Open the HP LeftHand Centralized Management Console (CMC) and log into the management group in which the
cluster resides.
2. Right-click on the cluster name, point to Edit Cluster, and select Edit Virtual IP Addresses.
4. Edit the VIP and subnet, and click OK.
Note: The VIP is on the same subnet as the storage nodes. 5. Verify if the address is correct and click OK.
Note: Before clicking OK, make sure servers that are already accessing the storage cluster are configured to use this new VIP for the cluster.
Installing the Microsoft iSCSI Initiator 2.0x for Windows Server 2003
You can obtain the Microsoft iSCSI Software Initiator installation package from www.microsoft.com. Search for “iSCSI Initiator” and follow the links to download the latest driver.
After the executable file has been downloaded, install it on each server on which you intend to mount a volume from HP LeftHand Storage. Launch the Microsoft iSCSI Initiator from the control panel or from the link on the desktop.
Note: In LeftHand operating system versions 8.1 or higher, if using the HP LeftHand DSM for MPIO, you must select the “Microsoft MPIO Multipathing Support for iSCSI” option during the install process.
Upgrading to newer releases of the iSCSI Initiator would require the system administrator to repeat the process above for each new version, on all servers connected to HP LeftHand Storage.
Configuring the Microsoft iSCSI Initiator
In Windows Server 2008 and later, iSCSI Initiator is a built-in component of the operating system. Therefore, upgrades to the iSCSI Initiator are carried out through the Windows Update process.
The following dialog box appears the first time you run the iSCSI Initiator applet. Choose Yes to start the Microsoft iSCSI service and have it start automatically on boot.
If you are using iSNS, select Yes to allow iSNS traffic to pass through the Windows Firewall in the next dialog. Otherwise,
you can choose No to keep those ports closed for better security.
Configuring the Microsoft iSCSI Initiator on Windows Server Core
When connecting a Server Core installation of Windows Server 2008 R2 to HP LeftHand Storage, the Microsoft iSCSI Initiator service needs to be started. To do so, type the following at the command prompt:
sc start msiscsi
To check the current status of the iSCSI Initiator service, use the following command:
sc interrogate msiscsi
To start the iSCSI Initiator service automatically on boot, change the start-up type using the following command:
sc config msiscsi start=auto
The Windows Firewall in a Server Core installation of Windows Server 2008 R2 is preconfigured to allow iSCSI communication.
Adding server connections to a HP LeftHand management group
To allow connections to your HP LeftHand Storage Cluster, you need to add a server connection to the HP LeftHand management group for each server which needs access to a volume on a storage cluster in that management group. After you have added a server connection, you can assign one or more volumes and snapshots to the server connection. Select the Tasks option from the HP LeftHand Centralized Management Console (CMC) menu bar, go to the Server
option, click the New Server option to create a new server connection, and choose your management group. Enter the
server’s Name and Description and verify that the Allow access via iSCSI and Enable load balancing options are
selected. Copy the Initiator Name from the Configuration tab on the iSCSI Initiator Properties window into the
matching field in the CMC. Then, click OK to complete the server registration.
If you set up a Windows Failover Cluster, consider grouping multiple server connections to a server cluster. This will make volume assignments easier and less error prone when working in installations with clustered servers.
Select the Tasks option from the HP LeftHand CMC menu bar, go to the Server option, click the New Server Cluster
option to create a new server cluster, and choose your management group. Enter the Server Cluster Name and Description and add servers from the list of existing server connections, or create new server connection as part
of the server cluster. For Windows Failover Cluster, leave the Server Cluster Settings at their defaults load
balancing enabled. Click OK to complete the server cluster registration.
Assigning volumes to the server
Select the Tasks option from the CMC menu bar, go to Server, click the Assign and Unassign Volumes and Snapshots
option and choose the server connection (or server cluster) to which you want to assign volumes. Select the volumes (and snapshots) that the server will access, set the correct read/write permissions, and click OK.
Note: To reduce the possibility of data corruption, do not grant write access to a given volume to more than one host server, with the exception of Windows Failover Clusters. Make sure that each volume is accessible by only one host server. For Windows Failover Clusters, consider grouping multiple servers to a server cluster rather than assigning a volume to individual server connections.
Entering target portal information
After the server connections have been successfully created and the volumes have been assigned to the server connections, add the virtual IP (VIP) address of the HP LeftHand Storage Cluster to the Target Portals list in the iSCSI Initiator. Follow the steps below:
1. Open the iSCSI Initiator.
2. Select the Discovery tab.
3. In the Target Portals section, click Discover Portal.
In the Windows Server 2003, select Add button.
4. Type in the IP address of the VIP of the cluster,
leave the port set to 3260,
and click OK.
This allows the server to search for HP LeftHand volumes using the VIP.
Note: If the steps above trigger an error message, hinting at connection or authorization failures; verify the entered VIP and the iSCSI qualified name (IQN) in the server connection for that particular Windows server.
Mounting a volume to a server
Select the Targets tab in the iSCSI Initiator to view the available targets, or volumes on the HP LeftHand Storage Cluster.
You will only see the volumes that have been assigned to the server in the CMC. If you do not see your volumes listed, first click the Refresh button, then check the list of assigned volumes for the server connection in the CMC and VIP
configuration.
Locate the first volume that you wish to connect to the server (it will be in an inactive state) and select Connect (in
To view the details about the newly established volume, select the target and then click the Properties (in Windows
Server 2003: Details) button to bring up the Target Properties window. Click the Device button (in Windows Server
2003, it is the Devices tab, and then click the Advanced button). This will bring up the Devices (in Windows Server 2003: Devices Details) window, which shows the disk number assigned to the volume on the system, as seen on Windows Disk
Enable multipath to volumes
Microsoft iSCSI Initiator allows for storage connectivity with enhanced resiliency (and depending on the storage networking, increased bandwidth) through the use of multiple paths (i.e. multiple network adapters) to HP LeftHand Storage. This method is also referred to as multipathing or Multipath I/O (MPIO). Using MPIO is recommended for all installations of Windows Server (and Windows Failover Cluster) which are connected to HP LeftHand Storage.
For optimal performance in Microsoft Windows environments, there is also a particular device-specific module (DSM) for HP LeftHand Storage, which integrates with the Microsoft MPIO framework. HP LeftHand DSM for MPIO optimizes the data path by establishing iSCSI sessions to each node in the storage cluster. When installed, it will automatically adjust the data paths to volumes on HP LeftHand clusters.
Starting with LeftHand operating system version 9.0, you may use Microsoft DSM for MPIO as an alternative to the HP LeftHand DSM for MPIO on Windows Server 2008 or higher.
With LeftHand operating system version 9.0 or higher you can make use of multiple network adapters on servers when connecting to HP LeftHand Storage. Before you continue, make sure that:
• LeftHand operating system version 9.0 or higher runs on all storage nodes
• Multipath I/O feature is installed for Windows Server 2008 or higher;
and MPIO is enabled for iSCSI devices (Administrative Tools: MPIO; Discover Multipaths)
or
Multipath support for iSCSI is installed during the Microsoft iSCSI Initiator, and HP LeftHand DSM for MPIO is installed on Windows Server 2003. To enable multipath for volumes:
1. Select the volume from the list of targets and click Connect.
2. Check Enable multipath check box in the Connect To Target window,
4. Select the Microsoft iSCSI Initiator as Local adapter, and choose Initiator IP as the first network adapter on the
iSCSI network.
5. Click OK and click OK in the Connect To Target window.
6. Repeat steps 1 to 5 for the volume for all remaining network adapters on the iSCSI network before moving on to
the next volume.
7. Select the target from the list and click Devices… on the Targets tab in the iSCSI Initiator.
8. Next, click on MPIO in the Devices dialog box.
9. Choose Round Robin (best practice) from the Load balance policy drop-down box,
10. Click OK (to exit the Device Details window).
You can verify the configuration by locating the HP LeftHand volume in the CMC and checking the information on the iSCSI tab for a particular volume. You should see one iSCSI sessions from each of the server’s network adapters. If the HP LeftHand DSM for MPIO is installed on the Windows server, the number of sessions depends on the number of nodes in the storage cluster. As a result, there is one session to each storage node plus one additional session (for instance, in a four-node storage cluster, the number of session equals five sessions) per network adapter (in this example: ten sessions in total).
For more information on how to setup multipath for HP LeftHand Multi-Site Cluster with one or more subnets, please consult:
• HP LeftHand Storage user manual
• HP LeftHand Windows Solution Pack user guide
• HP LeftHand Multi-Site user guide
Note: Windows Failover Cluster (Microsoft Cluster Service in Windows Server 2003) installations can benefit from the HP LeftHand DSM for MPIO. However, in larger installations with many cluster volumes on larger HP LeftHand Storage Clusters, the number of iSCSI sessions may reach the limit of 255 iSCSI sessions per Windows server, or 256 sessions per HP LeftHand volume. In these cases, it is advised to use the Microsoft DSM for MPIO, which comes built-in with Microsoft Windows Server 2008 or higher, instead of the HP LeftHand DSM for MPIO.
It is best practice to use either Microsoft DSM or HP LeftHand DSM for MPIO when connecting to the same HP LeftHand volume.
Mounting a volume through the command line
On Server Core installations of Windows Server 2008 R2, you can also use the Microsoft iSCSI Initiator user interface using:
iscsicpl
at the command prompt.
In a Server Core installation of Windows Server 2008, the volume must be mounted via the command line, using a built-in tool called iscsicli.exe. First, add the target portal. The syntax for adding a portal is as follows:
AddTargetPortal <TargetPortalAddress> <TargetPortalSocket><Initiator
Instance Name> <Initiator Port Number><Security Flags><Login Flags> <Header Digest> <Data Digest> <Maximum Connections> <DefaultTime2Wait>
<DefaultTime2Retain> <Username> <Password> <AuthType>
Typically, the only values that need to be passed are the portal IP address and the portal socket. The other values can be used for specific use cases that are outside the scope of this document. As an example, a typical command to add the target portal might look like the following:
The syntax for mounting a volume is as follows:
LoginTarget <TargetName> <ReportToPNP> <TargetPortalAddress>
<TargetPortalSocket> <Initiator Instance Name> <Port number> <Security Flags> <Login Flags> <Header Digest> <Data Digest> <Max Connections> <DefaultTime2Wait> <DefaultTime2Retain> <Username> <Password> <AuthType> <Key> <Mapping Count> <Target Lun> <OS Bus> <Os Target> <OS Lun>
For each parameter being passed, an asterisk (*) can be used to indicate that the default value should be used. As an example, a typical command to log in to a volume might look like the following:
logintarget iqn.2003-10.com.lefthandnetworks:boulder:23:demo-volume2 T * * Root\ISCSIPRT\0000_0 10.0.80.104 3260 * * * * * * * * * * 0
To log out of a volume, use the LogoutTarget command. The syntax of the command is:
LogoutTarget <SessionID>
For this example, the command to log out of the volume is as follows:
LogoutTarget 0xfffffa80047da018-0x4000013700000004
To find out which sessions are currently active, use the following command:
SessionList
Note: In order for the volumes to mount automatically at boot, they must be a persistent (favorite) target. The syntax for logging in to a target and persistently logging in to a target is the same; only the command is different. Instead of “LoginTarget” use “PersistentLoginTarget” and instead of only using "LogoutTarget", remove targets from the persistent (favorite) target list with "RemovePersistentTarget". To verify persistent targets, use the command “ListPersistentTargets”. All targets marked as persistent (favorites) will be displayed.
Using quick commands
The iscsicli application also has several “quick commands” built in. These operate very much like the standard commands, but are not passed as many variables. Instead, defaults are assumed, except for those options that are typically unique in configuring access to storage. For example, the target portal socket rarely changes from the default of 3260. In this example, for the command LoginTarget, using the quick command changes the syntax from:
logintarget iqn.2003-10.com.lefthandnetworks:boulder:23:demo-volume2 T * * Root\ISCSIPRT\0000_0 10.0.80.104 3260 * * * * * * * * * * 0
to:
qlogintarget iqn.2003-10.com.lefthandnetworks:boulder:23:demo-volume2
You can find more quick commands by typing “iscsicli /help” from the command prompt, or “help” from the iscsicli shell.
Using CHAP authentication
Instead of using only the iSCSI Qualified Name (IQN) for authorization purposes (described above), you can also use the Challenge-Handshake Authentication Protocol (CHAP) for authentication. CHAP is used to authenticate the peers of a connection, based upon the peer sharing a CHAP name and so-called “secrets”. The Microsoft iSCSI Initiator service and HP LeftHand Storage support both one-way (target secret) and two-way mutual (target and initiator secret) CHAP. CHAP authentication uses secrets associated with both the target and the initiator. Any initiator wanting to access a volume must know the target secret (one-way), and any target to be authenticated must know the initiator secret (two-way). Setting up CHAP is a two-part process. The first part is creating a server connection with target secret (and initiator secret for two-way CHAP), and the second step is connecting the volume using the secret(s). The following section describes how to configure the Microsoft iSCSI Initiator and HP LeftHand volume for CHAP authentication.
Registering a server and target portal with CHAP
Select the Tasks option from the CMC menu bar, go to Server, click New Server option to create a new server connection
and choose your management group. Enter the server Name and Description and verify that the Allow access via iSCSI
and Enable load balancing options are selected. Copy the Initiator Name from the Configuration tab on the iSCSI Initiator Properties window into the corresponding field in the CMC. Click the CHAP required radio button and use the
following steps to set the CHAP Name and Target Secret:
1. Open the iSCSI Initiator and go to the Target Portals section on the Discovery tab.
2. Click the Discover Portal button.
3. Type in the IP address of the VIP of the cluster in the text box, leave the Port set to 3260.
4. Click the Advanced button in the Discover Target Portal window.
5. In the Advanced Settings window, under the General tab, check the Enable CHAP log on checkbox.
6. Make sure to choose the same value for CHAP name for the server connection in the CMC and Name field in the
iSCSI Initiator's Advanced Settings window.
By default it is the same as the IQN of the server.
7. In the New Server windows in the CMC, fill the Target Secret with a secret of your choice and click OK.
8. In the iSCSI Initiator’s Advanced Settings window, fill in the same Target secret (same as in step 7 above)
and click OK.
10. The server can now discover targets in the management group.
Setting up the initiator secret
The initiator CHAP secret is set at the Microsoft iSCSI Initiator and must be configured via the CMC and the Microsoft iSCSI Initiator interface. In the iSCSI Initiator’s Configuration tab, click CHAP option to create the initiator secret (in
Windows Server 2003: Secret button on the General tab). The secret must be between 12 and 16 characters long, and it
must be different from the target secret. This secret must also be configured as Initiator Secret for the server
connection on the HP LeftHand management group using the CMC.
Setting up the initiator secret through the command line
From a command line, or in Windows Server 2008 Server Core, you can set the initiator secret by using the following command:
CHAPSecret <CHAP secret>
Mounting a volume to a server with CHAP
In the Target list, locate the first volume you wish to connect to the server (it will be in an inactive state) and select
Connect. This will bring up the Connect to Target window. Click the Add this connection to the list of Favorite Targets
checkbox. This will provide for automatic connection of the volume upon server reboot.
Next, click the Advanced button to bring up the Advanced Settings window. Under the General tab, click the Enable CHAP log on checkbox, fill in the (CHAP) name and target secret information (same as used during the target discovery),
and click OK. Click OK in the Connect To Target window and in the iSCSI Initiators Properties window. The volume will
now be displayed as Connected.
To view the details about the newly established volume, select the target and then click the Properties… (in Windows
Server 2003: Details) button to bring up the Target Properties window. Click the Devices… button (in Windows Server
2003, it is the Devices tab and then click the Advanced… button). This will bring up the Devices (in Windows Server
2003: Devices Details) window, which shows the disk number assigned to the volume on the system, as seen on Windows Disk Management. Use the disk number when locating the volume.
Mounting a volume to a server with CHAP through the command line
Mounting a volume with CHAP through the command line is similar to mounting a volume through the command line without CHAP. Using the QLoginTarget command (LoginTarget would work, as well), simply pass the target
name, CHAP name, and CHAP password when executing the command. For example:
Qlogintarget iqn-2003-10.com.lefthandnetworks:boulder:23:demo-volume-2 CHAPName TargetPassword
Creating NTFS volumes on HP LeftHand volumes
This chapter explains some of the considerations you need to take when making volumes available to applications. It will discuss the Disk Management utility and cover the steps to format the volume for use as a locally attached basic disk.
HP LeftHand thin provisioning and volume formatting options
HP LeftHand thin provisioning allows volumes to be created without storage space being pre-allocated. This feature greatly increases the overall utilization of the storage cluster and reduces the challenge of predicting future storage requirements. Storage space is allocated as data is written to the volume. Easy-to-read charts and alerts keep you apprised of volume utilization levels, letting you know when you are approaching storage limits—so you can purchase storage capacity only when you need it.
Windows Server 2008 and later versions write to the entire disk when performing a full format, whereas previous versions of Windows performed a read. Microsoft and HP both recommend performing a quick format when using HP LeftHand thin provisioning and other on-demand allocation technology. The Quick Format option avoids the initial write to the entire disk, maintains on-demand utilization, and completes in seconds rather than minutes to hours for
Creating NTFS volumes with Windows Disk Management
To create a partition and format a drive, start Disk Management by going into Microsoft Windows's Server Manager,
expanding the Storage item, and selecting Disk Management. The volumes that have been created and mounted by the
server will appear on the bottom right of the window. They will be offline and unallocated. To bring the disk online, right-click on the disk number, and select Online. Creating a partition and formatting the volume are both completed in
one process. To begin this process, right-click on the unallocated space on the disk, and select New Simple Volume.
Another dialog box appears asking for the size of the volume to be created. By default, the maximum capacity of the volume will be filled in. In most cases, the HP LeftHand volume would be created to the proper size, so using the full capacity here makes the most sense.
Note: HP LeftHand Storage best practice is to create one file system per HP LeftHand volume that is the same size as the partition created in Windows. It is acceptable and supported to create multiple partitions on HP LeftHand volumes, but making the volume the same size as the partition allows more granularity for creating snapshots, remote copies, and so on. It also simplifies management, because a change to one volume and partition will not affect the other partitions on the volume.
Another dialog box appears, asking whether to assign a drive letter (and, if so, which letter), mount the volume in an empty NTFS folder, or assign neither drive letter nor path. Consult with the application vendor to determine the proper option here.
A dialog box appears to request information on formatting the volume. In some instances, the volume would not need to be formatted, but most applications typically require a formatted volume in order to access the disk. Unless otherwise directed by the application vendor, keep the default file system and allocation unit values. You can change the volume label to something appropriate for the volume.
For example, a volume that contains an Exchange database might be labeled “Exchange-DB”. The label exists to help identify volumes.
Note: There is no benefit to doing a full volume format with HP LeftHand Storage. It is a best practice to choose Perform a Quick Format. Fully formatted volumes pre-provision storage space within the HP LeftHand Storage Cluster and fail to take advantage of HP LeftHand thin provisioning. In addition, quick format is completed in seconds as opposed to several minutes—or even hours, for larger volumes.
The final dialog box appears, showing the list of selections made so far. Click Finish to create the volume and perform
the format, Back to go back and change an option, or Cancel to cancel the creation of the partition and formatting of the
Creating NTFS volumes with DiskPart
To create a partition with DiskPart, you need to take the following steps: 1. Open a command prompt and enter diskpart.exe.
2. List all disks on the Windows server with this command:
list disk
Identify the disk on which you want to create the new NTFS volume on. 3. Select the proper disk (Disk 2 in this example):
select disk 2
4. If the disk is not already online, use:
online
5. To a new partition using the entire size of the disk, use:
create partition primary
6. To format the newly created partition with NTFS using quick format, enter the following command:
format fs=ntfs label=yourlabel quick
7. To assign a mount point or drive letter to the newly create NTFS volume, use the following code:
assign letter X: (the letter you want the drive to have) and/or
assign mount C:\EmptyFolder (the path of an empty directory on an existing NTFS volume)
8. To exit the DiskPart prompt, use this command:
Dynamic disks on HP LeftHand Storage
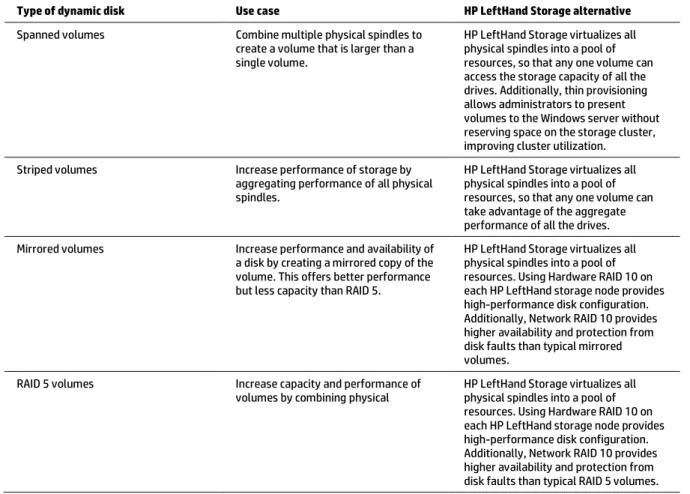
In Windows Server 2008, dynamic disks are now supported over iSCSI. This is a change from previous versions of Windows. However, most of the functionality that dynamic disks support is found in HP LeftHand Storage. Also, there is additional resource utilization on the Windows server, which comes from the management and operation of these dynamic disk sets. Table 1 refers to common use cases of dynamic disks.
Table 1. Common use cases of dynamic disks
Type of dynamic disk Use case HP LeftHand Storage alternative Spanned volumes Combine multiple physical spindles to
create a volume that is larger than a single volume.
HP LeftHand Storage virtualizes all physical spindles into a pool of resources, so that any one volume can access the storage capacity of all the drives. Additionally, thin provisioning allows administrators to present volumes to the Windows server without reserving space on the storage cluster, improving cluster utilization. Striped volumes Increase performance of storage by
aggregating performance of all physical spindles.
HP LeftHand Storage virtualizes all physical spindles into a pool of resources, so that any one volume can take advantage of the aggregate performance of all the drives. Mirrored volumes Increase performance and availability of
a disk by creating a mirrored copy of the volume. This offers better performance but less capacity than RAID 5.
HP LeftHand Storage virtualizes all physical spindles into a pool of resources. Using Hardware RAID 10 on each HP LeftHand storage node provides high-performance disk configuration. Additionally, Network RAID 10 provides higher availability and protection from disk faults than typical mirrored volumes.
RAID 5 volumes Increase capacity and performance of
volumes by combining physical HP LeftHand Storage virtualizes all physical spindles into a pool of resources. Using Hardware RAID 10 on each HP LeftHand storage node provides high-performance disk configuration. Additionally, Network RAID 10 provides higher availability and protection from disk faults than typical RAID 5 volumes.
Note: HP LeftHand Storage does not support snapshots or remote copies of the dynamic disks listed in the table above. It is highly recommended that administrators who want snapshot or remote copy functionality use HP LeftHand functionality rather than dynamic disks.
Managing dynamic disks that are used in any of the above ways creates additional overhead for administrators. Using software RAID from within Windows Server 2008 uses more system resources than if using simple basic disks. Additionally, if a mirrored or striped volume is created, the user will not be able to extend or shrink the volume. For these reasons, HP recommends using basic disks within Windows Server 2008, and provisioning Network RAID protected volumes on HP LeftHand Storage, rather than using software RAID within Windows.
Setting the disk partition alignment for optimal performance in Windows Server 2003
This section describes how to configure disk partitions for optimal alignment with HP LeftHand Storage. Partitions created with Windows Server 2003 are not aligned to the physical disk. Correct partition alignment helps reduce latency when writing to the partition, by eliminating unnecessary disk writes and reads that occur when partitions are not aligned. For best results, align Windows partitions at 64 kB. This can only be accomplished when creating a new partition before formatting. It is not possible to align a partition that already contains data without losing that data.
Diskpar.exe is available in the Windows 2000 Resource Kit. Obtain diskpar.exe and place it somewhere in the Windows system path and take the following steps. Open Disk Management and note the physical disk number of the drive you
want to partition (in this case, Disk 1).
1. Open a command prompt and enter diskpar –s <disk number>.
2. When prompted, answer Yes to both questions if you are sure.
3. When prompted, for the starting offset enter 128 (equal to a 64 kB offset). 4. When prompted, enter the desired size of the partition in MB.
Take the following steps to create an aligned partition within DiskPart in Windows Server 2003 SP1, or higher. 1. Open a command prompt and enter diskpart.exe.
2. List all disks on the Windows server:
list disk
Identify which disk you want to create the new NTFS volume on. 3. Select the proper disk (Disk 2 in this example):
select disk 2
4. If the disk is not already online, use:
online
5. To a new partition using the entire size of the disk and aligned to 64 kB, use:
create partition primary align=64
6. To format the newly created partition with NTFS using quick format, enter:
format fs=ntfs label=yourlabel quick
7. To assign a mount point or drive letter to the newly create NTFS volume, use:
assign letter X: (the letter you want the drive to have) and/or
assign mount C:\EmptyFolder (the path of an empty directory on an existing
NTFS volume)
8. To exit the DiskPart prompt, use this command:
exit
Expanding volumes
Storage administrators often need to expand volumes on a Windows server. Whether responding to company growth, new requirements, or infrastructure changes, administrators require a shared storage solution flexible enough to accommodate their changing storage needs. This section details the necessary steps to grow a disk on Windows Server 2008 R2.
Growing a disk in HP LeftHand Storage is a simple two-step process that can be performed while the volumes are still online and accessible to applications/users by:
1. Increasing the volume size on the HP LeftHand Storage Cluster, and 2. Expanding file system on the Windows server.
Increasing the volume size via the CMC
The first step in increasing the volume size is to increase the volume on the storage cluster, so that it is large enough to meet your needs. Typically the size of the volume on the HP LeftHand Storage Cluster and the size of the volume in Windows are designed to be the same.
For this example, the 500 GB volume is being increased to 1000 GB. This operation is completed via the CMC and consists of the following steps:
1. Select the volume to increase in size.
2. Right-click and select Edit Volume from the context menu.
3. Adjust the volume size accordingly and click OK.
After the volume size has been increased on the HP LeftHand Storage Cluster, the next step is to expand the file system to fully use the disk’s available space.
Expand the volume in Windows Disk Management
1. Go to Server Manager and open Disk Management.
2. Refresh Disk Manager (Action Refresh).
The space added in step one will appear next to the original volume.
3. Right-click on the volume that you want to extend (it must be on the same physical disk as the new free space), and click Extend Volume.
4. Extend Volume Wizard appears. Click Next.
5. Choose the amount of space by which you want to increase the volume. The default amount is the maximum available space to add to the volume. Typically, the volume on the HP LeftHand cluster has been increased to the proper size, so choosing the default is usually correct. Click Next.
6. A summary screen appears. If the summary reflects your chosen parameters, click Finish to begin the
extension process.
Expand the volume via command line
To expand the volume in the command line, follow the steps outlined below using DiskPart. 1. Open a command prompt and enter diskpart.exe.
2. List all volumes on the Windows server
list volume
Identify which volume you want to expand.
3. Select the proper volume (Volume 3 in this example):
select volume 3
4. To expand the volume to the capacity of the entire on the disk, use:
extend
5. To exit the DiskPart prompt, use:
exit
Shrinking volumes
Occasionally, volumes created and used on the HP LeftHand cluster end up being too large. HP LeftHand Storage has a volume-shrink capability; however, to do this safely with the NTFS file system, one must take careful steps to shrink the volume without data loss. Table 2 includes several reasons why you may want to shrink a volume.
Table 2. Reasons why you may want to shrink volumes
Common scenarios Reason to shrink
Volume simply too large Sometimes, the estimates used to create the volume turn out to be too high. In these cases, one may want to retain the data on the volume, but simply make the volume smaller so that the space on HP LeftHand cluster can be used for other volumes. Volume is no longer full If the volume was full (or nearly full), and then space is freed up
by users moving or deleting data off the volume, it would be ideal if one could simply shrink the volume to a size that is more in line with what is in use on the NTFS file system.
In most organizations, projects come and go. If a project is cancelled, or significantly scaled back, the storage needs for the project may be much less. In these cases, it makes sense to shrink the volume.
Application growth is slower than expected Sometimes, the growth estimate for a volume turns out to be too high. If the data is not growing as fast as anticipated, it may be prudent to shrink the volume so that the space on the HP LeftHand cluster can be better utilized by volumes that are
There may be other options that relieve the specific pain point you are addressing, such as doing a volume migration to another cluster, or converting a worrisome volume from being fully provisioned to thinly provisioned. Thin provisioning does not shrink the size of the volume that is presented to the host, but rather only allocates space on the cluster as needed. This means that space on the cluster is not used until data is actually written to the blocks.
The capability to shrink volumes on an HP LeftHand Storage has been a product feature since the product was first introduced. However, in order to shrink a volume on the cluster without destroying the data on the volume, you need to perform the steps in precise order. Performing the steps out of order can result in complete data loss on that particular volume. This section details the necessary steps to shrink a disk on Windows Server 2008 R2.
Shrinking a disk in HP LeftHand Storage is a two-step process that can be performed while the volumes are still online and accessible to applications/users:
1. Shrink file system on the Windows server, and 2. Shrink volume on the HP LeftHand Storage Cluster.
Note: To prevent data loss, you must shrink the NTFS file system before shrinking the HP LeftHand Storage Cluster.
Shrinking the file system in Windows Disk Management
The following example will walk you through the process of shrinking a 1000 GB volume down to 500 GB volume on Windows and HP LeftHand Storage.
1. Run CHKDSK against the NTFS file system.
2. Verify backups of the volume to be shrunk.
3. Create an HP LeftHand application-managed snapshot of the volume. This provides a quick recovery option as well as a secondary backup copy of the volume.
4. Right-click on the volume to shrink in Windows Disk Management, and select Shrink Volume from the
5. A dialog box pops up. The maximum available shrinkage amount is automatically calculated and displayed. Enter the amount of space you want to shrink the volume by. In other words, how much space you want to remove from the partition.
6. Volume system after being shrunk.
Shrinking volumes via command line
To shrink volumes on the using DiskPart, use the following steps: 7. Run CHKDSK against the NTFS file system.
8. Verify backups of the volume to be shrunk.
9. Create an HP LeftHand application-managed snapshot of the volume. This provides a quick recovery option, as well as a secondary backup copy of the volume.
10. Open a command prompt and enter diskpart.exe.
11. List all volumes on the Windows server:
list volume
12. Select the proper volume (Volume 3 in this example):
select volume 3
13. You can determine the maximum amount of space available to shrink by using:
shrink querymax
14. To shrink the volume by the maximum amount of space, use:
shrink
To perform a shrink to a particular amount, add the desired parameter with the number of megabytes by which to shrink:
shrink desired=512000
You can also add a minimum parameter, which forces the command to fail, if that amount of space isn’t available.
shrink desired=512000 minimum=300000.
DiskPart will attempt to shrink by about 500 GB. But, as long as it can shrink by at least 300 GB, the command will execute successfully.
Note: Microsoft and HP LeftHand Storage counts 1 GB as 1,024 MB (2^30). Shrinking a volume by 100,000 MB is not the same as shrinking it by 100 GB. This difference is reflected in the screenshot above, where the volume was shrunk to a little less than 500 GB (c.f. 512,000 MB).
Shrinking the volume via CMC
The second step after shrinking the file system, or the NTFS file system, is to the shrink the volume on the
HP LeftHand Storage Cluster. Be sure that the volume on the storage cluster is at least as large as the NTFS volume on the server.
Using the CMC, edit the volume and set the new size of the volume as a small increment (50 to 100 MB; 1 GB is the example outlined below) greater than the size of the file system. This is so that the entire NTFS volume will fit on the volume. If the volume on the storage cluster is smaller than the NTFS volume, data loss can occur.
1. Select the volume to decrease in size.
2. Right-click and select Edit Volume from the context menu.
3. Reduce the volume size accordingly and click OK.
5. This is a view of the new NTFS volume and disk size in Disk Management.
Note the small “unallocated” portion of the physical disk that remains after the shrink. This is the “buffer” from the previous step. You can choose to expand the volume to include this extra space, if you wish.
6. Run CHKDSK against the NTFS volume to verify file system consistency.
Application-Managed Snapshots
Block-level snapshots on shared storage preserve a point-in-time state of volumes. On HP LeftHand Storage, snapshots are always thinly provisioned and they do not require upfront space-reservation for enhanced storage efficiency: these snapshots comprise only changed data.
There are various use cases for snapshots in Windows environments:
• Roll-back of snapshots for quick recovery to a previous state of the volume
• Retrieve deleted files from a snapshots by presenting it to the same server
• Using a snapshot of application data for test and development on another server
• Backup of application data from a snapshot without affecting the application server
• Replicate snapshots to a disaster recovery (DR) location with HP LeftHand Storage
Snapshots are typically crash-consistent and therefore contain blocks of data that were on the volume at the time the snapshot was taken. When creating snapshots for volumes with continuous writes from applications, there is no guarantee that data in the snapshot represents valid application data (database, files, and so on).
The HP LeftHand Application-aware Snapshot Manager comes with a VSS Provider, which is specific to HP LeftHand Storage and creates a snapshot on storage clusters. To leverage Application-Managed Snapshots, you need to complete the following steps:
1. Install the HP LeftHand Application-aware Snapshots Manager on the Windows server
2. Configure the HP LeftHand management group’s credentials in the Authentication Console (component is installed
as part of the software) to enable the Windows server to create snapshots on the HP LeftHand Storage Cluster.
You can configure credentials for individual management groups and default credentials for management groups for which you have not explicitly configured credentials. When there is an active connection to HP LeftHand volumes, the Credential Wizard helps to set and test the credentials for the necessary
HP LeftHand management groups.
3. In the CMC, select New Snapshot from the volume’s context menu.
4. Click the Application-Managed snapshot checkbox. Click OK.
6. Locate the snapshot in the list of volumes and snapshots, and check the snapshot information on the Details tab.
The type should be Primary, Application-Managed.
In cases where an application is spanning multiple volumes (for instance, an SQL Server database with separate data base and log volumes), the VSS framework will quiesce all volumes belonging to the application. The
Application-Managed Snapshots on the HP LeftHand Storage Cluster will be part of a snapshot set. Rolling back to a previous state of the application will require a roll-back of all snapshots in the snapshot set.
Application-Managed Snapshots are as flexible as any other snapshots on HP LeftHand Storage. Like regular snapshots, Application-Managed Snapshots can be mounted to other servers, clone points for SmartClones, and can be used with schedules and Remote Copy. Scheduling Application-Managed Snapshots on HP LeftHand Storage allows for automated, periodic application-consistent snapshots and even replication to a disaster recovery site without additional software or scheduling on application servers.
For more information on Application-Managed Snapshots and snapshot handling in general, please refer to the HP LeftHand Storage user guide.
Summary
This paper covered how to connect Windows servers to HP LeftHand Storage, how to use Multipath I/O in Windows, and how to create, grow and shrink file systems on HP LeftHand volumes. These administrative procedures can be used for any HP LeftHand volume connected to Microsoft Windows Server for applications, such as file serving, email servers, and in conjunction with Hyper-V. For more general best practices, please consult HP LeftHand Storage documentation and whitepapers.
Appendix: Verifying the iSCSI Initiator version
This section provides instructions on how to determine the version of Microsoft iSCSI Initiator that you are using. This information is helpful to know when contacting HP support or troubleshooting iSCSI issues.
Using the Windows Device Manager to determine iSCSI Initiator version
Open the Device Manager by right-clicking Computer and selecting Manage. Select Device Manager in the Diagnostics section. In the System Properties window, select the Hardware tab, and click Device Manager.
For more information
Power the next generation of networks, applications, and Web services by seamlessly configuring and installing our unique HP LeftHand Storage with your Microsoft Windows Server. Visit hp.com/go/lefthand
Get connected
hp.com/go/getconnected
Current HP driver, support, and security alerts delivered directly to your desktop