3
CONFIGURING A NEW ECOMMERCE SITE
In the preceding chapter you saw how to create a basic Dynamicweb eCommerce web site from scratch. To let you focus on the process rather than on the specifics, the site you set up was deliberately simple and skipped most of the configuration options that are available to you. In the real world, however, things are often not so simple and your eCommerce site needs a lot more bells and whistles in order to become successful. In this chapter, I’ll show you how to configure a brand new ecommerce web site from scratch. This time, I’ll focus more on the many configuration options you have available via the Management Center. Later chapters show you other important areas ofDynamicweb eCommerce, such as the Product Catalog and Shopping Cart modules, the Orders list and more.
In particular, this chapter gives you a good look at:
Setting up countries, languages and currencies
How to configure different VAT groups
Ways to define rounding and auto numbering of orders
Creating and assigning manufacturers to products
Managing the Advanced eCommerce settings
This chapter assumes you’re starting off with an empty database based on the DefaultEmptyData8SQL database. If you followed along with the walkthroughs in the first chapter, this means you need to restore a backup of the database as you saw how to do in Chapter 1 to overwrite the changes you made earlier.
You should follow all steps from the section 1.2.4 - Configuring the Database, except for the step where you create a new database, as you can simply reuse the database that you created in that section.
If you get an error when logging in into the Administrative interface, reset the version numbers in the XML file and restart IIS as explained in the last step on configuring the database.
This chapter assumes you’ve activated at least the following licenses and modules:
Dynamicweb CMS Light
Dynamicweb eCommerce Basic
Internationalization
Multiple Shops
Once you’ve restored the database, you’re ready to configure your Dynamicweb eCommerce site. The remainder of this chapter assumes you have your site running at http://ecommerce8.local.dynamicweb.dk/ and that it is using a clean copy of the database, which you can extract from the DefaultEmptyData8Sql.zip file and that it uses the Files folder from the Bikez demo website. I am using the Bikes example in this book as it ships with a lot of implemented templates, saving you from manually typing a lot of code.
All the configuration options that are about to be discussed in this chapter can be found under the eCommerce node of the Management Center, which you can access as follows:
1. Browse to http://ecommerce8.local.dynamicweb.dk/Admin 2. Log in with your user name and password
3. Click the Management Center button on the Main Menu 4. Expand the eCommerce node as shown in Figure 3-1:
Figure 3-1
3.1 Creating and Configuring Shops
The main container for modules such as the Product Catalog and the Shopping Cart is the Shop. In most circumstances, a Dynamicweb eCommerce solution contains a single shop. Having only a single shop will simplify the setup and management of your
eCommerce solutions and, where possible, you should strive to use a single shop setup. However, with the Multiple Shops module installed, you can create more than one shop. This is useful if you want to target different user groups (such as a public facing shop and a shop for internal employees) for which different products and prices should be made available. Another common scenario for multiple shops is the so-called drop-shipping, where your site collects orders for another shop or company. This means orders collected by your shop are directly forwarded (dropped) to the third party company and not processed by the current shop.
It’s important to realize that you don’t necessarily need multiple shops in the following situations:
You want to run your shop on multiple domains. For example, you could run www.laptopshop.com and www.printershop.com on the site installation of Dynamicweb and they could each use products from the same Product Catalog; possibly each using a separate top level group. You can use the Web Sites modules for this instead.
You want to present products in your shop in multiple languages. You can accomplish this using the Internationalization module.
You want to differentiate between prices depending on the logged in user. You use the Prices module for this.
All these scenarios are supported by Dynamicweb eCommerce 8 using one or more of the existing modules, such as the Web Sites, Internationalization, Sales Discounts and Extranet modules. For more information about running your shops on multiple domains or in multiple languages, refer to chapter 14 - Building a Multi-Lingual eCommerce Web Site. For more information about price strategies, take a look at Chapter 9 – Prices and Sales Discounts.
3.1.1 Changing the Default Shop
When you set up a brand new Dynamicweb eCommerce environment, the database already contains a single shop that you can work with. However, it’s a good idea to personalize the shop by changing its name.
Walkthrough: Configuring the Default Shop
1. In order to change the existing shop, open the Management Center, expand the
eCommerce node and then Product Catalog and finally click the Shops item. You see a screen similar to Figure 3-2:
Figure 3-2
2. To edit the shop, click its name in the list of shops. This brings up the Edit Screen, depicted in Figure 3-3:
Figure 3-3
Here you can change or view the following details:
Name The name of the shop. This name is used in various locations throughout
Dynamicweb eCommerce (such as the Product Catalog module). You’re advised to keep this name reasonably short.
Icon This is the icon used to identify your shop in the Product Catalog module in the backend. The image you assign is cropped and resized to 16x16 pixels
automatically so make sure you choose an appropriate image.
Default When using multiple shops, this option enables you to mark one shop as the default. Orders that your frontend users place are stored in the Default Shop, unless you override this when configuring the Shopping Cart module.
Created The date and time this shop was created. This field is read-only.
Orderflow This field enables you to assign the order flow that’s used for this shop. Order flows are discussed in Chapter 10.
3. Enter Bikez as the new name, check off the Default checkbox and then click Save and close. Note that Bikez is the name of Dynamicweb’s demo site with a twist in the spelling of the word Bikes.
3.1.1 Creating New Shops
Creating a new shop is just as easy as changing the default shop. To create a new shop, open the Shops list in the eCommerce Management Center, click New shop on the toolbar (shown in Figure 3-2), enter the required details and click Save and Close.
3.2 Languages
Internationalization has been implemented at the core of Dynamicweb. This means you’ll see features to support multiple languages, billing and delivery countries, currencies, VAT and more in many different areas of Dynamicweb. For many of these options, Dynamicweb ships with a single, default item targeted at Denmark, Dynamicweb’s home country. For example, you’ll see Denmark as the country, Danish as the Language, Danish Kroner as the currency and so on. Dynamicweb is working on a new and improved, default empty database with better international defaults, but for now you’ll need to make some modifications yourself on a new database. If you’re building a site that targets Danish customers only, these defaults are fine. However, if you want to support a different group of users, or want to ship to different countries, you need to make some adjustments in the eCommerce settings of the Management Center. The Bikez demo application that you’ll build in this book will be in US English. This means that for now you’ll need to create the English language in the Management Center. In Chapter 14 - Building a Multi-Lingual eCommerce Web Site – you’ll see how to localize your eCommerce environment to use multiple languages.
Walkthrough: Setting the Default Language
1. Start by opening the eCommerce settings in the Management Center. Refer to the instructions at the start of this chapter if you don’t know how to do this.
2. Expand the Internationalization item and then click Language.
Figure 3-4
4. Click Save and close to apply the changes,
You may be tempted to create a new English language instead and then delete the existing Danish language. However, in the default shop, this language already has some associations with products, groups, countries and more. You would need to remove all these related items first before Dynamicweb lets you delete the language. I generally find it much quicker to simply rename the existing language.
The next important eCommerce item you need to configure is the list with available Countries.
3.3 Countries
The countries you define in Dynamicweb serve a number of purposes. For starters, they enable a user to choose a billing and optionally a delivery country. This country then appears in the address of the order so you know where to send the products and invoice to. However, countries are used for more than that. They are also used to determine the applicable VAT for an order and the available shipping and payment providers. You’ll see more of this later in this book. Even if you’re not shipping to multiple countries, you should set up at least one country.
To create a country in Dynamicweb eCommerce, you have three options:
1. Using Add manually. This option enables you to enter all details of a country manually. 2. Using Add all. This adds over 200 countries, so make sure this is really what you want
before you click that option. Each country you add here becomes available as a country people can have their products sent to. If you want to limit the number of delivery countries, just add the ones you want to support. You’ll need to manually delete each country individually or remove them from the database directly (they are stored in the table EcomCountries) if you don’t want them.
3. By selecting an item from the list of countries that Dynamicweb presents. If you choose this option, most of the details of the country are already filled in.
Figure 3-5
This screen enables you to enter the following country-related information:
Name This is the localized name of the country for the selected language.
So, you would enter Nederland when the current language is Dutch and The Netherlands when the language is English.
The currently active language is Danish but you will see how to change that in the next section.
Country code (2) This is the two-letter ISO code for the country, which you can select from the drop down list. E.g. you would select DK for Denmark, NL for the Netherlands GB for the United Kingdom, US for the USA and so on.
Country code (3) This is the three-letter ISO code for the country, which you can select from the drop down list. E.g. you would select DNK for Denmark, NLD for The Netherlands, GBR for the United Kingdom, USA for the USA and so on.
Currency code This is the international currency code for the currency used by the country you’re creating. For Denmark, you would choose DKK while for the Netherlands (which is part of the Eurozone) you would select EUR. For the United Kingdom you would choose GBP and for the USA you would choose USD.
Payment code This field is used only for one deprecated Danish payment gateway. For the other gateways, you can simply leave this field blank.
Locale ID Here you enter the locale ID for the country in the neutral culture-specific culture format. E.g. for Denmark you would enter da-DK, for the Netherlands you would enter nl-NL, for the UK you would choose en-GB and for the USA you would enter en-US.
VAT This field lets you define the default VAT for the country. You can override this by using VAT groups, which are discussed later. For
the US, you can ignore these settings and use the Avalara Tax Provider instead which handles the sales tax.
In Figure 3-5 you also see a tab called Default methods. Here you can define the default shipping and payment gateways for that specific country, as shown in Figure 3-6:
Figure 3-6
Shipping and Payment providers are discussed in Chapter 7 and 8 respectively. When setting up a new Dynamicweb eCommerce solution, a default country (Denmark) is already provided but it’s easy to add your own countries to the list. To follow along with building the Bikez demo, you need to add a few more countries to your solution by completing the steps from the following walkthrough. For real-world sites, you can delete Denmark, or change it to match one of the countries your site supports.
Walkthrough: Creating Countries
1. Start by opening the eCommerce settings in the Management Center, expand the Internationalization item and then click Countries.
2. On the toolbar click New country and choose United Kingdom from the list. Enter United Kingdom for the name, en-GB for the Locale ID and 20% for the VAT field. Leave all other values set to their defaults. Click Save and close on the toolbar to apply the changes.
3. Repeat the preceding step, but this time choose Netherlands, set the Name to The Netherlands, its Locale ID to nl-NL and its VAT to 19%.
4. Repeat step 2 once more, but this time United States, set the Name to United States, its Locale ID to en-US and its VAT to 0%.
The next thing you need to do in a default Dynamicweb eCommerce web site is configure the currencies, discussed next.
3.4 Currencies
Dynamicweb eCommerce enables you to define multiple currencies, which are used for prices, tax, discounts and so on.
In order to define multiple currencies, you need to have the Internationalization module installed.
To set up multiple currencies, you first need to create or modify the default currency and set its base rate. Other currencies then relate to this default currency and override the rate relative to the base rate of the default currency. So, for example, imagine you set Euros to be the default rate as follows:
Figure 3-7
Given the fact that (at the time of writing of this book), a dollar costs about 67 euro cents, you would create the Dollar currency as follows:
Notice how the rate has been set to 67. You should read the rate you define here as the number of cents of the default currency (the Euro) you have to pay to buy 100 cents of the currency you’re configuring (the Dollar). Swapping this logic around may either cost you a lot of money or make your shop so expensive nobody wants to buy anything from it. Be sure you understand what you need to enter here before you save your changes.
Dynamicweb does not support automatic updating of the currencies through a web service or other automated means. However, since the exchange rate is stored in the database (in the EcomCurrencies table) it’s easy to configure a scheduled task that executes some code that in turn access a currency rate web service if you have the need for automatic updates.
If you need a finer granularity of the exchange rate (for example when working with the Japanese Yen), you can increase the base rate of the default currency to something like 10,000. This gives you greater precision, which is needed for these types of currencies.
Walkthrough: Defining Currencies
To follow along, go ahead and change the default currency to euros. To do this, open the Management Center and expand eCommerce | Internationalization | Currency. Click the existing currency (Danish Kroner) and modify its settings as shown in Figure 3-7. Click Save and close when you’re done. You may notice the language drop-down here on the toolbar. This is used to switch to another language and localize the name of the currency. You see more of this in Chapter 14.
Closely related to prices and currencies in Dynamicweb are the VAT groups, which are discussed in the next section.
3.5 VAT Groups
With the VAT Groups feature of Dynamicweb eCommerce, you can define groups with different VAT percentages per country. Most countries work with different VAT
percentages, depending on the type of product and the country the items are being shipped to. For example, for Holland it’s common to have the following three groups:
Type Percentage When applicable
Low 6 Used for “basic services and goods” such as many types of food, hairdressers and so on.
High 19 Most of the other products and services.
None 0 The special zero percentage tax rate is used when selling services to foreign countries, for airplane tickets and a few other items.
Other countries have similar rules enabling you to combine products within only a few groups, rather than specifying the VAT percentage for each individual product. For the US market, you use the Avalara Sales Tax provider that ships with Dynamicweb to calculate sales tax on a state to state basis with “roof top accuracy”..
Toward the end of the chapter you’ll see a global eCommerce setting called Prices in the database include VAT, which determines if prices in the database have already tax applied to them or not. When working with multiple VAT groups, you should leave this setting turned off or Dynamicweb won’t be able to calculate tax correctly.
Alternatively you can enable “Use VAT group rate as VAT” option in the Management Center (Prices) as the system will then use the rate from the VAT group as system VAT and thus calculate the correct price
To make use of the VAT Groups feature, you typically follow this pattern: 1. Make sure you have defined the countries you want the VAT to apply to.
2. In the VAT Groups item of the eCommerce settings in the Management Center, create a new group with a general name such as Low, High or None.
3. On the Rates tab of the VAT group you’re creating, specify a percentage for each available country, as shown in Figure 3-9:
Figure 3-9
When creating or modifying a product in the product Catalog module you can assign the VAT Group as shown in Figure 3-10:
Figure 3-10
Creating products and assigning a VAT Group is discussed in Chapter 4 - The Product Catalog Module, while the next walkthrough shows you how to define a few VAT Groups.
Walkthrough: Creating VAT Groups
1. Start by opening the VAT groups item, which you’ll find under the Internationalization item of the eCommerce settings in the Management Center.
2. Click the existing VAT Group and change its Name and Native name to None and leave its type set to None:
Figure 3-11
Figure 3-12
4. Click Save and Close on the toolbar.
5. Click the New button on the toolbar and create a group called Low. Set the tax percentages on the Rates tab as follows:
Country Rate
Denmark 9
The Netherlands 6 United Kingdom 8
United States Leave empty
6. Click Save and close to save your settings.
7. Repeat the preceding step, but now create a group called High with the following tax rates:
Country Rate
Denmark 25
The Netherlands 19 United Kingdom 15
United States Leave empty
Besides configuring options such as Countries, Languages, Currencies and Exchange Rates, there are a few other settings you typically want to configure right at the
beginning of a new Dynamicweb eCommerce project. These options are discussed in the remainder of this chapter.
3.6 Auto Numbering
The ability to automatically number items in Dynamicweb with an optional suffix or prefix is a simple but very useful option. For example, it’s not uncommon to prefix order
numbers with the name of the shop or some other code. In the Bikez web site, you may want to number your orders as BIKEZ1, BIKEZ2, BIKEZ3 and so on. Fortunately, this is pretty easy to configure as demonstrated in the following walkthrough:
Walkthrough: Defining Auto Numbers
1. Open the eCommerce settings in the Management Center, expand the Advanced configuration option and then click Auto-numbering
2. Click the ORDER item and modify the details as follows:
Figure 3-13
3. Click Save and close
From now on, your orders will be numbered sequentially as BIKEZ1, BIKEZ2 and so on rather than as the default of ORDER1, ORDER2 and so on.
In a site that targets multiple languages, it’s not uncommon to prefix each order with the country code of the site where the product was ordered. For example, you may have the need to prefix Dutch orders with NL and Danish orders with DK. This may especially be required when submitting orders to a backend system that processes them. Out of the box Dynamicweb doesn’t support this, but it’s easy to implement this yourself using a Notification Subscriber. Chapter 17 digs deeper into Notification Subscribers and shows you how to dynamically change the Order ID based on the current language.
3.7 Rounding
Imagine you have a product with a price of € 44.99. During the summer sales, you decide to give an additional 3% discount on this price. By default the price with that discount applied would end up as € 43.64. This price doesn’t look very neat, so it may be desirable to round off prices like these to psychologically acceptable prices. For
example, you could round this down to 43.50, or up to either 43.75 or 43.99. How exactly you wish to round up or down is your choice, as Dynamicweb gives you complete
freedom in defining the rounding rules.
To define a rounding rule for a currency, carry out the steps in this walkthrough. This walkthrough shows you how to round up to a price that ends in .99 (e.g. 43.99 in the preceding example). The documentation that is accessible by clicking the Help button when defining a rounding rule has more examples for other supported scenarios.
Walkthrough: Defining Rounding Rules
1. Open the eCommerce settings in the Management Center, expand the Advanced configuration option and then click Rounding.
2. Click the New rounding button and you’ll see the following screen appear:
Figure 3-14
In this screen you can enter a number of fields, which are described in the following table.
Field Description
Name Here you can enter a name that describes the rounding method, such as “Pretty Prices” or “Round up to the next quarter”.
Method Determines whether you always want to round up or down, or whether you want to round to the nearest match.
Factor (for the Integer and for the Decimal part)
This number defines the unit to which numbers are rounded. If you enter 10 for the Integer part and round a price such as 36.55, the part before the decimal separator is rounded to 30 or 40 (depending on whether you round down or up). For the Integer part, it’s common to leave the Factor set to 1 as to not affect that part of the price. For decimals this value varies. If you want to round prices to .99, you specify 100 here and subtract 1 cent using the Addition field (see next). If you want to round to nearest quarters, you specify 25 here. Addition In the Addition field you specify the amount (in integers or in
decimals) you want to add or subtract from the price if it is rounded. For the Integer part you typically leave this set to zero. For the decimal part you set it to -1 to create prices like 1.99 (e.g. one cent is subtracted from a price of 2 euro) or 25 if you want to round prices to the nearest quarter.
Decimal places Here you can specify the number of decimal places used for the price. It’s common to have two decimal places, but you can override that if you wish.
3. To follow along with the Bikez demo, complete the Rounding screen as follows to create a rounding that rounds prices so they end in .99 cents:
Figure 3-15
4. Click Save and close on the toolbar to apply the changes.
5. Since configuring Rounding can be a bit awkward at first, Dynamicweb comes with a handy test option to see if your prices actually round the way you intended. You can only
test out a rounding that you’ve saved before; not during its creation process. So, to test out your Pretty Prices rounding, click its name in the list of roundings. Then at the bottom of the screen enter the price you want to test and click the button with the ellipsis. The Result field should be updated with your new ”pretty” price as visible in Figure 3-16:
Figure 3-16
6. The final step you need to carry out is associating this rounding with a currency. Since currencies can vary greatly in the size of the number and relevant decimals, you can define different rounding rules for different currencies. For example, you may want to round prices in Yen to the nearest whole Yen, while you may want to round Euros to the nearest cent. To assign this new rounding to the currency defined in the Bikez web site, open the Currency configuration screen (found under Internationalization in the eCommerce settings), click the Euro and then at the bottom of the screen choose your rounding from the drop-down list. Click Save and close to apply the changes.
3.8 Managing Manufacturers
Another area you may want to configure before you start adding products to your Product Catalog is the list of Manufacturers. Manufacturers are simple address cards of companies that manufacture a product. Once you’ve created a manufacturer, you can associate it with a product and then display its details along with the product on a list or details page. Take a look at Figure 3-17, which shows a quick example of an Adidas running shoe.
Figure 3-17
To the right you can see the company’s name, logo and address details, which have been set up in the Manufacturers area of the eCommerce settings as follows:
Figure 3-18
Walkthrough: Creating a Manufacturer
1. In the eCommerce settings in the Management Center, expand the Product Catalog node and then click Manufacturers.
3. Enter the details for a (fictitious) manufacturer. For the logo you can click the yellow “Browse for file” icon and then select an existing image or upload a new one. 4. Once you’re done, click Save and close to commit the changes you’ve made.
When you create a new product using the Product Catalog module you can assign a manufacturer on the main Details tab, as shown in Figure 3-19:
Figure 3-19
Since you haven’t created any products yet there’s no need to assign a manufacturer now. In the next chapter – which deals with the Product Catalog module extensively – you’ll learn more about creating new products.
3.9 Advanced Configuration
Before you move on to the next chapter, which shows you how to work with the Product Catalog module, this chapter closes off with a broad look at some of the remaining configuration options under the Advanced configuration item of the eCommerce settings. I won’t be discussing each and every option in great detail, as some require knowledge of modules and functionality that is discussed later in this book.
When you open the Advanced configuration for the eCommerce settings, you’ll see the following list:
Figure 3-20
In the remaining section of this chapter I’ll discuss all of these options, except for the last three since you’ve already seen Rounding and Auto-numbering and searching is
discussed in detail in Chapter 12.
3.9.1 General Settings
In Dynamicweb eCommerce 8, the Advanced Configuration | General section offers the following configuration options:
Figure 3-21
The following table describes the use of these options in more detail:
Days the cart is saved This option determines the lifetime in days of the cookie that is associated with the user’s cart in the database. When set to 0, the cookie is cleared as soon as the user closes the browser, which means a new cart is created the next time the user visits the site.
Weight unit The unit of measurement used for weight. Weight can be
assigned to products, which can then be used to determine the shipping fee.
Volume unit The unit of measurement used for volume. Volume can be
assigned to products, which can then be used to determine the shipping fee.
Only show products or variants that are active, have a price and are in stock
You can use these options to hide products from the list or details pages if they have no price, are not in stock or are currently not active. You can use the Page Picker to browse for a page to be shown if users access a direct link for a product that is no longer active.
Note: “Never active” on a product or variant means the product does not show up in lists, but users are still able to access them using direct links (from a search engine for example). Enabling the setting “which are active” prevents users from viewing inactive products.
Product - Group display cache
This option enables you to specify whether you want to cache product groups and for how long. This setting affects the front end only. Products you see in the backend are always retrieved from the database. You typically want to enable this option and set it to a duration of 10 minutes or more if you have lots of groups that don’t change very often.
Starting with Dynamicweb version 7.2, this option is no longer taken into account
Paragraph cache This option determines whether the rendered HTML of pages with
eCommerce modules is cached or not. This feature is not supported when using Designs and layouts and when using discounts or personal prices, so in most cases you want to leave this setting turned off.
Fee Calculation This option enables you to employ the user’s delivery country instead of the billing country to determine the fees applicable to the order. This is only used in the older Shopping Cart module, as the new Shopping Cart module lets you specify this when you insert the module in a page. You’ll see more of this in Chapter 7. Tree Structure When you turn on this option, you’ll see the number of products in
a group in parentheses after each group name in the backend, as shown in Figure 3-22.
Figure 3-22
This can be very useful to see which group contains products and how many. However, it comes with a performance cost, so you should turn it off for solutions that have a large number of products (thousands or more).
Track and Trace In previous versions of Dynamicweb, Track and Trace was just a
simple field on an order. However, Track and Trace is now a module that removes the need for this field in the order User Interface. For new installations, you should always leave this field unchecked.
Email Distribution method Determines whether order confirmation e-mail is sent using a local drop folder or directly through an SMTP server. The latter is a bit slower, so you should use the Drop folder option if you can.
3.9.2 Fields
In this area you define how multi-lingual settings and variants in Dynamicweb eCommerce (discussed in Chapter 5) behave.
What this dialog enables you to do is determine whether or not certain product properties can vary by language or by variant.
In order to be able to differentiate a property of a product in a different language or variant, you need to check off the associated option. Take a look at this screen to see how this might work:
Figure 3-23
In this dialog, two properties (Name and Teaser text) are checked, while Number isn’t. When you now create a product in multiple languages, you’re able to vary the Name and Short description for each language. However, as soon as you make a change to the product Number in one language, the change is automatically propagated to the other languages as well. The same concept applies to variants where a change in the Number affects the other variants as well.
You need to be aware of this behavior when creating multi-lingual products or when creating variants. The default for all fields is off, which means making a change to a property in one language or variant automatically affects all the others. If you’re not aware of this and haven’t configured the correct settings for different languages or variants, you could spend a lot of time translating products from, say, English to French only to find out that when you’re done, all your English products are in now in French as well.
You’ll see more of the impact of this dialog in Chapter 14, which discusses creating localized web sites.
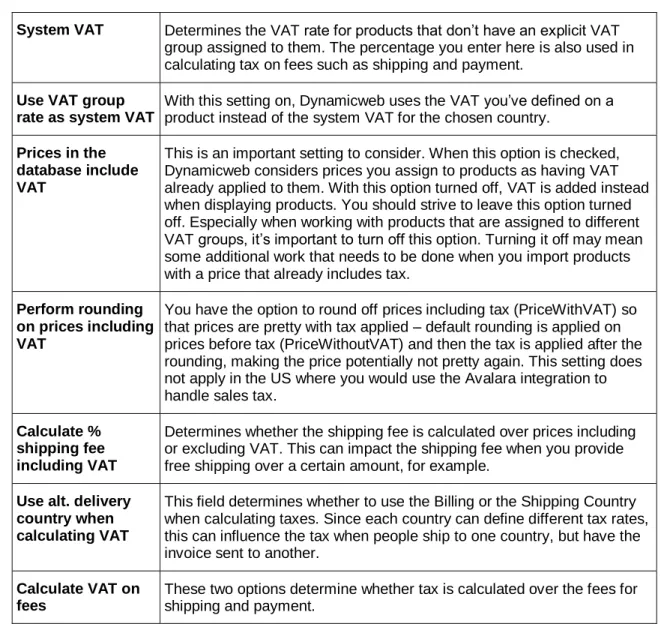
3.9.3 Prices
The Prices section lets you configure a few properties that relate to prices, tax and fees. Here are the options you can configure:
Figure 3-24
Interesting aside: in some circles, Dynamicweb is known as the “Checkbox CMS”. Dialogs like these certainly confirm that reputation.
System VAT Determines the VAT rate for products that don’t have an explicit VAT group assigned to them. The percentage you enter here is also used in calculating tax on fees such as shipping and payment.
Use VAT group rate as system VAT
With this setting on, Dynamicweb uses the VAT you’ve defined on a product instead of the system VAT for the chosen country.
Prices in the database include VAT
This is an important setting to consider. When this option is checked, Dynamicweb considers prices you assign to products as having VAT already applied to them. With this option turned off, VAT is added instead when displaying products. You should strive to leave this option turned off. Especially when working with products that are assigned to different VAT groups, it’s important to turn off this option. Turning it off may mean some additional work that needs to be done when you import products with a price that already includes tax.
Perform rounding on prices including VAT
You have the option to round off prices including tax (PriceWithVAT) so that prices are pretty with tax applied – default rounding is applied on prices before tax (PriceWithoutVAT) and then the tax is applied after the rounding, making the price potentially not pretty again. This setting does not apply in the US where you would use the Avalara integration to handle sales tax.
Calculate % shipping fee including VAT
Determines whether the shipping fee is calculated over prices including or excluding VAT. This can impact the shipping fee when you provide free shipping over a certain amount, for example.
Use alt. delivery country when calculating VAT
This field determines whether to use the Billing or the Shipping Country when calculating taxes. Since each country can define different tax rates, this can influence the tax when people ship to one country, but have the invoice sent to another.
Calculate VAT on fees
These two options determine whether tax is calculated over the fees for shipping and payment.
3.9.4 Images
The Images item of the eCommerce settings lets you configure what images are shown when a specific image for a product can’t be shown. This is useful if some of your products don’t have specific images. You can define an image for the Small, Medium and Large image that a Dynamicweb product supports out of the box. In addition, you can configure an image pattern (which is used to build up a dynamic path to the image) and the dimensions of your images, in case you want to resize them all to a fixed size. Figure 3-25 shows the Images screen:
Figure 3-25
Using the Pattern setting you can output eCommerce images in the frontend by setting up a general file pattern as follows:
1. Add your images to the Images folder. For example, add files like
PRODNNNN_common1.jpg, PRODNNNN_common2.jpg, and PRODNNNN_common3.jpg where ProdNNNN refers to a product number in the database.
2. Enter the following pattern in the Pattern box of the Images settings: /Files/Images/{ProductNumber}_*.jpg
3. Now you can insert tags like the following in your templates <!--@Ecom:Product.Image.common1.Default-->
<!--@Ecom:Product.Image.common2.Default--> <!--@Ecom:Product.Image.common3.Default-->
Based on this pattern, Dynamicweb will now find the correct images for the current product and add <img /> elements to the output for each tag you add. These tags are also available as “Clean” tags so you get just the URL to the image which you can use anywhere you see fit. Here’s an example that would output just the path to the image: <!--@Ecom:Product.Image.common1.Default.Clean-->
Note: The image has to exist on disk before the image tag shows up in the frontend. In Chapter 6 I’ll talk a lot more about Images and ways to set up dynamically named and sized images that go further than the standard three images you see here. You’ll also see the available placeholders you can use in your image patterns.
3.9.5 Sales Discounts
The Sales discounts node is discussed in Chapter 9 that shows you how to work with sales discounts in detail.
3.9.6 Shopping Cart
The final area of the Advanced eCommerce settings you need to look at is the Shopping Cart section, shown in Figure 3-26
Figure 3-26
The first check box lets a user skip the page where you can select a payment and a shipping provider if only one option of each is present. This features makes a lot of sense, as there’s not much point in forcing a user to choose something if they only have one choice.
The second check box deals with Step Validation - a validation mechanism used in the Shopping Cart module. You can ignore the warning about changes in templates when creating a site from scratch, as the default templates that ship with Dynamicweb already have these changes applied.
The final two options enable you to use a default payment and shipping provider (which in turn can add an additional fee to the order) before the user selects them. This may put a more representative price tag on the entire shopping cart during the shipping process, as these fees are already added to the cart. The default provider can be set for each country separately. You’ll see more of this later in the book.
3.10 Summary
This chapter showed you the steps you need to carry out when setting up a new
a later stage, it’s a good idea to configure a number of options correctly right from the start. Items you should configure at the beginning include:
Languages
Countries
Currencies
VAT groups
Manufacturers (if you use them)
By setting up these items right from the start, they are ready to use when you start adding data to your system. For example, you use the languages and manufacturers when creating new products using the Product Catalog module, which is discussed in the next chapter.
You also saw how to configure some of the advanced settings of Dynamicweb
eCommerce 8. Don’t worry if not all settings make sense at this stage; throughout this book you’ll revisit the Management Center to make changes to the setup, where appropriate, when working with specific modules and functionality. This gives you the chance to see more clearly how things fit together and the impact of the different configuration options.