Runbook Activity Reference for System
Center 2012 R2 Orchestrator
Microsoft Corporation
Published: November 1, 2013
Applies To
System Center 2012 - Orchestrator Orchestrator in System Center 2012 SP1 System Center 2012 R2 Orchestrator
Feedback
Copyright Information
This document is provided "as-is". Information and views expressed in this document, including URL and other Internet website references, may change without notice.
Some examples depicted herein are provided for illustration only and are fictitious. No real association or connection is intended or should be inferred.
This document does not provide you with any legal rights to any intellectual property in any Microsoft product. You may copy and use this document for your internal, reference purposes. You may modify this document for your internal, reference purposes.
© 2013 Microsoft Corporation. All rights reserved.
Microsoft, Access, Active Directory, ActiveSync, ActiveX, Authenticode, Bing, BitLocker, Excel, Forefront, Hyper-V, Internet Explorer, JScript, Microsoft Press, MSDN, Outlook, SharePoint, Silverlight, SoftGrid, SQL Server, Visio, Visual Basic, Visual C++, Visual Studio, Win32, Windows, Windows Intune, Windows Mobile, Windows PowerShell, Windows Server,
Windows Server System, and Windows Vista are trademarks of the Microsoft group of companies. All other trademarks are property of their respective owners.
Revision History
Release Date Changes
October 17, 2013 Original release of this guide. November 1, 2013 Minor updates for this guide.
Contents
Runbook Activity Reference for System Center 2012 - Orchestrator ... 6
Standard Activities... 6
Alphabetical List of Standard Activities ... 7
Ports and Protocols of Standard Activities ... 10
System ... 11
Run Program ... 12
Run .Net Script ... 16
End Process ... 19
Start/Stop Service... 20
Restart System ... 22
Save Event Log ... 23
Query WMI ... 26
Run SSH Command ... 27
Get SNMP Variable ... 30
Monitor SNMP Trap ... 31
Send SNMP Trap ... 34
Set SNMP Variable... 36
Scheduling ... 38
Monitor Date/Time ... 38
Check Schedule ... 41
Monitoring ... 41
Monitor Event Log ... 42
Monitor Service ... 45
Get Service Status... 46
Monitor Process ... 47
Get Process Status... 49
Monitor Computer/IP ... 50
Get Computer/IP Status ... 51
Monitor Disk Space ... 52
Get Disk Space Status ... 53
Monitor Internet Application ... 54
Get Internet Application Status ... 58
Monitor WMI ... 64
File Management ... 66
Compress File ... 67
Copy File ... 69
Create Folder ... 72
Decompress File ... 72
Delete Folder ... 75
Get File Status ... 76
Monitor File ... 78
Monitor Folder ... 80
Move File ... 82
Move Folder ... 85
PGP Decrypt File ... 85
PGP Encrypt File ... 87
Print File ... 90
Rename File ... 91
Email ... 93
Send Email ... 93
Notification ... 96
Send Event Log Message ... 96
Send Syslog Message ... 97
Send Platform Event... 98
Utilities ... 99
Apply XSLT ... 100
Query XML ... 101
Map Published Data ... 102
Compare Values ... 105
Write Web Page ... 107
Read Text Log ... 109
Write to Database ... 112
Query Database ... 115
Monitor Counter ... 119
Get Counter Value ... 119
Modify Counter ... 120
Invoke Web Services ... 121
Format Date/Time ... 124
Generate Random Text ... 128
Map Network Path ... 129
Disconnect Network Path ... 129
Get Dial-up Status ... 130
Connect/Disconnect Dial-up ... 131
Text File Management ... 132
Append Line ... 133
Delete Line ... 134
Find Text ... 136
Get Lines ... 138
Insert Line ... 139
Read Line ... 140
Runbook Control ... 144
Invoke Runbook ... 144
Initialize Data ... 146
Junction ... 147
Runbook Activity Reference for System
Center 2012 - Orchestrator
System Center 2012 - Orchestrator includes an extensive set of standard activities that enable you to create runbooks to automate your data center procedures. This guide contains detailed information about using each of the standard activities
Standard Activities
Standard Activities
Describes all of the Orchestrator Standard Activities.
Privacy
Orchestrator is committed to protecting your privacy, while delivering software that brings you the performance, power, and convenience you want. For more information, see the Privacy
Statement for System Center 2012 - Orchestrator.
For more information about the Orchestrator Release Candidate, see Release Notes for System Center 2012 - Orchestrator Release Candidate.
Other resources for this product
1. TechNet Library main page for System Center Orchestrator 2012
2. Getting Started with System Center 2012 - Orchestrator Release Candidate 3. Deploying System Center 2012 - Orchestrator Release Candidate
4. Administering System Center 2012 - Orchestrator Release Candidate 5. Integration Packs for System Center 2012 - Orchestrator Release Candidate 6. Using Runbooks in System Center 2012 - Orchestrator Release Candidate 7. Using the Orchestration Console in System Center 2012 - Orchestrator Release
Candidate
Standard Activities
Activities are organized into categories to help you find the appropriate activity for the task you want to perform. The following table provides a brief description of tasks you can accomplish with each activity category.
Tasks Categories
Tasks Categories
Perform schedule-based activities. Scheduling Monitor processes or system-level events. Monitoring Manage file interactions such as copying and
moving files.
File Management
Send e-mail notifications. Email Support other notification types. Notification Search for or modify data within a workflow. Utilities
Manipulate text files. Text File Management
Manage workflows. Runbook Control
See Also
Common Tabs
Learn how to configure common tab settings.
Alphabetical List of Standard Activities View all activities in alphabetical order.
Alphabetical List of Standard Activities
All standard activities are listed below.A
Append Line Apply XSLT C
Check Schedule Compare Values Compress File Copy File Create Folder D
Decompress File Delete File Delete Folder Delete Line
Disconnect Network Path E
End Process F
Find Text
Format Date/Time G
Generate Random Text Get Computer/IP Status Get Counter Value Get Disk Space Status Get File Status
Get Internet Application Status Get Lines
Get Process Status Get Service Status Get SNMP Variable I
Initialize Data Insert Line Invoke Runbook Invoke Web Services J
Junction M
Map Network Path Map Published Data Modify Counter Monitor Computer/IP Monitor Counter Monitor Date/Time Monitor Disk Space Monitor Event Log Monitor File Monitor Folder
Monitor Process Monitor Service Monitor SNMP Trap Monitor WMI Move File Move Folder P
PGP Decrypt File PGP Encrypt File Print File
Q
Query Database Query WMI Query XML R
Read Line Read Text Log Rename File Restart System Return Data Run .Net Script Run Program Run SSH Command S
Save Event Log
Search and Replace Text Send Email
Send Event Log Message Send Platform Event Send SNMP Trap Send Syslog Message Set SNMP Variable Start/Stop Service W
Write to Database Write Web Page
Ports and Protocols of Standard Activities
Orchestrator standard activities can communicate between the runbook servers where the runbook is deployed and any resource. If you have firewalls in your environment, when you use a standard activity, you must enable the ports between the runbook servers and resource as indicated in the following table.
Standard activity
Port on runbook server Port on resource server Notes
Query Database
Any port the target database requires.
Write to Database
Any port the target database requires.
Invoke Web Services
HTTP or HTTPS HTTP or HTTPS
Map Network Path Activity uses Microsof t Window s file sharing. Set SNMP Variable
SNMP SNMP
Get SNMP Variable
SNMP SNMP
Monitor SNMP Trap
SNMP SNMP
Send SNMP Trap
SNMP SNMP
Run Program Activity uses Microsof t
Standard activity
Port on runbook server Port on resource server Notes
Window s file sharing and I/O pipes. Send
SMTP SMTP
Monitor Internet Applicatio n
HTTP/SMTP/POP3/FTP/DNS HTTP/SMTP/POP3/FTP/DNS
Get Internet Applicatio n Status
HTTP/SMTP/POP3/FTP/DNS/Cust om
HTTP/SMTP/POP3/FTP/DNS/Cust om
Custom can be anything . Send
Syslog Message
syslog syslog
Other resources for this product
TechNet Library main page for System Center Orchestrator 2012
Runbook Activity Reference for System Center 2012 - Orchestrator
Alphabetical List of Standard Activities
See Also
TCP Port Requirements
System
The following table provides a brief description of tasks you can accomplish when using each System activity.
Tasks System Activities
Run any program or command on any computer in your domain.
Tasks System Activities
Run scripts that parse data or run functions against available APIs.
Run .Net Script
End processes that are running on the runbook server or on a remote computer.
End Process
Start, stop, pause, or restart a Windows service.
Start/Stop Service
Restart a computer on your network. Restart System Save entries from an event log so that they can
be used later.
Save Event Log
Send a Windows Management Instrumentation (WMI) query to a system that you specify and then return the results.
Query WMI
Open an SSH connection to a remote server and run shell commands on that server.
Run SSH Command
Query a network device for the value of variable that is assigned to the Management Information Base (MIB) address you specify.
Get SNMP Variable
Wait for an event to occur either in the
Microsoft SNMP Trap Service or on a port that you specify.
Monitor SNMP Trap
Raise an SNMP event that can be detected by a network systems manager application.
Send SNMP Trap
Modify a variable that is specified by its Management Information Base (MIB).
Set SNMP Variable
Run Program
The Run Program activity runs any program or command on any computer in your domain in interactive or background mode. Use this activity to run backup applications or a batch script that runs a set of complex commands.
Configuring the Run Program Activity
Before you configure the Run Program activity, you need to determine the following:
You also need to determine whether a user on the target computer will need to interact with the program when it is run. The user account that will run the program or command must have administrator rights to run programs on the target computer.
Use the following information to configure the Run .NET Script activity. Details
Settings Configuration Instructions
Program execution Select this mode to run a program in the same way as a Windows shortcut or the Windows Run dialog box. You can also use the ellipsis (...) button to browse for the computer.
Command execution Select this mode to run a command in the
same way as the Windows Command Prompt.
Computer Type the computer where this program or
command will run.
Program path If you selected the Program execution
mode, this element appears as Program path. Type the full path to the location of the program that you want to run. Then, to pass parameters to the program, type them in the Parameters box.
If you selected the Command run mode, this element appears as Command. Type the path of the command that you want to run, and include the parameters that you want to pass to the command on the same line in the Command box.
Parameters Type the parameters that will be passed to the
program that you want to run. This option is only available when you select the Program execution mode.
Working folder Type the full path of the working folder that the program or command will use. The command or program will behave as if it was run from the working folder.
Advanced
Settings Configuration Instructions
Settings Configuration Instructions
for the program:
Interactive: Select this option to display a user interface on the computer where the command or program is run. A user interface, if available, appears in a user session that is defined by the user credentials specified in the Run as boxes (User name, Password) on the Advanced tab.
Background, normal priority: Select this option to run the command or program in the background with the process priority set to normal. In this mode no user interface will be displayed.
Background, low priority: Select this option to run the command or program in the background with the process priority set to low. In this mode no user interface will be displayed. Some programs may not function correctly when set to low priority. If this is the case, use the Interactive or Background, normal priority settings instead.
Wait for the completion of the program Select this option to cause the Run Program to wait for the program or command to finish running before moving to the next activity in the runbook. If you have set the Execution mode to Interactive, then the user must close the program before the Run Program activity is able to move to the next activity in the runbook.
Terminate after Type the maximum number of minutes to wait
for the program or command to complete. Set this value to 0 to have the Run Program activity to wait indefinitely for the completion of the program or command. If the time has expired and the program or command has not completed running, the Run Program activity will shut down the program or command and report a failure.
Do not wait for the completion of the program
Select this option to cause the Run Program activity to run the program or command and not
Settings Configuration Instructions
wait for it to complete. When this option is selected, the published data items generated by the Run Program activity will not be available to other activities.
User name To use a different account name to log in to a
computer and run a program, type the account number in the User name box.
Note
This user name only logs in to the computer where the Run Program activity runs, and uses the interactive logon type. If the program that the Run Program activity launches accesses resources on other computers, the same user name is used on the remote computer, but with the network logon type.
Password Type the password associated with the user
name to run the program on the remote computer.
Published Data
The following table lists the published data items.
Item Description
Program path The program path or command that was
entered.
Program parameters The parameters that were passed to the program. This option is only available when Program run is selected on the Details tab. Working folder path The path of the working folder.
Process ID The process ID of the application that was started when the Run Program activity runs. If you are using Command run, this will be the process ID of the Windows Command Prompt application.
Item Description
by the Run Program activity.
Computer The name of the computer where the
application was started.
Program output The text that was sent to the console when the program was run.
Pure Output The unmodified output of the program.
Program output file The name of the local file where the program output was saved.
UNC program output file The name of the file where the program output was saved in UNC format.
Security
The Run Program activity is based on PsExec. PsExec lets you execute processes on other systems, complete with full interactivity for console applications. For more information on PsExec, go to PsExec.
The Run Program activity inherits certain security concerns from PsExec. Specifically, PsExec uses named pipes. This can be a security concern, as credentials can be sent through this tool. A work-around for customers concerned about security vulnerabilities is to create a mapped drive to the server that is the target of the Run Program activity. This establishes a security context for the Run Program activity.
Run .Net Script
The Run .Net Script activity runs scripts written in VB.NET, JScript, C#, and Windows
PowerShell. This activity is compatible with .NET CLR version 2.0 and later. Use the Run .Net Script activity to run scripts that parse data or run functions against available APIs.
Configuring the Run .Net Script Activity
Before you configure the Run .Net Script activity, you need to determine the following:
The code you want to run.
The libraries you want to use.
The data you want to publish.
Use the following information to configure the Run .Net Script activity.
You cannot set individual security credentials for this activity. It will run under the service account configured for the Runbook Service on the Runbook server where the instance of the activity is running. This account must have the authority to access the resources and perform the actions required by this activity.
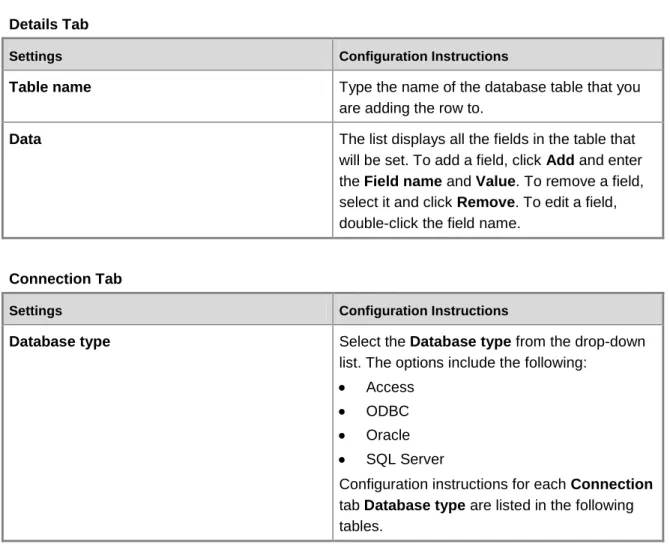
Details Tab
Settings Configuration Instructions
Type Select the script language. Use the ellipsis (...)
button to browse for the language.
Script Type the code that will run when the activity
runs.
Advanced Tab
Settings Configuration Instructions
Namespace Add a Namespace for each .NET namespace
that will be used within your code. This allows you to call the code without using fully qualified names for each of the classes. Orchestrator recommends adding System namespace to every Run .Net Script activity.
References Add each of the Assembly (DLL) references
that contain the libraries that you want to use. Add the System.dll located in the
Windows\Microsoft.NET\Framework\<.NET Version> directory.
Published Data
Add the published data items that you want this activity to publish. Every published data item that you add will be available on the Data bus. It is important to determine if a published data item will be multi-valued. The Run .Net Script activity automatically correlates multi-valued data from different items by aligning them. For example, if you choose to publish two items labeled “Name” and “Email” as Collections, the Run .Net script will try to line up each item in the Name collection with each item in the Email collection. If the collections are not equally sized, then the Run .Net Script activity will create blank values for the collection that has fewer items. For a list of data items and the corresponding description published by this activity, see the following Published Data table.
Published Data Tab
Settings Configuration Instructions
Name Enter the Name of the published data. This will
be the name that appears when other activities subscribe to the data published by the Run .Net Script activity.
Settings Configuration Instructions
Type You can select Date/Time, Integer, or String.
If the type you want is not available, select String. Use the ToString method of the activity to assign a value to this published data.
Collection If your data is multi-valued data, select
Collection. When using a collection you must use the Add method to add items to the collection. If you are not using the collection you can use the assignment operator (=) to assign the value.
Variable name Use unique naming to make sure that your
variable name does not collide with existing variables within your script or with classes and keywords available in .NET. We recommend prefixing variables with “OPD_”. For example, if you want to name your variable “myString”, you would name it “OPD_myString”.
The Run .Net Script activity will automatically create a .NET Property for this item. If this variable is a collection it will be created using a List<T>, where T is the Type that you selected. If it is not a collection the property will be created using a String, Integer, or Date/Time based on the Type that you selected.
Published Data
Item Description
Standard Error Any standard error output published by the Run .Net Script activity.
Namespaces The namespaces used.
Standard Output The standard output published by the Run .Net Script activity.
References The Assemblies used in the activity.
Script Body The script that was run.
End Process
The End Process activity ends processes that are running on the runbook server or on a remote computer. The End Process activity can be used to shut down an application that is not
responding. The activity returns success if the named process is successfully ended or if the name process is not running. This activity uses a satellite license.
Configuring the End Process Activity
Before you configure the End Process activity, you need to determine the following:
Name or ID of the process
Computer on which it is running
Use the following information to configure the End Process activity. Details Tab
Settings Configuration Instructions
Computer Type the computer where this process is
running. Enter localhost to specify the runbook server where the runbook is being processed. You can also use the ellipsis (...) button to browse for the computer.
Process Type the name or process ID of the process
that you are ending. You can also use the ellipsis (...) button to browse for the process. Browsing is only available if you have specified a valid Computer.
End all instances Select to end all processes that match the Process that you have specified when multiples are found.
Fail if there is more than one instance Select to cause the end process to fail if it finds more than one process matching the name you specified.
Terminate in Type the number of seconds to wait for the
process to be shut down gracefully before it is shut down forcefully.
Published Data
The following table lists the published data items.
Item Description
Item Description
Process you specified.
Process ID The process ID of each of the processes that matched the Process you specified.
Start/Stop Service
The Start/Stop Service activity will start, stop, pause, or restart a Windows service. The Start/Stop Service activity can be used to restart a service that has stopped responding or shut down a service in preparation for a backup. This activity uses a satellite license.
Configuring the Start/Stop Service Activity
Before you configure the Start/Stop Service activity you need to determine the following:
The service name
The computer where the service is running
Parameters that are required to start the service.
This depends on the service you are interacting with; it may not be required. Use the following information to configure the Start/Stop Service activity.
Details Tab
Settings Configuration Instructions
Action Select one of the following actions that you
want to take on the service:
Start service: Start the service if it is stopped. This action is ignored if the service is already running.
Stop service: Stop a running service. This action is ignored if the service is already stopped.
Pause service: Pause a running service. This action is ignored if the service is already stopped or paused.
Restart service: Stop then start a running service. If the service is already stopped it will only be started.
Computer Type the computer where this service is
running. Type localhost to specify the runbook server where the runbook is being processed. Note
Settings Configuration Instructions
You can also use the ellipsis (...) button to browse for the computer.
Service Type the name of the service. You can also use
the ellipsis (...) button to browse for the service. Browsing is only available if you have specified a valid Computer.
Parameters Type any parameters that are required to
interact with the Service.
Action must complete in less than Specify the maximum amount of time in which the action must complete. After the time has expired, the Start/Stop Service activity will timeout and return a failure.
Published Data
The following table lists the published data items.
Item Description
Service display name The name of the service as it appears in the Windows Services control panel utility. Service real name The name of the ran file that the service is
running.
Service status The current status of the service.
Service computer The name of the computer where the service is located.
Control Parameters The parameters that were passed to the
service when it was started, stopped, paused or restarted.
Control Time Allowance The maximum amount of time that was
specified to complete the Start, Stop, Pause, or Restart of service action.
Control Action The action that was taken on the service: Start, Stop, Pause, or Restart.
Restart System
The Restart System activity will restart a computer on your network. The Restart System activity can either wait for applications to shut down gracefully or you can configure the activity to forcefully shut down any running applications. You also can send a message to notify your users of the reason for the disruption.
Some applications may consume memory and hard disk space and will not relinquish them without restarting the system. The Restart System activity can be used to restart these systems during maintenance windows to maintain service during business hours.
Configuring the Restart System Activity
Before you configure the Restart System activity, you will need to determine the following:
The computer you want to restart.
Whether you want to forcefully shut down any running applications. Use the following information to configure the Restart System activity. Details Tab
Settings Configuration Instructions
Computer Type the computer that you are restarting. You
can also use the ellipsis ( ... ) button to browse for the computer.
Message Type a message that will be displayed to users
of the Computer before it is shut down.
Wait Type the number of seconds after sending the
Message to the users before the system will be shut down.
Force applications to close Select to forcefully shut down any applications that are running when the system is restarted.
Published Data
The following table lists the published data items.
Item Description
Computer The computer that was restarted.
Message to display The message that was sent to the computer before restarting.
Shutdown delay The number of seconds of delay between the message being sent and the computer restart.
Item Description
Force open apps to close Determines whether open applications were forced to shut down when the computer was restarted. This value can be either True or False.
Save Event Log
The Save Event Log activity is used to save entries from an event log so that they can be used later. The Save Event Log activity saves the event log entries to a delimited text file in a format that you specify. The activity allows you to choose which fields will be saved and allows you to filter against the fields to only allow particular event log entries to be saved. This activity uses a satellite license.
The Save Event Log activity can be used to create audit trails of problems that occur with a particular application or specific categories of event log entries. These saved files can later be used to track the performance of servers and applications in your network.
Configuring the Save Event Log Activity
Before you configure the Save Event Log activity, you need to determine the following:
The event log that you are saving from
The computer where it is located
The fields that you want to include
The format of the file
If you require only specific entries to be saved and not the entire event log, you will need to know what fields to filter against as well as what values to filter.
Use the following information to configure the Save Event Log activity. Details Tab
Settings Configuration Instructions
Computer Type the computer where the event log is
located. Type localhost to specify the runbook server where the runbook is being processed. You can also use the ellipsis ( ... ) button to browse for the computer.
Event log Type the name of the Windows Event Log
where the entries that you are saving are located. You can also use the ellipsis ( ... ) button to browse for the event log name. Note
Settings Configuration Instructions
Browsing is only available if you have specified a valid Computer.
Include Select all the event Log fields that you want to
save to the file. You have the option to select Event ID, Source, Category, Description, Type, Computer, and Date/time.
Filters Tab
Settings Configuration Instructions
Event ID Select and type the specific event ID of the
event log entry that you want to save.
Source Select and type the value that the Source field
of the event log entries will need to match.
Category Select and type the value that the Category
field of the event log entries will need to match.
Description Select and type the value that the Description
field of the event log entries will need to match.
Type Select and specify the value that the Type field
of the event log entries will need to match.
Computer Select and specify the value that the Computer
field of the event log entries will need to match.
Date from Select and specify the ranges of dates that the
events will need to be from to be included.
Output Tab
Settings Configuration Instructions
File name Type the name of the file where the event log
entries will be saved. This file will be saved on the computer where the event log resides. If the file exists Select the action that you want to take if a file
with the same name already exists:
Create a file with a unique name: Select to append a value to the filename to create a unique name that does not conflict with
Settings Configuration Instructions
an existing name.
Append: Select to append the entries that are being saved to the file.
Overwrite: Select to overwrite the existing file with the file that is being created.
Fail: Select to cause the Save Event Log activity to fail if the filename already exists.
File format Select the format that will be used to save the
event log entries to the file:
CSV Delimited: Select to use the CSV format to write each log entry.
TAB Delimited: Select to separate fields in each entry using the TAB character.
Custom Delimited: Select to separate fields in each entry using a custom character that you specify in the Delimiter box.
Delimiter Type the delimiter that you want to use to
separate the fields of each entry.
Create column headings Select to save the column header information when saving a set of entries to a file. The header information contains meta data such as the field names.
Published Data
The following table lists the published data items.
Item Description
Event log name The name of the event log that was saved.
Computer The computer where the event log that was
saved resides. Name and path of the file where entries are
saved
The full path of the file where the event log was saved.
Query WMI
The Query WMI activity will send a WMI query to a system that you specify and return the results. This activity also can be used to check statistics on a remote server to create audit trails that can be reviewed later.
Configuring the Query WMI Activity
Before you configure the Query WMI activity, you need to determine the following:
The computer you are querying.
The WMI query statement you want to run.
Use the following information to configure the Query WMI activity. Details Tab
Settings Configuration Instructions
Computer Type the name of the computer that you are
running the WMI query against. You can also use the ellipsis (...) button to browse for the computer.
Namespace Type the name of the WMI namespace that you
want to query.
WMI query Type the WMI query that will be used to query
the Computer. For more information about Windows Management Instrumentation, see Windows Management Instrumentation
(http://go.microsoft.com/fwlink/?LinkId=221343).
Published Data
The following table lists the published data items.
Item Description
Computer where the WMI query is performed The name of the computer where the WMI query was ran.
WMI Query The WMI query that was sent to the computer. WMI Query Result as a string The result of the WMI query.
Run SSH Command
The Run SSH Command activity opens an SSH connection to a remote server and runs shell commands on that server. Use the Run SSH Command activity to run backup applications or a batch script that runs a set of complex commands on a non-Windows computer. The Run SSH Command activity can run any command in a Secure Shell.
Run SSH Command activity is based on PuTTY beta .61. The implementation of SSH in "Run SSH Command" has certain limitations:
The Run SSH Command activity does not work against all SSH-1 and SSH-2 servers. In general, this activity functions with most SSH servers, but it does not work for all SSH server implementations.
You must download and use the PuTTy key generation tool to create keys for the Run SSH Command activity. The key generation tool is available at Download PuTTY - a free SSH and telnet client for Windows.
The Run SSH Command activity supports SSH-1. Microsoft does not recommend the use of SSH-1. If you want to prevent The Run SSH Command activity from using SSH-1, you should use a key file that contains keys that do not support SSH-1. Do not use a username and password pair use a key file.
The property Accept Host Key Change is not a recommended setting. This property should only be used to establish the initial connection to a computer when the key is stored on the runbook server. Runbooks that contain the Run SSH Command activity should be configured with Accept Host Key Change disabled. When you use this property it disables the
validation of the identity of the SSH server and represents a security risk.
You should review the list if cryptographic ciphers supported by PuTTY, which is found at Encryption algorithm selection.
PuTTY beta .61 uses a pseudorandom number generator suitable for most cryptographic purposes. It is not recommended for the generation of long-term cryptographic keys. For more information about PuTTY, go to Download PuTTY - a free SSH and telnet client for Windows.
Configuring the Run SSH Command Activity
Before you configure the Run SSH Command activity, you need to determine the following:
Connection information for the computer that hosts the SSH server that you want to connect to.
Commands that you want to run.
Whether you require a key file to log into the server before you are able to run commands; this depends on your SSH server.
Use the following information to configure the Run SSH Command activity. Details
Settings Configuration Instructions
Computer Type the name of the computer or IP address
Settings Configuration Instructions
use the ellipsis (...) button to browse for the computer.
Port Type the port number that you need to use to
connect to the SSH server.
Run Command Select this option and type the command that
you want to run on the SSH server after the connection has been established.
Command Set File Select this option and specify a file that contains a set of commands that will be run on the SSH server when the connection has been established. The command set file must use the scripting language of the native shell on the SSH server.
Accept Host Key Change Select this option to accept host key changes when they occur.
Security
It is recommended that you do not use this setting because it can cause a runbook to accept any change in a server, including any that are for malicious purposes. By selecting this option, you are instructing the activity to connect to any server, regardless of the host key. Only use this option for testing purposes.
Connection Timeout Specify the amount of time, in seconds, that the Run SSH Command activity will wait for the SSH command to complete. Configure a value of 0 (zero), or leave the box blank, to wait indefinitely.
After the timeout period has elapsed, the Run SSH Command activity times out and returns a warning. The command that you ran may continue running, regardless of whether the Run SSH Command activity times out.
Advanced
Settings Configuration Instructions
Username Type the username that you need to log into
the SSH server.
Password Select this option and type the password that is
associated with the Username that you specified.
Key File Select this option to specify a key file to use.
You must use the PuTTY key file generator to create a key file. You can download this tool from Download PuTTY - a free SSH and telnet client for Windows.
Passphrase Type the passphrase that is associated with the
key file that you specified.
Published Data
The following table lists the published data items.
Item Description
Command The command that ran on the SSH server. This
data is not available when the Command Set File option is selected.
Command Set file The command set file that was used to run commands on the SSH server. This option is not available when the Run Command option is selected.
Computer name The name or IP address of the SSH server. Execution Result The text that was published as output from the
commands that were run on the SSH server.
Exit Code The exit code published by the command.
When using a command set file, this will be the exit code of the last command in the file. Key file path The path of the key file that was used to
authenticate with the SSH server.
Port The port used to connect to the SSH server.
Get SNMP Variable
The Get SNMP Variable activity will query a network device for the value of variable that is assigned to the Management Information Base address that you specify. You can use the Get SNMP Variable activity to retrieve information about a network device to determine if an administrator needs to be notified.
Configuring the Get SNMP Variable Activity
Before you configure the Get SNMP Variable activity, you need to determine the following:
The IP address of the device, as well as the port number, SNMP MIB, and SNMP version
The community string required to retrieve the variable.
You cannot set individual security credentials for this activity. It will run under the service account configured for the Runbook Service on the Runbook server where the instance of the activity is running. This account must have the authority to access the resources and perform the actions required by this activity.
Use the following information to configure the Get SNMP Variable activity. Details Tab
Settings Configuration Instructions
IP address Type the IP address of the device hosting the
MIB variable.
Port Type port used to communicate with the
network device. The default port is 161. Object identifier Type the MIB identifier of the variable whose
value you want to retrieve.
SNMP Version Select the SNMP version to use when
connecting to the network device.
Community string Type the community string that will be used to authenticate against the network device. The community should have rights of Read only or higher. This field is case-sensitive and supports only alphanumeric characters.
Advanced Tab
Settings Configuration Instructions
Timeout Type the number of seconds the Get SNMP
Settings Configuration Instructions
Variable will wait for a response from the network device. If the operation times out, then it will attempt to retry the action. The number of retries is specified in the Retry box.
Retry Type the number of times to attempt to retrieve
the SNMP variable
Published Data
The following table lists the published data items.
Item Description
MIB identifier The MIB identifier of the variable that was retrieved.
MIB value The value of the variable that was retrieved. Device IP address The IP address of the device where the
variable was retrieved.
Timeout The timeout period specified in the Get SNMP
variable operator interface.
Retry attempts The number of attempts made to retrieve the SNMP Variable.
SNMP Version The SNMP version that was specified to retrieve this variable. This value can be SNMPv1 or SNMPv2c.
Community string The community string that was used to authenticate against this SNMP variable. Request port The port used to communicate to the SNMP
device.
Monitor SNMP Trap
The Monitor SNMP Trap activity waits for an event to occur either in the Microsoft SNMP Trap Service, or on a port that you specify. Using filters, you can invoke your runbooks according to the device that raised the event or the enterprise, generic, or specific identifiers of the SNMP trap. Use the Monitor SNMP Trap activity to monitor a network device for critical errors, automatically create a trouble ticket, and perform level 1 diagnostics on the device.
Configuring the Monitor SNMP Trap Activity
Before you configure the Monitor SNMP Trap activity, you need to determine the following:
Version of SNMP that you are using
Source host IP address
Enterprise identifier of the device
Generic or specific identifier of the device that you are monitoring Use the following information to configure the Monitor SNMP Trap activity. Details Tab
Settings Configuration Instructions
Microsoft SNMP Trap Service (SNMPv1, SNMPv2c)
Select this option to use the Microsoft SNMP Trap Service. This service is only compatible with SNMP versions SNMPv1 and SNMPv2c. No dependency (SNMPv1, SNMPv2c,
SNMPv3)
Select this option to monitor SNMP traps using a port rather than the Microsoft SNMP Trap Service.
Port If you select the No dependency option, type
the communication port number that will be monitored for SNMP traps. If you select port 162, the Microsoft SNMP Trap Service must be disabled because it uses the same port when it runs.
Source host Select to specify the IP address of the device
where the event originates.
Enterprise identifier Select to specify the enterprise identifier of the event raised by the device.
Generic identifier Select to specify the generic identifier of the SNMP trap. There are six options available: coldStart(0): Select to filter for a cold start of the network device. This option has a numerical value of 0.
warmStart(1):Select to filter for a warm start of the network device. This option has a numerical value of 1.
linkDown(2): Select to filter for a severed connection to the network device. This option has a numerical value of 2.
Settings Configuration Instructions
connection to the network device. This option has a numerical value of 3.
authenticationFailure(4): Select to filter for a failed SNMP authentications to the network device. This option has a numerical value of 4. egpNeighborLoss(5): Select to filter for a lost connection to an EGP neighbor. This option has a numerical value of 5.
enterpriseSpecific(6): Select to filter based on an enterprise specific ID. This option has a numerical value of 6. You must specify this option to filter based on a Specific identifier. Specific identifier Select to specify an enterprise specific identifier
for the SNMP trap. This setting becomes active when you select the enterpriseSpecific(6) option in the Generic identifier box.
Published Data
The following table lists published data items.
Item Description
Source IP address The IP address of the device where the trap originated.
Enterprise Id The enterprise ID of the trap.
Generic Id The generic ID of the trap.
Specific Id The specific ID of the trap. The value of the specific identifier is published when using the enterpriseSpecific(6) option of the Generic identifier box. Otherwise, a value of 0 (zero) is published.
Trap port The port where the trap was received.
Varbind count The number of variable bindings received. SNMP Version The SNMP version specified for this trap.
Send SNMP Trap
The Send SNMP Trap activity will raise an SNMP event that can be detected by a network systems manager application. By using an enterprise identifier of a known network device, you can send SNMP Traps on behalf of a network device in your system. Use the Send SNMP Trap to create events for runbooks that need to be tracked using an SNMP monitoring product. Configuring the Send SNMP Trap Activity
Before you configure the Send SNMP Trap activity you need to determine the following:
IP address of the device where you will send your SNMP trap
Identifiers of the trap
The SNMP version you will use
The agent address you want to identify as the sender of the SNMP trap information.
You cannot set individual security credentials for this activity. It will run under the service account configured for the Runbook Service on the Runbook server where the instance of the activity is running. This account must have the authority to access the resources and perform the actions required by this activity.
Use the following information to configure the Send SNMP Trap activity.
You can also add more information to the SNMP trap. Each item that you add becomes a published data item.
Details Tab
Settings Configuration Instructions
IP address Type the name of the computer or IP address
where you are sending the SNMP trap.
Port Type the port to use to send the SNMP trap.
Enterprise identifier Specify the enterprise identifier of the event being raised by the Send SNMP Trap activity. Generic identifier Specify the generic identifier of the SNMP trap.
There are six options available:
coldStart(0): Select to signify a cold start of the network device. This option has a numerical value of 0.
warmStart(1): Select to signify a warm start of the network device. This option has a numerical value of 1.
linkDown(2): Select to signify a severed connection to the network device. This option Note
Settings Configuration Instructions
has a numerical value of 2.
linkUp(3): Select to signify a re-established connection to the network device. This option has a numerical value of 3.
authenticationFailure(4): Select to signify a failed SNMP authentications to the network device. This option has a numerical value of 4. egpNeighborLoss(5): Select to signify a lost EGP peer connection to the network device. This option has a numerical value of 5. enterpriseSpecific(6): Select to specify an enterprise specific id. This option has a numerical value of 6. You must specify this option to specify a specific identifier.
Specific identifier Type the enterprise specific identifier for the SNMP trap. This setting becomes active when you select the enterpriseSpecific(6) option of the Generic identifier box.
SNMP Version Select the SNMP version to use when
generating the SNMP trap.
Community string Type the community string that will be used to authenticate against the network device. This field is case-sensitive and supports only alphanumeric characters.
The Send SNMP Trap activity does not verify the content of community strings, nor whether the strings are received. It sends whatever data you provide, whether it is valid or not. The activity returns a status of Success if it was able to send the data, regardless of whether the data were correct or readable.
Advanced Tab
Settings Configuration Instructions
Address If you want to identify another computer as the
agent that sends the SNMP trap information, type the agent address in the box. Otherwise,
Settings Configuration Instructions
leave the box blank. The activity will use the agent address of the runbook server that runs the runbook. This setting can only be used with version SNMPv1.
Published Data
The following table lists the published data items.
Item Description
Destination IP address The IP address of the device where the trap is sent.
Enterprise Id The enterprise ID of the trap.
Generic Id The generic ID of the trap.
Trap port The port where the trap was sent.
SNMP Version The SNMP version that was specified for this trap. This value can be SNMPv1 or SNMPv2c. Community string The community string that will be needed to
retrieve this SNMP trap.
Origin address The address of the device that generated the trap.
Specific Id The specific ID of the trap.
Set SNMP Variable
The Set SNMP Variable activity will modify a variable, specified by its MIB, on a network device. Use the Set SNMP Variable to update a variable that reports on the failure or success of a critical runbook.
Configuring the Set SNMP Variable Activity
Before you configure the Set SNMP Variable activity you need to determine the following:
IP address of the device as well as the port number, SNMP MIB, and the SNMP version
Community string required to update the variable
You cannot set individual security credentials for this activity. It will run under the service account configured for the Runbook Service on the Runbook server where the instance Note
of the activity is running. This account must have the authority to access the resources and perform the actions required by this activity.
Use the following information to configure the Set SNMP Variable activity. Details Tab
Settings Configuration Instructions
IP address Type the IP address of the device hosting the
MIB variable.
Port Type port used to communicate with the
network device.
Object identifier Type the MIB identifier of the variable whose value you want to change.
Object value Type the new value of the variable you are
changing. Make sure that the new value matches the constraints that are set out by device manufacturer. This field is case-sensitive and supports only alphanumeric characters.
SNMP version Select the SNMP version to use when
connecting to the network device. You can select SNMPv1 or SNMPv2c.
Community string Type the community string that will be used to authenticate against the network device. The community should have rights of Read write or higher. This field is case-sensitive and supports only alphanumeric characters.
Advanced Tab
Settings Configuration Instructions
Timeout Type the number of seconds the Set SNMP
Variable will wait for a response from the network device. If the operation times out, then it will attempt to retry the action. The number of retries is specified in the Retry box.
Retry Type the number of times to attempt to set the
SNMP variable.
The following table lists the published data items.
Item Description
MIB identifier The MIB identifier of the variable that was set. MIB value The new value of the variable that was set. Device IP address The IP address of the device where the
variable was set.
Timeout The timeout period specified in the Set SNMP
variable operator interface.
Retry attempts The number of attempts made to set the SNMP variable.
SNMP Version The SNMP version that was specified to set this variable. This value can be SNMPv1, or SNMPv2c.
Community string The community string that was used to authenticate against this SNMP variable. Request port The port used to communicate to the SNMP
device.
Scheduling
The following table provides a brief description of tasks you can accomplish when using each Scheduling activity.
Tasks Scheduling Activities
Invoke a runbook at a scheduled time. Monitor Date/Time Verify that a runbook can run at its scheduled
time.
Check Schedule
Monitor Date/Time
The Monitor Date/Time activity invokes runbooks at a time or interval that you specify. Use the Monitor Date/Time activity to invoke your runbooks at a specific time once a day, week, or month. You can also schedule runbooks to be invoked when a specific number of seconds have passed since it was last invoked, or immediately after the runbook is deployed.
The Monitor Date/Time activity uses the system clock of the operating system on the computer that runs the runbook server, not Coordinated Universal Time (UTC), to verify the runbook’s launch time. This enables the Monitor Date/Time activity to function in virtual machine
environments, and to continue running even when the system clock is adjusted because of the move into or out of Daylight Saving Time. However, if a runbook is scheduled to start during an hour that is skipped when the system clock is adjusted forward by one hour, that starting time is skipped, and the runbook starts at the next scheduled time. If a runbook is scheduled to start during an hour that occurs twice because the system clock is adjusted backwards by one hour, the runbook launches twice.
Depending on the practices in your time zone, the usual official time to change the system clocks at the start or finish of Daylight Saving Time is 2:00 A.M., or 02:00. We recommend that you configure a schedule to prevent your runbooks from being skipped or processed twice when the system clock changes.
The Monitor Date/Time activity becomes inactive when the schedule does not allow the runbook to run.
The Monitor Date/Time activity is best suited for scenarios where you need to run routines regularly that do not rely on events in other systems. For example, nightly backup procedures or periodically reading and processing mail in a customer service inbox.
Additional Use Cases
The Monitor Date/Time activity starts according to its configured interval and passes the runbook run to the Check Schedule activity. The Check Schedule activity verifies that the runbook is allowed to run at the current time.
If the runbook is permitted to run at that time, the Check Schedule activity publishes a published data value of True. It passes the runbook run to the next activity if there is a link to the next activity with a invoke condition of “Conforms to schedule from Check Schedule equals true”. If the runbook is not permitted to run at that time, the Check Schedule activity publishes a published data value of False. It passes the runbook run to the next activity if there is a link to the next activity with an invoke condition of “Conforms to schedule from Check Schedule equals false.” This is useful when you want to implement conditional link branches according to the results of the Schedule verification.
Configuring the Monitor Date/Time Activity
Before you configure the Monitor Date/Time activity, you need to determine the time or interval you want to use to invoke the runbook.
Use the following the information to configure the Monitor Date/Time activity. Details Tab
Settings Configuration Instructions
At Select an absolute time for the runbook to run.
Settings Configuration Instructions
day at the time that you specify.
Every [x] days [y] hours [z] minutes Select to specify intervals of days, hours, and minutes for the runbook to run.
Starting: Select to specify the number of minutes past the hour to invoke the runbook. This option is only available if you have specified 0 minutes and at least 1 Day or 1 hour .
At time slices within the hour: Select to invoke the runbook at times that are multiples of minutes you have specified. This option is only available when 0 days and 0 hours are specified. For example, if minutes is set to 15 then the Monitor Date/Time activity will invoke at 0, 15, 30, 45 minutes past each hour. Trigger immediately: Select to invoke the runbook immediately after deploying. Every [x] seconds Select to specify the interval, in seconds,
between each time the runbook is ran.
The Monitor Date/Time activity accepts the following inputs when configuring times and intervals: Configuring Time and Intervals
Unit Accepted Input
Seconds 5 - 300
Minutes 0 - 59 (0 is allowed only when hours/days are
also specified)
Hours 0 - 23 (0 is allowed when days/minutes are also
specified)
Days 0 - 48 (0 is allowed when hours/minutes are
also specified)
Time slices 1, 2, 3, 4, 5, 6, 10, 12, 15, 20, 30
Published Data
Check Schedule
The Check schedule activity verifies that a runbook is allowed to run at the current time according to the permitted times or interval configured in a schedule. To use this activity, you can create a schedule and configure the permitted times, denied times, or interval at which the runbook can run. Then you can insert the activity into a runbook following a Monitor Date/Time activity and configure it to check the schedule to verify whether a runbook is allowed to run at the current time. You can also use the Check Schedule activity in a runbook that monitors systems for availability. If a problem is encountered, the Check Schedule activity can verify whether the current time is during business hours, or in or out of a maintenance window.
Configuring the Check Schedule Activity
Use the following information to configure the Check Schedule activity.
1. From the Activity pane, drag a Check Schedule activity to the runbook.
2. Double-click the Check Schedule activity icon to open the Properties dialog box. 3. Select the Details tab, and next to the Schedule Template box, click the ellipsis (...)
button and in the Select a Schedule dialog box, select the Schedule that you want to verify.
Published Data
The following table lists published data items.
Item Description
Conforms to schedule Determines whether the current time is within the schedule specified. This value can be either True or False.
Monitoring
The following table provides a brief description of tasks you can accomplish when using each Monitoring activity.
Tasks Monitoring Activities
Invoke a runbook when new events that match a filter appear in the Windows Event Log.
Monitor Event Log
Invoke a runbook when a service has been started or stopped.
Monitor Service
Check the status of a service on any computer. Get Service Status To configure the Check Schedule activity
Tasks Monitoring Activities
Invoke a runbook when a process has been started or stopped.
Monitor Process
Check the status of a running process on any computer.
Get Process Status
Send a ping to a remote computer or IP address and wait for a response.
Monitor Computer/IP
Send a ping to a remote computer or IP address and wait for a response.
Get Computer/IP Status
Invoke a runbook when the disk space on a computer passes a critical threshold.
Monitor Disk Space
Retrieve the current amount of available disk space.
Get Disk Space Status
Invoke a runbook when an internet application server becomes available or unavailable.
Monitor Internet Application
Check the availability of a Web, Email (POP3 or SMTP), FTP, DNS, or custom server.
Get Internet Application Status
Invoke a runbook when a Windows
Management Instrumentation (WMI) event is received as a result of the WMI event query you specified.
Monitor WMI
Monitor Event Log
The Monitor Event Log activity invokes runbooks when new events that match a filter that you specify appear in the Windows Event Log. You can use the Monitor Event Log activity to run runbooks that will escalate, investigate, or correct any issues in response to events being
generated to the Windows Event Log. For example, a security audit failure appears in the security log which will send an email to an administrator to notify them of the problem. The second mode invokes your runbook when the size of the Windows Event Log reaches the maximum size allowed.
Configuring the Monitor Event Log Activity
Before you configure the Monitor Event Log activity, you need to determine the following:
Name of the event log you are monitoring
Use the following steps to configure the Monitor Event Log activity.
1. From the Activity pane, drag a Monitor Event Log activity to the runbook.
2. Double-click the Monitor Event Log activity icon to open the Properties dialog box. 3. Configure the settings on the Details tab and on the Advanced tab. Configuration
instructions are listed in the following tables. Details Tab
Settings Configuration Instructions
Computer Type the name of the computer that stores the
Windows Event Log that you want to monitor. You can also browse for the computer using the ellipsis (...) button. The runbook server that runs this activity must have the appropriate rights to monitor the Windows Event Log on that computer.
Event log Type the name of the Windows Event Log that
you are monitoring. You can also browse for the Windows Event Log using the ellipsis (...) button. Windows includes three Event Logs by default: Application, Security, and System. The computer that you are connecting to may contain other Event Logs.
Message filters The list shows all the filters that have been configured to filter the events that are
generated in the log that you have specified. To edit or remove an item in the list, select it and click Edit or Remove as applicable.
To add an event filter
1. Click Add to open the Filter Properties dialog box.
2. Select the property of the event log entry that you are filtering against. You can filter against the Category, Description, Event ID, Source, and Type that is attributed to the event. 3. Specify the relation you are using to
compare the value of the event To configure the Monitor Event Log activity
Settings Configuration Instructions
property to the filter value. If you select Category, Description, Type, and Source you can specify Contains or Does not contain. For Event ID you can specify is different than, is equal to , is lower than, is lower than or equals, is more than, and is more than or equals.
4. Specify the filter value that you are comparing the event property against. For Category, Description, and Source, enter the string that is contained within the property. For Event ID, enter the numeric value that will be compared against the ID of the event. For the Type condition, select the specific type of event that you want to filter for such as Error, Warning, Information, Success Audit, or Failure Audit.
Published Data
The following table lists the published data items.
Item Description
Event log name The name of the Windows Event Log being monitored.
Computer The name of the computer where the Windows
Event Log is stored.
Log entry description The text that is contained in the Event Log entry description.
Log Entry ID The ID of the Event Log entry.
Log Entry source The source of the event.
Log Entry computer The computer where the event occurred.
Log Entry type The type of event.
Log Entry date The date the event was logged. Log Entry time The time the event was logged.
Monitor Service
The Monitor Service activity invokes runbooks when a service has been started or stopped. You can use the Monitor Service activity to monitor services on any remote computer. Use the Monitor Service activity to create runbooks that take corrective actions when services unintentionally shut down. For example, if a SQL Server service that hosts critical data stops responding, you can use a Monitor Service activity with a Start/Stop Service activity to automatically restart the service. Configuring the Monitor Service Activity
Before you configure the Monitor Service activity, you need to determine the following:
Which computer hosts the service that you are monitoring
Which service you want to monitor
Whether the runbook will run when the service is started or stopped Use the following information to configure the Monitor Service activity. Details Tab
Settings Configuration Instructions
Computer Type the name of the computer where the
service that you are monitoring is located. You can also browse for the computer using the ellipsis (...) button. The runbook server that runs this activity must have the appropriate rights to monitor the services on that computer.
Service Type the name of the service that you are
monitoring. To open the Choose a Service dialog box, click the ellipsis (...) button. Service is started Select to invoke the Monitor Service activity
when the selected service has been started. Service is stopped or paused Select to invoke the Monitor Service activity
when the selected service has been stopped or paused.
When a service is restarted using the Windows Service Control Manager it is stopped and then started in succession. This will cause the Monitor Service activity to be invoked regardless of whether you have specified to invoke when the Service is started or Service is stopped or paused.
Restart stopped service Select the Restart stopped service box to restart a service that has stopped. You can also use the Start/Stop Service activity instead of