IBM Endpoint Manager
Data Protection for CPM 10.6 SP1
Administrator’s Guide
Version 9.0
IBM Endpoint Manager
Data Protection for CPM 10.6 SP1
Administrator’s Guide
Version 9.0
Note
Before using this information and the product it supports, read the information in “Notices” on page 45.
This edition applies to version 9, release 0, modification level 0 of IBM Endpoint Manager and to all subsequent releases and modifications until otherwise indicated in new editions.
© Copyright IBM Corporation 2012.
Contents
Chapter 1. Introducing Data Protection . 1
What’s New in Version 10.6 SP1 . . . 1
Data Protection Enhancements . . . 1
About Data Protection . . . 1
About Data Loss Prevention . . . 2
DLP Settings Wizard. . . 2
Device Control. . . 3
Device Control Wizard . . . 4
Installing the Data Protection Module . . . 5
Adding the Data Protection Site . . . 6
Configuring Client Notifications . . . 6
Chapter 2. DLP Data Identifiers . . . 7
Data Identifier Types . . . 7
Expressions . . . 7
Predefined Expressions . . . 7
Customized Expressions . . . 7
File Attributes . . . 10
Creating a File Attribute List . . . 10
Importing a File Attribute List . . . 11
Keywords . . . 11
Predefined Keyword Lists . . . 11
Customized Keyword Lists . . . 11
Chapter 3. Data Loss Prevention
Templates . . . 15
Data Loss Prevention Templates . . . 15
Predefined DLP Templates . . . 15
Customized DLP Templates . . . 15
Condition Statements and Logical Operators . . 16
Creating a Template . . . 16
Importing Templates . . . 17
Chapter 4. Data Loss Prevention
Policies . . . 19
Data Loss Prevention Policies . . . 19
DLP Channels . . . 19
Network Channels . . . 19
Transmission Scope and Targets for Network Channels . . . 22
System and Application Channels . . . 24
Data Loss Prevention Actions . . . 27
Decompression Rules . . . 27
Configuring Data Loss Prevention Policies . . . . 27
Chapter 5. Device Control
. . . 29
Permissions for Storage Devices . . . 29
Advanced Permissions for Storage Devices . . . . 30
Specifying a Digital Signature Provider . . . . 31
Specifying a Program Path and Name . . . . 31
Permissions for Non-storage Devices . . . 32
Managing Access to External Devices. . . 32
Configuring an Approved List of USB Devices . 32
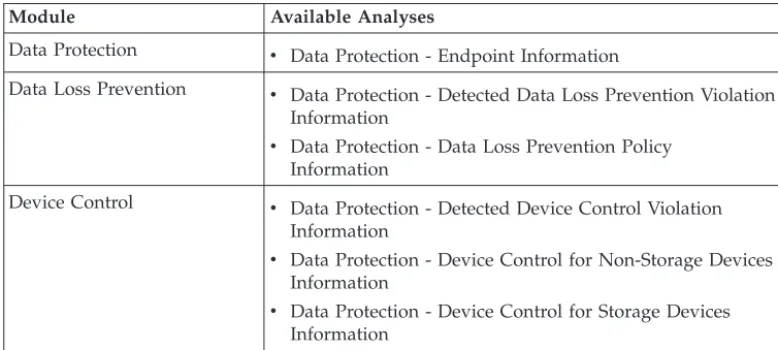
Chapter 6. Data Protection Analyses
and Reports . . . 35
Data Protection Analyses . . . 35
Data Protection - Endpoint Information Analysis . . 35
Data Protection - Detected Data Loss Prevention Violation Information Analysis . . . 36
Data Protection - Data Loss Prevention Policy Information Analysis . . . 37
Data Protection - Detected Device Control Violation Information Analysis . . . 37
Data Protection - Device Control for Non-Storage Devices Information Analysis . . . 38
Data Protection - Device Control for Storage Devices Information Analysis . . . 38
Data Loss Prevention Report . . . 40
Device Control Detections Report . . . 40
Appendix A. Data Protection Reference
Tables . . . 41
Wildcard Usage in Device Control . . . 41
Appendix B. Support. . . 43
Chapter 1. Introducing Data Protection
This chapter introduces the Data Protection features available in Core Protection Module and how to install the services.
v “What’s New in Version 10.6 SP1” v “About Data Protection”
v “About Data Loss Prevention” on page 2 v “Device Control” on page 3
v “Installing the Data Protection Module” on page 5 v “Adding the Data Protection Site” on page 6 v “Configuring Client Notifications” on page 6
What’s New in Version 10.6 SP1
Data Protection Enhancements
The Data Protection enhancements in Core Protection Module 10.6 SP1 include the following support and upgrades:
v Over 100 new pre-configured Data Loss Prevention templates and data identifiers
v Data Loss Prevention and Device Control support for 64-bit versions of Windows platforms
For a complete listing of supported 64-bit Windows platforms, refer to the Systems Requirements at:
http://docs.trendmicro.com/en-us/enterprise/core-protection-module.aspx
About Data Protection
Traditional security solutions are focused on preventing external security threats from reaching the network. In today’s security environment, this is only half the story. Data breaches are now commonplace, exposing an organization’s confidential and sensitive data – referred to as data identifiers– to outside unauthorized parties. A data breach may occur as a result of internal employee mistakes or carelessness, data outsourcing, stolen or misplaced computing devices, or malicious attacks. Data breaches can:
v Damage brand reputation
v Erode customer trust in the organization
v Result in unnecessary costs to cover for remediation and to pay fines for violating compliance regulations
v Lead to lost business opportunities and revenue when intellectual property is stolen
With the prevalence and damaging effects of data breaches, organizations now see the protection of sensitive information as a critical component of their security infrastructure.
About Data Loss Prevention
With the prevalence and damaging effects of data breaches, organizations now see digital asset protection as a critical component of their security infrastructure. Data Loss Prevention safeguards an organization’s sensitive data against accidental or deliberate leakage. Data Loss Prevention allows you to:
v Identify the sensitive information that requires protection using data identifiers v Create policies that limit or prevent the transmission of digital assets through
common transmission channels, such as email and external devices v Enforce compliance to established privacy standards
Before you can monitor sensitive information for potential loss, you must be able to answer the following questions:
v What data needs protection from unauthorized users? v Where does the sensitive data reside?
v How is the sensitive data transmitted?
v What users are authorized to access or transmit the sensitive data? v What action should be taken if a security violation occurs?
This important audit typically involves multiple departments and personnel familiar with the sensitive information in your organization.
If you already defined your sensitive information and security policies, you can begin to define data identifiers and company policies.
Data Loss Prevention protects your organization through use of:
v DLP Data Identifier Management (for details, see “Data Identifier Types” on page 7)
v DLP Template Management (for details, see “Data Loss Prevention Templates” on page 15)
v DLP Policy Management (for details, see “Data Loss Prevention Policies” on page 19)
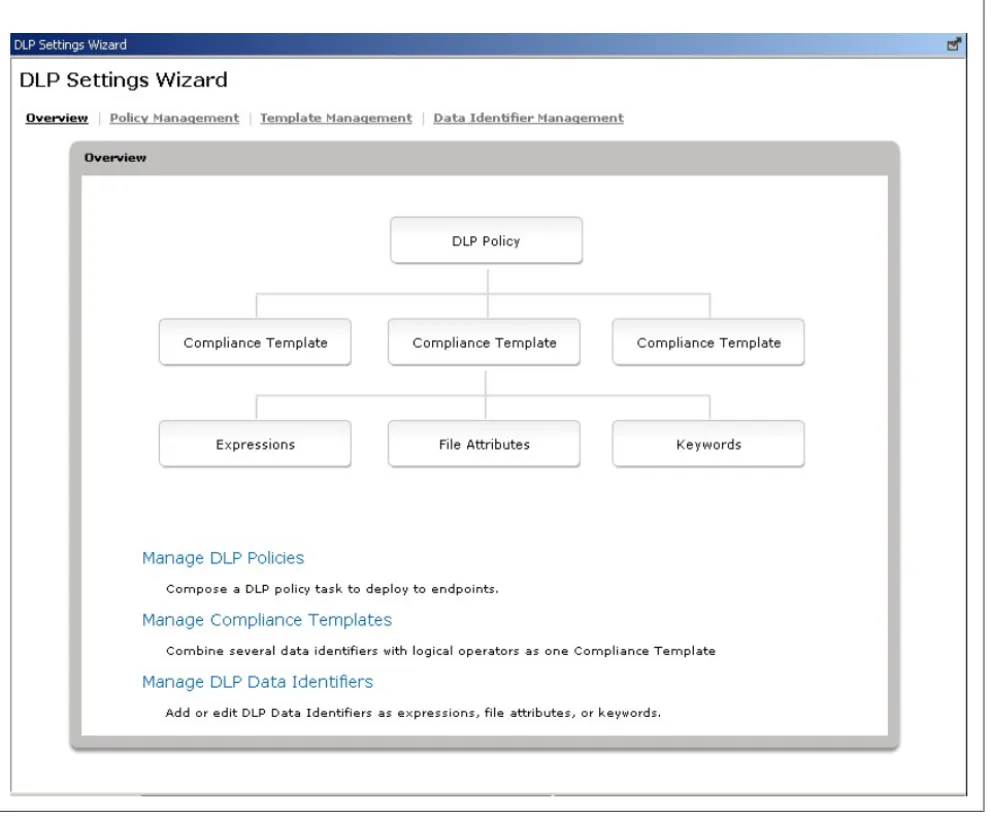
DLP Settings Wizard
Use the DLP Settings Wizard to create, modify, and manage your Data Loss Prevention data identifiers, templates, and policies.
The DLP Settings Wizard Overview screen provides a tree view to help you plan your DLP policies from beginning to end. Start creating your policies by clicking either the hyperlinks at the top of the Overview screen or the buttons located in the tree view.
To create a customized Data Loss Prevention policy, perform the following steps: 1. Create the necessary data identifiers to include in your policy. The three types
of data identifiers available are:
v Expressions (for details, see “Expressions” on page 7) v File Attributes (for details, see “File Attributes” on page 10) v Keywords (for details, see “Keywords” on page 11)
2. Create a Data Loss Prevention template using your customized data identifiers, or select from the predefined data identifiers provided with Data Protections services (for details, see “Data Loss Prevention Templates” on page 15).
3. Create and deploy a policy using your customized templates, or select from the predefined compliance templates provided with Data Protection services (for details, see “Data Loss Prevention Policies” on page 19).
Device Control
Device Control regulates access to external storage devices and network resources connected to computers. Device Control helps prevent data loss and leakage and, combined with file scanning, helps guard against security risks.
You can configure Device Control policies for internal and external client. CPM administrators typically configure a stricter policy for external clients
You can enforce specific policies to client groups or individual clients. You can also enforce a single policy to all clients.
After you deploy the policies, clients use the location criteria you have set in the Location Property Wizard (for details, see theCore Protection Module Administrator’s Guide,Chapter 9) to determine their location and the policy to apply. Clients switch policies each time the location changes.
Note:
v By default, Device Control is disabled on all versions of Windows Server 2003 and Windows Server 2008.
v For a list of supported device models, see:
http://docs.trendmicro.com/en-us/enterprise/data-protection-reference-documents.aspx
Device Control Wizard
Use the Device Control Wizard to manage and deploy device access permissions on your endpoints.
The wizard provides multi-layered permissions to storage devices that allows you to customize the level of access granted to a device, and the access to specific programs on the device (see “Permissions for Storage Devices” on page 29). Manage permissions to non-storage devices by allowing or blocking access to them. Device Control manages the following non-storage devices:
v COM and LPT ports v Modems v IEEE 1394 interface v Print screen key v Imaging devices v PCMCIA cards v Infrared devices
For more information about Device Control, see “Permissions for Storage Devices” on page 29.
Installing the Data Protection Module
Before you can begin protecting your endpoints from data leakage, you must first install the Data Protection module. The Data Protection module provides DLP policy and Device Control features.
Note:
Endpoints with the standalone Trend Micro Data Loss Prevention program
installed must uninstall the program before installing the Data Protection Services. 1. Navigate toEndpoint Protection>Core Protection Module>Deployment>
Install.
2. In the upper right pane, clickData Protection - Install Data Protection Services.
3. ClickTake Action.
4. In the Targettab, select the endpoints to which to install the Data Protection Services.
5. ClickOK. At the prompt, type your private key password and clickOK. 6. In the Action | Summary window that opens, monitor the "Status" of the
Action to confirm that it is "Evaluating", "Running", and then "Completed".
Adding the Data Protection Site
Install the Trend Micro Data Protection site from the console by adding its masthead (Trend Micro Data Protection.efxm) to the list of managed sites. 1. Copy theTrend Micro Data Protection.efxm file to the CPM server. 2. Double-click the file.
3. ClickYesto subscribe to the Trend Micro Data Protection Site. 4. At the prompt, type your private key password and clickOK.
5. Select the applicable computers to deploy the new Activation Code to. Select
All computersto deploy the new code to all endpoints.
6. ClickSave Changes. At the prompt, type your private key password and click
OK.
7. Close any open windows to return to the ESP Console view.
Configuring Client Notifications
Once Data Protection detects a DLP policy incident or Device Control violation, CPM performs the administrator-defined action associated with the event that occurred. Administrators can configure a customized message to inform users that CPM performed an action on their endpoint.
For example, if a user attempts to access a USB device on their endpoint and the administrator has configured Device Control to block access to USB devices, configure a message such as, “A Device Control violation has been detected. Access to the device has been denied.” This message informs users that their current action is in violation of a policy and that their computer is functioning properly.
Administrators can configure separate notifications for Device Control and Data Identifier Transmissions.
1. Navigate toEndpoint Protection>Configuration>Client Notifications>
Client Notification Settings.
2. Modify the message that displays on endpoints forDevice Control Violations
andData Identifier Transmissions, or accept the default messages. 3. ClickCreate Configuration Task. The Create Task window appears. 4. ClickOK, type your Private Key Password, and clickOK. A Task window
appears.
5. Click the hyperlink in the Actions window. The Take Action window opens. 6. Select all Applicable Computers and clickOK. When prompted, type your
private key password and clickOK.
7. In the Action | Summary window that opens, monitor the "Status" and "Count" of the Action to confirm that it is "Running" and then "Completed."
Chapter 2. DLP Data Identifiers
This chapter describes the different DLP data identifier types and how to configure customized data identifiers for use in templates.
v “Data Identifier Types” v “Expressions”
v “File Attributes” on page 10 v “Keywords” on page 11
Data Identifier Types
Digital assets are files and data that an organization must protect against
unauthorized transmission. You can define digital assets using the following data identifiers:
v Expressions: Data that has a certain structure. For details, see “Expressions.” v File attributes: File properties such as file type and file size. For details, see “File
Attributes” on page 10.
v Keyword lists: A list of special words or phrases. For details, see “Keywords” on page 11.
Note: It is not possible to delete a data identifier that is being used in a DLP template. Delete the template before deleting the data identifier.
Expressions
An expression is data that has a certain structure. For example, credit card numbers typically have 16 digits and appear in the format "nnnn-nnnn-nnnn-nnnn", making them suitable for expression-based detections.
You can use predefined and customized expressions. For details, see “Predefined Expressions” and “Customized Expressions.”
Predefined Expressions
CPM comes with a set of predefined expressions. These expressions cannot be modified or deleted.
CPM verifies these expressions using pattern matching and mathematical equations. After CPM matches potentially sensitive data with an expression, the data may also undergo additional verification checks.
For a complete list of predefined expressions, see http://docs.trendmicro.com/en-us/enterprise/data-protection-reference-documents.aspx.
Customized Expressions
Create customized expressions if none of the predefined expressions meet your requirements.
Expressions are a powerful string-matching tool. Ensure that you are comfortable with expression syntax before creating expressions. Poorly written expressions can dramatically impact performance.
When creating expressions:
v Refer to the predefined expressions for guidance on how to define valid
expressions. For example, if you are creating an expression that includes a date, you can refer to the expressions prefixed with "Date".
v Note that CPM follows the expression formats defined in Perl Compatible Regular Expressions (PCRE). For more information on PCRE, visit the following website:
http://www.pcre.org/
v Start with simple expressions. Modify the expressions if they are causing false alarms or fine tune them to improve detections.
There are several criteria that you can choose from when creating expressions. An expression must satisfy your chosen criteria before CPM subjects it to a DLP policy. For details about the different criteria options, see “Criteria for Customized
Expression.”
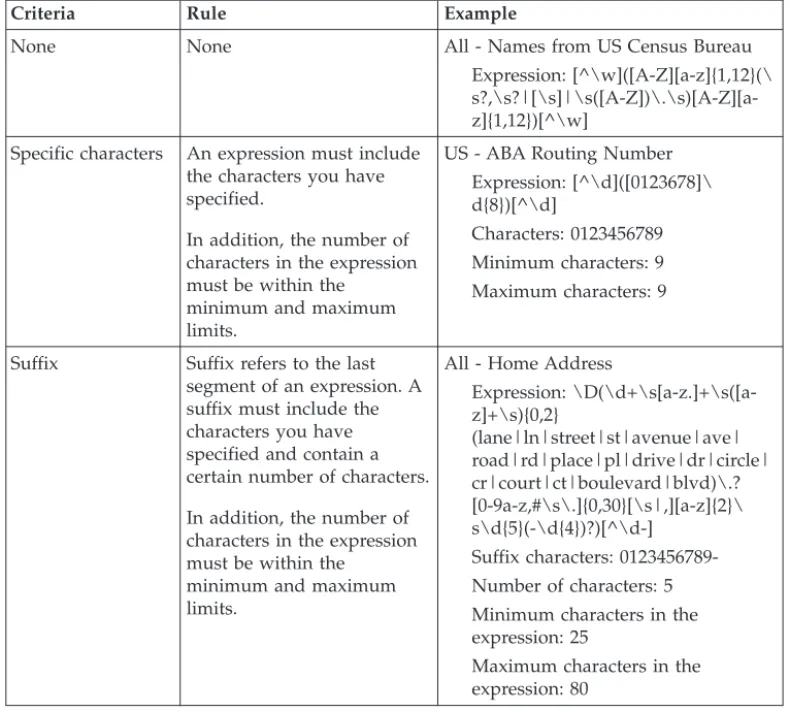
Criteria for Customized Expression
Table 1. Criteria Options for Customized Expressions
Criteria Rule Example
None None All - Names from US Census Bureau Expression: [^\w]([A-Z][a-z]{1,12}(\ s?,\s?|[\s]|\s([A-Z])\.\s)[A-Z][a-z]{1,12})[^\w]
Specific characters An expression must include the characters you have specified.
In addition, the number of characters in the expression must be within the
minimum and maximum limits.
US - ABA Routing Number Expression: [^\d]([0123678]\ d{8})[^\d]
Characters: 0123456789 Minimum characters: 9 Maximum characters: 9
Suffix Suffix refers to the last segment of an expression. A suffix must include the characters you have specified and contain a certain number of characters. In addition, the number of characters in the expression must be within the
minimum and maximum limits.
All - Home Address
Expression: \D(\d+\s[a-z.]+\s([a-z]+\s){0,2} (lane|ln|street|st|avenue|ave| road|rd|place|pl|drive|dr|circle| cr|court|ct|boulevard|blvd)\.? [0-9a-z,#\s\.]{0,30}[\s|,][a-z]{2}\ s\d{5}(-\d{4})?)[^\d-] Suffix characters: 0123456789-Number of characters: 5 Minimum characters in the expression: 25
Maximum characters in the expression: 80
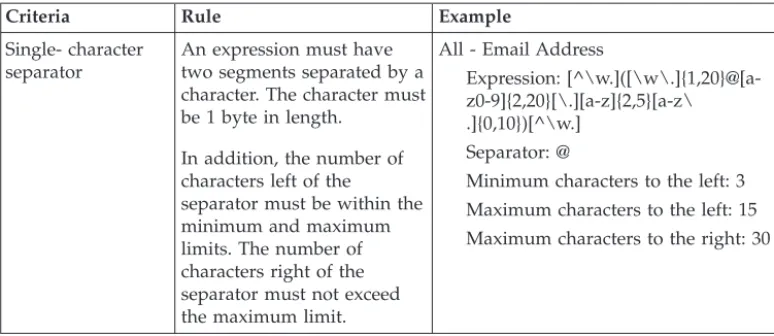
Table 1. Criteria Options for Customized Expressions (continued)
Criteria Rule Example
Single- character separator
An expression must have two segments separated by a character. The character must be 1 byte in length.
In addition, the number of characters left of the
separator must be within the minimum and maximum limits. The number of characters right of the separator must not exceed the maximum limit.
All - Email Address
Expression: [^\w.]([\w\.]{1,20}@[a-z0-9]{2,20}[\.][a-z]{2,5}[a-z\ .]{0,10})[^\w.]
Separator: @
Minimum characters to the left: 3 Maximum characters to the left: 15 Maximum characters to the right: 30
Creating a Customized Expression
1. Navigate toEndpoint Protection>Configuration>Data Protection> DLP Settings Wizard>Data Identifier Management.
2. Click theExpressiontab. 3. Click Add.
A new screen displays.
4. Type a name for the expression. The name must not exceed 64 bytes in length and cannot contain the following characters:
v > < * ^ | & ? \ /
5. Type a description that does not exceed 256 bytes in length. 6. Type the expression and specify whether it is case-sensitive. 7. Type the displayed data.
For example, if you are creating an expression for ID numbers, type a sample ID number. This data is used for reference purposes only and will not appear elsewhere in the product.
8. Choose one of the following criteria and configure additional settings for the chosen criteria (see “Criteria for Customized Expression” on page 8):
v None
v Specific characters v Suffix
v Single-character separator
9. Test the expression against an actual data.
For example, if the expression is for a national ID, type a valid ID number in theTest datatext box, clickTest, and then check the result.
10. Click Saveif you are satisfied with the result.
Note:
Save the settings only if the testing was successful. An expression that cannot detect any data wastes system resources and may impact performance.
Importing Customized Expressions
Use this option if you have a properly-formatted .xmlfile containing the
expressions. You can generate the file by exporting the expressions from either the CPM server you are currently accessing or from another CPM server.
1. Navigate toEndpoint Protection>Configuration>Data Protection>DLP Settings Wizard>Data Identifier Management.
2. Click theExpressiontab.
3. ClickImport and then locate the.xmlfile containing the expressions. 4. ClickOpen.
A message appears, informing you if the import was successful. If an expression to be imported already exists, it will be skipped.
File Attributes
File attributes are specific properties of a file. You can use two file attributes when defining data identifiers, namely, file type and file size. For example, a software development company may want to limit the sharing of the company’s software installer to the R&D department, whose members are responsible for the
development and testing of the software. In this case, the CPM administrator can create a policy that blocks the transmission of executable files that are 10 to 40MB in size to all departments except R&D.
By themselves, file attributes are poor identifiers of sensitive files. Continuing the example in this topic, third-party software installers shared by other departments will most likely be blocked. Trend Micro therefore recommends combining file attributes with other DLP data identifiers for a more targeted detection of sensitive files.
For a complete list of supported file types see http://docs.trendmicro.com/en-us/ enterprise/data-protection-reference-documents.aspx.
Creating a File Attribute List
1. Navigate toEndpoint Protection>Configuration>Data Protection>DLP Settings Wizard>Data Identifier Management.
2. Click theFile Attributetab. 3. ClickAdd.
A new screen displays.
4. Type a name for the file attribute list. The name must not exceed 64 bytes in length and cannot contain the following characters:
v > < * ^ | & ? \ /
5. Type a description that does not exceed 256 bytes in length. 6. Select your preferred true file types.
7. If a file type you want to include is not listed, selectFile extensionsand then type the file type’s extension. CPM checks files with the specified extension but does not check their true file types. Guidelines when specifying file extensions: v
Each extension must start with an asterisk (*), followed by a period (.), and then the extension. The asterisk is a wildcard, which represents a file’s actual name. For example,*.polmatches 12345.polandtest.pol.
v You can include wildcards in extensions. Use a question mark (?) to represent a single character and an asterisk (*) to represent two or more characters. See the following examples:
-*.*mmatches the following files:ABC.dem,ABC.prm,ABC.sdcm
-*.m*r matches the following files:ABC.mgdr,ABC.mtp2r,ABC.mdmr
v Be careful when adding an asterisk at the end of an extension as this might match parts of a file name and an unrelated extension. For example:*.do*
matches abc.doctor_john.jpgandabc.donor12.pdf.
v Use semicolons (;) to separate file extensions. There is no need to add a space after a semicolon.
8. Type the minimum and maximum file sizes in bytes. Both file sizes must be whole numbers larger than zero.
9. ClickSave.
Importing a File Attribute List
Use this option if you have a properly-formatted .xmlfile containing the file attribute lists. You can generate the file by exporting the file attribute lists from either the CPM server you are currently accessing or from another CPM server. 1. Navigate toEndpoint Protection>Configuration>Data Protection>DLP
Settings Wizard>Data Identifier Management. 2. Click theFile Attributetab.
3. ClickImport and then locate the.xmlfile containing the file attribute lists. 4. ClickOpen.
A message appears, informing you if the import was successful. If a file attribute list to be imported already exists, it will be skipped.
Keywords
Keywords are special words or phrases. You can add related keywords to a keyword list to identify specific types of data. For example, "prognosis", "blood type", "vaccination", and "physician" are keywords that may appear in a medical certificate. If you want to prevent the transmission of medical certificate files, you can use these keywords in a DLP policy and then configure CPM to block files containing these keywords.
Commonly used words can be combined to form meaningful keywords. For example, "end", "read", "if", and "at" can be combined to form keywords found in source codes, such as "END-IF", "END-READ", and "AT END".
You can use predefined and customized keyword lists. For details, see “Predefined Keyword Lists” and “Customized Keyword Lists.”
Predefined Keyword Lists
CPM comes with a set of predefined keyword lists. These keyword lists cannot be modified or deleted. Each list has its own built-in conditions that determine if the template should trigger a policy violation
For details about the predefined keyword lists in CPM, see http://
docs.trendmicro.com/en-us/enterprise/data-protection-reference-documents.aspx.
Customized Keyword Lists
Create customized keyword lists if none of the predefined keyword lists meet your requirements.
There are several criteria that you can choose from when configuring a keyword list. A keyword list must satisfy your chosen criteria before CPM subjects it to a DLP policy. Choose one of the following criteria for each keyword list:
v Any keyword v All keywords
v All keywords within <x> characters
v Combined score for keywords exceeds threshold
For details regarding the criteria rules, see “Customized Keyword List Criteria.”
Customized Keyword List Criteria
Table 2. Criteria for a Keyword List
Criteria Rule
Any keyword A file must contain at least one keyword in the keyword list. All keywords A file must contain all the keywords in the keyword list. All keywords
within <x> characters
A file must contain all the keywords in the keyword list. In addition, each keyword pair must be within <x> characters of each other. For example, your 3 keywords are WEB, DISK, and USB and the number of characters you specified is 20.
If CPM detects all keywords in the order DISK, WEB, and USB, the number of characters from the "D" (in DISK) to the "W" (in WEB) and from the "W" to the "U" (in USB) must be 20 characters or less.
The following data matches the criteria: DISK####WEB############USB
The following data does not match the criteria:
DISK*******************WEB****USB(23 characters between "D" and "W")
When deciding on the number of characters, remember that a small number, such as 10, will usually result in faster scanning time but will only cover a relatively small area. This may reduce the likelihood of detecting sensitive data, especially in large files. As the number increases, the area covered also increases but scanning time might be slower.
Combined score for keywords exceeds threshold
A file must contain one or more keywords in the keyword list. If only one keyword was detected, its score must be higher than the threshold. If there are several keywords, their combined score must be higher than the threshold.
Assign each keyword a score of 1 to 10. A highly confidential word or phrase, such as "salary increase" for the Human Resources department, should have a relatively high score. Words or phrases that, by
themselves, do not carry much weight can have lower scores. Consider the scores that you assigned to the keywords when
configuring the threshold. For example, if you have five keywords and three of those keywords are high priority, the threshold can be equal to or lower than the combined score of the three high priority keywords. This means that the detection of these three keywords is enough to treat the file as sensitive.
Creating a Keyword List
1. Navigate toEndpoint Protection>Configuration>Data Protection >DLP Settings Wizard> Data Identifier Management.
3. Click Add.
A new screen displays.
4. Type a name for the keyword list. The name must not exceed 64 bytes in length and cannot contain the following characters:
v > < * ^ | & ? \ /
5. Type a description that does not exceed 256 bytes in length.
6. Choose one of the following criteria and configure additional settings for the chosen criteria:
v Any keyword v All keywords
v All keywords within <x> characters
v Combined score for keywords exceeds threshold 7. To manually add keywords to the list:
a. Type a keyword that is 3 to 40 bytes in length and specify whether it is case-sensitive.
b. ClickAdd.
8. To add keywords by using the "import" option:
Note:
Use this option if you have a properly-formatted .csv file containing the keywords. You can generate the file by exporting the keywords from either the CPM server you are currently accessing or from another CPM server. a. ClickImport and then locate the.csvfile containing the keywords. b. ClickOpen.
A message appears, informing you if the import was successful. If a keyword to be imported already exists in the list, it will be skipped. 9. To delete keywords, select the keywords and clickDelete.
10. To export keywords:
Note:
Use the "export" feature to back up the keywords or to import them to another CPM server. All keywords in the keyword list will be exported. It is not possible to export individual keywords.
a. ClickExport.
b. Save the resulting.csvfile to your preferred location. 11. Click Save.
Importing a Keyword List
Use this option if you have a properly-formatted .xmlfile containing the keyword lists. You can generate the file by exporting the keyword lists from either the CPM server you are currently accessing or from another CPM server.
1. Navigate toEndpoint Protection>Configuration>Data Protection>DLP Settings Wizard>Data Identifier Management.
2. Click theKeyword Listtab.
3. ClickImport and then locate the.xmlfile containing the keyword lists. 4. ClickOpen.
A message appears, informing you if the import was successful. If a keyword list to be imported already exists, it will be skipped.
Chapter 3. Data Loss Prevention Templates
This chapter introduces the available predefined templates and details how to create customized templates for use in Data Loss Prevention policies.
v “Data Loss Prevention Templates” v “Predefined DLP Templates” v “Customized DLP Templates”
Data Loss Prevention Templates
A DLP template combines DLP data identifiers and logical operators (And, Or, Except) to form condition statements. Only files or data that satisfy a certain condition statement will be subject to a DLP policy.
For example, a file must be a Microsoft Word file (file attribute) AND must contain certain legal terms (keywords) AND must contain ID numbers (expressions) for it to be subject to the "Employment Contracts" policy. This policy allows Human Resources personnel to transmit the file through printing so that the printed copy can be signed by an employee. Transmission through all other possible channels, such as email, is blocked.
You can create your own templates if you have configured DLP data identifiers. You can also use predefined templates. For details, see “Customized DLP Templates” and “Predefined DLP Templates.”
Note: It is not possible to delete a template that is being used in a DLP policy. Remove the template from the policy before deleting it.
Predefined DLP Templates
CPM comes with the following set of predefined templates that you can use to comply with various regulatory standards. These templates cannot be modified or deleted.
v GLBA: Gramm-Leach-Billey Act
v HIPAA: Health Insurance Portability and Accountability Act v PCI-DSS: Payment Card Industry Data Security Standard v SB-1386: US Senate Bill 1386
v US PII: United States Personally Identifiable Information
For a detailed list on the purposes of all predefined templates, and examples of data being protected, see http://docs.trendmicro.com/en-us/enterprise/data-protection-reference-documents.aspx.
Customized DLP Templates
Create your own templates if you have configured data identifiers. A template combines data identifiers and logical operators (And, Or, Except) to form condition statements.
For more information and examples on how condition statements and logical operators work, see “Condition Statements and Logical Operators” on page 16.
Condition Statements and Logical Operators
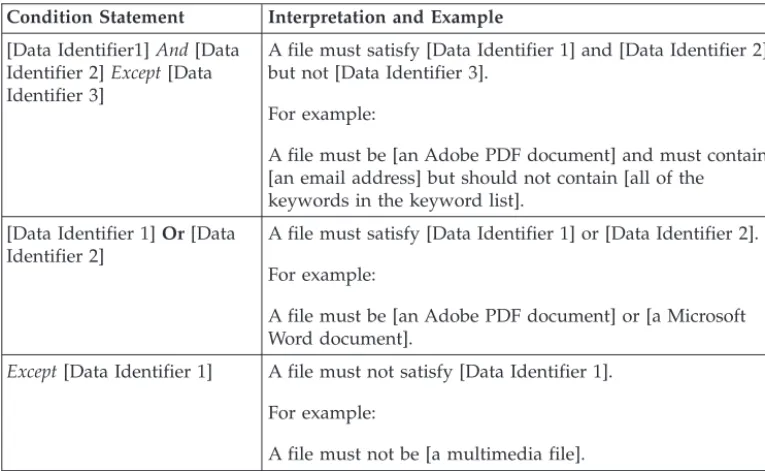
CPM evaluates condition statements from left to right. Use logical operators carefully when configuring condition statements. Incorrect usage leads to an erroneous condition statement that will likely produce unexpected results. See the examples in the following table.
Table 3. Sample Condition Statements
Condition Statement Interpretation and Example [Data Identifier1]And[Data
Identifier 2]Except[Data Identifier 3]
A file must satisfy [Data Identifier 1] and [Data Identifier 2] but not [Data Identifier 3].
For example:
A file must be [an Adobe PDF document] and must contain [an email address] but should not contain [all of the keywords in the keyword list].
[Data Identifier 1]Or[Data Identifier 2]
A file must satisfy [Data Identifier 1] or [Data Identifier 2]. For example:
A file must be [an Adobe PDF document] or [a Microsoft Word document].
Except[Data Identifier 1] A file must not satisfy [Data Identifier 1]. For example:
A file must not be [a multimedia file].
As the last example in the table illustrates, the first data identifier in the condition statement can have the "Except" operator if a file must not satisfy all of the data identifiers in the statement. In most cases, however, the first data identifier does not have an operator.
Creating a Template
1. Navigate toEndpoint Protection>Configurations>Data Protection>DLP Settings Wizard> Template Management.
2. Click Add.
A new screen displays.
3. Type a name for the template. The name must not exceed 64 bytes in length and cannot contain the following characters:
v > < * ^ | & ? \ /
4. Type a description that does not exceed 256 bytes in length. 5. Select data identifiers and then click the "add" icon.
When selecting definitions:
v Select multiple entries by pressing and holding theCTRLkey and then selecting the data identifiers.
v Use the search feature if you have a specific definition in mind. You can type the full or partial name of the data identifier.
v Each template can contain a maximum of 30 data identifiers. 6. To create a new expression, click Expressionsand then clickAdd new
7. To create a new file attribute list, click File attributesand then clickAdd new file attribute. In the screen that appears, configure settings for the file
attribute list.
8. To create a new keyword list, clickKeyword Listsand then clickAdd new keyword. In the screen that appears, configure settings for the keyword list. 9. If you selected an expression, type the number of occurrences, which is the
number of times an expression must occur before CPM subjects it to a DLP policy.
10. Choose a logical operator for each definition.
Note:
Use logical operators carefully when configuring condition statements. Incorrect usage leads to an erroneous condition statement that will likely produce unexpected results. For examples of correct usage, see “Condition Statements and Logical Operators” on page 16.
11. To remove a data identifier from the list of selected identifiers, click the trash bin icon.
12. Below Preview, check the condition statement and make changes if this is not your intended statement.
13. Click Save.
Importing Templates
Use this option if you have a properly-formatted .xmlfile containing the templates. You can generate the file by exporting the templates from either the CPM server you are currently accessing or from another CPM server.
1. Navigate toEndpoint Protection>Configurations>Data Protection>DLP Settings Wizard>Template Management.
2. ClickImport and then locate the.xmlfile containing the templates. 3. ClickOpen.
A message appears, informing you if the import was successful. If a template to be imported already exists, it will be skipped.
Chapter 4. Data Loss Prevention Policies
This chapter explains how to configure and deploy Data Loss Prevention policies on endpoints.
v “Data Loss Prevention Policies” v “DLP Channels”
v “Data Loss Prevention Actions” on page 27
v “Configuring Data Loss Prevention Policies” on page 27
Data Loss Prevention Policies
CPM evaluates a file or data against a set of rules defined in DLP policies. Policies determine files or data that must be protected from unauthorized transmission and the action that CPM performs when it detects transmission.
Note:
Data transmissions between the CPM server and its clients are not monitored. You can configure policies for internal and external clients. CPM administrators typically configure a stricter policy for external clients.
You can enforce specific policies to client groups or individual clients. You can also enforce a single policy to all clients.
After you deploy the policies, clients use the location criteria you have set in the Location Property Wizard (see the Core Protection Module Administrator’s Guide, Chapter 9for more details) to determine their location and the policy to apply. Clients switch policies each time the location changes.
DLP Channels
Users can transmit sensitive information through various channels. CPM can monitor the following channels:
v Network channels: Sensitive information is transmitted using network protocols, such as HTTP and FTP.
v System and application channels: Sensitive information is transmitted using a local computer’s applications and peripherals.
Network Channels
CPM can monitor data transmission through the following network channels: v Email clients v FTP v HTTP and HTTPS v IM Applications v SMB protocol v Webmail
To determine data transmissions to monitor, CPM checks the transmission scope, which you need to configure. Depending on the scope that you selected, CPM will monitor all data transmissions or only transmissions outside the Local Area Network (LAN).
Email Clients
CPM monitors email transmitted through various email clients. CPM checks the email’s subject, body, and attachments for data identifiers. For a list of supported email clients, see:
http://docs.trendmicro.com/en-us/enterprise/data-protection-reference-documents.aspx
Monitoring occurs when a user attempts to send the email. If the email contains data identifiers, CPM will either allow or block the email.
You can define monitored and non-monitored internal email domains.
v Monitored email domains: When CPM detects email transmitted to a monitored domain, it checks the action for the policy. Depending on the action, the
transmission is allowed or blocked.
Note:
If you select email clients as a monitored channel, an email must match a policy for it to be monitored. In contrast, an email sent to monitored email domains is automatically monitored, even if it does not match a policy.
v Non-monitored email domains: CPM immediately allows the transmission of emails sent to non-monitored domains.
Note:
Data transmissions to non-monitored email domains and to monitored email domains where "Monitor" is the action are similar in that the transmission is allowed. The only difference is that for non-monitored email domains, CPM does not log the transmission, whereas for monitored email domains, the transmission is always logged.
Specify domains using any of the following formats, separating multiple domains with commas:
v X400 format, such as /O=Trend/OU=USA, /O=Trend/OU=China v Email domains, such as example.com
For email messages sent through the SMTP protocol, CPM checks if the target SMTP server is on the following lists:
1. Monitored targets 2. Non-monitored targets 3. Monitored email domains 4. Non-monitored email domains
This means that if an email is sent to an SMTP server on the monitored targets list, the email is monitored. If the SMTP server is not on the monitored targets list, CPM checks the other lists.
1. Monitored email domains 2. Non-monitored email domains
FTP
When CPM detects that an FTP client is attempting to upload files to an FTP server, it checks for the presence of data identifiers in the files. No file has been uploaded at this point. Depending on the DLP policy, CPM will allow or block the upload.
When you configure a policy that blocks file uploads, remember the following: v When CPM blocks an upload, some FTP clients will try to re-upload the files. In
this case, CPM terminates the FTP client to prevent the re-upload. Users do not receive a notification after the FTP client terminates. Inform them of this situation when you roll out your DLP policies.
v If a file to be uploaded will overwrite a file on the FTP server, the file on the FTP server may be deleted.
For a list of supported FTP clients, see:
http://docs.trendmicro.com/en-us/enterprise/data-protection-reference-documents.aspx
HTTP and HTTPS
CPM monitors data to be transmitted through HTTP and HTTPS. For HTTPS, CPM checks the data before it is encrypted and transmitted.
For a list of supported web browsers and applications, see:
http://docs.trendmicro.com/en-us/enterprise/data-protection-reference-documents.aspx
IM Applications
CPM monitors messages and files that users send through instant messaging (IM) applications. Messages and files that users receive are not monitored.
For a list of supported IM applications, see:
http://docs.trendmicro.com/en-us/enterprise/data-protection-reference-documents.aspx
When CPM blocks a message or file sent through AOL Instant Messenger, MSN, Windows Messenger, or Windows Live Messenger, it also terminates the
application. If CPM does not do this, the application will become unresponsive and users will be forced to terminate the application anyway. Users do not receive a notification after the application terminates. Inform them of this situation when you roll out your DLP policies.
SMB Protocol
CPM monitors data transmissions through the Server Message Block (SMB) protocol, which facilitates shared file access. When another user attempts to copy or read a user’s shared file, CPM checks if the file is or contains a data identifier and then allows or blocks the operation.
The Device Control action has a higher priority than the DLP action. For example, if Device Control does not allow files on mapped network drives to be moved, transmission of sensitive data does not proceed even if DLP allows it. For details on Device Control actions, see “Permissions for Storage Devices” on page 29. For a list of applications that CPM monitors for shared file access, see: http://docs.trendmicro.com/en-us/enterprise/data-protection-reference-documents.aspx
Webmail
Web-based email services transmit data through HTTP. If CPM detects outgoing data from supported services, it checks the data for the presence of data identifiers. For a list of supported web-based email services, see:
http://docs.trendmicro.com/en-us/enterprise/data-protection-reference-documents.aspx
Transmission Scope and Targets for Network Channels
Transmission scope and targets define data transmissions on network channels that CPM must monitor. For transmissions that should be monitored, CPM checks for the presence of data identifiers before allowing or blocking the transmission. For transmissions that should not be monitored, CPM does not check for the presence of data identifiers and immediately allows the transmission.
Transmission Scope: All Transmissions
CPM monitors data transmitted outside the host computer.
Note:
Trend Micro recommends choosing this scope for external clients.
If you do not want to monitor data transmissions to certain targets outside the host computer, define the following:
v Non-monitored targets: CPM does not monitor data transmitted to these targets.
Note:
Data transmissions to non-monitored targets and to monitored targets where "Monitor" is the action are similar in that the transmission is allowed. The only difference is that for non-monitored targets, CPM does not log the transmission, whereas for monitored targets, the transmission is always logged.
v Monitored targets: These are specific targets within the non-monitored targets that should be monitored. Monitored targets are:
– Optional if you defined non-monitored targets.
– Not configurable if you did not define non-monitored targets.
For example:
The following IP addresses are assigned to your company’s Legal Department: v 10.201.168.1 to 10.201.168.25
You are creating a policy that monitors the transmission of Employment
Certificates to all employees except the Legal Department’s full time staff. To do this, you would select All transmissionsas the transmission scope and then:
Option 1:
1. Add 10.201.168.1-10.201.168.25 to the non-monitored targets.
2. Add the IP addresses of the Legal Department’s part-time staff to the monitored targets. Assume that there are 3 IP addresses, 10.201.168.21-10.201.168.23.
Option 2:
Add the IP addresses of the Legal Department’s full time staff to the non-monitored targets:
v 10.201.168.1-10.201.168.20 v 10.201.168.24-10.201.168.25
For guidelines on defining monitored and non-monitored targets, see “Defining Monitored and Non-monitored Targets.”
Transmission Scope: Only Transmissions Outside the Local Area
Network
CPM monitors data transmitted to any target outside the Local Area Network (LAN).
Note:
Trend Micro recommends choosing this scope for internal clients.
"Network" refers to the company or local network. This includes the current network (IP address of the endpoint and netmask) and the following standard private IP addresses:
v Class A: 10.0.0.0 to 10.255.255.255 v Class B: 172.16.0.0 to 172.31.255.255 v Class C: 192.168.0.0 to 192.168.255.255
If you select this transmission scope, you can define the following:
v Non-monitored targets: Define targets outside the LAN that you consider safe and therefore should not be monitored.
Note:
Data transmissions to non-monitored targets and to monitored targets where "Monitor" is the action are similar in that the transmission is allowed. The only difference is that for non-monitored targets, CPM does not log the transmission, whereas for monitored targets, the transmission is always logged.
v Monitored targets: Define targets within the LAN that you want to monitor. For guidelines on defining monitored and non-monitored targets, see “Defining Monitored and Non-monitored Targets.”
Defining Monitored and Non-monitored Targets
Follow these guidelines when defining monitored and non-monitored targets: 1. Define each target by:
v IP address or address range v Host name
v FQDN
v Network address and subnet mask, such as 10.1.1.1/32
Note:
For the subnet mask, CPM only supports a classless inter-domain routing (CIDR) type port. That means that you can only type a number like 32 instead of 255.255.255.0.
2. To target specific channels, include the default or company-defined port numbers for those channels. For example, port 21 is typically for FTP traffic, port 80 for HTTP, and port 443 for HTTPS. Use a colon to separate the target from the port numbers.
3. You can also include port ranges. To include all ports, ignore the port range. Below are some examples of targets with port numbers and port ranges: v 10.1.1.1:80
v host:5-20
v host.domain.com:20 v 10.1.1.1/32:20
4. Separate targets with commas.
Resolving Conflicts
If settings for transmission scope, monitored targets, and non-monitored targets conflict, CPM recognizes the following priorities, in order of highest priority to lowest:
v Monitored targets v Non-monitored targets v Transmission scope
System and Application Channels
CPM can monitor the following system and application channels: v Data recorders (CD/DVD)
v Peer-to-peer applications v Printer
v Removable storage
v Synchronization software (ActiveSync) v Windows clipboard
Data Recorders (CD/DVD)
CPM monitors data recorded to a CD or DVD. For a list of supported data recording devices and software, see:
http://docs.trendmicro.com/en-us/enterprise/data-protection-reference-documents.aspx
When CPM detects a "burn" command initiated on any of the supported devices or software and the action is Pass, data recording proceeds. If the action is Block, CPM checks if any of the files to be recorded is or contains a data identifier. If CPM detects at least one data identifier, all files—including those that are not, or
do not contain, data identifiers—will not be recorded. CPM may also prevent the CD or DVD from ejecting. If this issue occurs, instruct users to restart the software process or reset the device.
CPM implements additional CD/DVD recording rules:
v To reduce false positives, CPM does not monitor the following files:
.bud .dll .gif .gpd .htm .ico .ini
.jpg .lnk .sys .ttf .url .xml
v Two file types used by Roxio data recorders (*.pngand *.skn) are not monitored to increase performance.
v CPM does not monitor files in the following directories:
*:\autoexec.bat *:\Windows
..\Application Data ..\Cookies
..\Local Settings ..\ProgramData
..\Program Files ..\Users\*\AppData
..\WINNT
v ISO images created by the devices and software are not monitored.
Peer-to-Peer Applications
CPM monitors files that users share through peer-to-peer applications. For a list of supported peer-to-peer applications, see:
http://docs.trendmicro.com/en-us/enterprise/data-protection-reference-documents.aspx
Printer
CPM monitors printer operations initiated from various applications.
CPM does not block printer operations on new files that have not been saved because printing information has only been stored in the memory at this point. For a list of supported applications that can initiate printer operations, see: http://docs.trendmicro.com/en-us/enterprise/data-protection-reference-documents.aspx
Removable Storage
CPM monitors data transmissions to or within removable storage devices. Activities related to data transmission include:
v Creation of a file within the device
v Copying of a file from the host machine to the device v Closing of a modified file within the device
v Modifying of file information (such as the file’s extension) within the device
When a file to be transmitted contains a data identifier, CPM either blocks or allows the transmission.
The Device Control action has a higher priority than the DLP action. For example, If Device Control does not allow copying of files to a removable storage device, transmission of sensitive information does not proceed even if DLP allows it. For details on Device Control actions, see “Permissions for Storage Devices” on page 29.
For a list of supported removable storage devices and applications that facilitate data transmission activities, see:
http://docs.trendmicro.com/en-us/enterprise/data-protection-reference-documents.aspx
The handling of file transmission to a removable storage device is a
straightforward process. For example, a user who creates a file from Microsoft Word may want to save the file to an SD card (it does not matter which file type the user saves the file as). If the file contains a data identifier that should not be transmitted, CPM prevents the file from being saved.
For file transmission within the device, CPM first backs up the file (if its size is 75MB or less) to%WINDIR%\system32\dgagent\tempbefore processing it. CPM removes the backup file if it allowed the file transmission. If CPM blocked the transmission, it is possible that the file may have been deleted in the process. In this case, CPM will copy the backup file to the folder containing the original file. CPM allows you to define non-monitored devices. CPM always allows data transmissions to or within these devices. Identify devices by their vendors and optionally provide the device models and serial IDs.
Synchronization Software (ActiveSync)
CPM monitors data transmitted to a mobile device through synchronization software.
For a list of supported synchronization software, see:
http://docs.trendmicro.com/en-us/enterprise/data-protection-reference-documents.aspx
If the data has a source IP address of 127.0.0.1 and is sent through either port 990 or 5678 (the ports used for synchronization), CPM checks if the data is a data identifier before allowing or blocking its transmission.
When CPM blocks a file transmitted on port 990, a file of the same name
containing malformed characters may still be created at the destination folder on the mobile device. This is because parts of the file have been copied to the device before CPM blocked the transmission.
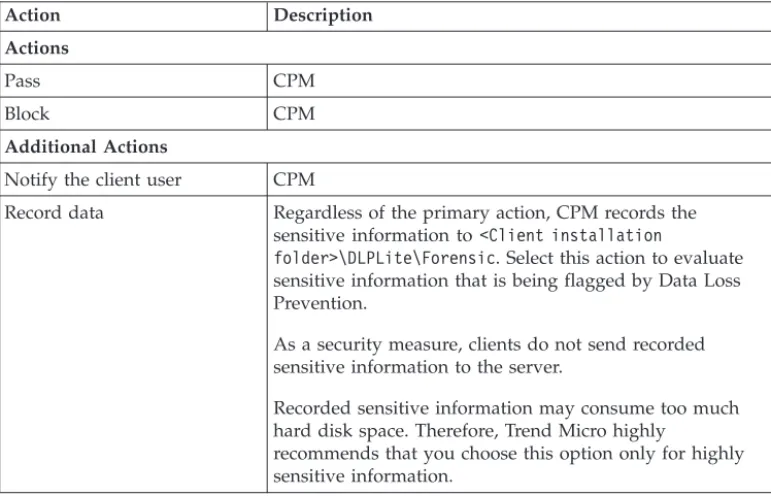
Data Loss Prevention Actions
When CPM detects the transmission of data identifiers, it checks the DLP policy for the detected data identifiers and performs the action configured for the policy. The following table lists the Data Loss Prevention actions.
Table 4. Data Loss Prevention Actions
Action Description
Actions
Pass CPM
Block CPM
Additional Actions
Notify the client user CPM
Record data Regardless of the primary action, CPM records the sensitive information to<Client installation
folder>\DLPLite\Forensic. Select this action to evaluate sensitive information that is being flagged by Data Loss Prevention.
As a security measure, clients do not send recorded sensitive information to the server.
Recorded sensitive information may consume too much hard disk space. Therefore, Trend Micro highly
recommends that you choose this option only for highly sensitive information.
Decompression Rules
Files contained in compressed files can be scanned for sensitive information. To determine the files to scan, CPM subjects a compressed file to the following rules: v Total number of embedded layers in compressed file exceeds __ (1-20)
v Total number of files in compressed file exceeds __ (1-2000)
Configuring Data Loss Prevention Policies
You can start to create Data Loss Prevention policies after you have configured data identifiers and organized them in templates.
In addition to data identifiers and templates, you need to configure channels and actions when creating a policy.
Note:
When upgrading from 10.6, re-create and deploy pre-configured DLP tasks to clients. Policies that require redeployment appear in an informational banner at the top of the screen. ClickCreateto begin the redeployment.
1. Navigate toEndpoint Protection>Core Protection Module>Configuration
>Data Protection >DLP Settings Wizard>Policy Management. 2. Click Add. A new screen appears.
3. Type a name for the template. The name must not exceed 64 bytes in length and cannot contain the following characters: > < * ^ | & ? \ /
4. Search for and select an available template. Click Add >to include the template to the policy.
5. Select the network channels to monitor. For more information on network channels, see “Network Channels” on page 19.
v ClickExceptionsnext to Email clients to configureNon-monitored Email
Domains.
v Configure the Transmission Scope to includeOnly transmissions outside
the Local Area Networkto improve scan performance.
v Expand the Exceptions section to configure specificNon-monitored Targets. Identify non-monitored endpoints by IP address, host name, FQDN, or network address and subnet mask.
6. Select the system and application channels to monitor. For more information on system and application channels, see “System and Application Channels” on page 24.
v ClickExceptionsnext to Removable storage to configureNon-monitored
Devices. Add non-monitored removable storage devices, identifying them by their vendors. The device model and serial ID are optional.
7. Select the action that CPM takes upon identifying a policy violation. For more information on the available actions, see “Data Loss Prevention Actions” on page 27.
8. Modify the default Decompression Settings as necessary. For more information on decompression settings, see “Decompression Rules” on page 27.
9. Click Create Fixlet and Save.
10. Type your Private Key Password and clickOK.
11. Below Actions, click the hyperlink to open the Take Action window. 12. In the Target tab, click All computers with the property values selected in
the tree belowand then choose a property that will include all the computers you want to deploy this Action to.
13. When finished identifying the computers you want to include in the
exception, clickOK. At the prompt, type your private key password and click
OK.
14. The Action | Summary window that opens, monitor the "Status" of the Action to confirm that it is "Running" and then "Completed".
Chapter 5. Device Control
This chapter outlines the Device Control permission types and how to manage endpoint access to external devices.
v “Permissions for Storage Devices”
v “Advanced Permissions for Storage Devices” on page 30 v “Managing Access to External Devices” on page 32
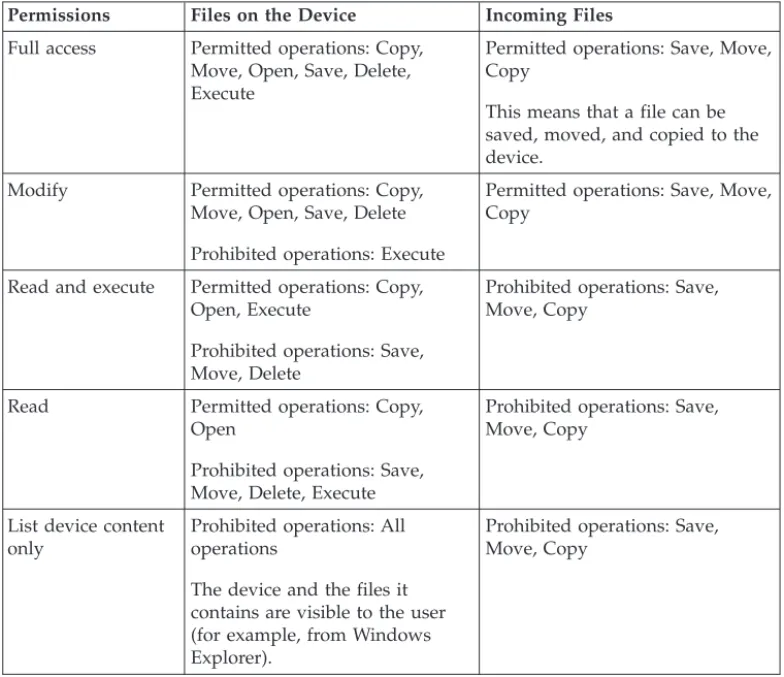
Permissions for Storage Devices
Device Control permissions for storage devices are used when you:
v Allow access to USB storage devices, CD/DVD, floppy disks, and network drives. You can grant full access to these devices or limit the level of access. v Configure the list of approved USB storage devices. Device Control allows you
to block access to all USB storage devices, except those that have been added to the list of approved devices. You can grant full access to the approved devices or limit the level of access.
The following table lists the permissions for storage devices.
Table 5. Device Control Permissions for Storage Devices
Permissions Files on the Device Incoming Files Full access Permitted operations: Copy,
Move, Open, Save, Delete, Execute
Permitted operations: Save, Move, Copy
This means that a file can be saved, moved, and copied to the device.
Modify Permitted operations: Copy, Move, Open, Save, Delete Prohibited operations: Execute
Permitted operations: Save, Move, Copy
Read and execute Permitted operations: Copy, Open, Execute
Prohibited operations: Save, Move, Delete
Prohibited operations: Save, Move, Copy
Read Permitted operations: Copy, Open
Prohibited operations: Save, Move, Delete, Execute
Prohibited operations: Save, Move, Copy
List device content only
Prohibited operations: All operations
The device and the files it contains are visible to the user (for example, from Windows Explorer).
Prohibited operations: Save, Move, Copy
Table 5. Device Control Permissions for Storage Devices (continued)
Permissions Files on the Device Incoming Files Allow Permitted operations: Copy,
Move, Open, Save, Delete, Execute
Permitted operations: Save, Move, Copy
This means that a file can be saved, moved, and copied to the device.
Block Prohibited operations: All operations
The device and the files it contains are not visible to the user (for example, from Windows Explorer).
Prohibited operations: Save, Move, Copy
The file-based scanning function in CPM complements and may override the device permissions. For example, if the permission allows a file to be opened but CPM detects that the file is infected with malware, a specific scan action will be performed on the file to eliminate the malware. If the scan action is Clean, the file opens after it is cleaned. However, if the scan action is Delete, the file is deleted.
Tip:
Device Control for Data Protection supports all 64-bit platforms. For Unauthorized Change Prevention monitoring on systems that CPM does not support (for details, see the System Requirements at http://docs.trendmicro.com/en-us/enterprise/ core-protection-module.aspx), set the device permission toBlockto limit access to these devices.
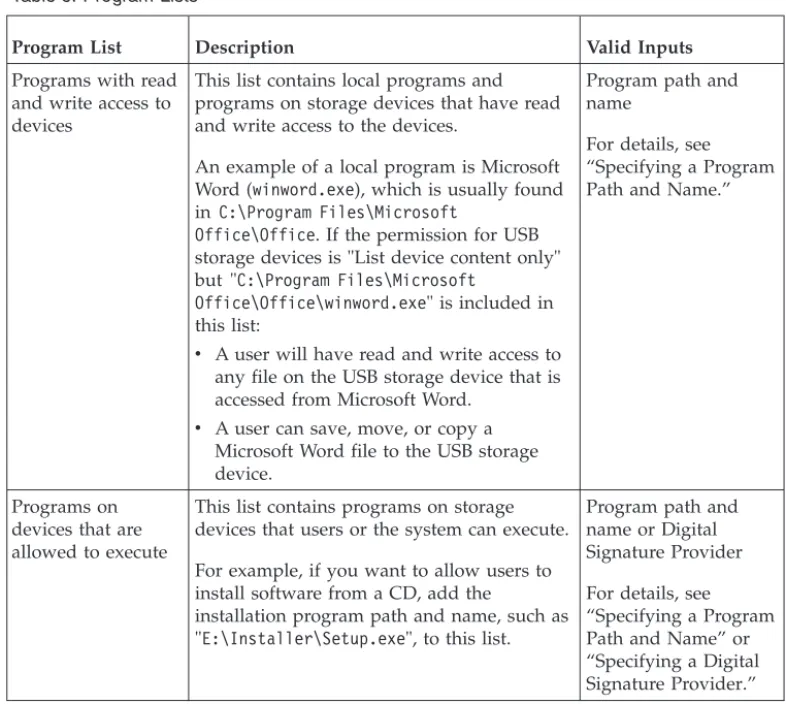
Advanced Permissions for Storage Devices
Advanced permissions apply when you grant limited permissions to storage devices. The permission can be any of the following:
v Modify
v Read and execute v Read
v List device content only
You can keep the permissions limited but grant advanced permissions to certain programs on the storage devices and on the local computer.
Table 6. Program Lists
Program List Description Valid Inputs
Programs with read and write access to devices
This list contains local programs and programs on storage devices that have read and write access to the devices.
An example of a local program is Microsoft Word (winword.exe), which is usually found in C:\Program Files\Microsoft
Office\Office. If the permission for USB storage devices is "List device content only" but "C:\Program Files\Microsoft
Office\Office\winword.exe" is included in this list:
v A user will have read and write access to
any file on the USB storage device that is accessed from Microsoft Word.
v A user can save, move, or copy a
Microsoft Word file to the USB storage device.
Program path and name
For details, see “Specifying a Program Path and Name.”
Programs on devices that are allowed to execute
This list contains programs on storage devices that users or the system can execute. For example, if you want to allow users to install software from a CD, add the
installation program path and name, such as "E:\Installer\Setup.exe", to this list.
Program path and name or Digital Signature Provider For details, see “Specifying a Program Path and Name” or “Specifying a Digital Signature Provider.”
There are instances when you need to add a program to both lists. Consider the data lock feature in a USB storage device, which, if enabled, prompts users for a valid user name and password before the device can be unlocked. The data lock feature uses a program on the device called "Password.exe", which must be
allowed to execute so that users can unlock the device successfully. "Password.exe" must also have read and write access to the device so that users can change the user name or password.
Each program list on the user interface can contain up to 200 programs.
Specifying a Digital Signature Provider
Specify a Digital Signature Provider if you trust programs issued by the provider. For example, type Microsoft Corporation or Trend Micro, Inc. You can obtain the Digital Signature Provider by checking the properties of a program (for example, by right-clicking the program and selecting Properties).
Specifying a Program Path and Name
A program path and name should have a maximum of 259 characters and must only contain alphanumeric characters (A-Z, a-z, 0-9). It is not possible to specify only the program name.
You can use wildcards in place of drive letters and program names. Use a question mark (?) to represent single-character data, such as a drive letter. Use an asterisk (*) to represent multi-character data, such as a program name.
Note:
Wildcards cannot be used to represent folder names. The exact name of a folder must be specified.
Permissions for Non-storage Devices
You can allow or block access to non-storage devices. There are no granular or advanced permissions for these devices.
Managing Access to External Devices
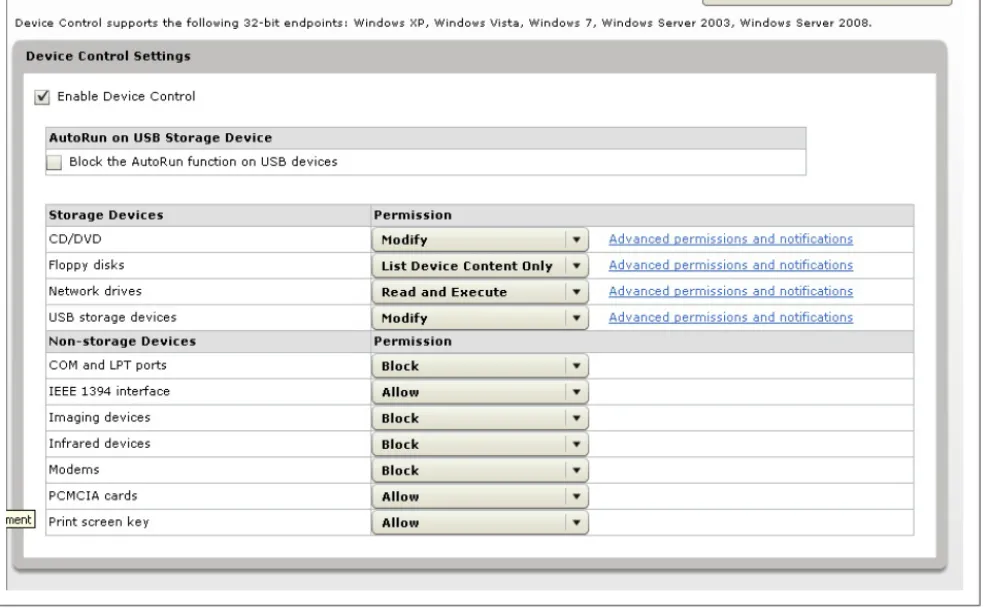
1. Navigate toEndpoint Protection>Core Protection Module>Configuration
> Device Control>Device Control Settings. 2. Select Enable Device Control.
3. Choose to allow or block the AutoRun function (autorun.inf) on USB storage devices.
4. Configure settings for storage devices.
a. Select a permission for each storage device. For details about permissions, see “Permissions for Storage Devices” on page 29.
b. If the permission for USB storage devices isBlock, configure a list of approved devices. Users can access these devices and you can control the level of access using permissions. See “Configuring an Approved List of USB Devices.”
5. For each non-storage device, select AlloworBlock. 6. Click Create a Task to deploy the settings.
7. Click OK. At the prompt, type your private key password and clickOK. 8. Below Actions, click the hyperlink to open the Take Action window.
9. In the Target tab, click Specific computers selected in the list belowand then choose the computers you want to deploy this Action to.
10. When finished identifying the computers you want to include in the
exception, clickOK. At the prompt, type your private key password and click
OK.
11. The Action | Summary window that opens, monitor the "Status" of the Action to confirm that it is "Running" and then "Completed".
Configuring an Approved List of USB Devices
1. ClickApproved devices. 2. ClickAdd new devices. 3. Type the device vendor.
4. Type the device model and serial ID.
5. Select the permission for the device. For details about permissions, see “Permissions for Storage Devices” on page 29.
6. To add more devices, click the+icon. 7. ClickOK.
Use the Device List Tool to query devices connected to endpoints. The tool provides the device vendor, model, and serial ID for each device. For details, see http://docs.trendmicro.com/en-us/enterprise/core-protection-module.aspx.