Owner’s Manual
Important Before using this product:
• Read this manual
• Comply with all safety and operating instructions • Ensure all parts and correct quantities are included Any parts damaged during shipment must be reported within 15 days of receipt. To report information regard-ing missregard-ing parts or damage, to purchase parts or accessories, or if you have any questions, please contact us.
Thank you for purchasing Spectrum products! Spectrum Industries, Inc
925 First Avenue, Chippewa Falls, WI 54729 USA 800 235 1262
Doctorate Interactive Lectern
™
55245 with CC800 worksurface cutout55244 without worksurface cutout 55353 with Overbridge Control Console™
Doctorate Lectern with CC800 cutout 55245TW
Doctorate Lectern without worksurface cutout 55244TW
Doctorate Lectern
with Overbridge Control Console™ 55353TW
Hardware Package Contents
Assembly / Setup
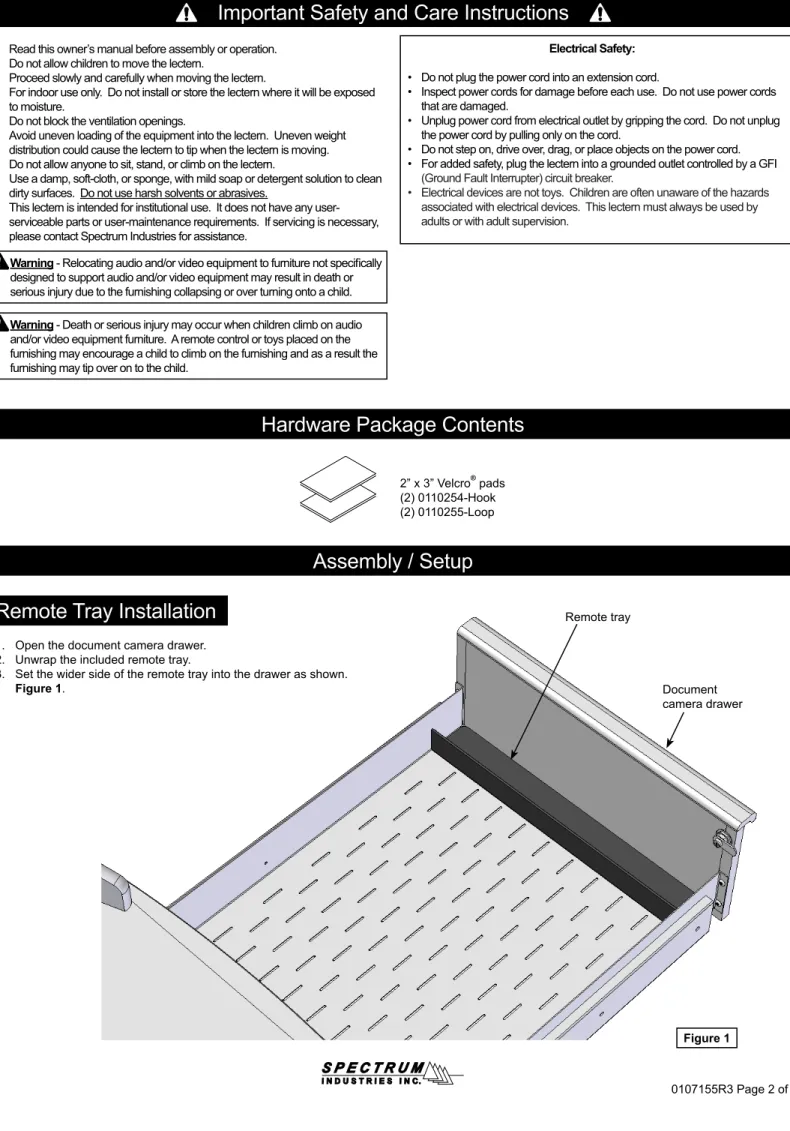
Remote Tray Installation
1. Open the document camera drawer. 2. Unwrap the included remote tray.
3. Set the wider side of the remote tray into the drawer as shown. Figure 1. Figure 1 Remote tray Document camera drawer 2” x 3” Velcro® pads (2) 0110254-Hook (2) 0110255-Loop • Read this owner’s manual before assembly or operation.
• Do not allow children to move the lectern.
• Proceed slowly and carefully when moving the lectern.
• For indoor use only. Do not install or store the lectern where it will be exposed to moisture.
• Do not block the ventilation openings.
• Avoid uneven loading of the equipment into the lectern. Uneven weight distribution could cause the lectern to tip when the lectern is moving. • Do not allow anyone to sit, stand, or climb on the lectern.
• Use a damp, soft-cloth, or sponge, with mild soap or detergent solution to clean dirty surfaces. Do not use harsh solvents or abrasives.
• This lectern is intended for institutional use. It does not have any user-serviceable parts or user-maintenance requirements. If servicing is necessary, please contact Spectrum Industries for assistance.
Electrical Safety: • Do not plug the power cord into an extension cord.
• Inspect power cords for damage before each use. Do not use power cords that are damaged.
• Unplug power cord from electrical outlet by gripping the cord. Do not unplug the power cord by pulling only on the cord.
• Do not step on, drive over, drag, or place objects on the power cord. • For added safety, plug the lectern into a grounded outlet controlled by a GFI
(Ground Fault Interrupter) circuit breaker.
• Electrical devices are not toys. Children are often unaware of the hazards associated with electrical devices. This lectern must always be used by adults or with adult supervision.
Warning - Relocating audio and/or video equipment to furniture not specifi cally designed to support audio and/or video equipment may result in death or serious injury due to the furnishing collapsing or over turning onto a child. Warning - Death or serious injury may occur when children climb on audio and/or video equipment furniture. A remote control or toys placed on the furnishing may encourage a child to climb on the furnishing and as a result the furnishing may tip over on to the child.
Worksurface device installation -
lecterns with worksurface cutout only
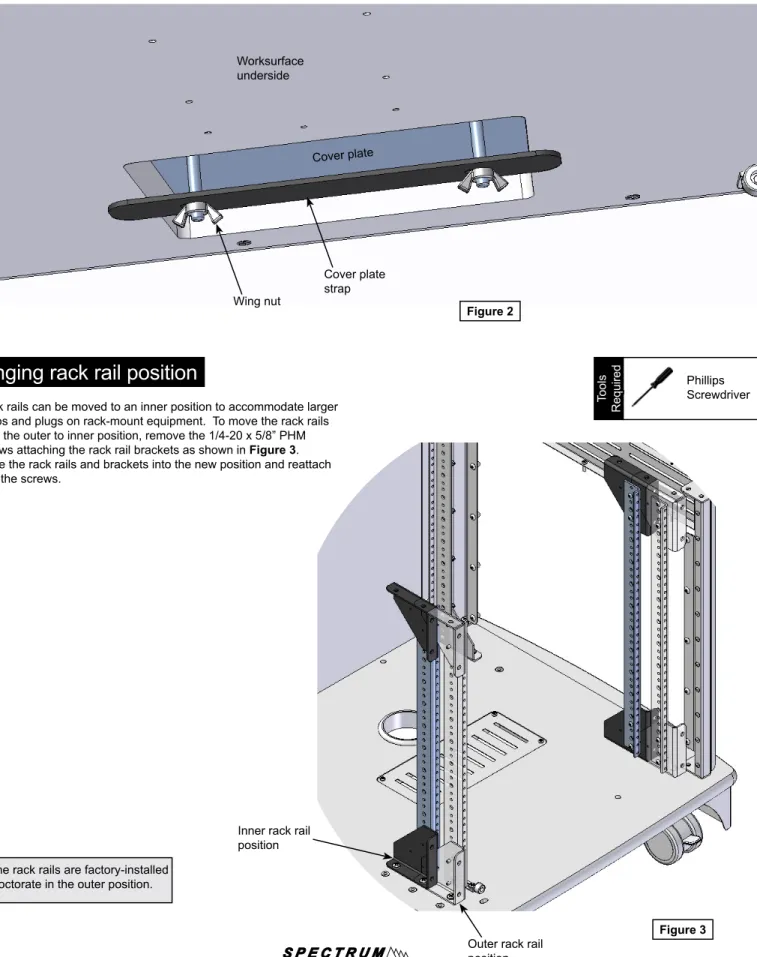
1. To install a worksurface device, the included cover plate will need to be removed from the worksurface. 2. From under the worksurface, remove the wing nuts and cover plate strap. Figure 2.
3. Lift off the cover plate, then refer to the device instructions for the remaining installation and setup.
Figure 2 Cover plate strap Wing nut Cover plate Worksurface underside
Changing rack rail position
1. Rack rails can be moved to an inner position to accommodate larger knobs and plugs on rack-mount equipment. To move the rack rails from the outer to inner position, remove the 1/4-20 x 5/8” PHM screws attaching the rack rail brackets as shown in Figure 3. 2. Move the rack rails and brackets into the new position and reattach
with the screws.
Note: The rack rails are factory-installed in the Doctorate in the outer position.
Phillips Screwdriver
Tools
Required
Figure 3 Inner rack rail
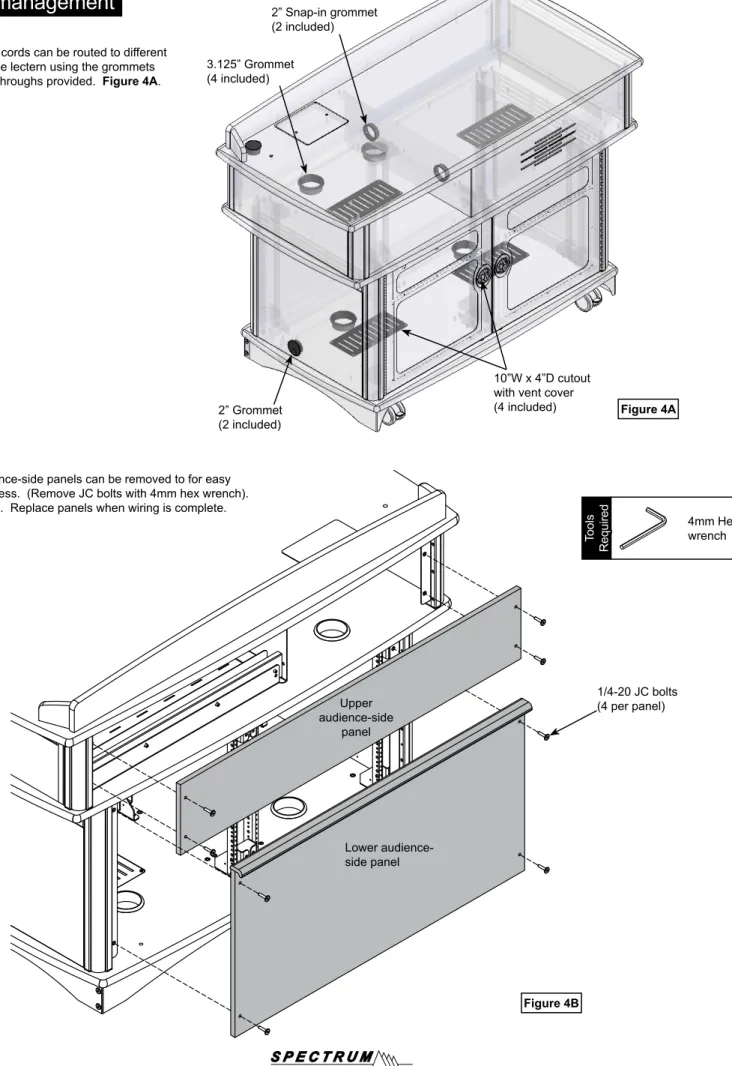
2” Snap-in grommet (2 included)
10”W x 4”D cutout with vent cover (4 included) 2” Grommet (2 included) 3.125” Grommet (4 included)
Cord management
Figure 4A Tools Required 4mm Hex wrench Figure 4B Lower audience-side panel Upper audience-side panel 1/4-20 JC bolts (4 per panel) The audience-side panels can be removed to for easywiring access. (Remove JC bolts with 4mm hex wrench). Figure 4B. Replace panels when wiring is complete. Wires and cords can be routed to different
areas of the lectern using the grommets and pass-throughs provided. Figure 4A.
Overbridge insert panel (overbridge lecterns only)
1. To remove the insert panel, remove the (2) 1/4-20 x 35mm JC bolts with a 4mm hex wrench and lift out the panel. Figure 5A.
2. To make cutouts in insert panel (optional):
3. Install controller(s) / electronics into panel.
4. Re-install the overbridge panel and secure with (2) 1/4-20 x 35mm JC bolts. Note: The insert panel shown (shaded) is not included with the lectern or over-bridge. This option needs to be ordered separately to complete the overover-bridge.
Figure 5A 1/4-20 x 35mm JC bolt Overbridge panel Tools Required 1/4-20 x 35mm JC bolt
A. Identify all location(s) and sizes for controller(s) or electronics while making sure all devices fit within the maximum cutout space available in the overbridge panel. See Figure 5B-C.
B. Locate and mark the exact cutout area(s) on the panel. Note: Using masking tape on cut lines will minimize laminate chipping while cutting.
C. Carefully make the cutout(s) in the overbridge panel using a jigsaw or router. 4mm Hex wrench
Jigsaw or Router Drill Pencil Masking tape Drill bit Measuring device
Note: The insert panel shown (shaded) is not in-cluded with the lectern or overbridge. This option needs to be ordered separately to complete the overbridge. This insert panel is horizontally sym-metrical and can be easily removed, rotated, and re-installed if a cutout needs to be relocated to the opposite side of the overbridge.
Note: The Overbridge Control Console™
has been designed for many of the currently available con-trollers on the market, however, modified cutouts should be reviewed by Spectrum to ensure clear-ance of brackets, keyboard slides, or other objects under the worksurface.
Doctorate overbridge panel blank (flat view)
overbridge section view 2” grommet recommended cutout area 2” grommet recommended cutout area Figure 5B Figure 5C
brake lever
Caster operation
1. To lock the caster rotation, press the brake lever. Figure 6. 2. To resume rotation, lift up on the brake lever.
Floor anchoring (toe kick versions only)
1. If your Doctorate Lectern is equipped with a toe kick, and you wish to attach it to the floor, the toe-kick will need to be detached from the lectern. To detach, remove the (4) 1/4-20 x 35mm JC bolts (one on each corner) from inside the lectern. Figure 7. (Save these fasteners).
2. Carefully lift the lectern off the toe kick and set aside. This will require several people.
3. Determine and locate the toe kick into its final position on the floor and mark the (4) mounting hole locations on the floor. (The toe kick mounting holes are 1/2” dia.) 4. Drill suitable holes into the floor and anchor the toe kick with appropriate fasteners. 5. Carefully lift the lectern back onto the toe kick and align the (4) mounting holes. 6. Re-attach the lectern to the toe kick with the previously removed JC bolts. 7. The access panel can be removed to access wiring below lectern.
Figure 7 Note: (4) fasteners are required to anchor
the toe kick to the floor. Due to the wide variety of flooring materials and conditions possible, anchor fasteners are not provided.
(4) 1/2” mounting holes for floor anchors 1/4-20 x 40mm JC bolt (access from inside lectern) 4 required access panel toe kick Tools Required 4mm Hex wrench Drill Figure 6
Moving and parking the lectern
• Before moving, unplug and secure all power cords. • Close and lock doors.• Remove any items from the top of the worksurface. • Unlock the casters.
• Push slowly and carefully. Do not move over uneven or irregular surfaces. • Do not allow children to move.
• Lock the casters after moving.
• Do not park unit in areas of heavy traffic.
• Do not run power cords across hallways, classrooms, or other areas where they will be walked on.
• Do not leave unit unattended in areas where children have access. • Keep doors closed and locked whenever unit is unattended or parked. • Keep casters locked whenever the lectern is unattended.
Accessories
Keyboard Drawer with flip-down front
18.75”W x 16”D x 3.8125”H (interior height) (max 1 per unit-keyed same as drawer and
front door) 55247
Overbridge Insert Panel
for overbridge version only-contact Spectrum to specify cutout size(s) and location(s)-overbridge not available separately
(includes two 2” grommets with covers) 96507 - blank panel
96507mod - panel with cutout(s) Adjustable Econo Keyboard Tray
18.375”W (max 1 per unit) 95520 - standard lectern (17.75”D)
95531 - overbridge lectern (12”D) Note: 95531 comes with a shorter 12”D keyboard slide and should be specified for overbridge version lecterns.
Note: Lectern will accommodate (one) keyboard tray or (one) keyboard drawer.
Custom-cut logo panel (audience-side)
50.25”W x 9”H 55248
YOUR LOGO HERE
Retractable Cord Reel
15’ [457.2 cm] retractable, 12 AWG, with breaker, (mounts horizontally inside lectern to base
panel) 10 lbs [.45 kg] 99029
Note: When installed, the optional cord reel takes up 3RU from the bottom of the rack rail.
The cord reel is intended to provide temporary access to electrical outlets for Spectrum mobile lecterns. Check local electrical codes prior to installation.
See spectrumfurniture.com for the latest available flat panel monitor arms, and rack-mount accessories.
WE WILL MAKE IT RIGHT FOR YOU!
Spectrum is committed to provide complete customer satisfaction. Each of our products is manufactured from the best materials available and each product is stringently monitored throughout the production process through our P.A.C.E. program (Product Assurance to meet Customer Expectations). We expressly warrant that Spectrum products will be of good quality and workmanship and free from defect for the period set out in the warranty table below from the date of delivery. This warranty shall not apply to defects or damage resulting from misuse, abuse, neglect, improper care, modifi cation or repair not authorized by Spectrum, or any other cause outside the control of Spectrum. Spectrum will, at its sole option, either repair or replace the defective product. This warranty is exclusive; no other warranty, written or oral, is expressed or implied. This warranty is given by Spectrum to Buyer and to no other per-son or legal entity. No Spectrum dealer, distributor, agent or employee is authorized to make any modifi cation or addition to this warranty.
NOTWITHSTANDING ANYTHING TO THE CONTRARY, SPECTRUM WILL NOT UNDER ANY CIRCUMSTANCES BE LIABLE FOR INDIRECT OR LIQUI-DATED DAMAGES, INCLUDING CONSEQUENTIAL, INCIDENTAL AND SPECIAL DAMAGES. IN NO EVENT SHALL SPECTRUM’S LIABILITY, WHETHER UNDER CONTRACT OR WARRANTY, IN TORT OR OTHERWISE, EXCEED THE PURCHASE PRICE RECEIVED BY SPECTRUM FOR THE PRODUCT AT ISSUE AND “RECALL ACTION” EXPENSES. SPECTRUM SHALL NOT BE SUBJECT TO ANY OTHER OBLIGATIONS OR LIABILITIES, WHETHER ARIS-ING OUT OF BREACH OF CONTRACT, WARRANTY, TORT (INCLUDARIS-ING NEGLIGENCE AND STRICT LIABILITY) OR OTHER THEORIES OF LAW, WITH RESPECT TO PRODUCTS SOLD OR SERVICES RENDERED BY SPECTRUM, OR ANY UNDERTAKINGS, ACTS OR OMISSIONS RELATING THERETO. Our Customer Service Department is ready to provide immediate attention to any questions, comments or concerns. They are available to answer your calls Monday through Friday from 7 am to 5 pm CST. In addition your product comments or concerns are welcome via e-mail at: [email protected].
Item Warranty Period
Adjustable Crank / Electric Desk Legs
• 1 Year Flat Panel Desk Gas Cylinders
Chairs
• Adjustable Height Chair Parts – including frames, gas cylinders, wood and plastic parts, control handles, casters • Adjustable Height Chair Upholstery
• In-Stock Upholstery
• Graded-In Fabrics and Customer Owned Material
• 7 Years • 2 Years • 2 Years • No Warranty Height Adjustable Columns and Lifts
• 1 Year General Use Casters
Electrical (including timers and LINAK actuators) • 2 Years
Keyboard / Mouse Trays • 1 Year
Flat Panel Monitor Arms
• Flat Panel Monitor Arm – General Parts
• Flat Panel Monitor Arm – Gas Cylinders • 5 Years• 2 Years Desks and Lecterns
• Computer Desk Chassis • Cart Chassis
• Lectern Chassis
• 10 Years Warranty Table effective 1/1/2015