Understanding API Security
With chapter selections by Justin Richer
and Antonio Sanso
Manning Author Picks
Copyright 2016 Manning Publications
For online information and ordering of these and other Manning books, please visit
www.manning.com. The publisher offers discounts on these books when ordered in quantity.
For more information, please contact
Special Sales Department Manning Publications Co. 20 Baldwin Road
PO Box 761
Shelter Island, NY 11964 Email: [email protected]
©2016 by Manning Publications Co. All rights reserved.
No part of this publication may be reproduced, stored in a retrieval system, or transmitted, in any form or by means electronic, mechanical, photocopying, or otherwise, without prior written permission of the publisher.
Many of the designations used by manufacturers and sellers to distinguish their products are claimed as trademarks. Where those designations appear in the book, and Manning
Publications was aware of a trademark claim, the designations have been printed in initial caps or all caps.
Recognizing the importance of preserving what has been written, it is Manning’s policy to have the books we publish printed on acid-free paper, and we exert our best efforts to that end. Recognizing also our responsibility to conserve the resources of our planet, Manning books are printed on paper that is at least 15 percent recycled and processed without the use of elemental chlorine.
Manning Publications Co. 20 Baldwin Road Technical PO Box 761
Shelter Island, NY 11964
Cover designer: Leslie Haimes
ISBN 9781617294327
iii
contents
Introduction vT
HE
OA
UTH
D
ANCE
1
The OAuth Dance
Chapter 2
from OAuth 2 in Action by Justin Richer and Antonio Sanso 2
W
ORKING
WITH
W
EB
API
S
22
Working with web APIs
Chapter 2
from Irresistible APIs: Designing web APIs
that developers will love by Kirsten K. Hunter 23
C
OMMUNICATING
WITH
THE
S
ERVER
47
Communicating with the server
Chapter 7
from SPA Design and Architecture: Understanding
single-page web applications by Emmit A. Scott, Jr. 48
S
HARING
AND
S
ECURING
W
EB
T
HINGS
79
Share: Securing and sharing web Things
Chapter 9
from Building the Web of Things
by Dominique D. Guinard and Vlad M. Trifa 80
W
HAT
I
S
A
MAZON
W
EB
S
ERVICES
? 112
What is Amazon Web Services?
CONTENTS
iv
I
MPLEMENTING
S
ECURITY
AS
A
S
ERVICE
145
Implementing security as a service
Chapter 8
from SOA Security by Ramarao Kanneganti
and Prasad A. Chodavarapu 146
v
introduction
We live in a programmable world. Every day new and inventive services come online, allowing us to connect our lives together like never before. Gone are the days when it was acceptable for a piece of software to live in its own little silo, disconnected from the outside world. Today, services are expected to be available for programming, mix-ing, and building into new applications.The web-based Application Programming Interface, or API, is the means by which services make themselves available in this dynamic world. By exposing an API, a service can find new life and utility far beyond what its core functionality was designed for.
But it’s not enough to just expose an API: these APIs need to be secured and pro-tected in order to be truly useful. An API that’s simply left open to everyone, with no security controls, cannot be used to protect personalized or sensitive information, which severely limits its desirability. There have been many approaches to this over the years, with many proprietary and bolted-on solutions having come and gone. The OAuth delegation and authorization protocol is one of the most popular standards for this today, replacing many of these hacks with a standard technology.
O
Auth 2.0 is a delegation and authorization security protocol. Unlike many other protocols, which are an end to themselves, the OAuth 2.0 protocol is always used in conjunction with some other technology. OAuth 2.0 provides the means to secure an API, but it does not provide the API itself. This chapter, The OAuth Dance, introduces the OAuth 2.0 protocol, showcasing the authorization code flow used in many web applications today.2
Chapter 2 from
OAuth 2 in Action
by Justin
Richer and Antonio Sanso
The OAuth Dance
By now you have a decent overview of what the OAuth 2.0 protocol is and why it is important. You also likely have an idea of how and where you might want to use the protocol, but what steps do you have to take to make an OAuth transaction? What do you end up with when you’re done with an OAuth transaction? How does this design make OAuth secure?
2.1
Overview of the OAuth 2.0 protocol: getting and
using tokens
OAuth is a complex security protocol, with components sending pieces of informa-tion to each other in a precise balance that’s akin to a technological dance.
Funda-This chapter covers
An overview of the OAuth 2.0 protocol
The different components in an OAuth 2.0 system
How the different components communicate with each other
3
Following an OAuth authorization grant in detail
mentally, there are two major steps to an OAuth transaction: issuing a token and using a token. The token represents the access that has been delegated to the client and it plays a central role in every part of OAuth 2.0. While the details of each step vary based on several factors, the canonical OAuth transaction consists of the following sequence of events:
1 The Resource Owner indicates to the Client they would like the Client to act on
their behalf (for example, load my photos from that service so I can print them)
2 The Client requests authorization from the Resource Owner at the
Authoriza-tion Server
3 The Resource Owner grants authorization to the Client 4 The Client receives a Token from the Authorization Server 5 The Client presents the Token to the Protected Resource
Different deployments of the OAuth process can handle each of these steps in slightly different ways, often optimizing the process by collapsing several steps into a single action, but the core process remains essentially the same. Next, we will look at the most canonical example of OAuth 2.0.
2.2
Following an OAuth authorization grant in detail
Let us take a look at an OAuth authorization grant process in detail. We are going to be looking at all steps between the actors, tracing the HTTP requests and responses for each step. In particular, we’ll follow the authorization code grant used with web-based client applications. These clients will be interactively authorized directly by the resource owner.
NOTE: The examples in this chapter are pulled from the exercise code that we’ll use later in the book. While you don’t need to understand the exercises to follow what’s going on, it might help to run through some of the com-pleted examples in appendix A. Note that the use of localhost throughout these examples is purely coincidental, as OAuth can and does work across multiple independent machines.
The authorization code grant uses a temporary credential, the authorization code, to represent the resource owner’s delegation to the client, and it looks like this.
Let me break this down into individual steps. First, the resource owner goes to the client application and indicates to the client they would like it to use a particular pro-tected resource on their behalf. For instance, this is where the user would tell the print-ing service to use a specific photo storage service.
5
Following an OAuth authorization grant in detail
Since we have a web client, this takes the form of an HTTP redirect to the authoriza-tion server’s authorizaauthoriza-tion endpoint. The response from the client applicaauthoriza-tion looks like this:
HTTP/1.1 302 Moved Temporarily x-powered-by: Express
Location:
http://localhost:9001/authorize?response_type=code&scope=foo&client_id=o
auth-client-1&redirect_uri=http%3A%2F%2Flocalhost%3A9000%2Fcallback&state=Lwt50DDQKU B8U7jtfLQCVGDL9cnmwHH1
Vary: Accept
Content-Type: text/html; charset=utf-8 Content-Length: 444
Date: Fri, 31 Jul 2015 20:50:19 GMT Connection: keep-alive
How do I find the server?
6 CHAPTER 2 The OAuth Dance
This redirect to the browser causes the browser to send an HTTP GET to the autho-rization server:
GET
/authorize?response_type=code&scope=foo&client_id=oauth-client-1&redirect_uri=http%3A%2F%2Flocalhost%3A9000%2Fcallback&state=Lwt50DDQKU B8U7jtfLQCVGDL9cnmwHH1 HTTP/1.1
Host: localhost:9001
User-Agent: Mozilla/5.0 (Macintosh; Intel Mac OS X 10.10; rv:39.0) Gecko/20100101 Firefox/39.0
Accept: text/html,application/xhtml+xml,application/xml;q=0.9,*/*;q=0.8 Accept-Language: en-US,en;q=0.5
Accept-Encoding: gzip, deflate Referer: http://localhost:9000/ Cookie: i18next=en
Connection: keep-alive
The client identifies itself and requests particular items, such as scopes, by including query parameters in the URL it sends. The authorization server can parse those param-eters and act accordingly, even though the client isn’t making the request directly.
Next, the authorization server will usually require the user to authenticate. This step is essential in determining who the resource owner is and what rights they’re allowed to delegate to the client.
Viewing the HTTP transaction
7
Following an OAuth authorization grant in detail
The user’s authentication passes directly between the user (and their browser) and the authorization server; it’s never seen by the client application. This essential aspect protects the user from having to share their credentials with the client application, the anti-pattern that OAuth was invented to combat (as I discussed in the previous chapter).
Additionally, since the resource owner interacts with the authorization endpoint through a browser, their authentication happens through a browser as well. Thus, a wide variety of authentication techniques are available to the user authentication pro-cess. OAuth does not dictate the authentication technology, and the authorization server is free to choose methods such as a username/password pair, cryptographic cer-tificates, security tokens, , or any number of other possibilities. We have to trust the web browser to a certain extent here, especially if the resource owner is using a simple authentication method like username and password, but the OAuth protocol is designed to protect against several major kinds of browser-based attacks, which we will cover in chapters 7, 8, and 9.
This separated approach insulates the client from changes to the user’s authentica-tion methods, allowing a simple client applicaauthentica-tion to benefit from emergent tech-niques, such as risk-based heuristic authentication applied at the authorization server. This does not convey any information about the authenticated user to the client, how-ever; this is a topic we’ll cover in depth in chapter 11.
Next, the user authorizes the client application:
autho-8 CHAPTER 2 The OAuth Dance
rization server can allow the user to deny some or all of these scopes, or it can let the user approve or deny the request.
Furthermore, many authorization servers allow the storage of this authorization decision for future use. If this is used, then future requests for the same access by the same client will not prompt the user interactively. The user will still be redirected to the authorization endpoint, and will still need to be logged in, but the decision of whether to delegate authority to the client will have already been made during a previous attempt. The authorization server can even override the end user’s decision based on an internal policy such as a client whitelist or blacklist.
Next, the authorization server redirects the user back to the client application:
This takes the form of an HTTP redirect to the client’s redirect_uri.
HTTP 302 Found Location:
http://localhost:9000/oauth_callback?code=8V1pr0rJ&state=Lwt50DDQKUB8U7j tfLQCVGDL9cnmwHH1
This in turn causes the browser to issue the following request back to the client:
GET /callback?code=8V1pr0rJ&state=Lwt50DDQKUB8U7jtfLQCVGDL9cnmwHH1 HTTP/1.1 Host: localhost:9000
User-Agent: Mozilla/5.0 (Macintosh; Intel Mac OS X 10.10; rv:39.0) Gecko/20100101 Firefox/39.0
Accept: text/html,application/xhtml+xml,application/xml;q=0.9,*/*;q=0.8 Accept-Language: en-US,en;q=0.5
Accept-Encoding: gzip, deflate
Notice that this is on the
client and not on the
9
Following an OAuth authorization grant in detail
Referer:
http://localhost:9001/authorize?response_type=code&scope=foo&client_id=o
auth-client-1&redirect_uri=http%3A%2F%2Flocalhost%3A9000%2Fcallback&state=Lwt50DDQKU B8U7jtfLQCVGDL9cnmwHH1
Cookie: i18next=en Connection: keep-alive
Since we’re using the authorization code grant type, this redirect includes the special code query parameter. The value of this parameter is a one-time-use credential known as the authorization code, and it represents the result of the user’s authorization decision. The client can parse this parameter to get the authorization code value when the request comes in, and it will use that code in the next step. The client will also check that the value of the state parameter matches the value that it sent in the previous step.
Now that the client has the code, it can send it back to the authorization server on its token endpoint:
The client performs an HTTP POST with its parameters as a form-encoded HTTP entity body, passing its client_id and client_secret as an HTTP Basic authorization header. This HTTP request is made directly between the client and the authorization server, without involving the browser or resource owner at all.
POST /token
Host: localhost:9001 Accept: application/json
Content-type: application/x-www-form-encoded
Authorization: Basic b2F1dGgtY2xpZW50LTE6b2F1dGgtY2xpZW50LXNlY3JldC0x
grant_type=authorization_code&
10 CHAPTER 2 The OAuth Dance
This separation between different HTTP connections ensures that the client can authenticate itself directly without other components being able to see or manipulate the token request.
The authorization server takes in this request and, if valid, issues a token.
The authorization server performs a number of steps to ensure the request is legiti-mate. First, it validates the client’s credentials (passed in the Authorization header here) to determine which client is requesting access. Then, it reads the value of the code parameter from the body and looks up any information it has about that authori-zation code, including which client made the initial authoriauthori-zation request, which user authorized it, and what it was authorized for. If the authorization code is valid, has not been used previously, and the client making this request is the same as the client that made the original request, the authorization server generates and returns a new access token for the client.
This token is returned in the HTTP response as a JSON object:
HTTP 200 OK
Date: Fri, 31 Jul 2015 21:19:03 GMT Content-type: application/json {
"access_token": "987tghjkiu6trfghjuytrghj", "token_type": "Bearer"
}
11
Following an OAuth authorization grant in detail
refresh token (used to get new access tokens without asking for authorization again) as well as additional information about the access token, like a hint as to the token’s scopes and expiration time. The client can store this access token in a secure place for as long as it wants to use the token, even after the user has left.
With the token in hand, the client can present the token to the protected resource:
The client has several methods for presenting the access token, and in this example we’re going to use the recommended method of using the Authorization header:
GET /resource HTTP/1.1 Host: localhost:9002 Accept: application/json Connection: keep-alive
Authorization: Bearer 987tghjkiu6trfghjuytrghj
The protected resource can parse the token out of the header, determine if it’s still valid, look up information regarding who authorized it and what it was authorized for, and return the response accordingly. A protected resource has a number of options for
The right to bear tokens
12 CHAPTER 2 The OAuth Dance
doing this token lookup, which we’ll cover in greater depth in a future chapter. The simplest option is for the resource server and the authorization server to share a data-base that contains the token information. The authorization server writes new tokens into the store when they’re generated, and the resource server reads tokens from the store when they are presented.
2.3
OAuth's actors: clients, authorization servers, resource
owners, and protected resources
As we touched on in the last section, there are four main actors in an OAuth system: clients, resource owners, authorization servers, and protected resources. Each of these components is responsible for different parts of the OAuth protocol, and all work together to make the OAuth protocol work.
13
OAuth Components: Tokens, scopes, and authorization grants
An OAuth protected resource is available through an HTTP server and it requires an OAuth token to be accessed. The protected resource needs to validate the tokens presented to it and determine whether and how to serve requests. In an OAuth archi-tecture, the protected resource has the final say as to whether or not to honor a token. In our cloud printing example, the photo storage site is the protected resource.
A resource owner is the entity with the authority to delegate access to the client. Unlike other parts of the OAuth system, the resource owner is not a piece of software. In most cases, the resource owner is the person using the client software to access something they control. For at least part of the process, the resource owner interacts with the authorization server using a web browser (more generally known as the user agent). The resource owner might also interact with the client using a web browser, as they do in our demonstration, but that’s entirely dependent on the nature of the cli-ent. In our cloud printing example, the resource owner is the end user who wants to print their photos.
An OAuth authorization server is an HTTP server that acts as the central compo-nent to an OAuth system. The authorization server authenticates the resource owner and client, provides mechanisms for allowing resource owners to authorize clients, and issues tokens to the client. Some authorization servers also provide additional capabili-ties such as token introspection and remembering authorization decisions. In our cloud printing example, the photo storage site runs its own in-house authorization server for its protected resources.
2.4
OAuth Components: Tokens, scopes, and authorization grants
In addition to these actors, the OAuth ecosystem depends on several other mecha-nisms, both conceptual and physical. These are the bits that connect the actors above in a larger protocol.
2.4.1 Access tokens
An OAuth access token, sometimes known as a token, is an artifact issued by the authorization server to a client that indicates the rights the client has been delegated. OAuth does not define a format or content for the token itself, but it always repre-sents the combination of the client’s requested access, the resource owner that autho-rized the client, and the rights conferred during that authorization (usually including some indication of the protected resource).
14 CHAPTER 2 The OAuth Dance
2.4.2 Scopes
An OAuth scope is a representation of a set of rights at a protected resource. Scopes are represented by strings in the OAuth protocol, and they can be combined into a set by using a space-separated list. As such, the scope value cannot contain the space char-acter. The format and structure of the scope value is otherwise undefined by OAuth.
Scopes are an important mechanism for limiting the access granted to a client. Scopes are defined by the protected resource, based on the API that it is offering. Cli-ents can request certain scopes, and the authorization server can allow the resource owner to grant or deny particular scopes to a given client during its request. Scopes are generally additive in nature.
Going back to our cloud printing example from before. The photo storage service’s API defines several different scopes for accessing the photos: read-photo, read-meta-data, update-photo, update-metaread-meta-data, create, and delete. The photo printing service only needs to be able to read the photos in order to do its job, and so it asks for the read-photo scope. Once it has an access token with this scope, the printer is able to read photos and print things out as requested. If the user decides to use an advanced function that prints a series of photographs into a book based on their date, the print-ing service will need the additional read-metadata scope. Since this is an additional access, the printing service needs to ask the user to authorize them for this additional scope using the regular OAuth process. Once the printing service has an access token with both scopes, it can perform actions that require either of them, or both of them together, using the same access token.
2.4.3 Refresh tokens
An OAuth refresh token is similar in concept to the access token, in that it is issued to the client by the authorization server and the client does not know, or care, what is inside the token. What is different is that the token is not ever sent to the protected resource. Instead, the client uses the refresh token to request new access tokens with-out involving the resource owner.
Why would a client need to bother with a refresh token? In OAuth, an access token could stop working for a client at any point. The user could have revoked the token, it could have expired, or some other system trigger might have made the token invalid. The client will usually find out about the token being invalid by using it and getting an error response. The client could get the resource owner to authorize them again. But what if the resource owner’s not there anymore?
15
OAuth Components: Tokens, scopes, and authorization grants
which, in turn, can get the resources. This limits the exposure of the refresh token and the access token in separate but complimentary ways.
Refresh tokens also give the client the ability to down-scope their access. If a client is granted scopes A, B, and C, but it knows that it only needs scope A to make a particular call, it can use the refresh token to request an access token for only scope A. This lets a smart client follow the security principle of least privilege without burdening less-smart clients with trying to figure out what privileges an API needs. Years of deployment experience has shown us that OAuth clients tend to be anything but smart, but it’s still good to have the advanced capability for those who want to exercise it.
What if the refresh token itself doesn’t work? The client can always bother the resource owner again, when they are available. In other words, the fallback state for an OAuth client is to do OAuth again.
2.4.4 Authorization grants
16 CHAPTER 2 The OAuth Dance
While it’s true that the authorization code represents a user’s authorization decision, it’s not itself an authorization grant. Instead, the entire OAuth process is the authori-zation grant: the client sending the user to the authoriauthori-zation endpoint, receiving the code, and finally trading the code for the token.
In other words, the authorization grant is the method for getting a token. In this book, as in the OAuth community as a whole, I occasionally refer to this as a flow of the OAuth protocol. There are several different kinds of authorization grants in OAuth, each with its own characteristics. I’ll cover these in detail in chapter 6, but most of our examples and exercises, such as the ones in the previous section, are going to be using the authorization code authorization grant type.
2.5
Interactions between OAuth's actors and components:
back channel, front channel, and endpoints
Now that we know the different parts of an OAuth system, take a look at how exactly they communicate with each other. OAuth is an HTTP-based protocol, but unlike most HTTP-based protocols, OAuth communication doesn’t always happen through a simple HTTP request and response.
2.5.1 Back-channel Communication
Many parts of the OAuth process use a normal HTTP request and response format to communicate to each other. Since these requests generally happen outside the pur-view of the resource owner and user agent, they’re collectively referred to as back-channel communication.
These requests and responses make use of all the regular HTTP mechanisms to communicate: headers, query parameters, methods, and entity bodies can all contain information vital to the transaction. Note that this might be a bit more of the HTTP stack than you’re used to, as many simple web APIs allow the client developer to pay attention to the response body.
The authorization server provides a token endpoint that the client uses to request access tokens and refresh tokens. The client calls this endpoint directly, presenting a form-encoded set of parameters that the authorization server parses and processes. The authorization server then responds with a JSON object representing the token.
OAuth over non-HTTP channels
While OAuth is defined only in terms of HTTP, several specifications have defined how to move different parts of the OAuth process to non-HTTP protocols. For instance, there are draft standards defining how to use OAuth tokens over GSS-APIa and CoAPb. All of these still use HTTP to bootstrap the process, and they tend to translate the HTTP-based OAuth components as directly as possible to these other protocols. a RFC 7628
17
Interactions between OAuth's actors and components: back channel, front channel, and
Additionally, when the client connects to the protected resource, it’s also making a direct HTTP call in the back channel. The details of this call are entirely dependent on the protected resource, as OAuth can be used to protect an extraordinarily wide variety of APIs and architecture styles. In all of these, the OAuth token is presented by the cli-ent and the protected resource must be able to understand the token and the rights that it represents.
2.5.2 Front-channel Communication
In normal HTTP communication, as we saw, the HTTP client sends a request that con-tains headers, query parameters, an entity body, and other pieces of information directly to a server. The server can then look at those pieces of information and figure out how to respond to the request, using an HTTP response containing headers, an entity body, and other pieces of information. However, in OAuth, there are several instances where two components cannot make direct requests and responses of each other, such as when the client interacts with the authorization endpoint of the autho-rization server. Front-channel communication is a method of using HTTP requests to communicate indirectly between two systems through an intermediary web browser.
This technique isolates the sessions on either side of the browser, which allows it to work across different security domains. For instance, if the user needs to authenticate to one of the components, they can do so without exposing their credentials to the other system. We can keep information separate and still communicate in the presence of the user.
18 CHAPTER 2 The OAuth Dance
19
Interactions between OAuth's actors and components: back channel, front channel, and
For example, in the authorization code grant example above, the client needs to send the user to the authorization endpoint, but it also needs to communicate certain parts of its request to the authorization server. To do this, the client sends an HTTP redirect to the browser. The target of this redirect is the server’s URL with certain fields attached to it as query parameters:
HTTP 302 Found
Location: http://localhost:9001/authorize? client_id=oauth-client-1&response_type=code&state=843hi43824h42tj
The authorization server can parse the incoming URL, as any other HTTP request, and find the information sent from the client in these parameters. When it’s time to return the authorization code to the client, the authorization server sends an HTTP redirect to the browser as well, but this time with the client’s redirect_uri as the base. The authorization server also includes its own query parameters in the redirect:
HTTP 302 Found
Location: http://localhost:9000/oauth_callback?code=23ASKBWe4
When the browser follows this redirect, it’ll be served by the client application, in this case through an HTTP request. The client can parse the URL parameters from the incoming request. In this way, the client and authorization server can pass messages back and forth to each other through an intermediary without ever talking to each other directly.
All information that’s passed through the front channel is accessible to the browser, both to be read and potentially manipulated before the ultimate request is made. The OAuth protocol accounts for this by limiting the kinds of information that are passed through the front channel, and by making sure that none of the pieces of information used in the front channel can be used on its own to accomplish the task of delegation. In the canonical case we saw in this chapter, some protocols, such as OpenID Connect, offer increased security through mechanisms for these front channel messages to be signed by the client or authorization server to add a further layer of protection, and we’ll look at that briefly in chapter 13.
What if my client isn’t a web app?
20 CHAPTER 2 The OAuth Dance
2.6
Summary
OAuth is a protocol with many moving pieces, but it is built of simple actions that add up to a secure method for authorization delegation.
OAuth is about getting tokens and using tokens
Different components in the OAuth system care about different parts of the process
Components use direct (back channel) and indirect (front channel) HTTP to communicate with each other.
21
Summary
Think of OAuth 2 like the web version of a valet key. This HTTP-based security protocol allows the users of a service to enable applications to use that service on their behalf without handing over full control. Web and mobile apps can securely access information from other servers for these users, enabling you to give your users functionality and services from other sites. Instead of unsafe password-sharing, OAuth offers a much more secure delegation protocol. OAuth is used everywhere, from large providers like Facebook and Google, to small APIs at startups, and even cloud ser-vices, it’s the worldwide standard. OAuth 2 is the must-know security protocol on the web today.
OAuth 2 in Action teaches you practical use and deployment of this protocol from the perspective of a client, authorization server, and resource server. You’ll begin with an overview of OAuth and a look at its components and interactions. Then, using lots of hands-on examples, you’ll build your first OAuth client, followed by an authoriza-tion server, and then a protected resource. The second part of the book dives into cru-cial implementation vulnerability topics. Then you learn about tokens, dynamic client registration, and more advanced topics. This book teaches you to how to distinguish between different OAuth options and choose the right set for your application. By the end of this book, you’ll be able to build and deploy applications that use OAuth on both the client and server sides.
What's inside
Understand OAuth 2 protocol and design Authorization with OAuth 2
Implementation risks
Building an OAuth 2 environment Protecting and accessing REST APIs
G
ood API design balances the technical details of the implementation with the business value desired by the product managers. Good APIs consider security even in the design phase. This chapter gives you an overview of web-based APIs and general API design concerns.23
Chapter 2 from
Irresistible APIs: Designing web
APIs that developers will love
by Kirsten K. Hunter
Working with web APIs
In the next few chapters, I’ll cover the server-client interaction in detail, but in this chapter I’ll help you understand the concepts with a simple example of an API and sample application. Most basic API examples use a to-do list but that’s kind of over-used, so I decided to go a different way: I’ve selected a list application with pizza toppings. Note that this particular application is simple by design; the goal is to show you how to interact with the API, and how an application interacts with an API. Of course, if this were a production application it would have a full pizza, or pizzas, and the database wouldn’t be shared. But for the goals here, I’ve taken out as much complexity as possible to make the basic principles clear.
Looking at an API is interesting, but it doesn’t necessarily help you to under-stand how it can drive an application. Additionally, it’s challenging to perform
This chapter covers
Structure of a simple API
Ways to inspect calls to an API
Interaction between an API and a client application
24 CHAPTER 2 Working with web APIs
actions such as create and delete in a browser, so in addition to the API I’ve included a simple application using this API with JavaScript. This application exercises all of the functionality in the API so you can see how an application interacts with a web API.
To get an idea of how this works in practice, I’ve created a basic API using Node.js, a JavaScript-based web server framework. (You can learn more about this framework at www.nodejs.org.) The API supports all of the needed actions to represent a com-plete system: create, read, update, and delete. The first task will be to explore the API in a browser using the read functionality.
This application runs on a web host at www.irresistibleapis.com/demo. You can check out the application there and follow along with the concepts in this chapter. If you’re a developer and want to explore the code more intimately, use the exercises at the end of the chapter to get the example running on your own system, including both the Node.js application and the HTML/JavaScript web application. In the sec-tion 2.6, I also describe the various moving parts to this API and applicasec-tion so you can play with it as you like.
2.1
HTTP basics
To understand the transactions between the client and the server in API interactions, you’ll need a basic grasp of how HTTP works. This topic will be covered in more detail in chapter 4, but for now I’ll give you some high-level information about the protocol.
HTTP stands for HyperText Transfer Protocol, and you’re probably most familiar with it as the way web browsers get information from web servers. An HTTP transac-tion is composed of a request from the client to the server (like a browser asking for a web page), and a response from the server back to the client (the web page from the server, for a browser). First, I’ll describe the elements in an HTTP request. You’re familiar with the URL, the address that you type into the address box on a browser, but that address is only one portion of the information sent from your browser to the server in order to process a web request.
2.1.1 HTTP request
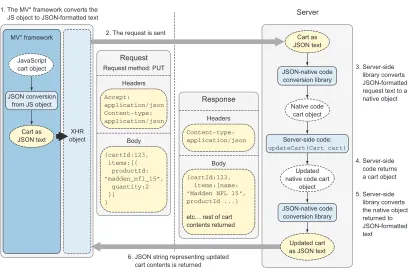
Figure 2.1 demonstrates the elements that make up an HTTP request, along with examples of how these sections are used. The HTTP request is usually sent with head-ers, setting the context for the transaction. An HTTP request always has a method; methods are the verbs of the HTTP protocol. To understand what your browser does, imagine that you’re visiting my main website. Here are the pieces of the request that are sent by your browser:
Headers: Accept: text/html—This tells the server that the browser wants to get an HTML-formatted page back. It’s the most readable format for humans, so it makes sense that your browser would request it.
25
HTTP basics
URL: http://irresistibleapis.com—This is the only piece you actually indicated for the browser.
Body: none—A GET request doesn’t need a body, because you’re not changing anything on the server—you’re just reading what’s there.
All of the actions of CRUD (create, read, update, and delete) are represented by methods within HTTP:
Create: POST
Read: GET
Update: PUT
Delete: DELETE
26 CHAPTER 2 Working with web APIs
The URL is the unique identifier for the resource. It’s just like any other URL on the internet, except in this case it’s used to describe the resource in an application system. If parameters are needed for the request, such as a keyword for search, they’re included in the parameters of the request. To see how parameters would look, here’s an example search request:
http://www.example.com/api/v1.0/search?keyword=flintstone&sort=alphabetical
In this example, the resource being called is http://www.example.com/api/v1.0/se-arch. The question mark and everything following it are parameters giving more in-formation about what the client wants in the response. A body section is only sent for create (POST) and update (PUT) transactions.
Next, I’ll describe the sections of an HTTP response.
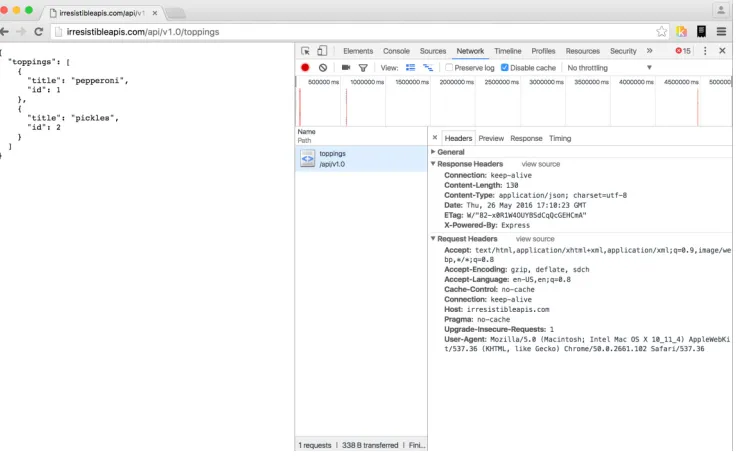
2.1.2 HTTP response
Figure 2.2 shows the elements of a typical HTTP server response. The server is likely to send back several headers giving information about the system and the response. Just as all requests have a method, all responses have a status code. These status codes will be described in more detail in chapter 4, but for now it’s sufficient to know that 2XX means that the request was successful, 3XX is a redirect to another location, 4XX is an error in the request from the client, and 5XX means the server had a problem. In the earlier example, calling my website, the server would’ve responded with the following:
27
The Toppings API
Status code: 200—Everything worked correctly. Headers:
– Content-Type: text/html—as requested by the client – Date: <date of response>
– Content-Length: <size of response>
Body—The content of the page. This is what you see if you “view source” within the browser—the HTML page that tells the browser how to render the page and what content to display.
2.1.3 HTTP interactions
Every HTTP transaction between a client and server will be composed of a request, sent from the client to the server, and a response, sent from the server back to the cli-ent. There’s no higher level interaction; each request/response is stateless and starts again from scratch. To help you understand this better, I’ll move on to a discussion of a specific API.
2.2
The Toppings API
Many different styles of API are available, but the one I’m going to be using and talk-ing most about here is a Representational State Transfer (REST)-style API, the most common type of web API.
As discussed in chapter 1, REST APIs are designed to work with each resource as a noun. A specific resource within a system has a unique identifier, which is a URL, just like the ones you visit in the browser. This URL identifies the resource in the system and is designed to be understandable when viewed. For example, with a REST API you could view the list of existing toppings with the following request:
http://irresistibleapis.com/api/v1.0/toppings
These are the actual URLs, retrieved with a GET (read) operation. If you put this in a browser, you’ll see the results displayed in figure 2.3.
You can visit this URL in your browser right now and get the information about a sin-gle topping or a list of toppings. Figure 2.3 shows what this call will look like in a web browser. Go ahead and try both of these calls in your own web browser to see how easy it is to retrieve information from this kind of service. Again, this is just like any other web request, only formatted for a computer to work with.
Now, to view a single topping, you’d take the id field from the list you just retrieved and append it to the URL. Basically, you’re saying “Give me the toppings list” and then “but just the one with the id of 1.” Almost all APIs work in this way. The parent level is a list of items, and adding an ID will retrieve a single member of the list.
http://irresistibleapis.com/api/v1.0/toppings/1
28 CHAPTER 2 Working with web APIs
want to do. You can add new items by sending a POST to the list itself (so in the earlier case, the /toppings endpoint would be used to add a new topping). This type of API encourages engagement and innovation by the developers, and consistency across multiple API providers makes it easier to get up and going writing clients.
2.3
Designing the API
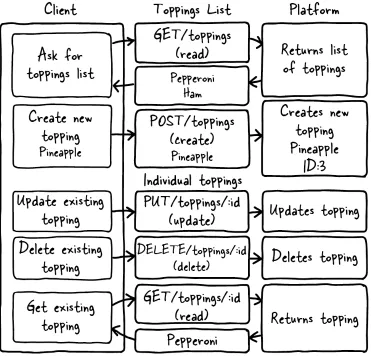
To go through the steps, imagine an online website for a pizza parlor. Users are having trouble interfacing with the pizza ordering system and want to be able to customize their pizzas. The company wants to increase customer satisfaction. This represents the Business Value for this platform. Figure 2.4 illustrates each call to the system and how it would be formatted.
To provide this, they need to create a system that consistently allows their users to pick different pizza toppings and keep them in a list (Use Case). The company decides to measure success by determining the increase in people finishing up started orders (Measurements). Fortunately for this example, it’s relatively easy to figure out how an API can meet these needs.
29
Designing the API
Because I’m creating a resource-based API, each request will be a unique URL describing one piece of the back-end structure with a method describing what the cli-ent wants to do with that resource. In this case, I have only two differcli-ent types of resources: individual toppings and lists of toppings. Individual topping resources such as /api/v1.0/toppings/1 are used for viewing, editing, and deleting a single topping. The list resource /api/v1.0/toppings is used for viewing all toppings or for adding a new topping to the list. Table 2.1 shows each call to the API and a description of what it does.
Figure 2.4 This diagram represents the complete set of interactions with the API system. The GET
request reads the current value of the resource, whether it’s a list or an individual item. POST is only allowed at the list level, and creates a new resource in the system. PUT updates and DELETE deletes an existing resource. All four of the needed methods, Create, Read, Update, and Delete method
30 CHAPTER 2 Working with web APIs
And that’s it. The platform features create, read, update, and delete operations avail-able to you by combining the HTTP methods with the URLs for your resources. But what do you get when you make these calls? When you GET the resource for a single topping, you get information just about that topping. Try this now in your browser: http://irresistibleapis.com/api/v1.0/toppings/1.
GET /api/v1.0/toppings/1 { "topping": {
"id": 1, "title": "Pepperoni" }
}
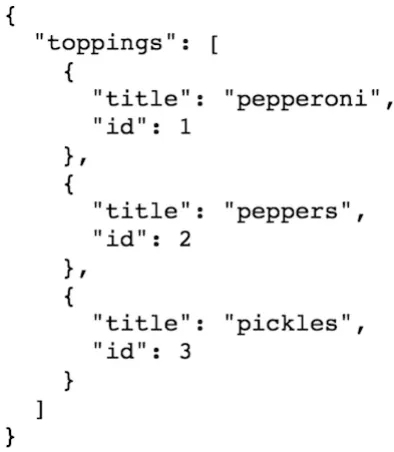
This response is represented in JavaScript Object Notation (JSON), a formatting syn-tax first described in chapter 1. JSON will be covered in more detail in chapter 4, but for now you can see how the data is structured. If you want more information about JSON you can find it at http://json.org. The curly braces indicate an object, which is a group of pairings of names and values. What’s represented here is a JSON structure describing a single object—a “topping,” which has an ID of 1 and a title of Pepperoni. This is the same resource address a client can access to view, delete, or update an exist-ing toppexist-ing. This means that the URL for the sexist-ingle toppexist-ing is actually the toppexist-ings list of http://irresistibleapis.com/api/v1.0/toppings followed by the ID of the top-ping from within this structure—so http://irresistibleapis.com/api/v1.0/toptop-pings/1. If you GET the resource for the list of toppings directly, the returned information includes a list instead of a single object. Call this URL in your browser to see the list: http://irresistibleapis.com/api/v1.0/toppings.
GET /api/v1.0/toppings { "toppings": [ { "id": 1,
Table 2.1 API calls
API Call Description
GET /api/v1.0/toppings List current toppings
GET /api/v1.0/toppings/1 View a single topping
POST /api/v1.0/toppings Create a new topping
PUT /api/v1.0/toppings/1 Update an existing topping
DELETE /api/v1.0/toppings/1 Delete an existing topping
Listing 2.1 Retrieving a single topping
Listing 2.2 Retrieving a list of all toppings
Curly braces indicate an object
Curly braces indicate dictionaries
31
Using a web API
"title": "Pepperoni" },
{
"id": 2,
"title": "Pineapple" }
] }
In this case, because the request was for a list of objects, square brackets demonstrate that the returned object contains a list of “toppings.” Each individual topping looks the same as listing 2.1. Again, this is simply how information is represented in JSON. To understand these calls and responses, just remember that an object (with keys and values) is represented by curly braces, and a list (an unnamed collection of items) is represented with square brackets. In some programming languages these are referred to as hashes and arrays.
Both of these calls can be made from a standard web browser. If other people have added items to the list, you’ll see those included in the list view as well; this is a live call into the API system and will return the appropriate information. In this case, the API is generated by node. If you’re a developer who’s interested in learning more about the back end of the system, the advanced exercise at the end of the chapter will give you information about how to run this system on your own, as well as the application running on top of the API.
This simple API interaction gives you the opportunity to start understanding some of the topics covered in chapter 4.
2.4
Using a web API
You can interact with this API in various ways, as you’ll learn in this section. Feel free to try any or all of these approaches to see how the interaction works.
2.4.1 Browser
A browser can make GET calls to specific resources very easily. Note that this is easy in the case of my demo API because there’s no authentication to worry about. The chal-lenge is that the browser doesn’t have any way to easily update, delete, or create new items. Using the developer tools or web inspector in your browser can give you more information about the call as well.
32 CHAPTER 2 Working with web APIs
For the request:
Headers:
– Accept: text/html, application/xhtml+xml,application/xml; q=0.9,image/webp; */*; q=0.8—This is the list of accepted formats for this browser request, in order of preference. Because it includes “*/*” – or “any content type” late in the list, the browser will accept any type of response and do the best it can with it. – Many other headers are shown in figure 2.5. Take a look at them and run the
same request on your system to see how they change and what stays the same in each request/response transaction.
Method—GET
URL—http://irresistibleapis.com/api/v1.0/toppings RequestBody—none
Statuscode—200 OK
2.4.2 Command line (curl)
If you’re comfortable with the command line, you can use the curl command to make calls to the API as well. This tool is fairly straightforward and makes it possible to interact with the API more completely, using all of the available methods rather than
33
Using a web API
limiting transactions to read operations as the browser does. curl is native on Unix-based systems such as Linux and Macintosh, and you can install it easily for Windows from http://curl.haxx.se/download.html.
Let’s take a quick tour through the API using curl. By default, curl uses GET (read), but you can specify other methods on the command line, as shown in the fol-lowing examples. Remember that your responses may be different if other people have been changing things; just go ahead and work with what you get. Don’t be shy— this API is just for this book, and you can’t break anything important. The best way to understand this type of system is to work with it yourself.
First, let’s use curl to look at a single topping. Lines beginning with a dollar sign indicate a command-line call. The other information is the information returned by the server itself.
$ curl http://irresistibleapis.com/api/v1.0/toppings/1 {
"topping": { "id": 1,
"title": "Pepperoni" }
}
That seems pretty reasonable. I’d eat a pizza with pepperoni on it. Let’s list all the top-pings and see what else is on the pizza. Remember that the list for the toptop-pings is at the parent level, or /api/v1.0/toppings.
$ curl http://irresistibleapis.com/api/v1.0/toppings {
"toppings": [ {
"id": 1,
"title": "Pepperoni" },
{
"id": 2,
"title": "Pineapple" },
{
"id": 3,
"title": "Pickles" }
] }
Wait, what? Pickles? That’s kind of gross. Let’s delete that one. The ID for it is 3, so the correct path to operate on is /api/v1.0/toppings/3.
Listing 2.3 GET /api/v1.0/toppings/1
34 CHAPTER 2 Working with web APIs
curl -i -X DELETE http://irresistibleapis.com/api/v1.0/toppings/3 {
"result": true }
The response here says we succeeded. Just to be sure, let’s pull a list of toppings again.
$ curl http://irresistibleapis.com/api/v1.0/toppings {
"toppings": [ {
"id": 1,
"title": "Pepperoni" },
{
"id": 2,
"title": "Pineapple" }
] }
Okay, that’s much better. But our pizza has pepperoni and pineapple, and I’d much prefer ham with my pineapple. Let’s go ahead and change that first one to make the pizza how I want it. To update an existing item, the command needs to send a PUT to the resource with the new information required.
$ curl -i -H "Content-Type: application/json" -X PUT -d '{"title":"Ham"}' http://irresistibleapis.com/api/v1.0/toppings/1
{
"topping": { "id": 1, "title": "Ham" }
}
Nice, now the pizza is looking pretty good. But really, as far as I’m concerned the pizza is just a vehicle to get cheese in my mouth, so I’ll add some extra cheese to go with the Hawaiian pizza I’ve built.
$ curl -H "Content-Type: application/json" -X POST -d '{"title":"Extra extra cheese"}' http://irresistibleapis.com/api/v1.0/toppings
{
"topping": { "id": 3,
Listing 2.5 DELETE /api/v1.0/toppings/3
Listing 2.6 GET /api/v1.0/toppings
Listing 2.7 PUT /api/v1.0/toppings/1
35
Using a web API
"title": "Extra extra cheese" }
}
Let’s do one final check to make sure that the pizza looks good.
$ curl http://irresistibleapis.com/api/v1.0/toppings {
"toppings": [ {
"id": 1, "title": "Ham" },
{
"id": 2,
"title": "Pineapple" },
{
"id": 3,
"title": "Extra extra cheese" }
] }
Awesome! Now the pizza is just right.
Note that with curl you can also pass -i for slightly more chatty information, or –v for a much larger dose of verbose output. If you’re having fun and you’d like to try those now, feel free. The extra details you’ll see are HTTP transaction details, which will be described in chapter 4.
2.4.3 HTTP sniffers
Browsers have become very capable at showing information about the calls they’re making, but this is of limited use for a couple of reasons. As I mentioned earlier, a browser is really only capable of sending a read request, which restricts the actions you’re able to explore. When you submit a form, it will create a create (POST) request, but you don’t have the ability to arbitrarily call these operations in your browser.
HTTP sniffers are tools that allow you to explore all the HTTP traffic your system processes. HTTP sniffers watch and report on the network traffic your system is gener-ating, whether it comes from a browser, an application, or a raw command-line call. With these tools, you can see the entirety of the HTTP request and response, and this allows you to debug what’s happening if you’re running into issues.
If you’re using a Mac, HTTPScoop (www.tuffcode.com) is a very friendly choice. It’s easy to set up and use, and the output is clear and complete. The downside to this tool is that it can’t monitor secure transactions (HTTPS calls) and so it’s not going to work with any API requiring secure calls. For the purposes of this book, though, you’ll only be accessing a nonsecure API (the demo API) so HTTPScoop is a fine choice—it
36 CHAPTER 2 Working with web APIs
would be my first choice for any Mac users wanting a reasonably intuitive experience. The license cost is $15 but you can try it for two weeks for free.
Figure 2.6 shows an example of the windows in HTTPScoop. For this chapter, I’ll focus on the main screen listing all calls and the Request/Response tab. Later in the book you’ll learn about headers, status codes, and other HTTP details so you can understand how they all interact together. For now, however, consider the request to be a simple request and response, and don’t worry about the particular details if you’re not already familiar with HTTP.
For Windows users, the best choice out there is Fiddler, which you can find at www.telerik.com/fiddler. For Windows, Mac, and Linux, there’s a slightly more com-plicated choice in Charles (http://www.charlesproxy.com). If you’re quite advanced in your network administration skills, you can try out Wireshark from https://www.wi-reshark.org. Wireshark is available and free for every major platform and sniffs all kinds of traffic, not just web/HTTP traffic, but the interface is quite complex and it can be difficult to understand what you’re seeing.
EXERCISE 1 Watch the traffic in an HTTP sniffer as you go through the exer-cises from this chapter. Use the curl calls to access the API directly and see what the calls look like. For more verbosity with curl, you can use –v in your command and see more information about the call from the client side. Com-pare the information in the sniffer to what curl sends and see if you can find patterns. Which debugging method gives the best information? Which one is easier for you to use?
37
Interaction between the API and client
EXERCISE 2 Make a deliberately incorrect call. Call /api/v1.0/top-pings/100—there’s not likely 100 toppings on the pizza so this is a bad call. What kind of output did you get from curl –v? What did the HTTP sniffer show? The status code tells you how the system responded, which should give you the information you need to figure out what the issue is.
2.5
Interaction between the API and client
Seeing these GET calls to the API is somewhat interesting, but unfortunately you can’t see the POST, PUT, or DELETE calls using a browser. curl isn’t very intuitive for explor-ing a system. Without some kind of application usexplor-ing the API, it’s difficult to explore and visualize the elegance and simplicity of this kind of interface.
Keeping in line with the simple API, I’ve created a simple application to exercise the API, creating a list of toppings for your virtual pizza. Again, for a real application there would be a full pizza and a method to place the order, but this application is deliberately as simple as possible so it’s easy to understand how it works.
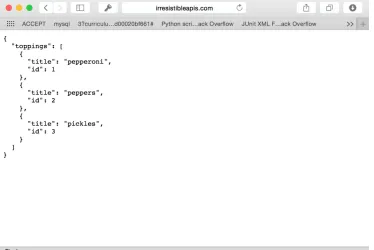
I’ll go through the same sequence I did in the last section. Here’s our starting pizza, with pepperoni, pineapple, and pickles. Loading the initial page causes an API call to be generated and we get the current list of toppings from the system.
First, take a look at the JSON representation returned when the API is called directly at /api/v1.0/toppings, shown in figure 2.7. Figure 2.8 shows how the appli-cation looks when this API call is made on the back end.
38 CHAPTER 2 Working with web APIs
Now take a look at the main application at http://irresistibleapis.com/demo. With the JSON data, the simple application can build the front page. Some of the items are static—that is, they don’t change. The top half of the page, for instance, is always the same, with the title of the display and a button to add new toppings. The bottom half, though, is created based on the information retrieved from the API. Each topping is listed, and the ID of the topping is used to create an appropriate button to act on that specific item. The user has no need to understand the relationship between the ID and the name of the topping, but the IDs used programmatically to set up the page to be functionally correct. Note how the information in the API in figure 2.4 directly maps to what’s shown in the application in figure 2.5. The buttons on this page map directly to the other API calls, as shown in table 2.2.
Table 2.2 The mapping between the API calls and application functions
API call Application function
GET /api/v1.0/toppings Main application page
GET /api/v1.0/toppings/1 View button on main page
POST /api/v1.0/toppings “Add new topping”
DELETE /api/v1.0/toppings/1 Delete button on either page
39
Interaction between the API and client
As we walk through the API actions, use the HTTP sniffer of your choice to watch the traffic as the interactions happen. A note here: Because this system is live, other peo-ple may have added, deleted, or edited the toppings and they may not match. Feel free to use the buttons to adjust the toppings to match, or just follow along with your own favorite toppings (Jalapeños? Sun Dried Tomatoes? Legos?).
The first action in the previous example was removing the pickles from the pizza, and clicking Delete on this page for the Pickles entry will do just that. This button knows which ID to operate on because it was embedded in the page when the listing was rendered.
Clicking the Delete button will make the DELETE call and then make a call to the API to re-render the list of toppings with the deleted topping gone. If you’re using an HTTP sniffer or have configured your browser to show you web traffic, you can see this call happening from your system. Figure 2.9 shows what it looks like in HTTPScoop.
As you can see, the application pulled a few different framework files, and then got the full listing for the main page. When I clicked Delete, the application sent a DELETE request to the API server and then requested a new list of toppings. All of the requests were successful, so the main page refreshed to show the new list. Figure 2.10 shows the list after I deleted the offending pickles from the toppings list.
To edit an existing topping, in this case to change Pepperoni to Ham, click the View button. Doing so makes the read call for the specific item and allows you to edit the title. Using this technique to edit the Pepperoni to Ham, and then clicking Save, causes a PUT to happen exactly as in the original example. Watch your HTTP sniffer or browser traffic to see how this progression works. Figure 2.11 shows what the edit page
40 CHAPTER 2 Working with web APIs
looks like for a particular topping—in this case I changed the title from Pepperoni to Ham. When this change is PUT to the API, it will change the item’s title from Pepper-oni to Ham, updating the database to reflect the change permanently.
The PUT request, viewed in HTTPScoop, shows the request and response (see figure 2.12).
As with the associated curl request earlier, the debugging demonstrates that the cli-ent sends a request including the new information for the requested item. A PUT request replaces information for an existing item in the system. In the response, the server returns a response showing the new values for the resource. This returned object matches the object that was PUT to the system. Without HTTPScoop this seems a little magical, but you should be seeing a pattern by this point; these common oper-ations are direct mappings to system calls on the back end of the application.
Again, once the topping is edited, the application redisplays the main page, now with Ham and Pineapple (figure 2.13).
What’s left then? Now I need to add my extra cheese to the pizza, because it’s my favorite sort of thing. Clicking the Add New Topping button on the main page gives
Figure 2.10 Once the topping has been deleted from the system, the HTML representation of the toppings list no longer shows the deleted topping. If the platform call is made (to /toppings) you’ll see that the change is reflected in the JSON representation as well.
41
Interaction between the API and client
me a page for adding a new topping, as shown in figure 2.14. Remember, adding a new item to the list is a POST action, and that’s what will happen on the back end. Fig-ure 2.15 shows what the API transaction looks like when this POST is sent.
This example demonstrates again the difference between PUT, which updates a spe-cific existing item, and POST, which creates a new item by adding it to the specified list.
Figure 2.12 When you change the title of an existing resource, the information is sent to the server, and it sends back the new representation of that item. In this case, the object is quite simple; the title is the only field that can be changed. This is a simple demonstration of how an update works on an API platform.
Figure 2.13 The list of toppings now includes Ham and Pineapple; the Pickles have been deleted (thank heavens) and the Pepperoni has been changed to Ham using an update. Again, if you made a call to the
42 CHAPTER 2 Working with web APIs
After adding this new topping to the system, the application again requests the list of toppings, which brings the web page back, once again, to the main page. This com-pletes the circuit using an application to exercise the back-end API. The single page running this application is quite straightforward, because all the logic and actions are happening on the back end using the API.
Now that you’ve had the opportunity to view some specific traffic, take time to play with the example application with the various HTTP inspection methods. Because this sample application runs in your browser, you have the option of using developer tools in your browser to watch the traffic or an HTTP sniffer for this exploration. For the exercises in this book, you’ll want to use an HTTP sniffer, so pick the one you’re most comfortable with and start familiarizing yourself with its use.
Advanced Example Note
If you’re a developer and wish to install your own copy of this system, follow the instructions in section 2.6 to do so. Otherwise, skip to section 2.7 for a summary of this chapter.
Figure 2.14 The Add a Topping screen is designed to add new toppings to the system. As mentioned earlier, a create action is generally represented by a POST operation, and that’s what the system will do in this case.
43
Install your own API and front end
2.6
Install your own API and front end
This optional section is designed specifically for developers who want to understand more completely the back-end functionality of the API and sample application. You can use a Docker container to run the system quickly on your own system or download the code from my GitHub repository. I’ll walk through the steps to install and use the Docker container first, and then give more general instructions for grabbing the code from GitHub to run on your own system.
2.6.1 Installing the system via Docker
Docker is extremely simple to install on Linux systems, and quite easy on OS X and Windows systems as well. Installing the Docker container is simple once you’ve got the Docker system set up. Using this container allows you to separate the code and pro-cesses from the main propro-cesses on your system while avoiding the memory and space management issues of more heavyweight virtual machine systems.
The Docker installers for installation on Windows and Macintosh are here:
https://www.docker.com/toolbox
If you’re an advanced user running Windows and already have virtualization working via VBox or another virtualization system, you need to be aware that Docker relies on VirtualBox, which may conflict with your existing setup. Additionally, boot2docker requires that virtualization be available on your system, which infrequently requires changes to the BIOS. Also, virtualization is only available on 64-bit systems. If your sys-tem is a 32-bit syssys-tem, you’ll need to install the code directly from GitHub.
Once you’ve installed Docker using the instructions at the Docker website, you’re ready to pull and run the container.
On Linux, issue the command (on one line)
% sudo docker run -p 3000:3000 synedra/irresistible
to bind your system’s port 80 to the Docker container on port 3000.
On systems using boot2docker (Windows or Mac OS X), the command is as follows (root access isn’t needed because of the nature of docker-machine):
% docker run -p 3000:3000 synedra/irresistible
The application automatically runs in the Docker container. When using boot2docker, the Docker engine assigns a separate IP address for Docker containers. In order to determine the IP address of your Docker container, issue the command docker-machine ip default. Once you’ve done that, you can access the system at http://<docker-ip/. Because the server is running on port 80, the default web port, the browser will find the web server on that port.
If you’d like to start the container and explore the code, you can do so with the fol-lowing command, which won’t start the node server: