JEEECCS, Volume 5, Issue 17, pages 19-24, 2019
Delta 3D Printer: Metal Printing
1
Sadiq Ur Rehman,
2Muhammad Hasnain Raza,
3Ahmad Raza Khan
1,2 Department of Electrical Engineering, FEST, Hamdard University, Karachi, Pakistan 3Department of Electrical Engineering, Quaid-e-Awam University of Engineering Science and Technology, Nawabshah, Pakistan
1[email protected];2[email protected]; 3[email protected]
Abstract – Now a day’s 3D printing is a very common
process used in industry, the common name being used for this object is “rapid prototyping”. The key advantage of a 3D printer is that it allows producing a prototype in a very short time, which is checked and soon after remodeled, significantly minimizing the required time to get from the prototype stage to the ultimate result. The Personal 3D printer will touch many facets of our daily lives. The basic aim is to bring this technology in under developing country like Pakistan is at low cost and to make it easily available for everyone for their everyday use. Delta type 3D printer is faster than the other printers available in the market and can save user time and cost of printing product. By making a user-friendly Delta 3D Printer, users will be able to digitalize their imagination and make it in the real world by using the printer. In this paper, brief understanding, experimental setup, simulation and results of metal printing using a metal Polylactic Acid (PLA) is presented. A prototype model is proposed with the objective that the model should enable different features based on which possible testing experiments can be performed. Moreover, the prototype model will work as a simulation system in which the user can play with the selection of different real-time parameters of the selected application and feature to see under which conditions best results can obtain. In making this printer we aim of achieving the objectives like making it affordable, precise (approx. 75%), efficient, user-friendly, available to the local market, making it reliable, fully customizable and portable
Keywords- 3D printer, metal PLA, Delta 3D Printer, affordable, reliable.
I. INTRODUCTION
Three dimensional (3D) printing, which is also called additive manufacturing, is a process in which 3D objects are formed layer by layer using required material with the help of computer control. With the help of this type of printing, the user is able to create any shape or geometrical design of an object. In this case, printing is done with the special type of printers among which delta 3D printers are highly preferred. There are around eight types of 3D printings which are namely Fused Deposition Modeling (FDM) [1], Laminated Object Manufacturing (LOM) [2], Selective Laser Sintering (SLS) [3], Binder Jetting (BJ) [4], Electron Beam Melting (EBM) [5], Selective Laser Melting (SLM) [6], Digital Light Processing (DLP) [7], Stereolithography (SLA) [8]. Due to vertical orientation and small footprints, the design of delta 3D printing is very unique as compared to the design of other 3D printers.
Delta 3D printing is taking the world with a storm. It provides everyone an opportunity to explore
creativity and innovation. The Delta printer is like the concept of the Delta robot [9]. Delta design is used in packing, surgery, and, of course in 3D printers. Delta printers use the Cartesian coordinate system, but they don't use linear-motion tracked movement to deposit filament. Instead, they use three arms, each a parallelogram (see fig. 1), and they move from one X, Y point to another by changing the angles of the parallelograms.
Figure 1. Arms of parallelogram attached with actuators in 3D printer [10].
Delta 3D Printer has the following features over other 3D printers available in the market.
• Acquires less desk space
• Large Printed objects (Height wise) • Fast Printing Speed
• Accurate Printing
• Able to build Complex Structures • Able to print many types of Materials • Sustainable
Figure 2. Applications of Delta 3D Printer
II. PROPOSED ARCHITECTURAL MODEL AND
SPECIFICATIONS
The body of the delta 3D printer is made of wood and held in place with glue and screws. Channel rails are used to make the bottom sliding box. Stainless steel rods are used for the carriage support and for the support of the body. Timing Pulleys and Timing Belt is used for the movement of the carriageway and the end factor. Linear bearing is used for the smooth movement of the carriageway. CADE software is used for the designing and sketching of the proposed Delta 3D Printer in which logo of Hamdard University can be seen (see fig.3).
Figure 3. Architecture model of Delta 3D Printer using CADE
Following steps were taken in assembling a proposed architectural model of the delta 3D printer.
A. The Electronics Components
The brain of the 3D Printer is an Arduino mega 2560 [11] on which a RAMPS 1.4 module is attached. The RAMP board is the main interface of the motor, end stops, thermistors, hot-end, fans, hot-bed and all the other electronics with the main Arduino board (See fig.4). All the wires of the electronics parts contain sufficient length that they can be connected to the
RAMPS 1.4 (see fig.5). Mostly all the electronics components are placed inside the bottom box
Figure 4. Electronics components placed inside the bottom box
Figure 5. Circuit diagram of the RAMPS 1.4, control system for the proposed Delta 3D Printer [12]
B. Setting the pololus
on the pololus stepper motor driver to reduce or increase the current being dragged and set them to 200mA and 400mA for the Axis and Extruder motor drivers respectively.
C. Preparations and assembly of the structure
The body is first designed on Sketch Up [13] on the blueprints and the structure are taken from it. Then the wood is cut accurately using a circular saw according to the blueprints of the structure. Then holes are drilled into the cut pieces for easy placement of the screws (see fig.6). The screws are put into place to strongly hold the body to complete the structure of the printer.
Figure 6. Structure of the printer Delta 3D Printer
D. Construction of the arms and Support for hot-end
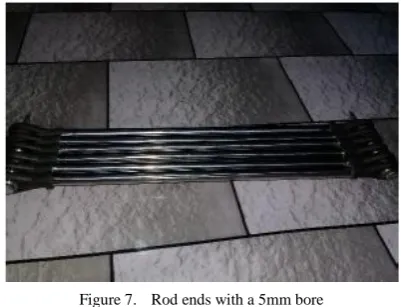
Rod ends with a 5mm bore are used for the 6 arms of the 3d printer (see fig. 7). The rod ends are attached on an aluminum rod at the ends with glue and screws. The 6 arms are of 250mm. For the support of the hot-end, we used a woodblock having three edges each at a 120-degree angle for attaching three arms to it with a hole in the middle for fixing the hot-end. Firstly, the hot-end is inserted into the woodblock from the bottom and then a PolyTetraFluoroEthylene (PTFE) [14] tube screw is tightened from the top.
Figure 7. Rod ends with a 5mm bore
E. Construction of the support of the bearings For the support of the linear bearing, 3 wood rectangles are cut to size so that the bearings could be attached to it. Holes are made to attach the bearing onto the wood block with the help of zip ties. The bearings are slide inside the stainless-steel rods (see
fig. 8) after attaching the support for the bearings and making holed for the arms to attach them.
Figure 8. Wood rectangles for the supports of bearings
F. Placing the hot-bed, end-stop and Firmware
In the center of the 3d printer the hot-bed it attaches with the help of four nuts at its corners. A hole in the center is made for the wires to enter the electronic box at the bottom of the printer (see section 2.1). End stops or the limit switches will tell the printer that it has reached its limits in heights.
The first firmware uploaded is Sprinter [15] so that the current on the motor drivers could be adjusted with the need of heating the hot-end and the bed. The main firmware Marlin [16] in uploaded into the Arduino mega 2560. The important factors in this firmware are the delta calculations like the arm’s length, delta radius, printer height, carrier and end factor offsets, the setting of the power supply, temperature levels, LCD controllers and end stop, etc. Settings are all done in the firmware before uploading it into the Arduino board.
G. Calibration
It is the most important stage in making the Delta 3D Printer as the quality and working of the printer depends on the steps taken for calibration. The errors in heights of ends tops, bed leveling, temperature run protections, LCD graphics, motors directions, motors speed, almost every parameter need to be checked before starting of the printer. If any correction is required then it needs to be done automatically so that the smooth running of the printer with its best’s results can be ensured.
In this way after making the body attached with all the mechanical and electronic parts and uploading the firmware, the prototype of the 3D printer is prepared
III. METHODOLOGY
Now open the 3D design (stl. File) in the Slicers [18] and set the parameter according to the printing requirement such as infill, nozzle size, feed rate, motor speed, fan speed, filament diameter, the temperature of heat-bed and hot-end, no. of skirt layers and supports layers etc.
Figure 9. Block diagram for the working of proposed 3D printer
Then Slice the objects and after slicing, the slicer will give the details that how much time it takes to print, how much printing material will be used, number of layers and will show the layer preview. Then initialize the printer and it will start to heat the bed and the hot-end temperature and will calibrate the bed leveling. The printer will not start printing until the set temperature (50 0C in our case) for the heat-bed and the hot-end are attained. As soon as the temperature is achieved the extruder will start extruding and the printer will start to print the skirt then brim and the support layer. After the support layer it will start printing the design and after the printing is finished, hot-end will automatically home itself.
Figure 10. GUI of Repetier-host v1.5.6
IV. CHALLENGES AND THEIR SOLUTIONS
The test print of the printer at the start was not good as it was expected that nothing is perfect from the beginning. In the first few prints which were printed with the test settings, there were problems like some layers were missing which were solved by reviewing the 3d model as it had some defects, after solving those faults the printer printed all the layers as it was supposed to do.
During the test, some layers slipped at one side (see fig 11) because of the missing steps and were solved by tightening the timing belts to a specific tension so that they neither hold the motor shaft too tightly for allowing it to rotate nor so loose that the motor makes a turn without moving the belt.
Figure 11. Printed logo of Hamdard University with slipped layers
V. EXPERIMENTAL SETUP AND RESULTS
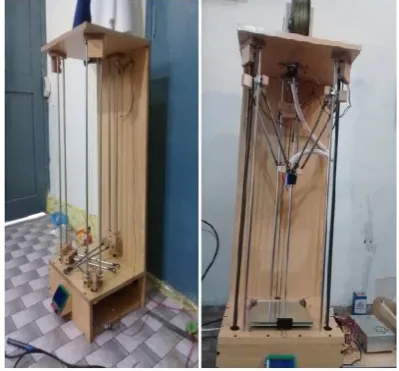
The prototype is made and can be seen in fig. 12 and set up with the configured firmware for running the printer in test mode. In the test mode the printer prints the test parts. Based on these test print settings and the test printed object the quality of the printer can be determined and changes can be made in the settings to remove any error or faults in the printer or the print settings.
Some scales were printed (see fig. 13) to check the accuracy of the printer with the actual objects (with the precision of approx. 75%). In these experiments, some test prints of scales, cubes, rectangles, circles, place holder scales and some other type of objects were printed to check the dimension accuracy of the printer.
Figure 12. Final Hardware of Proposed Delta 3D printer
Figure 13. 3D printer objects with metal PLA
The dimensions of the printed objects were out in the test prints as can be seen in fig.14, so measurements were taken to resolve it. The length of each arm and the height of each end-stop was checked precisely which improved the result of the printed object. Making the test print identical in term of shape, size, length, circumference, diameters, depths, thickness, etc. according to the assigned dimensions in the 3D CAD design.
Figure 14. 3D printer object with an error in dimensions
The temperature of the hot-end and the heat-bed were also altered to avoid overheating on small parts so that more detailed and complex geometrical objects could be printed out easily. Moreover, the setting of bed temperature, filament diameter, bed size, and nozzle diameter can be seen in fig. 15.
Figure 15. 3D printer setting in Repetier-host
The actual expense for making this proposed Delta 3D printer is around 81,000 PKR, detail breakup can be seen in table 1.
TABLE I. COST CALCULATION FOR PROPOSED DELTA 3D
PRINTER
S.No. Component Name # of
Item(s) Cost (PKR)
1 Arduino Mega 2560 1 1500 2 Reprap Ramps 1.4 1 2000 3 Stepper Motor+ Driver 4+4 10000+2000 4 Hot End + Thermistors 1+2 2000+2000 5 Extruder 1 2000 6 Heat Bed + End Stops 1+2 2000+1000 7 LCD Module + SD Slot 1 5000 8 Power Supply + Fans 1+5 5000+1500 9 Metal Filament 2 15000 10 Hardware’s (Body) 1 30000
Total Cost (PKR) 81,000
VI. CONCLUSIONS AND FUTURE WORK
With the help of a delta 3D printer, objects can be made of almost any shape or geometry. Proposed model of delta 3D printer works on the principle of metal printing using a Metal PLA. 3D printing provides everyone an opportunity to explore creativity and innovation. The personal 3D printer will touch many facets of our daily lives. Delta 3D Printer has the features of acquires less desk space, large printed objects (height-wise), fast printing speed, accurate printing, able to build complex structures, etc. over other 3D Printers out there in the market.
market including the Metal PLA. The total cost for making this fully functional delta 3D printer was much cheaper (around 80,000 PKR) than the available delta 3D printers in the market.
The future plans for this proposed delta 3D printer are that the printer would be made to run on more and more different types of filaments available in the market with improved precision. The printer needs to be able for print at very high temperatures of about 300 degree and low as 160 degrees easily with certain modification in the firmware settings. Advance work needs to be done on making printer intelligent as it will keep a track of total filament and notify the user to take certain steps so that the printer does not print without the filament in the middle of a print. Furthermore, the printer will be able to change between two colors of filaments between the print and make multi-color printed objects. In this, the printed objects will get a more attractive look and could be printed with more highlighted details. Accuracy can be improved by keeping every part dimensionally correct up to the 10th of a millimeter. Pullies with more steps should be used to increase accuracy. Ramps board and stepper motor drivers could be replaced with better ones to control the current more and stability could be achieved in the motors. Multifilament extruder and a multi-color hot end could be used to make interesting and color full objects fast and with great accuracy.
REFERENCES
[1] Halápi, Dávid, Sándor Endre Kovács, Zsolt Bodnár, Árpád B. Palotás, and László Varga. "Tensile Strength Analysis of 3D Printer Filaments." In 3D Conference Engineering Section Pécs, Hungary, October 5-6, 2018, p. 33.
[2] Vilasrao, Kusumkar Vipul. "Development and Applications of 3D Printing Resins From Renewable Resources." (2018). [3] Kruisová, A., R. Kolman, J. Trnka, J. Buchar, D. Mochar, J.
Kober, and J. Vtípil. "Effective elastic properties of 3D printed auxetic metamaterials." (2018).
[4] Antic, A., I. Gibson, and K. Hapgood. "Exploring the 3D printing binder jetting process for pharmaceutical applications." Chemeca 2018 (2018): 256.
[5] Bambach, Markus, Irina Sizova, Ole Geisen, and Omar Fergani. "Comparison of the Hot Working Behavior of Wrought, Selective Laser Melted and Electron Beam Melted Ti-6Al-4V." In Materials Science Forum, vol. 941, pp. 2030-2036. Trans Tech Publications, 2018.
[6] Kelly, Cambre N., Nathan T. Evans, Cameron W. Irvin, Savita C. Chapman, Ken Gall, and David L. Safranski. "The effect of surface topography and porosity on the tensile fatigue of 3D printed Ti-6Al-4V fabricated by selective laser melting." Materials Science and Engineering: C (2019). [7] Kwak, Hojung, Sungchul Shin, Hyunji Lee, and Jinho Hyun.
"Formation of a keratin layer with silk fibroin-polyethylene glycol composite hydrogel fabricated by digital light
processing 3D printing." Journal of Industrial and Engineering Chemistry (2018).
[8] Adnan, F. A., and F. R. M. Romlay. "Contour generation algorithm for projection mask stereolithography 3D printing process." In IOP Conference Series: Materials Science and Engineering, vol. 469, no. 1, p. 012006. IOP Publishing, 2019.
[9] Poma, Javier Alfredo Hilario, José Guillermo Balbuena Galván, Ismael Masharo Vargas Quispe, Ruth Aracelis Manzanares Grados, and Francisco Fabián Cuellar Cordova. "Design of a 2-DOF Delta Robot for Packaging and Quality Control of Processed Meat Products." In 2018 Latin American Robotic Symposium, 2018 Brazilian Symposium on Robotics (SBR) and 2018 Workshop on Robotics in Education (WRE), pp. 201-206. IEEE, 2018.
[10] David Gewirtz, "3D printing hands-on Understanding the difference between Delta and Cartesian printers", 2017. [Online]. Available: http://www.citethisforme.com/guides/ieee-with-url/how-to-cite-a-website. [Accessed: 21- Jan- 2019]
[11] Tazi, Imam, Kuwat Triyana, and Dwi Siswanta. "A novel Arduino Mega 2560 microcontroller-based electronic tongue for dairy product classification." In AIP Conference Proceedings, vol. 1755, no. 1, p. 170003. AIP Publishing, 2016.
[12] “RAMPS 1.4 3D Printer Controller+5Pcs DRV8825 Driver With Heat Sink Kit”, [Online]. Available: https://robu.in/product/ramps-1-4-3d-printer-controller5pcs-drv8825-driver-heat-sink-kit-arduino-reprap/, [Accessed: 19- Jul- 2019]
[13] Schreyer, Alexander C. Architectural Design with SketchUp: 3D Modeling, Extensions, BIM, Rendering, Making, and Scripting. John Wiley & Sons, 2015.
[14] Zhang, Bong June, Cheng Kuok, Kwang Jin Kim, Taeseon Hwang, and Hyungkee Yoon. "Dropwise steam condensation on various hydrophobic surfaces: Polyphenylene sulfide (PPS), polytetrafluoroethylene (PTFE), and self-assembled micro/nano silver (SAMS)." International Journal of Heat and Mass Transfer 89 (2015): 353-358.
[15] Ahmed, Ishtiaq. "design and fabrication of portable 3d printer." ph.d. diss., visvesvaraya technological university, 2018.
[16] Krüger, Jacob, Wanzi Gu, Hui Shen, Mukelabai Mukelabai, Regina Hebig, and Thorsten Berger. "Towards a Better Understanding of Software Features and Their Characteristics: A Case Study of Marlin." In International Workshop on Variability Modelling of Software-Intensive Systems, pp. 105-112. 2018.
[17] Sukindar, Nor Aiman Bin, Mohd Khairol Anuar Bin Mohd Ariffin, BT Hang Tuah Bin Baharudin, Che Nor, Aiza Binti Jaafar, and Mohd Idris Shah Bin Ismail. "Analysis of the Impact Process Parameters on Tensile Strength Using 3D Printer Repetier-Host Software." ARPN Journal of Engineering and Applied Sciences 12, no. 10 (2017): 3341-3346.
![Figure 1. Arms of parallelogram attached with actuators in 3D printer [10].](https://thumb-us.123doks.com/thumbv2/123dok_us/7805637.2085019/1.595.333.528.290.462/figure-arms-parallelogram-attached-actuators-d-printer.webp)
![Figure 5. Circuit diagram of the RAMPS 1.4, control system for the proposed Delta 3D Printer [12]](https://thumb-us.123doks.com/thumbv2/123dok_us/7805637.2085019/2.595.59.271.426.633/figure-circuit-diagram-ramps-control-proposed-delta-printer.webp)