Release Notes
period is one year from the date of shipment. GDC's sole obligation under its warranty is limited to the repair or replacement of the defective equipment provided it is returned to GDC, transportation prepaid, within a reasonable period. This warranty will not extend to equipment subjected to accident, misuse, or alterations or repair not made by GDC or authorized by GDC in writing. The foregoing warranty is exclusive and in lieu of all other warranties, express or implied, including but not limited to, warranties of merchantability and fitness for purpose.
Trademarks and Patents
General DataComm, the General DataComm logo and the following are trademarks of General DataComm, Inc in the United States and other countries: ACCULINE, ANALOOP, AUTOFRAME, BERT 901, DATACOMM SECURE-PAK, DATALOOP, DIGIDIAL, ENmacs, FASTPRO, FIRST RESPONSE, GDC, GDC APEX, GENERAL DATACOMM X-PRESS, GEN*NET, GEN*PAC, IMAGE*TMS, KILOMUX, LAN*TMS, MEGA*BRIDGE, MEGAMUX, MEGAMUX TMS, MEGANET, MEGASPLIT, MEGASWITCH, MEGAVIEW, NETCON, NETSWITCH, NMC, QUIKSHIPPERS, SERVI-CHECK, SERVI-SNAP, WINmacs.
ANALOOP and DATALOOP respectively are protected by U.S. patents 3,655,915 and 3,769,454. All other products or services mentioned in this document are identified by the trademarks, service marks, or product names as designated by the companies who market those products. Inquiries concerning such trademarks should be made directly to those companies.
Copyright
© 2007 General DataComm, Inc. All rights reserved. 6 Rubber Avenue, Naugatuck, Connecticut 06770 U.S.A.
This publication and the software it describes contain proprietary and confidential information. No part of this document may be copied, photocopied, reproduced, translated or reduced to any electronic or machine-readable format without prior written permission of General DataComm, Inc.
The information in this document is subject to change without notice. General DataComm assumes no responsibility for any damages arising from the use of this document, including but not limited to, lost revenue, lost data, claims by third parties, or other damages. If you have comments or suggestions concerning this manual, please write to Technical Publication Services or call 1-203-729-0271.
TABLE OF CONTENTS
Section 1 - Secure Access Controller Version 2.0.0... 5
1.0
Overview ... 5
2.0
SAC Software/Hardware Reference ...5
3.0
Minimum Platform and Hardware Requirements...6
4.0
SAC Client Software Installation Overview...7
5.0
SAC Server Software Overview (Factory-Installed) ...7
6.0
SAC Server Software Overview (User Installed) ...7
6.1
Microsoft Windows Platform Preparation (All SAC Servers) ...7
6.2
SAC Authentication Server Preparation ...7
6.3
SAC Database Server Preparation ...8
6.4
SAC Administration Server Preparation...8
6.5
Server Installation Checklist ...9
7.0
SAC Database Server Installation...10
8.0
SAC Administration Web Server Installation ...11
9.0
SAC Authentication Server Installation ...12
9.1
SAC Authentication Server Certificates ...12
9.2
SAC Authentication Server Installation ...13
9.2.1
Authentication Service Installation ...14
9.2.2
Remote Access Service Installation ...16
9.2.3
Monitoring Service Installation ...17
9.2.4
Service Console Installation ...17
10.0
Summary ...17
11.0
Backup Recommendations ...18
12.0
Uninstalling SAC Server Software ...18
13.0
Operation Guidelines ...19
Section 1 - Secure Access Controller Version 2.0.0
1.0
Overview
These release notes provide new information relevant to this version of the Secure Access Controller Server and Client Software, updating the information in the
SAC Server
Operation Manual
and theSAC Client Installation & Operation Manual.
If you require detailed operating instructions, please refer to those manuals. For the latest information, go to http://www.gdc.com or contact your GDC representative. The SAC Server Software Version 2.0.0 is typically pre-installed on one or more server-class PCs and shipped from the factory fully equipped and tested for use as Administration, Authentication and Database servers in a SAC System. The SAC Client Software Version 2.0.0 is installed by the user on a Pentium-class PC, as described in the Client manual.2.0
SAC Software/Hardware Reference
The following table lists the main deliverable SAC Server/Client Ver. 2.0.0 components. For details, see Section 3.0 Minimum Platform and Hardware Requirements.
Note:
IMPORTANT! It is strongly recommended that all SAC servers be provisioned with bootable backup software to protect the installed server software and system data from hard disk failure. To access the embedded Client Help and Server (Web Console) Help, the Adobe Acrobat Reader software is also required (free download from adobe.com).Note:
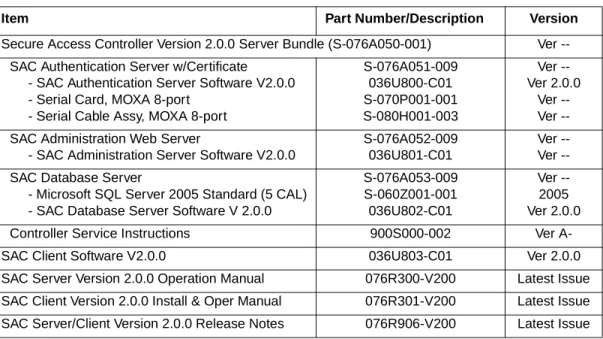
For part numbers and version information on the Secure Access Modem hardware, firmware and security key, refer to the latest Installation and Operation Manual for your SC V28.6/33.6 modem (060R112-000) or your SC Dual V.34 modem (060R122-000).Table 1: SAC Version 2.0.0 Part Numbers
Item Part Number/Description Version
Secure Access Controller Version 2.0.0 Server Bundle (S-076A050-001) Ver --SAC Authentication Server w/Certificate
- SAC Authentication Server Software V2.0.0 - Serial Card, MOXA 8-port
- Serial Cable Assy, MOXA 8-port
S-076A051-009 036U800-C01 S-070P001-001 S-080H001-003 Ver --Ver 2.0.0 Ver Ver --SAC Administration Web Server
- SAC Administration Server Software V2.0.0
S-076A052-009 036U801-C01
Ver Ver --SAC Database Server
- Microsoft SQL Server 2005 Standard (5 CAL) - SAC Database Server Software V 2.0.0
S-076A053-009 S-060Z001-001 036U802-C01 Ver --2005 Ver 2.0.0 Controller Service Instructions 900S000-002 Ver A-SAC Client Software V2.0.0 036U803-C01 Ver 2.0.0 SAC Server Version 2.0.0 Operation Manual 076R300-V200 Latest Issue SAC Client Version 2.0.0 Install & Oper Manual 076R301-V200 Latest Issue SAC Server/Client Version 2.0.0 Release Notes 076R906-V200 Latest Issue
3.0
Minimum Platform and Hardware Requirements
For the SAC Authentication Server:
• Pentium server-class PC, 2.8GHz, 1GB RAM, 80GB Hard drive
• Windows Server 2003 Enterprise/Standard Edition and current Service Packs • Dual Gigabit Network Adapter
• Microsoft-certified multi-serial port (8-port) card, driver and cable • CD-RW/DVD ROM drive
• Windows HyperTerminal terminal emulation program • SAC Authentication Server software
For the SAC Administration Web Server:
• Pentium server-class PC, 2.8GHz, 1GB RAM, 80GB Hard drive
• Windows Server 2003 Enterprise/Standard Edition and current Service Packs • Dual Gigabit Network Adapter
• CD-RW/DVD ROM drive
• Microsoft Internet Information Service (IIS)
• Microsoft .Net Framework Ver 2.0 (download from www.microsoft.com) • SAC Administration Server Ver. 2.0.0 software
For the SAC Database Server:
• Pentium server-class PC, 2.8GHz, 4GB RAM, Dual 80GB Hard drives • Windows Server 2003 Enterprise/Standard Edition and current Service Packs • Gigabit Ethernet NIC
• 750-watt Redundant Power Supply • CD-RW/DVD ROM drive
• Microsoft Internet Information Service (IIS) • Microsoft SQL Server 2005 Standard Edition • SAC Database Server Ver. 2.0.0 software For the SAC Client PC:
• Pentium-class PC or laptop
• Windows XP or Windows 2000 operating system • CDROM Drive
• Adobe Acrobat Reader software (free download from www.adobe.com) • SAC Client Ver. 2.0.0 software
Note:
IMPORTANT! It is strongly recommended that all SAC servers be provisioned with bootable backup software. Acrobat Reader software is also required to access the Client manual via the Client Help, and all SAC documentation via the Web Console Help (free download from www.adobe.com).Note:
To use hardware/software components other than those listed above, consult the manufacturer of those components to determine compatibility.4.0
SAC Client Software Installation Overview
SAC Client software is typically installed on a PC by the user onto a remote PC/laptop. Client Install/Uninstall procedures are described in the SAC Client Software Installation & Operation Manual. Check Section 14.0 Known Issues in this document for updates.
5.0
SAC Server Software Overview (Factory-Installed)
The SAC servers are typically shipped from the factory with the required hardware and operating platform fully installed, and the specific SAC Server software pre-installed and ready for configuration. The user need only install the following additional software on all factory-supplied SAC servers:
• Install Bootable Backup software (STRONGLY Recommended). • Install Adobe Acrobat Reader software (required to view manuals)
Note:
After installing the above utilities, refer to the SAC Server Operation Manual to configure each SAC server, user and Secure Access Modem in the system.6.0
SAC Server Software Overview (User Installed)
In some cases, the SAC software may be installed by the user on user-provided server-class PCs. In this situation, the user must perform the following preparations prior to SAC server software installation.
6.1
Microsoft Windows Platform Preparation (All SAC Servers)
• Refer to the hardware specifications accompanying your server-class PC to ensure that processor speed, memory capacity, and components meet SAC software and hardware requirements.
• Contact your System Administrator or IT staff for assistance in loading the Windows Server 2003 operating system and the current Service Packs.
• Install the Adobe Acrobat Reader to view and print Server and Client Help in PDF format. This free utility can be downloaded from www.adobe.com.
• Install Bootable Backup software (STRONGLY Recommended).
6.2
SAC Authentication Server Preparation
In addition to the Microsoft Windows platform preparation for all servers, Authentication Servers require the following additional software and hardware components before the SAC Authentication software can be installed:
• Install the multi-serial port card and cabling on the Authentication Server. From the multi-serial port card CD, load a separate instance of the driver software for each of the eight serial ports.
• If not already resident, install the Windows HyperTerminal terminal emulation program from your Windows Server 2003 software CD.
• Acquire a software certificate as described in Section 9.1 SAC Authentication Server Certificates.
6.3
SAC Database Server Preparation
In addition to the Microsoft Windows platform preparation for all servers, the Database Server requires the following additional software and hardware components before the SAC Database software can be installed:
• First, install and enable Microsoft Internet Information Service (IIS) software as described in the instructions provided by Microsoft.
• Then, install Microsoft SQL Server 2005 software as described in the accompanying instructions, using the following settings:
6.4
SAC Administration Server Preparation
In addition to the Microsoft Windows platform preparation for all servers, the Administration Server requires the following additional software and hardware components before the SAC Administration software can be installed:
• Install and enable Microsoft Internet Information Service (IIS) software as described in the instructions provided by Microsoft.
• Launch the Windows Installer Ver 3.1 (KB8938030v2-x86.exe) which is resident on the server. Use it to install the Microsoft .Net Framework Ver 2.0 (dotnetfx.exe) which is a free download from www.microsoft.com.
Components to Install: SQL Server Database Services
Choose the Default Instance Name. Choose the Default Listening Port: 1433
Choose Mixed Authentication Mode. Enter and confirm password: admin
Collation Settings: SQL Collations. Choose the Default Dictionary.
Use the built-in system account: Local System. Install Workstation Component: Client Component
6.5
Server Installation Checklist
Make a copy of the following form and record the information needed for each SAC server during installation and configuration of server software.
ADMINISTRATION WEB SERVER
Software Requirements:
___ Microsoft Windows Server 2003
___ Microsoft Internet Information Service (IIS) ___ SAC Administration Server Ver. 2.0.0 software
___ Microsoft .Net Framework Ver 2.0 ___ Bootable Backup Software ___ Acrobat Reader (www.adobe.com) IP Address or DNS Name:
Web Console Website: (Default: SNsacWebAdmin) Website Port Number: (Default: 8090)
MS SQL Server Port: (Default: 1433) Database Connection User Name: (Default: webuser) SAM PIN:
Remote User Public Key: Groups and User IDs:
Categories and SAM IDs:
DATABASE SERVER
Software Requirements:
___ Microsoft Windows Server 2003
___ Microsoft Internet Information Service (IIS) ___ SAC Database Server Ver. 2.0.0 software
___ Microsoft SQL Server 2005 ___ Bootable Backup Software ___ Acrobat Reader (www.adobe.com) DB IP Address or DNS name: (Default: 192.168.5.1)
DB User name: (Default: COMMUSER) DB Password: (Default: securenex)
AUTHENTICATION SERVER
Software Requirements:
___ Microsoft Windows Server 2003 ___ HyperTerminal Software
___ SAC Authentication Server Ver. 2.0.0 software ___ Multi-serial port (8-port) card, driver and cable
___ Bootable backup software
___ Acrobat Reader (www.adobe.com) ___ SAC Software certificate (license) Auth. Server Name (4 to 32 characters, no spaces) (Default: SAC1 or SAC2)
Auth. Server IP Address or DNS Name: MAC address:
7.0
SAC Database Server Installation
The following procedure installs the SAC database schema on a server-class PC that is already running Windows 2003 Server operating system. This SAC schema is comprised of the Microsoft SQL server-based database structure and initialization data.
1. Ensure the Microsoft IIS and Microsoft SQL software programs are already installed on the server.
2. Insert the SAC Server Installation CD in the CDROM drive.
Note:
IMPORTANT! If there is a previous installation of the SAC Database Server software on this server, it is a good practice to backup your SQL database and log file BEFORE proceeding with an upgrade or reinstall of the SAC software. Refer to your Microsoft SQL documentation for instructions.3. Log on to the SAC Database Server as an administrator.
• From the Start menu, click Run to open a DOS command console. • In the Open field, type cmd, then click OK.
4. At the DOS prompt, change the current drive to the CDROM drive where the SAC Installation CD is located (for example, E:).
5. At the CD drive prompt, change to the database directory by typing:
cd Database.
6. At the Database prompt, type make.bat to install the SAC database schema. The install script will display a series of messages while the installation occurs.
Note:
IMPORTANT! Avoid terminating the install script prematurely.Do not press Control-C or otherwise attempt to interrupt the installation. 7. When the installation is complete, the following message will appear:
SNsac database schema has been created.
8. You can now close the DOS console and remove the SAC software CD from the CDROM drive. The SAC Database Server software installation is complete. 9. Proceed to Section 8.0 SAC Administration Web Server Installation.
8.0
SAC Administration Web Server Installation
The SAC Administration Web Server software is installed via a GUI-based Install Wizard on a server-class PC that is already running Windows Server 2003 operating system. 1. Ensure the Microsoft IIS and Microsoft .Net Framework software programs are
already installed on the server.
2. Insert the SAC Server Installation CD in the CDROM drive.
Note:
IMPORTANT! If there is a previous installation of the Administration Web Server software on this server, you must uninstall the previous instance BEFORE proceeding with an upgrade or reinstall of the software. Refer to Section 12.0 Uninstalling SAC Server Software for complete uninstall procedures.3. Browse to the Web directory on the CD and double-click the following file to start the Install Wizard:
SNsac.Admin.Installer.exe
4. A Welcome screen for the SAC Administration Web Console appears. Follow the instructions on the screen and click Next to continue.
5. The Settings screen appears for setting up the SAC Web Console website. If you do not have special requirements, accept the default site name (SNsacWebAdmin) and default website port number (8090). Otherwise:
• At the Name field, enter a name of the Web Console web site.
• At the Number field, enter the port number of the Web Console web site. • Click Next to continue.
Note:
An error message will display if you specify a name or a port that is already in use.6. The Choose Components screen appears. At present there is only one software component for the Administration Server, which cannot be de-selected. Click Next
to continue.
7. The Install Location screen appears for selecting where the software will reside on the SAC Administration Server. If you have a special requirement, browse to the desired location. Otherwise, accept the default location, which is:
c:\Program Files\SecureNex\SNsac.
8. Click Install to continue. An Installing screen appears, showing the progress of the installation. When the progress bar reaches around 70%, it will pause for about 30 seconds for operating system registration processing. Do not cancel or attempt to interrupt the installation until complete.
9. When the installation is done, a Completion screen appears. Click the Finish
button to close the Install Wizard. The SAC Administration Web Server installation is complete.
9.0
SAC Authentication Server Installation
The SAC Authentication Server software is installed with a GUI-based Install Wizard, on a server-class PC that is already running Windows Server 2003 operating system. The following procedures must be performed to prepare SAC Authentication Server for use:
• Acquire software certificate (license) for each Authentication Server. • Install SAC Authentication Server software
• Individually install SAC services (Authentication, Remote Access, Monitoring) and the Local Service Console.
9.1
SAC Authentication Server Certificates
In order to install SAC software on the Authentication Server, a unique software certificate (i.e., server license key) must be acquired from the manufacturer for each Authentication Server. Each certificate is associated with a particular Authentication Server’s MAC address. To acquire a certificate for each server:
1. Determine the MAC addresses of each Authentication Server as follows: • From the Windows Desktop Start Menu, browse to:
Programs-> Accessories-> Command Prompt->
• At the command prompt screen, display the Authentication Server’s physical (MAC) address by typing: ipconfig /all
Note:
When the server is equipped with a backup Network interface Card (NIC), a MAC address will be dispayed for each Ethernet port. Select the MAC address of the port that will be the primary connection to the network.2. Contact your GDC representative for instructions on using this MAC address to acquire the software certificate for each Authentication Server.
3. The acquired file will have the MAC address as part of the file name. Save this file in a safe location on the Authentication Server.
4. During SAC Authentication Server software installation, this file will be used to create a valid server key (server.key) that will permit the software installation to proceed.
Note:
When the Authentication Server is shipped from the factory pre-installed with SAC software, a valid server key is already activated for that Authentication Server.9.2
SAC Authentication Server Installation
1. Ensure your HyperTerminal software program is already installed on the server, and that the multi-serial port driver software has been installed for each serial port. 2. Insert the SAC Server Installation CD in the CDROM drive.
Note:
IMPORTANT! If there is a previous installation of the Authentication Server software on this server, you must uninstall the previous instance BEFORE proceeding with an upgrade or reinstall of the software. Refer to Section 12.0 Uninstalling SAC Server Software for complete uninstall procedures.3. Log on to the SAC Authentication Server as an administrator.
4. Browse to the Server folder on the CD and execute the setup.exe file to start the Install Wizard.
5. A Welcome screen for the SAC System appears. Follow the instructions on the screen and click Next to continue.
6. The License Agreement screen appears. Read the agreement carefully. If you agree, click I Agree to continue.
7. The Choose Components screen appears, showing the four components that can be installed on the Authentication Server. When a component is already checkmarked, it has already been installed on the server. Be sure to select all four components with a checkmark:
• SNsac Authentication Service • SNsac Remote Access Service • SNsac System Monitoring Service • SNsac Service Console
8. Click Next to continue. Each selected component will be installed individually, as described below.
Note:
If you de-select one or more previously installed components in Step 7., a Remove screen will appear; click Uninstall to remove each de-selected component in sequence. The Installer will then proceed to install any selected components, as described below.9.2.1 Authentication Service Installation
9. A Welcome screen for the SNsac Authentication Service appears. Follow the instructions on the screen and click Next to continue.
10. The Install Location screen appears for selecting where the software will reside on the SAC Authentication Server. If you have a special requirement, browse to the desired location. Otherwise, accept the default location, which is:
c:\Program Files\SecureNex\SNsac. 11. Click Next to continue.
12. The Import License Key screen appears, as shown below:
13. Click [...] to browse to the valid software certificate previously acquired from the manufacturer for this Authentication Server. Then click Open. A server key file (server.key) is now created and activated for this server.
Note:
The server key is generated from the software certificate received from the manufacturer. Refer to Section 9.1 SAC Authentication Server Certificates for information on acquiring a valid software certificate for each Authentication Server in your SAC system.14. With a valid license key, the Authentication Service Settings screen appears, as shown below:
• In the Name field, enter a unique name for this Authentication Server. • In the DB address field, enter the valid IP address or DNS name for the SAC
Database Server.
• In the DB user field, enter a Database username for connecting to the SAC database Server. Default name is COMMUSER.
• In the Password fields, enter and confirm a password for the database user. Default password is securenex.
Note:
IMPORTANT! Ensure the Authentication Service information is correct and make a record of your entries. You must precisely enter this data at the Web Console when configuring the server, as described in the SAC Server Operation Manual.15. Click Install to continue. An Installing screen appears, showing the progress of the installation. Do not cancel or attempt to interrupt the installation until complete. 16. When the Installation is complete, click Close. The Authentication Service is now
installed on this server.
17. If you have selected additional components for installation, the Installer will display the next appropriate Welcome screen, as described below.
9.2.2 Remote Access Service Installation
18. When the SNsac Remote Access Service is selected for installation, a Welcome screen appears. Follow the instructions on the screen and click Next to continue. 19. The Install Location screen appears for selecting where the software will reside on
the SAC Authentication Server. If you have a special requirement, browse to the desired location. Otherwise, accept the default location, which is:
c:\Program Files\SecureNex\SNsac.
20. Click Next to continue. The Remote Access Service Settings screen appears, as shown below:
• In the Port field, enter the listening port for this server. This is the port that will receive commands from the Web Console. Any unoccupied port number may be entered. The default value is 8070.
21. Click Install to continue. An Installing screen appears, showing the progress of the installation. Do not cancel or attempt to interrupt the installation until complete. 22. When the Installation is complete, click Close. The Remote Access Service is now
installed on this server.
23. If you have selected additional components for installation, the Installer will display the next Welcome screen, as described below.
9.2.3 Monitoring Service Installation
24. When the SNsac Monitoring Service is selected for installation, a Welcome screen appears. Follow the instructions on the screen and click Next to continue. 25. The Install Location screen appears for selecting where the software will reside on
the SAC Authentication Server. If you have a special requirement, browse to the desired location. Otherwise, accept the default location, which is:
c:\Program Files\SecureNex\SNsac.
26. Click Install to continue. An Installing screen appears, showing the progress of the installation. Do not cancel or attempt to interrupt the installation until complete. 27. When the Installation is complete, click Close. The Monitoring Service is now
installed on this server.
28. If you have selected additional components for installation, the Installer will display the next Welcome screen, as described below.
9.2.4 Service Console Installation
29. When the Service Console is selected for installation, a Welcome screen appears. Follow the instructions on the screen and click Next to continue.
30. The Install Location screen appears for selecting where the software will reside on the SAC Authentication Server. If you have a special requirement, browse to the desired location. Otherwise, accept the default location, which is:
c:\Program Files\SecureNex\SNsac.
31. Click Install to continue. An Installing screen appears, showing the progress of the installation. Do not cancel or attempt to interrupt the installation until complete. 32. When the Installation is complete, click Close. The Service Console is now
installed on this server.
10.0 Summary
When SAC server software has been properly installed on the SAC Administration Server, the SAC Database Server, and one or more SAC Authentication Servers (primary and secondary), the SAC system can be configured for use.
• System Administrator: Refer to the latest issue of the SAC Server Operation Manual (076R300-V200) for detailed configuration and operation procedures. • Remote Users: Refer to the SAC Client Installation & Operation Manual
11.0 Backup Recommendations
Once the SAC servers are fully installed and configured for use, be sure to back up the SAC server hard drives, configurations and key files, and the SQL database. This is also important after making major changes to the configuration of a SAC Server, or before attempting to reinstall or upgrade SAC server software.
• Install your backup software on each SAC server, then and make a bootable backup of each hard drive as described in the documentation accompanying your software. In the rare instance of a disk failure, you need only reformat/replace the faulty hard drive, and then restore the server software and data from your backup CD.
• It is also a good practice to save a copy of the configuration file and security keys associated with the server onto a CD.
• It is strongly suggested that you regularly detach and backup the SQL database and log file from your SAC Database Server, using the Microsoft SQL utilities. Refer to your Microsoft SQL documentation for instructions.
12.0 Uninstalling SAC Server Software
The SAC software on Administration or Authentication servers must be uninstalled before you can reinstall or upgrade those servers with a new version of SAC software. Perform the following steps to uninstall SAC software on either server. Note that the SAC Database Server does not need to be uninstalled before a reinstallation or upgrade of the SAC software.
Note:
IMPORTANT! It is strongly recommended that you first perform all of the backup procedures as described in Section 11.0 Backup Recommendations BEFORE uninstalling or upgrading SAC software on any server.1. Close all open applications.
2. For Authentication Servers only, ensure the server.key for each server is saved in a separate location on its hard drive.
3. From the Start menu, go to
[drive]
:\Program Files\SecureNex\SNsac\4. Browse to the folder for the particular server and click the executable file for uninstalling that server.
5. When the Uninstall Wizard Welcome screen appears, click Uninstall to proceed. Once the progress screen appears, you will not be able to stop the process. 6. When finished, the Complete screen appears. You can now close the Uninstall Wizard
13.0 Operation Guidelines
• On a system startup, the Authentication Server will only initialize the modems in the modem bank when the authentication service is started. When a modem is added to the modem bank, the authentication service must be stopped and then started to detect the new modem.
• Always start the authentication service before starting the monitoring service. • Ensure that the Authentication Server is configured with port numbers that
correspond to the connected modems in the modem bank, and that the multi-serial card cable connectors are attached to each configured port.
14.0 Known Issues
When the SAC Client software is installed on a PC that is running Windows XP Media Center Edition 2005, the telephony service settings intended for Caller/ID will use the same communications (COM) port that is assigned to the modem. This conflict will lock up the COM port on the PC so that the SAC Client can not open the port.
To resolve this conflict, disable all the telephony services in Windows XP Media Center Edition 2005 as follows:
1. From the Start Menu, click Settings, and then select Messenger and
Caller ID. (In some cases, you will only be able to select Messenger.) 2. Under Show notification for:, select None.