Using VMware ESX Server With Hitachi
Data Systems NSC or USP Storage
ESX Server 3.0.2
This technical note discusses using ESX Server hosts with a Hitachi Data Systems (HDS) NSC or USP SAN
storage array using FibreChannel (FC) connections. These storage arrays use advanced storage virtualization
technology, and setup differs from setup of a non‐virtualized SAN storage array that is to be used with ESX
Server hosts. You can also use certain other storage arrays in an SVD configuration. See the SAN Compatibility Guide for a complete list.
The technical note starts with an introduction to SVD (storage virtualization device) technology, and then steps
you through setting up your storage array and your ESX Server hosts. The last section discusses how you can
resolve the issue that arises because the LUN identifiers change when the LUNs are virtualized.
Understanding Storage Virtualization
An ESX Server host can be connected to storage arrays that export LUNs from back‐end internal RAID devices,
as discussed in detail in the SAN Configuration Guide.
Some storage controllers, appliances, and network‐based devices have the capability to connect external
storage arrays as back‐end devices and virtualize the LUNs from these back‐end devices. Virtualized LUNs
hide the actual LUN allocation details from the ESX Server host. This storage virtualization feature provides
added flexibility because it brings disparate storage arrays under single management control and allows data
Copyright © 2007 VMware, Inc. All rights reserved.
2
Configuration Example
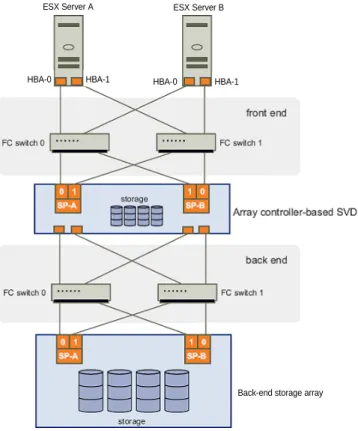
Figure 1 shows an example of a typical configuration.
Figure 1. Using a Storage Virtualization Device
The diagram shows the following elements from top to bottom:
Two ESX Server hosts (ESX Server A and ESX Server B) are connected through two FC switches to an array
controller‐based storage virtualization device (SVD). The SVD could be an HDS NSC or USP array, or an
equivalent model as discussed in the SAN Compatibility Guide.
The SVD is connected to a back‐end storage device through two FC switches.
The rest of this document explains how to set up the storage arrays and ESX Server hosts in such
configurations and how set up your ESX Server host to use the virtualized LUNs instead.
Terminology
The following terminology is used in this document (see Figure 1 for an illustration).
Storage Virtualization Device (SVD) — A storage controller, appliance, or network‐based device that can
export LUNs from external storage arrays. The external storage arrays are connected to the SVD as back‐end
devices.
Virtualized SAN LUN — A LUN that is exported by an SVD. Such a LUN is allocated on the back‐end storage
device but accessible through the SVD. During the virtualization process, the SVD presents the back‐end
storage LUNs to the hosts using a new LUN ID (UUID or serial number).
NOTE Another typical configuration (not shown here) connects the back‐end array to the same fabric as the
SVD.
ESX Server A ESX Server B
HBA-0 HBA-1HBA-1 HBA-0 HBA-1
System Setup
System setup consists of these tasks:
“Task 1: Setting Up the SVD Storage Array to Work With ESX Server Hosts” on page 3
“Task 2: Migrating From Back‐end Storage to Virtualized Storage” on page 3
“Task 3: Making Storage Available to the ESX Server Host” on page 3
Task 1: Setting Up the SVD Storage Array to Work With ESX Server Hosts
The first step in preparing your system is to set up the SVD storage array. Using the HDS Storage Navigator
management interface, set the following options:
Task 2: Migrating From Back-end Storage to Virtualized Storage
The next step is migrating from back‐end storage to virtualized storage. That is, making the back‐end storage
available as virtualized storage via the SVD. This section gives only the high‐level steps involved. For
additional information, contact your HDS support representative.
To migrate from back-end storage to virtualized storage
1 Make sure that no other host or ESX Server host is directly connecting to the LUNs you want to virtualize
from the back‐end.
2 Using the back‐end array management software, present the desired LUNs to the SVD initiator host
groups.
3 Use the SVD (NSC or USP) management software (Storage Navigator) to virtualize the LUNs from the
back‐end storage array.
a Using the Universal Volume Manager tool, discover back‐end storage LUNs and virtualize them. b Using the LUN Manager tool, map these virtualized LUNs to the ESX Server host or hosts.
Task 3: Making Storage Available to the ESX Server Host
After you’ve completed the tasks above, you can make the storage available to the virtual machines running
on your ESX Server host. The process is the same as for any other FC storage, and is discussed in the ESX Server 3i Configuration Guide, the ESX Server 3 Configuration Guide, and the SAN Configuration Guide.
Making VMFS Volumes or RDMs Visible After LUN ID Changes
VMFS‐3 metadata identify storage volumes using several properties, including the LUN number and the LUN
ID (UUID or Serial Number). Virtualized LUNs have different UUIDs than the corresponding LUNs on the
back‐end array. Because of the resulting metadata mismatch, VMware Logical Volume Manager (LVM)
identifies the SVD volumes as snapshots. This section discusses how to make an ESX Server host recognize a
virtualized LUN containing either RDM storage or a VMFS volume.
Option Value Comment
Host Mode Option =19 ON This is a Host Group setting and is not
accessible by customers. Contact HDS for
assistance with this change.
Host Mode 0A (Netware) You must use Netware for all VMware
Host groups.
Host Mode settings for SVD initiator host groups
in the back‐end storage array.
Windows Server 2003
Copyright © 2007 VMware, Inc. All rights reserved.
4
Accessing VMFS Volumes on Virtualized LUNs Without Volume Resignaturing
This section discusses how you can make VMFS volumes accessible without volume resignaturing. In this
approach, you turn off the LVM.DisallowSnapshotLun option. This setting allows your ESX Server host to
mount VMFS volumes even though the LUN ID has changed. If you expect to use array‐based LUN snapshots
in the same configuration, you should use the volume resignaturing approach instead. See “Accessing VMFS
Volumes on Virtualized LUNs with Volume Resignaturing.”
To Access VMFS Volumes on Virtualized LUNs Without Volume Resignaturing
1 Power off all virtual machines.
2 Present the virtualized LUN to the ESX Server hosts and perform two rescan operations on each host.
The virtualized LUN is detected as a snapshot.
3 From a VI Client connected to a VirtualCenter Server, select an ESX Server host in the Inventory panel and
click the Configuration tab.
4 Click Advanced Settings.
5 In the LVM.DisallowSnapshotLun field, replace the default (1) with 0 and click OK.
6 Click Rescan, and then click Rescan again.
7 Make sure the VMFS volume is mounted successfully.
8 Repeat the steps for each ESX Server host that shares the same virtualized LUN.
Accessing VMFS Volumes on Virtualized LUNs with Volume Resignaturing
The second approach for presenting VMFS volumes on virtualized LUNs involves volume resignaturing.
To Access VMFS Volumes on Virtualized LUNs With Volume Resignaturing
1 Power off all virtual machines.
2 Present the virtualized LUN to only one ESX Server host and perform two rescan operations.
The virtualized LUN is detected as a snapshot.
3 In a VI Client connected to a VirtualCenter Server, select the ESX Server host and click the Configuration
tab.
4 Click Advanced Settings
5 In the LVM.EnableResignature field, replace the default (0) with 1 and click OK.
6 Click Rescan, and then click Rescan again.
7 Make sure the VMFS volume is mounted successfully.
8 Change LVM.EnableResignature back to 0 and click OK.
9 Reregister all existing virtual machines from the virtualized LUN on the ESX Server host.
10 Present the virtualized LUN to the next ESX Server hosts and repeat step 8 until you have reregistered all
virtual machines.
WARNING When LVM.DisallowSnapshotLUN is set to 0, no snapshot LUNs should be presented to the ESX
Server host or data corruption can result. For details, see the section on volume resignaturing in the SAN Configuration Guide.
VMware, Inc. 3401 Hillview Ave., Palo Alto, CA 94304 www.vmware.com
Copyright © 2007 VMware, Inc. All rights reserved. Protected by one or more of U.S. Patent Nos. 6,397,242, 6,496,847, 6,704,925, 6,711,672, 6,725,289, 6,735,601, 6,785,886, 6,789,156, 6,795,966, 6,880,022, 6,944,699, 6,961,806, 6,961,941, 7,069,413, 7,082,598, 7,089,377, 7,111,086, 7,111,145, 7,117,481, 7,149, 843, 7,155,558, and 7,222,221; patents pending. VMware, the VMware “boxes” logo and design, Virtual SMP and VMotion are registered trademarks or trademarks of VMware, Inc. in the United States and/or other
Accessing RDM Storage on Virtualized LUNs
If you use RDM (raw device mapping) storage on the back‐end storage array, then virtualize the
corresponding LUN, the result is a stale RDM pointer, which you have to remove.
To Access RDM Storage on Virtualized LUNs
1 Power off all virtual machines.
2 Present the virtualized RDM LUN to the ESX Server host and perform two rescans.
3 Locate the virtual machine that has the RDM mapped to the back‐end LUN (which is now virtualize) and
power off the virtual machine.
4 Remove the stale RDM pointer.
5 Recreate the RDM to point to the virtualized LUN.
6 Repeat steps 1‐5 for each RDM that was previously mapped to back‐end storage.
Caveats
When working with SVDs, consider the following caveats:
The Copy On Write (COW) Snapshot feature available for HDS NSC systems has not been tested by
VMware in conjunction with ESX Server hosts.
Migration with VMotion of virtual machines fails on VMFS‐3 volumes on LUSE LUNs located on Hitachi
Data Systems (HDS) TagmaStore USP/NSC arrays. There is currently no workaround. See
http://kb.vmware.com/kb/3408142.
An ESX Server host requires two rescan operations to detect all available paths to virtualized storage. See