Juniper Networks, Inc.
1194 North Mathilda Avenue Sunnyvale, CA 94089 USA408-745-2000
www.juniper.net
WX Central Management System (CMS)
Administrator’s Guide
Release 5.7.2
September 2010
1988, 1989, 1991, 1992, 1993, 1994. The Regents of the University of California. All rights reserved.
GateD software copyright © 1995, the Regents of the University. All rights reserved. Gate Daemon was originated and developed through release 3.0 by Cornell University and its collaborators. Gated is based on Kirton's EGP, UC Berkeley's routing daemon (routed), and DCN's HELLO routing protocol. Development of Gated has been supported in part by the National Science Foundation. Portions of the GateD software copyright © 1988, Regents of the University of California. All rights reserved. Portions of the GateD software copyright © 1991, D. L. S. Associates.
This product includes software developed by Maker Communications, Inc., copyright © 1996, 1997, Maker Communications, Inc.
Products made or sold by Juniper Networks or components thereof might be covered by one or more of the following patents that are owned by or licensed to Juniper Networks: U.S. Patent Nos. 5,473,599, 5,905,725, 5,909,440, 6,192,051, 6,333,650, 6,359,479, 6,406,312, 6,429,706, 6,459,579, 6,493,347, 6,538,518, 6,538,899, 6,552,918, 6,567,902, 6,578,186, and 6,590,785.
Juniper Networks, the Juniper Networks logo, JUNOS, NetScreen, ScreenOS, and Steel-Belted Radius are registered trademarks of Juniper Networks, Inc. in the United States and other countries. JUNOSe is a trademark of Juniper Networks, Inc. All other trademarks, service marks, registered trademarks, or registered service marks are the property of their respective owners.
Copyright 2010 Juniper Networks, Inc. All rights reserved.
FCC Statement
The following information is for FCC compliance of Class A devices: This equipment has been tested and found to comply with the limits for Class A digital device, pursuant to part 15 of the FCC rules. These limits are designed to provide reasonable protection against harmful interference when the equipment is operated in a commercial environment. The equipment generates, uses, and can radiate radio-frequency energy and, if not installed and used in accordance with the instruction manual, may cause harmful interference to radio communications. Operation of this equipment in a residential area is likely to cause harmful interference, in which case users will be required to correct the interference at their own expense.
The following information is for FCC compliance of Class B devices: The equipment described in this manual generates and may radiate radio-frequency energy. If it is not installed in accordance with the instruction manual, it may cause interference with radio and television reception. This equipment has been tested and found to comply with the limits for a Class B digital device in accordance with the specifications in part 15 of the FCC rules. These specifications are designed to provide reasonable protection against such interference in a residential installation. However, there is no guarantee that interference will not occur in a particular installation.
If this equipment does cause harmful interference to radio or television reception, which can be determined by turning the equipment off and on, the user is encouraged to try to correct the interference by one or more of the following measures:
Reorient or relocate the receiving antenna.
Increase the separation between the equipment and receiver.
Consult the dealer or an experienced radio/TV technician for help.
Connect the equipment to an outlet on a circuit different from that to which the receiver is connected.
Caution: Changes or modifications to this product could void the user's warranty and authority to operate this device and may result in the equipment no longer complying with FCC requirements for Class A or Class B digital devices. In that event, your right to use the equipment may be limited by FCC regulations, and you may be required to correct any interference to radio or television communications at your own expense.
U.S. Government Rights
Commercial software and commercial software documentation: This documentation is commercial computer software documentation and the products (whether hardware or software) covered by this documentation are or contain commercial computer software. Government users are subject to the Juniper Networks, Inc. standard end user license agreement and any applicable provisions of the FAR and its supplements. No further rights are granted. Products (whether hardware or software) covered by, and information contained in, this documentation are controlled by U.S. Export Control laws and may be subject to the export or import laws in other countries. Nuclear, missile, chemical, biological weapons end uses or end users, whether direct or indirect, are strictly prohibited. Export or re-export to countries subject to U.S. embargo or to entities identified on US export exclusion lists, including, but not limited to, the denied persons and specially designated national lists, is strictly prohibited.
End User License Agreement
READ THIS END USER LICENSE AGREEMENT ("AGREEMENT") BEFORE DOWNLOADING, INSTALLING, OR USING THE SOFTWARE. BY DOWNLOADING, INSTALLING, OR USING THE SOFTWARE OR OTHERWISE EXPRESSING YOUR AGREEMENT TO THE TERMS CONTAINED HEREIN, YOU (AS CUSTOMER OR IF YOU ARE NOT THE CUSTOMER, AS A REPRESENTATIVE/AGENT AUTHORIZED TO BIND THE CUSTOMER) CONSENT TO BE BOUND BY THIS AGREEMENT. IF YOU DO NOT OR CANNOT AGREE TO THE TERMS CONTAINED HEREIN, THEN (A) DO NOT DOWNLOAD, INSTALL, OR USE THE SOFTWARE, AND (B) YOU MAY CONTACT JUNIPER NETWORKS REGARDING LICENSE TERMS.
1. The Parties. The parties to this Agreement are (i) Juniper Networks, Inc. (if the Customer's principal office is located in the Americas) or Juniper Networks (Cayman) Limited (if the Customer's principal office is located outside the Americas) (such applicable entity being referred to herein as "Juniper"), and (ii) the person or organization that originally purchased from Juniper or an authorized Juniper reseller the applicable license(s) for use of the Software ("Customer") (collectively, the "Parties").
2. The Software. In this Agreement, "Software" means the program modules and features of the Juniper or Juniper-supplied software, for which Customer has paid the applicable license or support fees to Juniper or an authorized Juniper reseller, or which was embedded by Juniper in equipment which Customer purchased from Juniper or an authorized Juniper reseller. "Software" also includes updates, upgrades and new releases of such software. "Embedded Software" means Software which Juniper has embedded in or loaded onto the Juniper equipment and any updates, upgrades, additions or replacements which are subsequently embedded in or loaded onto the equipment.
3. License Grant. Subject to payment of the applicable fees and the limitations and restrictions set forth herein, Juniper grants to Customer a non-exclusive and non-transferable license, without right to sublicense, to use the Software, in executable form only, subject to the following use restrictions:
a. Customer shall use Embedded Software solely as embedded in, and for execution on, Juniper equipment originally purchased by Customer from Juniper or an authorized Juniper reseller.
b. Customer shall use the Software on a single hardware chassis having a single processing unit, or as many chassis or processing units for which Customer has paid the applicable license fees; provided, however, with respect to the Steel-Belted Radius or Odyssey Access Client software only, Customer shall use such Software on a single computer containing a single physical random access memory space and containing any number of processors. Use of the Steel-Belted Radius or IMS AAA software on multiple computers or virtual machines (e.g., Solaris zones) requires multiple licenses, regardless of whether such computers or virtualizations are physically contained on a single chassis.
c. Product purchase documents, paper or electronic user documentation, and/or the particular licenses purchased by Customer may specify limits to Customer's use of the Software. Such limits may restrict use to a maximum number of seats, registered endpoints, concurrent users, sessions, calls, connections, subscribers, clusters, nodes, realms, devices, links, ports or transactions, or require the purchase of separate licenses to use particular features, functionalities, services, applications, operations, or capabilities, or provide throughput, performance, configuration, bandwidth, interface, processing, temporal, or geographical limits. In addition, such limits may restrict the use of the Software to managing certain kinds of networks or require the Software to be used only in conjunction with other specific Software. Customer's use of the Software shall be subject to all such limitations and purchase of all applicable licenses.
d. For any trial copy of the Software, Customer's right to use the Software expires 30 days after download, installation or use of the Software. Customer may operate the Software after the 30-day trial period only if Customer pays for a license to do so. Customer may not extend or create an additional trial period by re-installing the Software after the 30-day trial period.
e. The Global Enterprise Edition of the Steel-Belted Radius software may be used by Customer only to manage access to Customer's enterprise network. Specifically, service provider customers are expressly prohibited from using the Global Enterprise Edition of the Steel-Belted Radius software to support any commercial network access services.
The foregoing license is not transferable or assignable by Customer. No license is granted herein to any user who did not originally purchase the applicable license(s) for the Software from Juniper or an authorized Juniper reseller.
4. Use Prohibitions. Notwithstanding the foregoing, the license provided herein does not permit the Customer to, and Customer agrees not to and shall not: (a) modify, unbundle, reverse engineer, or create derivative works based on the Software; (b) make unauthorized copies of the Software (except as necessary for backup purposes); (c) rent, sell, transfer, or grant any rights in and to any copy of the Software, in any form, to any third party; (d) remove any proprietary notices, labels, or marks on or in any copy of the Software or any product in which the Software is embedded; (e) distribute any copy of the Software to any third party, including as may be embedded in Juniper equipment sold in the secondhand market; (f) use any 'locked' or key-restricted feature, function, service, application, operation, or capability without first purchasing the applicable license(s) and obtaining a valid key from Juniper, even if such feature, function, service, application, operation, or capability is enabled without a key; (g) distribute any key for the Software provided by Juniper to any third party; (h) use the Software in any manner that extends or is broader than the uses purchased by Customer from Juniper or an authorized Juniper reseller; (i) use Embedded Software on non-Juniper equipment; (j) use Embedded Software (or make it available for use) on Juniper equipment that the Customer did not originally purchase from Juniper or an authorized Juniper reseller; (k) disclose the results of testing or benchmarking of the Software to any third party without the prior written consent of Juniper; or (l) use the Software in any manner other than as expressly provided herein.
5. Audit. Customer shall maintain accurate records as necessary to verify compliance with this Agreement. Upon request by Juniper, Customer shall furnish such records to Juniper and certify its compliance with this Agreement.
accompanies the Software (the "Warranty Statement"). Nothing in this Agreement shall give rise to any obligation to support the Software. Support services may be purchased separately. Any such support shall be governed by a separate, written support services agreement. TO THE MAXIMUM EXTENT PERMITTED BY LAW, JUNIPER SHALL NOT BE LIABLE FOR ANY LOST PROFITS, LOSS OF DATA, OR COSTS OR PROCUREMENT OF SUBSTITUTE GOODS OR SERVICES, OR FOR ANY SPECIAL, INDIRECT, OR CONSEQUENTIAL DAMAGES ARISING OUT OF THIS AGREEMENT, THE SOFTWARE, OR ANY JUNIPER OR JUNIPER-SUPPLIED SOFTWARE. IN NO EVENT SHALL JUNIPER BE LIABLE FOR DAMAGES ARISING FROM UNAUTHORIZED OR IMPROPER USE OF ANY JUNIPER OR JUNIPER-SUPPLIED SOFTWARE. EXCEPT AS EXPRESSLY PROVIDED IN THE WARRANTY STATEMENT TO THE EXTENT PERMITTED BY LAW, JUNIPER DISCLAIMS ANY AND ALL WARRANTIES IN AND TO THE SOFTWARE (WHETHER EXPRESS, IMPLIED, STATUTORY, OR OTHERWISE), INCLUDING ANY IMPLIED WARRANTY OF MERCHANTABILITY, FITNESS FOR A PARTICULAR PURPOSE, OR NONINFRINGEMENT. IN NO EVENT DOES JUNIPER WARRANT THAT THE SOFTWARE, OR ANY EQUIPMENT OR NETWORK RUNNING THE SOFTWARE, WILL OPERATE WITHOUT ERROR OR INTERRUPTION, OR WILL BE FREE OF VULNERABILITY TO INTRUSION OR ATTACK. In no event shall Juniper's or its suppliers' or licensors' liability to Customer, whether in contract, tort (including negligence), breach of warranty, or otherwise, exceed the price paid by Customer for the Software that gave rise to the claim, or if the Software is embedded in another Juniper product, the price paid by Customer for such other product. Customer acknowledges and agrees that Juniper has set its prices and entered into this Agreement in reliance upon the disclaimers of warranty and the limitations of liability set forth herein, that the same reflect an allocation of risk between the Parties (including the risk that a contract remedy may fail of its essential purpose and cause consequential loss), and that the same form an essential basis of the bargain between the Parties.
9. Termination. Any breach of this Agreement or failure by Customer to pay any applicable fees due shall result in automatic termination of the license granted herein. Upon such termination, Customer shall destroy or return to Juniper all copies of the Software and related documentation in Customer's possession or control.
10. Taxes. All license fees payable under this agreement are exclusive of tax. Customer shall be responsible for paying Taxes arising from the purchase of the license, or importation or use of the Software. If applicable, valid exemption documentation for each taxing jurisdiction shall be provided to Juniper prior to invoicing, and Customer shall promptly notify Juniper if their exemption is revoked or modified. All payments made by Customer shall be net of any applicable withholding tax. Customer will provide reasonable assistance to Juniper in connection with such withholding taxes by promptly: providing Juniper with valid tax receipts and other required documentation showing Customer's payment of any withholding taxes; completing appropriate applications that would reduce the amount of withholding tax to be paid; and notifying and assisting Juniper in any audit or tax proceeding related to transactions hereunder. Customer shall comply with all applicable tax laws and regulations, and Customer will promptly pay or reimburse Juniper for all costs and damages related to any liability incurred by Juniper as a result of Customer's non-compliance or delay with its responsibilities herein. Customer's obligations under this Section shall survive termination or expiration of this Agreement.
11. Export. Customer agrees to comply with all applicable export laws and restrictions and regulations of any United States and any applicable foreign agency or authority, and not to export or re-export the Software or any direct product thereof in violation of any such restrictions, laws or regulations, or without all necessary approvals. Customer shall be liable for any such violations. The version of the Software supplied to Customer may contain encryption or other capabilities restricting Customer's ability to export the Software without an export license.
12. Commercial Computer Software. The Software is "commercial computer software" and is provided with restricted rights. Use, duplication, or disclosure by the United States government is subject to restrictions set forth in this Agreement and as provided in DFARS 227.7201 through 227.7202-4, FAR 12.212, FAR 27.405(b)(2), FAR 52.227-19, or FAR 52.227-14(ALT III) as applicable.
13. Interface Information. To the extent required by applicable law, and at Customer's written request, Juniper shall provide Customer with the interface information needed to achieve interoperability between the Software and another independently created program, on payment of applicable fee, if any. Customer shall observe strict obligations of confidentiality with respect to such information and shall use such information in compliance with any applicable terms and conditions upon which Juniper makes such information available.
14. Third Party Software. Any licensor of Juniper whose software is embedded in the Software and any supplier of Juniper whose products or technology are embedded in (or services are accessed by) the Software shall be a third party beneficiary with respect to this Agreement, and such licensor or vendor shall have the right to enforce this Agreement in its own name as if it were Juniper. In addition, certain third party software may be provided with the Software and is subject to the accompanying license(s), if any, of its respective owner(s). To the extent portions of the Software are distributed under and subject to open source licenses obligating Juniper to make the source code for such portions publicly available (such as the GNU General Public License ("GPL") or the GNU Library General Public License ("LGPL")), Juniper will make such source code portions (including Juniper modifications, as appropriate) available upon request for a period of up to three years from the date of distribution. Such request can be made in writing to Juniper Networks, Inc., 1194 N. Mathilda Ave., Sunnyvale, CA 94089, ATTN: General Counsel. You may obtain a copy of the GPL at http://www.gnu.org/licenses/gpl.html, and a copy of the LGPL at http://www.gnu.org/licenses/lgpl.html.
15. Miscellaneous. This Agreement shall be governed by the laws of the State of California without reference to its conflicts of laws principles. The provisions of the U.N. Convention for the International Sale of Goods shall not apply to this Agreement. For any disputes arising under this Agreement, the Parties hereby consent to the personal and exclusive jurisdiction of, and venue in, the state and federal courts within Santa Clara County, California. This Agreement constitutes the entire and sole agreement between Juniper and the Customer with respect to the Software, and supersedes all prior and contemporaneous agreements relating to the Software, whether oral or written (including any inconsistent terms contained in a purchase order), except that the terms of a separate written agreement executed by an authorized Juniper representative and Customer shall govern to the extent such terms are inconsistent or conflict with terms contained herein. No modification to this Agreement nor any waiver of any rights hereunder shall be effective unless expressly assented to in writing by the party to be charged. If any portion of this Agreement is held invalid, the Parties agree that such invalidity shall not affect the validity of the remainder of this Agreement. This Agreement and associated documentation has been written in the English language, and the Parties agree that the English version will govern. (For Canada: Les parties aux présentés confirment leur volonté que cette convention de même que tous les documents y compris tout avis qui s'y rattaché, soient redigés en langue anglaise. (Translation: The parties confirm that this Agreement and all related documentation is and will be in the English language)).
Document Contents ... 13
Document Conventions... 14
Requesting Technical Support ... 15
Self-Help Online Tools and Resources... 15
Opening a Case with JTAC ... 15
Chapter 1 Introduction 17 About CMS ... 17
What’s New in Version 5.7.2... 18
How CMS Works ... 18
Understanding CMS ... 19
CMS Support of Device Software Versions ... 19
Logging In to CMS ... 19
CMS Web Interface... 20
Where to Go Next ... 21
Chapter 2 Installing CMS 23 System Requirements ... 23
Supported Browsers and Character Sets... 24
Installation Procedure ... 25
Pre-Installation Tasks ... 25
Installing the Windows FTP Server ... 26
Windows Server 2008... 26
Windows Server 2003... 27
Windows Server 2000... 27
Upgrading to CMS 5.7.2 From a Previous Release ... 27
Installing WX CMS ... 28
Uninstalling WX CMS... 31
Logging In for the First Time ... 31
Using CMS Servers with Multiple Network Interfaces ... 34
Recommended Configuration Tasks ... 34
Where to Go Next ... 35
Chapter 3 Managing Devices 37 Viewing and Accessing WX Devices from CMS ... 37
Viewing WX Devices... 38
Viewing WX Device Events ... 41
Accessing the WXOS Web Interface from CMS ... 41
Exporting WX Community and Device Information ... 42
Managing WX Device Boot Images ... 43
Loading WXOS Boot Images ... 43
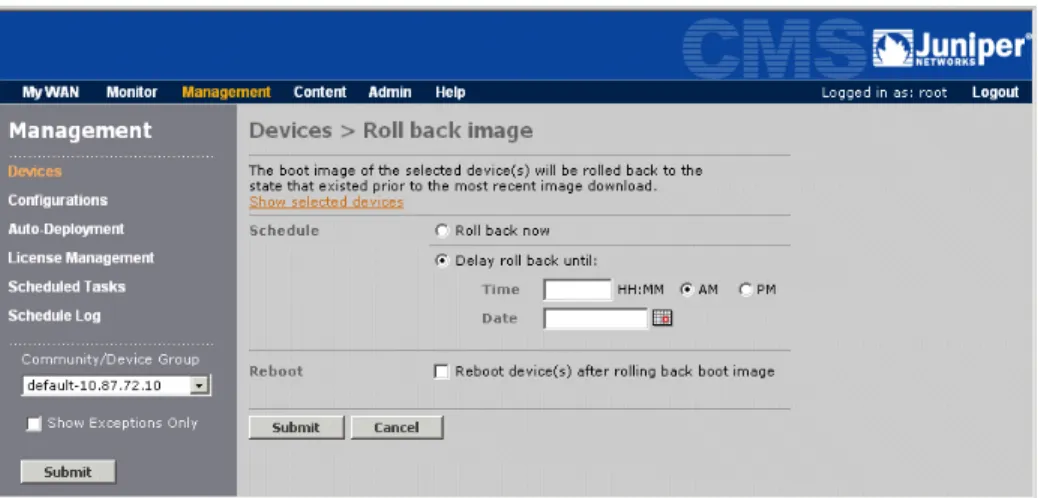
Rolling Back Device Boot Images ... 46
Rebooting Devices ... 48
Managing WX Device Configurations ... 49
Viewing WX Device Configuration Summaries ... 49
Analyzing Device Configurations ... 50
Loading Device Configurations ... 52
Rolling Back Device Configurations ... 55
Backing Up Device Configurations ... 56
Restoring Device Configurations ... 57
Running Packet Capture and Other WX Maintenance Tasks ... 59
Running Packet Capture for WX Devices ... 59
Resetting the HTTP Cache on WX Devices ... 61
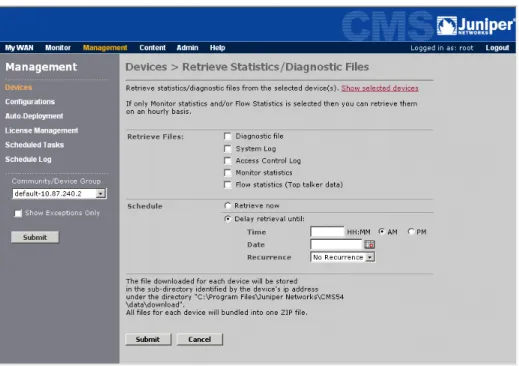
Retrieving WX Device Files ... 62
Applying a WX Registration Server Password ... 64
Putting WX Devices in Safe Mode ... 65
Managing CMS Schedules... 66
Managing Scheduled Tasks ... 66
Exporting a Schedule Log ... 70
Chapter 4 Managing Device Configurations 71 Overview of Device Configurations ... 71
About Device Configurations ... 72
Partial Configuration Settings ... 72
Downloading Global and Partial Configurations ... 74
Merging Configurations ... 75
Creating and Editing Configurations ... 76
Consistency Checking... 77
Tracking Configuration Versions... 77
Using Cross Site Scripting Mode ... 78
Tips for Managing Configurations ... 79
Viewing Configurations ... 79
Managing Configurations ... 81
Extracting Configurations ... 81
Duplicating Configurations ... 83
Creating New Configurations with Factory Defaults... 84
Comparing Configurations ... 86
Displaying Configurations ... 87
Viewing Configuration History ... 87
Publishing Configurations ... 89
Importing a Single Configuration File ... 90
Importing Configuration Files in Bulk ... 91
Exporting Configurations ... 92
Changing Referenced Configurations ... 92
Changing the Cross Site Scripting Mode ... 93
Deleting Configurations ... 93
Defining Configuration Settings ... 94
Configuring Device Settings ... 98
Configuring Device Addresses ... 99
Defining Communities... 100
Configuring Time Zone Settings... 102
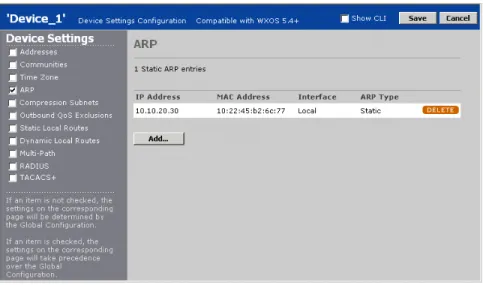
Configuring the ARP Table... 102
Defining Outbound QoS Exclusions ... 104
Adding Static Routes... 105
Configuring Router Polling ... 107
Configuring Multi-Path Addresses ... 108
Configuring the RADIUS Source Address ... 110
Configuring the TACACS+ Source Address ... 110
Configuring Basic Setup Parameters... 111
Configuring the Interface Settings... 111
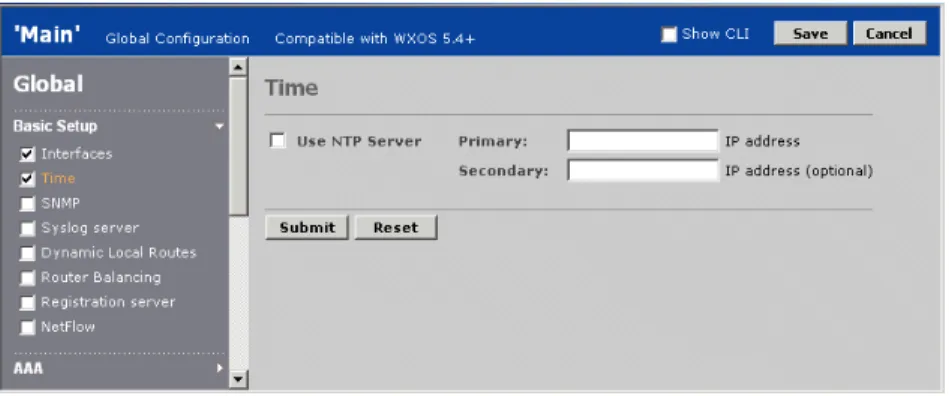
Configuring NTP ... 113
Enabling SNMP ... 114
Defining Syslog Servers ... 115
Configuring Dynamic Local Routes ... 116
Enabling Route-Based Router Balancing ... 118
Designating a Registration Server ... 119
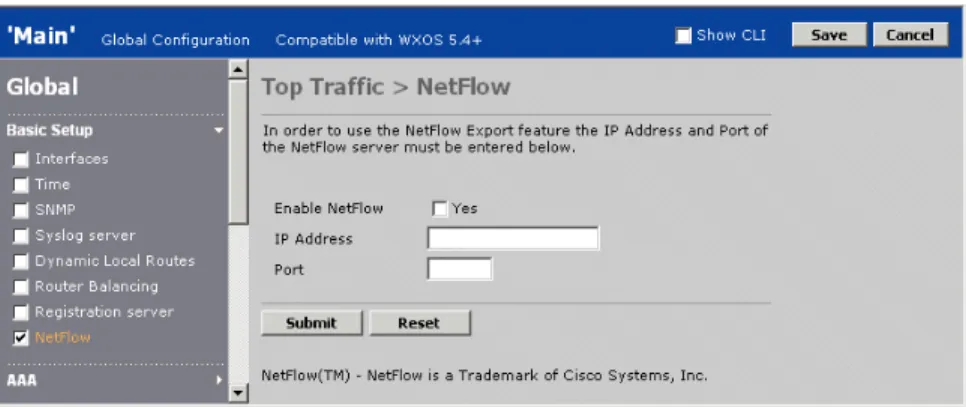
Generating NetFlow Records ... 121
Configuring AAA Settings ... 122
Selecting Authentication Methods... 123
Enabling Authorization Checking... 124
Defining RADIUS Servers and Server Groups ... 125
Defining TACACS+ Servers ... 126
Defining Local Users ... 128
Configuring a Login Banner ... 129
Securing Operator Access ... 130
Securing Front Panel Access ... 131
Configuring Application Settings ... 131
Default Application Definitions ... 132
Viewing the Application Overview ... 134
Configuring Application Definitions ... 135
Testing New Application Definitions ... 138
Assigning Applications to Traffic Classes ... 138
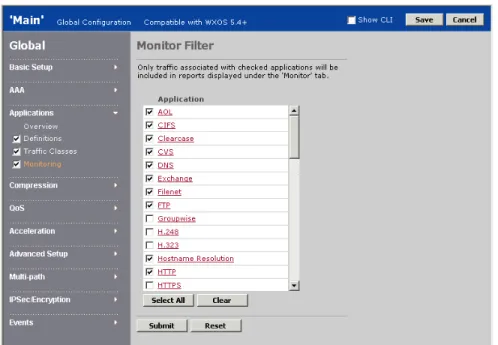
Monitoring Applications... 139
Configuring Compression Settings ... 140
Configuring Endpoints for Compression ... 140
Configuring Network Sequence Caching ... 142
Compressing Applications ... 144
Configuring Remote Routes ... 145
Configuring Tunnel Load Balancing Policies ... 146
Configuring Default Decompressors ... 148
Defining Preferred Decompressors ... 150
Configuring Tunnel Mode Settings ... 151
Configuring QoS Settings ... 152
Using Outbound QoS to Enhance Performance ... 152
Understanding Outbound QoS... 153
Traffic Classes and Bandwidths... 154
QoS Templates and Endpoints ... 155
WAN Circuit Speeds and Router Overhead... 155
Dedicated, Oversubscribed, and Variable Rate WANs ... 156
Direct Setup Versus Wizard Configuration Results ... 158
Class Priorities and Excess Bandwidth Allocation... 160
ToS/DSCP Values... 161
Unadvertised Subnets ... 162
Procedure for Configuring Outbound QoS Policies... 162
Using the Outbound QoS Setup Wizard ... 163
Defining Outbound QoS Templates ... 172
Defining Outbound QoS Endpoints... 173
Changing Outbound ToS/DSCP Values ... 177
Starting and Stopping Outbound QoS ... 180
Configuring Inbound QoS Policies ... 181
Configuring Traffic Acceleration ... 182
Overview of Packet Flow Acceleration... 183
TCP Acceleration... 183
Forward Error Correction ... 184
Fast Connection Setup ... 184
Overview of Application Flow Acceleration ... 185
Microsoft CIFS and Microsoft Exchange Acceleration ... 186
HTTP Acceleration ... 187
Enabling Acceleration by Endpoint ... 188
Enabling Acceleration by Application ... 191
Enabling TCP Acceleration by Application... 192
Enabling Fast Connection Setup by Application ... 193
Enabling Microsoft CIFS Acceleration ... 193
Enabling Microsoft Exchange Acceleration... 195
Enabling HTTP Acceleration ... 197
Configuring Advanced Setup Parameters ... 198
Configuring Topology Settings ... 198
Selecting a Topology ... 199
Partial Mesh Example ... 199
Tiered Network Example... 200
Selecting a Community Size ... 200
Configuring Source/Destination Filters... 202
Defining the Prime Time ... 204
Configuring Packet Interception ... 205
Methods of Packet Interception... 205
Configuring Packet Interception for Off-Path Devices... 207
RIP Router/Switch Configuration Commands ... 209
WCCP Router Configuration Commands ... 212
External Policy-Based Router Commands ... 216
Alternatives to Packet Interception... 216
Configuring WAN Performance Monitoring ... 218
Configuring Multiple Tunnels Between WX 100 Servers ... 219
Adding CLI Commands to Configurations ... 221
Configuring Policy-Based Multi-Path... 222
Procedure for Configuring Multi-Path... 223
Enabling Policy-Based Multi-Path... 223
Defining Multi-Path Templates... 224
Defining Multi-Path Endpoints ... 226
Configuring Routers to Support Multi-Path... 228
Configuring IPsec ... 230
Default IPsec Policy ... 231
IPsec Implementation Details ... 231
Procedure for Configuring IPsec Policies... 232
Defining IPsec Settings by Endpoint ... 232
Defining IPsec Templates ... 234
Defining the Default IPsec Policy ... 236
Defining the IPsec Application Filter ... 237
Optimizing SSL Traffic ... 238
Importing SSL Certificates ... 239
Enabling Applications for SSL Optimization... 240
Configuring Events... 241
Chapter 5 Automatic Deployment and License Management 245 About Automatic Deployment... 245
Configuring Auto-Deployment... 246
Auto-Deployment Procedure ... 246
Defining Deployment Groups ... 247
Defining Deployment Records... 249
Importing Deployment Records in Bulk... 251
Viewing the Auto-Deployment Status... 252
Configuring License Management ... 253
Licensing Procedure ... 253
Importing and Validating Authorization Codes ... 254
Generating and Applying Licenses ... 255
Viewing the License Status ... 258
Chapter 6 Monitoring Performance 259 Viewing and Printing Reports... 259
Configuring the My WAN Page... 261
Viewing Reports on the Monitor Page ... 265
WAN Statistics ... 265
WAN Performance Statistics ... 265
WAN Throughput Statistics ... 270
WAN Application Summary ... 271
WAN Optimization Summary ... 272
WAN Optimization by Destination... 273
Compression Statistics ... 275
Data Compression Statistics ... 275
Application Summary Statistics ... 280
Passthrough Statistics ... 282
Packet Size Distribution Statistics ... 283
Monitoring Tunnel Status ... 284
QoS Statistics ... 286
Outbound QoS Statistics ... 287
Inbound QoS Statistics... 290
Acceleration Statistics ... 293
Acceleration Summary ... 293
TCP Acceleration Statistics... 295
Fast Connection Setup Statistics ... 297
CIFS and Exchange Acceleration Statistics... 299
HTTP Acceleration Statistics ... 301
Top Traffic Statistics... 303
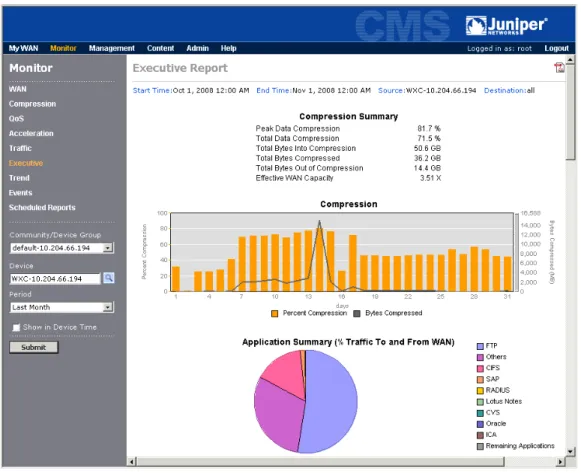
Executive Summary ... 305
Trend Reports ... 307
Events Reports ... 308
Scheduling Reports ... 313
Managing Scheduled Reports ... 314
Chapter 7 Content Management 317 Defining and Distributing Content ... 317
Managing Scheduled Content Distribution Tasks... 323
Viewing the Schedule Log ... 325
Accessing Network Drives... 325
Chapter 8 CMS Setup and Administration 329 Administering CMS Users... 329
Partitioning Users by Customer ... 329
Viewing My Account and Changing Passwords ... 330
Defining CMS User Accounts ... 331
Defining User Groups ... 333
Defining User Roles ... 335
Viewing Logged In Users ... 338
Administering WX Devices ... 338
Importing and Managing Communities ... 339
Changing a Registration Server Address or Password ... 341
Managing Device Groups ... 342
Configuring Device Polling... 345
Configuring Data Retention ... 346
Uploading a Boot Image ... 347
Viewing the Polling Catch-Up and Failure Logs ... 348
Managing Event Forwarding Filters and Email Distribution Lists... 350
Defining Email Distribution Lists ... 350
Defining Event Forwarding Filters ... 351
Administering CMS ... 355
Setting WAN Performance Thresholds ... 356
Entering a Permanent CMS License Key ... 357
Controlling Client Device Access to CMS ... 358
Configuring AAA Settings for Remote Authentication ... 359
Defining a Proxy Server ... 362
Defining the Session Timeout ... 363
Configuring the FTP Server ... 364
Defining an SMTP Server ... 365
Enabling Syslog Reporting ... 366
Stopping and Starting the Scheduler ... 366
Changing the CMS Server IP Address... 367
Changing the Web Server Port ... 368
Viewing System Logs ... 369
Generating a Diagnostic File ... 370
Backing Up and Restoring the Database ... 370
Manual MySQL Database Backups ... 371
Restoring Manual MySQL Database Backups... 371
Automatic MySQL Database Backups ... 371
Restoring Automatic MySQL Database Backups ... 372
CMS Configuration Backups ... 373
Moving CMS to Another Disk Drive ... 373
Purging Temporary Java Files ... 374
Changing the CMS Time Zone ... 374
Appendix A CMS Licenses 375 Appendix B System Events 377 Severity Levels ... 377
WX System Events and SNMP Traps ... 378
WX Syslog Messages ... 382
Appendix C Understanding Exported Data Results 387 NetFlow Version 5 Export ... 387
Performance Statistics Export ... 388
General Device Information... 389
Data Section Information... 389
System Session Statistics ... 390
Compression Session Statistics ... 392
Application Session Statistics ... 392
WAN Statistics ... 393
Application Flow Acceleration Statistics... 393
Bandwidth Management Statistics ... 393
WAN Performance Statistics ... 394
Inbound Traffic By Port Statistics... 395
Top Traffic Export ... 395
Appendix D Common Application Port Numbers 397
Glossary 399
management and configuration tool for the WX and WXC Application Acceleration Platforms. This section describes the audience, organization, and typographical conventions used in this manual.
Audience
This manual is intended for administrators who install and use CMS, and for network managers who monitor device performance. Readers are assumed to be familiar with their network architecture and devices, and can perform basic network configuration procedures.
Document Contents
Chapter 1, “Introduction” on page 17, provides an overview of CMS, and describes the new features in this release.
Chapter 2, “Installing CMS” on page 23, describes how to install the CMS software.
Chapter 3, “Managing Devices” on page 37, describes how to centrally manage devices in a community by performing such tasks as loading new
configurations and WXOS™ boot images on selected devices. It also describes how to use the scheduler to manage scheduled tasks.
Chapter 4, “Managing Device Configurations” on page 71, describes how to create and maintain global and partial configurations in CMS.
Chapter 5, “Automatic Deployment and License Management” on page 245, describes how to configure new devices automatically, and how to distribute permanent licenses to devices that have evaluation licenses.
Chapter 6, “Monitoring Performance” on page 259, describes how to monitor the percentage of data compression, outbound bandwidth management by traffic class, and the tunnel status for the devices in each community. Chapter 7, “CMS Setup and Administration” on page 329, describes CMS
administration tasks, such as importing communities and defining user accounts.
Appendix A, “CMS Licenses” on page 375, describes the evaluation and permanent licenses for CMS.
Appendix B, “System Events” on page 377, describes the SNMP traps and syslog messages for the system events generated by CMS and the WX devices. Appendix C, “Understanding Exported Data Results” on page 387, describes
the contents of the statistics file that CMS can retrieve from a device.
Appendix D, “Common Application Port Numbers” on page 397, lists common application port numbers, as listed by the Internet Assigned Numbers Authority (IANA).
“Glossary” on page 399, includes definitions of networking terms as well as terms specific to devices and CMS.
Document Conventions
The following tables show the conventions used throughout this book. Table 1 defines notice icons; Table 2 defines text conventions; and Table 3 defines GUI conventions.
Table 1: Notice Icons
Icon Meaning Description
Informational note Indicates important features or instructions.
Caution Indicates that you may risk losing data or damaging your hardware.
Warning Alerts you to the risk of personal injury.
Table 2: Text Conventions
Convention Description
Plain sans serif type Filenames and directory names.
Italics Terms defined in text.
Variable elements for which you supply values. Book titles.
+ (plus sign) Key names linked with a plus sign indicate that you must press two or more keys simultaneously.
Table 3: GUI Conventions
Convention Description
> (chevron) Navigation paths through the UI.
Bold type User interface elements that you select in a procedure, such as tabs, buttons, and menu options.
Requesting Technical Support
Technical product support is available through the Juniper Networks Technical Assistance Center (JTAC). If you are a customer with an active J-Care or JNASC support contract, or are covered under warranty, and need postsales technical support, you can access our tools and resources online or open a case with JTAC. JTAC policies—For a complete understanding of our JTAC procedures and
policies, review the JTAC User Guide located at
http://www.juniper.net/customers/support/downloads/710059.pdf. Product warranties—For product warranty information, visit
http://www.juniper.net/support/warranty/.
JTAC hours of operation—The JTAC centers have resources available 24 hours a day, 7 days a week, 365 days a year.
Self-Help Online Tools and Resources
For quick and easy problem resolution, Juniper Networks has designed an online self-service portal called the Customer Support Center (CSC) that provides you with the following features:
Find CSC offerings—http://www.juniper.net/customers/support/ Find product documentation—http://www.juniper.net/techpubs/ Find solutions and answer questions using our Knowledge Base—
http://kb.juniper.net/
Download the latest versions of software and review your release notes— http://www.juniper.net/customers/csc/software/
Search technical bulletins for relevant hardware and software notifications— http://www.juniper.net/alerts/
Join and participate in the Juniper Networks Community Forum— http://www.juniper.net/company/communities/
Open a case online in the CSC Case Manager— http://www.juniper.net/customers/cm/
To verify service entitlement by product serial number, use our Serial Number Entitlement (SNE) Tool—
https://tools.juniper.net/SerialNumberEntitlementSearch/
Opening a Case with JTAC
You can open a case with JTAC on the Web or by telephone.
Use the Case Manager tool in the CSC at http://www.juniper.net/customers/cm/. Call 1-888-314-JTAC (1-888-314-5822—toll free in USA, Canada, and Mexico). For international or direct-dial options in countries without toll-free numbers, visit us at http://www.juniper.net/customers/support/requesting-support/.
This chapter introduces the WX Central Management System (CMS) and covers the following topics:
“About CMS” in the next section
“What’s New in Version 5.7.2” on page 18 “How CMS Works” on page 18
“Understanding CMS” on page 19
About CMS
CMS provides easy and extensive central configuration and monitoring for WX devices in geographically dispersed locations. CMS can manage up to 2000 devices in multiple communities. CMS offers the following benefits:
Cost effective — CMS reduces the cost of ownership for WX devices by creating a single location from which to manage all devices and leverage configurations on devices already deployed in the network.
Eases configuration — Using CMS, you can quickly and easily configure tens or hundreds of newly deployed devices, modify the configuration of already deployed devices, and view and manage the newly created WAN capacity generated by our Molecular Sequence Reduction (MSR)™ and Network Sequence Caching (NSC)™ technology.
Simplifies software deployment — CMS dramatically simplifies the
configuration and management of software upgrades. From a single location, and in a single operation, you can upgrade all devices in the same community to a new software version.
Creates global policies — CMS allows network managers to centrally manage and modify global and device-specific configuration settings on all devices. Global settings include basic and advanced setup options, such as for NTP and SNMP, authentication settings, application definitions, outbound QoS settings, and the applications being compressed, monitored, and accelerated.
Manage events —CMS can centrally configure WX system and performance events, monitor CMS and WX event occurrences, and selectively forward events to syslog servers and/or an email server to generate email alerts.
Schedules all tasks —Using CMS, you can schedule all device management tasks to be performed at the optimal time for the individual location.
Centrally views all application acceleration and WAN performance statistics
— CMS provides a single, clear window into the performance of devices around the globe. It presents historical per-tunnel and per-application compression statistics for each device.
Centrally views global device and tunnel status — Using CMS, you can immediately view the status of all tunnels and of each deployed device.
All features are available through the CMS Web-based graphical user interface. Up to 50 users can access CMS simultaneously. You can control access to CMS with user accounts and passwords, as well as access control lists.
What’s New in Version 5.7.2
CMS 5.7.2 provides the following new features:
Web Proxy Support—CMS now supports the use of a web proxy server to access the internet (see “Defining a Proxy Server” on page 362).
Windows Server 2008 Support—CMS can now be installed on Microsoft Windows Server 2008.
Virtual Machine Support—CMS now supports the following virtual machine environments:
VMware ESX version 4.0
Citrix XenServer with XenCenter version 5.5 Hyper-V Manager version 6.0
Timeout Setting for Loading WXOS Images—The time allowed to download a WXOS boot image can now be increased to allow the task to complete over a slow connection, such as a satellite link (see “Loading WXOS Boot Images” on page 43).
How CMS Works
CMS is deployed on a server in your network running Windows Server 2008, Windows Server 2003, or Windows Server 2000 (Figure 1). CMS includes a Web server that can be accessed by multiple remote clients using secure Web access. A CMS client is a workstation in your network that supports the Microsoft Internet Explorer 6.0 (or later) Web browser. You can access the Web by directing the browser to the IP address or host name of the CMS server (to use the host name, the host name must have a DNS entry.)
Figure 1 shows a logical flow of the communication between the WX devices, a CMS server, and the CMS Web clients. Configuration data between the devices and the CMS server is securely transmitted via a proprietary protocol (UDP is used to poll devices for some basic status information). Monitoring data is collected from the devices in clear text (compressed). Data between the CMS server and the Web clients is securely transmitted via HTTPS.
Figure 1: CMS Communication
Understanding CMS
The following topics provide general information about CMS. “CMS Support of Device Software Versions” in the next section. “Logging In to CMS” on page 19.
“CMS Web Interface” on page 20.
CMS Support of Device Software Versions
CMS 5.7.2 manages devices running WXOS version 5.4 and later. Devices running WXOS versions prior to 5.4 are displayed in some Web pages (such as the Devices page), but they cannot be managed through CMS.
Logging In to CMS
When you log in to CMS for the first time, you must specify the user name root and a default password. The root user account has the CMS administrator role, which provides access to all CMS functions. As a CMS administrator, you can create additional user accounts and specify the level of access for each user, as described in “Defining CMS User Accounts” on page 331.
If two or more users modify the same settings concurrently, the last set of saved changes is used. HTTPS Secure Protocol S M C X W LAN LAN LAN CMS Web Clients
To log out, click Logout in the taskbar of any page. Users are logged out
automatically if their sessions are inactive for the session timeout time (default is 30 minutes).
CMS Web Interface
The CMS Web interface (Figure 2) contains a taskbar across the top of each page, a left-hand navigation pane, and a data pane for configuring and viewing policies and performance data.
Figure 2: CMS Web Interface
The taskbar indicates the name of the current user and provides the following links: My WAN — Select and view a personalized set of performance charts specific
to the user account.
Monitor — Monitor tunnel status and performance statistics.
Management — Manage devices, configurations, automatic deployment, and scheduled tasks.
Content — Maximize response times by preloading compression dictionaries
NOTE: If you close the Web browser without logging out, your session remains open until the session timeout time expires.
Admin — Administer CMS, such as add and delete user accounts, and import communities.
Help — Open the About window, which includes the CMS software version and license information, or open a PDF version of this manual.
Logout — Log out of the CMS Web interface.
Where to Go Next
This chapter describes the installation procedure for the Central Management System (CMS) and covers the following topics:
“System Requirements” in the next section
“Supported Browsers and Character Sets” on page 24 “Installation Procedure” on page 25
“Logging In for the First Time” on page 31
“Using CMS Servers with Multiple Network Interfaces” on page 34 “Recommended Configuration Tasks” on page 34
System Requirements
Verify that the designated CMS server meets or exceeds the following hardware and software requirements:
One of the following versions of Microsoft Windows:
Windows Server 2008 (Standard or Professional Edition) Windows Server 2003 Standard Edition
Windows Server 2003 Enterprise Edition with Service Pack 1 Windows Server 2000 with Service Pack 4
NOTE: CMS should be installed on a dedicated server that is not running any other applications, particularly database backup and anti-virus software, which may lock files and interfere with the CMS database. For online database backups, use the backup utility provided with CMS (see “Backing Up and Restoring the Database” on page 370).
Minimum CPU, memory, and disk space requirements shown in the following table for each range of devices being managed. These estimates assume a dedicated server with high speed drives, and a 60-minute polling interval.
CD-ROM drive and Video display with 1024 x 768 resolution 10/100 Ethernet Network Interface Controller (NIC)
A user account with administrator privileges (to perform the installation) Microsoft FTP Server installed and running, with an “anonymous” or
password-protected user account that has read/write access to the FTP home directory
Supported Browsers and Character Sets
CMS can be administered through the CMS Web interface using Microsoft Internet Explorer version 6.0 or later. All other Web browsers are currently not supported. Only English characters are supported.
Verify that your browser accepts cookies (required to log in), and that the server is always checked for the latest configuration information:
1. Select Internet Options from the Tools menu.
2. Click Settings under Temporary Internet Files, select Every visit to the page, and click OK.
3. Click the Privacy tab and verify that the setting is Medium High or lower. 4. Click the Security tab, click Default Level, and verify that the setting is Medium
or lower.
5. Click the Advanced tab, and verify that Play animations in web pages is selected (required for in-progress indicators on the Devices page).
On Windows Server 2003, the browser's default Security setting is High, which will prevent you from logging in to CMS. Change the Security setting to Medium.
Number of WX
Devices Pentium 4 CPU (GHz)
RAM (GB) Estimated Disk
Space (GB) Under 100 2.0+ (min. 1.8) 1.0 (minimum) 40+ (min. 40) 100 to 500 2.8+ (min. 2.0) 1.5 (min. 1.0) 60+ (min. 40) 500 to 1000 3.0+ (min. 2.8) 2.0 (min. 1.5) 80+ (min. 60) 1000 to 1500 3.2+ (min. 3.0) 3.0 (min. 2.0) 100+ (min. 80) 1500 to 2000 3.2+ dual CPU (min. 3.2) 4.0 (min. 3.0) 120+ (min. 100)
NOTE: The Executive report does not display correctly if the browser uses the Sun Java Virtual Machine. To display the Executive report correctly, use the Internet Explorer JVM.
Installation Procedure
The following topics describe how to install and uninstall WX CMS 5.7.2: “Pre-Installation Tasks” in the next section
“Installing the Windows FTP Server” on page 26
“Upgrading to CMS 5.7.2 From a Previous Release” on page 27 “Installing WX CMS” on page 28
“Uninstalling WX CMS” on page 31
Pre-Installation Tasks
If you are installing WX CMS for the first time, complete all of the following pre-installation tasks:
Verify that the TEMP environment variable for the system account is set to a drive with 100 MB of free disk space for the temporary files.
Verify that the system date, time, and time zone are accurate for your location. In addition to the time zone setting in the Windows Date/Time properties dialog box, check the time zone environment variable. See your Microsoft Windows documentation for more information.
If you change the time zone after CMS is installed, you must restart the JuniperCMS service (see “Changing the CMS Time Zone” on page 374).
Verify that the following ports are available and are not blocked by firewalls or other devices:
NOTE: An error occurs if the disk specified by TEMP has insufficient space, even if you install CMS on a separate disk with sufficient free space.
Ports Description
443 or 8443 Port 443 is the default port used by the CMS Web server. If another server uses port 443, such as IIS, disable that server or specify port 8443 for the CMS Web server during installation. Port 443 or 8443 is required to support auto-deployment of WX devices.
3577 and 3578 Ports 3577 and 3578 (both TCP and UDP) are used to communicate with the WX devices. WXOS uses 3577 as the destination port to send acknowledgements and statistics to CMS. If port 3577 is in use, you are prompted to enter another port number during CMS installation. If necessary, you can change the port number after installation as follows:
1. Open a command window on the CMS server. 2. Enter the following commands:
cd <CMS installation directory>/mysql/bin mysql -admin -peri
use cmsdata;
update ScheduleTable set StatsRecvPort = <port #>; quit
Determine if the Sun™ Microsystems™ Java™ Runtime Environment (JRE™), which is a component of the Java 2 Platform, Standard Edition (J2SE™), is on your system. If JRE version 1.5.0 is not present, the CMS installation wizard will install it.
Reserve a static IP address for the CMS server. If you later change the IP address of the CMS server, you must reboot the server and obtain a new license key before you can continue using CMS.
Verify that a syslog server is not installed. CMS includes a syslog server to collect events from WX devices, but the server will not start if another syslog server is already running.
Verify that numbers are formatted using a period as the decimal point and a comma as the separator (“1,234.56”). For example, to change the number formats on Windows XP, click Regional and Language Options in the Control Panel, click Customize, and select a period for the decimal symbol and a comma for the digit grouping symbol.
Installing the Windows FTP Server
The Microsoft FTP Server must be installed and running on the CMS server, with an "anonymous" or password-protected user account that has read/write access to the FTP home directory. CMS can use FTP to upload WX boot images and import WX configurations. The WX devices use FTP to send monitoring data and other files to CMS.
The default FTP folder is: drive:\inetpub\ftproot
Where drive is the drive on which Internet Information Services (IIS) is installed. If you later change the FTP server account or root directory, you must make the same changes in CMS (see “Configuring the FTP Server” on page 364).
The following sections describe how to install the FTP server on each supported version of Windows.
Windows Server 2008
1. Select Start >Administrative Tools > Server Manager. 2. In the left frame, right-click Roles and select Add Roles.
3. Select Server Roles and select File Services, Web Server (IIS), FTP Publishing Service, FTP Server, and FTP Management Console.
4. Click Install to start the installation process.
NOTE: On Windows Server 2003, ports 443 and 3577 are blocked by default, and must be added to the firewall exception list.
5. Configure the FTP service to allow anonymous connections:
a. Start the Internet Information Services Manager or open the IIS snap-in. b. Expand the server name, and then expand FTP Sites.
c. Right-click Default FTP Site, click Properties, and enter the IP address for which you want to enable FTP.
d. Click the Security Accounts tab.
e. Select the Allow Anonymous Connections check box. Optionally, select the Allow Only Anonymous Connections check box if you want to prevent users from logging on by using user names and passwords. f. Click the Home Directory tab.
g. Select the Read and Log visits check boxes, and then clear the Write check box.
h. Click OK.
6. Exit the Internet Information Services Manager or close the IIS snap-in.
Windows Server 2003
1. Install the FTP service as described at http://support.microsoft.com/?kbid=323384.
2. Enable write permission for the FTP service, as described at
http://support.microsoft.com/default.aspx?scid=kb;en-us;309007&sd=tech.
Windows Server 2000
1. Click Start > Settings > Control Panel, and double-click Add/Remove Programs.
2. Double-click Add/Remove Windows Components.
3. Select Internet Information Services (IIS), and click Details.
4. In the IIS window, select the check box for File Transfer Protocol Server and click OK.
5. Click Next to install the service. When prompted, insert the Microsoft Windows 2000 Server CD into the CD drive.
Upgrading to CMS 5.7.2 From a Previous Release
Due to the change in InstallShield, direct upgrades to CMS 5.7.2 from releases prior to CMS 5.7.1 are not supported. Releases prior to CMS 5.7.1 must be uninstalled, as follows:
1. Do one of the following, depending on your current CMS license:
Permanent License—Select Admin > Setup > License Key and copy the value in the License Key field to another location.
Evaluation License—Do not back up the database, and during
uninstallation be sure to remove the data and configuration folders. If you attempt to restore a previously saved database, some features will not work correctly.
2. Use the Microsoft Windows Add/Remove Programs function in the Control Panel to uninstall the previous release of CMS. If you have a permanent CMS license, elect to retain the data and configuration folders.
3. Install CMS 5.7.2. If you have a permanent CMS license, select Yes to use the existing contents of the C:\Program Files\Juniper Networks\CMS folder. This will make use of the data and configuration folders retained in Step 2.
4. When the installation is complete, apply the permanent license key that was saved in Step 1, as described in the administrator’s guide.
Installing WX CMS
To install the WX CMS software:
1. Log in to the Microsoft Windows server as a user with administrator privileges. Next, close all windows and exit all programs, including any anti-virus
programs running on the desktop.
2. Insert the CMS CD into the server’s CD drive.
After installation files are extracted, a welcome window for the installation wizard is displayed. If the welcome window does not appear, you can access the installation program on the CD.
3. Click Next. The CMS license agreement appears. Read the agreement carefully. To accept the terms of the agreement, click Yes. The Customer Information window opens (Figure 3).
NOTE: Click OK for all security or AntiSpyware prompts encountered during the installation and initial setup of CMS.
Figure 3: Entering Customer Information
4. Enter customer information:
a. Enter a user and company name.
b. If you have a permanent license key, enter it in the License Key box. If you do not have a permanent license key, leave “Evaluation” in the License Key box. For more information about licenses, see “CMS Licenses” on
page 375.
c. Click Next. The Choose Install Type window opens (Figure 4). Figure 4: Selecting the Installation Type
5. Select a Typical or Custom installation, as follows: Click Typical to do the following:
Install the CMS files in C:\Program Files\Juniper Networks\CMS. Install JRE version 1.5.0 in C:\Program Files\Java\j2rel.5.0_06 if it is
not already installed on your system.
Set the Web server port to 443 (the default HTTPS port). If port 443 is currently used by IIS or some other Web server, you are prompted to enter another port number (enter port 8443).
To change any of the default settings, click Custom to open the Custom Settings window (Figure 5).
Figure 5: Customizing CMS Installation
a. To change the locations of the CMS files, click Browse and use the Windows Explorer to navigate to the desired locations.
b. If the default Web server port number (443) is already in use, enter port number 8443. If 8443 is also in use, specify a port number above 1200. Note that you cannot auto-deploy devices unless the port number is 443 or 8443.
c. Click Next.
6. To change any of the previous settings, click Back. If you are satisfied with the settings, click Next to start the installation.
If TCP or UDP port number 3577 is in use, you are prompted to enter another port number (CMS listens on this port to collect performance data from the devices).
7. When the installation is complete, a window displays the URL to use to access CMS. Click Finish. The restart window is displayed.
Before restarting the system, remove any disks or CDs from the drives, and verify that the MySql and JuniperCMS services are installed (Start > Run, enter “services.msc” and click OK). If the services are marked as disabled, reboot the system and repeat the installation procedure.
8. To restart the system, select Yes and then click Finish.
9. On Windows Server 2008, change the logon account of the JuniperCMS service from the default Local System account to another Admin user account. If you plan to use CMS for content management, you may want to create a new account with the appropriate network access privileges (see “Accessing Network Drives” on page 325).
To change logon account of the JuniperCMS service: a. Click Start > Run, enter “services.msc” and click OK.
b. In the Services window, right-click on JuniperCMS and click Stop. c. Right-click on JuniperCMS, select Properties, and click the Log On tab. d. Select This Account, enter the new account name, enter and confirm the
account password, and click OK.
e. Right-click on JuniperCMS and click Start.
Uninstalling WX CMS
To uninstall CMS, use the Microsoft Windows Add/Remove Programs function in the Control Panel. The uninstall wizard allows you to delete the CMS data and
configuration folders, which include all files related to CMS, including the license, communities, users, and passwords. If you are removing CMS from your system, you can safely delete these files.
If the JRE was installed by the installation wizard, the uninstall wizard also lets you delete it from the system.
After you uninstall CMS, verify that the MySql and JuniperCMS services have been removed. If they are marked as disabled, rebooting the system should remove them.
Logging In for the First Time
After installing CMS for the first time, you must log into the Web interface and perform some basic administration.
You can log into the CMS Web interface from any workstation in your network. The Web interface supports Microsoft Internet Explorer version 6. Data is securely transmitted from the CMS server to the Web browser via HTTPS.
To log in to the CMS Web interface:
1. From a workstation in your network, start your Web browser and enter the following URL:
https://<IP address of the CMS server>:<port number>
Be sure to use “https” instead of “http”. Also, if you have changed the CMS Web server port number from 443 to 8443, you must include “:8443” after the IP address. For example:
https://10.10.0.1:8443
NOTE: CMS 5.7.2 supports WX devices running WXOS 5.4 through 5.7. Devices running WXOS versions prior to 5.4 are listed on some CMS pages, such as the Devices page, but they are not fully supported by CMS 5.7
If you have not changed the Web server port number from the default of 443, you can omit the colon and port number after the IP address.
2. Depending on your Web browser settings, the Security Alert dialog box may appear. Click Yes to open the Login page (Figure 6).
Figure 6: Logging In For The First Time
3. Enter the following user name and password, and click Log In. User name: root
Password: juniper
The Change CMS Administrator Password page opens (Figure 7). Figure 7: Changing the Default Password
4. Enter and verify a new password for the root user, and click Submit. The password is case-sensitive.
5. A blank Communities page opens. To manage the WX devices in each
community, you must import the communities defined on each device that acts as a registration server. For more information about registration servers, see “Designating a Registration Server” on page 119. If you do not yet have a registration server, you can import communities at a later time (see “Importing and Managing Communities” on page 339).
To import communities into CMS:
Figure 8: Importing Communities to CMS
b. Specify the following information, and click Next.
c. Select the check box next to each community you want to import, and click
Next.
Note that the Default community name on each registration server is “Default - <IP address>” in CMS.
d. Select at least one user group that can access the imported devices, or click
New User Group to define a new user group (see “Defining User Groups” on page 333), and then click Next.
e. Click Finish. If the registration server is behind a NAT device, the Public IP Addresses page opens.
Public IP Address Enter the IP address of a registration server.
Private IP Address If the registration server is on the private side of a NAT device, enter the registration server’s private IP address. All WX devices that use the registration server must also be on the private side of the same NAT device.
Figure 9: Entering Public IP Addresses
f. Enter the public IP address for each device listed, and click Submit. If you omit the public address, you can view the device in CMS and add it to device groups, but you cannot perform any other operations on the device. The CMS quick setup is complete. If the server where you installed CMS has multiple network interface cards (NICs), see “Using CMS Servers with Multiple Network Interfaces” on page 34. To perform additional administrative tasks, see “Recommended Configuration Tasks” on page 34.
Using CMS Servers with Multiple Network Interfaces
If the CMS server has multiple network interface cards, you must specify which IP address is used by FTP on the remote WX devices to download WXOS images from the CMS server, even if only one interface is used (otherwise, the address is chosen randomly).
To specify the IP address: 1. Stop the JuniperCMS service:
a. Click Start > Run, type services.msc and click OK.
b. In the Services window, right-click on JuniperCMS and click Stop. 2. In the following file, change the “CmsIP=” line to specify the correct IP
address:
<Install>\CMS\data\preference\Installinfo.properties
Where “<Install>” is the location where CMS is installed. The default location is C:\Program Files\Juniper Networks\CMS.
Recommended Configuration Tasks
Now that CMS is initially configured, you should perform the following tasks (the first item is required):
Task Description
Synchronizing Clocks The clocks on all devices, including the CMS server, should be synchronized to the same Simple Network Time Protocol (SNTP) server or server hierarchy. To use CMS to configure an NTP server for your devices, see “Configuring NTP” on page 113.
If you do not have an SNTP server in your network, you can use the address of the CMS server. During installation, CMS enables the Windows SNTP server. Be sure to verify that port 123 (UDP) is not blocked by firewalls or other devices.
If you use some other SNTP server to synchronize your devices, the Windows SNTP agent on the CMS server should be pointed to the same SNTP server.
Importing Communities If you have multiple registration servers, import the communities from each server, as described in “Importing and Managing Communities” on page 339.
Defining User Groups Create one or more user groups, and assign all users and imported communities to at least one user group, as described in “Defining User Groups” on page 333.
Using NAT If a registration server and its communities are on the private side of a NAT device, note the following:
You can add or change a device’s public address from the Communities page or the Devices page (see “Viewing WX Devices” on page 38).
If two registration servers have the same private address, their default communities have the same name. To distinguish the communities, change the private IP address of one of the registration servers, or, on one of the registration servers, move all devices to a non-default community and import that community.
If other WX devices have the same private address, change the device names to avoid confusion.
Uploading Boot Images Upload WXOS boot images to the CMS server, as described in “Uploading a Boot Image” on page 347. An uploaded image can then be downloaded to selected devices.
Analyzing Configurations Use CMS to retrieve and analyze the differences between the configurations of selected devices. Extracted configurations can be used as a starting point in managing your device
configurations. For more information about analyzing a
configuration, see “Analyzing Device Configurations” on page 50. For more information about extracting a configuration, see “Extracting Configurations” on page 81.
Analyzing configurations also helps you select a global
configuration that can be modified and loaded on other devices. For more information about modifying and loading a
configuration, see “Defining Configuration Settings” on page 94 and “Loading Device Configurations” on page 52.
Where to Go Next
To view the devices that CMS discovers for the Community, see “Managing Devices” on page 37. To create user accounts or perform additional administrative functions, proceed to “CMS Setup and Administration” on page 329.
This chapter describes how to use CMS to centrally manage communities of WX devices. It covers the following topics:
Viewing and Accessing WX Devices from CMS on page 37 Scheduling Tasks for Multiple WX Devices on page 42 Managing WX Device Boot Images on page 43 Managing WX Device Configurations on page 49
Running Packet Capture and Other WX Maintenance Tasks on page 59 “Managing CMS Schedules” on page 66
Viewing and Accessing WX Devices from CMS
The following topics describe how to view and access WX devices from CMS: Viewing WX Devices on page 38
Viewing WX Device Events on page 41
Accessing the WXOS Web Interface from CMS on page 41 Exporting WX Community and Device Information on page 42
Viewing WX Devices
The Devices page lets you view the devices in each community or device group associated with your user groups, execute tasks for selected devices, and open the WXOS Web interface for a standalone device. You can also change the public IP address associated with a device’s private NAT address.
To view the devices in each community or device group: 1. Click Management in the taskbar.
2. Select a community or device group from the Community/Device Group list, and click Submit.
Figure 10: Viewing Devices
3. If the device polling takes too long, you can click Stop in the upper-right corner of the page. Polling continues, but you can then execute tasks for one or more devices, such as loading a new boot image, as described in “Managing WX Device Boot Images” on page 43.
From the Devices page, you can also:
Click a highlighted IP address to change the associated public address. A in the Status column indicates the public address is missing or incorrect. To change a registration server’s address, see “Changing a Registration Server Address or Password” on page 341.
View the status, hardware model, software version, license, and functional properties of each device. An asterisk (*) next to the software version indicates that the device did not respond to the last query.
Click Legend to view a brief description of the icons used on the Devices page (see Table 4 for more information).
Click Refresh to view the latest device status information. Click the column headers to change the sort.