Installation and Configuration Guide
Software Version: 7.4
Legal Notices
Warranty
The only warranties for HP products and services are set forth in the express warranty statements accompanying such products and services. Nothing herein should be construed as constituting an additional warranty. HP shall not be liable for technical or editorial errors or omissions contained herein. The information contained herein is subject to change without notice.
Restricted rights legend
Confidential computer software. Valid license from HP required for possession, use or copying. Consistent with FAR 12.211 and 12.212, Commercial Computer Software, Computer Software Documentation, and Technical Data for Commercial Items are licensed to the U.S. Government under vendor's standard commercial license.
Copyright Notice
© Copyright 2015 Hewlett-Packard Development Company, L.P.
Trademark Notices
Microsoft® and Windows® are trademarks of the Microsoft group of companies. UNIX® is a registered trademark of The Open Group.
Linux® is the registered trademark of Linus Torvalds in the U.S. and other countries.
Red Hat® is a registered trademark of Red Hat, Inc. in the United States and other countries. Citrix® and XenDesktop® are registered trademarks of Citrix Systems, Inc. and/or one more of its subsidiaries, and may be registered in the United States Patent and Trademark Office and in other countries.
Intel®, Itanium® and Intel® Xeon® are trademarks of Intel Corporation in the U.S. and other countries. © 2012 Google Inc. All rights reserved. Chrome™ is a trademark of Google Inc.
Page 2 of 84 HP Insight Remote Support 7.4: Installation and Configuration Guide
Contents
3
Preface
7
Document purpose and audience 7
Product overview 7
Related documents 8
Document revision history 8
Sign up to receive Insight Remote Support communications 8
HP support information 9
We appreciate your feedback! 9
Chapter 1: Understanding installation process and requirements
10
Upgrade Insight Remote Support 10
Fulfill Hosting Device system requirements 11
Fulfilling hardware requirements 11
Number of monitored devices supported 12
Configuration collection capabilities 13
Fulfilling operating system requirements 15
Supported Microsoft Windows operating systems 15
Supported Microsoft Hyper-V server 17
Supported VMware operating systems 17
Supported Citrix XenServer operating systems 18
Fulfilling software requirements 18
Install web browsers 18
Install .NET Framework 18
Perform a Windows Update 19
Fulfilling access requirements 19
Fulfill networking requirements 19
Fulfill communication requirements 20
Configuring communication from a web browser to Insight RS 20
Verify Hosting Device connectivity with HP 22 Configuring communication between the Hosting Device and monitored devices 23
Install SNMP on the Hosting Device 23
Configure Traps 24
Set SNMP Trap service startup type 24
Update WMI Mapper to monitor Windows Server 2012 devices 24
Monitor the Hosting Device 25
Chapter 2: Installing Insight Remote Support for the first time
26
Download and install Insight Remote Support 26
Locating log files 28
Logging on to the Insight RS Console 29
Known issue: Cannot log on to the Insight RS Console as an administrator 29
Resolve certificate warning 30
Internet Explorer 30
Mozilla Firefox 31
Google Chrome 32
Chapter 3: Completing the Setup Wizards
35
Complete the Monitored Device Setup Wizard 35
Configure your devices 36
Configure protocol access credentials 36
Discovery sources 38
Discover devices 41
Export health report 42
Complete the Hosting Device Setup Wizard 43
Receiving remote support 43
Optimize environment 43
Remote support software updates 43
Contact information 44
Site information 45
Registering HP Insight Remote Support 46
Test connectivity to HP 46
HP Insight Remote Support 7.4: Installation and Configuration Guide Page 4 of 84 Contents
Register With HP 46
Integrate Insight RS with HP Insight Online 47
HP Authorized Channel Partners 48
Chapter 4: Completing post-installation configuration tasks
49
Install the HP Insight Remote Support Content Level Update 49
Verify Hosting Device health 50
Verify warranty and contract information 50
Verify device status 51
Resolve monitored device status issues 51
Send test events and generate collections 53
Clear status errors 53
Configure the backup settings 54
Set the backup target location 54
Set the number of backup versions 55
Integrate with HP SIM 55
HP SIM Adapter best practices 55
Install the HP SIM Adapter 58
Configure the HP SIM Adapter 58
Enable and configure email notifications 61
Forward service events to another management application 63
Enable operator-level user authentication 64
Disable SSLv3 (if required) 65
Add device groups 66
Chapter 5: Restoring from backup
68
Manually run backup schedules 68
Viewing successful backup information 69
Identifying backup failures 69
Restoring Insight RS from backup 69
Chapter 6: Uninstalling Insight RS
71
Delete devices from Insight RS Console 72
Disable connection to HP Insight Online 72
Uninstall the Insight RS software 73
Cleanup Hosting Device 73
Appendix A: Export and import of device information
74
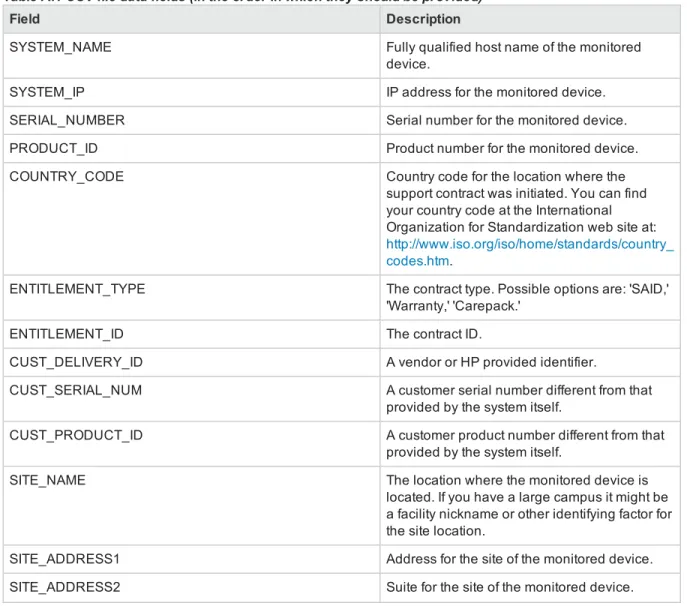
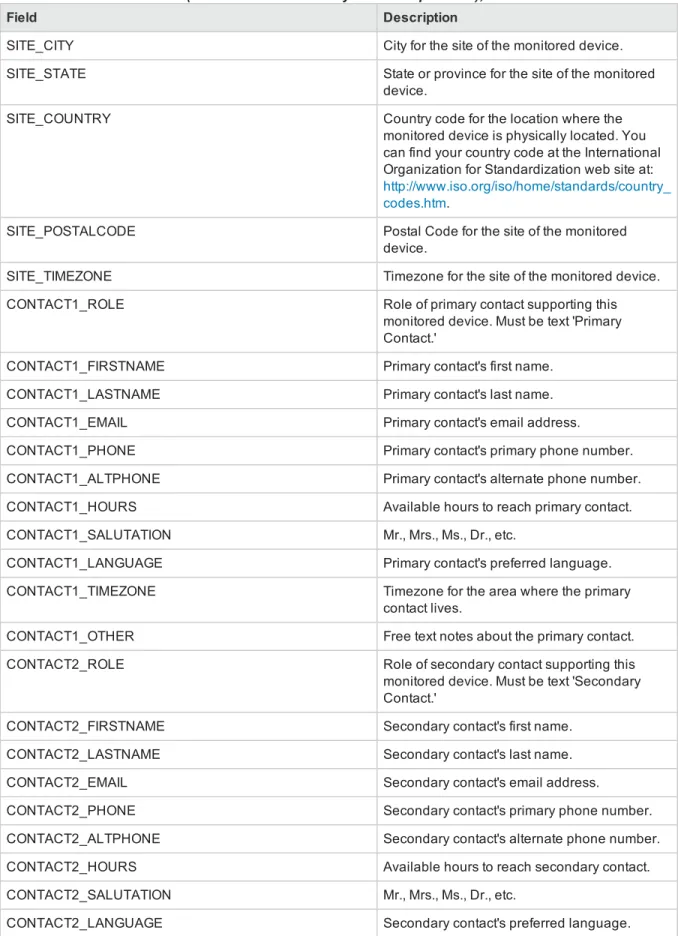
Export a bulk CSV file 74
Import a bulk CSV file 74
Edit a bulk CSV file 75
Glossary
78
Index
83
HP Insight Remote Support 7.4: Installation and Configuration Guide Page 6 of 84 Contents
Document purpose and audience
This document provides the necessary information to install and configure HP Insight Remote Support (RS) on a Hosting Device and provides steps to troubleshoot the installation.
Important:This document only covers installing and configuring Insight RS on the Hosting Device. Your monitored devices may require additional software components and configuration that needs to be completed separately. Device configuration should be performed prior to the installation of Insight RS. The information necessary to configure monitored devices is described in theHP Insight Remote Support Monitored Devices Configuration Guide. If you have not completed the installation and configuration information described in both of these documents, Insight RS may not work properly.
This document is intended for HP's customers, HP business partners, and HP account teams. This document is intended to guide both HP customers and HP support personnel through the installation and configuration of Insight RS.
Product overview
Insight RS is a software solution that enables reactive and proactive remote support to improve the availability of supported servers, storage systems, and other devices in your data center. Insight RS relies on several HP components and communication between various software applications within the
customer enterprise and between the customer enterprise and HP to deliver support services. Software components may be installed on the Hosting Device or on monitored devices depending on their purpose. Insight RS can be used on its own or can be integrated with HP Systems Insight Manager (SIM).
For more information about Insight RS, go to:http://www.hp.com/go/insightremotesupport.
Important:To configure Insight RS correctly, it is essential that you read this document thoroughlybeforeproceeding with the installation of Insight RS.
Related documents
For additional Insight RS documentation, go to:http://www.hp.com/go/insightremotesupport/docs.
l HP Insight Remote Support Release Notes
This document provides product details and information about which monitored devices and Hosting Devices are supported for use with the Insight RS solution.
l HP Insight Remote Support Quick Installation Guide
This document provides a checklist for installing and configuring Insight RS. l HP Insight Remote Support Installation and Configuration Guide
This document provides detailed information about installing and configuring Insight RS. l HP Insight Remote Support Monitored Devices Configuration Guide
This document provides information to configure the devices that will be monitored by Insight RS. l HP Insight Remote Support Security White Paper
This document provides an overview of the security features available in Insight RS. l HP Insight Remote Support Upgrade Guide
This document provides information about upgrading Insight RS to version 7.4. l HP Insight Online Getting Started Guide
This document provides information about the prerequisites for using HP Insight Online, and explains how to use Insight Online to manage your company’s HP devices, contracts and warranties.
Document revision history
Edition Software Version Publication Date Change Summary
1.0 7.4 August 2015 Initial release.
Sign up to receive Insight Remote Support
communications
The HP Insight Remote Support product team uses HP’s Support Communication process to communicate important news such as Engineering Advisories, Customer Advisories, Engineering Notices, and Customer Notices.
To sign up to receive Support Communications using HP Subscribers Choice, go to: https://h30046.www3.hp.com/SubChoice/country/us/en/signin.aspx.
HP Insight Remote Support 7.4: Installation and Configuration Guide Page 8 of 84 Preface
When you subscribe, search forInsight Remote Support.
HP support information
HP recommends you consult the Insight RS documentation to resolve issues. The documentation is designed to guide you through a successful installation and configuration. However, if you need further support for Insight RS, help is available through HP's local Response Centers. For contact details, go to: http://www.hp.com/go/rstechsupport.
Before contacting support, you can check if your issue has a solution available. Note that a valid contract and HP Passport log on is required to view issue solution documents.
To view Insight RS issue solutions, complete the following steps:
1. Go tohttp://www.hp.comand browse toSupport→Support & troubleshooting. 2. In theFind by productfield, typeInsight Remote Supportand clickGo. 3. In the search results, clickHP Insight Remote Support Next Gen Software. 4. In theMost viewed solutionspane, clickView allto see the solutions.
We appreciate your feedback!
If you have comments about this document, you cancontact the documentation teamby email. If an email client is configured on this system, click the link above and an email window opens with the following information in the subject line:
Feedback on Insight Remote Support 7.4 Installation and Configuration Guide
Just add your feedback to the email and click send.
If no email client is available, copy the information above to a new message in a web mail client, and send your feedback to [email protected].
Chapter 1: Understanding installation process
and requirements
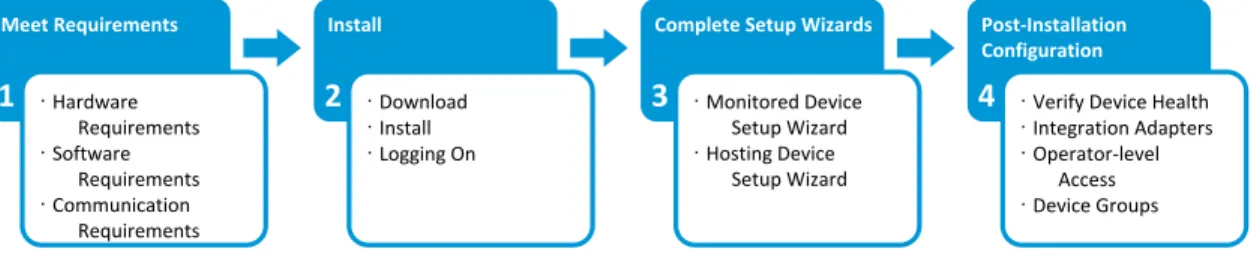
This chapter provides an overview of the Insight RS installation process and identifies the system requirements for the Hosting Device.
Perform the following steps for a first time installation of Insight RS on your Hosting Device.
Upgrade Insight Remote Support
If Insight RS is installed on your Hosting Device, see the upgrade instructions provided in theHP Insight Remote Support Upgrade Guideat:http://www.hp.com/go/insightremotesupport/docs.
Before getting started, review the following table. It lists the functionality that was available in earlier versions of Insight RS but is not currently available in Insight RS7.4.
Functionality Details
Hosting Device l All Microsoft Windows 2003 operating system versions willnotbe
supported on any Insight RS 7.x versions. Products that willnotbe
supported by any 7.x version
l HP Enterprise Secure Key Manager l HP Secure Key Manager
l HP Dynamic Smart Cooling
l HP SAN Virtualization Services Platform l HP Modular Array
l HP Enterprise Modular Array l HP Raid Array
l HP Enterprise Storage Array l M-series Switches (McData)
l Carrier-grade Servers (cx2620, cc3310)
l HP 9000 rp2400 series (A-Class), rp5400 series (L-Class), and
D,K,R,T,V (Class) servers
l IBM AIX servers l Sun Solaris servers
Table 1.1Insight RS 5.x functionality not available in Insight RS 7.4
Page 10 of 84 HP Insight Remote Support 7.4: Installation and Configuration Guide
Functionality Details
Mission Critical Service Delivery (Insight RSA only)
Capabilities to deliver mission critical services such as:
l HP-UX System Health Check assessments (not available within
Insight RS 7.x, but available as a standalone client)
l TAM-S and CCMon Services l Unreachable Device Notification Table 1.1Insight RS 5.x functionality not available in Insight RS 7.4, continued
Fulfill Hosting Device system requirements
The Hosting Device must meet the hardware and software requirements defined in theHP Insight Remote Support Release Notesand summarized in the Hardware, Operating System, Software, Access, and Communication Requirements sections below.
Important:Make sure the system date is set correctly on the Hosting Device.
Important:To protect your privacy, do not use sensitive information in the name of the Hosting Device server. The server name will be visible in the Insight RS Console and HP Insight Online, and can be viewed by HP support and your HP Authorized Channel Partner.
Fulfilling hardware requirements
Insight RS is supported only on the following HP ProLiant servers:
l For under 2,500 devices, any HP ProLiant G4 or above (x64 system) with Insight Management Agent or WBEM Provider support
l For 2,500 to 3,500 devices, any HP ProLiant G7 or above (x64 system) with 2 processors and with Insight Management Agent or WBEM Provider support
Important:ProLiant MicroServers are not supported as Hosting Devices at this time.
See theHP Insight Remote Support Release Notesfor more details about Insight Management Agent and WBEM Provider support.
Important:If you are installing or retaining HP Systems Insight Manager on the same Hosting Device, then the extra resources and requirements needed for this application should be added accordingly. See theHP Systems Insight Manager Installation and Configuration Guide for Windowsathttp://www.hp.com/go/foundationmgmt/docsfor details.
Important:When running the Hosting Device in a virtual environment, HP recommends increasing the memory and disk space recommendations by 10% when the Virtual Machine (VM) is created. Do this for each VM added to the ProLiant.
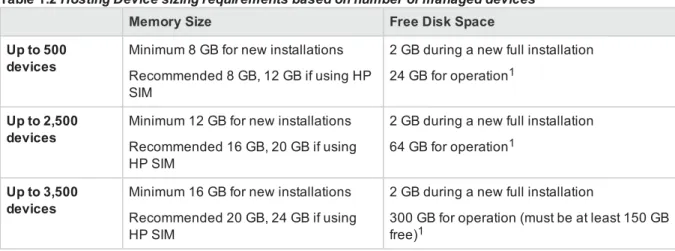
Memory Size Free Disk Space
Up to 500 devices
Minimum 8 GB for new installations Recommended 8 GB, 12 GB if using HP SIM
2 GB during a new full installation 24 GB for operation1
Up to 2,500 devices
Minimum 12 GB for new installations Recommended 16 GB, 20 GB if using HP SIM
2 GB during a new full installation 64 GB for operation1
Up to 3,500 devices
Minimum 16 GB for new installations Recommended 20 GB, 24 GB if using HP SIM
2 GB during a new full installation
300 GB for operation (must be at least 150 GB free)1
Table 1.2Hosting Device sizing requirements based on number of managed devices
1The disk space requirements are affected by the number and type of devices if collections are configured (strongly recommended and in some case a requirement of the contract type). Please see theHP Insight Remote Support Release Notesfor details.
Number of monitored devices supported
This solution has been optimized to support up to 3,500 monitored devices per Hosting Device. If you need to monitor more than 3,500 devices, HP recommends that you use multiple Insight Remote Support installations, either on multiple physical servers or installed on its own supported virtual machine.
Normally, each physical device counts as one device when calculating the overall maximum device number, e.g. a ProLiant server and its iLO 4 only count as a single device. However, there are some exceptions that need to be taken into account as listed below. The device count is based on the frequency and size of collections, and the Hosting Device resources required to gather the collections for the device type.
l HP ProLiant Gen8 servers using the embedded iLO 4 capabilities when AHS collections are turned on, count as 5 devices (without AHS collections, each server counts as one device)
l Each networking switch counts as 4 devices
l Each HP StoreVirtual 4xxx Storage Node counts as 30 devices l Each HP StoreAll Network Storage System counts as 4 devices l Each Tape Library counts as 4 devices
l Each HP 2000/MSA device counts as 4 devices
HP Insight Remote Support 7.4: Installation and Configuration Guide Page 12 of 84 Chapter 1: Understanding installation process and requirements
l Each HP P6000 Enterprise Virtual Array counts as 8 devices l Each VMware® vCenter™ server installation counts as 4 devices
l Any device that is configured as part of a SAN collection, adds an additional count of 4 devices
Configuration collection capabilities
HP Insight Remote Support7.4 has the ability to collect configuration information from your monitored devices managed centrally from the Hosting Device.
These services are initiated when the devices register and further collections are automatically scheduled by default. These configuration collections enable the following:
l HP Support to provide improved technical support.
l Data collections provide HP (or your nominated HP Authorized Channel Partner) with information on the monitoring health of each of your devices. This is displayed in Insight Online if you have chosen this option.
l Certain HP Proactive services have a mandatory requirement for remote support monitoring and collections enabled on all devices for the customer to receive all the features and service deliverables provided under the service. This means HP is not obligated to provide delivery of proactive
entitlements for disabled collections for these devices until such time as the remote support monitoring and collection functionality is restored.
l Optionally, if during installation or subsequently you have requested HP or your preferred HP Authorized Chanel Partner to provide recommendations that may improve your environment.
Important:Dependent on the collection type, additional disk space needs to be allocated to allow configuration collections to operate correctly. Note, all collections have a number that are retained for historic records. Additionally, collections are compressed by a ratio of ten to one when they are retained but consideration for disk space should be given if multiple collections are run at the same time. The only exception is Active Health System (AHS) Collections that are not compressed. Please see"Collection types and disk space requirements" belowfor details on how to calculate the required disk space.
Schedule frequency (default schedule)
Average size per collection (compressed)
Number of collections retained
Active Health System (AHS) Collection
Applicable for HP ProLiant Gen8 and Gen9 servers only, independent if the server is using the embedded management capabilities in the iLO 4 or using a diagnostic agent installed on the operating system.
HP ProLiant Gen8 and Gen9 Weekly 25 MB 3
Server Basic Configuration Collection
Windows and Linux on HP ProLiant Monthly 200 KB 5
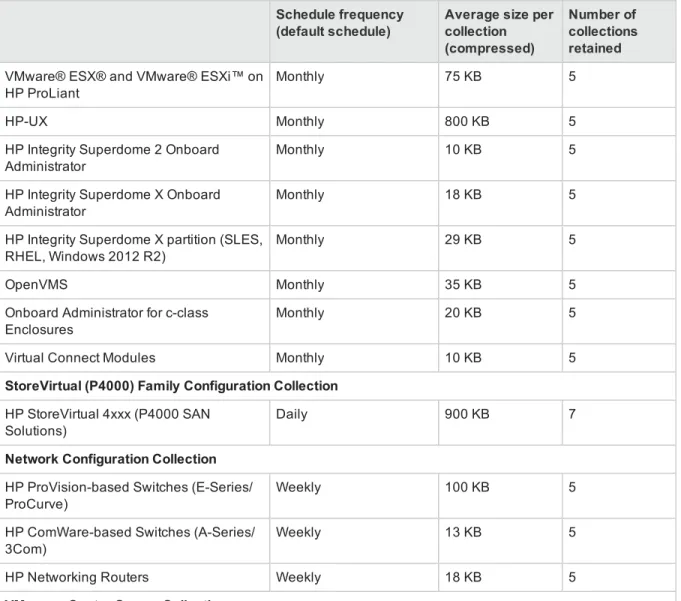
Schedule frequency (default schedule)
Average size per collection (compressed)
Number of collections retained
VMware® ESX® and VMware® ESXi™ on HP ProLiant
Monthly 75 KB 5
HP-UX Monthly 800 KB 5
HP Integrity Superdome 2 Onboard Administrator
Monthly 10 KB 5
HP Integrity Superdome X Onboard Administrator
Monthly 18 KB 5
HP Integrity Superdome X partition (SLES, RHEL, Windows 2012 R2)
Monthly 29 KB 5
OpenVMS Monthly 35 KB 5
Onboard Administrator for c-class Enclosures
Monthly 20 KB 5
Virtual Connect Modules Monthly 10 KB 5
StoreVirtual (P4000) Family Configuration Collection
HP StoreVirtual 4xxx (P4000 SAN Solutions)
Daily 900 KB 7
Network Configuration Collection
HP ProVision-based Switches (E-Series/ ProCurve)
Weekly 100 KB 5
HP ComWare-based Switches (A-Series/ 3Com)
Weekly 13 KB 5
HP Networking Routers Weekly 18 KB 5
VMware vCenter Server Collection
This collection size includes all the configuration information from VMware vCenter and all of its virtual machines. The size varies based on the size and complexity of the cluster being monitored. More virtual machines in the cluster will increase the size.
VMware vCenter Server Weekly 5 MB 3
Storage Configuration Collection
P6000 Enterprise Virtual Arrays Weekly 250 KB 5
HP StoreFabric SAN switches Weekly 100 KB 5
HP StoreEasy Storage (Commercial NAS) Monthly 450 KB 5 HP ESL/HP StoreEver EML/HP StoreEver
MSL
Weekly 25 KB 5
HP SureStore 2000 (Modular Smart Arrays)
Weekly 100 KB 5
Table 1.3Collection types and disk space requirements, continued
HP Insight Remote Support 7.4: Installation and Configuration Guide Page 14 of 84 Chapter 1: Understanding installation process and requirements
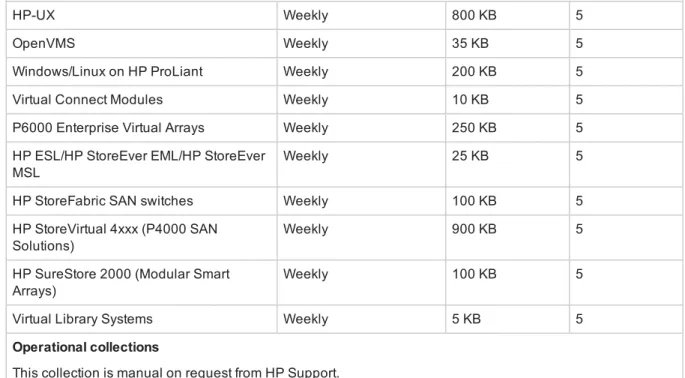
Schedule frequency (default schedule)
Average size per collection (compressed)
Number of collections retained
SAN Configuration Collection
These collections are in addition to the collections listed above but are only required to fulfill the deliverables of a SAN Proactive Services contract
HP-UX Weekly 800 KB 5
OpenVMS Weekly 35 KB 5
Windows/Linux on HP ProLiant Weekly 200 KB 5
Virtual Connect Modules Weekly 10 KB 5
P6000 Enterprise Virtual Arrays Weekly 250 KB 5 HP ESL/HP StoreEver EML/HP StoreEver
MSL
Weekly 25 KB 5
HP StoreFabric SAN switches Weekly 100 KB 5
HP StoreVirtual 4xxx (P4000 SAN Solutions)
Weekly 900 KB 5
HP SureStore 2000 (Modular Smart Arrays)
Weekly 100 KB 5
Virtual Library Systems Weekly 5 KB 5
Operational collections
This collection is manual on request from HP Support.
Support Data Collection On demand 10 MB 2
Table 1.3Collection types and disk space requirements, continued
Fulfilling operating system requirements
Insight RS 7.4 can be installed on a Windows HP ProLiant server or Windows virtual guest on a VMware, Citrix or Hyper-V virtual machine.
Important:HP SIM and Insight RS 7.4 support different versions of the Microsoft Windows operating system. If you intend to synchronize Insight RS with HP SIM, make sure the Hosting Device operating system is supported by both HP SIM and Insight RS. For HP SIM operating system support, see theHP Insight Management Support Matrixat:
http://www.hp.com/go/insightmanagement/docs.
Supported Microsoft Windows operating systems
The following Microsoft Windows operating system versions are supported with English, French, Italian, German, Spanish, Dutch, Traditional Chinese, Simplified Chinese, Korean, and Japanese International Server. Operating systems arenotsupported unless included in the below list.
Important:Only 64-bit (x64) versions of Microsoft Windows operating systems are supported.
l Microsoft Windows Server 2012 R2
n Standard Edition n Datacenter Edition
l Microsoft Windows Server 2012
n Standard Edition n Datacenter Edition
l Microsoft Windows Server 2008 R2 for x64 including Service Pack 1
n Standard Edition n Enterprise Edition
l Microsoft Windows Server 2008 Service Pack 2 for x64
n Standard Edition n Enterprise Edition n Datacenter Edition
l Microsoft Windows Web Server 2008 Service Pack 2 for x64
Installing Insight RS on an HP StoreEasy Storage system is supported when Insight RS monitors only the StoreEasy Storage system and the storage presented to the system.
l Windows Storage Server 2012 R2
n Standard edition
l Windows Storage Server 2012
n Standard edition
l Windows Storage Server 2008 R2
n Standard edition n Enterprise edition
l Windows Storage Server 2008
n Standard edition n Enterprise edition
Important:Installing or upgrading Insight Remote Support on a Microsoft Windows server configured as a domain controller is not supported.
Important:Support for Microsoft Windows Server 2008, Windows Server 2008 R2 and Windows Server 2012 is limited to the full server version only and is not available for the core version as much of the required functionality is unavailable in this version. This also excludes
HP Insight Remote Support 7.4: Installation and Configuration Guide Page 16 of 84 Chapter 1: Understanding installation process and requirements
Windows Server core versions running the Hyper-V role.
Supported Microsoft Hyper-V server
Hyper-V virtual machines are supported if the Microsoft Windows virtual guest operating system is a supported Hosting Device operating system.
The following Microsoft Windows versions are supported: l Microsoft Hyper-V Server 2012 R2
l Microsoft Windows Server 2012 R2 using Hyper-V role l Microsoft Hyper-V Server 2012
l Microsoft Windows Server 2012 using Hyper-V role l Microsoft Windows Server 2008 R2 using Hyper-V role
Supported VMware operating systems
The following VMware versions are supported: l VMware vSphere ESXi 6.0
l VMware vSphere ESXi 5.5 including Update versions l VMware vSphere® ESXi 5.1 including Update versions l VMware ESXi Server 4.0, 4.1, 5.0
l VMware ESX Server 4.0 and 4.1 including Update versions
Support is provided on a VMware ESX or ESXi supported HP ProLiant server utilizing 64-bit VMware Guests running Windows Server 2008 or 2012 variants as described in"Supported Microsoft Windows operating systems" on page 15.
Support is provided for the following VMware vSphere® capabilities when the Hosting Device is installed in a VMware Windows virtual machine:
l VMware vSphere® vMotion® when the Hosting Device is moved to another server in the same cluster l VMware vSphere Fault Tolerance to provide Hosting Device hardware resilience using two servers
running in parallel for continuous fault tolerance for an Insight Remote Support installation. For details of this capability please refer to
http://www.vmware.com/products/vsphere/features/fault-tolerance.html
Important:VMware vCenter features that are not supported on a Virtual Machine based Hosting Device includes VMware Distributed Resource Scheduler (DRS), VMware High Availability (HA), VM cloning, VM copying and Physical to Virtual (P2V) Migrations with the VMware vCenter Converter.
Supported Citrix XenServer operating systems
The following Citrix XenServer versions are supported: l Citrix XenServer 5.5 and 5.6 including Update versions l Citrix XenServer 6.0, 6.1 and 6.2 including Update versions
Fulfilling software requirements
Important:Make sure the system date is set correctly on the Hosting Device.
Install web browsers
The following web browsers are supported for Insight RS: l Microsoft Internet Explorer, versions 8.x, 9.x, 10.x, and 11.x l Mozilla Firefox, versions 37.x and 38.x
l Google Chrome, version 44.x
Install .NET Framework
Microsoft .NET Framework 3.5 or later is required.
To verify your version of the .NET Framework, complete the following steps:
Windows 2008
1. On the Hosting Device, open theServer Manager.
2. In the Server Manager, clickFeaturesand verify that .NET Framework 3.5.x or later is listed in the right pane.
3. If the .NET Framework is not listed, click theAdd Featureslink.
4. In the Select Features screen, expand.NET Framework 3.5.x Features. 5. Select the .NET Framework 3.5.x check box, and then clickNext.
6. In the Confirm Installation Selections screen, review the selections and clickInstall. 7. When the installation completes, clickClose.
Windows 2012
1. On the Hosting Device, open theServer Manager.
2. In the Server Manager, clickLocal Serverand verify that .NET Framework 3.5.x or later is listed in the Roles and Features section of the right pane.
3. If the .NET Framework is not listed, clickTasks→Add Roles and Features.
HP Insight Remote Support 7.4: Installation and Configuration Guide Page 18 of 84 Chapter 1: Understanding installation process and requirements
4. On the Select Features screen of the Add Roles and Features Wizard, expand.NET Framework 3.5.x Features.
5. Select the .NET Framework 3.5.x check box, and then clickNext.
6. In the Confirm Installation Selections screen, review the selections and clickInstall. 7. When the installation completes, clickClose.
Perform a Windows Update
HP recommends performing a Windows Update on the Hosting Device before installing Insight RS. Make sure you restart the Hosting Device after the updates are installed.
Fulfilling access requirements
To install Insight RS, you must haveadministrative rightsto Microsoft Windows on the Hosting Device.
Important:Due to enhanced security features in Windows 2008 and later, HP recommends that you run the installation as useradministratoror as a user in theAdministratorsgroup. Insight RS should only be installed by a user who is logged on to the Hosting Device through the system console or a console-mode Remote Desktop Connection (RDC) session. Do not attempt to install Insight RS through a non-console mode RDC session.
To access the Hosting Device remotely with Windows RDC, use one of the following console-mode switches:
l When connecting from a Windows XP, Windows 2000, or Windows 2003 system, use the/console switch:
c:\windows\system32\mstsc.exe /console
l When connecting from a Vista, Windows 2008, Windows 2012, or Windows 7 system, use the/admin switch:
c:\windows\system32\mstsc.exe /admin
Fulfill networking requirements
Make sure the following network requirements are met before installing Insight RS:
l IPv6 is not supported and needs to be disabled on the Hosting Device. Insight RS only supports the IPv4 networking protocol.
l Make sure your Hosting Device has a valid static IP address, and that it is connected to your network. Dynamic IP addresses are not supported.
Note:Network Address Translation (NAT) is not supported for communications between the Hosting Device and monitored devices.
Fulfill communication requirements
There are three communication paths within Insight RS that require settings to your firewall. Make sure that the correct firewall openings are configured to allow communication between the components.
Configuring communication from a web browser to Insight
RS
Port 7906 (HTTPS)—Open port 7906 on the Hosting Device to access the Insight RS user interface on the Hosting Device from other systems inside of the same network. Also make sure that Windows firewall allows the connection to port 7906.
Configuring communication from the Hosting Device to HP
Insight RS communicates directly with the HP Data Center through the firewall or web proxy server (if a web proxy server is in use).Insight RS supports connecting directly to the Internet or connecting through a proxy server. Insight RSdoes notsupport proxies using proxy auto-configuration scripts, NTLM (NT LAN Manager) authentication, or Kerberos authentication.
The Insight RS configuration may fail if your firewall or security software filters network communication between the Hosting Device and the HP Data Center. For example, some firewall software, such as WatchGuard firewall, filters some HTTP protocols by default. It may block HTTP redirection, HTTP download of compressed files, etc. In those cases, change the firewall settings so that it does not block anyHTTP communication between the Hosting Device and the HP Data Center. Verify that it passes any HTTP standard protocol between the Hosting Device and the HP Data Center, so that it meets the communication requirement (TCP 443 outbound with established back).
Configure the following port and alias in your firewall:
l Port 443 (HTTPS)—Insight RS communicates over HTTPS/443 to submit incidents to and retrieve warranty and contract information from HP. HTTPS provides encryption for confidentiality of software configuration data collected from the Hosting Device and transferred to HP. HP recommends you configure your firewall before installing Insight RS.
l services.isee.hp.com—Set your firewall rules to allow access to HP using the alias
services.isee.hp.com. All data sent to HP is through an HTTPS connection to the destination
services.isee.hp.com. This destination is a virtual IP address that is automatically routed to an active server in one of the HP Data Centers. HP strongly recommends configuring only the alias. If your policies require IP addresses, see theHP Insight Remote Support Security White Paperfor details.
Configure the Hosting Device to use DNS
HP Insight RS uses redundant data centers to provide resiliency and load balancing. Global Server Load Balancing (GSLB) redirects traffic based on server load and availability. GSLB uses Domain Name System (DNS) to return the IP address of an available server. The Hosting Device must use DNS to
HP Insight Remote Support 7.4: Installation and Configuration Guide Page 20 of 84 Chapter 1: Understanding installation process and requirements
communicate with the redundant sites. If you configure IP addresses in the hosts file instead of using DNS, you will lose service when the GSLB redirects traffic.
To configure the Hosting Device to use Domain Name System (DNS), complete the following steps: 1. Log on to the system as a member of theAdministratorsgroup.
2. ClickStart→Control Panel.
3. In the Network and Internet category, click theView network status and taskslink. 4. Click the link for Connections, for example:Local Area Connection,Ethernet. 5. ClickProperties. The Properties screen appears.
6. SelectInternet Protocol Version 4 (TCP/IPv4)and clickProperties. The Internet Protocol Version 4 (TCP/IPv4) Properties screen appears.
7. Click one of the following options:
n Obtain an IP address automatically(if appropriate for the your environment)
n Use the following IP address
8. Specify the Hosting Device's IP address fields and the DNS server(s) available in your environment. 9. ClickOK, clickOK, and then clickClose. Close the Network and Sharing Center.
10. Verify the settings by performing thenslookupcommand in a DOS window: nslookup services.isee.hp.com
The output should show the IP address of the DNS server you typed.
Verify Hosting Device connectivity with HP
HP recommends verifying connectivity to the HP Data Center before installing Insight RS to avoid installation failures due to connectivity problems.
During installation, there is no specific connectivity check for Insight RS. The Hosting Device Setup Wizard contains a connectivity test. If there are any problems the first time Insight RS attempts to connect to the HP Data Center, the test will fail. Therefore, verifying connectivity before installation reduces the chance of connectivity failure.
Perform the following connectivity test:
HP Insight Remote Support 7.4: Installation and Configuration Guide Page 22 of 84 Chapter 1: Understanding installation process and requirements
Important:This test doesnotverify that the Hosting Device or Insight RS configurations will actually submit collections or events, but it does validate that the Hosting Device itself can communicate to HP's servers before you continue configuring the Hosting Device.
l services.isee.hp.com
If you are using a proxy server, verify connectivity between the Hosting Device and the HP Data Center by using a web browser to connect to the following site:
https://services.isee.hp.com/version/index.html. The response should be a version number, for example:##.##.##.##.
Note:This version number willnotmatch the version of the software which you are installing.
If you are not using a proxy server, verify connectivity toservices.isee.hp.comby using telnet. From a command prompt, type the commandtelnet services.isee.hp.com 443. You will see a
connection established, which confirms connectivity.
Configuring communication between the Hosting Device
and monitored devices
The firewall settings between the Hosting Device and the monitored devices also need to be opened. This could be the Windows firewall and, if one exists, the firewall between the Hosting Device and the
monitored devices. See theHP Insight Remote Support Security White Paperfor the ports needed for your device types.
Depending on your monitored device type, your Hosting Device will collect event and configuration data from the monitored device through one or more of the following: SNMP, WBEM, ELMC, and/or P6000 Command View. The instructions to configure SNMP on the Hosting Device are in"Install SNMP on the Hosting Device" below. The instructions to configure communications on your monitored device are in the chapter specific to the device in theHP Insight Remote Support Monitored Devices Configuration Guide. If you fail to configure these protocols properly, events and configuration collections will not reach the Hosting Device and therefore will not be communicated by the Hosting Device to HP for support.
Install SNMP on the Hosting Device
SNMP is required for Insight RS to monitor device types that use SNMP for communication (see theHP Insight Remote Support Monitored Devices Configuration Guidefor specific devices). SNMPmustbe installed on the Hosting Device. SNMP is provided by Microsoft and, if not already installed on your Hosting Device, can be installed through the Server Manager.
To install SNMP on your Hosting Device, complete the following steps: 1. On the Hosting Device, open theServer Manager.
n For Windows 2008, go toAction→Add Features.
n For Windows 2012, go toManage→Add Roles and Features.
3. Scroll down toSNMP Service. If it is not selected, select the check box and clickNext. Follow the wizard to install the service.
Configure Traps
Once you have SNMP installed on your Hosting Device, configure it to receive packets from your monitored devices by completing the following steps:
1. On the Hosting Device, clickStart→Administrative Tools→Services. 2. Double clickSNMP Serviceto open the Properties window.
3. On theTrapstab, make sure a community string is listed, and make surelocalhostand127.0.0.1
exists as a trap destination.
4. On theSecuritytab, choose one of the following options:
n Accept SNMP packets from any host.
n Accept SNMP packets from these hostsand use theAddfeature to add your monitored devices
to the list.
5. ClickOKto save your changes and close the SNMP Service Properties configuration window.
Set SNMP Trap service startup type
Insight RS requires the SNMP Trap service to start automatically upon boot. Configure the SNMP Trap service by completing the following steps:
1. On the Hosting Device, clickStart→Administrative Tools→Services. 2. Double clickSNMP Trapto open the Properties window.
3. Click theGeneraltab.
4. From theStartup typedrop-down list, selectAutomatic. 5. If the service is not running, clickStart.
6. ClickOKto save your changes and close the SNMP Trap Properties configuration window.
Update WMI Mapper to monitor Windows Server 2012 devices
If you want to take advantage of Insight RS 7.4's support for monitored devices running Windows Server 2012, you need to ensure that the WMI Mapper is updated to version 7.2.3 or later. This version of WMI Mapper is included in recent HP SIM distributions, and it is also available as a package which can be installed from the Insight RS Software Updates screen.
To make sure you have a supported version of WMI Mapper, complete the following steps:
HP Insight Remote Support 7.4: Installation and Configuration Guide Page 24 of 84 Chapter 1: Understanding installation process and requirements
1. To verify the installed version of WMI Mapper, navigate toStart→Control Panel→Programs and Features. Check theInstalledcolumn for the packagePegasus WMI Mapper. If version 7.2.3 or later is installed, no further action is required. If 7.2.3 or later is not installed, proceed to the next step. 2. To install or upgrade WMI Mapper from the Insight RS Console:
a. Log on to the Insight RS Console.
b. In the Insight RS Console, navigate toAdministrator Settings→Software Updates. c. Select the WMI Mapper package in the table.
d. Select theAvailable Versiontab below the table, and then clickInstall. Note that the Insight RS service will be stopped during and restarted after the WMI Mapper installation, so the web
interface will indicate the need to log out.
Monitor the Hosting Device
Monitor the physical server that the Insight RS software is installed on. The software required to monitor the Hosting Device depends on the ProLiant generation and operating system installed. For information about configuring your Hosting Device for monitoring, see theHP Insight Remote Support Monitored Devices Configuration Guide.
Chapter 2: Installing Insight Remote Support for
the first time
This chapter guides you through the Insight RS installation process.
At this point, step 1 below is complete. Perform step 2 to install and configure Insight RS on your Hosting Device.
If a previous version of Insight RS is installed on your Hosting Device and you want to upgrade, see the HP Insight Remote Support Upgrade Guide.
Download and install Insight Remote Support
Before beginning the Insight RS installation, you need to download the Insight RS software package from the HP Software Depot at:http://h20392.www2.hp.com/portal/swdepot/displayProductInfo.do?
productNumber=REMOTESUPPORT.
To download Insight RS, complete the following steps:
1. Log on to your Hosting Device using an Administrator account. You must log on as an Administrator or as a user that is a direct member of the Hosting Device's Administrators group.
2. Download the.exefile containing the Insight RS installation files from the HP Software Depot. To begin the installation, complete the following steps:
1. On the Hosting Device, right-click the self-extracting.exefile that you downloaded from the HP Software Depot, and chooseRun as administrator. After the files are extracted, the installation wizard launches and performs a prerequisite check.
Page 26 of 84 HP Insight Remote Support 7.4: Installation and Configuration Guide
2. If all of the prerequisites are met, clickNext. If any prerequisites are not met, do one of the following:
n If the problem is a critical failure, exit the installer, resolve the issue, and then restart the installer. n If the problem is a warning, either exit the installer to resolve the issue or check theConfirm to
continuecheck box and clickNext. 3. On the Welcome screen, clickNext.
4. Review the license agreement, select theI accept the terms in the License Agreementcheck box, and clickNext. The Destination Folder section of the wizard appears.
5. On the Destination Folder screen, you can change the default locations for program files, configuration files, database files, and log files. Do one of the following:
n To install Insight RS to the default destination folders, clickNext.
n To install files to other folders, clickChange, select a new destination folder, and clickOK.
Repeat for any install folder you want to change, and when finished, clickNext.
Installation directories must be seen by Microsoft Windows as local drives and not network drives. Insight RS cannot be executed from a single shared disk by multiple computers.
Note:If you have a large number of devices to monitor, HP recommends you configure the destination folder for the database and log files to be on different volumes to increase the performance of Insight RS.
6. ClickInstall. When the installation is nearing completion, the following message appears:Install complete. Waiting up to 600 seconds for the Insight RS Console to become available.
7. When the installation completes, clickFinishto exit the installation wizard.
Important:After installation, if thersadmincommand is not recognized when run from a command prompt, log off then log back on to Windows. This forces Windows to apply the new modifiedPATHvariable. A reboot isnotrequired.
Locating log files
If you encounter any problems during installation, view thersinstall.logand the
hprs_msi_install-HP Insight Remote Support 7.4: Installation and Configuration Guide Page 28 of 84 Chapter 2: Installing Insight Remote Support for the first time
0.logfiles. During installation, these log files are located in the%TEMP%folder. After a successful installation, these log files are copied to theC:\ProgramData\HP\RS\LOG\folder. This is the default log file location, and it will be different if you chose a different log file location during installation.
Note:TheC:\ProgramDatafolder is a hidden folder, so you may need to set your folder options to show hidden folders.
Logging on to the Insight RS Console
After installation, wait a few minutes before attempting to log on to the Insight RS Console to make sure the hosting device is ready for registration. If you try to log on immediately, you will be prompted by a message informing you that the system is starting up and to try again later. If you do this, you must force a refresh on the Insight RS Console (or open a new browser window) to avoid the browser cache.
Point your browser to:https://<hosting_device_ip_or_fqdn>:7906.
Log on as an Administrator or as a user that is a direct member of the Hosting Device's Administrators group. The first time you log on to the Insight RS Console you need to log on as an Administrator, but you can enable access for any system account. For more information, see"Enable operator-level user authentication" on page 64.
If the account is not an Administrator account you will not be able to access the Administrator Settings, Discovery or Solution Manager screens in the Insight RS Console.
Note that after 30 minutes of inactivity the Insight RS Console times out the session and the user is logged off.
Important:Your web browser language settings determine the language displayed in the Insight RS Console. When connecting to Insight RS Console from a remote system, configure your web browser language settings to match the language you used when you installed Insight RS.
Known issue: Cannot log on to the Insight RS Console as
an administrator
Issue: You are using a domain user account. This account is a member of a domain group which in turn is a member of the domain Administrators group. User Account Control (UAC) is turned on.
Example:
You cannot log on to the Insight RS Console with userMYDOMAIN\myusernameand, l MYDOMAIN\myusernameis a member of the groupMYDOMAIN\specialusers.
l MYDOMAIN\specialusershas been added to theMYDOMAIN\Administratorsgroup. l UAC is turned on.
l Turn off UAC on the Hosting Device.
l Add your user account to a local Administrators group on the Hosting Device. For example, add
MYDOMAIN\myusernameto the localHostingDevice\Administratorsgroup.
l Add your user account directly to the domain Administrators group. For example, add
MYDOMAIN\myusernameto theMYDOMAIN\Administratorsgroup directly.
l Create a new local Administrators account and use that to log on to the Hosting Device. For example, create an Administrative account namedHostingDevice\AdminAccountand log on with that.
Resolve certificate warning
When you point your browser (Microsoft Internet Explorer, Mozilla Firefox, or Google Chrome) to the Insight RS Console, a certificate error message appears. To resolve the security warning for your Internet browser, complete the following steps:
Note:The desktop shortcut installed on the Hosting Device points to the localhost. If using the desktop shortcut to start the Insight RS Console, change the properties of the shortcut to use the Hosting Device's IP address or FQDN for the certificate steps below to work correctly.
Internet Explorer
1. Click theContinue to this website (not recommended)link.
2. In the address bar, clickCertificate Error. The Untrusted Certificate window appears.
3. ClickView certificates.
4. In the Certificate dialog box, clickInstall Certificate. 5. In the Certificate Import Wizard, clickNext.
6. Click thePlace all certificates in the following storeoption. 7. ClickBrowse. The Select Certificate Store window appears.
HP Insight Remote Support 7.4: Installation and Configuration Guide Page 30 of 84 Chapter 2: Installing Insight Remote Support for the first time
8. SelectTrusted Root Certification Authoritiesand clickOK. 9. ClickNextandFinish. The Security Warning dialog box appears. 10. ClickYesto confirm you want to install the certificate.
Mozilla Firefox
1. Click theI Understand the Riskslink to expand the section and clickAdd Exception.
2. In the Add Security Exception dialog box, typehttps://<hosting_device_ip_or_fqdn>:7906/into the Location field or continue to the next step if the information is correct.
3. ClickConfirm Security Exceptionto resolve the security warning.
Google Chrome
1. On thePrivacy errorscreen that appears, click the “lock with the red X” icon in the menu bar, and choose “Certificate information”.
2. In the Certificate dialog box, click theDetailstab and then clickCopy to File. The Certificate Export Wizard appears.
3. Proceed through the wizard and save the certificate. When complete, clickOKto close the
HP Insight Remote Support 7.4: Installation and Configuration Guide Page 32 of 84 Chapter 2: Installing Insight Remote Support for the first time
Certificate dialog box.
4. Use the Microsoft Management Console to import the certificate as a trusted root certificate: a. On the Start menu, clickRun, typeMMC, and then clickOK. Microsoft Management Console
opens with an empty console.
b. From the console, chooseFile→Add/Remove Snap-in.
c. In theAvailable snap-inspane, selectCertificatesand clickAdd.
d. In the Certificates snap-in dialog box, select how you want to manage certificates and click
Finishand then clickOK.
e. In the left menu, selectTrusted Root Certification Authorities. In the Object Type pane, right-clickCertificatesand chooseAll Tasks→Import.
f. In the Certificate Import Wizard, import the certificate you saved in step 3. Place the certificate in the Trusted Root Certification Authorities store.
g. ClickFinish.
HP Insight Remote Support 7.4: Installation and Configuration Guide Page 34 of 84 Chapter 2: Installing Insight Remote Support for the first time
At this point, steps 1 and 2 below are complete. Perform step 3 to complete the setup wizards.
When you first open the Insight RS Console, you must complete the Setup Wizards. There are two Setup Wizards: the Monitored Device Setup Wizard checks the readiness of the devices you want to monitor, and the Hosting Device Setup Wizard allows you to enter default settings about your environment. HP recommends you complete the Monitored Device Setup Wizard first and let it run in the background while you complete the Hosting Device Setup Wizard.
Access the Insight RS Console through a web browser at:https://<hosting_device_ip_or_ fqdn>:7906. Log on to the Insight RS Console using an Administrator account. You can log on to the Insight RS Console using any system account, but if the account is not an Administrator account you will not be able to access the Administrator Settings, Discovery or Solution Manager screens in the Insight RS Console.
Important:The Setup Wizards are not available in the main menu after you complete them. You can update the settings elsewhere in the Insight RS Console if necessary. If you need to access the wizards again, use the following URL:https://<hosting_device_ip_or_
fqdn>:7906/remotesupport/command/viewWizards/. On the HP Insight Remote Support Setup Wizard screen, you can:
l Complete the Monitored Device Setup Wizard to discover the devices you want to monitor. For more information, see"Complete the Monitored Device Setup Wizard" below.
l Complete the Hosting Device Setup Wizard to configure the Hosting Device. For more information, see"Complete the Hosting Device Setup Wizard" on page 43.
Complete the Monitored Device Setup Wizard
The Monitored Device Setup Wizard checks whether Insight RS can communicate with devices in your environment based on the configured credentials and verifies the devices are ready to be monitored by HP Insight Remote Support. The Monitored Device Setup Wizard can be left unattended for large
environments. The results can be viewed in the final screen of the wizard or on the Discovery screen in the Insight RS Console.
Insight RS checks every device’s warranty and contract to make sure it has a valid HP warranty, Care Pack or contract. If a device has no HP warranty or contract, the monitoring health indicator in the Insight RS Console will be red. If this is red, then no service events will be analyzed or sent to HP.
Configure your devices
Before your devices can be monitored by Insight RS, they need to be configured to communicate with the Hosting Device. For information about configuring your specific device type, refer to theHP Insight Remote Support Monitored Devices Configuration Guideat:
http://www.hp.com/go/insightremotesupport/docs.
Configure protocol access credentials
On the Discovery Access Credentials screen, configure protocol credentials for the devices in your environment.
Note:This information can be modified on theDiscovery→Credentialstab.
Each device in your environment requires protocols that Insight Remote Support uses to communicate with the device. Each of these protocols must have associated credential information.
During discovery, protocol credentials are used to gather information about the device such as warranty and contract information. If the protocol credentials are not supplied, the device may be discovered, but all of the relevant information about the device may not be detected, preventing Insight Remote Support from monitoring the device.
See theHP Insight Remote Support Monitored Devices Configuration Guidefor the protocols required for each device type.
Important:Set up discovery credentialsbeforeattempting device discovery. If devices are discovered without protocol credentials, then the warranty and contract information is not detected by Insight Remote Support.
Important:Insight RS requires administrator access to the monitored devices. Discovery and collections require privileged access in order to retrieve information about the monitored devices.
To add a new protocol credential, complete the following steps:
HP Insight Remote Support 7.4: Installation and Configuration Guide Page 36 of 84 Chapter 3: Completing the Setup Wizards
1. Experienced users can choose a protocol directly from the Select and Configure Protocol drop-down list, but less experienced users can filter the protocols to determine the necessary protocol for a given device type. To filter the list of available protocols, do one of the following:
n To choose from a list of all available protocols (regardless of device), selectAll Device Typesin
the Select Type drop-down list.
n To filter the list of available protocols, select the type of device for which you want to configure
access credentials in the Select Type drop-down list. You can also identify a sub device type in the Select Sub-Type drop-down list to further filter the list of protocols.
The Select and Configure Protocol drop-down list is filtered according to your selection(s). 2. From the Select and Configure Protocol drop-down list, select the appropriate protocol. 3. ClickNew. The New Credential dialog box appears with fields for the protocol you selected.
4. Complete the fields in the New Credential dialog box.
Note:The available fields depend on the protocol that you select.
The following table describes the different fields you will see when working with different protocols:
Credential field Description
Priority Select a priority from the drop-down list. Credentials with a higher set priority will be attempted before credentials with a lower set priority. For example, a set of credentials with a priority of 1 will be executed first during the discovery process.
Credential field Description
Type Select a credential type from the drop-down list. For example, Username Password Credential, Certificate Credential, Anonymous Credential. Selecting a new credential type changes the available fields in the window.
Port Contains the default port number.
Use default Clear this check box if you do not want to use the default port number. Type the appropriate port number in the Port field.
Named Credential If you have created a named credential for the device type, you can select it here. Insight Remote Support populates the access fields with the login details specified in the named credential.
By default, the protocol uses the Named Credential that is assigned to the selected device. If no named protocols exist, thenNoneis selected in the Named Credential drop-down list.
Username Type the username used to access the device type.
Password Type the password used to access the device type.
Confirm Password Re-type the password you typed in the Password field.
File Upload Click theBrowsebutton to locate the certificate and upload it.
Certificate Alias If the certificate you are identifying for access has an alias, type the alias here.
5. After completing the fields, clickAdd.
The credential is added to the list of credentials for the protocol.
Note:Each protocol can have multiple credentials configured. Select a protocol in the Select and Configure Protocol drop-down list to view the list of credentials for that protocol.
6. Repeat steps 1 - 5 to add additional protocol credentials.
7. To update or delete a protocol credential, select the credential in the table and modify the information in the Existing Credential dialog box.
8. ClickNextto continue to the next screen of the wizard. Insight Remote Support saves the credential information.
Discovery sources
On the Discovery Sources screen, configure which devices on your network you want discovered. Device discovery identifies devices on your network to be monitored by Insight Remote Support. There are three ways to tell Insight RS which devices on your network to discover, and they can be used individually or in combination: IP addresses, Windows domains, and local networks.
Important:If you have more than 30 devices on your network, depending on your network
HP Insight Remote Support 7.4: Installation and Configuration Guide Page 38 of 84 Chapter 3: Completing the Setup Wizards
speed, it may take a considerable time to discover all of the devices at once. Unless you have a very small network, HP advises that you specify discovery settings before starting device discovery.
To configure discovery sources, complete the following steps:
1. Add IP addresses to be discovered. You can discover a single device by typing its IP address or discover multiple devices by typing a range or list of IP addresses.
To discover devices by IP address, complete the following steps: a. Click theIP Addressespane.
b. ClickNew. The IP Address dialog box appears.
c. Do one of the following:
o To discover a single monitored device, type the device's IP address in the Address field. o To discover a range of devices, select theAddress Rangeoption. In the Start Address field,
type the IP address of the first device in the range. In the End Address field, type the IP address of the last device in the range.
o To discover a list of devices, select the Address List option. In the Comma-Separated List box, type the IP addresses of the devices separated by commas.
d. ClickAdd.
The IP address or addresses appear in the table. IP address ranges appear in the Start Address and End Address columns. Single IP addresses display only in the Start Address column. 2. Add Windows domains to be discovered. You can discover devices by typing a Windows domain
name and log on credentials.
To discover devices by Windows domain, complete the following steps: a. In the main menu, selectDiscovery.
b. Click theSourcestab.
c. Click theWindows Domainspane.
e. In the Domain field, type the domain name.
f. In the User field, type the username of the domain administrator. g. In the Password field, type the domain administrator's password. h. ClickAdd.
The domain and the administrator's user name appear in the table. i. Make sure the Discover check box is selected for the domain.
3. Add local networks to be discovered. You can discover devices by typing local network information and subnet information. Note that discovering a local network can take a long time for large
environments.
To discover devices by local network, complete the following steps: a. In the main menu, selectDiscovery.
b. Click theSourcestab.
c. Click theLocal Networkspane.
d. ClickNew. The Local Network dialog box appears.
e. Do the following:
o In the Network Address field, type a network address. o In the Subnet Mask field, type the subnet mask. f. ClickAdd.
HP Insight Remote Support 7.4: Installation and Configuration Guide Page 40 of 84 Chapter 3: Completing the Setup Wizards
The local network and subnet information appears in the table. g. Make sure the Discover check box is selected for the local network. 4. ClickNext.
Discover devices
On the Discover Devices screen, start discovery of the devices you want Insight Remote Support to monitor.
Note:You can add a large number of devices and pre-configured data such as contact and site information to Insight Remote Support by using the bulk upload functionality. For more
information, see"Export and import of device information" on page 74. To begin discovery, complete the following steps:
1. After configuring your protocol credentials and discovery source(s), clickStart Discovery. Insight Remote Support displays the progress:
As discovery runs, Insight Remote Support adds discovered devices to the All Devices table. A device's Status column shows whether or not the device is ready to be monitored.
If you exit the Discovery screen, discovery continues in the background.
2. Review your discovered device(s). Discovered devices display in sets of 10. If Insight Remote Support discovers more than 10 devices, use the buttons at the bottom of the table to navigate to the other sets of devices.
If a device displays an error icon ( ) for its status, hover over the icon to view more details about why discovery was not successful for the device.
Note:The results table shows all devices that have been discovered by Insight RS, not just devices that have been discovered with the current settings, so you may see more devices
than expected with your current settings.
1. ClickFinishto close the wizard.
Verification is complete, and successfully discovered devices are ready to be monitored.
Export health report
You can export a health report of the devices in your environment to determine how many are ready to be monitored by Insight RS, and also let HP or your Channel Partner to determine the effort it would take to configure your devices and deploy Insight RS in your environment.
To export a health report, complete the following steps: 1. In the main menu, selectDevices.
2. Below the devices table, clickExport Report. 3. Open or save the report.
The report pulls the device information from the local database and lists all of the devices covered by your discovery settings and shows why they may or may not have been successfully discovered. You can share the report with your HP representative or Channel Partner to determine the effort required to configure the devices in your environment and deploy Insight RS.
Note that when this report is generated from the Monitored Device Setup Wizard, Insight RS has not yet connected to HP, so will not be able to populate the report with warranty and contract information. Run the report from the Discovery or Devices screens in the Insight RS Console to see warranty and contract information.
HP Insight Remote Support 7.4: Installation and Configuration Guide Page 42 of 84 Chapter 3: Completing the Setup Wizards
Complete the Hosting Device Setup Wizard
The Hosting Device Setup Wizard guides you through the initial configuration of Insight Remote Support. In the Hosting Device Setup Wizard you set up default contact, site, and Channel Partner information, connect to HP, and connect Insight Remote Support to Insight Online.
The left pane displays each step in the wizard and highlights the current step in green. Complete the information in each step and clickNextto continue. Required fields are marked by an asterisk (*). Return to any step in the wizard by clickingPreviousuntil you reach the desired step.
Receiving remote support
On the Receiving Remote Support screen, enable notifications and configure software updates. Complete the following sections:
Optimize environment
Through Insight Remote Support, you can allow (or deny) HP and its partners to contact your organization with products and services recommendations, pricing, and delivery information.
In theChoosing to optimize my environmentsection, do one of the following:
l To allow HP and HP Authorized Resellers to contact your organization, select theYes, I consent to
having HP or my HP authorized reseller contact me to discuss optimizing my environment
check box.
l To deny HP and HP Authorized Resellers from contacting your organization, clear theYes, I consent
to having HP or my HP authorized reseller contact me to discuss optimizing my environment
check box.
Note:Click themore Infolink to read details about the different communications HP and HP Authorized Resellers send to clients.
This setting can be updated at any time on theApplication Settings→Settingsscreen.
Remote support software updates
Choose how you want to receive software updates. The following table describes the available options:
Option Action
Automatically Download and Install
SelectAutomatically Download and Installto automatically download and install a group's packages. This is the default setting, and is the recommended setting because new product support and product improvements are installed automatically.