SEC-ACDv3120-QUICK-GUIDE
D o c T y p e L a n g . C o d e ENG / # P a g e s 99 A u t h o r Samsung / R e v i e w e r / A p p r o v a l / R e g . D a t e I t e m C o d eACD Quick Guide
(How to Install,
Configure and Run)
This document is an official technical document which is written, registered, and used based on the Samsung Technical document management policy TNA-2210.
Revision History
Revision Date Author Details
00 Oct 2007 ACD/IVR Team Initial Draft
Table of Contents
1. Overview
...8
1.1 S/W Architecture... 8 1.2 Features... 9 1.2.1 Server... 13 1.2.2 Supervisor... 15 1.2.3 Reporting... 18 1.2.4 Wallboard... 19 1.2.5 Agent... 20 1.2.6 RAD... 21 1.3 General Specification... 22 1.4 License Policy... 22 1.5 Organization... 222. Preparation
...23
2.1 OfficeServ MMC... 232.2 Microsoft SQL Server or Express... 25
2.3 .Net Framework... 25 2.4 OfficeServ Link... 26
3. Installation
...29
3.1 ACD Server/Supervisor/Reporting/RAD... 29 3.2 ACD Wallboard... 35 3.3 ACD Agent... 374. ACD Server
...42
4.1 Configuration via System Configuration... 42
4.1.1 License Information... 42
4.1.2 Server Configuration... 43
4.1.3 Data Archiving... 44
4.2 System Configuration via Supervisor... 45
4.2.1 Server Connections... 46
4.2.2 Port Assignments... 46
4.2.3 Supervisor Accounts... 47
4.2.5 Completion Codes... 49
4.3 ACD Configuration via Supervisor... 50
4.3.1 Division Definitions... 50
4.3.2 Group Definitions... 50
4.3.3 Split Definitions... 50
4.3.4 IVR Assignments... 51
4.3.5 Assign Completion Codes... 52
4.4 Agent Configuration via Supervisor... 52
4.4.1 Agent Configuration... 52
4.4.2 Phone-only Agent Configuration... 52
4.4.3 Assign Agent Splits... 53
4.4.4 Agent Permissions... 53
4.5 Call Routing Configuration via Supervisor... 54
4.5.1 IVR Routing Schedule... 54
4.5.2 DID/CLI Routing... 55
4.5.3 Skill-Based Routing... 55
4.6 Running ACD Server... 56
4.7 Monitoring ACD Server... 59
4.7.1 Split... 59
4.7.2 Agent... 59
4.7.3 Port... 60
4.7.4 Queue... 61
4.8 Upgrading ACD Server... 61
4.8.1 With Installation Setup... 61
4.8.2 With Server Patch... 61
5. ACD RAD
...63
5.1 Configuring Supervisor... 63
5.1.1 Port Assignments... 63
5.1.2 ACD Split Definition... 63
5.1.3 System Options... 63
5.1.4 DID/CLI Routing... 64
5.2 Configuring RAD... 64
5.2.1 RAD Setting... 65
5.2.2 Switch Setting... 65
5.2.3 Logging Option Setting... 66
5.2.4 Prompt... 67
6. ACD Agent
...69
6.1 Main Window... 70 6.1.1 Options... 70 6.1.2 Toolbar... 74 6.1.3 Status Bar... 74 6.2 Split Window... 75 6.3 Favorite Window... 756.4 Message Ticker Window... 75
6.5 Split Stat Window... 75
6.6 Agent Stat Window... 76
6.7 Phonebook Integration... 76 6.7.1 MS Outlook... 76 6.7.2 GoldMine... 78 6.7.3 ACT... 81
7. ACD Wallboard
...83
7.1 Statistics... 83 7.1.1 Server Statistics... 83 7.1.2 Split Statistics... 84 7.1.3 Agent Statistics... 85 7.2 Main Window... 868. ACD Reporting
...88
9. Trouble Shooting
...93
List of Figures
[Figure 1] ACD Architecture... 8
[Figure 2] ACD/RAD Call Flow... 12
[Figure 3] ACD/IVR Call Flow... 13
[Figure 4] System Configuration – Data Archiving... 14
[Figure 5] Process Manager... 14
[Figure 6] Supervisor... 16
[Figure 7] Reporting... 18
[Figure 8] Wallboard... 20
[Figure 9] Agent Caller Information Window... 21
[Figure 10] Agent Main Window... 21
[Figure 11] RAD... 22
[Figure 12] OfficeServ Link... 26
List of Tables
[Table 1] ACD/IVR Terminologies ... 9[Table 2] Basic Routing Combinations ... 11
[Table 3] Menus of Supervisor ... 17
[Table 4] Menus of Reporting ... 19
[Table 5] MMC for Single-Switch ACD/IVR ... 24
[Table 6] MMC for Multiple MGI Cards... 24
[Table 7] Menus of Agent ... 70
[Table 8] Toolbar of Agent ... 74
[Table 9] Server Statistics... 84
[Table 10] Split Statistics ... 85
[Table 11] Agent Statistics... 86
[Table 12] Menus of Agent ... 87
Acronyms
ACD Automatic Call Distributor
RAD Recorded Announcement Device
IVR Interactive Voice Responce MMC Man Machine Communication TTS Text-To-Speech
References
1) Author. Date of print. title. volume number. edition. Print agency. company. Document title. version number. date.
2) <committee name>.<industry standard>.<version number>.<date> ...
1. Overview
This document describes how to install, configure and run OfficeServ ACD.
1.1 S/W Architecture
The ACD consists of the six modules as the following.
• Server: ACD server for call routing and system configuration
• Supervisor: web-based management and configuration application
• Reporting: web-based call center statistics (call, split1, agent, etc.)
• Wallboard: real-time call center monitoring application
• Agent: client program for call center agent
• RAD (Recorded Announcement Device): playing greeting messages per CLI/DID and wait comfort message to waiting callers
For playing voice prompts, the ACD can use either of RAD (Recorded Announcement Device) or IVR (Interactive Voice Response). The RAD is conceptually a light-weight IVR which plays greeting messages per CLI/DID and wait comport messages only. The IVR provides advanced features such as self-menu, callback, DTMF detection, and call recording. For more information on the IVR, refer to the OfficeServ IVR Quick Guide.
[Figure 1] ACD Architecture
1
1.2 Features
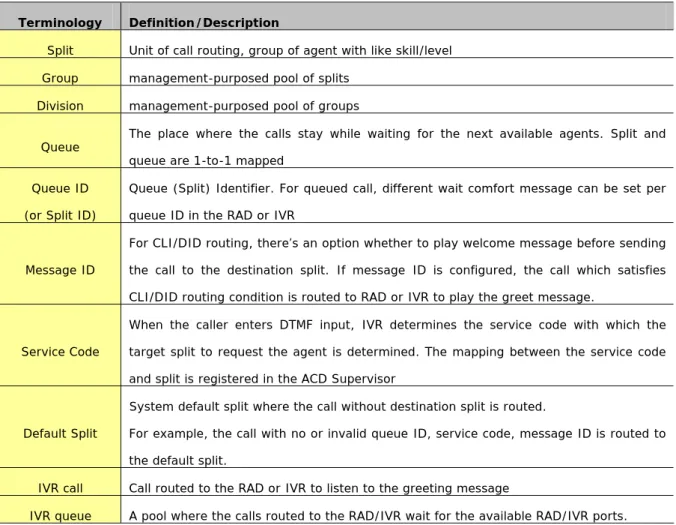
Table 1 provides the definition of terminologies used in OfficeServ ACD and IVR
Terminology Definition/Description
Split Unit of call routing, group of agent with like skill/level Group management-purposed pool of splits
Division management-purposed pool of groups
Queue The place where the calls stay while waiting for the next available agents. Split and queue are 1-to-1 mapped
Queue ID (or Split ID)
Queue (Split) Identifier. For queued call, different wait comfort message can be set per queue ID in the RAD or IVR
Message ID
For CLI/DID routing, there’s an option whether to play welcome message before sending the call to the destination split. If message ID is configured, the call which satisfies CLI/DID routing condition is routed to RAD or IVR to play the greet message.
Service Code
When the caller enters DTMF input, IVR determines the service code with which the target split to request the agent is determined. The mapping between the service code and split is registered in the ACD Supervisor
Default Split
System default split where the call without destination split is routed.
For example, the call with no or invalid queue ID, service code, message ID is routed to the default split.
IVR call Call routed to the RAD or IVR to listen to the greeting message
IVR queue A pool where the calls routed to the RAD/IVR wait for the available RAD/IVR ports. [Table 1] ACD/IVR Terminologies
Three basic routing rules are the following.
• CLI: If caller’s number (CLI) is a specific number registered, then route the call to the corresponding split.
• DID: If caller’s dialed number (DID) is a specific number registered as DID routing, then route the call to the corresponding split
• IVR: Pass the call to the IVR to listen to the welcome message and get the DTMF input to determine the destination split.
From OfficeServ perspective, there are five ports configured for ACD
• ACD gateway port: the port where the customer call to ACD arrives
• ACD queue port: the port where the customer call waits for the available agents
• IVR port: the port where the customer call is cared by RAD/IVR for greet message or wait comfort message
• Agent port: the port where the agent phone is configured
A customer call to ACD passes through the trunk port and is transferred to the ACD G/W. If the routing rule configured per trunk port needs the IVR/RAD service, the call is transferred to the IVR port to listen to the message. If no message service is needed, the call is transferred to the ACD queue port to wait for the available agent of the target split. The call waiting in the ACD queue port goes to IVR port to listen to wait comfort message at every queue message interval configured per split (queue). After finishing the wait comfort service, the call returns to the ACD queue port. When an agent becomes available in the target split, the call is transferred to the agent port (idle extension port).
By Definition, the call which isn’t sent to the ACD queue port for agent request is called “IVR call”. The call which is sent to the ACD queue port is called ACD call wherever the call is disconnected (e.g. call disconnected at IVR port while listening the wait comfort message is classified as “ACD call”). The callback request call is classified “ACD call” since the callback request is submitted to each corresponding ACD split.
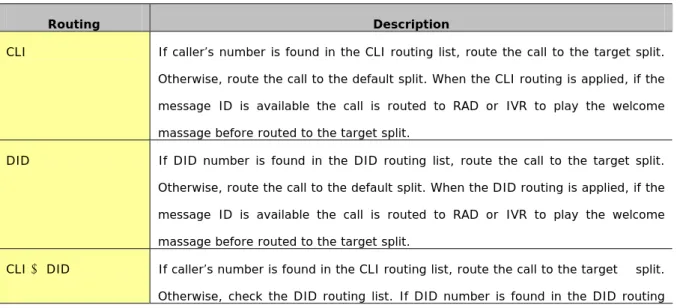
Table 2 describes all routing combinations available on trunk ports. If the IVR is not used with ACD, only the first four routing rules will be available.
Routing Description
CLI If caller’s number is found in the CLI routing list, route the call to the target split. Otherwise, route the call to the default split. When the CLI routing is applied, if the message ID is available the call is routed to RAD or IVR to play the welcome massage before routed to the target split.
DID If DID number is found in the DID routing list, route the call to the target split. Otherwise, route the call to the default split. When the DID routing is applied, if the message ID is available the call is routed to RAD or IVR to play the welcome massage before routed to the target split.
CLI → DID If caller’s number is found in the CLI routing list, route the call to the target split. Otherwise, check the DID routing list. If DID number is found in the DID routing
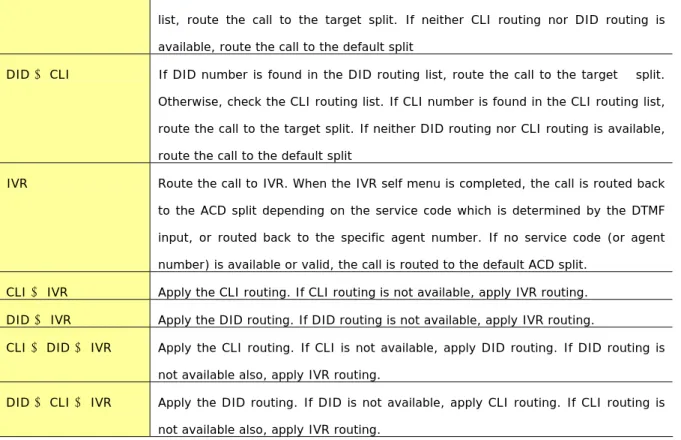
list, route the call to the target split. If neither CLI routing nor DID routing is available, route the call to the default split
DID → CLI If DID number is found in the DID routing list, route the call to the target split. Otherwise, check the CLI routing list. If CLI number is found in the CLI routing list, route the call to the target split. If neither DID routing nor CLI routing is available, route the call to the default split
IVR Route the call to IVR. When the IVR self menu is completed, the call is routed back to the ACD split depending on the service code which is determined by the DTMF input, or routed back to the specific agent number. If no service code (or agent number) is available or valid, the call is routed to the default ACD split.
CLI → IVR Apply the CLI routing. If CLI routing is not available, apply IVR routing. DID → IVR Apply the DID routing. If DID routing is not available, apply IVR routing.
CLI → DID → IVR Apply the CLI routing. If CLI is not available, apply DID routing. If DID routing is not available also, apply IVR routing.
DID → CLI → IVR Apply the DID routing. If DID is not available, apply CLI routing. If CLI routing is not available also, apply IVR routing.
[Table 2] Basic Routing Combinations
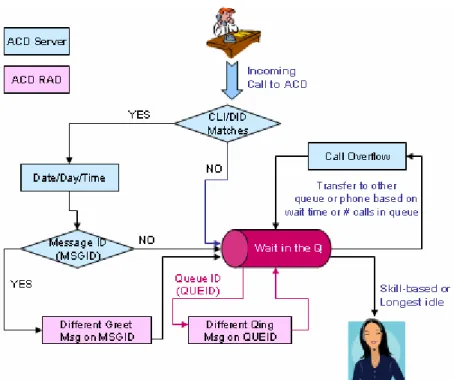
Figure 2 illustrates the call flow between ACD Server, RAD and Agent. When a new call arrives, Server searches for the CLI/DID routing. If matching CLI/DID routing with day/date/time is found, the call is routed to the specified split. If no CLI/DID routing is found, the call is routed to the system default split. In case of CLI/DID routing, if message iD is configured, the call is sent to RAD to play the corresponding greet message before being sent to target split (ACD queue port). The call waits in the target split queue until being routed to most appropriate agent. If no available agent is found during overflow threshold time, the call is overflowed to other split or phone number. While the call is waiting in the split queue, RAD plays wait comfort message at every queue message interval.
[Figure 2] ACD/RAD Call Flow
Figure 3 illustrates the call flow between ACD Server, IVR and Agent. When a new call arrives at ACD gateway port, if IVR routing is configured, the call is routed the IVR. In the IVR, the target split is determined based on the caller’s input via DTMF digits. Integrated with customer DB, the caller’s personal information such as customer ID, customer level, and customer type is searched, authorized and transferred to the Agent program.
[Figure 3] ACD/IVR Call Flow (not up-to-date)
1.2.1 Server
In addition to call routing, Server provides two management features – System Configuration and Process Manager. System Configuration provides the following features
• License management allows the user browse and update the current license
• Server Configuration allows the user to change Link IP, SQL IP, SQL login ID and password, and language.
• Monitoring allows the user to monitor the run time status of ports, queues, logged-in agents and splits.
• Data Archiving allows the user to set the scheduled log removal, packing the individual call log, individual call log removal and the Wallboard reset.
[Figure 4] System Configuration – Data Archiving
The Process Manager allows the user to start, stop the ACD Server processes.
1.2.2 Supervisor
The ACD Supervisor allows the user to configure and administer the ACD Server.
• Call routing o Routing by CLI/DID/IVR o Routing by Day/Date/Time o Call overflowing o Skill-based routing o VIP routing
• System configuration and management through web o Ports
o IVR Server
• Call center management through web o IVR Service Codes
o Completion Codes
o Split management: create/edit/delete, agent assignment
• Centralized agent management o Agent status monitoring o Messaging
o Forced-status management o Blending (2009 1Q)
o Callback/Abandoned call distribution o Multi-split login (max 8)
o Phone-only agent o Customizable break type
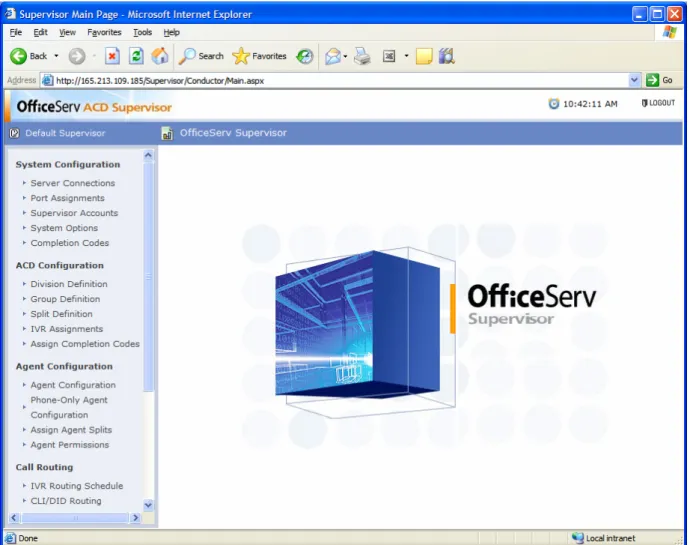
[Figure 6] Supervisor
Table 3 provides the short description of each Supervisor menu.
Menu Description
Server Connection Add/Edit/Delete IVR Server
Port Assignments
9 Add/Edit/Delete Port
• ACD Gateway where the call to switch is bypassed to ACD Server
• ACD Queue where the wait calls stay
• Agent Station which is for agent extension
• Central Office Trunks: Set basic routing rules
• RAD/IVR System
Configuration
Supervisor Accounts
9 Accounts: Supervisor/Wallboard login account management
9 Permissions: Supervisor menus per administrator level
9 Password: Change default Supervisor account (“admin”) password
System Options
9 Call Center
• Auto Answer Timer
• Date Routing
• Default Split
• Call Recorder: IP address or DNS name of IVR Call Recorder
• Queue Message Setup
• VIP Service Level
9 Protection: Access authorization password for License Information and Application Settings pages
9 License Information: Display the current license information
9 Application Settings: IP settings and data archiving options
Complete Codes Add/Edit/Delete Completion Code Division Definition Add/Edit/Delete Division
Group Definition Add/Edit/Delete Group Split Definition Add/Edit/Delete Split
IVR Assignments Add/Edit/Delete IVR Service Code ACD
Configuration
Assign Completion
Codes Assign completion code to split Agent Configuration Add/Edit/Delete ACD Agent Phone-Only Agent
Configuration Add/Edit/Delete Phone-only ACD Agent Assign Agent Splits
9 Multi-split login assignment (up to eight)
• By Split: Assign agent to splits
• By Agent: Assign splits to agent
9 Skill Levels: skill level description Agent
Configuration
Agent Permissions Agent application permission per agent security level IVR Routing Schedule IVR routing by Day/Date/Time
CLI/DID Routing 99 CLI/DID routing by Day/Date/Time RAD/IVR Message ID option per CLI/DID Call Routing
Skill-based Routing Skill-based routing setting per split Messaging Sending messages to logged-in agent Callback List Assign callback list to agent
Abandoned Call List Assign abandoned call list to agent Completion Code
History Viewing completion code record Supervisor
Control
Supervisor Work
History Viewing supervisor activity history System Overview Real time Server monitoring Live Monitoring
Agent Monitoring Real time agent monitoring and forced status change [Table 3] Menus of Supervisor
1.2.3 Reporting
• Server/Split/Agent summary by day/hour
• Wait time distribution
• Talk time details
• Agent performance
• Dialed number history
• Call tracking
• Overflow tracking
• Lost call history
• Exporting to Excel
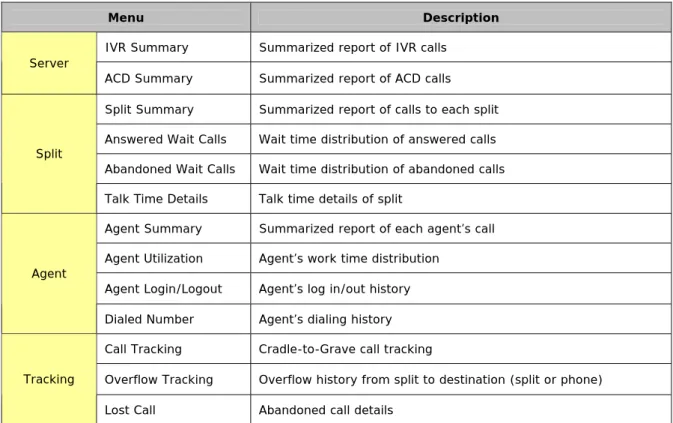
Table 4 describes each Reporting menu.
Menu Description
IVR Summary Summarized report of IVR calls Server
ACD Summary Summarized report of ACD calls
Split Summary Summarized report of calls to each split Answered Wait Calls Wait time distribution of answered calls Abandoned Wait Calls Wait time distribution of abandoned calls Split
Talk Time Details Talk time details of split
Agent Summary Summarized report of each agent’s call Agent Utilization Agent’s work time distribution
Agent Login/Logout Agent’s log in/out history Agent
Dialed Number Agent’s dialing history Call Tracking Cradle-to-Grave call tracking
Overflow Tracking Overflow history from split to destination (split or phone) Tracking
Lost Call Abandoned call details
[Table 4] Menus of Reporting
1.2.4 Wallboard
The Wallboard provides real-time call center monitoring. (See Figure 5)
• Server/Split/Agent activity monitoring o Call statistics per call type o Agent Efficiency
• Unlimited # views and max 24 items per view (view: a set of monitoring item)
• Alarming color and log
• Messaging
[Figure 8] Wallboard
1.2.5 Agent
• Popup window with customer information on call arrival
• Convenient call control
o Answer/Hold/Transfer/Conference o DND/Auto Answer/Completion Code
• Conversation recording (IVR feature)
• Emergency assistance request
[Figure 9] Agent Caller Information Window
[Figure 7] RAD
[Figure 10] Agent Main Window
1.2.6 RAD
The RAD is a light-weight IVR which provides the minimal functionalities required for playing greeting messages per CLI/DID identified by MSG ID and wait comfort messages identified by QUE ID.
[Figure 11] RAD
1.3 General Specification
• Language: English
• OfficeServ: 500, 7200 and 7400 (MP V4.21 or above)
• DB: SQL Server/Express
• Operating System: Windows NT, XP, 2003 Server, Vista
• Required SW: .NET Framework 2.0, OfficeServ Link V3.0.0.3, OfficeServ IVR V1.5.1
1.4 License Policy
• Server
o # Switches (2009-2010)
o Outbound Campaign (2009-2010)
• # Concurrent users of Supervisor
• # Concurrent users of Agent o Phone Book Plug-in
• # Concurrent users of Wallboard
• # Concurrent users of Reporting
• Voice Message Device: NONE, RAD, or IVR
• #IVR ports
• Email for universal queue (2009)
1.5 Organization
This document is organized as the following. Chapter 2. Preparation
Chapter 3. Installation Chapter 4. ACD Server Chapter 5. ACD RAD Chapter 6. ACD Agent Chapter 7. ACD Wallboard Chapter 8. ACD Reporting Chapter 9. Trouble Shooting
2. Preparation
To run the ACD/IVR, please check the following - NO FWD setting for
following are the MMC checklist for setting multiple MGI cards.
2.1 OfficeServ MMC
Note: The MCP Version should be V4.21C or above.
MMC Description
841 (v4.30: 860)
Set feature license
From SIP STACK ALLOW, set # SIP trunk and # IVR/UMS ports 857 Assign virtual slot to IVR/UMS (usually C4:S9) (v4.30: SIP APPL) 225 For each IVR/UMS ports, set the type (IVR or UMS)
Note: IVR port number should be greater than UMS port number 820 Set unique Link ID
206 Barge-in type // for call recording
NO BARGE-IN ⇐ WITH (or WITHOUT) TONE 501 Set the recall time
• #71 Recall Wait Time: ringing time at source after recall before transferred to default operator group
• #77 Transfer recall time: ringing time at destination before recall 724 Check the numbering plan
• Trunk number
• Station number
• Virtual extension number
• IVR/UMS number
601 Station group setting for ACD G/W, Queue and IVR(UMS)
Set 5001 for ACD G/W
• Ring Type: DISTRIBUTED
• Next Port: 5039
• Assign members with virtual extension numbers obtained from MMC 724
• Max simultaneous new calls + 5 Set 5002 for ACD Queue
• Ring Type: DISTRIBUTED
• Assign members with virtual extension numbers obtained from MMC 724 Set 5039 for IVR
• TYPE: BI-VMS
• Ring Type: DISTRIBUTED
• Assign members with IP-UMS numbers obtained from MMC 724 701 COS Content (01) - Usable Feature and set
23 FORWARD ⇐ YES 37 OUT TRSF ⇐ YES 38 OVERRIDE ⇐ YES 55 SECURE ⇐ NO 66 VM REC ⇐ YES 68 VMS REC ⇐ YES 830 Set System IP ADDR
• Set MCP IP address
• Set MCP G/W IP address
• Set the CTI Server IP (OfficeServ Link IP)
• Set IP-IVR Server IP 831 • Set MGI IP address
• Set MGI G/W IP Address. 835 MGI DSP Option Address
• DTMF Type ⇐ OUTBAND
Note G.723 is not supported in IVR
102 No FWD setting for Agent station (No FOLLOW ME)
207 Set ACD G/W, Queue Ports to ‘Normal Port’ (NO ‘VMAA Port’)
722 For agent station, set one call button (no incoming call is allowed while the agent is busy)
[Table 5] MMC for Single-Switch ACD/IVR Check also
• MMC 722 – call button
• MMC 805 – program version (818 – program upgrade)
• MMC 812 – country code
• MMC 430 – port status
• MMC 323
• MMC 430
• MMC 714
The following are the MMC checklist for setting multiple MGI cards.
MMC Description
601 Register all UMS Dial No. (e.g. 8651-8666) to a station group (e.g. 5039) with BI-VMS type 615 Add all MGI Dial No. (e.g. 3801-3816) to every item in MMC 615 sub-menu USER
724 Register MGI Dial No. (e.g. 3801-3816) and UMS Dial No. (e.g. 8651-8666) 806 Check if the switch recognizes all MGI cards
831 Check the IP addresses of all MGI cards
835 Check the MGI DSP option CODEC = G.729 -20ms
2.2 Microsoft SQL Server or Express
Note: You can skip this section if MS SQL is already running on your system.
This section will describe how to install, configure and run the MS SQL Express 2005.
(1) Download and install SQL Express2.
To download, visit http://www.microsoft.com/downloads/details.aspx?FamilyID=220549b5-0b07-4448-8848-dcc397514b41&displaylang=en
(2) During SQL installation, set the Authentication Mode to SQL Server and Windows Authentication.
(3) Allow remote connection
For more information, visit http://support.microsoft.com/default.aspx?scid=kb;EN-US;914277
(4) From SQL Server Configuration Manager, set the Start Mode of Server to Automatic.
2.3 .Net Framework
If .Net Framework is installed before IIS then run “aspnet_iisreg.exe” which is located in the Framework directory under the Windows OS directory,
C:\WINNT\Microsoft.NET\FRAMEework\v1.1.4322\aspnet_iisreg.exe –i
2
2.4 OfficeServ Link
[Figure 12] OfficeServ Link
(3) From OfficeServ Link V3 Option, check the option for automatic switch connection and running as Service.
(4) Start OfficeServ Link
3. Installation
ACD installation package consists of three setup files
1.
ACD Server with Supervisor, Reporting and RAD2.
ACD Wallboard3.
ACD AgentThe ACD License is entered during Server installation. If the license is eligible with RAD, the server setup installs the RAD. Otherwise, the RAD is not installed along. Wallboard and Agent installation doesn’t check the license. Whereas, during the run time, the their connection to Server is checked against the number of liable concurrent connections in the license.
3.1 ACD Server/Supervisor/Reporting/RAD
(1) From ACD folder, double click setup.exe(3) Agree with User License Agreement and click Next
(5) Check the license key information and click Next
Note: The RAD is installed with the Server if the license is RAD-eligible
(6) Enter DB instance, login ID (sa or sa privilege account), and password. Click Next.
For SQL Express, the instance name should be SQLEXPRESS.
(8) Wait while the ACD is configuring
(9) Click YES to create the ACD DB. To keep the existing ACD DB or not to recreate the ACD DB, click No.
Note: Click YES on the first ACD V3.1 installation.
(10) Click Finish to complete the installation
3.2 ACD Wallboard
(1) From the ACD setup folder, double click the ACD31_Wallboard.exe
(2) Choose the setup language and click OK.
(4) Agree with User License Agreement and click Next
(6) Wait while the ACD Wallboard is configuring
3.3 ACD Agent
(1) From the ACD setup folder, double click the ACD31_Agent.exe
(2) Choose the setup language and click OK.
(4) Agree with User License Agreement and click Next
(6) Check option the Modifiable ACD server IP and station number to allow the agent to modify ACD Server IP and station number. Click Next
4. ACD Server
4.1 Configuration via System Configuration
To run the ACD System Configuration, click the right-click menu on the ACD Server icon.
4.1.1 License Information
The License Settings window allows the user to do the following activities
• Browse the license information
• Update the license key
To update the license key, enter the new license and press the Update button. The password window is prompted to authorize the access (default password: acdadmin).
Supervisor Equivalent: System Options > License Information (Browsing only)
4.1.2 Server Configuration
• OfficeServ Link IP
• ACD Server IP
• SQL Server IP
• SQL login information: SQL instance, login language After modifying the settings, press the Save button.
Supervisor Equivalent: System Options > Application Settings
The Data Archiving window allows the user to schedule the call log data archiving/removal and wallboard data reset.
• Debugging log removal interval
• Summary call data archiving
• Daily reset time for Wallboard
After modifying the settings, press the Save button.
Supervisor Equivalent: System Options > Application Settings
4.2 System Configuration via Supervisor
To run the Supervisor, from the program menu or desktop, start the ACD Supervisor. Enter login ID and password (default: admin/4321).
This section describes the ACD Supervisor configuration based on the IVR license. The Supervisor configuration with RAD license is presented in chapter 5.1.
4.2.1 Server Connections
Register the IVR server.4.2.2 Port Assignments
Register the port numbers• ACD Gateway (MMC 601)
• ACD Queue Group (MMC 601)
• Agent Station
• Central Office Trunks with Routing Options (CLI, DID, IVR)
4.2.3 Supervisor Accounts
Configure the login accounts for Supervisor, Reporting and Wallboard. The Supervisor and Reporting share the same login account. By default, “admin” account is created with Supervisor.
For each Supervisor account, there are four levels. The permission per supervisor level is set in the “Permission” tab.
Modify the password of current logged-in Supervisor account in the “Password” tab.
Modify the Supervisor account’s level description in the “Admin Levels” tab.
System Option page allows the user to configure the ACD system-wide parameters as the following.
• Abandon Threshold: A call which is disconnected by caller after waiting more than abandoned threshold is counted as “abandoned call”
• Ring Time before Auto Answer: Ring time before the agent program automatically answers the call (unit: msec)
• Default Split: default call routing destination which is used when no destination split is available
• Call Recorder: IVR Call Recorder’s IP address or DNS name. When the recording button is pressed at the Agent program, the conversation recording starts.
• Queue Message Setup
o Overflow Destination [Phone number or Split]: the overflow target of RAD/IVR call in case when the call waits in the RAD/IVR queue for more than “Max Queue Time”
o Max Queue Time: how long the RAD/IVR call will be waiting in the RAD/IVR Queue when no RAD/IVR port is available
o Priority [Greeting Message or Queue Message]: When a RAD/IVR call becomes available, which type call (call waiting for greet message vs. call waiting for wait comfort message) will have the priority.
• Non-Trunk Routing: Routing rule for calls which are not bypassed through trunk ports
• Supervisor Number: The emergency contact number used in the Agent program. When the emergency button is pressed, the Agent automatically dials at this number.
• VIP Level: Any call received from IVR with customer level which is greater than or equal to this VIP level is considered as “VIP” call in the ACD. For example, if the VIP level is set to 2, the call with customer level 1 or 2 is VIP call. The VIP call is routed to the agent who is allowed to serve the VIP call. Refer to Agent Configurations for agent options.
4.2.5 Completion Codes
Completion code is recorded for each ACD call in Agent program. This page allows the user to register the completion codes. The completion codes are managed in two levels: completion code
and minor completion code.
Note: Completion Code ID is automatically generated by the system
4.3 ACD Configuration via Supervisor
4.3.1 Division Definitions
A split is a pool of like-skill or like-level agents. Group ACD Group is a pool of splits. Division is a pool of Groups. This page allows the user to create/modify/delete divisions
Note: Division ID is automatically generated by the system.
4.3.2 Group Definitions
This page allows the user to create/modify/delete groups.
Note: Group ID is automatically generated by the system.
4.3.3 Split Definitions
This page allows the user to create/modify/delete splits.
• Usable: usability
• Queue After: caller’s wait time in the split queue before going to the RAD/IVR to hear the wait comfort message
• Wrap-up Time: wrap-up time for agent primarily logged on to this split
• Use Completion Code: Yes or No (Default: Yes)
• Allow Overflows: usability of call overflow feature. Overflow target is either the other split or phone number. (Default: No Overflow)
Note: Split ID is automatically generated by the Server Note: Outbound split is not available
4.3.4 IVR Assignments
This page allows the user to create/modify/delete IVR Service Codes. When the caller enters DTMF input during IVR service, IVR determines the service code based on the DTMF input and transfers the call to ACD with the service code if agent service is requested. The call received from IVR is routed to the split which is associated with the service code.
Note: Service Code ID is automatically generated by the system.
4.3.5 Assign Completion Codes
This page allows the user to assign the completion codes to each split.
Note: Completion codes should be created in the Completion Codes page prior to assignment
4.4 Agent Configuration via Supervisor
4.4.1 Agent Configuration
This page allows the user to create/modify/delete agent to serve the calls routed to ACD splits.
• Usable: usability of agent
• Security level: there are nine security levels which determine the menus and features allowed to each agent in the Agent program. Agent permissions per security level are set in “Agent Permissions” page.
• ID: Agent ID which is used in Agent program for login
• Handles: whether to allow the agent to handle the blended calls or VIP calls.
• No-Answer: the status of Agent program in case the agent doesn’t answer the call
• Split: log-in split.
Note: Agent ID cannot be modified
Note: Agent can logon to maximum eight splits. The Agent Configuration page sets the primary split only. The multi-split assignment is configured in “Assign Agent Splits” page.
4.4.2 Phone-only Agent Configuration
(Agent program). In addition to the basic information described in section 4.4.1, it requires station number for each agent.
4.4.3 Assign Agent Splits
This page allows the user to assign the agents to multiple splits (max eight splits).
4.4.4 Agent Permissions
The menus and features allowed in the Agent program can be configured per agent depending on the security level set in the Agent Configuration page.
• Auto Answer: Whether to allow the agent to toggle on/off the Auto Answer option
• Auto Answer Delay: Whether to allow the agent to extend ring time before automatic answer
• Wrap-up Auto-End: Whether to allow automatic wrap-up end t
• Extend Wrap-up: Whether to allow the agent to extend wrap-up time before automatic ending
• No Answer Action: Whether to allow the agent to change the status after no answer to incoming call
• DND (Do-Not-Disturb): Whether to allow the agent to toggle on/off the DND option
• Split Login: Whether to allow the agent to choose split(s) to login and reassign split priority
• Server Address: Whether to allow the agent to change Server IP address
• Login ID: Whether to allow the agent to change login ID
• Agent Station: Whether to allow the agent to change station number
• Assign Completion Code: Whether to allow the agent to assign completion code for ACD inbound call
• Cancel Completion Code: Whether to allow the agent to cancel completion code for ACD inbound call
4.5 Call Routing Configuration via Supervisor
This page allows the user to configure the multi-split logon of each agent by split or by agent.
4.5.1 IVR Routing Schedule
This page allows the user to configure the scheduled IVR routing per IVR service code. If not configured, IVR service routing configured in IVR Assignments page is applied all day long.
4.5.2 DID/CLI Routing
This page allows the user to configure the scheduled DID or CLI routing. For each DID or CLI number, if Message ID field is checked, the greeting message is played before routing the call to the target split. The IVR should be configured accordingly with the corresponding message ID (MS00-MS99) in the Split Call control. Refer to the IVR V1.5 Quick Guide for scenario creation.
4.5.3 Skill-Based Routing
This page allows the user to configure the skill-based routing per split.
Given skill range specified by “Search First” and “Search Last”, server search for any idle agent in the range. If no idle agent is found within “Search Time”, the call is routed to other idle agent.
4.6 Running ACD Server
From the right click menu of ACD Server, click Process Manager.
ACD Server consists of several processes with different functions. There are several methods to start/stop the ACD Server processes.
1.
Turn off the Windows Fire Wall to allow the Agent and Wallboartd to access the Server2.
To enable automatic starting of ACD Server processes, check the checkbox “Auto”. Onchecking “Auto”, the ACD Server processes start to run. By default, Auto option is checked.
4.
To start all ACD Server processes, click the menu Execute > Start all.5.
To stop all ACD Server processes, click the menu “Execute > Stop all” or click the menu “Exit OfficeServ ACD Server” from the right-click menu.6.
To stop/start the ACD Server Service, open Control Panel > Administrative Tools > Services. Double click OfficeServ ACD Server and press Stop or Start button.4.7 Monitoring ACD Server
To monitor ACD Server, click “Monitor System” menu.
4.7.1 Split
It displays the splits currently configured in the ACD DB. Any modification with split is instantly effective without restarting the ACD Server. Please refer to the ACD User’s Guide for more information about each field of split status.
Note: The ACD Server should be running to run the Monitors.
4.7.2 Agent
It displays the agents currently logged on to the ACD. Please refer to the ACD User’s Guide for more information about each field of agent status.
4.7.3 Port
It displays the ports currently configured for the ACD purpose. With any modification with port configuration, the Server should be restarted to make the change effective. Please refer to the ACD User’s Guide for more information about each field of port status.
4.7.4 Queue
It displays the calls currently waiting in the ACD queue for agent service. Each queued call can be deleted with “Delete Call” button. Please refer to the ACD User’s Guide for more information about each field of queued call status.
4.8 Upgrading ACD Server
There are two ways to upgrade the ACD Server. One is using the installation setup and the other is using the Server patch (exe and dll files).
4.8.1 With Installation Setup
To upgrade the ACD Server with the installation setup, please take the following steps
1.
Log out from ACD Agent2.
From “Add or Remove Programs” of Windows Control Panel, remove ACD Server3.
Install the ACD Server without deleting the ACD DB4.
Log on to ACD Agent4.8.2 With Server Patch
1.
Log out from ACD Agent2.
Uncheck “Auto” of ACD Server Process Manager (if checked) and stop ACD Processes3.
From Service list of Windows Control Panel, stop the OfficeServ ACD Server service4.
Copy patch files in the folder “%ACD Server HOME%\bin”5.
From Service list of Windows Control Panel, start the ACD Server service6.
Check “Auto” of ACD Server Process Manager (optional) and start ACD Processes7.
Log on to ACD Agent5. ACD RAD
5.1 Configuring Supervisor
5.1.1 Port Assignments
Register the RAD ports in the Port Assignments page of Supervisor
Note: The ACD Server should be running to run the Monitors.
5.1.2 ACD Split Definition
Create the splits. For each split, set the “Queue After” time which is elapsed time in ACD Queue before routing the call to RAD to play the wait comfort message.
Set the following system options.
• Default Split: default call routing destination which is used when no destination split is available
• Queue Message Setup
o Overflow Destination [Phone number or Split]: the overflow target of RAD/IVR call in case when the call waits in the RAD/IVR queue for more than “Max Queue Time”
o Max Queue Time: how long the RAD/IVR call will be waiting in the RAD/IVR Queue if no RAD/IVR ports are available
o Priority [Greeting Msg or Queue Msg]: When a RAD/IVR call becomes available, which type RAD/IVR call will have the priority.
5.1.4 DID/CLI Routing
For each DID/CLI routing number, set the following
• Destination split
• Effective Period
• Message ID which is used in RAD/IVR to determine the greeting message to play before routing the destination split
5.2 Configuring RAD
5.2.1 RAD Setting
From the Settings menu, configure the RAD as the following:
• From Settings > RAD, configure the following o ACD Server IP
o Voice Message File Folder
Note: Voice Message File folder should be set properly before running Settings > Prompt.
5.2.2 Switch Setting
From Settings > Switch, configure the switch connection.
• MCP IP (MMC 830)
• Link ID (MMC 820)
• Availability
5.2.3 Logging Option Setting
From Settings > Log, configure the logging option.
• Log level (0: NONE, 5: HIGH)
• Log file size (5 or 10 MB)
• Log file removal interval (1-48 hours)
5.2.4 Prompt
From Settings > Prompt, configure the voice messages.
• Message ID or Queue (Split) ID
• Voice message file (WAV or MP3)
5.3 Running RAD
If you finished the configuration of both Supervisor and RAD, you are ready to run the RAD. To run the ACD RAD, press “Start” button or click the menu Execute > Start. The connection status changes from LINK: STOPPED to LINK: CONNECTING.
Note: ACD Server should be running to start the RAD. Otherwise, the error message prompts.
If the connection is successful, the RAD status changes to LINK: ALIVE. Otherwise, the status changes to LINK: FAILED. If connection fails, check the settings of OfficeServ MMC or RAD. (See Trouble Shooting chapter for more information)
6. ACD Agent
Agent program consists of multiple windows
• Main Window – menus, call control, agent status, elapsed time of current status, phone status
• Split Window – Currently assigned splits
• Favorite Window – most frequently used agent/split/phone number
• Message Window – message from supervisor, callback/abandoned call counter
• Split Stat Window – split’s statistics (up to 7 items)
6.1 Main Window
Main Window allows the user to control the agent calls, configure the environment settings, and open/close other views. Table 7 illustrates the menus of Main Window
Menu Description
Options Configuration File
Exit Exit the program Split Window Open/Close Split Window Favorite Window Open/Close Favorite Window Message Ticker Window Open/Close Message Ticker Window Split Stat Window Open/Close Split Stat Window Agent Stat Window Open/Close Agent Stat Window View
Always On Top Display Agent program always on the top Log In/Out Log in/out
Set Break Set the agent’s status to Break Toggle Wrap-up End or extend wrap-up mode Agent
Control
Change Password Change agent’s login password Dial Make a call
Answer Answer an incoming call
Disconnect Disconnect the current on-going call
Redial Redial
Hold Hold the current on-going call Transfer Transfer Conference Conference Do Not Disturb Set Do Not Disturb
Call Control
Auto Answer Set Automatic Answer
Help About ACD Agent Version and Date of Agent program [Table 7] Menus of Agent
6.1.1 Options
The user configures the Agent program in the Options menu. It provides six tabs. The CIM tab allows the user to integrate the Agent program with 3rd party phonebook program such as MS OutlookTM, GoldMineTM and ACTTM. CIM tab is provided only when “Phonebook” is eligible by license..
(1) General Tab allows the user configure the ACD Server IP, language and login options.
(2) Screen Pop tab allows the user to set the Caller Information Popup options
(3) Split Stat tab allows the user to choose split statistics items to display in the Split Stat Window. It is enabled after logging in.
(4) Agent Stat tab allows the user to choose agent statistics items to display in the Agent Stat Window. It is enabled after logging in.
(5) Hotkeys tab allows the user to set shortcut keys that can be used to access commonly used functions.
(6) If the Phonebook Plug-in license is eligible, the CIM tab is displayed.
Integrating Agent with 3rd party phone book program is presented in Section 6.7.
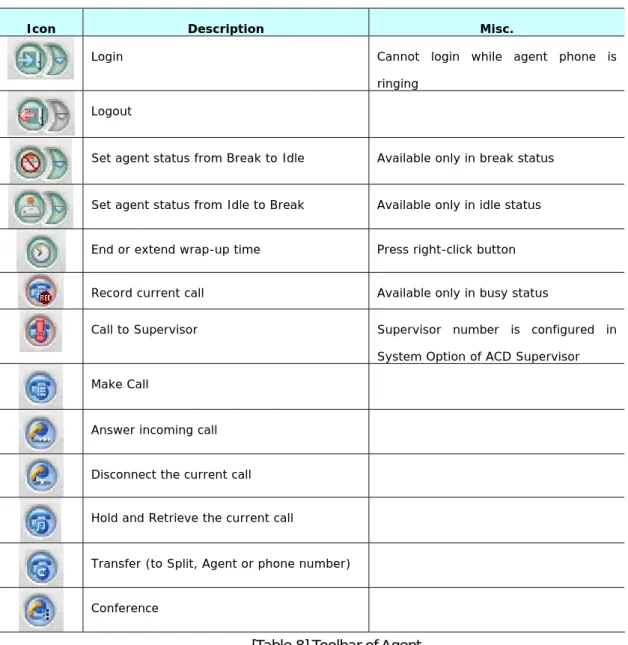
6.1.2 Toolbar
Table 8 illustrates the toolbar buttons of Agent Main Window.
Icon Description Misc.
Login Cannot login while agent phone is ringing
Logout Set agent status from Break to Idle Available only in break status
Set agent status from Idle to Break Available only in idle status End or extend wrap-up time Press right-click button Record current call Available only in busy status
Call to Supervisor Supervisor number is configured in System Option of ACD Supervisor Make Call
Answer incoming call Disconnect the current call Hold and Retrieve the current call
Transfer (to Split, Agent or phone number)
Conference [Table 8] Toolbar of Agent
6.1.3 Status Bar
The Status bar displays the following 9 Agent status with elapsed time 9 Phone status
9 DND option 9 Auto Answer option
6.2 Split Window
Split Window allows the user to browse the splits where the agent is logged-in. For each status (logged in or not) split, skill level and priority information is displayed in the right pane. If permitted by Agent Permission page of Supervisor, the agent can log in/out from individual split and change the priority of each split. On selecting each split in Break status, open right-click menu.
6.3 Favorite Window
Favorite Window allows the user to add frequently used split/agent/phone number, view the agent status and dial/transfer/conference with right-click button.
To add a new favorite, press right click button from “Add New” icon in the Favorite Window.
6.4 Message Ticker Window
Message Ticker window displays the messages received from Supervisor or Wallboard and allows the user to process callback/abandoned calls.
6.5 Split Stat Window
Split Stat window displays the real-time statistics of splits where the agent is logged-in. Prior to opening the Split Stat Window, the split statistics items should be selected from Split Stats tab of Option menu.
6.6 Agent Stat Window
Agent Stat window displays the real-time statistics of agent. Prior to opening the Agent Stat Window, the agent statistics items should be selected from Agent Stats tab of Option menu.
6.7 Phonebook Integration
The Agent can be integrated with 3rd party CIM (Customer Information Management) program such as Outlook, GoldMine and ACT. Linked with Agent, the CIM program does
9 Display the customer information when a new call arrives 9 Allow the user to make a call
Initially, the CIM field of CIM tab in Option Window is set to NONE.
6.7.1 MS Outlook
This section describes how to use the Microsoft OutlookTM with the Agent.
Configuration
To link Agent with Outlook, set the CIM field of CIM tab in Option menu to “Outlook”.
1.
Set the CIM field of General tab to Outlook.2.
Launch the Outlook.3.
Log in to the Agent Incoming CallWhen a call arrives to the Agent, the caller information is displayed in the Outlook. .
Outgoing Call
From the Outlook, the user can make a new call. If Outlook is integrated with Agent successfully, the toolbar is displayed as illustrated below.
]
1.
If the toolbar is now shown in the Outlook, from Tools – Options – Other – Advanced Options - COM Add-Ins, select OutlookAddin.dll under CMT program file folder.2.
Run the Outlook and select Contacts tab.3.
Select the phone number to dial4.
The customer name is displayed in the toolbox. If click the field, the customer’s phone number is displayed5.
Select the number and click button to dial. At the same time, the Agent displays “Outgoing” with dialed number.6.
To disconnect the call, press button.7.
To leave the call record in the Outlook, press button.6.7.2 GoldMine
This section describes how to use the GoldMine linked with the Agent.
Configuration
To link the CMT with the GoldMine, select the menu Tool Æ Options.
4.
Set the CIM field of CIM tab in Option menu to GoldMine5.
Enter ID, Password, INI file path and executable file path− ID Password: Enter the ID of GoldMine
− Password: Enter the Password of GoldMine
− INI: Using upper Browse button, open the GM.ini file under the GoldMine installation folder, and get the path to RealINI. Enter that path in the INI field.
− EXE: Using lower Browse button, enter the path to the execution file under the GoldMine installation folder. For instance, C:\Program Files\GoldMine\gmw6.exe
6.
Log on to the Agent Incoming CallOn new call arrival, the caller’s information is displayed in the GoldMine.
1.
The GoldMine Popup window displays the call notification window with basic caller’s information if there is the caller’s data stored.Outgoing Call
From the GoldMine Phone Field, the user can make a call.
1.
Run the GoldMine.2.
Select Contact Æ Dial Phone Æ Dial Phone 1 to make a call to the number in the Phone 1 Field.6.7.3 ACT
This section describes how to use ACTTM linked with the Agent.
Configuration
To link the CMT with the CIM, select the menu Tool Æ Options.
1.
Set the CIM field of CIM tab in Option menu to ACT.2.
Launch the ACT.3.
Log on to the Agent Incoming CallOn new call arrival, the caller information is displayed in the ACT information if there is caller’s data stored..
Outgoing Call
From the ACT Phone Field, the user can make calls.
1.
Run the ACT.2.
Put the cursor on Phone Field and press 에 . At the same time, Agent displays “Outgoing” with dialed number7. ACD Wallboard
7.1 Statistics
This section describes the definitions of statistics displayed in the Wallboard.
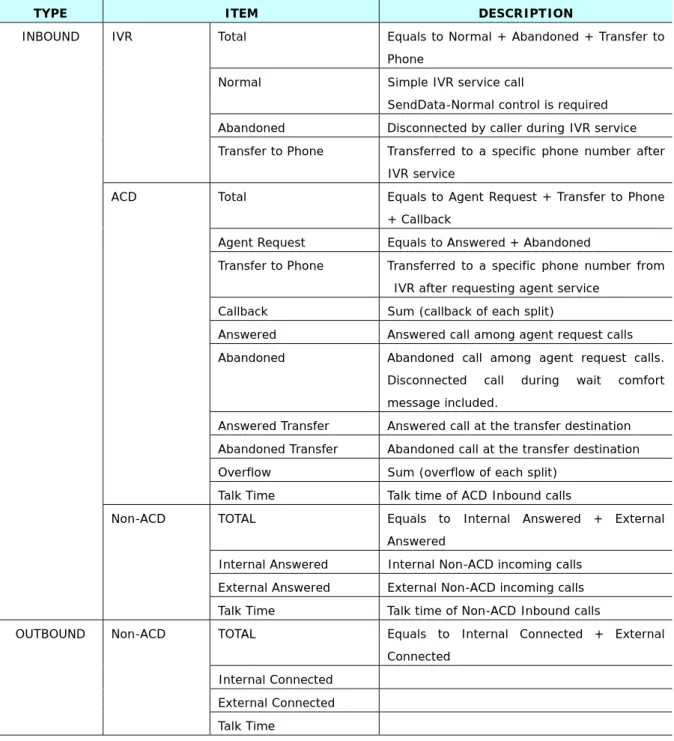
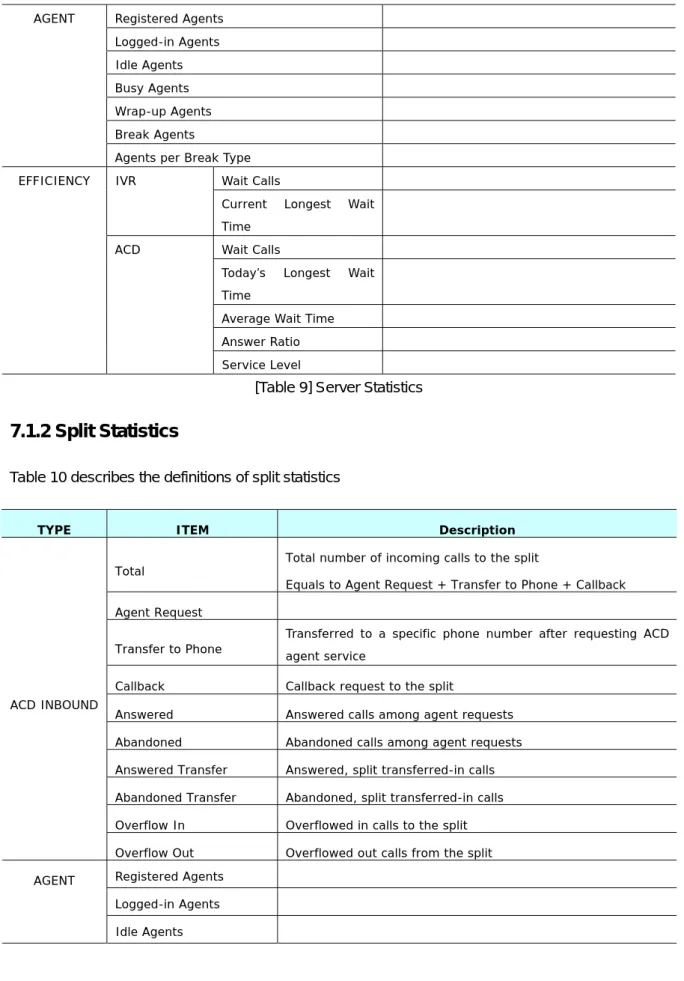
7.1.1 Server Statistics
Table 9 describes the definitions of server statistics.
TYPE ITEM DESCRIPTION
Total Equals to Normal + Abandoned + Transfer to Phone
Normal Simple IVR service call
SendData-Normal control is required Abandoned Disconnected by caller during IVR service IVR
Transfer to Phone Transferred to a specific phone number after IVR service
Total Equals to Agent Request + Transfer to Phone + Callback
Agent Request Equals to Answered + Abandoned
Transfer to Phone Transferred to a specific phone number from IVR after requesting agent service
Callback Sum (callback of each split)
Answered Answered call among agent request calls Abandoned Abandoned call among agent request calls.
Disconnected call during wait comfort message included.
Answered Transfer Answered call at the transfer destination Abandoned Transfer Abandoned call at the transfer destination Overflow Sum (overflow of each split)
ACD
Talk Time Talk time of ACD Inbound calls
TOTAL Equals to Internal Answered + External Answered
Internal Answered Internal Non-ACD incoming calls External Answered External Non-ACD incoming calls INBOUND
Non-ACD
Talk Time Talk time of Non-ACD Inbound calls
TOTAL Equals to Internal Connected + External Connected
Internal Connected External Connected OUTBOUND Non-ACD
Registered Agents Logged-in Agents Idle Agents Busy Agents Wrap-up Agents Break Agents AGENT
Agents per Break Type Wait Calls IVR
Current Longest Wait Time
Wait Calls
Today’s Longest Wait Time
Average Wait Time Answer Ratio EFFICIENCY
ACD
Service Level
[Table 9] Server Statistics
7.1.2 Split Statistics
Table 10 describes the definitions of split statistics
TYPE ITEM Description
Total Total number of incoming calls to the split
Equals to Agent Request + Transfer to Phone + Callback Agent Request
Transfer to Phone
Transferred to a specific phone number after requesting ACD agent service
Callback Callback request to the split
Answered Answered calls among agent requests Abandoned Abandoned calls among agent requests Answered Transfer Answered, split transferred-in calls Abandoned Transfer Abandoned, split transferred-in calls Overflow In Overflowed in calls to the split ACD INBOUND
Overflow Out Overflowed out calls from the split Registered Agents
Logged-in Agents AGENT
Busy Agents Wrap-up Agents Break Agents
Agents per Break Type
Availability Ratio of work hour against total logged-in time ((Logged_in time – Break Time)/Logged_in time)*100 Wait Calls # wait calls in the split queue
Longest Wait Time Longest wait time of the split Average Wait Time Average wait time of the split
Answer Ratio Answered call ratio among all agent requested calls EFFICIENCY
Service Level Ratio of answered calls in service objective time [Table 10] Split Statistics
7.1.3 Agent Statistics
Table 11 describes the definitions of agent statistics
TYPE ITEM DESCRIPTION
Answered # Answered, ACD inbound calls by the agent Unanswered # Unanswered calls by the agent
Transfer-in # Answered, transferred-in calls by the agent Transfer-out # Transferred-out calls by the agent
Talk Time Talk time spent in answering ACD-In calls ACD
Average Talk Time Average talk time per ACD-In call Calls # Answered, non-ACD inbound calls INBOUND
Non-ACD
Talk Time Talk time spent in non-ACD inbound calls Calls # Connected, non-ACD outbound calls OUTBOUND Non-ACD
Talk Time Talk time spent in non-ACD outbound calls Elapsed time of current status
Talk Time
Total talk time
Equals to ACD In Talk Time + Non-ACD In Talk Time + Non-ACD Out Talk Time
Average Talk Time Average talk time per call Idle Time Total idle time
EFFICIENCY
Average Wrap-up Time Average wrap-up time per call Break Time Total break time
[Table 11] Agent Statistics
7.2 Main Window
To log on to the Wallboard, enter the ACD Server IP, login ID (created in Supervisor), and password in the Login page.
In the ACD Wallboard, the item is called “field” and an arbitrary group of item is called “View”. Table 12 illustrates the menus of Main Window
Menu Description
Open Open stored view Save Save the view Save As Save As File
Exit Exit the program Log In
Log Out Connect
Language New Fields
Set Refresh Time Field Clear Tool Bar Status Bar Message Bar Refresh Bar List Style Call Control Top Window
Cascade Arrange the views in cascade style Horizontal Arrange the views in horizontal style Window
Vertical Arrange the views in vertical style Help About ACD Agent Version and Date of Wallboard program
[Table 12] Menus of Wallboard
To create a new view, take the following steps
1.
Click the menu “New Fields,” then Display Information window opens. The user can create views as long as the system resources allow.2.
In the View tab of Display Information window, select the category and field name to display in the view. There are three categories for field – Server, Split, Agent. In case of Split and Agent, choose split name or agent name. Maximum 24 fields can be chosen per view.3.
In the Option tab, set the title, the number of rows and columns in the view, alarm log folder, warning color and threshold values8. ACD Reporting
Table 13 describes the ACD Reporting pages which generates the various reports of Call Center activities. Refer to Section 7.1 for definition of ACD Statistics.
CATEGORY PAGE DESCRIPTION
IVR Summary
Summary of IVR
9 # Total IVR calls
9 # Normal IVR calls
9 # Abandoned IVR calls
9 # Transferred-to-phone IVR calls
Server
ACD Summary
Summary of ACD calls (inbound and outbound)
9 # Total ACD calls
9 # Agent requests
9 # Transferred-to-phone ACD calls
9 # Callbacks
9 # Answered ACD calls
9 # Abandoned ACD calls
9 # Answered Transferred ACD calls
9 # Abandoned Transferred ACD calls
9 # Overflows
9 Answer ratio within service level objective (sec)
9 Service level (%)
9 Average wait time
9 ACD inbound talk time
9 #Internal answered non-ACD inbound calls
9 #External answered non-ACD inbound calls
9 Non-ACD inbound talk time
9 # Internal connected non-ACD outbound calls
9 # External connected non-ACD outbound calls
9 Non-ACD outbound talk time
Split
Split Summary Summary of ACD-inbound calls to each split
9 # Total ACD calls
9 # Agent requests
9 # Transferred-to-phone ACD calls
9 # Callbacks
9 # Answered ACD inbound calls
9 # Abandoned ACD inbound calls
9 Answer ratio within service level objective (sec)
9 Service level (%)
9 Average wait time of answered calls
9 Average wait time of abandoned calls
Answered Wait Calls
Wait time distribution of answered ACD inbound calls
9 # Agent Requests
9 # Answered ACD calls
9 # Abandoned ACD calls
9 Answer ratio within service level objective (sec)
9 Service level (%)
9 # calls waited for specific period
Abandoned Wait Calls
Wait time distribution of abandoned ACD inbound calls
9 # Agent Requests
9 # Answered ACD calls
9 # Abandoned ACD calls
9 Answer ratio within service level objective (sec)
9 Service level (%)
9 # calls waited for specific period
Talk Time Details
Talk time distribution of answered ACD inbound calls
9 # Answered ACD calls
9 Total talk time
9 # calls of talk time for specific period
Agent Summery
Summary of calls and time of each split
9 # Answered calls
9 # Unanswered calls
9 # Answered Transferred-in ACD calls
9 # Transferred-out calls
9 ACD-in talk time
9 Average ACD-in talk time per call
9 # Internal answered non-ACD inbound calls
9 # External answered non-ACD inbound calls
9 Non-ACD in talk time
9 # Internal connected non-ACD outbound calls
9 # External connected non-ACD outbound calls
9 Non-ACD out talk time
9 Total talk time
9 Average talk time per call
9 Total idle time
9 Total wrap-up time
9 Total break time
9 Availability (%): Agent
9 Logged in time 9 Talk time 9 Idle time 9 Wrap-up time 9 Break time 9 Availability (%)
9 Break time per type
Agent Login/Logout
Agent’s log in/out record
9 Login time
9 Logout time
9 Logged in time
Dialed Number
Agent’s dialing record with most frequently dialed number
9 Destination (dialed number)
9 Connect time
9 Disconnect time
9 Ring time (If ring time is 0, the call is busy failed)
9 Talk time (If talk time is 0, the call is not connected)
Call Tracking
Cradle-to-Grave call tracking and CLI/DID tracking per split and agent
9 Arrival time at ACD gateway
9 CLI (caller’s number)
9 DID (caller’s dialed number)
9 Customer ID received from IVR
9 Customer level received from IVR
9 Call Type ACD vs. Non-ACD In vs. Out Answered vs. Abandoned Internal vs. External 9 Agent answered 9 Queue time 9 Ring time 9 Talk time Tracking
Overflow Tracking Overflow history
9 Arrival time at ACD gateway
9 CLI (caller’s number)
9 DID (caller’s dialed number)
9 Customer ID received from IVR
9 Ring time
9 Talk time
Lost Call
Abandoned call tracking
9 CLI (caller’s number)
9 Arrival time at ACD gateway
9 Duration: queue time
9 Result: Agent processing result (New/Processing/Complete)
9 Assign time: Time when the abandoned call is assigned to agent for processing
9 Agent: agent who is assigned for processing the abandoned call
9 Handle time: Time when the abandoned call is handled by agent
9. Trouble Shooting
This chapter describes how to resolve the ACD problems with configuration, settings and Web related settings.
1.
Cannot open Supervisor or ReportingIf the ASP.NET version of Supervisor or Reporting is set to 2.0x, add the following to the “web.config” file located under C:\Program Files\Samsung Electronics\OfficeServ ACD\Supervisor or Reporting.
<system.web> ....
<pages enableEventValidation ="false" ></pages> <!—Add this line -->
…
</system.web>
Ú How to check the version of ASP.NET
1. Open IIS Manager (click Start > Run, type inetmgr, and then click OK)
2. Open Supervisor/Reporting Properties and select ASP.NET tab (right-click Supervisor / Reporting, and click Properties)
2.
Wallboard fails to connect to ServerI. Check if the ACD Server is running
II. Check if the wallboard account is created in the Supervisor > Supervisor Accounts. III. From Control Panel > Windows Firewall > Exception, check the checkboxes of ACD
Server processes to unblock incoming network connections to ACD Server
IV. From the Server configuration, check the ACD Server IP. It should not be “127.0.0.1”
3.
Agent fails to connect to ServerI. Check if the ACD Server is running
II. Check if the agent account is created in the Supervisor > Agent Configuration III. Check if the agent port number is registered in the Supervisor > Port Assignments IV. Check if the agent station is plugged in
V. From Control Panel > Windows Firewall > Exception, check the checkboxes of ACD Server processes to unblock incoming network connections to ACD Server
VI. From the Option > Server configuration, check the ACD Server IP VII. Check if the Agent phone is ringing or busy