Part No. 118358-A Rev. A September 1997
Marketing Release 5.1
Remote Access
Concentrator Software
Server Tools for
4401 Great America Parkway 8 Federal Street Santa Clara, CA 95054 Billerica, MA 01821
Copyright © 1997 Bay Networks, Inc.
All rights reserved. Printed in the USA. September 1997.
The information in this document is subject to change without notice. The statements, configurations, technical data, and recommendations in this document are believed to be accurate and reliable, but are presented without express or implied warranty. Users must take full responsibility for their applications of any products specified in this document. The information in this document is proprietary to Bay Networks, Inc.
The software described in this document is furnished under a license agreement and may only be used in accordance with the terms of that license. A summary of the Software License is included in this document.
Trademarks
Optivity and Bay Networks are registered trademarks and Remote Annex, Quick2Config, System 5000, Bay Networks Press, and the Bay Networks logo are trademarks of Bay Networks, Inc.
Microsoft, MS, MS-DOS, Win32, Windows, and Windows NT are registered trademarks of Microsoft Corporation.
All other trademarks and registered trademarks are the property of their respective owners.
Restricted Rights Legend
Use, duplication, or disclosure by the United States Government is subject to restrictions as set forth in subparagraph (c)(1)(ii) of the Rights in Technical Data and Computer Software clause at DFARS 252.227-7013.
Notwithstanding any other license agreement that may pertain to, or accompany the delivery of, this computer software, the rights of the United States Government regarding its use, reproduction, and disclosure are as set forth in the Commercial Computer Software-Restricted Rights clause at FAR 52.227-19.
Statement of Conditions
SUCH PORTIONS OF THE SOFTWARE ARE PROVIDED “AS IS” AND WITHOUT ANY EXPRESS OR IMPLIED WARRANTIES, INCLUDING, WITHOUT LIMITATION, THE IMPLIED WARRANTIES OF
Bay Networks, Inc. Software License Agreement
NOTICE: Please carefully read this license agreement before copying or using the
accompanying software or installing the hardware unit with pre-enabled software (each of which is referred to as “Software” in this Agreement). BY COPYING OR USING THE SOFTWARE, YOU ACCEPT ALL OF THE TERMS AND CONDITIONS OF THIS LICENSE AGREEMENT. THE TERMS EXPRESSED IN THIS AGREEMENT ARE THE ONLY TERMS UNDER WHICH BAY NETWORKS WILL PERMIT YOU TO USE THE SOFTWARE. If you do not accept these terms and conditions, return the product, unused and in the original shipping container, within 30 days of purchase to obtain a credit for the full purchase price
1. License Grant. Bay Networks, Inc. (“Bay Networks”) grants the end user of the
Software (“Licensee”) a personal, nonexclusive, nontransferable license: a) to use the Software either on a single computer or, if applicable, on a single authorized device identified by host ID, for which it was originally acquired; b) to copy the Software solely for backup purposes in support of authorized use of the Software; and c) to use and copy the associated user manual solely in support of authorized use of the Software by Licensee. This license applies to the Software only and does not extend to Bay Networks Agent software or other Bay Networks software products. Bay Networks Agent software or other Bay Networks software products are licensed for use under the terms of the applicable Bay Networks, Inc. Software License Agreement that accompanies such software and upon payment by the end user of the applicable license fees for such software.
2. Restrictions on use; reservation of rights. The Software and user manuals are
THE FOREGOING WARRANTIES AND LIMITATIONS ARE EXCLUSIVE REMEDIES AND ARE IN LIEU OF ALL OTHER WARRANTIES EXPRESS OR IMPLIED, INCLUDING WITHOUT LIMITATION ANY WARRANTY OF MERCHANTABILITY OR FITNESS FOR A PARTICULAR PURPOSE. Licensee is responsible for the security of its own data and information and for maintaining adequate procedures apart from the Software to reconstruct lost or altered files, data, or programs.
4. Limitation of liability. IN NO EVENT WILL BAY NETWORKS OR ITS
LICENSORS BE LIABLE FOR ANY COST OF SUBSTITUTE PROCUREMENT; SPECIAL, INDIRECT, INCIDENTAL, OR
CONSEQUENTIAL DAMAGES; OR ANY DAMAGES RESULTING FROM INACCURATE OR LOST DATA OR LOSS OF USE OR PROFITS ARISING OUT OF OR IN CONNECTION WITH THE PERFORMANCE OF THE SOFTWARE, EVEN IF BAY NETWORKS HAS BEEN ADVISED OF THE POSSIBILITY OF SUCH DAMAGES. IN NO EVENT SHALL THE LIABILITY OF BAY NETWORKS RELATING TO THE SOFTWARE OR THIS
AGREEMENT EXCEED THE PRICE PAID TO BAY NETWORKS FOR THE SOFTWARE LICENSE.
5. Government Licensees. This provision applies to all Software and
documentation acquired directly or indirectly by or on behalf of the United States Government. The Software and documentation are commercial products, licensed on the open market at market prices, and were developed entirely at private expense and without the use of any U.S. Government funds. The license to the U.S. Government is granted only with restricted rights, and use, duplication, or disclosure by the U.S. Government is subject to the restrictions set forth in subparagraph (c)(1) of the Commercial Computer Software––Restricted Rights clause of FAR 52.227-19 and the limitations set out in this license for civilian agencies, and subparagraph (c)(1)(ii) of the Rights in Technical Data and Computer Software clause of DFARS 252.227-7013, for agencies of the Department of Defense or their successors, whichever is applicable.
6. Use of Software in the European Community. This provision applies to all
Remote Access Concentrator Software Server Tools for Windows NT
foregoing, Licensee, on behalf of itself and its subsidiaries and affiliates, agrees that it will not, without first obtaining all export licenses and approvals required by the U.S. Government: (i) export, re-export, transfer, or divert any such Software or technical data, or any direct product thereof, to any country to which such exports or re-exports are restricted or embargoed under United States export control laws and regulations, or to any national or resident of such restricted or embargoed countries; or (ii) provide the Software or related technical data or information to any military end user or for any military end use, including the design,
development, or production of any chemical, nuclear, or biological weapons.
9. General. If any provision of this Agreement is held to be invalid or
unenforceable by a court of competent jurisdiction, the remainder of the provisions of this Agreement shall remain in full force and effect. This Agreement will be governed by the laws of the state of California.
Remote Access Concentrator Software Server Tools for Windows NT
Contents
About This Guide
Before You Begin . . . xi
Conventions . . . xi1
Acronyms . . . x11
Ordering Bay Networks Publications . . . xiv
Bay Networks Customer Service . . . xiv
How to Get Help . . . xv
Chapter 1 Introduction
NA Utility Features . . . 1-1 Windows NT Server Access Security Features . . . 1-2 Using RAC Documentation . . . 1-2 User Authentication Issues . . . 1-2 Name Server Issues . . . 1-3 Logging Issues . . . 1-3 Documentation Exceptions . . . 1-3 Platform Requirements . . . 1-4
Chapter 2
Selecting Server Tools Options
Selecting a Security Server . . . 2-1 Creating a RADIUS Authentication and Accounting Server . . . 2-6 Selecting Booting/Logging Options. . . 2-8 Using the Event Viewer . . . 2-10 Configuring a RADIUS Server . . . 2-13 Creating and Configuring a RADIUS Server . . . 2-14 Modifying RADIUS Server Information . . . 2-15 Deleting RADIUS Server Information . . . 2-16 Displaying Version Information . . . 2-17
Chapter 3
Understanding Erpcd
Contents
Chapter 4
Using Security Features
Figures
About This Guide
Using Bay Networks® Remote Access Concentrator Server Tools for
Microsoft® Windows NT®, you can to boot, configure, and manage
Remote Access Concentrators (RACs) on a Windows NT network.
This guide is intended for System Administrators or others who need to configure RAC servers. It assumes that you are familiar with network protocols and that you know the parameter values needed to configure RACs.
This guide is part of the complete RAC documentation set. You should refer to other manuals in the set for information not related to Remote Access Concentrator Server Tools for Windows NT.
Before You Begin
Before using this guide, you must:
• Install the Remote Access Concentrator.
• Install the Remote Access Concentrator Software for Windows and Windows NT.
If you want to Go to
Read an overview of Server Tools features Chapter 1
Learn how to set RAC security parameters Chapter 2
Understand erpcd and security requests Chapter 3
About This Guide
Conventions
This manual uses the following printing conventions:
Convention: Represents:
special type In examples,special type indicates system output.
special type Boldspecial type indicates user input.
In command examples, this notation indicates that
pressing enters the default value.
bold Bold indicates commands, pathnames, or filenames that
must be entered as displayed.
italics In the context of commands and command syntax, lowercase italics indicate variables for which the user supplies a value.
[ ] In command dialog, square brackets indicate default
values. Pressing selects this value. Square brackets
appearing in command syntax indicate optional arguments.
{ } In command syntax, braces indicate that one, and only
one, of the enclosed value must be entered.
| In command syntax, this character separates the different
options available for a parameter.
Notes provide important information.
Return
Return
About This Guide
Acronyms
ACP Access Control Protocol
ARA AppleTalk Remote Access
ARAP AppleTalk Remote Access Protocol
bfs block file server
CHAP Challenge Handshake Authentication Protocol
CLI Command Line Interface
erpcd expedited remote procedure daemon
IP Internet Protocol
IPX Internetwork Packet Exchange
ISDN Integrated Services Digital Network
NFS Network File Server
PAP Authentication Protocol
PPP Point to Point Protocol
RAC Remote Access Concentrator
SLIP Serial Line Internet Protocol
TCP Transmission Control Protocol
TFTP Trivial File Transfer Protocol
UD User Datagram Protocol
About This Guide
Ordering Bay Networks Publications
To purchase additional copies of this document or other Bay Networks publications, order by part number from Bay Networks Press™ at the
following numbers:
• Phone--U.S./Canada: 888-422-9773
• Phone--International: 510-490-4752
• FAX--U.S./Canada and International: 510-498-2609
The Bay Networks Press catalog is available on the World Wide Web at support.baynetworks.com/Library/GenMisc. Bay Networks publications are available on the World Wide Web at support.baynetworks.com/Library/tpubs.
Bay Networks Customer Service
You can purchase a support contract from your Bay Networks distributor or authorized reseller, or directly from Bay Networks Services. For information about, or to purchase a Bay Networks service contract, either call your local Bay Networks field sales office or one of the following numbers:
Region Telephone number Fax number
United States and Canada
800-2LANWAN; then enter Express Routing Code (ERC) 290,
About This Guide
How to Get Help
If you purchased a service contract for your Bay Networks product from a distributor or authorized reseller, contact the technical support staff for that distributor or reseller for assistance.
If you purchased a Bay Networks service program, call one of the following Bay Networks Technical Solutions Centers:
Technical Solutions Center Telephone number Fax number
Billerica, MA 800-2LANWAN 508-916-3514
Santa Clara, CA 800-2LANWAN 408-495-1188
Valbonne, France 33-4-92-96-69-68 33-4-92-96-69-98
Sydney, Australia 61-2-9927-8800 61-2-9927-8811
Chapter 1
Introduction
R
emote Access Concentrator Server Tools for Windows NT allows you to boot and configure Remote Annexes and Remote Access Concentrators (RACs) on a Windows NT network. You can manage one or more RACs using the na utility. In addition, the product takes advantage of Windows NT domains to authenticate and authorize users.NA Utility Features
The na utility lets you monitor and modify RAC operating characteristics. It allows you to:
• Boot a RAC.
• Reset a RAC.
• Identify a RAC by its Internet address or host name.
• Set and show values for all RAC configuration parameters.
• Save current configuration parameter settings into script files.
• Copy the current configuration parameters from one port to another or from one RAC to another.
Chapter 1 Introduction
Windows NT Server Access Security Features
Remote Access Concentrator Server Tools for Windows NT works with a Windows NT Server to provide access security. You define user and group access parameters in Windows NT, and link the appropriate group definitions with the RAC using the Server Tools Options graphical user interface.
Remote Access Concentrator Server Tools for Windows NT allows you access to the standard RAC log file, a RADIUS server log file, and the Windows NT Event Log.
Using RAC Documentation
In addition to this manual, you need the Managing Remote Access
Concentrators Using Command Line Interfaces and Remote Access Concentrator Software Reference. These guides provide reference,
procedure, and feature descriptions.
Chapter 1 Introduction
Name Server Issues
Remote Access Concentrator Server Tools for Windows NT supports DNS and IEN-116 name servers. Bay Networks does not ship IEN-116 for Windows NT. For more information, see Managing Remote Access
Concentrators Using Command Line Interfaces.Be aware that IEN-116 discussions do not apply to Remote Access Concentrator Server Tools for Windows NT.
Logging Issues
Besides the standard RAC log destinations, you can configure Remote Access Concentrator Server Tools for Windows NT to send Syslog and ACP log messages to the Windows NT Event Log. See Chapter 3 in this guide for details. For additional logging information, refer to Managing
Remote Access Concentrators Using Command Line Interfaces.
Documentation Exceptions
Some information in Managing Remote Access Concentrators Using
Command Line Interfaces does not apply to Remote Access Concentrator
Chapter 1 Introduction
Platform Requirements
Remote Access Concentrator Server Tools for Windows NT requires:
• Windows NT Server version 3.51 or 4.0 configured to support the TCP/IP protocol.
• Administrative privileges on the server. • 15 MB free disk space on an NTFS drive.
• One Windows NT Server client license per RAC.
• A PC with an Intel Pentium (or any fully compatible) CPU or a DEC Alpha (running Windows NT Server 4.0).
• 32 MB RAM.
Chapter 2
Selecting Server Tools Options
T
he Server Tools Options window appears after you complete the installation process. Double-click on the Options icon in the Bay Networks program group window. The Server Tools Options window has four tabbed dialog boxes that allow you to select a security server, select booting and logging options, choose and configure a RADIUS server, and view information about your current Remote Access Concentrator Server Tools for Windows NT software version. This chapter includes:• Selecting a Security Server and Group Authentication
• Selecting Booting/Logging Options
• Configuring a RADIUS Server
• Displaying Version Information
Selecting a Security Server
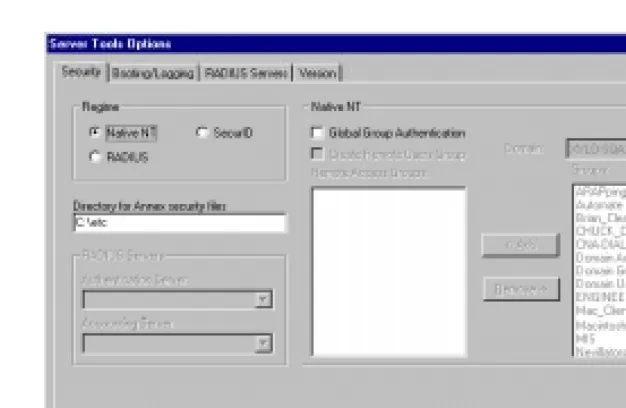
The Security tab dialog box allows you to choose a security regime, select RADIUS Authentication and Accounting servers, and add or remove domains and remote access groups.
Chapter 2 Selecting Server Tools Options
Figure 2-1. The Server Tools Options Dialog Box
To select options in the Security window:
Specify a Regime Select the protocol you desire from the Regime radio box.
• Native NT (default selection) • RADIUS Security
Chapter 2 Selecting Server Tools Options
Native NT Security 1. If you select Native NT in the Regime radio box, the Directory
for Annex security files field becomes active. Accept the
default or enter a new destination drive and directory for the
acp_logfile file.
This field designates the drive on which you installed Remote Access Concentrator Server Tools and the etc directory, where the system stores the acp_dialup, acp_keys, and acp_userinfo files.
2. If you select Native NT as your security protocol, click the
Global Group Authentication check box.
You must select this box if you want to use Windows NT global groups to authenticate users. If you do not select it, the system will authenticate user names and passwords only.
3. If you select Native NT and want to create a default remote users group, click the Create Remote Users Group check box.
If you want to create a new Remote Users Group, seeRADIUS Security on page 2-4.
4. If you select Native NT, choose an existing domain from the
Domain field.
When you choose a domain, the groups within that domain appear in the Groups list box.
5. If you select Native NT, choose a name from the Groups list box.
6. ClickAddto move the group(s) you select to the Remote
Access Groups list box.
Chapter 2 Selecting Server Tools Options
You can double-click on a group name from the Remote Access
Groups list, to move it to the Groups list. If you want to change
your selections, highlight the group from the Groups list box and click on Remove, or double-click the group name.
If you install Remote Access Concentrator Server Tools on a primary domain controller, the groups you select here must have local log on privileges to allow authentication. For more information about this privilege, refer toInstalling Remote Access Concentrator Software for Windows and Windows NT included with your documentation set.
RADIUS Security ▼ If you select RADIUS as your security protocol, select the Authentication
Server and Accounting Server in the RADIUS Servers list box.
If the only options available in these two drop–down lists are local and same as authentication server, you need to create a list of servers from which to choose. For more information on this procedure, seeConfiguring a RADIUS Server on page 2-13. Chapter 4 provides additional information regarding RADIUS security.
Third Party Security 1. If you are using SecurID, click the SecurID Regime radio box selection, and all of the fields become dimmed.
2. When you have completed your Security setup, click on OK to set the changes you made and close the dialog box.
Chapter 2 Selecting Server Tools Options
You can add or remove a new Remote Users Group (on the Security tab window) within the Server Tools Options application. However, unless this new group already exists, you must first create the new group and its information via the Windows NT operating system.
▼ To add a new default group, click the Create Remote Users Group check box.
▼ Remote Users Group appears automatically in the Remote Access Groups list. If you find you do not need the group, you can delete it before
you click on OK or Apply by selecting it and clicking on Remove, or by deselecting the Create Remote Users Group check box.
To create a new Group:
1. Click on the Administrative Tools icon in the Windows NT program group window.
The Administrative Tools window appears.
2. Click on the User Manager for Domains icon.
The User Manager for Domains dialog box appears.
3. Add the new Group and associated information.
For more information, see the Windows NT documentation on using the options in this window.
4. When you have completed adding your Group information, click on the Security tab in the Server Tools Options window.
The Security dialog box opens.
5. Click on the Domain pull–down menu.
Chapter 2 Selecting Server Tools Options
6. Select the newly created Group from the Groups list box and click on Add.
The selected group appears in the Remote Access Groups list box.
7. When you have completed your changes, click on OK to set the changes you made and close the dialog box.
Click on Cancel to close the dialog box without saving or applying your changes.
Click on Apply to set your changes and leave the Server
Tools Options window open on your desktop. Use this option
if you want to make changes in any of the other tabbed dialogs.
Creating a RADIUS Authentication and Accounting
Server
To create a RADIUS Authentication or Accounting server:
1. From the Server Tools Options window, click on the RADIUS
Servers tab.
The RADIUS Servers dialog box opens.
2. Click on New.
Chapter 2 Selecting Server Tools Options
4. Tab to the IP Address text field and enter the IP Address that goes with the Host Name.
Repeat step 4 to configure the Secret format, the Timeout period, and the number of Retries (for more details on
Secret, Timeout, and Retries, seeChapter 4).
5. Click on Accept to apply the new server information or
Revert to cancel your changes.
You can modify any of the fields before you click on
Accept or Revert. After Accept or Revert is chosen, the
fields become inactive. To reactivate (for editing) these fields, select the server, then choose Modify.
6. Click on OK to save your changes and close the dialog box.
Click on Cancel to close the dialog box without saving or applying your changes.
Click on Apply to set your changes, and leave the Server
Tools Options window open on your desktop. Use this option
if you want to make changes in any of the other tabbed dialogs.
Chapter 2 Selecting Server Tools Options
Selecting Booting/Logging Options
The Booting/Logging tab window allows you to select log files, to choose locations for load and dump files, and to choose directories, time formats and network address formats for the log file.
▼ To display this window, choose the Booting/Logging tab in the Server
Chapter 2 Selecting Server Tools Options
To select options in the Booting/Logging window:
1. In the Directory for load and dump files field, you can accept the default or enter a drive and directory for the RAC system images and dump files.
This field automatically lists the drive on which the Remote Access Concentrator Server Tools is installed, and the bfs default directory, where the system stores load and dump files.
If you enter a new directory, use the File Manager to move the RAC software images to the new directory. If you do not move the images to the new directory, the RACs will be unable to boot.
2. Click either Use NT Event Log, Use acp_logfile, or Use
RADIUS Logging to choose a method for storing log
messages.
You can log RAC syslog messages, and erpcd or RADIUS security messages.
• If you select Use NT Event Log, the system stores messages in the Applications portion of the standard Windows NT Event Log.
• If you select Use acp_log file, the system stores messages in the acp_logfile in the chosen directory in the Security dialog box. You can view the acp_logfile by double-clicking on the
acp_logfile icon in the Bay Networks program group
window.
• If you select Use RADIUS logging, the system sends messages in the RADIUS server.
Chapter 2 Selecting Server Tools Options
3. If you select Use acp_logfile in the Booting/Logging dialog box, specify a time listings format in the Time Format box.
You can choose:
• YY/MM/DD HH:MM:SS to display the date and time that
an event occurred (e.g., 95/12/30 06:22:15).
• Use Seconds to list time in seconds since January 1, 1970.
4. If you select Use acp_logfile or NT Event Log from the
Booting/Logging dialog box, select an IP address or Host Name format from the Network Address Format box.
You can choose:
• Use IP Address to place the Internet address of a RAC that
generates logging messages in the log files.
• Use Host Name to include a RAC name in the log files instead
of the RAC’s Internet address.
The time and address formats you choose appear in the
acp_logfile or RADIUS logging. If you choose Use NT Event Log, the format appears in the Detail window of
the NT Event Log.
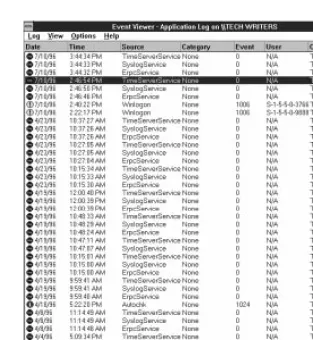
Using the Event Viewer
Chapter 2 Selecting Server Tools Options
▼ To view Windows NT logs, double-click on the Event Viewer icon in
[image:33.612.179.492.141.480.2]Administrative Tools and select Application from the Log menu.
Figure 2-2. Event Viewer
Chapter 2 Selecting Server Tools Options
The Windows NT Event Log stores information in the following columns:
• An icon at the beginning of each line indicates the severity of the message.
• Date stores the date that the event was logged in Windows NT.
• Time stores the time that the event was logged into Windows
NT. The Detail window of the Event Log lists the times events occur.
• Source lists the software that logged the event.
– For syslog messages from a RAC or from the network,
Annex_syslog appears.
– For messages generated by erpcd, the column displays
Annex_syslog.
– For security messages, the log entry readsAnnex_ACP. • Category classifies events.
• Event displays the event number (the RAC generates a number
to identify each event).
• User displaysN/A. Remote Access Concentrator Server Tools
does not use this column.
• Computer displays the name of the host on which erpcd is
installed.
Chapter 2 Selecting Server Tools Options
Configuring a RADIUS Server
The RADIUS Servers tab dialog box allows you to create, modify, delete and configure a RADIUS server, and to set the IP Address and Secret format parameters.
▼ To view this information, click on the RADIUS Servers tab of the Server
[image:35.612.179.493.231.435.2]Tools Options window.
Figure 2-3. The Radius Servers Dialog Box
Chapter 2 Selecting Server Tools Options
Creating and Configuring a RADIUS Server
To create and configure a new RADIUS Server:
1. Click on New.
All information fields become active.
2. Enter the Host Name of the RADIUS Server you are creating in the text field.
3. Tab to the IP Address text field and enter the IP address of the Host Name.
4. Repeat step 3 to configure the Secret format, the Timeout period, and the number of Retries.
5. Click on Accept to apply the new server information, or
Revert to cancel your changes.
You can modify any of the fields before you click on
Accept or Revert. After choosing Accept or Revert, the
fields become inactive. To reactivate (for editing) these fields, select the server, then choose Modify.
6. Click OK to save your changes and close the Server Tools
Options window.
Click on Cancel to close the dialog box without saving or applying your changes.
Chapter 2 Selecting Server Tools Options
Modifying RADIUS Server Information
1. Select a desired RADIUS server from the RADIUS Servers list box.
When you select a RADIUS server, the information fields on the right side of the dialog box automatically fill in with the appropriate information pertaining to the RADIUS server you chose. Click on Modify.
All information text fields become active, except the Host
name.
2. Place your cursor in the information field you wish to change, and enter the new information.
3. Click on Accept to save the modified information or Revert to cancel your changes.
You can modify any of the fields before you click on
Accept or Revert. After choosing Accept or Revert, the
fields become inactive. To reactivate these fields, select the server, then choose Modify.
4. Click OK to save your changes and close the Server Tools
Options window.
Click on Cancel to close the dialog box without saving or applying your changes.
Click on Apply to set your changes and leave the Server
Tools Options window open on your desktop. Use this option
Chapter 2 Selecting Server Tools Options
Deleting RADIUS Server Information
1. Select the RADIUS Server to be deleted and click on Delete.
All information text fields remain inactive and a confirmation dialog box appears.
2. Click OK to delete the RADIUS Server or Cancel to exit the confirmation dialog box without deleting any server
information.
The confirmation dialog box closes.
3. Click OK to save your changes and close the Server Tools
Options window.
Click on Cancel to close the dialog box without saving or applying your changes.
Click on Apply to set your changes and leave the Server
Tools Options window open on your desktop. Use this option
Chapter 2 Selecting Server Tools Options
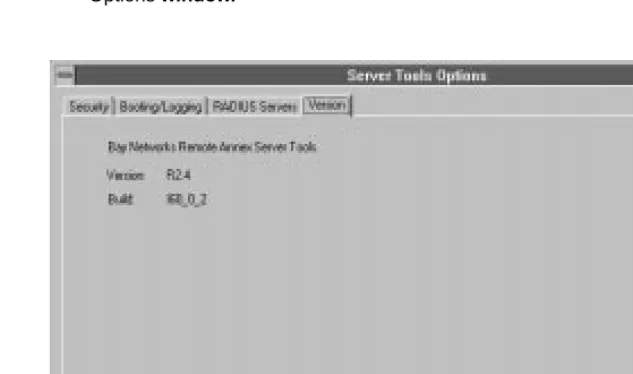
Displaying Version Information
The Version tab window provides the company and product name, version number, and build number for the Remote Access Concentrator Server Tools.
▼ To view this information, click on the Version tab of the Server Tools
[image:39.612.178.495.232.419.2]Options window.
Chapter 3
Understanding Erpcd
R
emote Access Concentrator Server Tools uses the expedited remoteprocedure call daemon (erpcd) running on a Windows NT server. Erpcd
responds to all RAC boot, dump, and ACP security requests. ACP’s
eservices file, stored in the \etc directory, lists the services that erpcd
provides. Eservices includes controls for:
• The block file server (bfs) program sends boot files to a RAC and collects dump files from a RAC.
• The Access Control Protocol (ACP) program provides security when you define a Windows NT server as a security server.
The Remote Access Concentrator Server Tools
implements erpcd differently, because it uses Windows NT domain authentication.
This chapter describes the files you can edit. It includes:
• Editing Files
Chapter 3 Understanding Erpcd
Editing Files
You can edit the acp_userinfo, acp_dialup, and acp_keys files from the Bay Networks program group window. There is an icon for each file in the program group window.
▼ To open an individual file, such as the acp_userinfo file, from the Bay Networks program group window, double-click on the respective icon and the file will open in the Windows NT Notepad editor.
The changes take effect immediately. User names and group names are not case-sensitive.
Using the acp_userinfo File
The acp_userinfo file stores information about the RAC commands and protocols available to users. When a user logs into the server, erpcd matches the login environment with acp_userinfo entries, and controls user access based on these entries.
Defining User Profiles
Chapter 3 Understanding Erpcd
For example, if a user who belongs to the Engineering group requests access to a RAC port on Monday morning at 10 a.m. and a profile excludes Engineering group members from using that RAC on Mondays between 9 and 11 a.m., the user cannot log in to the port. In this case, Remote Access Concentrator Server Tools authenticates the user’s Windows NT name and password, matches the current environment (the RAC, port, day and time) to an entry in acp_userinfo, and downloads instructions (or attributes) so that the RAC denies access to the user.
User Profile Formats
The acp_userinfo file stores user profiles in the user...end block format. This format includes:
• User to begin the block.
• One or more keywords that specify the user environment. Entries must contain:
• A keyword, an equal sign (=) and a value, without spaces. For an explanation of these keywords, refer toUser Environment Keywords on page -4.
• A semicolon (;) to separate keyword/value statements.
• A backslash (\) at the end of a line if you continue the entry on a second line.
Chapter 3 Understanding Erpcd
• The attributes that erpcd applies when all user profile elements match the login environment of the user.
• endto conclude the profile.
The acp_userinfo file can include as many user profiles as you need. The matching process requires that all elements in a user profile match the login environment of the user.
Using Profile Environment Keywords
User profiles contain one or more keywords that define user login conditions. Erpcd matches these conditions to environment conditions listed in a user profile.
Since erpcd uses the first profile it finds that matches the login environment of a user, you need to specify profiles in the order in which you want them to match.
Username and Group Keywords
The username keyword specifies a single Windows NT user. The group keyword allows you to create a user profile for any member of a Windows NT group.
▼ To use these keywords, enterusername=orgroup= followed by a user or group name.
Chapter 3 Understanding Erpcd
time Keyword The time keyword defines a period of time during which profile attributes apply.
▼ To use this keyword, typetime= followed by one or more of the following:
• A day of the week (e.g.,Thursday).
• A specific date, including the month and the date (e.g.,March 1).
• A range of hours in hh:mm format (e.g.,06:30). You must enter start time and end time. You can entera.m. orp.m.
following the times.
If you do not enter a day and/or a date, erpcd applies the start and end time every day of the week. If you omita.m. orp.m., the time defaults
to the 24-hour format.
protocol Keyword The protocol keyword defines a protocol by which a user can connect to a RAC.
▼ To define a protocol, typeprotocol= followed byslip,ppp, orcli.
You cannot enter more than one protocol on a line. However, you can repeat theprotocol= format and add a second or third profile.
annex and ports Keywords
The annex and ports keywords specify the RACs and ports to which profile attributes will apply.
▼ To list RACs and/or ports, typeannex= and/orports= followed by one or more RAC names or IP addresses and one or more port numbers, respectively.
Chapter 3 Understanding Erpcd
To combine the annex and port keywords in one line, separate keyword/ value entries with a semicolon (e.g.,annex=Annex 02, 245.132.88.22; ports=1,3,6-22). If you omit RAC names or addresses and list one or
more ports, the profile attributes apply to all RACs.
Understanding Profile Attributes
In each user profile, one or more attributes follow keywords and their values. This section explains the attributes you can include.
accesscode The accesscode attribute controls the text users enter when logging in to a dial-back port. Before you can use the accesscode attribute, you must define at least two modem pools (one for dial-in and one for dial-out) in the acp_userinfo file. A modem pool groups asynchronous ports on one or more RACs.
Modem pool definitions appear at the end of the acp_userinfo file. To define a modem pool:
1. From the Bay Networks program group window, double-click on the appropriate icon to open the acp_userinfo file.
The acp_userinfo file opens in the Notepad editor.
2. Find the area of the file where entry information resides and typepool followed by a name for the modem pool (e.g.,pool inboundpool1).
Chapter 3 Understanding Erpcd
The acp_userinfo file can store accesscode attributes in a user profile. To create an accesscode entry:
1. Typeaccesscode followed by a code name.
For IPX clients, enterIPX for the access code.
2. Typephone_no followed by an actual phone number (e.g., phone_no 634-5789).
If you do not enter a phone number, the system prompts the user for it. Entercharge_back for IPX clients, and the system
prompts a user for a phone number, drops the connection, and calls the user back at that number.
3. Typein_pool followed by the name of an inbound modem pool (e.g.,in_pool inboundpool1).
4. Typeout_pool followed by the name of an outbound modem pool (e.g.,out_pool outboundpool1).
5. Typejob followed by one CLI command, its arguments, and end.
You do not need to enter a job specification.
6. Typeend.
clicmd The clicmd attribute lists CLI commands that erpcd will execute if the profile matches. To use this attribute:
1. From the Bay Networks program group window, double-click on the appropriate icon to open the acp_userinfo file.
The acp_userinfo file opens in the Notepad editor.
2. Find the area of the file where entry information resides and typeclicmd.
Chapter 3 Understanding Erpcd
4. Typeend.
Repeat the line you created in Steps 1-3 if you want to use more than one CLI command. Erpcd executes CLI commands in the order in which they appear.
5. Addclicmd...end following the last line that lists a CLI command.
Use this line if you want to continue the CLI session after erpcd executes the last CLI command.
You cannot use clicmd unless you set the cli_security parameter to
Y. Do not include the same CLI command in the clicmd and climask entries.
climask The climask attribute limits the CLI commands users can execute. To use this attribute:
1. From the Bay Networks program group window, double-click on the appropriate icon to open the acp_userinfo file.
The acp_userinfo file opens in the Notepad editor.
2. Find the area of the file where entry information resides and typeclimask.
3. Enter the CLI commands. If you enter more than one command, separate commands with spaces.
Chapter 3 Understanding Erpcd
When a user name and password match the profile, erpcd sends this list to the RAC, which prevents the user from executing the commands.
You cannot use climask unless the cli_security parameter is set toY. Do not include the same CLI command in the clicmd and climask entries.
deny The deny attribute prevents a user from connecting to a RAC. To use the command:
1. From the Bay Networks program group window, double-click on the appropriate icon to open the acp_userinfo file.
The acp_userinfo file opens in the Notepad editor.
2. Find the area of the file where entry information resides and typedeny following a user name or group name.
If you include additional attributes in a profile that uses deny, the profile will not execute them.
When erpcd denies access to a RAC, it generates a message in the log file. For CLI users, the message appears on the screen.
filter The filter attribute sets network address restrictions for specific users or groups. These restrictions apply to the port on which a user logs in.
To use the attribute:
1. From the Bay Networks program group window, double-click on the appropriate icon to open the acp_userinfo file.
Chapter 3 Understanding Erpcd
2. Find the area of the file where entry information resides, and typefilter.
3. Enter a filter definition.
4. Typeend.
Repeat the line you created in Steps 1-3 if you want to use more than one filter. Erpcd executes filter attributes in the order of appearance.
Each filter definition includes categories for direction, scope, family, criteria, and actions. Separate each part of the filter definition with a space.
• Direction applies the filter to incoming or outgoing packets.
You can enterinput oroutput. To apply a filter to incoming as well as outgoing packets, you must create two separate
definitions.
• Scope controls how erpcd matches the filter definition. You can
enterinclude to apply the filter to packets that match the definition, orexclude to apply the filter to packets that do not meet the definition.
• Family, an optional part of the definition, specifies the protocol
to which the filter applies. Currently, the system supports only
Chapter 3 Understanding Erpcd
• Criteria includes the conditions for the filter. This section uses a
keyword followed by a value. You can enter:
• dst_address (the destination address of the packet)
followed by an IP address.
• dst_port (the destination port) followed by a port number from 1-65535 or by a service name.
• src_port (the source port number) followed by a port
number from 1-65535 or by a service name.
• src_address (the source address of the packet) followed by an IP address.
• address_pair for incoming or outgoing packets passing
between two addresses, followed by two IP addresses. Enter both addresses, separated by a space, on the same line. If you use this keyword, you cannot usedst_address or
src_address.
• port_pair for incoming or outgoing packets passing
between two ports or services, followed by a port number or service name. If you use this keyword, you cannot use
dst_portorsrc_port.
• protocol (the transport protocol of the packet) followed by
a number from 1 to 65535 or bytcp,udp, oricmp.
To match all addresses or port numbers, enter -1 or*
in place of an address or port number. For service names, you can enterdomain,finger,ftp,name,
nfs,nntp,rlogin,route,routed,router,
rtelnet,sftp,smtp,telnet,tftp,time,who, orlogin.
• Actions specify activity of a filter when its criteria match a
packet. Enter one or more of the following actions:
Chapter 3 Understanding Erpcd
• icmp discards the packet and sends an ICMP message indicating that the destination is unreachable.
• netact defines activity for a SLIP or PPP dynamic dial-out
line. When you usenetact in a filter that is enabled on SLIP
or PPP dynamic dial-out line, packets that match the filter constitute activity on the line. If the line is not up,netact
discards the packet.
• no_start, used withinclude (in the Scope category),
specifies that packets defined as activity will not activate a dynamic dial-out line, but will keep the line up and will reset the net_inactivity timer parameter to zero.
• syslog logs the event in the log files.
route The route attribute defines the IP routes that a router makes available through a RAC when it dials in. Use this attribute when you do not want a router to incur overhead in running a routing protocol itself. To use this attribute:
1. From the Bay Networks program group window, double-click on the appropriate icon to open the acp_userinfo file.
The acp_userinfo file opens in the Notepad editor.
2. Find the area of the file where entry information resides and typeroute.
Chapter 3 Understanding Erpcd
5. Enter an IP address for the gateway that is the next hop for the route.
If you enter an asterisk, the RAC uses the remote address of the port as the gateway.
6. If necessary, you can enter a number from 1 to 15 to indicate the number of hops to the destination, or-hto indicate that the route is hardwired.
You can skip this step. You do not have to enter a number of hops or-h.
7. Typeend.
at_zone The at_zone attribute lists AppleTalk zones on a network. To use this attribute:
1. From the Bay Networks program group window, double-click on the appropriate icon to open the acp_userinfo file.
The acp_userinfo file opens in the Notepad editor.
2. Find the area of the file where entry information resides and typeat_zone.
3. Enter one or more zone names.
If you use more than one zone name, separate names using spaces (e.g.,at_zone zone1 zone2). Zone names can use up to
32 characters; you cannot use non-printable characters. If you enter a name that contains spaces, enclose the entire name in double quotation marks.
Chapter 3 Understanding Erpcd
at_connect_time The at_connect_time attribute specifies the number of minutes that an ARA connection can remain open. To use this attribute:
1. From the Bay Networks program group window, double-click on the appropriate icon to open the acp_userinfo file.
The acp_userinfo file opens in the Notepad editor.
2. Find the area of the file where entry information resides and typeat_connect_time followed by the number of minutes.
user john
at_connect_time 12 end
The above example limits the session to twelve minutes.
at_nve_filter The at_nve_filter attribute allows you to include or exclude users from specific objects, network numbers, subzones, and zones. Specify one
at_nve_filter attribute for each user in a profile. To use this attribute:
1. From the Bay Networks program group window, double-click on the appropriate icon to open the acp_userinfo file.
The acp_userinfo file opens in the Notepad editor.
2. Find the area of the file where entry information resides and typeat_nve_filter.
3. Typeinclude orexclude.
Chapter 3 Understanding Erpcd
7. Typeend.
user username=john at_passwd smith
at_nve_filter exclude joe*:*@ *:*@sales end end
For object names, network numbers or subzone names, and zone names, you can use an asterisk as a wildcard. All entries in steps 3, 4, and 5 are case-sensitive and can use up to 32 characters.
at_password The at_password attribute stores a passwords for registered AppleTalk users. Remote Access Concentrator Server Tools uses the passwords to authenticate all AppleTalk users. To use this attribute:
1. From the Bay Networks program group window, double-click on the appropriate icon to open the acp_userinfo file.
The acp_userinfo file opens in the Notepad editor.
2. Find the area of the file where entry information resides and typeat_password followed by a password using 1 to 9 characters.
Include punctuation marks in the password. If you use spaces and/or hexadecimal values, use the backslash (/) preceding these characters.
Chapter 3 Understanding Erpcd
chap_secret The chap_secret attribute defines the token used for authentication when you use the CHAP protocol for PPP links. CHAP authenticates users based on the user names in the acp_userinfo file. To create a token:
1. From the Bay Networks program group window, double-click on the appropriate icon to open the acp_userinfo file.
The acp_userinfo file opens in the Notepad editor.
2. Find the area of the file where entry information resides and typechap_secret following by the token.
Each token can use up to 32 alphanumeric characters. Bay Networks recommends that all tokens use at least 16 characters.
Using the acp_keys File
The acp_keys file stores RAC names or IP addresses and corresponding encryption keys. Erpcd uses the keys you define here to create encryption keys that the security server and a RAC use to exchange messages. When the security server receives an encrypted message from a RAC, it matches the key with an associated RAC in the acp_keys file. If there is no match, the RAC and the server cannot communicate.
To create an entry in the acp_keys file:
Chapter 3 Understanding Erpcd
3. Type a colon to separate RAC names or addresses from the encryption key.
4. Enter an encryption key that uses up to 15 characters.
You cannot use spaces or tabs here. Encryption keys are case-sensitive. For additional information, refer toCreating Encryption Keys on page 3-17.
For example,annex1,annex2: abcxyz is a simple entry that defines an
encryption key for two RACs. If you need to continue an entry on a second line, use the backslash (/) at the end of the first line.
Erpcd first attempts to match complete IP address entries in the acp_keys file. If erpcd does not find an exact match, it searches
entries that contain wildcards. In either case, erpcd uses the first key entry it finds.
Creating Encryption Keys
Define encryption keys by setting the acp_key parameter for each RAC. If the key value is not the same in the acp_keys file and for the acp_key parameter, the RAC and the server cannot communicate. In addition, you must set the enable_security parameter toY to use security features.
To set up encryption keys:
1. From the Bay Networks program group window, double-click on the appropriate icon to open the acp_keys file.
The acp_keys file opens in the Notepad editor.
2. Find the area of the file where entry information resides and enter RAC names or IP addresses and encryption keys in the acp_keys file.
3. Use the admin command to set the acp_key parameter for each RAC you listed in the acp_keys file.
Chapter 3 Understanding Erpcd
5. Use the reset annex security command to reset security for the RACs whose keys you added or changed.
6. Use the Services control panel to restart erpcd.
Using the acp_dialup File
The acp_dialup file stores user names, RAC names and addresses, and port numbers. Erpcd matches Annex and user entries to provide IP addresses for users dialing in to the network. It denies access to users if it does not find a matching entry.
To use the information in acp_dialup, you must set the
address_origin parameter toACP via the na utility. This allows a RAC to search the acp_dialup file for the remote client’s user name and for local and remote addresses.
To create an entry in the acp_dialup file:
1. From the Bay Networks program group window, double-click on the appropriate icon to open the acp_dialup file.
The acp_dialup file opens in the Notepad editor.
2. Go to the end of the file and enter a user name. If authentication is performed with multiple domain
Chapter 3 Understanding Erpcd
4. Enter a remote address followed by a local address.
Use an asterisk (wildcard) for any part of an IP address. You must use spaces to separate the user name, port number/RAC, Local Address, and Remote Address fields.
Using Local and Remote Addresses
If the acp_dialup file contains a matching user name and local and remote addresses exist in the file, the RAC uses those values. If the acp_dialup file contains a matching user name and a remote address but not a local address, the RAC uses the remote address from the file, and uses the RAC’s IP address for the local address.
If the file does not contain a matching user name, the RAC uses values from the local_address and remote_address parameters.
• If both parameters contain addresses, the RAC uses these values.
• If both parameters are set to0.0.0.0, the RAC negotiates for
both addresses with the remote PPP client. The connection is denied for a remote SLIP client.
• If local_address contains a value and remote_address is set to
0.0.0.0, the RAC uses the local address and negotiates with the
Chapter 4
Using Security Features
R
emote Access Concentrator Server Tools uses standard Windows NT domain security and RAC-based security features to protect your network from unauthorized access. To use Remote Access Concentrator Server Tools security features:• Use the Windows NT Administrative Tools/User Manager for
Domains to create groups, user names, and passwords.
• Use the na utility to set security parameters on the RAC for the types of security you want.
Erpcd authentication is not case-sensitive. Group names
cannot contain spaces.
Use group authentication by selecting options in the Security dialog box:
• Select Global Group Authentication.
• Select a domain, then select the groups whose members can be authenticated.
If you are using Global Group Authentication, select
Native NT as your Security Regime.
For more information on group authentication, seeChapter 3.
This chapter summarizes most security features and explains the relationship between Windows NT domain security and server-based security. It includes:
• Using Windows NT Domain Security
• Setting Remote Access Concentrator Security Parameters
• Using ACE/Server Security
• RADIUS Security
Although this manual documents the differences between UNIX and Windows NT implementation, the RADIUS for Windows NT
Chapter 4 Using Security Features
Using Windows NT Domain Security
When a user logs on to a RAC, to one of its ports, or to a network, the system performs authentication based on the security parameters you enter. Once you set the parameters that enable a type of security:
• The system checks the Windows NT user name and password.
• If you selected Global Group Authentication and chose groups for remote access in the Server Tools Options windows, the system performs additional authentication. If the user name and password are valid, the system determines whether the user is a member of any groups you select.
Support for Multiple Domains
Remote Access Concentrator Server Tools can authenticate users from domains other than the default domain of the security server. To facilitate this feature, the Windows NT administrator must establish at least a one-way trust relationship.
Chapter 4 Using Security Features
Multiple Domain Authentication Setup Procedure
Follow these Windows NT steps to facilitate support for multiple domain authentication:
Windows NT Steps 1. Establish the appropriate trust relationship among domains.
2. Load the Remote Access Concentrator Server Tools on the trusting domain controller.
3. Define the user(s) in the trusted domain’s security accounts manager database.
Server Tools Steps All Windows NT users who require authorization must use the Remote Access Concentrator Server Tools software to configure these services. Those definitions are accomplished in the following steps:
1. Add a valid entry(s) in the acp_userinfo file.
2. If the caller requires a dial-up address, add a valid entry(s) in the acp_dialup file.
The name of the user must be defined in the acp_userinfo and acp_dialup file in the format:
domain-name\\user-name
For example, a user named Stephen from the Marketing domain would log on asMarketing\\Stephen.Windows NT and Windows 95 use this
Chapter 4 Using Security Features
Setting RAC Security Parameters
The Access Control Protocol (ACP) of the RAC provides server-based security. When you define one network server as a security server, use ACP software default settings or modify the software to create a customized security policy for your network. This section includes:
• Security Requirements
• Types of Security
Security Requirements
Before you can use server-based security, you must use the na utility to:
• Set the enable_security parameter toY.
• Define one server as the primary security server by entering its address in the pref_secure1_host parameter. Define a backup security server in the pref_secure2_host parameter.
• If a RAC queries the primary server and does not receive a response within the time defined in the
network_turnaround parameter, the RAC queries the
backup server.
• If the backup server does not respond within the time specified, the RAC broadcasts to the network for another server running
Chapter 4 Using Security Features
You can customize security features by editing several ACP files. These files are maintained by the security server through the Remote Access Concentrator Server Tools program window.
• The acp_keys file includes encryption key information.
• The acp_dialup file contains user names and addresses for dial-up connections.
• The acp_userinfo file contains initial login environment information and start-up CLI commands.
Types of Security
Configure your system for several types of server-based security by using the na utility to set security parameters. Once these parameters are set, Remote Access Concentrator Server Tools uses Windows NT user names and passwords to authenticate users. This section describes the type of server-based security that use Windows NT domain security. It includes:
• PPP Security
• CLI Security
• Virtual CLI Security
• AppleTalk Security
• Port Server Security
You must set certain parameters to enable each type of security described here. Once you set parameters, each user will have to enter a user name and password. Remote Access Concentrator Server Tools grants access only to those user names and passwords listed in any Windows NT global group you selected in the Remote Access
Chapter 4 Using Security Features
PPP Security
Point-to-Point (PPP) provides a link between hosts that carry IP, IPX, and ARA protocols. After PPP negotiates Link Control Protocol (LCP) options, the hosts at either end of the link authenticate their identities using PAP or CHAP security protocols.
• PAP is a two-way handshake in which hosts exchange user names and passwords in clear text.
• CHAP is a three-way handshake that uses a secret token defined in the acp_userinfo file to authenticate users.
▼ To configure Windows NT security for PPP links, you must set the
ppp_security_protocol parameter.
• If you set ppp_security_protocol to pap, the system uses Windows NT user names and passwords for authentication.
• If you set ppp_security_protocol to chap–pap, the system first requests CHAP security. If CHAP is not acknowledged, it requests PAP.
CHAP does not authenticate Windows NT user names, passwords, or remote access groups. It authenticates based on user names from the acp_userinfo file and the CHAP token.
▼ To log user access for PPP, set the slip_ppp_security parameter toY.
Chapter 4 Using Security Features
CLI Security
The Command Line Interpreter (CLI) of the RAC allows users to connect to hosts, move between established sessions, modify port characteristics, and display statistics for the RAC, hosts, and the network. CLI provides superuser commands for network administration and management.
▼ To configure server-based security for CLI connections, set the cli_security parameter toY.
Virtual CLI Security
Virtual CLI (VCLI) connections allow network users access to CLI commands. When a user enters a telnet command to connect to a RAC, and requests the CLI at the port server prompt, the RAC’s port server process creates a virtual CLI connection.
AppleTalk Security
Remote Access Concentrator Server Tools authenticates AppleTalk users via the acp_userinfo file. This file includes entries for usernames and passwords, a guest profile for anonymous access, and an AppleTalk connection timer.
Chapter 4 Using Security Features
Port Server Security
The port server process of the RAC allows it to accept telnet or rlogin connection requests from network users, hosts, and applications. When a user connects to a RAC via telnet or rlogin and responds to the port prompt by entering a port or rotary number, the security server requires a Windows NT domain user name and password. To configure server-based security:
• For port server connections, set the port_server_security parameter toY.
• For VCLI connections, set the vcli_security parameter toY.
Third Party Security Types
Remote Access Server Tools for Windows NT supports ACE/Server (SecurID) security.
Using ACE/Server Security
Chapter 4 Using Security Features
Creating a SecurID Client for an NT Server:
You must transfer a binary copy of the sd_conf.rec file from the SecurID server to the Windows NT root directory. Also the server must be registered as a SecurID client.
Supported ACE/ Server Releases
Remote Access Concentrator Server Tools offers support for ACE/Server Release 2.1.1 and 2.2.
ACE/Server is supported using ACP. For more information on configuring SecurID security using the graphical user interface, see Chapter 2.
Additional Security Types
Remote Access Concentrator Server Tools supports port server, CLI, VCLI, and PPP security using Windows NT domain user names and passwords. Remote Access Concentrator Server Tools supports:
• Security Filters, ARA and Dial-back security defined in the
acp_userinfo file.
• Dial-up security defined in the acp_dialup file.
Remote Access Concentrator Server Tools and UNIX-based systems support local RAC security and Proprietary IPX security in the same way. Remote Access Concentrator Server Tools does not support the following server-based security types:
• Connection Security
• Password History and Aging
• Blacklisting
Chapter 4 Using Security Features
RADIUS Security
RADIUS is an IETF-developed protocol that defines a communication standard between a Network Access Server (NAS) and a host-based communication server. RADIUS modes are as follows:
• RADIUS Authentication includes authentication of the dial-up user to the RADIUS server, and authentication of the RADIUS server to the NAS. RADIUS supports authentication modes PAP and CHAP.
• RADIUS Accounting, another IETF-developed protocol, defines a communication standard between an NAS and a host-based accounting server. It records duration of service, packet throughput, and raw throughput.
• RADIUS Authorization is not supported in this release, but Authorization is addressed by the Access Control Protocol (ACP). Authorization of the acp_userinfo, acp_restrict, and
acp_dialup files applies to users that are authenticated through
Chapter 4 Using Security Features
RADIUS and ACP Protocol Operation
RADIUS and ACP servers work together to provide the user with a standard means of communication between a Network Access Server and a host-based server.
When or If... The...
the security profile matches the
Server Tools Options dialog box
RADIUS On/Off radio button,
expedited remote procedure call daemon (ERPCD)/ACP prompts the RAC for the user name and password. the user name and password are
entered correctly,
ERPCD/ACP sends a RADIUS
Access-Request packet to the RADIUS server
(this packet contains the normal RADIUS header and the
Access-Request attributes).
the Accept,
Access-Reject, or Access-Challenge
packet fails to arrive in the specified amount of time,
ERPCD/ACP re-sends the packet.
no response is received, ERPCD/ACP sends the
Access-Request packet to the backup RADIUS
server, if configured in the Server Tools
Options dialog box.
ERPCD/ACP receives an
Access-Accept packet,
ERPCD/ACP considers the user validated.
ERPCD/ACP receives an
Reject or an unsupported Access-Challenge or the backup
RADIUS server also fails to respond,
Chapter 4 Using Security Features
RADIUS Authentication
RADIUS authentication supports the authentication modes PAP and CHAP. This section covers the following topics:
• PPP and CHAP Support
• Access-Request Attributes
• Access-Accept and Access-Reject Attributes
PPP and CHAP Support
RADIUS requires PPP/CHAP enforcement to be in the RADIUS server.
If the RADIUS On/Off radio button in the Server Tools Options/
Security dialog box is set to off, the ACP server validates against the
The... Then...
RAC sends the ACP server an ACP
Authorization-Request message
containing the CHAP information,
the ACP server determines if RADIUS is to be used (set in
Server Tools Options dialog box)
and sends a request to the RADIUS server containing the CHAP information needed for validation. RADIUS server validates the
information and returns either an
Access-Accept or Access-Reject
message,
the ACP server responds to the RAC with REQ_GRANTED or
Chapter 4 Using Security Features
Access-Request Attributes
ERPCD/ACP sends Access-Request packets which indicate how the user connects to the RAC. This information is used by the server as a hint or a restriction. The available access-request attributes are:
User-Name Indicates the name of the user that the RADIUS server will authenticate. An unterminated ASCII string identical to the user name that ERPCD/ ACP retrieves via the user name prompt. You can specify up to 31 alphanumeric characters.
User-Password Specifies the user password that the RADIUS server will authenticate.
CHAP-Password Specifies the response value of a CHAP user in response to the password challenge.
NAS-IP-Address Indicates the IP address of t

![Crystal structure of (2E) N methyl 2 [(4 oxo 4H chromen 3 yl)methylidene]hydrazinecarbothioamide](data:image/gif;base64,R0lGODlhAQABAIAAAP///wAAACH5BAEAAAAALAAAAAABAAEAAAICRAEAOw==)