Sun Microsystems, Inc. 901 San Antonio Road Palo Alto, CA 94303 USA 650 960-1300 fax 650 969-9131
Securing Systems with
Host-Based Firewalls -
Implemented
With SunScreen™ Lite 3.1 Software
By Martin Englund
-SunIT Network Security Group
Sun BluePrints™ OnLine - September 2001
http://www.sun.com/blueprints
Part No.: 816-1632-10 Revision 01, September 2001
Copyright 1999 Sun Microsystems, Inc. 901 San Antonio Road, Palo Alto, California 94303 U.S.A. All rights reserved.
This product or document is protected by copyright and distributed under licenses restricting its use, copying, distribution, and decompilation. No part of this product or document may be reproduced in any form by any means without prior written authorization of Sun and its licensors, if any. Third-party software, including font technology, is copyrighted and licensed from Sun suppliers.
Parts of the product may be derived from Berkeley BSD systems, licensed from the University of California. UNIX is a registered trademark in the U.S. and other countries, exclusively licensed through X/Open Company, Ltd.
Sun, Sun Microsystems, the Sun logo, The Network Is The Computer, SunScreen, and Solaris are trademarks, registered trademarks, or service marks of Sun Microsystems, Inc. in the U.S. and other countries. All SPARC trademarks are used under license and are trademarks or registered trademarks of SPARC International, Inc. in the U.S. and other countries. Products bearing SPARC trademarks are based upon an architecture developed by Sun Microsystems, Inc. The OPEN LOOK and Sun™ Graphical User Interface was developed by Sun Microsystems, Inc. for its users and licensees. Sun acknowledges the pioneering efforts of Xerox in researching and developing the concept of visual or graphical user interfaces for the computer industry. Sun holds a non-exclusive license from Xerox to the Xerox Graphical User Interface, which license also covers Sun’s licensees who implement OPEN LOOK GUIs and otherwise comply with Sun’s written license agreements.
RESTRICTED RIGHTS: Use, duplication, or disclosure by the U.S. Government is subject to restrictions of FAR 52.227-14(g)(2)(6/87) and FAR
52.227-19(6/87), or DFAR 252.227-7015(b)(6/95) and DFAR 227.7202-3(a).
DOCUMENTATION IS PROVIDED “AS IS” AND ALL EXPRESS OR IMPLIED CONDITIONS, REPRESENTATIONS AND WARRANTIES, INCLUDING ANY IMPLIED WARRANTY OF MERCHANTABILITY, FITNESS FOR A PARTICULAR PURPOSE OR NON-INFRINGEMENT, ARE DISCLAIMED, EXCEPT TO THE EXTENT THAT SUCH DISCLAIMERS ARE HELD TO BE LEGALLY INVALID.
Copyright 1999 Sun Microsystems, Inc., 901 San Antonio Road, Palo Alto, Californie 94303 Etats-Unis. Tous droits réservés.
Ce produit ou document est protégé par un copyright et distribué avec des licences qui en restreignent l’utilisation, la copie, la distribution, et la décompilation. Aucune partie de ce produit ou document ne peut être reproduite sous aucune forme, par quelque moyen que ce soit, sans l’autorisation préalable et écrite de Sun et de ses bailleurs de licence, s’il y en a. Le logiciel détenu par des tiers, et qui comprend la technologie relative aux polices de caractères, est protégé par un copyright et licencié par des fournisseurs de Sun.
Des parties de ce produit pourront être dérivées des systèmes Berkeley BSD licenciés par l’Université de Californie. UNIX est une marque déposée aux Etats-Unis et dans d’autres pays et licenciée exclusivement par X/Open Company, Ltd.
Sun, Sun Microsystems, le logo Sun, The Network Is The Computer, SunScreen, et Solaris sont des marques de fabrique ou des marques déposées, ou marques de service, de Sun Microsystems, Inc. aux Etats-Unis et dans d’autres pays. Toutes les marques SPARC sont utilisées sous licence et sont des marques de fabrique ou des marques déposées de SPARC International, Inc. aux Etats-Unis et dans d’autres pays. Les produits portant les marques SPARC sont basés sur une architecture développée par Sun Microsystems, Inc.
L’interface d’utilisation graphique OPEN LOOK et Sun™ a été développée par Sun Microsystems, Inc. pour ses utilisateurs et licenciés. Sun reconnaît les efforts de pionniers de Xerox pour la recherche et le développement du concept des interfaces d’utilisation visuelle ou graphique pour l’industrie de l’informatique. Sun détient une licence non exclusive de Xerox sur l’interface d’utilisation graphique Xerox, cette licence couvrant également les licenciés de Sun qui mettent en place l’interface d’utilisation graphique OPEN LOOK et qui en outre se conforment aux licences écrites de Sun.
CETTE PUBLICATION EST FOURNIE "EN L’ETAT" ET AUCUNE GARANTIE, EXPRESSE OU IMPLICITE, N’EST ACCORDEE, Y COMPRIS DES GARANTIES CONCERNANT LA VALEUR MARCHANDE, L’APTITUDE DE LA PUBLICATION A REPONDRE A UNE UTILISATION PARTICULIERE, OU LE FAIT QU’ELLE NE SOIT PAS CONTREFAISANTE DE PRODUIT DE TIERS. CE DENI DE GARANTIE NE S’APPLIQUERAIT PAS, DANS LA MESURE OU IL SERAIT TENU JURIDIQUEMENT NUL ET NON AVENU.
Securing Systems With Host-Based
Firewalls
Firewalls have traditionally been used to protect the perimeter of a network; that is, the connection between the company network and the Internet. As the intranets grow larger, threats appear within firewall boundaries as well. This article describes how a host-based firewall software can protect a system from both external and internal threats.
A host-based firewall adds an extra layer of security around your systems,
protecting you from hostile attacks and misconfigurations. Instead of only having a single firewall at the perimeter, referred to as choke-point firewall, you can now have them on each server. So if someone penetrates one of your systems, they won’t be able to use that as a stepping stone for further attacks, and you will also be notified of their presence.
This article focuses on the use of SunScreen™ Lite software to protect a single host, which is a Web server residing in a so called de-militarized zone (DMZ). This article only presents the command line interface procedures to install and administer the SunScreen Lite software because it is a convenient way to manage systems without a graphical display.
This article assumes the reader has a moderate understanding of how a firewall works and the basics in TCP/IP communication and Solaris™ Operating
Environment (Solaris OE) administration. This article also assumes that there is a secure way to access a login shell on the system on which we will install the SunScreen Lite 3.1 software.
The information in this article applies to the Solaris 8 OE and above together with SunScreen Lite 3.1 software.
Why Do You Need a Host-Based
Firewall?
The question you should ask yourself is not why you should install a host-based firewall, instead it is why you should not! Several products are available for free, including SunScreen Lite and IPFilter, and considering the hostility on the Internet today, there are many reasons to add a host-based firewall to your portfolio of handy security tools.
A host-based firewall can prevent accidents from happening—for example, someone might unintentionally turn on thetelnetdaemon on a system, which opens up a new potential target for an attacker. If you install a firewall and configure it to block unknown traffic to the individual system, you are protected from this kind of mistake. Unknown traffic in this case is something that you haven’t explicitly defined as allowed in your security policy.
Additionally, a host-based firewall provides protection from threats caused by misconfigurations. If you have a misconfiguredhttpserver on the system, it might allow arbitrary commands to be executed as thehttpdaemon user. Attackers might try to connect from your system to their own, to download tools for attacking the system further. If you configure a host-based firewall to prevent unknown traffic originating from your system, these attempts are intercepted.
Host-Based Firewall Advantages
There are five major points to observe when comparing host-based firewalls with choke-point firewalls:
■ Topology – Host-based firewalls are not topology-sensitive, whereas choke-point
firewalls are. However, do not assume that everything inside is friendly, and only the outside is hostile.
■ Performance – Distributed or host-based firewall solutions do not impact the
performance of the entire network the same way in which a choke-point firewall does. Some more detail on the performance impact is available on page 5.
■ Availability – If one host-based firewall node goes down, it is not a major issue;
however, if a choke-point firewall goes down, it becomes a priority. When architecting high availability solutions, bear in mind that complicated architectures weaken the system from a security perspective.
■ Verification – Firewall rules are useless if they are not verified. The difficulty in
verifying the rules is directly related to the sheer number of rules in the firewall. Distributed firewall rulesets are typically more specific, and as such, contain significantly fewer rulesets than choke-point firewalls which support many network segments and significantly more protocols and services.
■ Cost – Choke-point firewalls have their purpose, however they should only be
used where necessary, e.g. blocking denial of service (DOS) attacks at the perimeter of the company network to conserve bandwidth. Frequently, the environment can be made more secure by using host-based firewall solutions, at little or no cost, than highly available firewall complexes.
Solaris OE Security
Installing a host-based firewall is only one part of the systems overall security measures. You should harden the Solaris OE installation by using the Solaris™ Security Toolkit (Toolkit) before you install SunScreen Lite software. The Toolkit tightens the system by turning off unused network services and assuring that the file permissions are as restrictive as possible. The Toolkit also saves time if you are planning on doing similar installations in the future.
You should consider increasing the system audit by enabling the Basic Security Module (BSM). BSM helps identify users that initiate a network connection from your system. This identification would otherwise be impossible to prove. The Sun BluePrints™ OnLine article, Auditing in the Solaris™ 8 Operating Environment, describes how to set up and enable the BSM. The Solaris ST can also enable the auditing described in the above article automatically for you.
Why SunScreen Lite as a Host-Based Firewall?
After deciding to use host-based firewalls, the decision of which software to use is relatively straightforward, for which SunScreen Lite has several compelling
arguments. First of all, it is available for free as either a download from the Internet, or distributed with the Solaris 8 OE distribution media. In addition, even though its available at no cost, it is a fully supported product for customers with support contracts.
Getting SunScreen Lite 3.1 Software
SunScreen Lite 3.1 software is distributed with the Solaris 8 OE, and is also available for download from the Internet. It is only supported in the Solaris 8 OE and above.
Note – SunScreen Lite is referred to as SunScreen for the remainder of this article, unless there is a need to point out a difference between the two products. The differences between the Lite and full version are discussed later in this article.
Downloading From the Internet
To download SunScreen software, go to the URL:
http://www.sun.com/software/securenet/lite/download.html
and select either the SPARC™ or Intel version. You’ll have to supply registration information in order to get access to the download area.
Save the compressed SunScreen archive to disk and extract it:
Note – You have to extract the files so that they are readable by user nobody, because thecheckinstallscript is run as that user.
Locating the Software on the CD-ROM
If you have the Solaris 8 Software 2 of 2 CD-ROM, insert it, and if you have volume manager running, it will mount it for you. SunScreen software will then be available from the following path:
# mkdir /var/tmp/sunscreen-3.1-lite # cd /var/tmp/sunscreen-3.1-lite
# gzcat /path/to/sunscreen3.1lite.sparc.tar.gz | tar fx
Patches
There are two patches for SunScreen Lite software, one for the SPARC edition and one for the Intel edition. You should download and install the latest version for your architecture from SunSolve OnLine (http://sunsolve.sun.com/).
■ 109736 SunScreen Lite 3.1 SPARC
■ 109737 SunScreen Lite 3.1 X86
Performance Impact
Adding SunScreen software to a system affects the performance, but only slightly. The exact impact is difficult to specify without actually trying it out, because so many factors need to be taken into consideration. For example, the number of filtering rules, the number of Network Address Translation (NAT) rules, the amount of logging, and the use of encryption, etc. need to be considered.
If you compare host-based firewalls with a choke-point firewall, the performance impact is less because every system takes care of itself, instead of requiring all traffic to pass through a bottleneck.
Before the Installation
Before starting the firewall installation, you should confirm the network connectivity of the involved systems. Should communication problems surface after firewall configuration, the issues can quickly be isolated to configuration errors rather than network problems.
To be able to verify that the SunScreen module gets loaded properly, look at the network modules on the interface, before SunScreen software is installed:
Starting the Installation
The entire SunScreen Lite installation manual is available online at: http://docs.sun.com:80/ab2/coll.557.2/SSCRNLITEINST/
It can be used for reference, if you encounter problems.
# ifconfig hme0 modlist 0 arp
1 ip 2 hme
Start the installation with default answers to all questions:
In addition to installing the software, the previous command does basic configuration of the SunScreen software as well.
Now you need to reboot the system, because the SunScreen kernel modules have to be loaded between the network interface driver and the IP stack:
When the system has rebooted and you are logged in again, you have to set the PATH and MANPATH to include the SunScreen directory. This should be done in your shell initialization file (.profileif you use Bourne Shell which is used in this article):
# ./install -nodisplay
Installing SunScreen 3.1 Lite Version Log file: /var/sadm/install/logs/
SunScreen_3.1_Lite_Version_install.B04020804 installed pkg: SUNWbdc installed pkg: SUNWkeymg installed pkg: SUNWkusup installed pkg: SUNWrc2 installed pkg: SUNWrc4 installed pkg: SUNWdes installed pkg: SUNWdesx installed pkg: SUNWsman installed pkg: SUNWbdcx installed pkg: SUNWrc4x installed pkg: SUNWhttp installed pkg: SUNWicgSS installed pkg: SUNWicgSA installed pkg: SUNWicgSA installed pkg: SUNWicgSM Install complete.
Uninstaller is at: /var/sadm/prod/com.sun.Screen/425688652/ uninstall_SunScreen_3_1.class # init 6 # PATH=/opt/SUNWicg/SunScreen/bin:$PATH # export PATH # MANPATH=/opt/SUNWicg/SunScreen/man:$MANPATH # export MANPATH
After adding the new paths, you should make sure that SunScreen module is loaded by looking at the module listing of the interface:
Now that you have successfully installed SunScreen software and have confirmed that it is loaded using the previous steps, you now proceed to configure it.
Configuration
The proceeding configuration is based on a simple scenario, which is present in nearly every corporate architecture. However, this is not the preferred configuration; instead, an n-tier architecture should be used. This article will be followed by a forthcoming Sun BluePrints OnLine article, Host-based Firewalls in N-Tier
Environments, which describes how to migrate from the architecture depicted here to
a recommended n-tier architecture.
In this article, SunScreen software is configured as a host-based firewall to allow communication between it and two other nodes, each serving a unique purpose. The nodes are a Web server, a SQL server, and an administration system. In the following configuration example, the firewall is installed on the system callednsgweb.
We will create a configuration that allows everyone to access the Web server with
httpandhttps; allows hosts on the intranet toftpfiles to the Web server; allows the Web server itself to access an SQL database and make DNS queries; and also allows an internal host to access the Web server for administration throughssh.
Note that a host-based firewall should be installed on every system listed here: the Web server, the SQL server, and the remote administration system.
When we define our security policy, we will have a number of terms which need some further explanation. The common objects are the smallest building blocks you use when you manage your SunScreen software. They are used by (common to) all existing policies and are things such as hosts, services, and interfaces. A security
policy is a set of rules, based on the common objects, consisting of packet filtering
rules, administrative access rules, network address translation rules, and virtual private network rules.
# ifconfig hme0 modlist 0 arp
1 ip 2 efs 3 hme
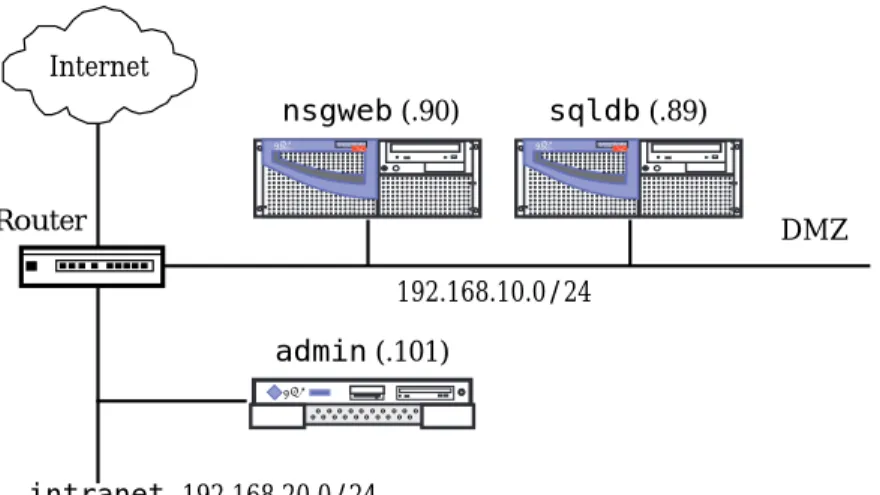
TABLE 1lists the network objects connected to the Web server.
FIGURE 1illustrates the network diagram for the servers and administration system.
FIGURE 1 Diagram of Network Objects
The Command Line Interface
Now we are ready to start editing the security policy. The installation process creates a security policy namedInitial, which we modify to fit our needs with the SunScreen administration utility (ssadm):
TABLE 1 Network Objects
Name IP Address Description
nsgweb 192.168.10.90 The Web server we are protecting admin 192.168.20.101 The administration host
sqldb 192.168.10.89 The SQL database server
# ssadm edit Initial
Loaded common objects from Registry version 1 Loaded policy from Initial version 1
edit> admin (.101) Router Sun 192.168.10.0/24 intranet 192.168.20.0/24 Sun microsystems ENTERPRISE 420R nsgweb (.90) sqldb (.89) Sunmicrosystems ENTERPRISE 420R Internet DMZ
Brief online help is available, which lists the following available commands:
Adding Network Objects
First, we create the five network objects: the Web server, the SQL database server, the internal administration host, the DMZ network, and the intranet, with the following commands:
Adding Service Objects
SunScreen software comes with most services predefined, but we need to addssh
andhttpsas services:
edit> help help | HELP
list | list_name <TYPE>
search <TYPE> <SUBTYPE> <SUBSTRING> add <TYPE> ...
delete <TYPE> ... insert <TYPE> # ... replace <TYPE> # ... move <TYPE> # # refer <TYPE> name referlist <TYPE> name rename <TYPE> name name
renamereference <TYPE> name name load <policy> lock_status save saveas reload verify quit | QUIT
edit> add ADDRESS nsgweb HOST 192.168.10.90 COMMENT "http Server" edit> add ADDRESS sqldb HOST 192.168.10.89 COMMENT "SQL Server"
edit> add ADDRESS admin HOST 192.168.20.101 COMMENT "Administration Server" edit> add ADDRESS dmz RANGE 192.168.10.0 192.168.10.255 COMMENT "DMZ network" edit> add ADDRESS intranet RANGE 192.168.20.0 192.168.20.255 COMMENT "intranet"
edit> add SERVICE ssh SINGLE FORWARD "tcp" PORT 22 edit> add SERVICE https SINGLE FORWARD "tcp" PORT 443
Then we create a group containingwww(which is the preconfigured name forhttp) andhttpsnamedweb, so that we can easily allow access to both ports in the policy:
Adding Rules to the Policy
First, we look at the rules that the installation script created for us:
This is a very liberal rule, but since we are adding extra security, we are not depending on the SunScreen software to protect the system initially. If you need tighter security from the beginning, you can use the command,ssadm configure, after the installation, and choose a more restrictive initial policy.
Start by removing the promiscuous rule:
The order of the rules are very important for both functionality and performance; we look at the order in the Rule Ordering section.
Note –Do not activate an empty policy. There is an invisible rule at the end, which drops everything, and completely disconnects you from the network.
The syntax of filtering rules is very simple, it has four mandatory fields and some optional. The first field is the service that we want to examine, this is usually the same name as in/etc/services, for example,telnet,ftp,time. The second field is the source address of the packet, which can be a host, a network, or a group of the two. The third field is the destination address, and since this is a host-based firewall, all inbound packets are always for the host we are running the SunScreen software on. The last mandatory field is the action to take if service, source address, and destination address matches the packet. You can either ALLOW or DENY the packet.
edit> add SERVICE web GROUP www https
edit> list rules
1 "common" "*" "*" ALLOW
Then you can add some optional fields, where LOG and LOG SUMMARY are the most frequent. This saves an entry in the log for that packet. SeeTABLE 2for details of the different types of log entries. Another optional field you can use is
COMMENT, which must be followed by a quoted string. The COMMENT field allows you to describe the intent of the rule as a reference for you or others.
Now we can start adding our own rules. Add the following rule to allowhttpand
httpsrequests from any system to our Web server:
Add the following rule to allow the Web server to make SQL queries to the database server:
For performance reasons, you should not use DNS logging in the Web server, and you cannot trust the DNS lookups to be correct. It is, however, handy to be able to make DNS lookups, so add the following rule to allow the Web server to make DNS queries:
Add the following rule to allow remote login to the Web server from theadmin
system:
Note –Remember that it is very easy to saw off the branch you are sitting on when you are remotely logged into a firewall. If you forget to add the previoussshrule, you will be cut off from the system when you activate the policy.
Add the following rule to allowftpto the Web server from the intranet, so people may upload new Web pages:
edit> add rule web * nsgweb ALLOW COMMENT "Allow http and https"
edit> add rule sqlnet nsgweb sqldb ALLOW COMMENT "Allow SQL"
edit> add rule dns nsgweb * ALLOW COMMENT "Allow DNS lookups"
edit> add rule ssh admin nsgweb ALLOW LOG SUMMARY COMMENT "Allow ssh"
Then add a rule that stops all other access to the Web server and creates a log detailed entry each time someone attempts unauthorized access to the Web server:
Note – If you are using this article to secure your home system, you should probably skip the following rule because it will stop all packets originating from the system, except DNS and SQL, which are allowed by an earlier rule.
Add a rule that stops all outbound traffic from the Web server and creates a log entry each time:
The list of rules now looks as follows:
Activating the Rules
Every time you enter thesavecommand, any changes to the rules gets saved to disk, and the policy version number gets incremented. If any of the common objects have been modified, the Registry version will also be incremented, as shown below:
The older versions of the policy and Registry are kept, but you can delete them when they are no longer needed. This revision process is very handy when you install a new policy and services stop working. You can always easily revert to the last policy by referring to that policy with the.versionextension.
edit> add rule * * nsgweb DENY LOG DETAIL COMMENT "Log access to this system"
edit> add rule * nsgweb * DENY LOG SUMMARY COMMENT "Log outgoing traffic"
edit> list rules
1 "web" "*" "nsgweb" ALLOW COMMENT "Allow http and https" 2 "sqlnet" "nsgweb" "oradb" ALLOW COMMENT "Allow SQL" 3 "dns" "nsgweb" "*" ALLOW COMMENT "Allow DNS lookups"
4 "ssh" "admin" "nsgweb" ALLOW LOG SUMMARY COMMENT "Allow ssh"
5 "ftp" "intranet" "nsgweb" ALLOW COMMENT "allow ftp from the intranet" 6 "*" "*" "nsgweb" DENY LOG DETAIL COMMENT "Log access to the screen" 7 "*" "nsgweb" "*" DENY LOG SUMMARY COMMENT "Log outgoing traffic"
edit> save
Saved common objects to Registry version 2 Saved policy to Initial version 2
When we are content with the rules it is time to put them to work, but first we want to verify that the rules do not contain errors:
If the verification succeeds, you can exit the program and activate the new policy:
When you have installed the new policy and check the log for blocked packets, you might decide that the new policyInitial.2is too restrictive; you can then activate the previous by giving the following command:
Note – If you accidentally alter or impair the current policy, you can issue the
reloadcommand which loads the last saved policy from disk and discards the changes you made.
The following is an example of output of thereloadcommand:
The Log
Some say that “ignorance is bliss,” but in computer security this is not true. Just installing a firewall without bothering to check the logs, gives you a false sense of security.
edit> verify
Configuration verified successfully (not activated).
edit> quit
# ssadm activate Initial
Configuration activated successfully on nsgweb.
# ssadm activate Initial.1
Configuration activated successfully on nsgweb.
edit> reload
Loaded common objects from Registry version 2 Loaded policy from Initial version 2
You need to make a decision on how much to log. If you choose too much, chances are that you will never have time to scan the logs for intrusion attempts. If you choose too little, you will never know if you are under attack.
Determining the appropriate amount of logging is an iterative task. Design a new policy, install it, and try it out by testing the different rules yourself. Check the log, decide if the policy needs to be updated, and start over.
The Different Types of Logging
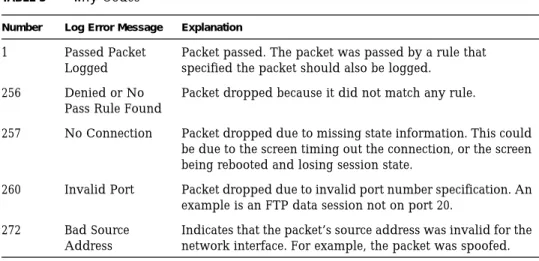
You have four options when you want to log something.TABLE 2lists these four options.
Viewing the Log
When it is time to look at the contents of the log, you use thessadm log get
command that dumps the current log in binary format to standard out, which you should redirect to a file. Then you usessadm logdump -i filenamecommand, which reads the binary log from the file, and prints it in human readable form.
logdumphas several options, but we will just look at a few.
TABLE 2 Log Options
Log Type Description
LOG_NONE This occurs if the log field is left empty. LOG_SUMMARY Logs the first 40 bytes of the packet. LOG_DETAIL Logs the entire packet.
LOG_SESSION Logs information about the session; that is, source and destination addresses and ports (if applicable), the amount of data being sent in each direction, and the length of the session.
To display the current log, run the following:
To only view the dropped packets, run the following:
# ssadm log get > /tmp/sunscreen.log # ssadm logdump -i /tmp/sunscreen.log
1 XLOG 0.00000 ? -> ? activate, LVL: app, SEV: note, ? ("activated nsgweb default Initial.1")
2 XLOG 4198.57211 ? -> ? edit, LVL: app, SEV: note, ? ("saved nsgweb default Registry.2")
3 XLOG 4198.59286 ? -> ? edit, LVL: app, SEV: note, ? ("saved nsgweb default Initial.2")
4 XLOG 4222.36387 ? -> ? activate, LVL: app, SEV: note, ? ("activated nsgweb default Initial.2")
5 hme0 (257: no connection)4246.79202 192.168.20.13 -> nsgweb TELNET C port=55479
6 hme0 (256: deny rule or no pass rule)4256.58767 192.168.10.86 -> 192.168.10.255 UDP D=138 S=138 LEN=215
7 hme0 (256: deny rule or no pass rule)114.66783 bd -> 224.0.0.1 IP D=224.0.0.1 S=192.168.10.240 LEN=28, ID=2612
8 hme0 (256: deny rule or no pass rule)4311.99695
192.168.10.49 -> 192.168.10.255 NTP broadcast (Mon May 21 15:56:57 2001)
9 hme0 (256: deny rule or no pass rule)4338.79535
192.168.10.49 -> 192.168.10.255 NTP broadcast (Mon May 21 15:57:24 2001)
10 hme0 (256: deny rule or no pass rule)4371.59457 192.168.10.86 -> 192.168.10.255 UDP D=138 S=138 LEN=209
11 hme0 (256: deny rule or no pass rule)4372.88698
192.168.10.49 -> 192.168.10.255 NTP broadcast (Mon May 21 15:57:58 2001)
# ssadm logdump -i /tmp/sunscreen.log logwhy 256
1 hme0 (256: deny rule or no pass rule)4256.58767 192.168.10.86 -> 192.168.10.255 UDP D=138 S=138 LEN=215
2 hme0 (256: deny rule or no pass rule)114.66783 bd -> 224.0.0.1 IP D=224.0.0.1 S=192.168.10.240 LEN=28, ID=2612
3 hme0 (256: deny rule or no pass rule)4311.99695 192.168.10.49 -> 192.168.10.255 NTP broadcast (Mon May 21 15:56:57 2001)
4 hme0 (256: deny rule or no pass rule)4338.79535 192.168.10.49 -> 192.168.10.255 NTP broadcast (Mon May 21 15:57:24 2001)
5 hme0 (256: deny rule or no pass rule)4371.59457 192.168.10.86 -> 192.168.10.255 UDP D=138 S=138 LEN=209
6 hme0 (256: deny rule or no pass rule)4372.88698 192.168.10.49 -> 192.168.10.255 NTP broadcast (Mon May 21 15:57:58 2001)
Thelogwhyoption allows you to do a filter on the description of the packet that is in the log.TABLE 3lists the most commonwhycodes:
Cleaning Up the Log
If you have a Microsoft Windows system on the same subnet, you will see a lot of netbios broadcast packets in the log:
To prevent netbios from cluttering up the log, you can add a rule that hides those packets from you:
You must insert this rule before the general rule that stops packets destined for the system you are protecting. In our policy, it would be before the rule,"Log access to the screen". In the section, Adding a Finishing Touch, we add a more generic rule to get rid of unwanted packets such as netbios.
TABLE 3 whyCodes
Number Log Error Message Explanation 1 Passed Packet
Logged
Packet passed. The packet was passed by a rule that specified the packet should also be logged.
256 Denied or No Pass Rule Found
Packet dropped because it did not match any rule.
257 No Connection Packet dropped due to missing state information. This could be due to the screen timing out the connection, or the screen being rebooted and losing session state.
260 Invalid Port Packet dropped due to invalid port number specification. An example is an FTP data session not on port 20.
272 Bad Source Address
Indicates that the packet’s source address was invalid for the network interface. For example, the packet was spoofed.
6 hme0 (256: deny rule or no pass rule)4256.58767 192.168.10.86 -> 192.168.10.255 UDP D=138 S=138 LEN=215
10 hme0 (256: deny rule or no pass rule)4371.59457 192.168.10.86 -> 192.168.10.255 UDP D=138 S=138 LEN=209
edit> add ADDRESS dmz-bc HOST 192.168.10.255 COMMENT "DMZ broadcast
address"
edit> insert rule 6 netbios * dmz-bc DENY COMMENT "Silently drop
As you saw in the log, there is a time host on the network, serving the DMZ with NTP. Add a rule for this too, because it is important to have the clocks in sync when you need to analyze and correlate logs from different systems:
The rules now look as follows:
How Much Disk is Needed for the Logs
For LOG_SUMMARY, each log entry is 112 bytes. If you log 10 packets/second for 6 months this would take roughly 290 MB of diskspace, so you must make sure that you have enough space in the/varfilesystem to accommodate the logs. The logs are stored in the directory/var/opt/SUNWicg/log.
If the filesystem that the logs are saved to becomes full, the logging will stop, but the SunScreen software will still filter the packets.
The default setting for the log files chops them in 100 MB pieces. Depending on the amount of traffic you log, it can take from a couple of hours to several months until it starts a new log.
You should transfer the logs to another system at a regular basis. If you add the following line to root’scrontab, it will generate a new log every monday morning:
Then you can setup your administration system to collect the file once a week, and save it in a local repository. Note that this should be done in a secure manner, by usingssh, SKIP, or IPsec.
edit> add ADDRESS timehost HOST 192.168.10.49
edit> insert rule 6 ntp timehost dmz-bc ALLOW COMMENT "Allow NTP broadcasts"
edit> list rules
1 "web" "*" "nsgweb" ALLOW COMMENT "Allow http and https" 2 "sqlnet" "nsgweb" "oradb" ALLOW COMMENT "Allow SQL" 3 "dns" "nsgweb" "*" ALLOW COMMENT "Allow DNS lookups"
4 "ssh" "admin" "nsgweb" ALLOW LOG SUMMARY COMMENT "Allow ssh"
5 "ftp" "intranet" "nsgweb" ALLOW COMMENT "allow ftp from the intranet" 6 "ntp" "timehost" "dmz-bc" ALLOW COMMENT "Allow NTP broadcasts" 7 "netbios" "*" "dmz-bc" DENY COMMENT "Silently drop netbios"
8 "*" "*" "nsgweb" DENY LOG DETAIL COMMENT "Log access to the screen" 9 "*" "nsgweb" "*" DENY LOG SUMMARY COMMENT "Log outgoing traffic"
Rule Ordering
When you add your rules to the policy, there are several things to keep in mind. You can accidently hide a rule; that is, you put a more general rule before a specific rule. The following example illustrates this:
In this example, rule number 2 is never going to match any packets, because the packets that match rule number 2 will match rule number 1 first.
You should put the rules that match the most used services on top. When a packet arrives to the SunScreen firewall, it is matched against the rules, starting at rule number 1, continuing with the next and so on. As soon as a match occurs, the rule either allows or denies the packet, depending on what is stated in the rule, and then picks the next packet to be inspected. So if you have a Web server, you should put the rule that allows thehttptraffic on top, to minimize the performance impact.
Adding a Finishing Touch
Before we leave the Web server to fend for itself, we need to make additional modifications to the policy. To prevent the log from growing too large, we add a rule that drops some of the denied packets we saw in the log, without adding them to the log. For convenience sake, we create a group, so we can add more services that should be silently denied, without having to add new rules:
We also need to add a tripwire rule, which notifies us that someone is tampering with the system. We know that there should be notelnettraffic coming from any system in the DMZ to the host, because you usesshfor remote access and also
edit> list rules
1 "ssh" "*" "nsgweb" DENY LOG SUMMARY COMMENT "Stop ssh"
2 "ssh" "admin" "nsgweb" ALLOW LOG SUMMARY COMMENT "Allow ssh from admin"
edit> add service not-logged GROUP netbios
should never login from one system to another in the DMZ. So, we add a special rule to catchtelnettraffic, which also sends an SNMP trap to our administration system:
This way we get a notification that there is something very strange going on in the DMZ which needs further investigation. This can be done for more services, but that is left as an exercise for the reader. Finally save, verify, and activate the new policy.
How to Disable SunScreen Software
It may be necessary to entirely disable the SunScreen software to diagnose network problems that could have been caused by installation of the firewall. One common mistake is to forget to add a rule that allows RIP (if you are using it).
For example, suppose you activate your new policy, everything works as it should, so you head for a cup of coffee. When you return, there are several people standing outside of your room, with grim expressions on their faces.
RIP depends on constant updates of the routing table, which are broadcasted out on the network by the routers every 30 seconds. Due to not adding an ALLOW rule for RIP to the policy, when you activated the rules, the systems were cut off from the RIP updates. So, after 90 seconds, the entries in the systems routing tables were removed, leaving the systems without routes.
edit> delete screen nsgweb
edit> add screen nsgweb CDP SNMP 192.168.20.101
edit> insert rule 7 telnet dmz nsgweb DENY LOG DETAIL SNMP COMMENT “tripwire
rule for telnet“
edit> list rules
1 "web" "*" "nsgweb" ALLOW COMMENT "Allow http and https" 2 "sqlnet" "nsgweb" "oradb" ALLOW COMMENT "Allow SQL" 3 "dns" "nsgweb" "*" ALLOW COMMENT "Allow DNS lookups"
4 "ssh" "admin" "nsgweb" ALLOW LOG SUMMARY COMMENT "Allow ssh"
5 "ftp" "intranet" "nsgweb" ALLOW COMMENT "allow ftp from the intranet" 6 "ntp" "timehost" "dmz-bc" ALLOW COMMENT "Allow NTP broadcasts"
7 "telnet" "dmz" "nsgweb" DENY LOG DETAIL SMTP COMMENT "tripwire rule for telnet" 8 "not-logged" "*" "*" DENY COMMENT "Deny without logging"
9 "*" "*" "nsgweb" DENY LOG DETAIL COMMENT "Log access to the screen" 10 "*" "nsgweb" "*" DENY LOG SUMMARY COMMENT "Log outgoing traffic"
When situations like this occur, it is very handy to stop the SunScreen software from interacting with the packets and hand over all control to the Solaris OE. To stop SunScreen software, enter the following:
When you disable the SunScreen software, the system passes the packets untouched, from the network interface up to the IP stack, which is exactly how the system was performing before the SunScreen software was installed.
If the network starts working again after deactivating the SunScreen software, you might want to look for a misconfiguration or a missing rule. Examine the traffic that was getting dropped by SunScreen software with thesnoopcommand, and add an ALLOW rule if appropriate.
To put SunScreen software back to work, just rename the.not-activefile to
.activeand reboot. Then the system is back to normal again.
Uninstalling SunScreen Software
If you need to remove the SunScreen software completely, you first run the uninstall program:
If you want to remove the configuration files and the logs, remove the directories they are stored in:
What’s Next?
There are a number of enhancements that can be made to this policy. One thing could be to log thesshaccesses to the system, to increase the auditing.
# mv /etc/opt/SUNWicg/SunScreen/.active /etc/opt/SUNWicg/SunScreen/.not-active # init 6
# cd /var/sadm/prod
# java uninstall_SunScreen_3_1 -nodisplay
The forthcoming Sun BluePrints OnLine article, Host-based Firewalls in N-Tier
Environments, will show you how to configure a Centralized Management Group to
manage a group of SunScreen hosts. If you have a large number of firewalled hosts and try to configure them individually, the situation quickly becomes
unmanageable. You can setup all of the systems to be managed from a central point, where you can create a policy that is distributed to all SunScreen firewalls. This system can also act as a central repository for log files.
Verification
The validation and verification of a host-based firewall is much easier than of a choke-point firewall, which can easily contain hundreds of filtering rules. This amount of filtering rules makes it difficult to get a good overview. Additionally, you must be very careful when you change the policy for a choke-point firewall, because you affect all systems protected by it, whereas changing the ruleset of a host-based firewall, only affects the host itself.
There is no way, short of testing it yourself, to know that you have constructed a policy that gives you the protection you want for a system. To perform testing, you can use some of the publicly available tools, such asnmap
(http://www.insecure.org/nmap/). This software allows you to scan the available ports on a system, and gives you a list of the ports thatnmapwas able to connect to. You can then compare this list of ports with the policy and decide if it makes sense.
This step should not be overlooked, because you can be sure that someone else will runnmapto scan your system, and find out what you have forgotten to protect.
Some Last Thoughts
A firewall is not “the silver bullet of security;” there is no such thing at all. Neither is it a substitute for proper systems administration, such as patching the Solaris OE and the applications. You still need to run a toolkit like the Toolkit to harden and fix the Solaris OE configuration, before you put the system in a hostile environment.
What SunScreen software provides you, is a tool to limit the exposure of the systems
soft spots and protect you from incidents caused by accidently starting a new
network service on the system. SunScreen software also provides you with excellent network auditing capabilities that you would not have otherwise.
Security for a system should be applied in layers. The outmost layer could be a company-wide firewall or a router with access control lists (ACLs), then you would have a host-based firewall protecting each system. If you are feeling paranoid, you can also addtcp_wrappers(ftp://ftp.porcupine.org/pub/security/) to provide more protection and logging capabilities, and finally you have a hardened network
security system. This protects you from a security single point of failure; if you forget to add a rule in the firewall to prevent access to thetelnetport, chances are that you remembered to protect it in the router or in thetcp_wrappers.
What is the Difference Between the Full
and Lite SunScreen Versions?
The most important differences between SunScreen Lite and the full version are that the Lite version is limited to two network interfaces (extra interfaces are ignored); cannot operate in stealth mode; cannot support more than 10 unregistered IP addresses that can be translated to a registered address using Network Address Translation; and does not operate in high availability configurations.
A full list of differences is available in the SunScreen Lite installation documentation.
Conclusion
The castle and moat model, where you only have a strong perimeter defence, can no longer be used as the company intranet grows larger. When you have both partners, contractors, and temporary employees with full access to the network, the need for additional tools to control system access arises.
In this article we discussed how to make use of the SunScreen software to protect a single host from both internal and external threats, restricting the services offered by a system to that of its function. We also tightened the protected system’s access to network services offered by other systems, to only those needed for daily operations.
Further we showed how to inspect the traffic blocked by the SunScreen, and how to reduce the amount of logging to increase the readability of the log.
Finally we placed a tripwire on the system to catch suspicious activities and notify you thereof.
Bibliography
Noordergraaf, Alex and Brunette, Glenn, The Solaris™ Security Toolkit -- Quick Start:
Updated for Toolkit version 0.3, Sun BluePrints OnLine, June 2001.
http://www.sun.com/blueprints/0601/jass_quick_start-v03.pdf
Noordergraaf, Alex and Brunette, Glenn, The Solaris™ Security Toolkit -- Release Notes:
Updated for Toolkit version 0.3, Sun BluePrints OnLine, June 2001.
http://www.sun.com/blueprints/0601/jass_release_notes-v03.pdf
Noordergraaf, Alex and Brunette, Glenn, The Solaris™ Security Toolkit -- Installation,
Configuration, and Usage Guide: Updated for Toolkit version 0.3, Sun BluePrints OnLine,
June 2001.
http://www.sun.com/blueprints/0601/jass_conf_install-v03.pdf
Noordergraaf, Alex and Brunette, Glenn, The Solaris™ Security Toolkit -- Internals:
Updated for Toolkit version 0.3, Sun BluePrints OnLine, June 2001.
http://www.sun.com/blueprints/0601/jass_internals-v03.pdf
Noordergraaf, Alex, Building Secure N-Tier Environments, Sun BluePrints OnLine, October 2000.
http://www.sun.com/blueprints/1000/ntier-security.pdf
Noordergraaf, Alex and Osser, William, Auditing in the Solaris™ 8 Operating
Environment, Sun BluePrints OnLine, February 2001.
http://www.sun.com/blueprints/0201/audit_config.pdf
Bellovin, Steven M., Distributed Firewalls, ;login;, pp. 39-47, November 1999. http://www.research.att.com/~smb/papers/distfw.pdf
Acknowledgements
I would like to thank the following people for reviewing this article in its various stages: Leif Dellmar, Stephen Gillis, Kjell Högstrom, Alex Noordergraaf, Mattias Nordin, and Danny Smith.
I would especially like to thank Valerie Bubb and Mark Fenwick, for the technical review of the article and their many suggestions on how to improve it.
Author’s Bio: Martin Englund
Martin Englund has over 9 years of experience in the area of Computer and Network Security. He is currently working in the SunIT Network Security Group as a Network Security Engineer, where he designs the next generation of Sun’s internal vulnerability scanner and security policy compliance tool. Prior to joining NSG Martin worked five years at Sun Enterprise Services as a senior support engineer for Solaris OE and security products.