Operations Manual USB-IF
Over-Current Test Fixture
USB Over-Current
Test Fixture
January 14, 2013 Revision 1.0
PACKAGE CONTENTS
The USB-IF Over-Current Test Fixture should come with the following: • Qty. 1 - Over-Current Test Fixture
Please examine package contents upon receiving your fixture kit for these items.
Required Test Equipment • Ammeter
• Voltmeter
• Load fixtures used for USB voltage drop testing • Host or Hub to be tested
2 Over-current Test Background and Objective
This section provides a brief background on the objective of over-current testing.
Enhancements to the USB specifications allow USB peripherals to consume currents in excess of the original USB 1.0 Specification. The Battery Charging specification allows peripherals with a battery to consume up to 1.5A when attached to a Charging Downstream Port. The USB 3.0 Specification allows SuperSpeed devices to consume up to 900mA. The Power Delivery Specification allows significantly higher current to be consumed. In addition, some vendors have implemented proprietary methods that enable their USB products to exceed current limits when attached to vendor specific downstream ports. Due to the increased risk of ill behaved peripherals consuming high currents when not permitted, the USB-IF is offering an Over-current Test Fixture to verify that over-current mechanisms of hosts and hubs are handled properly and are reported correctly to host software.
Host and self powered hubs are required to implement over-current protection circuitry. Bus powered hubs have the option of implementing over-current protection. The purpose of over-current protection circuitry is to ensure a safe distribution and consumption of power on either a per port basis or as an aggregate of ports. A detailed explanation of over-current can be found in the USB 2.0 Specification. It is not required for host and hubs to trigger an over-current condition when devices surpass maximum current consumption limitations defined in the USB specifications. The over-current circuitry is to report any situation in which a host or hub cannot safely source the current pulled by a device or group of devices. An over-current condition must not be triggered on any port sourcing less than the minimum required current defined for that port. Above the minimum current limitations, the over-current trigger level is vendor specific. The USB-IF encourages all vendors to set the over-current limitation with
purposes of safety in mind. If a downstream port can safely source the current, it should do so even if the current exceeds USB specification limits.
At the time of this writing, compliance testing of over-current triggering is informational only.
When using the over-current fixture, it is not mandatory that over-current be triggered. Some downstream ports may be able to safely source current in excess of 1.8A, which is the maximum current that the fixture will consume at 5V. However, if over-current is triggered, the over-current event must be reported to the host system software and appropriate power shutdown on the affected port must occur. No damage can occur and no product repairs must be required in order to restore power to the downstream port.
Power to the affected downstream port will be removed on an over-current event. The host operating system will report an over-current event to the user. If one response occurs without the other, there is a problem with the over-current detection or reporting mechanisms in the product.
Hosts have the responsibility of recovering ports from over-current conditions as outlined in section 11.12.5 of the USB 2.0 Specification. Re-enumeration of all affected ports must be observed when testing.
HARDWARE
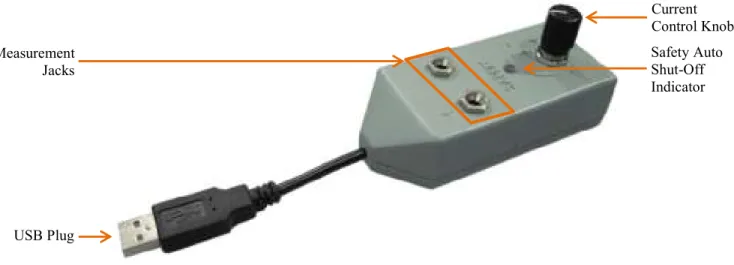
The USB-IF Over-Current Test Fixture is designed to produce an adjustable load on a single USB port capable of being measured using an Ammeter. This load can be used to determine over-current fault trigger levels on a USB hub or host. The test fixture contains the following interfaces as shown in Figure 1:
• Measurement Jack (Banana-Type) for measuring current • USB Plug captive cable
• Safety Auto Shut-Off Indicator to prevent overheating
The fixture is capable of drawing from a range of about 300mA to 1.8A from a 5V source. Because the heat dissipated when drawing such a large load is relatively high the fixture will automatically turn off after 30 seconds; in this situation the Safety Auto Shut-Off Indicator light will glow. To reset the fixture simply detach from the USB port and reattach.
Figure 1: USB Over-Current Test Fixture Measurement Jacks Safety Auto Shut-Off Indicator Current Control Knob USB Plug
4 OPERATION
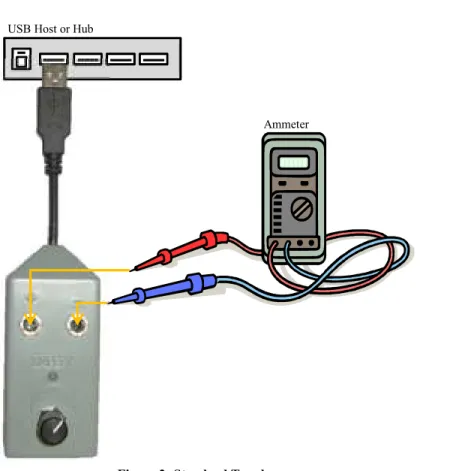
Select a downstream port to test. Load adjacent downstream ports with the voltage drop fixtures. The cumulative load should not exceed 5A. Attach the Over-current test fixture to the downstream port to test. Figure 2 provides a standard topology for testing an over-current condition. Turning the Current Control Knob clockwise will increase current draw and counter-clockwise will decrease current draw. If the Safety Auto Shut-Off Indicator illuminates during use simply detach and reattach the fixture to start drawing current again.
Figure 2: Standard Topology
Note: Be sure the digital Ammeter probes are placed in the current measurement jacks and that the Ammeter is set to measure current.
USB Host or Hub