LLL
7HVW\RXUNQRZOHGJHRIWKH1HWZRUN0RQLWRUDQG$&'/LQN
0DQDJHPHQW&RQVROH
8VLQJ0DQDJHPHQW&RQVROH
8SORDGLQJUDZGDWDIURPWKHORFDOKDUGGULYH (GLWLQJUHJLVWU\VHWWLQJV 6HWWLQJDODUPV %DFNLQJXSDQGUHVWRULQJWKH<RXU6LWH'DWDEDVH %DFNLQJXSDQGUHVWRULQJWKH&&0'DWDEDVH7HVW\RXUNQRZOHGJHRI0DQDJHPHQW&RQVROH
$QVZHUVWR&&07XWRULDOTXHVWLRQV
:HOFRPH
The Mitel Networks™ 6100 CCS (Contact Center Solutions) suite is designed for the 2000, SX-200, and SX-200 with Real Time (SX-200 EL/ML LIGHTWARE 17 Release 4.0 and greater) telephone systems. The 6100 CCS suite provides data collection, analysis and storage, forecasting, real-time monitoring, online messaging, historical reporting, data mining, and wall sign messaging. The suite consists of 6110 Contact Center Management, 6115 Contact Center Management (InterActive), 6120 Contact Center Scheduling, and 6150 Mulitmedia Contact Center. 6110 CCM is the base application and the other applications are add-on applications.
The Mitel Networks 6110 Contact Center Management User Tutorial provides a brief description of the 6110 CCM architecture, a review of basic call center concepts, information on how to assign user security permissions, and tips on how to navigate 6110 CCM. It provides essential information on how to use the 6100 CCS applications, and provides practical exercises and questions designed to test your understanding of each application.
&&0DUFKLWHFWXUH
prairieFyre uses the Microsoft BackOffice Server family of products—notably Windows 2000 Server, SQL Server, and Internet Information Server—to provide 6110 CCM, an Internet/intranet application that provides access to data on a Web browser. With 6110 CCM, you can manage your call center from anywhere, at any time.
6110 CCM has all the benefits of the Microsoft Distributed interNet Applications architecture (DNA). Using this architecture, 6110 CCM passes information from a client through an Internet/intranet, to a server running Windows NT Server through a SQL Server database, and back again.
Microsoft products support 6110 CCM in the following ways. 6110 CCM uses Microsoft Internet Information Server (IIS) to provide data to clients over the Internet. IIS is a Web-based server that displays call center information in a Web browser. Using IIS, you can monitor and program your call center on site, or from a remote location. 6110 CCM uses a Windows 2000 or NT Server operating and security system for the computer running as the 6110 CCM Enterprise Server, and SQL Server as the database engine. It uses Excel 97 or 2000 to present historical and forecast tables and charts.
&RQQHFWLYLW\WRWKH&&0(QWHUSULVH6HUYHU
Typically, the telephone system is co-located with the 6110 CCM Enterprise Server as illustrated in Figure 1-1. On the 6110 CCM Enterprise Server, prairieFyre configures Comport 2 to accept the ACD data stream, and Comport 1 to accept the SMDR data stream. All components are connected over an RS-232 serial cable or a Transmission Control Protocol-Internet Protocol (TCP-IP) socket.
Typically, the ACD stream is delivered from the telephone system DNIC circuit over a 2100 or 1100 Dataset to Comport 2.
The SMDR stream is delivered in one of two ways:
• From the telephone system LPR1 port to Comport 1
• From the telephone system DNIC circuit over a 2100 or 1100 Dataset to Comport 1
The SMDR stream provides call record data and the ACD stream provides agent event and calls waiting information. The SMDR stream provides the data feed for over eighty percent of the historical reports you produce. You use the ACD stream strictly for agent shift reporting.
)LJXUH&&0VHWXS
The prairieFyre Service continuously updates the SuperAdvisor, AgentAdvisor, and WallBoarder real-time displays with telephone system data. It simultaneously forwards real-time data to the Structured Query Language (SQL) database and to connected clients over TCP-IP.
The SQL database stores the wall sign and YourSite Database programming data in addition to all of the report records. The local hard drive stores vital, raw telephone system files. Alarms you set in the Management Console application inform you when the disk space on either drive is low.
&DOOFHQWHUFRQFHSWV
Call centers process a high volume of calls to meet marketing, sales, customer service, technical support, and other business objectives. A finely-tuned call center distributes calls efficiently and optimizes the use of agents and other resources. This section describes the inbound call center environment and how resources interact to process calls.
$&'FDOOIORZ
An Automatic Call Distributor (ACD) is a specialized telephone system application for distributing incoming calls. The primary goal of an ACD is to ration calls to agents in a cost-effective manner that provides acceptable service to callers.
To optimize the use of agents, you cross-train them so they can handle a variety of inquiries. Rather than distributing calls to a number of small, specialized agent or extension groups, the ACD distributes them efficiently among the entire pool of available agents. When you consolidate resources, the same number of call center agents handle more calls while maintaining service levels.
You can program the ACD to ensure the first call to arrive reaches the first available agent or you can vary the order of calls and agents to provide superior service to preferred customers, and skills-based routing.
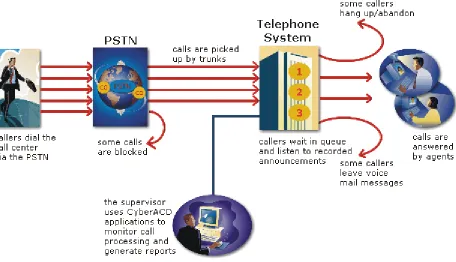
Figure 1-2 illustrates how call center resources interact to process calls.
The path of an incoming call is as follows. A caller telephones your call center via the Public Switched Telephone Network (PSTN). (The PSTN is a global collection of Central Offices (COs) interconnected by long-distance telephone systems.) The local CO directs the call to one of your trunk groups. An available trunk picks up the call. Typically, calls from the PSTN arrive to the call center over incoming trunks and calls from the call center to the PSTN travel over outgoing trunks. If no trunks are available, the call does not get through to the system (is blocked) and the caller receives a busy signal.
When a trunk picks up a call, it forwards it through to a group of agents answering calls, or to some other answering point. The call arrives at the ACD queue of an agent group. The queue delays the call rather than blocking the call from entering the system. The time the caller waits in queue is the queue time. While waiting in queue, the caller listens to product features, announcements, or other messages provided by a Recorded Announcement Device (RAD). The caller can wait patiently in queue for an available agent, leave a voice mail message, or hang up (abandon) the call.
An agent answers the call. The time the caller spends talking to the agent is the talk time. When the call is completed, the agent may need to perform additional work associated with the call. The time taken to perform this work is the wrap up time.
0RQLWRULQJWKHFDOOIORZSURFHVV
Second-by-second (real-time) statistics presented on wall signs and desktop monitors enable you to monitor the service provided to callers. You can monitor the number of incoming calls, the time it takes to process them, the queue load, and the availability of agents using a Management Information System (MIS). The term MIS refers to the processing of data produced by the telephone system. The MIS uses telephone system records to provide forecasting, real-time monitoring, and reporting functions.
(QVXULQJWUDIILFFDUU\LQJHIILFLHQF\ To optimize traffic-carrying efficiency ensure
• Sufficient trunks are available to carry incoming calls • Callers experience a delay in queue
• There is a random distribution of calls among available agents
6FKHGXOLQJWRRSWLPL]HFDOOIORZ
&DOOURXWLQJ
Call routing options you program in the telephone system provide a set of instructions that automate the movement of calls to their intended answering points. You can define options—if the caller dials 1 forward the call to customer service. You can specify re-routing for calls not answered after a set period of time and parse incoming Automatic Number Identification (ANI) and Dialed Number Identification Service (DNIS) data to direct call routing. Figure 1-3 illustrates some common routing options.
)LJXUH&DOOURXWLQJ
'LDOLQJDQDJHQW¶VH[WHQVLRQ
In the simplest call scenario, a single trunk picks up an incoming call to your call center. The telephone system presents the caller with options to dial various answering points. The caller dials an individual agent at an extension through a queue number. A queue number is an address mechanism for a queue or other answering point. The programming associated with the queue number defines the routing and timing features of the call. The telephone system collects data on the agent and trunk involved in the call. The ACD management reporting application produces reports on agent and trunk activity.
'LDOLQJDTXHXH
&DOORYHUIORZ
An ACD call that is not answered immediately is placed in a queue. If an agent does not pick up the call after a set amount of time (the overflow time) the system places the call in the queue of another agent group, in addition to keeping it in the first queue. The first available agent in either group answers the call. The overflow feature limits the delay faced by callers by queuing calls against two or more agent groups, as illustrated in Figure 1-4.
&DOOLQWHUIORZ
You can program the telephone system to direct a queue delayed call to voice mail or to another answering point. The interflow timer runs independently of the overflow timer. If the interflow timer expires, the system removes the call from the queue and re-directs it to another answering point, such as a trunk or voice mail.
)LJXUH0XOWLSOHTXHXHURXWLQJ
8QGHUVWDQGLQJWKHLQERXQGFDOOHQYLURQPHQW
The inbound call center environment has unique characteristics that must be considered in effective planning and management.
5DQGRPDQGSUHGLFWHGFDOODUULYDO
Calls arrive randomly to call centers. You cannot predict the minute-to-minute arrival of calls. This results in unanticipated increases in workload, and impacts staffing calculations and the load carried by system and network resources.
&DOOHUWROHUDQFH
The following factors influence a caller’s tolerance to queue delays: • The immediacy of the caller’s requirement
• The availability of similar products or services • The caller’s expectations for service
• The time available to make the call
• Whether or not the caller is paying for the call
%HIRUH\RXEHJLQ
This tutorial uses the following document conventions.
'LDORJER[V\QWD[
The following terms apply to actions you perform in dialog boxes:
• Click precedes items you select with the mouse, such as buttons and items in list boxes. • Press precedes items you select on the keyboard.
• Select or clear precedes items you turn on or turn off, such as check boxes.
• Select precedes items you select in combo boxes (text boxes with attached list boxes).
• Using a drag-and-drop operation means clicking an object on the screen with the left mouse button, and pressing the mouse button while you drag the object to a different position on the screen.
For example: click OK; press ENTER; select the PFDatabase check box.
,WDOLF
Italic typeface is used to set off words, letters, and numbers referred to as themselves in the text, and for characters or words you type in the user interface. For example: overflow is the routing of calls to more than one queue; the program saves text files as MMDDYYYY.sql.
4XRWDWLRQPDUNV
Quotation marks are used for memorable or well known information. For example: perform “what-if” scenarios on the resultant data.
%ROG
Bold designates paths you select in your root directory and items you click, press, or select. For example: Click OK; delete 50 and insert 60; select the Check database integrity check box.
0HQXLWHPV
Menu items you select are separated by an arrow [=>]. For example, File=>Open tells you to select the Open submenu on the File menu.
$VVXPSWLRQV
Before you begin the tutorial it is essential
• 6110 CCM is installed. (See the Mitel Networks 6110 Contact Center Management Installation Guide for more information.)
• You are connected to the SX-2000, the SX-200 or the SX-200 with Real Time.
• On the 6110 CCM Enterprise Server, you have been assigned a user account and 6110 CCM user permissions.
&&06HFXULW\0RGHO
After you install 6110 CCM, you must grant users access to the 6110 CCM Web site. When users browse to the 6110 CCM Enterprise server to start 6110 CCM, security requires they provide a valid user name and password. 6110 CCM security challenges users a second time if they attempt to run an application to which they are not permitted access.
Starting with version 2.8, Mitel Networks 6110 CCM has new security features. The security can now be as basic or as flexible (advanced) as you need it.
With security roles, you can define what you want users to have access to. By default the security role is Not Restricted (to the Web site). However you have the option of creating a more customized security role and then assign users to it.
/HW¶VEHJLQ
The following tips will help you navigate efficiently in the 6110 CCM browser environment.
9LHZLQJPXOWLSOH:HEEURZVHUVHVVLRQVRI&&0
Sometimes you will need to view two or more 6110 CCM applications simultaneously. For example, you open two or more 6110 CCM Web sessions to compare report data to SMDR search results.
To run multiple 6110 CCM sessions:
,QWKHEURZVHUW\SHLQWKH&&06HUYHU,3DGGUHVVKWWS>\RXU&&06HUYHU DGGUHVV@&&0$OWHUQDWLYHO\GRXEOHFOLFNWKH&&0GHVNWRSLFRQ
,I\RXGRQRWVHHWKH&&0GHVNWRSLFRQWRFUHDWHDVKRUWFXWWR&&0GUDJ DQGGURSWKH&&0:HEDGGUHVVWR\RXUGHVNWRS
&OLFN$GGWR)DYRULWHVWRDGGWKH&&06HUYHU,3DGGUHVVWR\RXUOLVWRIIDYRULWH DGGUHVVHVDQGFOLFN2.
&OLFN)DYRULWHVORFDWHWKHSUDLULH)\UH&&0HQWU\DWWKHERWWRPRIWKHOLVWDQG PRYHLWWRWKHWRSRIWKHOLVWXVLQJDGUDJDQGGURSRSHUDWLRQ
2SWLRQDOO\FOLFN0DNH+RPH3DJHWRVHWWKH&&06HUYHU,3DGGUHVVDV\RXU KRPHSDJH
(QWHU\RXUXVHUQDPHDQGSDVVZRUGDQGFOLFN6XEPLW
&OLFN&KDQJH3DVVZRUGDQGFKDQJH\RXU&&0SDVVZRUG
You start the first instance of 6110 CCM by clicking the 6110 CCM desktop icon (on the server computer) or by starting Windows Explorer and typing in the 6110 CCM Server address (on a client computer).
You access the second (and subsequent) copies of 6110 CCM by clicking the Internet Explorer icon on the Windows Taskbar and selecting 6110 CCM from your list of favorites. Alternatively, you can click
Tools=>Internet Options and set your Home page to the 6110 CCM application (your 6110 CCM Enterprise Server IP address) and run multiple instances of 6110 CCM simultaneously.
For example, to open a new session of SMDR Inspector:
&OLFNWKH&&0GHVNWRSLFRQDQGORJRQWR&&0 2QWKH7RROVPHQXULJKWFOLFN60'5,QVSHFWRU
&OLFN2SHQLQ1HZ:LQGRZWRVWDUW60'5,QVSHFWRULQDQHZEURZVHUVHVVLRQ
6110 CCM displays the new SMDR Inspector session in addition to your original 6110 CCM session.
NOTE: You can alternate between the two 6110 CCM sessions by holding down the Alt key and pressing
the Tab key until you locate the desired session.
&&0UHDOWLPHDSSOLFDWLRQV
Supervisor monitors, agent monitors, and reader boards (wall signs) display real-time telephone system data. Supervisors and agents view real-time statistics over the intranet or Internet in the SuperAdvisor and AgentAdvisor applications respectively. Supervisors display text messages and call center statistics on one or more Spectrum light emitting diode (LED) wall signs using WallBoarder. (See AgentAdvisor and WallBoarder for more information on the AgentAdvisor and WallBoarder applications.)
The prairieFyre Service continuously updates the SuperAdvisor, AgentAdvisor, and WallBoarder displays for the SX-2000 and the SX-200 with Real Time (SX-200 EL/ML LIGHTWARE Release 4.0 and greater) with SMDR and ACD telephone system records.
Figure 1-5 illustrates the connectivity between the prairieFyre Service and connected clients viewing the 6110 CCM real-time applications.
6XSHU$GYLVRU
SuperAdvisor displays agent and queue statistics in color-coded grids. The grid cells change color when performance changes to keep supervisors informed of the service provided to callers. SuperAdvisor provides statistics in real-time, by 15-minute interval, over-the business-day, and by shift.
For the SX-2000 and the SX-200 with Real Time, when you click RealTime=>SuperAdvisor Figure 1-6 appears.
)LJXUH6XSHU$GYLVRUPDLQVFUHHQ6;DQG6;ZLWK5HDO7LPH
For the SX-2000 and the SX-200 with Real Time, SuperAdvisor consists of 11 monitors. The Agent State by Position, Employee State by Position, Agent State by Time, Employee State by Time, and Agent Shift monitors provide agent availability statistics. The Queue by Period, Queue Now, and Queue Group Now monitors provide queue statistics. The Call Count by Queue, Queue Service Level Percent, and Queue Status monitors provide graphic displays on queues statistics.
On the SuperAdvisor main screen, you can create profiles to save threshold settings and display
characteristics you define for monitors. The Save button saves all open monitors under one profile name. The Load button loads existing profiles and deletes profiles.
When you open a new monitor, the computer monitor icon turns green to verify you are receiving data. If the computer icon is marked with a red X, SuperAdvisor is not receiving data.
When you select devices, such as agents or queues, to display on a monitor you can specify the devices be sorted alphabetically or by device ID, in ascending or descending order. SuperAdvisor displays the devices across the grid in the order you specify. (See Viewing real-time statistics for more information).
NOTE: 6110 CCM permissions are based on database teams and groups. In programming the YourSite
8VLQJ6XSHU$GYLVRU
The following exercises will familiarize you with SuperAdvisor. Using the Agent State by Position and Queue Now grids you will
• Select call center elements (devices) to monitor.
• Add devices to grids, rearrange them, resize them, and sort them. • Hide grid fields.
• Define performance thresholds for devices and ACD variables. • Define grid styles.
• Create profiles to save grid and chart characteristics. • Copy profiles to other client computers.
• Chat online with supervisors and agents.
6HOHFWLQJGHYLFHVWRPRQLWRU
NOTE: An agent must be a member of an agent group defined in the YourSite Database in order for you to
view the agent in SuperAdvisor or AgentAdvisor.
To view the real-time activities of agents:
&OLFN5HDO7LPH !6XSHU$GYLVRU
The SuperAdvisor main screen appears.
&OLFNWKH3RVLWLRQLFRQDQGFOLFN$JHQWE\3RVLWLRQ
8QGHU$JHQW*URXSVVHOHFWRQHRUPRUHDJHQWJURXSVWRPRQLWRU$OWHUQDWLYHO\ XQGHU$JHQW*URXS0HPEHUVVHOHFWDJHQWVWRPRQLWRUDQGFOLFN2.
The Agent State by Position grid appears. It displays the state, agent name, agent ID, extension number (or queue number for agents On ACD or on ACD Hold) and time in state for each agent.
$GGLQJUHDUUDQJLQJUHVL]LQJDQGVRUWLQJGHYLFHV
To add additional agents to the Agent State by Position grid:
5LJKWFOLFNWKH$JHQW6WDWHE\3RVLWLRQJULGDQGFOLFN$GG'HYLFH,'V 8QGHU$JHQW*URXS0HPEHUVVHOHFWDGGLWLRQDODJHQWVDQGFOLFN2.
SuperAdvisor adds the agents to the bottom of the Agent State by Position grid.
NOTE: If you right-click a cell and add a single agent to the grid, the new agent replaces the agent in the
current cell.
5LJKWFOLFNWKHJULGDQGFOLFN/HJHQGWRYLHZDJHQWVWDWHLFRQVDQGWKHLUPHDQLQJV
To rearrange and resize agent cells on the Agent State by Position grid:
/HIWFOLFNDQDJHQW¶VFHOODQGSHUIRUPDGUDJDQGGURSRSHUDWLRQWRPRYHLWWRD GLIIHUHQWSRVLWLRQRQWKHJULG
2SWLRQDOO\FOLFNWKHFROXPQKHDGHUDERYHDQ\FROXPQRIDJHQWVWDWHLFRQVDQGGUDJ WKHULJKWHGJHRIWKHKHDGHUWRZDUGVWKHOHIWWRPDNHWKHFROXPQDQGDJHQWVWDWH LFRQVSURSRUWLRQDWHO\VPDOOHU
To enlarge the grid frame:
/HIWFOLFNWKHORZHUULJKWFRUQHURIWKHGLVSOD\DQGSHUIRUPDGUDJDQGGURSRSHUDWLRQ
To auto-fit the grid to the frame:
5LJKWFOLFNWKHJULGDQGFOLFN6L]H*ULGWR)UDPH
The grid cells change size to fit the new grid dimensions.
To sort agents on the Agent State by Position grid:
5LJKWFOLFNWKHJULGDQGFOLFN6RUW*ULGE\6WDWH
SuperAdvisor sorts the agents by state and time in state. SuperAdvisor displays the agents across the grid in the following order:
• On ACD agents • ACD Hold agents • Wrap Up agents • Idle agents
• On Non ACD agents • Non ACD Hold agents • Outbnd agents
• Outbnd Hold agents • Make Busy agents • Do Not Disturb agents • Log Off agents • Unknown agents
To view the real-time activities of queues:
&OLFNWKH1RZLFRQDQGFOLFN4XHXH
8QGHU4XHXH*URXSVVHOHFWRQHRUPRUHTXHXHJURXSVWRPRQLWRU$OWHUQDWLYHO\ XQGHU4XHXH*URXS0HPEHUVVHOHFWTXHXHVWRPRQLWRUDQGFOLFN2.
SuperAdvisor displays the Queue Now grid on top of the Agent State by Position grid.
NOTE: A queue must be a member of a queue group defined in the YourSite Database in order for you to
view the queue in SuperAdvisor or AgentAdvisor.
0RYHWKH4XHXH1RZJULGWRDQHZSRVLWLRQXVLQJDGUDJDQGGURSRSHUDWLRQ
+LGLQJJULGILHOGV
You can hide grid fields (columns) you are not interested in viewing on the Agent Shift grid, and on all grids that display queue information. To hide grid fields on the Queue Now grid:
5LJKWFOLFNWKHJULGDQGFOLFN3URSHUWLHV &OLFNWKH&ROXPQ+HDGHUVWDE
8QGHU6KRZ+LGH&ROXPQ+HDGHUVFOHDUWKHFKHFNER[HVIRUVWDWLVWLFV\RXZDQW WRKLGHIURPYLHZ
'HILQLQJJULGVW\OHV
You can customize the appearance of grid elements, such as column and row headers, on all SuperAdvisor grids.
To define grid styles on the Queue Now grid:
5LJKWFOLFNWKH4XHXH1RZJULGDQGFOLFN3URSHUWLHV
The Grid Properties screen appears.
&OLFNWKH6W\OHWDE
NOTE: You can select multiple grid elements by pressing Shift or Control and apply styles across them.
,QWKH*ULG(OHPHQWVOLVWFOLFNDJULGHOHPHQW
&OLFN%DFNJURXQG)RQW7\SHDQG)RQW&RORUDQGVSHFLI\DEDFNJURXQGFRORUIRQW W\SHDQGIRQWFRORUIRUWKHJULGHOHPHQW
6HOHFWDOLJQPHQWDQGJULGRSWLRQVIRUWKHJULGHOHPHQW &OLFN2.WRVDYHVW\OHFKDQJHVIRUWKHJULGHOHPHQW 2SWLRQDOO\UHSHDWVWHSVWRIRURWKHUJULGHOHPHQWV &OLFN2.
'HILQLQJSHUIRUPDQFHWKUHVKROGV
SuperAdvisor displays statistics in color-coded grid cells on your desktop. The grid cells and statistics change color when performance changes to keep you informed of the service provided to callers.
When performance thresholds are not being met, SuperAdvisor appears on top of all open desktop applications and “beeps”. You can optionally select an alternate .wav file to play.
To define performance thresholds and corresponding colors for ACD variables:
5LJKWFOLFNWKH$JHQW6WDWHE\3RVLWLRQJULGDQGFOLFN3URSHUWLHV
The Grid Properties screen appears.
&OLFNWKH$ODUPWDE
,QWKH3HUIRUPDQFH9DULDEOHVOLVWFOLFNDYDULDEOH 8QGHU7KUHVKROGVHOHFWUDQJHYDOXHVIRUWKHVWDWLVWLF
&OLFN%DFNJURXQGDQG)RUHJURXQGDQGVSHFLI\DODUPWKUHVKROGFRORUVIRU7KUHVKROG
2SWLRQDOO\VHOHFWWKH$XWR3RSXSFKHFNER[WRGLVSOD\6XSHU$GYLVRURQWRSRIDOO RWKHUDSSOLFDWLRQVZKHQWKHWKUHVKROGFRQGLWLRQVDUHVDWLVILHG
2SWLRQDOO\VHOHFWWKH3OD\$XGLEOH)LOHFKHFNER[WRKDYH6XSHU$GYLVRUEHHSZKHQ WKHWKUHVKROGFRQGLWLRQVDUHVDWLVILHG
5HSHDWVWHSVWRWRGHILQHSDUDPHWHUVIRU7KUHVKROGDQG7KUHVKROG 5HSHDWVWHSVWRWRGHILQHWKUHVKROGVIRURWKHUSHUIRUPDQFHYDULDEOHV
NOTE: If you have more than one Agent/Employee State by Position or Agent/Employee State by Time
grid displayed, any changes you make to the ACD variable threshold programming or grid styles effect all open Agent/Employee State by Position or Agent/Employee State by Time monitors.
You can define performance thresholds for individual or multiple queues on the Agent Shift, Queue Now, Queue Group Now, and Queue by Period monitors.
To define performance thresholds and corresponding colors for devices and ACD variables:
5LJKWFOLFNWKH4XHXH1RZJULGDQGFOLFN3URSHUWLHV
The Grid Properties screen appears.
&OLFNWKH$ODUPWDE
NOTE: You can select the Select All check box to apply threshold settings for a performance variable
across all available queues. If you select the Standard Grid Color check box the background color turns white for the active performance variable.
,QWKH'HYLFH,'VOLVWVHOHFWRQHRUPRUHTXHXHVDJHQWVRUVHOHFWWKH6HOHFW$OO FKHFNER[WRVHOHFWDOOTXHXHVDJHQWV
,QWKH3HUIRUPDQFH9DULDEOHVOLVWFOLFNDYDULDEOH 8QGHU7KUHVKROGVHOHFWUDQJHYDOXHVIRUWKHVWDWLVWLF
&OLFN%DFNJURXQGDQG)RUHJURXQGDQGVSHFLI\DODUPWKUHVKROGFRORUVIRU7KUHVKROG
2SWLRQDOO\VHOHFWWKH$XWR3RSXSFKHFNER[WRGLVSOD\6XSHU$GYLVRURQWRSRIDOO RWKHUDSSOLFDWLRQVZKHQWKHWKUHVKROGFRQGLWLRQVDUHVDWLVILHG
2SWLRQDOO\VHOHFWWKH3OD\$XGLEOH)LOHFKHFNER[WRKDYH6XSHU$GYLVRUEHHSZKHQ WKHWKUHVKROGFRQGLWLRQVDUHVDWLVILHG
5HSHDWVWHSVWRWRGHILQHSDUDPHWHUVIRU7KUHVKROGDQG7KUHVKROG 5HSHDWVWHSVWRWRGHILQHWKUHVKROGVIRURWKHUSHUIRUPDQFHYDULDEOHV &OLFN2.
&UHDWLQJSURILOHV
On the SuperAdvisor main screen you can create profiles to save threshold settings and display
characteristics you define for monitors. The Save button saves all open monitors under one profile name. The Load button loads existing profiles and deletes profiles.
NOTE: You must save your open monitors to a profile before you select a different 6110 CCM application,
such as YourSite, or Report Inbox, or your programming in SuperAdvisor will be lost.
By default, the profile is saved in the SuperAdvisor folder.
&OLFN6DYH
,I\RXGRQRWZDQWWRVDYHWKHSURILOHLQWKH6XSHU$GYLVRUIROGHUDIWHU6DYHLQ VHOHFWWKHORFDWLRQWKDW\RXZDQWWKHSURILOHVDYHG
To clear monitors currently displayed:
2QWKH,QWHUQHW([SORUHUPHQXFOLFN5HIUHVK
SuperAdvisor closes all monitors.
To retrieve a profile saved in SuperAdvisor:
&OLFN/RDG
6HOHFWDSURILOHIURPWKHOLVWER[DQGFOLFN2.
&KDWWLQJRQOLQHZLWKVXSHUYLVRUVDQGDJHQWV
You can communicate essential information to one or more agents or supervisors quickly and securely with the SuperAdvisor ChatLine. You can broadcast service alerts, coach agents, and send timely messages, such as asking an agent to delay going on break when it is busy.
NOTE: You must log on to the SuperAdvisor chat module in order to send and receive online messages.
When you receive a message, SuperAdvisor displays it immediately on top of all open windows.
To chat online with agents or supervisors:
5LJKWFOLFNWKH6XSHU$GYLVRUPDLQVFUHHQRUDQ\RSHQPRQLWRUDQGFOLFN&KDW
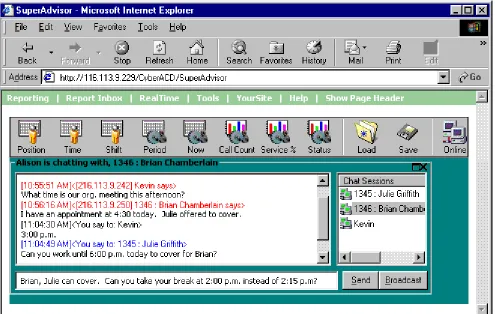
Figure 1-8 appears.
)LJXUH6XSHU$GYLVRU&KDW/LQH
7\SHDPHVVDJHLQWKHWH[WZLQGRZDQGFOLFN6HQG
The Device IDs screen appears.
The agents or supervisors you selected appear in the Chat Sessions window. The Chat Sessions window lists the agent ID and name of each agent you selected. Supervisors are identified by name only.
NOTE: On the agent grids, if you right-click an agent’s cell and click Chat the agent appears in the Chat
Sessions window automatically.
Blue text appears in the chat window to confirm SuperAdvisor sent your message. The recipients response to your message appears in the chat window below a red header.
To send a subsequent message to agents or supervisors:
5LJKWFOLFNWKH&KDW6HVVLRQVZLQGRZDQGFOLFN$GG&KDW6HVVLRQV
6HOHFWRQHRUPRUHDJHQWJURXSVDJHQWVRUVXSHUYLVRUVWRVHQGWKHPHVVDJHWRDQG FOLFN2.
7\SHDPHVVDJHLQWKHWH[WZLQGRZDQGFOLFN6HQG
Alternatively, you can type a message, click Broadcast, select a recipient, and click OK to send a subsequent message to agents or supervisors.
To reply to a message, type a message and press Enter. ChatLine sends your response to the person who most recently sent you a message (the person listed at the bottom of your chat window). To reply to a previous message, select the individual in the Chat Sessions window, type a message, and click Send.
NOTE: If the agent or supervisor is logged out at the time you send the message, ChatLine marks the
7HVW\RXUNQRZOHGJHRI6XSHU$GYLVRU
Read the following questions and select one answer.,I\RXULJKWFOLFNDFHOODQGDGGDVLQJOHDJHQWWRDJULGWKHQHZDJHQW D,VDGGHGDWWKHERWWRPRIWKHJULG
E5HSODFHVWKHDJHQWLQWKHWRSOHIWFHOO F5HSODFHVWKHDJHQWLQWKHFXUUHQWFHOO G,VDGGHGDWWKHWRSRIWKHJULG
<RXFDQULJKWFOLFNWKHJULGDQGFOLFN6RUW*ULGE\6WDWHRQWKH D$JHQW*URXS*ULG
E$JHQW6WDWHE\7LPHJULG F$JHQW6WDWHE\3RVLWLRQJULG
G$JHQW6WDWHE\3RVLWLRQJULGDQGWKH$JHQW6WDWHE\7LPHJULG 7RKLGHJULGFROXPQV
D5LJKWFOLFNDQ\JULGILHOGDQGFOLFN+LGH&ROXPQ
E5LJKWFOLFNWKHULJKWHGJHRIDQ\JULGFHOODQGGUDJLWWRWKHOHIW F&OLFNWKHOHIWHGJHRIDFROXPQKHDGHUDQGGUDJLWWRWKHULJKW
G8QGHU3URSHUWLHV !6KRZ+LGH&ROXPQ+HDGHUVFOHDUWKHFKHFNER[HVIRUVWDWLVWLFV \RXZDQWWRKLGHIURPYLHZ
7KUHVKROGSURJUDPPLQJ\RXGHILQHIRUDQDJHQWPRQLWRU D(IIHFWVDOORSHQDJHQWDQGTXHXHPRQLWRUVLQDVHVVLRQ E(IIHFWVDOORSHQPRQLWRUVRIWKHVDPHW\SHLQDVHVVLRQ F(IIHFWVDOORSHQDJHQWPRQLWRUVLQDVHVVLRQ
G2QO\HIIHFWVWKHPRQLWRUWRZKLFKWKHFKDQJHVDUHDSSOLHG <RXFUHDWHSURILOHVWRVDYH
D7KUHVKROGVHWWLQJVDQGGLVSOD\FKDUDFWHULVWLFVIRUDOORSHQPRQLWRUV
E7KUHVKROGVHWWLQJVGLVSOD\FKDUDFWHULVWLFVDQGFKDWVHVVLRQVIRUDOORSHQPRQLWRUV F7KUHVKROGVHWWLQJVDQGGLVSOD\FKDUDFWHULVWLFVIRUDOOPRQLWRUVRIWKHVDPHW\SH G$VQDSVKRWRIDJHQWDQGTXHXHSHUIRUPDQFHRQDOORSHQPRQLWRUV
,IWKHDJHQWRUVXSHUYLVRULVORJJHGRXWDWWKHWLPH\RXVHQGDPHVVDJH&KDWOLQH D1RWLILHV\RXZLWKDIODVKLQJVXSHUYLVRURUDJHQWLFRQ
E0DUNVWKHVXSHUYLVRU¶VRUDJHQW¶VLFRQZLWKDUHG; F3URYLGHVDQDXGLWRU\DODUP
$JHQW$GYLVRU
The AgentAdvisor application provides real-time statistics for the SX-2000 and SX-200 with Real Time systems. It displays statistics in color-coded sections on the agent’s desktop. The display keeps agents informed of significant changes in the service provided to callers.
NOTE: When you minimize AgentAdvisor a green AgentAdvisor icon appears on your system tray. You
double-click the icon to restore AgentAdvisor.
8VLQJ$JHQW$GYLVRU
The following exercises will familiarize you with AgentAdvisor. Using the Agent State by Position and Queue Now grids you will
• Select call center elements (devices) to monitor.
• Add devices to grids, rearrange them, resize them, and sort them. • Hide grid fields.
• Define performance thresholds for devices and ACD variables. • Define grid styles.
• Create profiles.
• Copy profiles to other client computers. • Chat online with supervisors.
6HOHFWLQJGHYLFHVWRPRQLWRU
NOTE: In the YourSite Database, an agent must be a member of an agent group, and must be associated to
an employee ID in order for you to view the agent in AgentAdvisor. An employee must be a member of an employee group in order for you to view the employee in AgentAdvisor. A queue must be a member of a queue group and have at least one agent group associated to it in order for you to view the queue in AgentAdvisor. This is to support real-time and report permissions: you define permissions for database groups.
To view the real-time activities of agents:
&OLFN6WDUW !3URJUDPV !SUDLULH)\UH6RIWZDUH,QF !&&0$JHQW$GYLVRU /RJRQWR$JHQW$GYLVRUXVLQJ\RXUHPSOR\HH,'QXPEHU
You enter an employee ID to enable you to chat online with supervisors.
Figure 1-10 appears.
You enter profile names to save display parameters and alarm characteristics you define for agents and queues.
(QWHUDSURILOHQDPHDQGFOLFN2.RUFOLFN1HZ3URILOHDQGHQWHUWKHQDPHODWHU
The Monitor Selection screen appears.
6HOHFW$JHQWE\3RVLWLRQDQGFOLFN2.
The Device IDs screen appears.
8QGHU$JHQW*URXSVVHOHFWRQHRUPRUHDJHQWJURXSVWRPRQLWRU$OWHUQDWLYHO\ XQGHU$JHQW*URXS0HPEHUVVHOHFWDJHQWVWRPRQLWRUDQGFOLFN2.
The Agent State by Position grid appears.
The Agent State by Position grid displays the state, agent name, agent ID, extension number (or queue number for agents On ACD or on ACD Hold) and time in state for each agent.
2SWLRQDOO\ULJKWFOLFNWKHJULGDQGVHOHFW$OZD\VRQ7RSWRGLVSOD\WKHDFWLYHPRQLWRU RQWRSRIDOORWKHUDSSOLFDWLRQV
2SWLRQDOO\ULJKWFOLFNWKHJULGDQGFOHDUWKH&DSWLRQFRPPDQGWRKLGHWKHWLWOHEDU
If you hide the title bar, you can move the display by holding down the shift key, clicking the grid, and performing a drag-and-drop operation.
To start a second instance of AgentAdvisor:
/RJRQWR$JHQW$GYLVRUDQGVWDUWDQHZVHVVLRQ 5HSHDWVWHSVWRWRGLVSOD\WKH4XHXH1RZPRQLWRU
You should now have two AgentAdvisor monitors running simultaneously.
$GGLQJUHDUUDQJLQJUHVL]LQJDQGVRUWLQJGHYLFHV
To add additional agents to the Agent State by Position grid:
5LJKWFOLFNWKH$JHQW6WDWHE\3RVLWLRQJULGDQGFOLFN$GG'HYLFH,'V 8QGHU$JHQW*URXS0HPEHUVVHOHFWDGGLWLRQDODJHQWVDQGFOLFN2.
AgentAdvisor adds the agents to the bottom of the Agent State by Position grid.
NOTE: If you right-click a cell and add a single agent to the grid, the new agent replaces the agent in the
current cell.
To rearrange and resize agent cells on the Agent State by Position grid:
/HIWFOLFNDQDJHQW¶VFHOODQGSHUIRUPDGUDJDQGGURSRSHUDWLRQWRPRYHLWWRD GLIIHUHQWSRVLWLRQRQWKHJULG
2SWLRQDOO\FOLFNWKHFROXPQKHDGHUDERYHDQ\FROXPQRIDJHQWVWDWHLFRQVDQGGUDJ WKHULJKWHGJHRIWKHKHDGHUWRZDUGVWKHOHIWWRPDNHWKHFROXPQDQGDJHQWVWDWH
This resizes all agent state icons on the grid. To enlarge the grid frame:
/HIWFOLFNWKHORZHUULJKWFRUQHURIWKHGLVSOD\DQGSHUIRUPDGUDJDQGGURSRSHUDWLRQ
To auto-fit the grid to the frame:
5LJKWFOLFNWKHJULGDQGFOLFN6L]H*ULGWR)UDPH
The grid cells change size to fit the new grid dimensions.
To sort agents on the Agent State by Position grid:
5LJKWFOLFNWKHJULGDQGFOLFN6RUW*ULGE\6WDWH
AgentAdvisor sorts the agents by state and time in state and displays the agents across the grid in the following order:
• On ACD agents • ACD Hold agents • Wrap Up agents • Idle agents
• On Non ACD agents • Non ACD Hold agents • Outbnd agents
• Outbnd Hold agents • Make Busy agents • Do Not Disturb agents • Log Off agents • Unknown agents
+LGLQJJULGILHOGV
On the Queue Now grid you can optionally hide the grid fields (columns) you are not interested in viewing.
To hide columns on the Queue Now grid:
5LJKWFOLFNWKHJULGDQGFOLFN3URSHUWLHV &OLFNWKH&ROXPQ+HDGHUVWDE
8QGHU6KRZ+LGH&ROXPQ+HDGHUVFOHDUWKHFKHFNER[HVIRUVWDWLVWLFV\RXZDQWWR KLGHIURPYLHZ
&OLFN2.
AgentAdvisor hides the grid fields.
'HILQLQJJULGVW\OHV
You can customize the appearance of grid elements, such as column and row headers on all AgentAdvisor grids.
To define grid styles on the Queue Now grid:
5LJKWFOLFNWKH4XHXH1RZJULGDQGFOLFN3URSHUWLHV
&OLFNWKH6W\OHWDE
,QWKH*ULG(OHPHQWVOLVWFOLFNDJULGHOHPHQW
&OLFN%DFNJURXQG)RQW7\SHDQG)RQW&RORUDQGVSHFLI\DEDFNJURXQGFRORUIRQW W\SHDQGIRQWFRORUIRUWKHJULGHOHPHQW
6HOHFWDOLJQPHQWDQGJULGRSWLRQVIRUWKHJULGHOHPHQW &OLFN2.WRVDYHVW\OHFKDQJHVIRUWKHJULGHOHPHQW 2SWLRQDOO\UHSHDWVWHSVWRIRURWKHUJULGHOHPHQWV &OLFN2.
NOTE: You can apply styles across multiple grid elements by pressing Shift or Control.
'HILQLQJSHUIRUPDQFHWKUHVKROGV
Agents can program performance thresholds in AgentAdvisor, or supervisors can define performance thresholds and copy them to all agents.
To define performance thresholds and corresponding colors for ACD variables on the Agent State by Position grid:
5LJKWFOLFNWKH$JHQW6WDWHE\3RVLWLRQJULGDQGFOLFN3URSHUWLHV
The Grid Properties screen appears.
&OLFNWKH$ODUPWDE
,QWKH3HUIRUPDQFH9DULDEOHVOLVWFOLFNDYDULDEOH 8QGHU7KUHVKROGVHOHFWUDQJHYDOXHVIRUWKHVWDWLVWLF
&OLFN%DFNJURXQGDQG)RUHJURXQGDQGVSHFLI\DODUPWKUHVKROGFRORUVIRU7KUHVKROG
2SWLRQDOO\VHOHFWWKH$XWR3RSXSFKHFNER[WRGLVSOD\$JHQW$GYLVRURQWRSRIDOO RWKHUDSSOLFDWLRQVZKHQWKHWKUHVKROGFRQGLWLRQVDUHVDWLVILHG
2SWLRQDOO\VHOHFWWKH3OD\$XGLEOH)LOHFKHFNER[WRKDYH$JHQW$GYLVRUEHHSZKHQ WKHWKUHVKROGFRQGLWLRQVDUHVDWLVILHG
5HSHDWVWHSVWRWRGHILQHSDUDPHWHUVIRU7KUHVKROGDQG7KUHVKROG 5HSHDWVWHSVWRWRGHILQHWKUHVKROGVIRURWKHUSHUIRUPDQFHYDULDEOHV
&OLFN2.
You can define performance thresholds and corresponding colors for individual or multiple queues on the Queue Now and Agent Group monitors.
To define performance thresholds for queues and ACD variables on the Queue Now grid:
5LJKWFOLFNWKH4XHXH1RZJULGDQGFOLFN3URSHUWLHV
The Grid Properties screen appears.
&OLFNWKH$ODUPWDE
NOTE: You can click the Select All check box to apply the threshold settings for a performance variable
,QWKH'HYLFH,'VOLVWVHOHFWRQHRUPRUHTXHXHVRUVHOHFWWKH6HOHFW$OOFKHFNER[ WRVHOHFWDOOTXHXHV
,QWKH3HUIRUPDQFH9DULDEOHVOLVWFOLFNDYDULDEOH 8QGHU7KUHVKROGVHOHFWUDQJHYDOXHVIRUWKHVWDWLVWLF
&OLFN%DFNJURXQGDQG)RUHJURXQGDQGVSHFLI\DODUPWKUHVKROGFRORUVIRU7KUHVKROG
2SWLRQDOO\VHOHFWWKH$XWR3RSXSFKHFNER[WRGLVSOD\$JHQW$GYLVRURQWRSRIDOO RWKHUDSSOLFDWLRQVZKHQWKHWKUHVKROGFRQGLWLRQVDUHVDWLVILHG
2SWLRQDOO\VHOHFWWKH3OD\$XGLEOH)LOHFKHFNER[WRKDYH$JHQW$GYLVRUEHHSZKHQ WKHWKUHVKROGFRQGLWLRQVDUHVDWLVILHG
5HSHDWVWHSVWRWRGHILQHSDUDPHWHUVIRU7KUHVKROGDQG7KUHVKROG 5HSHDWVWHSVWRWRGHILQHWKUHVKROGVIRURWKHUSHUIRUPDQFHYDULDEOHV &OLFN2.
&UHDWLQJSURILOHV
In AgentAdvisor you can create profiles to save threshold settings and display characteristics you define for monitors.
To save the threshold settings and display characteristics for a grid currently displayed in AgentAdvisor:
5LJKWFOLFNWKHJULGDQGFOLFN6DYH3URILOH 7\SHDSURILOHQDPHDQGFOLFN2.
To retrieve a profile you created:
/RJRQWR$JHQW$GYLVRUXVLQJ\RXUHPSOR\HH,'
The Browse, Open or Create a Profile window appears.
&OLFN%URZVH
/RFDWHDQGVHOHFWWKHSURILOH &OLFN2.
AgentAdvisor displays the monitor for the profile.
&RS\LQJSURILOHVWRRWKHUFOLHQWFRPSXWHUV
You can create one or more profiles in AgentAdvisor and make them available to agents (who have AgentAdvisor installed).
To copy a profile to a agent’s computer:
5LJKWFOLFN6WDUWDQGFOLFN([SORUHWRVWDUW([SORUHU
&OLFN&?3URJUDP)LOHV?SUDLULH)\UH6RIWZDUH,QF?&&0?$JHQW$GYLVRU
This is the directory where AgentAdvisor is installed.
5LJKWFOLFNWKH$JHQW$GYLVRUSURILOH\RXFUHDWHG
&RS\LWWR&?3URJUDP)LOHV?SUDLULH)\UH6RIWZDUH,QF?&&0?$JHQW$GYLVRU RQWKHRWKHUDJHQWVFRPSXWHU
The agent can then gain access to the profile on their computer in AgentAdvisor.
&KDWWLQJRQOLQHZLWKVXSHUYLVRUVDQGDJHQWV
With the AgentAdvisor chat feature, agents can communicate essential information to supervisors or agents quickly and securely. Agents requiring help on calls can consult with supervisors online and provide immediate feedback to clients, without having to leave their seats.
NOTE: You must log on to AgentAdvisor in order to send and receive messages. When you receive a
message, AgentAdvisor displays it immediately on top of all open windows.
To chat online with supervisors or agents:
5LJKWFOLFNDQRSHQPRQLWRUDQGFOLFN&KDW
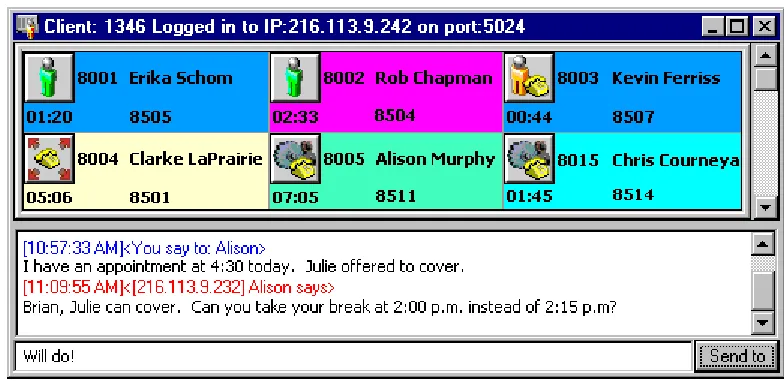
Figure 1-11 appears.
)LJXUH$JHQW$GYLVRU&KDW/LQH
7\SHDPHVVDJHDQGFOLFN6HQGWR
6HOHFWRQHRUPRUHVXSHUYLVRUVRUDJHQWVWRVHQGWKHPHVVDJHWRDQGFOLFN2.
Blue text appears in the chat window to confirm AgentAdvisor sent the message. The supervisor’s or agent’s response to the message appears in the chat window below a red header.
7HVW\RXUNQRZOHGJHRI$JHQW$GYLVRU
Read the following questions and select one answer.:KLFKRIWKHIROORZLQJVWDWHPHQWVLVQRWWUXH" D$JHQW$GYLVRULVDVWDQGDORQHDSSOLFDWLRQ E$JHQW$GYLVRURQO\ZRUNVRYHUWKHLQWUDQHW
F$QDJHQWPXVWEHDPHPEHURIDQDJHQWJURXSGHILQHGLQWKH<RXU6LWH'DWDEDVHLQ RUGHUIRU\RXWRYLHZWKHDJHQWLQ$JHQW$GYLVRU
G,I\RXKDYHDQ6;WHOHSKRQHV\VWHPWKDWSUHGDWHVWKH6;YHUVLRQ UHOHDVHDJHQWVFDQQRWYLHZUHDOWLPHGDWDLQ$JHQW$GYLVRU
:KLFKRIWKHIROORZLQJVWDWHPHQWVLVQRWWUXH"
D<RXFDQNHHS$JHQW$GYLVRURQWRSRIDOORWKHUDSSOLFDWLRQVRQ\RXUGHVNWRS E<RXFDQGLVSOD\$JHQW$GYLVRUYHUWLFDOO\RUKRUL]RQWDOO\RQ\RXUGHVNWRS F:LWK$JHQW$GYLVRU\RXFDQFKDWRQOLQHZLWKFXVWRPHUVDQGVXSHUYLVRUV
G:LWK$JHQW$GYLVRU\RXFDQFUHDWHSURILOHVWRVDYHORJRQLQIRUPDWLRQWKUHVKROG VHWWLQJVDQGGLVSOD\FKDUDFWHULVWLFVIRUDGLVSOD\HGPRQLWRU
&&0UHSRUWLQJDSSOLFDWLRQV
The Reporter and Scheduled Reports applications provide detailed call center statistics. You can generate reports for 15, 30, or 60-minute intervals across any series of days you specify. You use Reporter to produce run-on-demand reports, and Scheduled Reports to set up timetables for generating reports.
4Sight provides forecast reports that predict the number of agents you require based on historical data.
The Reporter and Scheduled Reports programs have Agent, Queue, Employee, Team, Extension, Trunk, 4Sight, and DNIS Report categories. There is also a Custom Reports category for users who are licensed for custom reports.
When you generate reports the Report Writer sends them to your personal report inbox. The reports you generate are available only to you. You can gain access to your reports by clicking the Report Inbox menu.
When you click the Reporting menu Figure 1-12 appears.
5HSRUWHU
The Reporter application has Agent, Queue, Employee, Team, Extension, Trunk, 4Sight, and DNIS Report categories. There is also a Custom Reports category for users who are licensed for custom reports. You can restrict access to any or all reports with by Advanced Security Roles using Report lists. See “Security” on page 47.
&RQILJXULQJ5HSRUW'LVWULEXWRU
The Report Distributor application prints and e-mails your reports and displays the status of your printing and mailing jobs. It runs in the system tray on your computer and must be running at all times in order to print and e-mail reports automatically.
The Report Distributor runs under the identity of the logged on user and prints to the default printer as defined by the logged on user. A user who logs on but does not have a default printer setup, or does not have adequate permissions to use the default printer causes the Report Distributor to fail each print job that it attempts to action. Users must have a mail client installed in order for the Report Distributor to e-mail reports.
In order to e-mail reports to other users your network requires a properly configured MAPI mail client.
If you have not already configured Report Distributor on your client computer, to automate the printing of reports and e-mails:
2Q\RXUV\VWHPWUD\ULJKWFOLFNWKH5HSRUW'LVWULEXWRULFRQDQGFOLFN5HVWRUH
If the Report Distributor icon is not displayed on the system tray, click Start=>prairieFyre Software Inc=>6110 CCM Report Distributor to start the Report Distributor.
&OLFN2SWLRQV
5LJKWFOLFN6LWHVDQGFOLFN$GG
7\SHDGHVFULSWLYHQDPHW\SHDYDOLG&&085/DQGSUHVV(QWHU 2SWLRQDOO\UHSHDWVWHSVDQGWRDGGDVHFRQG85/
8VLQJ5HSRUWHU
The following exercises will familiarize you with Reporter. Using a Queue Group Abandon Spectrum by Period Report you will
• Generate a run-on-demand report. • Review report details.
• View the report grid and chart in Excel in your browser.
*HQHUDWLQJDUXQRQGHPDQGUHSRUW
Before you generate any reports, ensure you select Help=>Client Download and download the 6110 CCM Excel report templates from the Client Download page to your computer.
If you intend to e-mail the report to one or more recipients you must add the recipients to a mailing list and associate the recipients to a group.
To set up groups for e-mailing reports:
&OLFN0\2SWLRQV !&RQWDFWV 2QWKH&RQWDFWVWDEFOLFN$GG
7\SHWKHILVWQDPHODVWQDPHDQGHPDLODGGUHVVRIWKHSHUVRQWRZKLFK\RXZDQWWR HPDLOWKHUHSRUWDQGFOLFN2.
2SWLRQDOO\DGGDGGLWLRQDOHPDLOUHFLSLHQWVWRWKHFRQWDFWVOLVW &OLFN*URXSV
&OLFN$GGDQGW\SHDQDPHDQGGHVFULSWLRQIRUWKHFRQWUDFWJURXSDQGFOLFN2. 2QWKH*URXSVWDEGRXEOHFOLFNWKHJURXSDGGPHPEHUVWRWKHJURXSDQGFOLFN
To run the report:
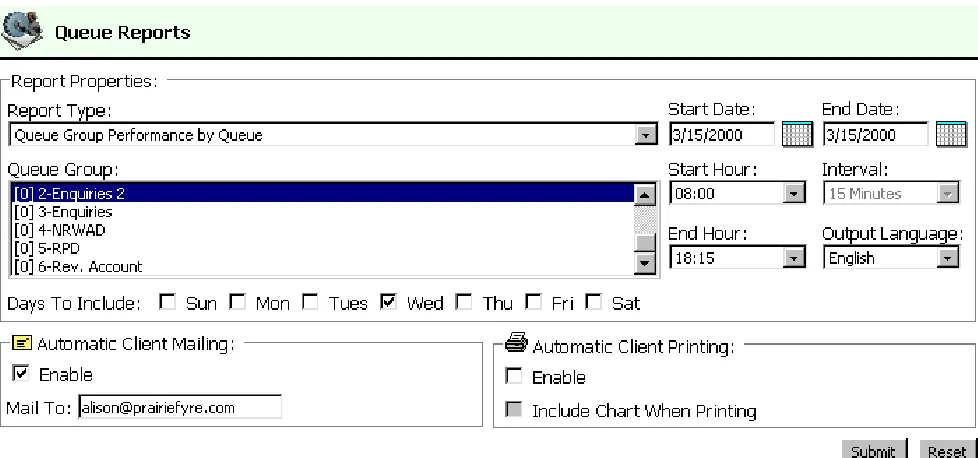
&OLFN5HSRUWLQJ !4XHXH5HSRUWV
Figure 1-13 appears.
)LJXUH
NOTE: You can generate multiple queue reports simultaneously by selecting more than one queue group in
the Queue Group list and clicking Submit. This function applies to all report types.
NOTE: Each time you run a report, Reporter retains the Start Hour, End Hour, Interval, and Days to
Include report parameters last selected.
,QWKH5HSRUW7\SHOLVWFOLFN4XHXH*URXS$EDQGRQ6SHFWUXPE\3HULRG ,QWKH4XHXH*URXSOLVWVHOHFWDGHYLFH
,QWKH6WDUW'DWHDQG(QG'DWHOLVWVFOLFNDVWDUWGDWHDQGHQGGDWHIRUWKHUHSRUW ,QWKH6WDUW+RXUDQG(QG+RXUOLVWVFOLFNDVWDUWKRXUDQGHQGKRXUIRUWKHUHSRUW ,QWKH2XWSXW/DQJXDJHOLVWVHOHFW(QJOLVKRU)UHQFK
,QWKH,QWHUYDOOLVWVHOHFWWKHWLPHLQWHUYDOIRUUHSRUWLQJ ,QWKH2XWSXW/DQJXDJHOLVWVHOHFW(QJOLVKRU)UHQFK
8QGHU'D\VWR,QFOXGHVHOHFWGD\VRIWKHZHHNWRLQFOXGHLQWKHUHSRUW 8QGHU$XWRPDWLF&OLHQW3ULQWLQJ2SWLRQVVHOHFWSULQWLQJRSWLRQV
8QGHU$XWRPDWLF&OLHQW0DLOLQJ2SWLRQVVHOHFWWKH(QDEOHFKHFNER[DQG VHOHFWDQHPDLODGGUHVV
&OLFN6XEPLW
5HYLHZLQJUHSRUWGHWDLOV
The Report Inbox application displays all run-on-demand, scheduled, and forecast reports generated under your user name.
To view report details:
&OLFN9LHZ5HSRUW,QER[XSRQVXEPLWWLQJDUHSRUWRUFOLFN5HSRUW,QER[ ! 7RGD\¶V5HSRUWV
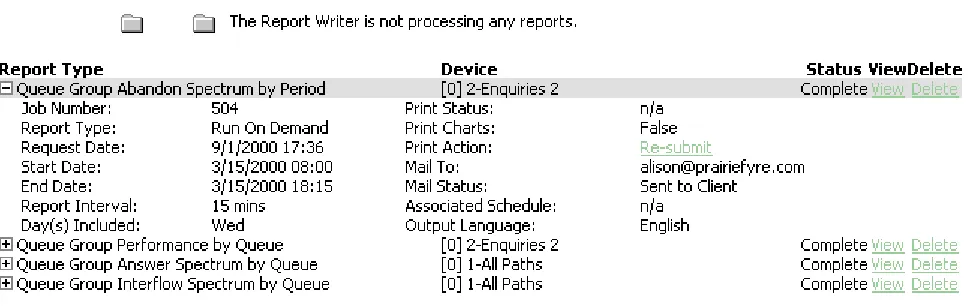
Figure 1-14 appears.
)LJXUH5HSRUWVWDWXV
The Status field confirms if your report is ready. When Complete appears in the status field the report is waiting in your Report Inbox. When Pending appears, the report is not ready. No Data means no records were available for the parameters you specified. Failed means the report did not generate. If a report fails, the Report Writer logs errors in the NT event log. Re-Submit regenerates the report.
&OLFNWKHH[SDQVLRQER[DGMDFHQWWRWKH4XHXH*URXS$EDQGRQ6SHFWUXPE\3HULRG 5HSRUWWRUHYLHZUHSRUWVWDWXVGHWDLOV
9LHZLQJWKHUHSRUWJULGDQGFKDUW
To view the report grid and chart:
&OLFNWKH9LHZHQWU\DVVRFLDWHGZLWKWKH4XHXH*URXS$EDQGRQ6SHFWUXPE\3HULRG 5HSRUWWRRSHQWKHUHSRUWLQ([FHOLQ\RXUEURZVHU
When you click View, the client-side Report Writer (Web page) retrieves the data files from the 6110 CCM Server and re-creates the data set on your computer. It starts Excel and displays the report spreadsheet and graph. If you click View to open a second report, Report Writer displays it in the same Excel session
While the report is open on your computer, you can save it to your local disc drive and e-mail it to others, or place it on a shared network drive for others to access. In order to e-mail reports to other users your network requires a properly configured MAPI mail client. (See your system administrator for details.) If you e-mail reports to other users they must have Excel installed on their computers to view the reports.
NOTE: Report Writer deletes all reports that are 30 days or older from your report inbox. For
run-on-demand reports, the request date governs the reports age. For scheduled reports, the date the system runs the report governs the reports age. You save any reports you want to retain beyond 30 days to your hard drive or network home directory.
:KDWWRGRLIGDWDLVPLVVLQJIURPWKHUHSRUWV
The prairieFyre Service compares the raw telephone system data to the configuration of the YourSite database and forward relevant files to the Structured Query Language (SQL) database in real time. Reports are run based on the data in the SQL database.
NOTE: 6110 CCM permissions are based on database teams and groups. In programming the YourSite
Database, you must create agent IDs and associate the agents to employees and to agent groups. You must associate the agent groups to the queues for which they answer calls. You must associate the employees to employee groups and the queues to queue groups. You must create these associations in the database in order to view real-time data and report on these devices. If you are reporting on extensions, trunks, DNIS numbers, and account codes, you must add these devices to the YourSite Database and associate the extensions to extension groups, trunks to trunk groups, and DNIS numbers to DNIS groups.
If you run a report and notice that the data for a particular device is missing from the report output, verify the device is programmed in the telephone system and in the YourSite Database. If you determine the device is missing from the database, add it to the database and use the Summarize Data command (on the Management Console program) to update the prairieFyre Service and the SQL database with the complete telephone system data stored on the local hard drive. You can then produce reports on the device.
'HOHWLQJUHSRUWV
6FKHGXOHG5HSRUWV
Scheduled Reports sets up timetables for generating Agent, Queue, Employee, Team, Extension, Trunk, 4Sight, and DNIS reports.
When you click Reporting=>Scheduled Reports Figure 1-15 appears. This is where you create and manage schedules.
)LJXUH6FKHGXOHG5HSRUWVPDLQVFUHHQ
8VLQJ6FKHGXOHG5HSRUWV
The following exercises will familiarize you with Scheduled Reports. Using a Queue Group Abandon Spectrum by Queue Report you will
• Create a report schedule.
• Associate a report to the schedule. • Review report details.
&UHDWLQJDUHSRUWVFKHGXOH
If you intend to e-mail the report to one or more recipients you must add the recipients to a mailing list and associate the recipients to a group.
To set up groups for e-mailing reports:
&OLFN0\2SWLRQV !&RQWDFWV 2QWKH&RQWDFWVWDEFOLFN$GG
7\SHWKHILVWQDPHODVWQDPHDQGHPDLODGGUHVVRIWKHSHUVRQWRZKLFK\RXZDQWWR HPDLOWKHUHSRUWDQGFOLFN2.
2SWLRQDOO\DGGDGGLWLRQDOHPDLOUHFLSLHQWVWRWKHFRQWDFWVOLVW &OLFN*URXSV
&OLFN$GGDQGW\SHDQDPHDQGGHVFULSWLRQIRUWKHFRQWUDFWJURXSDQGFOLFN2. 2QWKH*URXSVWDEGRXEOHFOLFNWKHJURXSDGGPHPEHUVWRWKHJURXSDQGFOLFN
6DYH
To create a schedule for producing reports:
2QWKH6FKHGXOHG5HSRUWVPDLQVFUHHQFOLFN1H[WXQGHU&UHDWH1HZ6FKHGXOHWR FUHDWHDVFKHGXOH
A screen for selecting schedule parameters appears.
Under Reports Time Span, if you select Year to Date, the report output includes all days from 1 January to the present date. You can optionally select the From Given Start Date to Current Date option and produce reports for your fiscal year.
If you select printing and mailing options, the Report Distributor prints and e-mails all of the reports included in the schedule (on the date the system runs the reports).
,QWKH6FKHGXOH1DPHOLVWW\SHDVFKHGXOHQDPH
,QWKH7KLV6FKHGXOH:LOO5XQOLVWFOLFNWKHVFKHGXOHIUHTXHQF\VXFKDVHYHU\GD\ HYHU\:HGQHVGD\RUWKHVWDUWRIPRQWK
,QWKH$WOLVWFOLFNWKHWLPHRIGD\WKHVFKHGXOHZLOOEHDFWLYDWHG
,QWKH5HSRUW7LPH6SDQOLVWFOLFNWKHGD\VWREHLQFOXGHGLQWKHVFKHGXOH 8QGHU$XWRPDWLF&OLHQW3ULQWLQJVHOHFWSULQWLQJRSWLRQV
8QGHU$XWRPDWLF&OLHQW0DLOLQJVHOHFWWKH0DLO5HSRUWVIURP7KLV6FKHGXOH7R FKHFNER[DQGVHOHFWDQHPDLODGGUHVV
&OLFN&UHDWH
A screen for selecting report categories appears.
$VVRFLDWLQJDUHSRUWWRWKHVFKHGXOH
You can associate one or more reports to a single schedule.
To associate a report to the current schedule:
&OLFNDUHSRUWLFRQVXFKDV4XHXH5HSRUWV
NOTE: You can generate multiple queue group reports simultaneously by selecting more than one queue
group in the Queue Group list and clicking Submit. This function applies to all report types.
,QWKH5HSRUW7\SHOLVWFOLFN4XHXH*URXS$EDQGRQ6SHFWUXPE\4XHXH ,QWKH4XHXH*URXSOLVWFOLFNDTXHXHJURXS
,QWKH6WDUW+RXUDQG(QG+RXUOLVWVFOLFNDVWDUWKRXUDQGHQGKRXUIRUWKHUHSRUW ,QWKH2XWSXW/DQJXDJHOLVWVHOHFW(QJOLVKRU)UHQFK
8QGHU'D\VWR,QFOXGHVHOHFWGD\VRIWKHZHHNWRLQFOXGHLQWKHUHSRUW &OLFN6XEPLWWRDGGWKHUHSRUWWRWKHFXUUHQWVFKHGXOH
A screen confirming the reports were added to the schedule appears. You can click Add Report (to add an additional report to the active schedule) Manage Schedule (to review schedule status details) or Scheduled Report Menu (to create a new schedule).
Consider the schedule parameters you have defined. At the specified time, Report Scheduler will generate reports associated with your schedule. It will place them in your inbox, print them in hard copy, and e-mail them to the group you selected.
5HYLHZLQJUHSRUWGHWDLOV
To view schedule details for the reports associated with the active schedule:
&OLFN0DQDJH6FKHGXOH
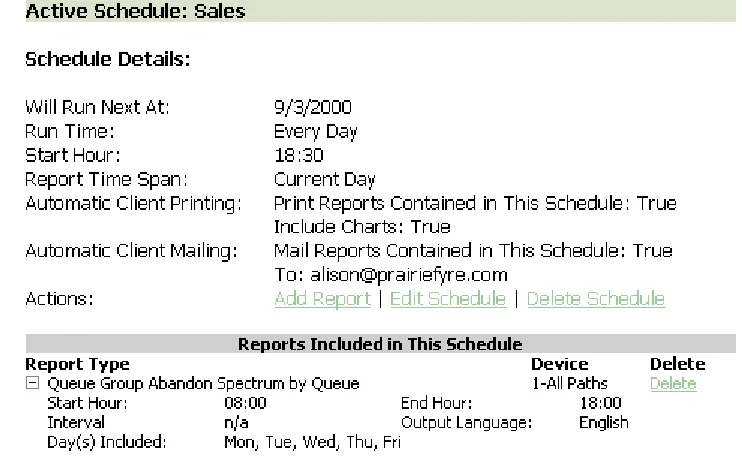
Figure 1-16 appears.
)LJXUH0DQDJHVFKHGXOH
A screen that provides schedule details for the reports associated with the active schedule appears.
The Report Type field lists the report name and the Device field lists the ID of the device on which you are reporting.
9LHZLQJWKHUHSRUWJULGDQGFKDUW
NOTE: 6110 CCM permissions are based on database teams and groups. If you have the SX-2000, you can
use the Quick Configuration tool to create associations. In programming the YourSite Database, you must create agent IDs and associate the agents to employees and to agent groups. You must associate the agent groups to the queues for which they answer calls. You must associate the employees to employee groups and the queues to queue groups. You must create these associations in the database in order to view real-time data and report on these devices. If you are reporting on extensions, trunks, DNIS numbers, and account codes, you must add these devices to the YourSite Database and associate the extensions to extension groups, trunks to trunk groups, and DNIS numbers to DNIS groups.
To view the report grid and chart:
&OLFN5HSRUW,QER[ !7RGD\¶V5HSRUWV
&OLFNWKH9LHZHQWU\DVVRFLDWHGZLWKWKH4XHXH*URXS$EDQGRQ6SHFWUXPE\4XHXH 5HSRUWWRRSHQWKHUHSRUWLQ([FHOLQ\RXUEURZVHU
When you click View, the client-side Report Writer (Web page) retrieves the data files from the 6110 CCM Enterprise Server and re-creates the data set on your computer. It starts Excel and displays the Queue Group Abandon Spectrum by Queue Report spreadsheet and graph. If you click View to open a second report, Report Writer displays it in the same Excel session.
*HQHUDWLQJVFKHGXOHGUHSRUWVLPPHGLDWHO\
In scheduled Reports, typically you create a schedule, associate reports to it, and specify the date and time you would like the reports to be run. On the Scheduled Reports main screen, under Execute Schedule Now, you can select a schedule and generate the reports associated with the schedule immediately.
To generate scheduled reports immediately:
2QWKH6FKHGXOHG5HSRUWVPDLQVFUHHQXQGHU([HFXWH6FKHGXOHVHOHFWDVFKHGXOH
A screen displaying details for the schedule appears.
8QGHU6HOHFW6WDUWDQG(QG'DWHVVSHFLI\WKHGDWHVRQZKLFK\RXDUHUHSRUWLQJ &OLFN([HFXWH1RZ
6LJKW
Effective call center management involves having the right resources in place at the right times to handle an accurately forecasted workload at the desired level of service. Finding the right balance between resources and traffic volumes is critical. 4Sight accurately predicts your resource requirements.
Conducting a forecast involves accurately estimating the three components of call load: talk time, wrap up time, and call volume. 4Sight applies the Erlang C equation to the estimated call load and average talk time and predicts the agent requirement for your service level percentage and service level time targets.
When you click Reporting=>4Sight Figure 1-17 appears.
)LJXUH6LJKWPDLQVFUHHQ
8VLQJ6LJKW
The following exercises will familiarize you with 4Sight. You will learn how to • Generate a run-on-demand forecast report.
• Review report details.
*HQHUDWLQJDIRUHFDVWUHSRUW
If you intend to e-mail the report(s) (associated with your schedule) to one or more recipients you must add the recipients to a mailing list and associate the recipients to a group.
To set up groups for e-mailing reports:
&OLFN0\2SWLRQV !&RQWDFWV 2QWKH&RQWDFWVWDEFOLFN$GG
7\SHWKHILVWQDPHODVWQDPHDQGHPDLODGGUHVVRIWKHSHUVRQWRZKLFK\RXZDQWWR HPDLOWKHUHSRUWDQGFOLFN2.
2SWLRQDOO\DGGDGGLWLRQDOHPDLOUHFLSLHQWVWRWKHFRQWDFWVOLVW &OLFN*URXSV
&OLFN$GGDQGW\SHDQDPHDQGGHVFULSWLRQIRUWKHFRQWUDFWJURXSDQGFOLFN2. 2QWKH*URXSVWDEGRXEOHFOLFNWKHJURXSDGGPHPEHUVWRWKHJURXSDQGFOLFN
6DYH
To run the report:
&OLFN5HSRUWLQJ !6LJKW
The Select Report Options screen appears. The Report type list specifies the type of forecast report you produce: 4Sight Forecast (queue) or 4Sight Group Forecast (queue group).
,QWKH5HSRUW7\SHOLVWFOLFNDUHSRUWW\SH ,QWKH4XHXHOLVWVHOHFWDGHYLFH
The Start date and End date specify the date range for the historical data you use in the forecast.
,QWKH6WDUW'DWHDQG(QG'DWHOLVWVFOLFNDVWDUWGDWHDQGHQGGDWHIRUWKHUHSRUW ,QWKH6WDUW+RXUDQG(QG+RXUOLVWVFOLFNDVWDUWKRXUDQGHQGKRXUIRUWKHUHSRUW ,QWKH,QWHUYDOOLVWVHOHFWWKHIRUHFDVWLQWHUYDOE\RUPLQXWHV
,QWKH2XWSXW/DQJXDJHOLVWVHOHFW(QJOLVKRU)UHQFK
8QGHU$XWRPDWLF&OLHQW0DLOLQJVHOHFWWKH(QDEOHFKHFNER[DQGVHOHFWDQHPDLO DGGUHVV
8QGHU$XWRPDWLF&OLHQW3ULQWLQJVHOHFWSULQWLQJRSWLRQV &OLFN6XEPLW
The Report Confirmation screen appears.
&OLFN9LHZ5HSRUW,QER[WRRSHQ\RXUUHSRUWLQER[
The Report Inbox application displays all run-on-demand, scheduled, and forecast reports generated under your user name.
3HUIRUPLQJZKDWLIVFHQDULRV
4Sight uses default service level percentage (80%), service level time (20 sec), and wrap up time (15 sec) values in calculating the agents required. You can change the values for the calls offered, average talk time, wrap up time, and service level percentage and time and recalculate the number of agents required.
For example, you can reduce the average talk time and recalculate the agents required and the calls handled across 15-minute time intervals for the shift.
([SRUWLQJGDWDWR&&6
7HVW\RXUNQRZOHGJHRI&&05HSRUWLQJ
Read the following questions and select one answer.<RXU6LWH
The YourSite Database consists of Configuration and Security components. You add elements and groups to YourSite in Configuration and program and enforce device level security in Security.
8VLQJ<RXU6LWH
The following exercises will familiarize you with YourSite. Using agents, agent groups, queues, and queue groups you will
• Add elements. • Add database groups.
• Add elements to database groups. • Security
&RQILJXUDWLRQ
When you click YourSite=>Configuration Figure 1-18 appears.
)LJXUH<RXU6LWH&RQILJXUDWLRQPDLQVFUHHQ
In an ACD call center using 6110 CCM there are two main databases: the telephone system database and the prairieFyre YourSite Database. In the Configuration module, you program YourSite to mirror the trunks, lines, routing and timing options, and agent positions in use on the telephone system.
'HWHUPLQLQJZKLFKFDOOFHQWHUGHYLFHVWRFRQILJXUH
Before you program devices and device groups in the YourSite Database you must consider your needs.
5HSRUWLQJ
• Will you report on all devices and device groups, or only on agents, agent groups, queues, and queue groups?
5HDOWLPH
• SuperAdvisor and AgentAdvisor display statistics on agents, agent groups, queues, queue groups, employees, and employee groups. You must configure these devices in the YourSite Database and associate them to groups in order to view data on them in real time.
2QOLQHFKDW
• Agents log on to the chat module using employee IDs: you must configure them in the database.
NOTE: 6110 CCM permissions are based on database teams and groups. If you have the SX-2000, you can
use the Quick Configuration tool to create associations. If you have the SX-200 or SX-200 with real-time, then you must configure 6110 CCM in the traditional manner. In programming the YourSite Database, you must create agent IDs and associate the agents to employees and to agent groups. You must associate the agent groups to the queues for which they answer calls. You must associate the employees to employee groups and the queues to queue groups. You must create these associations in the database in order to view real-time data and report on these devices. If you are reporting on extensions, trunks, and employees, you must add these devices to the YourSite Database and associate the extensions to extension groups, trunks to trunk groups, and DNIS numbers to DNIS groups.
4XLFN&RQILJXUDWLRQ7RRO
There are now two ways to configure Mitel Networks 6110 CCM: the quick configuration tool or the traditional configuration. The quick configuration tool works only for the SX-2000.
4XLFNFRQILJXUDWLRQWRRO
The quick configuration tool works only for the SX-2000.
prairieFyre created the Quick Configuration Tool to help our customers configure Mitel Networks 6110 CCM quickly and efficiently.
&RQYHUWLQJ0LWHOIRUPVWRDW[WILOH
&OLFN6WDUW !3URJUDPV !$FFHVVRULHV !+\SHUWHUPLQDO !+\SHU7HUPLQDO or if you have Windows 2000,
FOLFN6WDUW !3URJUDPV !$FFHVVRULHV !&RPPXQLFDWLRQV !+\SHU7HUPLQDO 2QWKH&RQQHFWLRQ'HVFULSWLRQZLQGRZXQGHU1DPHW\SHWKHQDPHRIWKLV
FRQQHFWLRQHJ&RQQHFWLRQ &OLFN2.
$IWHU&RQQHFWXVLQJVHOHFWWKHFRPSRUWHJ&20 &OLFN2.
9HULI\WKDWWKHELWVSHUVHFRQGGDWDELWVSDULW\VWRSELWVDQGIORZFRQWURODUH FRUUHFW
&OLFN2.
&OLFN7UDQVIHU !&DSWXUH7H[W
&OLFN%URZVHDQGVHOHFWWKHGHVWLQDWLRQRIWKHWH[WILOH &OLFN6WDUW
:KHQDOOWKH0LWHOIRUPVLQIRUPDWLRQLVFRQYHUWHGWRWH[WFORVHWKH&RQQHFWLRQ +\SHU7HUPLQDOZLQGRZ
On the PBX, you now send all valid Agent Group Assignments and Path Assignment to the file. Save the text file and proceed to Configuring Agents, Agent Groups, and/or Queues.
&RQILJXULQJ$JHQWV$JHQW*URXSVDQGRU4XHXHV
&OLFN6WDUW !3URJUDPV !SUDLULH)\UHVRIWZDUH,QF !SUDLULH)\UH0DQDJH PHQW&RQVROH
&OLFN'DWDEDVH !,PSRUW&RQILJXUDWLRQIURP0LWHO$VVLJQPHQW)RUPV $IWHU6HOHFWD)LOHFOLFN%URZVH
6HOHFWWKHGDWDILOHFUHDWHGE\WKH6;WHOHSKRQHVZLWFK &OLFN2.
6HOHFW$JHQWV$JHQW*URXSVDQGRU4XHXHV &OLFN&RPPLWWR'DWDEDVH
A legend appears that indicates if the data has been successfully added, if it already exists, or if it was not selected.
7UDGLWLRQDOFRQILJXUDWLRQ
If you have the SX-200 with real-time or the SX-200, you must configure the database the traditional way.
$GGLQJHOHPHQWVWR<RXU6LWH
You can add elements, such as agents, extensions, trunks, and account codes to YourSite.
To add elements to yourSite:
&OLFN<RXU6LWH !&RQILJXUDWLRQ
5LJKWFOLFNWKHHPSOR\HHJULGDQGFOLFN$GG
$GGDQHPSOR\HHWRWKHGDWDEDVHEHLQJVXUHWRVHOHFWWKHFDOOFHQWHUVLWHQRGHWR ZKLFKWKHHPSOR\HHEHORQJV
&OLFN$GG$OO
&OLFN&ORVHWRUHWXUQWRWKHPDLQVFUHHQ
On the Employee tab, you must enter an employee ID for each call center agent and associate the employee ID to the agent ID. The agent ID and employee ID for an agent can be identical, or different. The choice is yours. It is important you do not assign the same employee ID to two agents; agents must have unique employee IDs.
After you add the data, you can double-click grid headers and sort the data by ascending or descending order.
To add agents to YourSite:
&OLFNWKH$JHQWWDE
5LJKWFOLFNWKHJULGDQGFOLFN$GG
$GGDQDJHQWWRWKHGDWDEDVHEHLQJVXUHWRVHOHFWWKHFDOOFHQWHUVLWHQRGHWR ZKLFKWKHDJHQWEHORQJV
&OLFN$GG$OO
&OLFN&ORVHWRUHWXUQWRWKHPDLQVFUHHQ
To add queues to YourSite:
&OLFNWKH4XHXHWDE
The Queue tab displays agent groups that belong to the queue selected in the Queue list. You define queue dialable numbers, reporting numbers, names, service level time, short abandon time, and short talk time values for queues by right-clicking the grid and clicking Add. You can optionally add a series of queues to YourSite by clicking the Quick Setup button. After you add the data, you can double-click grid headers and sort the data by ascending or descending order.
4XHXHUHSRUWLQJQXPEHU
For the SX-2000, the database expands any dialable number that is less than three digits. For example, if you enter a queue number comprised of fewer than three numeric characters, such as P1, YourSite adds two zeros preceding the 1, as does your telephone system. If you enter a queue number of P30, the database expands the number to P030. For the SX-200 and SX-200 with Real Time, the database expands any dialable number that is less than four digits. For example, if you enter a queue number of P30, the database expands the number to P0030.
NOTE: For the SX-200 and the SX-200 with Real Time, the dialable number and queue reporting number
you define (in YourSite) for a particular queue must be identical. If you use 5300 as the dialable number for the primary customer service queue, you must use P5300 for the corresponding queue reporting number.
'LDODEOH
The Dialable field specifies the number the caller dials to reach a device.
6KRUW$EDQGRQ 7LPH
The Short Abandon Time field specifies the minimum time a caller must wait before abandoning a call in order for the system to collect statistics on the call (for the queue).
Callers abandon after they reach a trunk (before they reach the ACD queue) or while they are in queue waiting for an available agent (either before or after the short abandon time you specify). The telephone system collects statistics on both types of abandons. You assign short abandon time values to ACD queues in YourSite to exclude call statistics on callers who abandon shortly after reaching an ACD queue from queue calculations.
6KRUW7DON 7LPH
The Short Talk Time field specifies the minimum time an agent must talk to a caller in order for the system to collect statistics on the call (for the queue).
6HUYLFH
The Service field specifies the service level time for the queue.
The service level identifies the average length of time a caller who has obtained a trunk waits for an available agent. You use it in calculating the agent requirement. The service level = (calls answered + calls abandoned in Y seconds) ÷ (calls answered + calls abandoned after the short abandon time). It excludes statistics for calls abandoned quickly, without discounting abandoned calls entirely.
The service level is comprised of the service level percent and service level time. The service level time is the threshold time used in calculating the service level percent, such as 90 percent of calls answered in 20 seconds. The service level percent and service level time parameters comprise your service objective.
5LJKWFOLFNWKHJULGDQGFOLFN$GG
$GGDTXHXHQXPEHUTXHXHQDPHGLDODEOHQXPEHUVKRUWDEDQGRQWLPHYDOXHVKRUW WDONWLPHYDOXHDQGVHUYLFHOHYHOWLPHYDOXHIRUWKHTXHXHWRWKHGDWDEDVHEHLQJ VXUHWRVHOHFWWKHFDOOFHQWHUVLWHQRGHWRZKLFKWKHTXHXHEHORQJV
&OLFN$GG$OO