Raritan Multi-Platform Client
Raritan Remote Client
User Guide
MPC version 5.0.0.5
RRC version 4.6.3.5
For Use with
Raritan’s Dominion
®and
IP-Reach
®Products
Copyright © 2007 Raritan, Inc. MPC_RRC-0E-E
June 2007 255-80-5223
Copyright and Trademark Information
This document contains proprietary information that is protected by copyright. All rights reserved. No part of this document may be photocopied, reproduced, or translated into another language without express prior written consent of Raritan, Inc.
© Copyright 2007 Raritan, Inc., CommandCenter®, IP-Reach®, Dominion®, and the Raritan company logo are trademarks or registered trademarks of Raritan, Inc. All rights reserved. Java® is a registered trademark of Sun Microsystems, Inc. Internet Explorer is a registered trademark of Microsoft® Corporation. Netscape® and Netscape Navigator are registered trademarks of Netscape Communication Corporation. Macintosh® and Mac OS are registered trademarks of Apple Computer Inc. Linux® is a registered trademark of Red Hat Inc. All other marks are the property of their respective owners.
© Copyright 2007 GoAhead Software, Inc. All Rights Reserved.
For assistance in the North or South America, please contact the Raritan Technical Support Team by telephone (732) 764-8886, by fax (732) 764-8887, or by e-mail [email protected]
Ask for Technical Support – Monday through Friday, 8:00am to 8:00pm, Eastern.
For assistance around the world, please see the last page of this guide for regional Raritan office contact information.
Contents
Chapter 1: Introduction and Installation... 1
Use with Raritan Products ...1
Minimum System Requirements ...1
Note to CC-SG Users ...1
Java Runtime Environment (JRE) Requirements ...2
MPC Supported Browsers ...4
Raritan Multi-Platform Client (MPC) Supported Operating Systems ...4
Launching MPC from a Web Browser...5
Installing and Launching Standalone MPC ...5
Raritan Remote Client (RRC) ...6
Launching RRC from a Web Browser...6
Installing and Launching Standalone RRC ...8
Chapter 2: Operation ... 9
Window Layout...9 MPC Interface...9 RRC Interface ...10 Connection Profiles ...11 Creating Profiles ...11 Modifying Profiles ...16 Deleting Profiles...16Establishing a New Connection ...17
Closing a Remote Connection ...17
Connection Info ...18
Navigator ...19
Display and Sorting Options ...21
Toolbar and Shortcuts...26
Status Bar ...27
Remote KVM Console Control ...28
Keyboard Shortcut Menu ...29
Windows Key and Keyboard Shortcuts in MPC ...30
Changing the Keyboard Menu Shortcut Hotkey Combination...30
Single Mouse Mode / Dual Mouse Mode ...30
Automatic Mouse Synchronization...32
Mouse Synchronization Options ...33
Screen Modes ...33
Full Screen / Target Screen Resolution ...33
Scaling...36
Auto-Scroll ...37
Keyboard Handler ...38
Keyboard Macros...38
Connection and Video Properties ...42
Color Calibration ...49
Keyboard Type (MPC Only)...50
Chapter 3: Virtual Media ... 51
Overview ...51
Prerequisites for Using Virtual Media...52
Using Virtual Media ...52
Connecting to Virtual Media ...53
For Local Drives...53
For CD-ROM/DVD-ROM/ISO Images...54
Disconnecting Virtual Media ...55
File Server Setup (File Server ISO Images Only) ...56
Chapter 4: Administrative Functions ... 57
Upgrading Device Firmware ...57
Changing a Password ...57
Restarting Device...58
Restoring User Configuration ...58
Backup and Restore (Dominion KX II only) ...59
Log Files...61
Activity Log ...61
Diagnostic Log (excluding Dominion KX II)...61
Broadcast Port ...62
Remote Power Management ...62
Launching Administrator and Diagnostic Interfaces ...63
Administrator Interface...63
Diagnostic Interface (excluding Dominion KX II)...63
Tools Options ...64
General Options (RRC Only) ...66
Appendix A: Installing and Launching Standalone MPC... 67
Windows...67
Checking JRE Version in Windows...67
Installing MPC for Windows ...68
Launching MPC in Windows ...69
Linux...70
Checking JRE Version in Linux ...70
Installing MPC for Linux...70
Launching MPC in Linux...72
Solaris ...73
Checking JRE Version on Sun Solaris...73
Installing MPC for Sun Solaris ...74
Launching MPC on Sun Solaris ...76
Macintosh...77
Checking JRE Version in Mac OSX...77
Installing MPC for Mac OSX ...77
Launching MPC in Mac OSX ...78
Modem Connectivity...79
To Make Modem Connectivity Available on Unix/Linux for Non-Root Users ...79
Appendix B: Conditions for Intelligent Mouse Synchronization .. 81
Figures
Figure 1: Java Control Panel... 2
Figure 2: Temporary Files Settings ... 3
Figure 3: Java Applet Cache Viewer ... 3
Figure 4: Delete Temporary Files... 3
Figure 5: Launching RRC in IE ... 6
Figure 6: RRC Loading Screen ... 7
Figure 7: Possible Security Alert Screens ... 7
Figure 8: MPC Window Layout ... 9
Figure 9: RRC Window Layout... 10
Figure 10: Add Connection – Connect Tab ... 11
Figure 11: Add Connection – Dial Up Connection Type Detail... 12
Figure 12: Add Connection – Compression Tab ... 13
Figure 13: Add Connection Window in RRC ... 13
Figure 14: Add Connection – Security Tab ... 15
Figure 15: Modify Connection Screen ... 16
Figure 16: Connection Info... 18
Figure 17: Expanded Navigation Tree ... 19
Figure 18: View, Show Menu Options... 21
Figure 19: Sort Ports by Channel... 22
Figure 20: Navigator in Channel Order ... 22
Figure 21: Sort Ports by Name... 23
Figure 22: Navigator in Name Order ... 23
Figure 23: Sort Ports by Status ... 24
Figure 24: Navigator in Status Order ... 24
Figure 25: MPC Navigator Tabs... 25
Figure 26: MPC / RRC Toolbar ... 26
Figure 27: Status Bar ... 27
Figure 28: Navigation Tree... 28
Figure 29: Hot Key Shortcut Menu... 29
Figure 30: RRC Remote Desktop ... 31
Figure 31: MPC Remote Desktop ... 31
Figure 32: Single Cursor Mode Window ... 31
Figure 33: Target Screen Resolution Mode in MPC... 34
Figure 34: Full Screen Mode in RRC ... 35
Figure 35: Scale Video Mode... 36
Figure 36: Auto-Scroll View with Border Indicated ... 37
Figure 37: Add Keyboard Macro Window ... 39
Figure 38: Add Keyboard Macro Window ... 40
Figure 39: Keyboard Macros Window ... 40
Figure 40: Macro Listed on the Keyboard Menu ... 41
Figure 41: Properties Dialog in MPC... 42
Figure 42: Modify Connection in RRC... 42
Figure 43: Settings (Video) ... 44
Figure 44: Video Settings (Generation 1)... 46
Figure 45: Video Settings for Dominion KX101... 48
Figure 46: Example of Sizing the Notepad Window ... 49
Figure 47: Keyboard Type Selection (MPC Only) ... 50
Figure 51: File Server Setup ... 56
Figure 52: Change Password Window ... 57
Figure 53: Backup and Restore Menu Options ... 59
Figure 54: Backup All ... 59
Figure 55: Restore Device Configuration ... 60
Figure 56:Restore Packages... 60
Figure 57: Options Window... 62
Figure 58: Launching Diagnostic Console for KX Manager ... 63
Figure 59: Options – General Tab... 64
Figure 60: Single Cursor Mode ... 64
Figure 61: Options – Advanced Tab ... 65
Figure 62: General Options Window ... 66
Figure 63: Single Cursor Mode Confirmation Screen... 66
Figure 64: Choose Install Path... 68
Figure 65: Shortcut Options ... 68
Figure 66: Final Installation Screen... 69
Figure 67: Launching MPC in Windows ... 69
Figure 68: Check JRE Version in Linux ... 70
Figure 69: Set Installation Path ... 71
Figure 70: Shortcut Options ... 71
Figure 71: Final Installation Screen... 72
Figure 72: MPC Launched in Linux... 72
Figure 73: Check JRE Version in Sun Solaris... 73
Figure 74: Set Installation Path ... 74
Figure 75: Final Installation Screen... 75
Figure 76: Launching MPC in Sun Solaris ... 76
Figure 77: Check JRE Version in Mac OSX... 77
Figure 78: Select Installation Path ... 77
Figure 79: Final Installation Screen... 78
Chapter 1: Introduction and Installation
Raritan Multi-Platform Client (MPC) and Raritan Remote Client (RRC) are graphical user interfaces for the Raritan Dominion KX and IP-Reach product lines, providing remote access to target servers connected to Raritan KVM over IP devices. Non-Windows users must use Raritan Multi-Platform Client, and Windows® users running Internet Explorer must use Raritan Remote Client.
Use with Raritan Products
Raritan Multi-Platform Client (MPC) and Raritan Remote Client (RRC) are intended for use with the following products:
PRODUCT MPC RRC Dominion KX II (G2) 9 Dominion KX I (G1) 9 9 Dominion KX101 (G1) 9 9 Dominion KSX (G1) 9 9 IP-Reach 9 9 UST-IP (G1) 9 9 Legend: G1 Generation 1 G2 Generation 2
There are some differences between MPC when used with the Dominion KX I and Dominion KX II devices; these differences are noted in the user manual.
Note: RRC cannot be used with Dominion KX II devices.
Minimum System Requirements
The minimum system requirements for the Raritan Multi-Platform Client and Raritan Remote Client are:
• CPU Speed: 1.0 GHz
• RAM: 512 Mbytes
Note: Running the client software on system configurations below either of these specifications may impact performance and result in errors.
Note to CC-SG Users
If you are using Dominion KX II in a CC-SG configuration, do not use the CC-SG proxy mode if you are also planning to use the Multi-Platform Client (MPC).
Java Runtime Environment (JRE) Requirements
Raritan recommends using Java® Runtime Environment (JRE) version 1.5 for optimum performance, but MPC will function with JRE version 1.4.2_05 or greater (with the exception of JRE 1.5.0_02). JRE 1.6 is also supported, but has not been fully tested.
Determine your version of the JRE on the Java webpage: http://www.java.com/en/download/help/testvm.xml
You may need some configuration depending on your OS and browser; configuration instructions are provided with the JRE download. Please note that modem use is not supported with Raritan’s Dominion KX101.
Important: When launching MPC from a browser, it is highly recommended to disable the Java Applet caching.
Although no actual problems have occurred when Java caching is turned on, some non-impacting Java exceptions have occurred with the caching turned on. Generation of these Java-exceptions can appear in the Java Applet Console window, and may degrade performance.
For Linux/UNIX environments, the Java Control Panel is located in the JRE’s bin directory; the location varies based on where JRE was installed by your Linux/UNIX administrator.
Tip: It is also recommended that you clear the Java cache.
To disable Java caching and clear the cache (these steps use Microsoft Windows XP and JRE 1.5.0):
1. From the Start menu, click Control Panel.
3. To disable Java caching:
A. From the General tab, click the Settings button in Temporary Internet Files. The Temporary Files Settings dialog opens:
Figure 2: Temporary Files Settings
B. Click the View Applets button. The Java Applet Cache Viewer opens:
Figure 3: Java Applet Cache Viewer
C. Clear the Enable Caching checkbox.
D. Click OK.
4. To clear the Java cache:
A. From the Temporary Files Settings dialog, click the Delete Files button. The Delete Temporary Files dialog opens:
MPC Supported Browsers
MPC supports the following browsers:
• Internet Explorer 6 and 7
• Firefox® 1.5 and 2.0
• Mozilla® 1.7
• Safari 2.0
Raritan Multi-Platform Client (MPC) Supported Operating
Systems
When launched as web applet or as a standalone application, MPC allows you to reach target servers via different Raritan Dominion KX and IP Reach models.
Raritan MPC is compatible with the following platforms:
• Windows XP
• Windows 2000 SP4
• Windows Vista
• Red Hat Linux® 9.0
• Red Hat Enterprise Workstation 3.0 and 4.0
• SUSE Linux Professional 9.2 and 10
• Fedora Core 5 and above
• Mac®
Launching MPC from a Web Browser
Important: Regardless of the browser you use, you must allow pop-ups from the Dominion device’s IP address in order to launch MPC.
1. To launch MPC from a client running any supported browser, type http://IP-ADDESS/mpc into the address line, where IP-ADDESS is the IP address of your Raritan device. MPC will launch in a new window that does not contain a menu bar, tool bar, scroll bar, or address bar. Work in this window and toggle to other open windows using the ALT+TAB command. 2. When MPC launches, a device tree of all automatically detected Raritan devices found on
your subnet is displayed on the left side of the screen. If you do not find your unit listed by name, create an icon manually by selecting Connection > New Profile. The Add Connection window opens.
3. Type a device Description, specify a Connection Type, add the device IP Address, and click OK. These specifications can be edited later.
4. In the Navigator panel on the left of the screen, double-click on the icon that corresponds to your Raritan device.
If you prefer, install MPC as a standalone applet (see next section).
Note: Depending on your browser and browser security settings, you may see various security and certificate check and warning dialog boxes. It is necessary to accept the options in order to launch MPC.
Installing and Launching Standalone MPC
Please see Appendix A: Installing and Launching Standalone MPC for instructions on installing the standalone version of MPC on various operating systems.
Direct Dial Modem applies to devices running on Windows, Linux, and Sun Solaris, but not on Macintosh®. If you are using Microsoft® Windows with MPC, you must use the Standalone version.
Raritan Remote Client (RRC)
Important: RRC works only with MS Internet Explorer. If you are using a different Web browser, MPC will load automatically.
Most users access RRC via Internet Explorer, while other users, particularly those operating over a modem connection, invoke RRC standalone. Both options are detailed below. Modem use is not supported with Raritan’s Dominion KX101.
Launching RRC from a Web Browser
Your IP-Reach and Dominion units feature Web browser-access capabilities and can provide a connection from any Windows-based Remote PC running Microsoft Internet Explorer 6.0.
Security Settings
To access IP-Reach or Dominion KX via Web browser, your Web browser must be configured appropriately under the Internet Explorer security settings tab:
• Download Signed ActiveX controls should be set to either “Enable” or “Prompt”
• Run ActiveX controls and plug-ins should be set to either “Enable” or “Prompt” Please consult your Microsoft Internet Explorer documentation for additional information.
Note: Microsoft Windows 2000, Microsoft Windows XP, and Microsoft Windows 2003 restrict certain types of users from downloading and running ActiveX controls and plug-ins, regardless of the above settings in Internet Explorer. Please consult your Microsoft Windows documentation for more information.
Launching RRC
1. Ensure that your browser security settings are configured appropriately and type the IP address assigned to your IP-Reach or Dominion unit (please see the Initial Configuration
section in the appropriate product user guide for additional information) in the URL field of your Web browser.
Figure 5: Launching RRC in IE
Note: IP-Reach and Dominion units ship with the default IP address of 192.168.0.192. Please note that an IP address must be used. Hostnames are not currently supported.
2. You will be redirected to an HTTPS (128-bit) secure Web page so you can launch RRC.
Figure 6: RRC Loading Screen
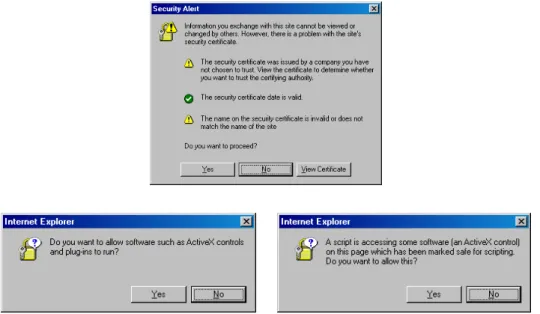
3. Depending on your browser and its security configuration, you may see any or all of the following dialog boxes, confirming access and launch of an externally-provided program. Click Yes to advance through any of these prompts.
Figure 7: Possible Security Alert Screens
Removing RRC from the Browser Cache
To remove RRC from your browser cache for any reason, follow the standard procedure for your Web browser software.
Directions for Internet Explorer v6.0:
1. If you have used RRC recently, exit all instances of Internet Explorer, and restart Internet Explorer.
2. On the Internet Explorer Tools menu, click Internet Options.
3. When the Internet Options dialog box appears, click on the General Settings tab, and click Delete Files.
4. Click on the Settings tab, and then click View Objects.
5. Internet Explorer will display a list of cached program objects. Select any entries named “TeleControl Class,” “Raritan Console,” or “Power Board” and delete them.
Installing and Launching Standalone RRC
Note: This step is optional. IP-Reach or Dominion can be accessed from a Remote PC either by installing RRC software or by launching RRC via Web browser. Accessing IP-Reach or Dominion via Web browser does not require any software installation on the Remote PC. This section lists the steps required to invoke RRC using standalone software, which may be useful for accessing IP-Reach or Dominion via modem or if you wish to close firewall access to ports 80 and/or 443.
1. Launch your Web browser and go to Raritan’s Web site (http://www.raritan.com/). Click Support in the top navigation bar, and then click Firmware Upgrades in the left navigation bar (or type the URL http://www.raritan.com/support/firmwareupgrades).
2. Scroll down the page until you see the appropriate product name and click on it.
3. Locate the appropriate version of the standalone RRC client for the Release you are using. 4. The entry for the standalone RRC client is a .zip file which contains the release notes and the
Installer for Standalone RRC. Check the release notes for the latest information.
5. You can download the .zip file to your client machine or simply click on the .zip file entry. 6. Double-click on the Installer executable in the .zip file and follow the on-screen instructions
in the InstallShield Wizard to complete RRC installation on your Remote PC. Be sure to check the release notes for the latest information and any release specific instructions.
7. Depending upon the configuration of your PC, the RRC installation program may also automatically install DirectX and Microsoft Foundation Class libraries, if they are required. If so, you will be asked to restart your PC after installation.
8. A Raritan Remote Client icon will appear on your desktop. Click on this icon to launch the standalone RRC client.
9. The standalone client can be uninstalled in the Add or Remove Programs applet in the Windows Control Panel. You must uninstall before installing a new version of Standalone RRC.
Chapter 2: Operation
Window Layout
MPC Interface
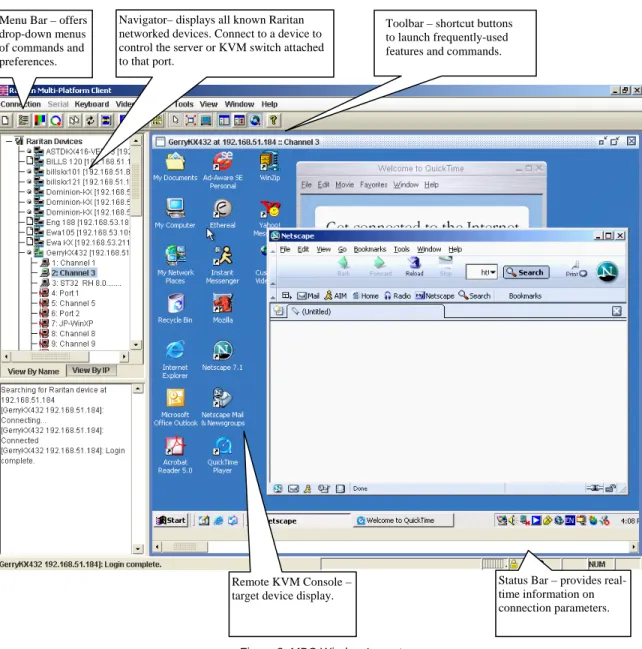
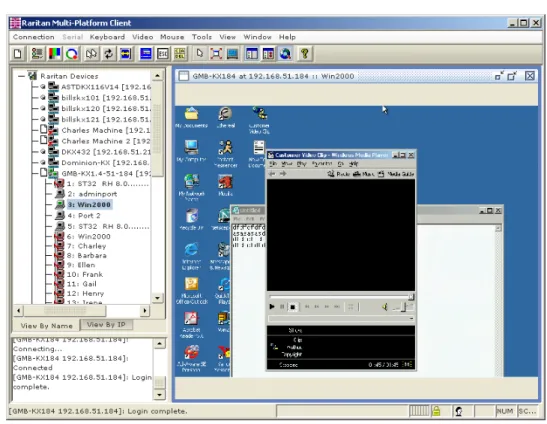
MPC functions are grouped into six general sections on the screen. As a standalone product, or as a Web applet, the MPC window contains these main sections:
Navigator– displays all known Raritan networked devices. Connect to a device to control the server or KVM switch attached to that port.
Menu Bar – offers drop-down menus of commands and preferences.
Toolbar – shortcut buttons to launch frequently-used features and commands.
Remote KVM Console – target device display.
Status Bar – provides real-time information on connection parameters.
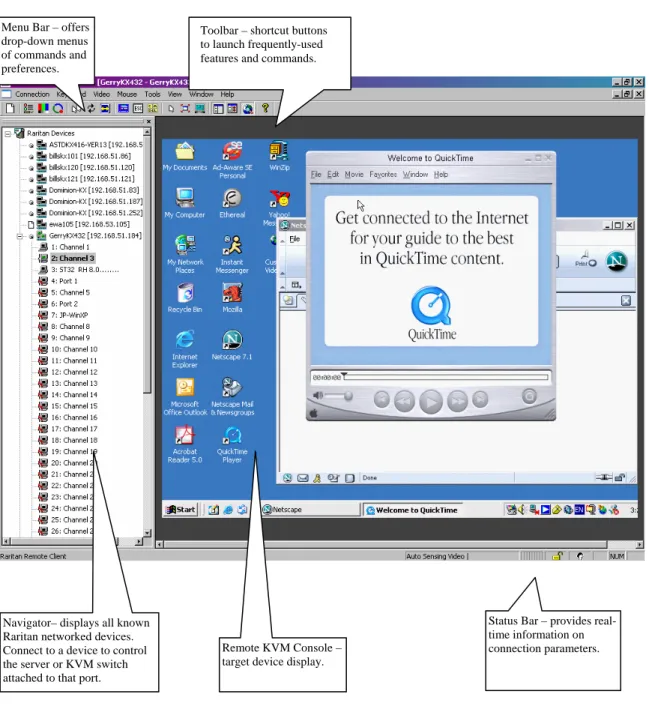
RRC Interface
The RRC window is almost identical to the MPC window.
Menu Bar – offers drop-down menus of commands and preferences.
Toolbar – shortcut buttons to launch frequently-used features and commands.
Status Bar – provides real-time information on connection parameters. Navigator– displays all known
Raritan networked devices. Connect to a device to control the server or KVM switch attached to that port.
Remote KVM Console – target device display.
Connection Profiles
Connection profiles store important information about your Raritan device, such as IP address, custom TCP ports, preferred compression settings, and custom security keys. A profile is required to access devices outside your subnet and to access devices using dial-up connection.
Through profiles, you can set up personalized connections; these profiles are not shared among other users.
Tip: If your Raritan device is configured to use a custom TCP port or a group security key, first create a connection profile so that you can access the device.
Creating Profiles
To create a profile:
1. There are two ways to create a profile:
• For automatically discovered devices, right-click on the device name in the Navigator and select Add Profile from the shortcut menu.
• For other devices, select Connection > New Profile.
The Add Connection window opens. Options are organized into three tabs. 2. Update the Connect tab:
Only the Connect Tab is available for Generation 2 (G2) Raritan devices
Figure 10: Add Connection – Connect Tab
− Description: Type a meaningful description (up to 32 characters, alphanumeric, special characters allowed). This description identifies the Raritan device in the Navigator.
− Product: Select the Raritan product you are using from the drop-down list: Dominion KX G2 (Dominion KX II), Dominion KX G1, Dominion KSX G1, IP-Reach, UST-IP G1, and KX101 G1.
− Connection Type: Use the drop-down list box to select the type of connection. Please note that only TCP/IP is available for Generation 2 (G2) Raritan devices.
Select TCP/IP Connection for a LAN/WAN connection.
♦ Find Raritan device by (select one of these options):
9 IP Address: Type the IP Address assigned to your Raritan device.
9 Name: Type the name assigned to your Raritan device during initial setup.
9 DNS: Type the Domain Name Server (DNS) name. Use this option if you have a DNS server to resolve a DNS name to the IP Address assigned to your Raritan device. Please note that you cannot use this option for Raritan Generation 2 (G2) devices.
Select Dial Up Connection for a direct analog modem connection to the Raritan device. Type the parameters that MPC or RRC should use to establish a connection. Dial up connection does not apply to Generation 2 (G2) or KX101.
9 Phone Number. Include any additional codes that MPC or RRC should dial to establish a connection, such as country codes, area codes, or outside line access codes.
9 Modem. Select the modem (as configured in Windows) from the drop-down list that MPC or RRC should use to dial and connect to your Raritan device.
Important: MPC modem connectivity is supported on Windows, Linux, and Sun Solaris, but not Macintosh.
Note: For security reasons, you must use the MPC standalone client if you require modem access. In addition, one modem on a client PC can be used for only one device connection.
MPC Release 5.0+ MPC (Pre-5.0 Release)
Screen variation
Figure 11: Add Connection – Dial Up Connection Type Detail
− Use Default Port Number: For TCP Ports, Dominion KX and IP-Reach are automatically configured to use TCP Port 5000 when communicating with MPC/RRC.
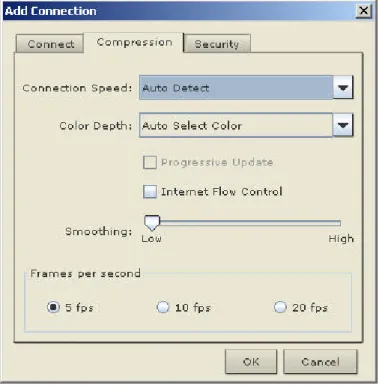
Figure 12: Add Connection – Compression Tab
Figure 13: Add Connection Window in RRC
− Connection Speed: Select the Connection Speed from the drop-down list. IP Reach and Dominion can automatically detect available bandwidth and not limit bandwidth use; but you can also adjust this usage according to bandwidth limitations. Depending on the Raritan device in use, different options may be available.
Auto Detect 100mb Ethernet 10mb Ethernet 1.5mb (Max DSL/T1) 1mb (Fast DSL/T1) 512 kb (Medium DSL/T1) 384 kb (Slow DSL/T1) 256 kb (Cable) 128 kb (Dual ISDN) 56 kb (ISP Modem) 33 kb (Fast Modem) 24 kb (Slow Modem)
− Color Depth: Select the Color Depth from the drop-down list. IP-Reach and Dominion can dynamically adapt the color depth transmitted to remote users in order to maximize usability in all bandwidth constraints. Depending on the Raritan device in use, different options may be available.
Important: For most administrative tasks (server monitoring, reconfiguring, etc.), administrators do not require the full 24-bit or 32-bit color spectrum made available by most video graphics cards. Attempting to transmit such high color depths wastes network bandwidth.
Auto Select Color 15-bit RGB Color 12-bit RGB Color 8-bit RGB Color 5-bit Color 4-bit Color 4-bit Gray 3-bit Gray 2-bit Gray Black and White
Progressive Update increases the usability in constrained bandwidth environments. When Progressive Update is enabled, IP-Reach or Dominion initially sends an image of the remote desktop at lower color depths, and then provides higher color depth images as bandwidth allows.
Note: When Color Depth is set to Auto Select Color (default), Progressive Update is automatic. IP-Reach or Dominion will enable/disable Progressive Update as required, disabling it for fast connections and enabling it for slow connections.
Internet Flow Control: When using IP-Reach or Dominion over an unpredictable public WAN (particularly in international scenarios), checking the Internet Flow Control check box ensures that packets transmitted by IP-Reach or Dominion are received and reconstructed by MPC/RRC in the correct order.
Smoothing (15-bit mode only): Use the slider to select the desired level of video Smoothing. The level determines how aggressively to blend screen regions with small color variation into a single smooth color. Smoothing improves the appearance of target video by reducing displayed video noise.
− (MPC Only) Frames Per Second: This setting instructs MPC how often to redraw the video display of the target. This only affects the client display behavior and has no bearing on the data rate of the video being sent to the client. Setting this option higher makes the video appear smoother but also requires more processing power.
4. Update the Security tab (not available for Generation 2 (G2) Raritan devices):
Please note that the Security tab is disabled for Generation 2 Raritan devices. If your Dominion or IP-Reach unit is configured to use a private security key, input that key to gain the authorization required to initiate a connection to that IP-Reach or Dominion unit.
Figure 14: Add Connection – Security Tab
− Type the private security key in the Private Key field.
− Re-type the private security key in the Confirm Private Key field to ensure no typographical errors were made.
Modifying Profiles
To modify a profile in MPC or RRC:
1. Select the device in the Navigator panel and right-click on it. 2. Select Modify Profile. The Modify Connection window opens:
Figure 15: Modify Connection Screen
3. Update the fields as appropriate. 4. Click OK.
Deleting Profiles
To delete a profile in MPC or RRC:
1. Select the device with a profile in the Navigator and right-click on it. 2. Select Delete Profile.
3. When prompted to confirm the deletion, click Yes to delete the profile for this device, or click No to return to MPC or RRC without deleting.
Establishing a New Connection
Note: Depending on your version of the JRE, you might receive a certificate message when using the MPC standalone application to access a Dominion KX II device. You have to accept the certificate in order to establish the connection.
Double-click the icon of a Raritan networked device in the Navigator, then type your user name and password to connect. You can also right-click on the device name and select New Connection from the shortcut menu.
Note: The default IP-Reach or Dominion login user name is admin, with the password raritan. This user has administrative privileges. Passwords are case sensitive and must be entered in the exact case combination in which they were created. The default password raritan must be entered entirely in lowercase letters. To ensure security, change the default username password as soon as possible.
If you do not see an icon for your IP-Reach or Dominion in the Navigator, please follow the instructions in the Creating Profiles section in this chapter to create a new connection profile for your IP-Reach or Dominion.
If you are having problems connecting to a Raritan device, be sure to check the following:
• Username: Raritan usernames are not case-sensitive.
• Password: Raritan passwords are case-sensitive.
• TCP Port: If you have configured your Raritan Device to use a non-default TCP Port, this information must be entered into its connection profile.
• Firewall Settings: If you are accessing a Raritan Device through a firewall, that firewall must be configured to allow two-way communication on TCP Port 5000 (or the custom TCP Port to which your Raritan Device has been configured).
• Security Key: If you have configured your Raritan Device to require a group security key, that key must be entered into the device’s connection profile.
Note: If you are running MPC on Internet Explorer with both a Microsoft Firewall and a non-Microsoft Firewall utility installed, when you launch MPC – even if MPC is not open – IE will launch a message telling you that MPC is already running. To avoid this, deactivate one of your Firewalls, or use a browser such as Mozilla or Firefox.
Closing a Remote Connection
To close the IP-Reach or Dominion connection, select the device in the Navigator and right-click on it. Select Disconnect from the shortcut menu.
To exit MPC or RRC completely, on the Connection menu, click Exit.
Connection Info
To obtain information about your MPC connection:
Select Connection > Connection Info. The Connection Info window opens:
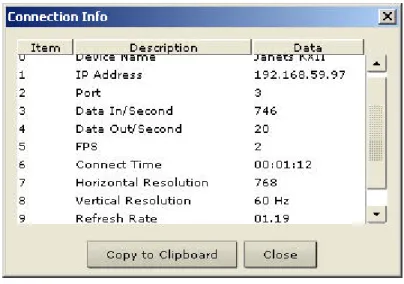
Figure 16: Connection Info
The following information is displayed about the current connection:
• Device Name. The name of your Dominion or IP-Reach device.
• IP Address. The IP Address of your Dominion or IP-Reach device.
• Port. The KVM Communication TCP/IP Port used to access the target device.
• Data In/Second. Data rate in.
• Data Out/Second. Data rate out.
• FPS. The frames per second transmitted for video.
• Connect Time. The duration of the connect time.
• Horizontal Resolution. The screen resolution horizontally.
• Vertical Resolution. The screen resolution vertically.
• Refresh Rate. How often the screen is refreshed.
• Protocol Version. The RFB Protocol version.
To copy this information:
Click Copy to Clipboard. The information is now available to be pasted into the program of your choice.
Navigator
The MPC and RRC Navigator panels provide a tree view of every known Raritan device so you can access all Raritan networked appliances for which a connection profile exists and/or all Raritan devices automatically identified on the network.
Note: Automatic Raritan device identification uses the UDP protocol, and will typically identify all Raritan devices on your subnet. Network administrators rarely allow UDP broadcasts to function outside of a subnet. Automatic Raritan device identification will find only those Raritan devices that are configured to use the default TCP Port (5000) or another “broadcast” port as set in the Options panel on the Tools menu.
Figure 17: Expanded Navigation Tree
Each device entry in the Navigator provides two icons to communicate network status and connection profile information. A connection profile is generally created by an MPC or RRC user in order to store personalized information about specific devices (please see the section Creating Profiles in this chapter for additional information).
In MPC, devices are named according to the Manager Name field in KX Manager’s Network Configuration screen. Dominion KX II devices are named according to the Device Name field in Dominion KX II Console Network Settings screen.
In RRC, profiled devices are listed in the Navigator according to the data in the Description field of the device’s profile. Automatically-identified devices will be identified according to the name assigned to them in that device’s network configuration setting.
Left Icon (Connection Profile Icon)
Profiled – A network connection profile exists for this device. Modem Profile – A modem connection profile exists for this device.
Not Profiled – MPC/RRC found this device on the network, but a connection profile does not exist for it.
Right Icon (Network Status Icon)
Connected (green) – You are currently authenticated and connected to this device. Available (black) – This device is currently available on the network, but you are not currently connected to it.
Unavailable – A profile exists for this device, but it is not currently available on the network. (Note that all devices with modem profiles to which you are not currently connected will display this icon.)
For each Raritan device to which you are connected, the Navigator expands its display tree to show each port for which you have access.
• Ports displayed with a green icon indicate that you are connected to that port.
• Bold type indicates which port is currently displayed (active) in the remote desktop area of the client.
For each server port entry, the Navigator displays the following icons: Connected (green)
Available for connection
Unavailable (no device connected, or access is blocked)
In use by another (may be unavailable depending on permissions)
Note: Blank port names are displayed as ‘Unnamed.’ If you make a port name blank, it will revert to this default when you reconnect to the device.
Navigator Customization
Use specific tools in the Toolbar to customize some Navigator attributes:
Display / Hide Navigator – Toggle Navigator visibility. You can also use View → Navigator in the Menu Bar to toggle Navigator visibility.
Refresh Navigator – Update the device status information displayed in the Navigator.
Show Browsed Devices – Toggle whether the Navigator should display “Not Profiled” devices found on the network, or should show only devices for which profiles exist. This option can also be reached using View → Show → All in the Menu Bar.
Note: The Browse connection method is the only method of connecting to a Raritan Device configured to use DHCP IP addressing.
Display and Sorting Options
To better organize your view of all ports, use the Show and Sort options. Please note that you do not need an open connection to a target to Show and Sort targets in the Navigation panel.
Showing Ports
In MPC and RRC, you can select which ports to view in the Navigation panel by selecting Show options on the View menu.
• Discovered Devices: shows or hides discovered devices from the navigator view; you will not see broadcast messages when this option is disabled.
• Unassigned Channels: shows or hides channels with no attached targets. Please note that the default for generation 1 (G1) devices is to show unassigned channels (option is enabled), whereas, the default is to hide unassigned channels (option is disabled) for generation 2 (G2) devices.
• Tools: shows or hides the Admin and Diagnostic ports.
Figure 18: View, Show Menu Options
Sorting Ports
Use the Sort options on the View menu to organize KX port information; sort ports by channel number, channel name, or channel status.
Sort by Channel Number
When sorted by channel, ports are listed numerically.
Sort by Name
When sorted by name, port names are sorted alphanumerically within each group.
Figure 21: Sort Ports by Name
Sort by Status
Ports are sorted in the following order:
• Active Channels
• Busy Channels
• Available Devices
• Unavailable Devices
MPC Navigator Tabs
MPC tabs at the base of its Navigator pane. These tabs allow you to change how you display devices.
Click the View By Name tab to sort the list alphabetically by name, or click the View By IP tab to sort the list numerically by IP address.
Figure 25: MPC Navigator Tabs
Please note that these tabs are available only in the MPC interface.
In both MPC and RRC, if all ports of the device to which you are connecting are already occupied, an alert message appears and you must try to connect when one or the ports is available.
Toolbar and Shortcuts
The Toolbar provides one-click access to the most frequently-used commands.
Figure 26: MPC / RRC Toolbar
BUTTON BUTTON NAME FUNCTION
New Profile Creates a new Navigator entry for a Raritan device; same results as selecting Connection Æ New Profile in the menu bar.
Connection Properties
Opens Modify Connection Properties dialog box to manually adjust bandwidth-correlated options (Connection Speed, Color Depth, etc.).
Video Settings Opens the Video Settings dialog box to manually adjust video conversion parameters.
Color
Calibration Adjusts color settings to reduce excess color noise. Synchronize
Mouse
In dual-mouse mode, forces realignment of target server mouse pointer with Raritan Remote Client mouse pointer.
Refresh Screen Forces refresh of video screen. Auto-sense
Video Settings Forces refresh of video settings (resolution, refresh rate). Enter On-Screen
Menu
Not applicable for IP-Reach or Dominion. Used by MPC/RRC with other Raritan products.
Exit On-Screen Menu
Not applicable for IP-Reach or Dominion. Used by MPC/RRC with other Raritan products (on keyboard, press ESC)
Send CTRL+ALT+D
EL
Sends a CTRL+ALT+DEL key sequence to the target server.
Single Cursor Mode
Enters Single Cursor Mode, in which the local PC’s mouse pointer no longer appears on-screen. Press CTRL+ALT+X to exit this mode.
Full Screen
Mode Maximizes the screen real estate to view the target server desktop.
Scaling Increases or reduces target video size so you can view the entire contents of the target server window without using the scroll bar. Show / Hide
Navigator Toggles Navigator panel from visible to hidden. Refresh
Navigator Forces a refresh of the data displayed by the RRC Navigator. Show / Hide
“Browsed” Devices
Toggles whether or not the RRC Navigator displays Raritan Devices automatically identified on the network (that do not have pre-configured profiles associated with them).
Status Bar
The Status Bar displays session information about your connection to a Raritan IP-Reach or Dominion unit.
Figure 27: Status Bar
• Video Sensing Status / Path Indicator: indicates the occurrence of video sensing, during connections to target KVM Server ports.
• Bandwidth Usage Indicator: indicates how much of your total available bandwidth is currently being used. The Connection Speed setting, found under the Compression tab of the Connection Properties screen, determines total available bandwidth.
• Security Indicator: indicates whether the current remote connection is protected by encryption. Encryption requirements are set during IP-Reach or Dominion configuration of your Raritan KVM over IP device. When a Raritan IP-Reach or Dominion device is configured for No encryption or SSL Authentication, NO data encryption, the Security Indicator is represented on the Status Bar as an open lock. When SSL authentication, data encryption or SSL authentication, SSL encryption is selected, the Security Indicator is represented on the Status Bar as a closed lock.
• Concurrent Connections Indicator: indicates if multiple remote users are currently connected to the same IP-Reach or Dominion target server on the device, showing one icon for a single connected user, and two icons if two or more users are connected.
Concurrent connection ability can be set globally under PC share mode on the KX Manager Security Settings screen, or set per individual user in the Concurrent Access Mode setting on the KX Manager User Account Settings screen. For Dominion KX II, concurrent connection ability can be set using the PC Share Mode option in the Dominion KX II Security Settings page: PC-Share permits concurrent access; Private limits server access to one user at a time.
• Lock Key Indicators: indicates the status of the current target KVM Server, with respect to the activation of the Caps-Lock, Num-Lock, and Scroll-Lock keys. If these keys are enabled on the target server being viewed, this affirmative status will be reflected on the Status Bar as indicated.
Note: The Lock Key (Scroll Lock, Num Lock, Caps Lock) LEDs on your keyboard that indicate whether the Lock Key is active may or may not be in sync with the Lock Key Indicators on the RRC Status Bar. Please use the Status Bar as your guide.
Remote KVM Console Control
Once you establish a connection with a Raritan IP-Reach or Dominion KX device, that unit’s icon in the Navigator expands to display all ports enabled for remote
Figure 28: Navigation Tree
Choose one of the following options to establish a remote KVM console connection:
• Double-click on the KVM port you want to control – this method closes any previous connection before connecting to the new port
• Right-click on the port and select Switch from the shortcut menu – this method closes any previous connection before connecting to the new port
• Right-click on the port and select New Connection from the shortcut menu – this method allows you to connect to the selected port without closing any previous connections, creating a new connection if the device supports multiple concurrent connections
Once connected, Raritan KVM over IP devices display real-time video output of the target server (this video is compressed and encrypted according to the configuration settings specified by the Administrator). You now have complete, low-level control of the KVM console as if you were physically located next to the server.
To close a connection, right-click on the connected device and click Disconnect. To exit MPC or RRC completely, on the Connection menu, click Exit.
Keyboard Shortcut Menu
To access the MPC or RRC keyboard shortcut menu, use either the default keyboard combination of CTRL+LEFT ALT+M or the keyboard combination you assign (please see next section for directions on changing the default keyboard combination). Execute any of the commands on the shortcut menu either by pressing (on your keyboard) the underscored letter on the button face, or by clicking the button in the menu with your mouse cursor.
Note: You must use the LEFT ALT key on your keyboard.
Figure 29: Hot Key Shortcut Menu
TO: PRESS CTRL+LEFT ALT+M, AND THEN PRESS:
Toggle to/from Full/Normal Screen Mode* F
Perform video Auto Sensing** A
Display connection information* I
Display or Set connection properties* P
Display or Set Video Settings* V
Refresh screen R
Color Calibrate** C
Synchronize mouse Y
Change to/from Single/Double cursor mode S
Send CTRL+ALT+DEL to the target system D
Send CTRL+ALT+M to the target system N
Exit the Dialog/Menu without altering the keyboard state
Esc
Windows Key and Keyboard Shortcuts in MPC
Windows Key and the Start Menu
When running MPC on a Windows JRE 1.4.2_x platform, if you press the Windows Key to display the Start Menu, the Start Menu will only appear on the Client machine, the key is not sent to the Target device.
When running MPC on a Windows JRE 1.5.0_x platform, if you press the Windows Key, the Start Menu appears both on the Client and the Target devices. Use your mouse to manually close the Start Menu you do not want to use.
Please note that if you do not close the Target device Start Menu properly, any key that you touch on your keyboard (that has a Windows Key combination function) will send that command to the Target device; for example, if you press E, the Target device will launch a new Explorer window; if you press D, all Target windows will be minimized so you can view the Desktop. To close the Start Menu on the Target device, click on the Start button or click away from the Start Menu.
Changing the Keyboard Menu Shortcut Hotkey Combination
Tools – Options
New section: Keyboard Menu Shortcut Hotkey – drop down with CTRL+LEFT ALT + [A-Z] The menu will change, the onscreen message will change; both take on the newly assigned combo. If you forget the combo, press CTRL+LEFT ALT together and the Keyboard Menu Shortcut Hotkey appears across the bottom of the screen for five seconds. Press to toggle.
In Full screen mode, need the KMSH to get back to regular view.
Single Mouse Mode / Dual Mouse Mode
When remotely viewing a target server that uses a pointing device, you will see two mouse pointers in the Remote Desktop. When your mouse pointer lies within the Remote Desktop area of MPC or RRC, mouse movements and clicks are directly transmitted to the target server connected. The MPC/RRC mouse pointer, generated by the operating system on which MPC/RRC is running, slightly leads the target server’s mouse pointer during movement, a necessary result of digital delay.
On fast LAN connections, you may want to disable the MPC/RRC mouse pointer and view only the target server’s pointer. To toggle between these two modes, use the CTRL+LEFT ALT+M Hot Key combination to activate the Hot Key menu, then press the letter S on your keyboard to select Single/Double Cursor (orpress the Single Mouse Pointer mode icon in the Toolbar).
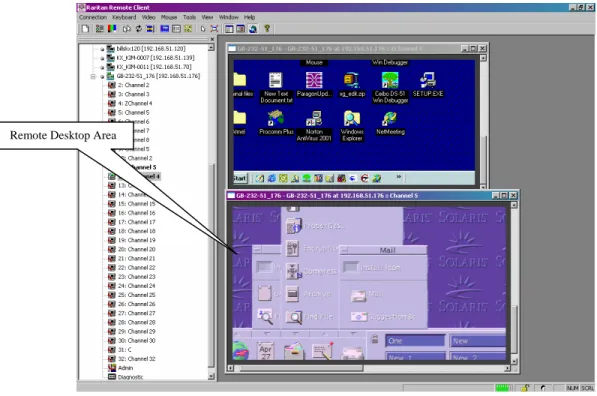
Remote Desktop Area
Figure 30: RRC Remote Desktop
Remote Desktop Area
When in Dual Cursor mode, press CTRL+LEFT ALT+M and execute the Synchronize Mouse shortcut to force realignment of the mouse pointers. If the mouse pointers still remain out of sync, click on the Auto-Sense VideoSettings button on the Toolbar.
Auto-Sense VideoSettings button
Note: When in Dual Cursor mode, if the dual mouse pointers are synchronized, but left idle for five minutes or longer, the target mouse pointer will automatically align itself with the upper left corner of the target window. Execute the Synchronize Mouse command to ensure local and target mouse pointer alignment.
Automatic Mouse Synchronization
When in Dual Cursor mode, the system will automatically align the mouse pointers when the cursor is inactive for 15 seconds. Enable this feature by selecting Options from the Tools menu and clicking on the checkbox before Auto-Sync mouse in two-cursor mode.
Mouse Synchronization Options
In addition to synchronizing mouse pointers or toggling Single Cursor Mode, RRC’s Mouse menus provide three options for syncing pointers when in Dual Cursor mode:
• Absolute: When connected to selected Dominion KX units and targets with USB ports, MPC will use absolute coordinates to keep the pointers in sync.
• Intelligent: Under certain conditions, MPC can detect the target mouse settings and synchronize the mouse pointers accordingly, allowing the user to have mouse acceleration on the target device. See Appendix B: Conditions for Intelligent Mouse Synchronization for more details.
• Standard: This is the standard mouse synchronization algorithm. For the proper target mouse settings, see the User Guide of your Raritan KVM over IP device.
Please note that only Intelligent and Standard mouse are available to MPC and RRC users working on Dominion KX units.
Screen Modes
Full Screen / Target Screen Resolution
Besides a standard view, MPC and RRC provide a Full Screen view and a Scaling option, which increase the Remote Desktop Area, making viewing the target video easier. In MPC, this option is called Target Screen Resolution mode and in RRC, it is called Full Screen mode.
Use the Full Screen Mode shortcut on the Toolbar to activate Full Screen mode, or use the menu commands as described.
Note: Full Screen Mode is not available in MPC only on a Dominion KX unit when the KX unit is under CommandCenter Secure Gateway (CC-SG) control.
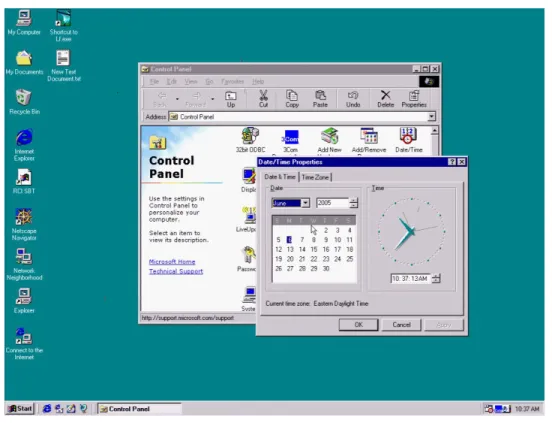
MPC - Target Screen Resolution Mode
Target Screen Resolution mode removes the surrounding MPC graphical interface (except for scrollbars) and your local desktop area, completely filling your monitor with the target server video. Your monitor’s resolution may be adjusted to match the resolution of the target server. To view which video resolutions your system supports, access your computer’s Control Panel from the Windows Start menu, double-click on Display, and click on the Settings tab.
Activate Target Screen Resolution mode, once connected to a target, from the View menu. On the View menu, click Target Screen Resolution. If you prefer to use the Hot Key menu, press CTRL+LEFT ALT+M and then the letter F on your keyboard to select Full/Normal Screen. If your graphic system does not support the resolution of the target system, you will be unable to activate Full Screen mode and a message will appear, requesting that you change your video resolutions first.
Figure 33: Target Screen Resolution Mode in MPC
Note: The CTRL+LEFT ALT+M key combination does not work for certain target servers if you are running JRE 1.5.0_01. To return from full screen mode, use Alt+Tab and select MPC.
RRC – Full Screen Mode
Full Screen mode removes the surrounding RRC graphical interface and your local desktop area, filling your monitor with the video from the target server. Your monitor’s resolution will be adjusted to match the resolution of the target server, if your graphics system supports it. To view which video resolutions your system supports, access your computer’s Control Panel from the Windows Start menu, double-click on Display, and click on the Settings tab.
Activate Full Screen mode, once connected to a target, from the View menu. On the View menu, click Full Screen. If you prefer to use the Hot Key menu, press CTRL+LEFT ALT+M and then the letter F on your keyboard to select Full/Normal Screen.
If your graphic system does not support the resolution of the target system, you will be unable to activate Full Screen mode and a message will appear, requesting that you change your video resolutions first.
Scaling
Scaling your target window size allows you to view the entire contents of the target server window. This feature increases or reduces the size of the target video to fit the MPC/RRC window size and maintains aspect ratio, so that you see the entire target server desktop while in the full standard MPC/RRC view.
To activate Scale Video mode and increase the size of the target video window, on the View menu, click Scale, or use the Scaling shortcut on the Toolbar. To exit this mode and return the target window to its previous size, on the View menu, click Scale, or click the Scaling shortcut once again.
Auto-Scroll
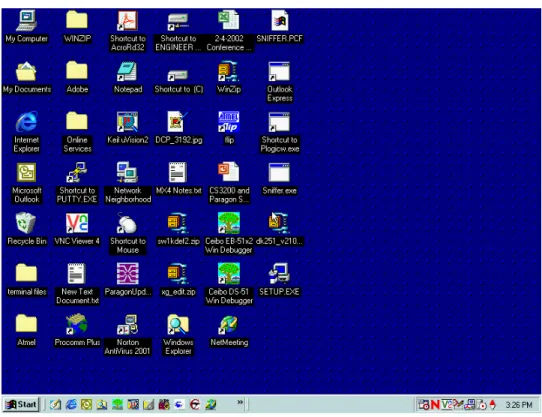
The auto-scroll feature automatically scrolls the video display in the direction of the cursor as the cursor approaches the edge of the display. A thin border appears around the perimeter of the Remote Desktop Area (this border can be activated using the Tools menu). If you see scroll bars, when you move the mouse cursor onto the border, the screen will automatically scroll in the appropriate direction.
The blank border around the target video is the Auto-Scroll area.
Figure 36: Auto-Scroll View with Border Indicated
Note: Enabling Scale Video will scale the complete target video image to fit the Remote Desktop Area as it grows or shrinks. You can combine this setting with Target Screen Resolution for a full screen affect on targets with a higher resolution than your desktop.
Keyboard Handler
RRC sends all keystroke combinations to the target system with the following exceptions:
• CTRL+ALT+DEL – Reboots the computer; the sequence is sent to the local system and the Windows Security (Task Manager, Shutdown, etc.) dialog is displayed.
• CTRL+Num Lock – This toggles the state of the Num Lock LED if the Num Lock state of the local system disagrees with that on the target system.
• CTRL+Caps Lock – This toggles the state of the Caps Lock LED if Caps Lock state of the local system disagrees with that on the target system.
• CTRL+Scroll Lock – This toggles the state of the Scroll Lock LED if Scroll Lock state of the local system disagrees with that on the target system.
• CTRL+LEFT ALT+M – Brings up a dialog/menu providing normal RRC shortcuts (described below).
• Keystrokes used to generate user-defined keyboard macros.
• Print Scrn – Treated locally and copies the screen to the clipboard.
There are no other exceptions. For example, ALT+F4 closes the current program on the target system.
Keyboard Macros
IP-Reach or Dominion’s Keyboard Macro feature ensures that keystroke combinations intended for the target server are sent to, and interpreted only by, the target server. Otherwise, they might be interpreted by the computer on which MPC or RRC is running.
CTRL+ALT+Delete Macro
Due to its frequent use, a CTRL+ALT+Delete macro, used to reboot the target computer, has been pre-programmed into MPC and RRC.
Send
CTRL+ALT+DEL
Sends a CTRL+ALT+DEL macro to the target server.
Clicking on the CTRL+ALT+Delete shortcut in the Toolbar sends this key sequence to the server or KVM switch to which you are currently connected. In contrast, if you were to physically press the CTRL+ALT+Delete keys while using MPC or RRC, the command would first be intercepted by your own PC due to the structure of the Windows operating system, instead of sending the key sequence to the target server as intended.
Building a Keyboard Macro
These directions describe how to create a keyboard macro for the Windows command Minimize All Windows/Show Desktop. Follow these steps, substituting the appropriate key combination for the command you want, to create your own macro.
For example: In Windows, pressing a keyboard macro is a shortcut that sends a command to your PC. When connected to a target server with MPC or RRC, a keyboard macro is one means to accomplish this task on the target server – because pressing the key combination results in your own client PC intercepting the command and performing it – instead of sending the command to the target server as intended.
1. On the Keyboard menu, click Keyboard Macros.
2. When the Keyboard Macros window appears, click Add to add a new macro. The Add Keyboard Macro window appears.
Figure 37: Add Keyboard Macro Window
3. Build the Keyboard Macro by editing the fields in the Add Keyboard Macro window: A. Type a name in the Keyboard Macro Name field. This name will appear on the MPC or
RRC Menu Bar after the macro is created. In this example, type Minimize All Windows. B. Optional: In the Hot-Key Combination field, select a keyboard combination from the
drop-down list. This allows you to execute the macro with a predefined keystroke when MPC is running. In this example, select the CTRL+ALT+1 keystroke from the drop-down list.
C. In the Keys to Press drop-down list, scroll through and select each key for which you would like to emulate key presses – in the order by which they are to be pressed. Click Press Key after each selection. As each key is selected, it will appear in the Keys to Release field. In this example, select two keys: the Windows key and the letter D key. D. In the Keys to Release field, select each key for which you would like to emulate key
releases – in the order by which they are to be released. Click Release Key after each selection. In this example, both keys pressed must also be released.
E. Review the Macro Sequence field – the contents are automatically generated depending on the Keys to Press and Keys to Release selections. Ensure that the contents list the exact key sequence you want. To remove a step in the sequence, select it, and click Remove. To change the order of steps in the sequence, select the step and click Ç and È to re-order the steps.
Figure 38: Add Keyboard Macro Window
4. Click OK to save the macro, or Cancel to close the window without saving. Click Clear to clear all field and start over. When you click OK, the Keyboard Macros window appears, listing the new keyboard macro.
Figure 39: Keyboard Macros Window
Running a Keyboard Macro
Once you have created a keyboard macro, execute it from the Keyboard menu or by using the Hot Key (keyboard) combination if you assigned one while creating the macro.
Menu Bar Activation
When you create a macro, it appears under the Keyboard menu. Execute the keyboard macro by clicking on its name on the Keyboard menu.
Figure 40: Macro Listed on the Keyboard Menu
Hot Key Activation
If you assigned a Hot Key combination to a macro when building it, you can execute the macro by pressing its assigned keystroke. In this example, press the keys CTRL+ALT+1 simultaneously to minimize all windows on a Windows target server.
Connection and Video Properties
The IP-Reach and Dominion dynamic video compression algorithms maintain KVM console usability under varying bandwidth constraints. The IP-Reach and Dominion units optimize KVM output not only for LAN use, but also for WAN and dialup use. These units can also control color depth and limit video output, offering an optimal balance between video quality and system responsiveness for any bandwidth constraint.
The following parameters in the Connection Properties and Video Settings windows can be optimized to suit your requirements for different operating environments.
Connection Properties
Connection Properties
Manually adjust bandwidth-related options (connection speed, color depth, smoothing, etc.).
To set the connection properties:
1. Select Connection > Properties. In MPC, the Properties Dialog opens. In RRC, the Modify Connection window opens.
Generation 2 (G2)
Generation 1 (G1) Figure 41: Properties Dialog in MPC
− Connection Speed: Use this setting to manually adjust the connection speed to accommodate bandwidth constraints. IP-Reach and Dominion can automatically detect available bandwidth and not limit bandwidth use; but you can also adjust this usage according to your needs. Depending on the Raritan device in use, different options may be available. Auto Detect 1G Ethernet 100mb Ethernet 10mb Ethernet 1.5mb (Max DSL/T1) 1mb (Fast DSL/T1) 512 kb (Medium DSL/T1) 384 kb (Slow DSL/T1) 256 kb (Cable) 128 kb (Dual ISDN) 56 kb (ISP Modem) 33 kb (Fast Modem) 24 kb (Slow Modem)
− Color Depth: IP-Reach and Dominion can dynamically adapt the color depth transmitted to remote users in order to maximize usability in all bandwidths. Select from among the options in the drop-down list (depending on the Raritan device in use, different options may be available): 15-bit RGB Color 8-bit RGB Color 4-bit Color 4-bit Gray 3-bit Gray 2-bit Gray Black and White
− Please refer to Connection Profiles for information about the Progressive Update, Internet Flow Control, Smoothing (15-bit mode only), and Frames per second (MPC only) options.
Important: For most administrative tasks (server monitoring, reconfiguring, etc.), administrators do not require the full 24-bit or 32-bit color spectrum made available by most video graphics cards. Attempting to transmit such high color depths wastes network bandwidth.
3. Click OK to change the Connection Properties or Cancel to close the window without saving changes.
Video Settings
Video settings can be refreshed in several ways:
• Using Video > Refresh Screen
• Directing IP-Reach or Dominion to automatically detect the video settings (Video > Auto-sense Video Settings)
• Using the Color Calibration command to calibrate the video, enhancing the colors displayed
• Changing the settings from the Video Settings screen
Video Settings Opens Video Settings for manual adjustment of video parameters. To change the video settings:
1. Select Video > Video Settings. The Settings window opens:
Figure 43: Settings (Video)
2. Update the desired settings:
− Noise Filter: IP Reach and Dominion can filter out the electrical interference of video output from graphics cards. This feature optimizes picture quality and reduces bandwidth. Higher settings transmit variant pixels only if a large color variation exists in comparison
Note: Lower Noise Filter settings (approximately 1 to 4) are recommended. Although higher settings will stop the needless transmission of false color variations, true and intentional small changes to a video image may not be transmitted.
− PLL Settings: If the video image looks extremely blurry or unfocused, the PLL Settings for clock and phase can be adjusted until a better image appears on the active target server.
Warning: Please exercise caution when changing the Clock and Phase settings; doing so may result in lost or distorted video and you may not be able to return to the previous state. Contact Raritan Technical Support before making any changes.
Clock: Controls how quickly video pixels are displayed across the video screen. Changes made to clock settings cause the video image to stretch or shrink horizontally; odd number settings are recommended. Under most circumstances this setting should not be changed because the auto-detect is usually quite accurate.
Phase: Phase values range from 0 to 31 and will wrap around. Stop at the phase value that produces the best video image for the active target server.
− Color Settings: These settings control the brightness, contrast, and positioning of the target server display.
Brightness Red. Controls the brightness of the red signal; range is 0 – 127.
Brightness Green. Controls the brightness of the green signal; range is 0 – 127.
Brightness Blue. Controls the brightness of the blue signal; range is 0 – 127.
Contrast Red: Controls the red signal contrast; range is 0 – 255.
Contrast Green: Controls the green signal contrast; range is 0 – 255.
Contrast Blue: Controls the blue signal contrast; range is 0 – 255.
Horizontal Offset: Controls the horizontal positioning of the target server display on your monitor; range is 0 – 512.
Vertical Offset: Controls the vertical positioning of the target server display on your monitor; range is 0 – 128.
3. To preview the change prior to making the selection, check the Preview checkbox. 4. Check the Automatic Color Calibration checkbox to enable this feature.
5. Video Sensing: Select the video sensing mode:
− Best possible video mode: IP-Reach or Dominion will perform the full Auto Sense process when switching targets or target resolutions. Selecting this option calibrates the video for the best image quality.
− Quick sense video mode: Selecting this option will cause IP-Reach or Dominion to use a quick video Auto Sense in order to show the target’s video sooner. This option is especially useful for entering a target server’s BIOS configuration right after a reboot. 6. After you change a value, click Apply.
7. Click OK to change the Video Settings or Cancel to close the window without saving changes.
Note: Some Sun background screens, such as screens with very dark borders, may not center precisely on certain Sun servers. Use a different background or place a lighter colored icon in the upper left corner of the screen.
Video Settings (Generation 1 Only)
Video Settings Opens the Video Settings dialog box to manually adjust video conversion parameters.
1. On the Video menu, click Video Settings. The Settings window appears.
Figure 44: Video Settings (Generation 1)
These settings can be refreshed using the Color Calibration command, described in the next section, by manually forcing IP-Reach or Dominion to auto-detect the video settings (on the Video menu, click Auto-sense Video Settings), or by changing the settings in this screen. After you change a value, click Apply to test the setting.
− Noise Filter: IP-Reach or Dominion can filter out electrical interference of video output from graphics cards. This feature optimizes picture quality and reduced used bandwidth.
Note: The default Noise Filter is 4; Raritan recommends that you lower this value to 0 (zero). Higher: Noise Filter settings instruct IP-Reach or Dominion to transmit a variant
pixel of video only if a large color variation exists in comparison to its neighbors. However, setting the threshold too high can result in the unintentional filtering of