EPAM Cloud
Auto Configuration
Services
Quick Reference Guide
August 2015
CIRG-4
2 EPAM SYSTEMS
Contents
Contents ... 2
Preface ... 4
About this Guide ... 4
Audience ... 4
The structure of the Guide... 4
Documentation References ... 5
1 EPAM Cloud Services. General Notion ... 6
2 Cloud Monitoring Service (CMS) ... 7
Service Activation ... 7
Service Manipulations ... 7
Viewing the Results ... 8
Web UI ... 8
Pricing ... 9
3 Auto Configuration Service (ACS) ... 10
Service Activation ... 10
Manipulating Chef Server... 10
Reconfiguring Your VM with Chef Roles... 11
Web UI ... 11
Pricing ... 12
4 Log Aggregation Service (LAS) ... 12
Service Activation ... 13
Service Manipulations ... 13
Web UI and Viewing Logs ... 13
Pricing ... 14
5 Load Balancer Service (LBS) ... 14
Starting the Load Balancer ... 15
Configuring the Load Balancer ... 15
Web UI ... 17
Pricing ... 18
6 Docker Service (DOS) ... 19
Working with Containers ... 20
Docker Info ... 21
Web UI and Rest API ... 21
Working with Docker Images via Docker Registry ... 21
Pricing ... 24
7 Hadoop Data Platform Service (HDP) ... 25
Starting the Hadoop Service ... 25
Retrieving Hadoop Info ... 26
Running Jobs ... 26
Manipulating Slaves and Clients ... 27
Web UI ... 27
Pricing ... 28
8 Ambari as a Service ... 30
Starting a One-Node Ambari Server and Configuring the Cluster ... 30
Configuring and Starting Cluster Nodes ... 31
Retrieving Information on Ambari resources... 33
Web UI ... 33
Pricing ... 34
Default Blueprint ... 35
Configuration Example ... 36
9 Cloudify as a Service (CAS) ... 37
Cloudify as a Service ... 37
Cloudify Commands ... 38
Cloudify UI ... 39
Changing Credentials ... 40
Pricing ... 40
10 Infrastructure Scheduling Service (CRON) ... 41
Scheduling Activation ... 41 Describing Schedules ... 42 Deleting Schedules ... 42 Cron Reference ... 42 Pricing ... 44 Version History ... 45
4 EPAM SYSTEMS
Preface
About this Guide
This guide is designed for EPAM Cloud users who resort to EPAM Private Cloud Services. The document contains brief descriptions of the available auto-configuration based services and provides the information on their typical flow.
Audience
This guide is designed for EPAM Private Cloud users who manage their own infrastructure via Maestro CLI.
The structure of the Guide
The guide consists of ten chapters. The first one describes the general idea of a service, the others give the services descriptions.
Please email your comments and feedback to EPAM Cloud Consulting at
[email protected] to help us provide you with documentation that is as clear, correct and readable as possible.
NB: This manual provides the most common cases of the usage of commands engaged in services manipulation. The full descriptions of the mentioned commands are given in
EPAM SYSTEMS 5
Documentation References
You might also want to check the following EPAM Cloud Orchestrator documents:
Document Title Contains Information on
Maestro CLI Developer Guide
Maestro CLI client use and customizationMaestro CLI Setup Guide
Installation of Maestro CLI ClientMaestro CLI Quick Start
Guide
Setting up a common cloud environmentAuto Configuration: Box
Solutions
Auto Configuration Service concept and usageMaestro CLI Reference Guide
EPAM Cloud Orchestrator Command Line Interface and the list of CLI commands, their parameters and response examples
Maestro API Reference Guide
EPAM Cloud Orchestrator Application Programming InterfaceProject Management Guide
Hints and guidelines on customization of EPAM Orchestrator for the specific project needsResource Utilization Quotas
Guide
Resource Utilization Quotas and respective guidelinesCheckpoint Utilization Guide
Concepts of checkpoints, including their utilization within Orchestrator, limitations and best practicesEmail Notification
Subscriptions Guide
Notifications description, usage and customization guidelines and default values
EPAM Private Cloud Billing
Guide
Current billing model implemented for EPAM Private CloudAWS Utilization Guide
Setup and utilization of Amazon Web Services-based infrastructure through EPAM Cloud OrchestratorGraphical User Interface
Guide
EPAM Cloud Orchestration graphical user interfaceMaestro Stacks Guide
Maestro Stacks creation and utilizationMaestro CLI Quick Reference
Card
A set of all CLI commandsPlease email your comments and feedback to EPAM Cloud Consulting at
[email protected] help us provide you with documentation that is as clear, correct and readable as possible.
6 EPAM SYSTEMS
1
EPAM Cloud Services. General Notion
EPAM Private Cloud offers you a set of services, related to Cloud utilization.The main one is Cloud Computing Service that allows you to create and manage your own infrastructure in Cloud. The other services complement Cloud Computing and make it easier and faster in use. These services are software solutions that allow you to install and manipulate a component, necessary for your project, with a simple set of Maestro CLI commands. This functionality is meant to simplify your work with Orchestrator and give you the additional infrastructure monitoring and management tools.
Below, you can see the list of the common commands used for services manipulation, and examples of their usage:
Starting a service: Most services are started with the or2-manage-service command with the corresponding --service flag that identifies which service is to be started:
or2-manage-services -p project -r region -s service --activate
Retrieving information on active services: The or2-decribe-services command describes the services activated for given project in the given region:
or2-describe-services -p project -r region
Getting information on a specific service: The corresponding or2-describe-[service] commands can provide you with the necessary details on the instances involved into the service. For example, the following command will return information about the Log Aggregation service:
or2-describe-logging -p project -r region
Getting information on service-related instances: To see the list of all the instances involved into a specific service, or into all services, you can use the or2din command with -S/--service parameter followed by a service name or ‘any’ keyword (to get instances engaged in all services)
or2-describe-instances -p project -r region -S any
Monitoring service performance: You can monitor the state and the performance of each service using the or2-audit command with --group PROJECT flag. This command returns the list of the service events that take place in the specified project during the current day.
or2-audit -p project -r region --group PROJECT
It is impossible to start services in a project/region, if its Chef mode is set to USER or EPC.
EPAM SYSTEMS 7
2
Cloud Monitoring Service (CMS)
EPAM Orchestrator provides the users with a set of monitoring tools that allow to get information on different aspects of the service performance.
Cloud Monitoring service includes two components: Chef monitoring and Zabbix monitoring services.
Chef Server monitoring service provides you with the Chef Server statistics that is available on UI Monitoring page. This is a default service that does not need to be set up manually. Chef Server Monitoring is a passive service, which means that it does not load the system and uses standard tools of your operation system.
Zabbix monitoring service allows the user to get Zabbix statistics on their infrastructure. The service needs to be activated by the user.
The table below provides the list of service-related commands and their descriptions.
Command Description
or2-manage-service …. -s monitoring -a Starts the service in the specified project and region
or2-start-monitoring (or2mon) Adds an instance to the monitoring list
or2-describe-monitoring (or2dmon) Retrieves information about the instances monitored by Zabbix server, Zabbix monitoring templates and Zabbix agent availability
or2-stop-monitoring (or2sm) Removes an instance from the monitoring list
Service Activation
To start Zabbix monitoring service, run or2-manage-service (or2ms) command with the following flags:
or2-manage-service -p project -r region -s monitoring --activate
Each project can have only one Zabbix server activated for it. If the server is already activated, you will get the respective error message.
If there is no Zabbix server activated for your project, a special stack will be run to launch a VM with all the corresponding Zabbix Server settings. The command response will give the ID of the executed stack.
Service Manipulations
To start monitoring an instance, run:
8 EPAM SYSTEMS For the correct Zabbix Monitoring service performance, it is recommended to add the custom image based instances to the monitoring list only after they come to the running state. Otherwise, the custom image can be indicated incorrectly and will be monitored as a Linux image (regardless of its real type).
To retrieve the information about the instances monitored by Zabbix server, Zabbix monitoring templates and Zabbix agent availability, run:
or2-describe-monitoring -p project -r region
To remove the instance from the Monitoring list, use:
or2-stop-monitoring -p project -r region -i instanceID
To stop the Zabbix Monitoring Service and remove the Server VM, run the following command:
or2-manage-service -p project -r region -s monitoring --deactivate
Viewing the Results
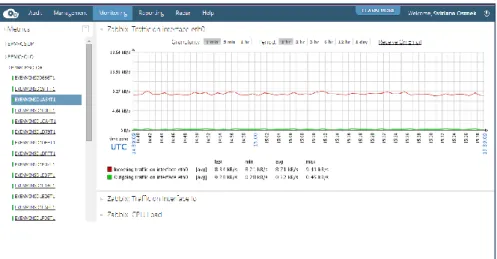
When the Monitoring Service is set up, you can see the details about the server performance on the UI Monitoring page.
Figure 1 - Zabbix Statistics
Web UI
It is possible to connect to Zabbix server via HTTP connection and to get the detailed information about the server.
To get the URL to be used for connection, use the or2-describe-services --full command that returns the list of the services activated for the project, their IP and DNS names and the web UI URL addresses. Copy the webUiUrl value and paste it to the address line of your browser. To login, use the following credentials:
EPAM SYSTEMS 9 Password: zabbix
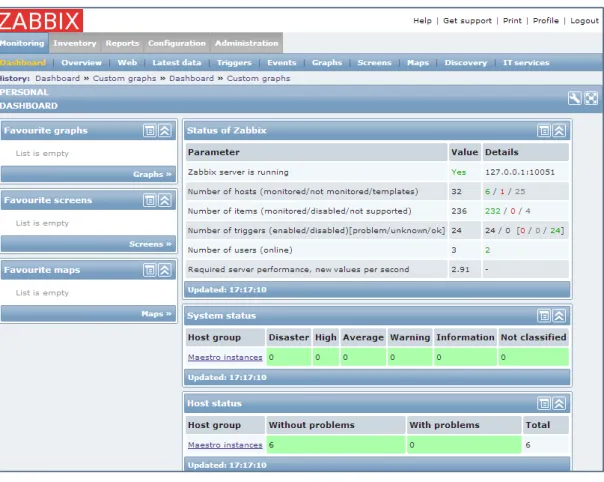
After the successful authorization, you will get access to Zabbix Server data:
Figure 2 - Zabbix UI
Please remember that Zabbix statistics for an instance is shown only after the or2-start-monitoring command adds this instance to the or2-start-monitoring list.
Pricing
The service usage price is defined by the price of the Zabbix Server VM. The default parameters of a Zabbix Server VM are:
Shape: MEDIUM
Image: Ubuntu12.04_64-bit
Therefore, the approximate monthly cost of a Zabbix Server usage in case of 100% and 24/7 load is about $57.06 in EPAM-BY1 region (as to 07/28/2014). The price can vary depending on the region.
10 EPAM SYSTEMS
3
Auto Configuration Service (ACS)
Auto configuration service allows Cloud users to run instances with pre-installed sets of software, effectively eliminating the need to install and configure software manually.
The table below provides the list of service-related commands and their descriptions.
Command Description
or2-manage-service …. -s chef -a Starts the service in the specified project and region
or2-chef-mode (or2cm) Sets one of the existing chef modes to the project
or2-describe-chef (or2dchef) Describes the project’s Chef Server mode or2-set-instance-properties (or2setp) Used with c/--chefattribute and
-h/--chefrole flag sets the desired chef attribute to be used and the role to be set to the instance
Service Activation
Auto Configuration Service is activated by default as soon as the project gets activated in Cloud.
However, you can change the Chef Server used at your project by switching the Chef mode. To do it, you need to activate the Chef Server Service that is based on EPAM Private Cloud auto-configuration service, and can be deployed in few Maestro CLI commands.
To set up the Chef Server Service, run the or2-manage-service (or2ms) command with the following flags:
or2-manage-service -p project -r region -s chef --activate
Manipulating Chef Server
When the service is run, you can use the or2-chef-mode (or2cm) command to switch between the following ACS modes:
Default mode (-m default) - the default mode for all projects in the EPAM Private Cloud. In this case, a common Chef server is used for all production environment machines.
EPC mode (-m epc) - use project-specific Chef server, created by EPAM Orchestrator for the specified project.
User mode (-m user) - use project-specific Chef server, created and properly configured by the user. When switching to this mode, the user should provide Chef server's instance ID (or instance IP) and manually upload validation.pem file to the
EPAM SYSTEMS 11
Orchestrator’s file storage. The user should also provide the path to validation.pem file during the command invocation.
The command call can look as follows:
or2-chef-mode -p demopro -r demoreg -m epc
To get the current Chef mode, Chef Server DNS and Chef Server state, you can use the or2-describe-chef (or2dchef) command:
or2-describe-chef -p demopro -r demoreg
to stop the Chef Server Service, run the following command:
or2-manage-service -p project -r region -s chef --deactivate
This command does not remove any resources created during the service performance
Reconfiguring Your VM with Chef Roles
In order to set a chef role or several roles for an instance, you can use the or2-set-instance-properties command with alias that allow to simplify the role assignment. The -c/--chefattribute flag is used to specify the desired chef attribute to be used, and -h/--chefrole - the role to be set to the instance:
or2-set--instance-properties -i EVBYMINSD26C6T1 -h role1 -h role2 -c value1 -c "recipename1.attribute1=value2" -p
epmc-2chef
Web UI
It is possible to connect to Chef Server, created for EPC and USER modes, via HTTP connection and to get the detailed information about the server.
To get the URL to be used for connection, use the or2-describe-chef command. Use the server DNS name to connect.
To login to an EPC Chef Server, use the following login and password:
Login: user Password: chef-server
For initial login to a User Chef Server, use the login and password provided in the left corner of the login page. It is highly advisable that you change these default credentials to custom ones.
NB: 1. The service is released in Beta mode, and some performance issues are possible. 2. It is impossible to start other services in a project/region, if its Chef mode is set to USER or EPC.
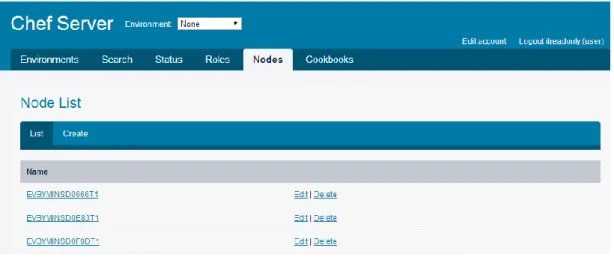
12 EPAM SYSTEMS When you successfully login, you will get access to Chef Server information:
Figure 3 - Chef UI
Pricing
The service usage influences the project cost in case the Chef mode is switched to EPC. In this case, a special VM for project Chef Server is created. This VM has the following parameters:
Shape: MEDIUM
Image: Ubuntu12.04_64-bit
It is billed just as any other VM of such type. Therefore, the approximate monthly cost of such server in case of 100% and 24/7 load is about $57.06 in EPAM-BY1 region (as to 07/28/2014). The price can vary depending on the region.
To get more detailed estimations, please, use our Cost Estimator tool.
When the Chef mode is switched from EPC to any other one, the VM launched for EPC mode, is stopped, and is not billed any more.
4
Log Aggregation Service (LAS)
EPAM Cloud Orchestrator provides the users with a GrayLog-based Log Aggregator Service that collects the logs from the specified instances and gives an easy and visual access to them via a web-interface.
The table below provides the list of service-related commands and their descriptions.
Command Description
or2-manage-service …. -s log -a Starts the service in the specified project and region
or2-start-logging (or2log) Start collecting logs from the specified instance
EPAM SYSTEMS 13
or2-stop-logging (or2stoplog) Stops collecting logs from the specified instance
Service Activation
To start the service, use the or2-manage-service command with the following parameters:
or2-manage-service -p project -r region -s log --activate
During the service activation, a VM with is started and a GrayLog server is configured on it. The server setup is a complicated process and can take up to an hour. If the project already has a GrayLog Server, you will get the respective error message.
Service Manipulations
EPAM Orchestrator supports the following commands for Log service manipulations:
To add an instance to the logging list, and start collecting logs from these instances, run:
or2-start-logging -p project -r region -i instanceID
To get the list of the logged instances and the DNS name of the GrayLog Server, use:
or2-describe-logging -p project -r region
To remove the instance from the Logging Service list, use:
or2-stop-logging -p project -r region -i instanceID
The server stops collecting the instance log data, but all the logs, previously aggregated, are kept.
To stop the log aggregation service and remove the GrayLog Server VM, run the following command:
or2-manage-service -p project -r region -s log --deactivate
Web UI and Viewing Logs
You can view the collected logs by connecting to the Log Server via HTTP. The typical address template for connecting to Log Server is:
http://<LogServerDNS>
You can see the Log Server instance DNS in the response of the or2-describe-logging command, as well as of the or2-describe-services command.
The login and password that are to be used during the login to the server are returned at or2-describe-services command call:
14 EPAM SYSTEMS
Figure 4 - Log service user/password details
When you log in, you will get to GrayLog Web Interface that provides you with the full access to the gathered data:
Figure 5 - GrayLog UI
Pricing
The service usage price is defined by the price of the GrayLog Server VM. The default parameters of a GrayLog Server VM are:
Shape: MEDIUM
Image: Ubuntu12.04_64-bit
Therefore, the approximate monthly cost of a GrayLog Server usage in case of 100% and 24/7 load is about $57.06 in EPAM-BY1 region (as to 07/28/2014). The price can vary depending on the region.
To get more detailed estimations, please, use our Cost Estimator tool.
5
Load Balancer Service (LBS)
EPAM Cloud Orchestrator provides the users with a Nginx-based Load Balancing Service that allows the user to arrange load balancing with a set of CLI commands.
EPAM SYSTEMS 15 The table below provides the list of service-related commands and their descriptions.
Command Description
or2-manage-service …. -s load-balancer -a Starts the service in the specified project and region
or2-load-balancer-config (or2lbconf) Configures load balancing
or2-describe-load-balancing (or2dlb) Returns the list of the hosts manipulated by the Load Balancer and the information on their availability
Starting the Load Balancer
To start the Load Balancer Service, use the or2-manage-service command with the following flags:
or2-manage-service -p project -r region -s load-balancer --activate
Only one Load Balancer can be created for a project. If your project already has a Load Balancer, the command will return a corresponding error message.
To stop the Load Balancer Service and to remove the Load Balancer Server, perform the following command:
or2-manage-service -p project -r region -s load-balancer --deactivate
This command does not remove any resources created during the service performance.
Configuring the Load Balancer
All the Load Balancer configuration actions are performed with or2-load-balancer-config (or2lbconf) command. The command deals with four configuration areas, each having its own set of properties or properties behaviour:
Balancing - this area deals with Load Balancer Server, balancing members, the details on the balancer connections.
Limits - this area deals with the user connections and requests limits Bans - this area allows to ban specific URLs or user IPs
Cache - this are allows to set up Load Balancer caching
When used with --project and --region parameters only, the command displays the list of the configuration settings applied to the Load Balancer.
16 EPAM SYSTEMS CLI Parameters
Parameter Name Description General -p, --project Project ID
-r, --region Virtualization region -P, --plain-output Use plain output view --full Show full command output --help Display command help
Balancing -b, --balancing Specifies the configuration area as "balancing" --balancerName FQDN for the Load Balancer
-i, --instance The ID of the instance to be added or removed from the balancing members list
--port The port to route to. Default: 80
--permanent Enable/Disable "keep alive" feature: Nginx will open the specified number of connections with each host [0?]. Default 0.
--iphash Enable/disable "sticky session" [on/off] Default: on -d, --remove Remove a host from the balancing members list -d, --removeAll Remove all hosts from the balancing members list Limits -l, --limit Specifies the configuration area as "limit"
--connections Specifies that the number of allowed simultaneous user connections should be set
--requests Specifies that the limit of requests per second should be set
--perIp Sets the connections or requests limit for a given IP (set 0 to remove the limit)
--total Sets the connections or requests limit for the whole balancer
Bans --ban Specifies the configuration area to "ban"
--ip Adds IP address to the ban list. Format: xxx.xxx.xxx.xxx
EPAM SYSTEMS 17
--status Set status code for URL to return (Default: 403 Forbidden)
-d, --remove Removes ban from IP or URL -d, --removeAll Removes all bans
Cache --cache Specifies the configuration area to "cahce" --url Sets the URL to cache
--extension Sets the extensions of files to be cached --expiration Sets the cache expiration time (in minutes) -d, --remove Removes caching files or URLs
-d, --removeAll Disables caching
To get the list of the hosts manipulated by the Load Balancer and see their availability, use the or2-describe-load-balancing (or2dlb) command:
or2-describe-load-balancing -p project -r region
Below, you can see some examples of Load Balancer configuration commands: Add an instance to the balancing group:
or2lbconf --balancing --instance instance1
Change the port of instance1 to 2752:
or2lbconf --balancing --instance instance1 --port 2752
Set maximum connections from a unique IP to 10 and the overall maximum connections to balancer - to 50:
or2lbconf --balancing --instance instance1
Set /maestro/ to return 404 Not found:
or2lbconf --ban --url /maestro/ --status 404
Enable caching on /images/ with 10 minutes expiration:
or2lbconf --cache --url /images/ --expiration 10
Web UI
Load Balancer service does not have any web UI. All the manipulations are to be performed via CLI.
18 EPAM SYSTEMS
Pricing
The service usage price is defined by the price of the Load Balancer Server VM. The default parameters of a Load Balancer Server VM are:
Shape: MEDIUM
Image: Ubuntu12.04_64-bit
Therefore, the approximate monthly cost of a Load Balancer Server usage in case of 100% and 24/7 load is about $57.06 in EPAM-BY1 region (as to 07/28/2014). The price can vary depending on the region.
EPAM SYSTEMS 19
6
Docker Service (DOS)
Docker is a new approach to virtual resources provisioning. It allows you to get virtual environments (containers) within minutes, as they are created based on shared kernel (hypervisor). Meanwhile Docker Containers remain independent in manipulation.
EPAM Private Cloud allows you to have Docker as a Service for your project needs. Below, you can see the list of the main Docker concepts:
Master - a Docker host with a Docker manager (swarm) that performs Docker cluster health check, load balancing on containers creation, and collects information on existing images, containers, configuration, statuses etc.
Hypervisor - A VM that plays a role of a base for containers. A Hypervisor VM is created by Orchestrator on Docker Service activation
Container - A Hypervisor-hosted resource that uses a part of Hypervisor’s capacities and can be used as a typical virtual server.
Container Image - An image stored on Hypervisor and used for containers creation Docker Registry - a repository service that allows you to share VM images between
hypervisors. Registry is hosted on a separate VM that is used as a storage for container images.
Repository - an entity within a registry, in which the images are grouped. Typically, repository names are taken according to the OS family used on the images that will be stored in this or that repository (e.g., CentOS).
Tag - Images in repositories are referenced by tags, which are typically given according to image OS version (e.g., 6, 7, etc.).
The service performs in cluster mode (based on Docker Swarm). We use When a user activates the Docker service in a region for their project, Orchestration starts a VM which hosts a Docker Master that becomes the entry point to the cluster. Mater VM is also the first hypervisor where you can run containers.
After the Master VM is started, you can create new hypervisors (nodes) to increase your Docker cluster’s capacity.
To find out more details on Docker as a product, please visit the Official Docker Web-Site. The table below provides the list of service-related commands and their descriptions.
Command Description
or2-manage-service …. -s docker -a Starts the service in the specified project and region
or2-docker-container (or2dc) Manipulates Docker containers
or2-docker-image (or2di) Manipulates images available for containers creation
or2-describe-docker (or2dd) Gives the list of existing Docker elements and their details
20 EPAM SYSTEMS or2-docker-registry-image (or2dri) Manipulates images in a registry
Starting the Docker Service
To start the Docker Service, use the or2-manage-service (or2ms) command with the following flags:
or2-manage-service -p project -r region -s docker --activate
The command runs a maestro stack that creates and configures a Docker Master VM. If you need a new hypervisor node to be added to your Docker cluster, just repeat the or2-manage-service command.
By default, Docker nodes are MEDIUM-shaped VM with Ubuntu 12.04 operating system. If needed, you can use the --shape parameter with the or2-manage-service command to run a node with a non-default shape.
To stop the service, use --deactivate and -i hypervisor_instance_id to deactivate hypervisors one by one, with the Docker Master being deactivated the last.
Working with Containers
The Hypervisor plays a role of a base for containers that use the hypervisor resources. To run, terminate, stop and start the containers, the or2-docker-container (or2dc) command is used.
To run a new container, call the or2dc command with the following parameters:
or2-docker-container -p project -r region -a run -i image_id
Here, the -a parameter specifies the action to be performed (run), and -i parameter specifies the container image to be used.
Docker manager will automatically select the hypervisor with the lowest load and run the container there. However, you can use the -h/--hypervisor parameter to set a specific hypervisor to be used.
To see the list of available images, run the or2di command with the -a describe flag:
or2-docker-image -p project -r region -a describe
While running a new container, you can specify an entry point command by setting it in the --cmd parameter:
or2-docker-container -p project -r region -a run -i image_id --cmd "/bin/bash"
To stop or start a container, use the or2dc command with the following parameters:
or2-docker-container -p project -r region -a stop[or start] -c container_name
EPAM SYSTEMS 21
The stop command shuts down the container and releases some of the resources occupied by it. The start command re-launches the stopped container.
To remove a container, call the or2dc command with the following parameters:
or2-docker-container -p project -r region -a terminate -c container_name
Here, the -a parameter specifies the action to be performed (terminate) and -c specifies the container name or ID
Docker Info
The or2-describe-docker (or2dd) command allows to get the list of the existing Docker elements and their details.
Using this command with different parameters, you can get the following information: General overview of the Docker service resources with their details and roles:
or2dd -p project -r region
The detailed information on a Docker cluster:
or2dd -p project -r region -t cluster
Web UI and Rest API
The Docker service does not have any web UI. All the manipulations are to be performed via CLI.
However, there is REST API you can use for your needs The connection details can be found in or2dser command response.
Working with Docker Images via Docker Registry
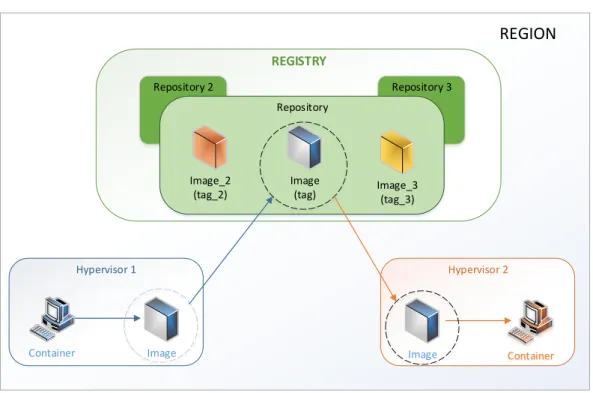
Docker service is provided together with the Docker Registry facilities - a repository service that allows you to share images within the Docker service.
A Registry is created on a separate VM and is used as a storage for images. Images in a registry are organized as a catalog: they are grouped in repositories and tagged.
22 EPAM SYSTEMS Hypervisor 1
REGION
Container Image Hypervisor 2 Image Container REGISTRY Repository 2 Repository 3 Repository Image(tag) Image_3(tag_3) Image_2
(tag_2)
Figure 6 - Docker Registry flow
We typically recommend to name repositories after the OS family (e.g.CentOS), and give images tags according to the OS version (6,7, etc).
Docker service and registry manipulations are performed with a set of the following Maestro CLI commands:
The typical Docker images manipulation flow can be described in the following steps: 1. Create a new Docker Registry:
or2dr -p project -r region -a create
On the command call, Orchestrator launches a SMALL VM based on Ubuntu12.04_64-bit image.
The command response will return the ID of the stack, used to create the new registry:
2. Find the DNS of the Registry VM, using the or2-describe-sevices (or2dser) command:
or2dser -p project -r region
The command output will give the list of active project services, where you can find the details:
EPAM SYSTEMS 23
3. Create a new image from an existing container, using or2-docker-image (or2di) command with -a commit property:
or2di -p project -r region -a commit -h hypervisor_dns -c container_id -n image_name -g image_tag
Where:
-a : the action to be taken
-h : Docker hypervisor instance ID
-c : the ID of the container that will be used to create an image -i : the ID of the image to be created
-g : the tag of the image to be created
When the command is executed, you will find the following response:
4. Push the new image to an existing Registry, using or2-docker-image (or2di) command with -a push property:
or2di -p project -r region -a push -R target_repo_name -i image_name -g image_tag -dr dockerRegistryInstanceID
You can check whether the image was uploaded to the registry by calling the or2-describe-registry-image (or2dri) command:
or2di -p project -r region -i registry_instance_id
Please note, that on the registry, the image name is treated as a repository name:
5. Pull the image from the Registry to all existing hypervisors, using or2-docker-image (or2di) command with -a pull property:
or2dri -p project -r region -a pull
24 EPAM SYSTEMS After this, you can check the images on other hypervisors and find the imported one there. Please note that the image name includes the hostname of the registry where it is taken from:
After this, the new image can be used to run containers in the Docker cluster.
You can also pull images from public Docker Registry (https://index.docker.io) . To do this, run the or2di -a pull command without the -dr parameter.
6. To delete a repository with all included images (tags) from a registry, run the or2dri command with the -a delete parameter:
or2dri -p project -r region -a delete -dr dockerRegistryInstanceId -R repository_name
You can delete only the registry with all included tags. It is impossible to remove a single tag (image)
Pricing
The service usage price is defined by the price of the Docker hypervisor VM. The default parameters of a Docker hypervisor VM are:
Shape: MEDIUM
Image: Ubuntu14.04_64-bit
Therefore, the approximate monthly cost of a Docker Server usage in case of 100% and 24/7 load is about $57.06 in EPAM-BY1 region (as to 07/28/2014). The price can vary depending on the region and the shape you select for the Docker hypervisor. To get more detailed estimations, please, use our Cost Estimator tool.
EPAM SYSTEMS 25
7
Hadoop Data Platform Service (HDP)
Hadoop is an open-source solution that provides storage and computing facilities for processing large-scale data in clusters.
EPAM Private Cloud provides Hadoop capacities that can be used by developers to test and debug their Hadoop jobs before running them on production.
EPAM Private Cloud Hadoop Data Platform Service is based on Hortonworks Hadoop solution.
The table below provides the list of service-related commands and their descriptions.
Command Description
or2-manage-service …. -s hadoop -a -l
slaves -h shape
Starts the service in the specified project and region
or2-describe-hadoop (or2dh) Gives the list, the states, and the DNS names of existing Hadoop resources. or2-manage-hadoop (or2mh) Creates and removes Hadoop resources
Starting the Hadoop Service
To start the Hadoop service, run the or2-manage-service (or2ms) command with --activate (-a) , --service (-s) hadoop and other necessary flags:
or2ms -p project -r region -a -s hadoop -l slaves -h shape
where:
-l (--hadoop-slave-count) specifies the number of Hadoop slave machines that will be run (1 by default, if the property is not specified)
-h (--shape) specifies the instance shape for Hadoop slave machines (MEDIUM by default, if the property is not specified)
You can also use the -k (--key-name) option to specify the SSH key for all the created resources.
26 EPAM SYSTEMS The service when activated, by default starts the following virtual machines:
VM Role OS Shape Number
Hadoop Client Ubuntu 12.04 x64 SMALL 1 Hadoop Resource Manager Ubuntu 12.04 x64 MEDIUM 1 Hadoop Name Node Ubuntu 12.04 x64 MEDIUM 1 Hadoop Slave Ubuntu 12.04 x64 MEDIUM
(alterable with -h parameter
1 (alterable with
-l parameter
To check whether Hadoop has started properly, you should login to the client and run a test job. The cluster is ready to work if the test job is performed without issues.
Each project can have only one Hadoop service activated for the region, but the service can include several Hadoop clients, each responsible for its own job. For more details on new Hadoop resources creation, see the Manipulating Slaves and Clients section.
Retrieving Hadoop Info
To see the list, the states and the DNS names of Hadoop resources, run the or2-describe-hadoop (or2dh) command:
or2dh -p project -r region
You can also use the or2-describe-services (or2dser) command with the -s Hadoop flag to find the Hadoop client DNS.
Running Jobs
To run a Hadoop job, you have to connect to the Hadoop Client you want to use. To connect, use the DNS name retrieved by the or2dh command and the following credentials:
User: hdfs Password: user
When connected to the Client, run the following command on it:
hadoop jar job_path [job parameters]
Where:
job_path stands for the path to the .jar file describing the Hadoop job
job_parameters stands for the list of the parameters that can be accepted by the current job
Each Hadoop client has a set of pre-installed demo jobs you can run to check how the service works. For example, the command below will call the job with a program that is intended to calculate the Pi number:
EPAM SYSTEMS 27
hadoop jar /usr/lib/hadoop-mapreduce/hadoop-mapreduce-examples-2.4.0.2.1.5.0-695.jar pi 10 20
Here,
pi specifies the name of a valid program available within the specified job 10 stands for an integer specifying the number of mappings
20 stands for an integer specifying the number of samples per map. You can also see the other examples in the /usr/lib/hadoop-mapreduce/ folder.
Manipulating Slaves and Clients
It is possible to change the number of existing Hadoop Clients and Slaves after the service activation. This can be done with the or2-manage-hadoop (or2mh) command:
or2mh -p project -r region -a -c number -s resource_type
where:
-a (--add) - a flag identifying that a resource should be added
resource_type is a type of the Hadoop resource (client, slave)
number identifies the number of the new resources to be created (1 by default)
You can also specify the resource shape with the -h / --shape parameter. To remove a slave, use the or2mh command with the -m /--remove parameter:
or2mh -p project -r region -c number -s resource_type --remove
When you remove a slave, it will still be detected as active on Resource Manager and Name Nod UIs for some time.
Web UI
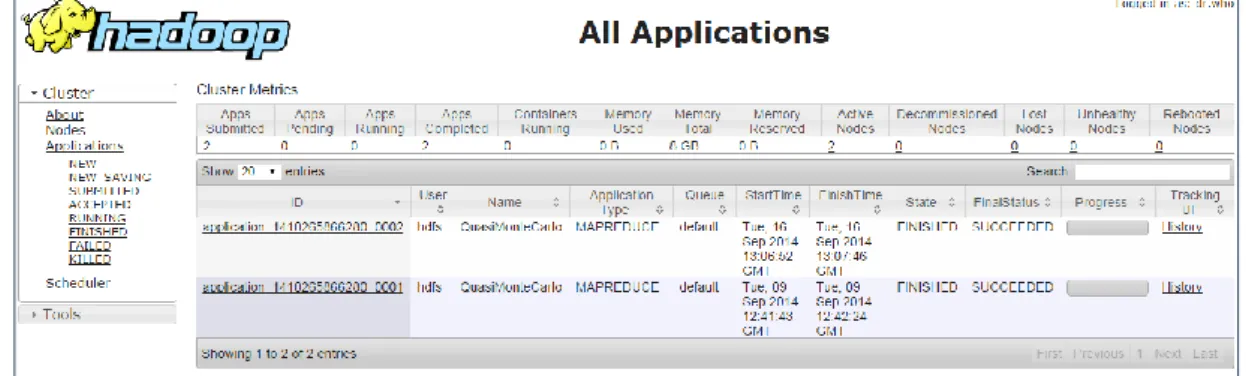
To monitor the Hadoop Service performance, you can login to the Hadoop Resource Manager and Hadoop Name Node. For Resource Manager, use its DNS name and port 8088:
http://hadoop_rm_dns:8088
When you connect, you can see the list of the performed jobs (called Applications here), their status, and get the access to other details:
28 EPAM SYSTEMS
Figure 7 - Hadoop RM Web UI
To login to Hadoop Name Node UI, use the Name Node DNS and the 50070 port:
http://hadoop_nn_dns:50070
Figure 8 - Hadoop Name Node Web UI
You don’t have to specify any credentials to connect to Hadoop Resource Manager and Name Node web interfaces.
Pricing
The service usage price is defined by the price of the created Hadoop Resources. The default parameters of a minimum set of Hadoop VMs are:
Image: Ubuntu12.04_64-bit Shapes: MEDIUM (three VMs)
EPAM SYSTEMS 29
Therefore, the approximate monthly cost of minimum set of Hadoop Data Platform Service in case of 100% and 24/7 load is about $211.44 in EPAM-BY1 region (as to 09/17/2014). The price can vary depending on the region, the number of clients and slaves and their shapes. To get more detailed estimations, please, use our Cost Estimator tool.
30 EPAM SYSTEMS
8
Ambari as a Service
Apache Ambari is an open-source software that provides a web based UI and APIs for provisioning, management and monitoring of Hadoop clusters.
As EPAM Cloud Service, Ambari creates an Ambari-Server for your project, sets up a cluster of Ambari-Agents that deploy a chosen stack of Hadoop bundle for you and provide the existing Ambari facilities for managing the Hadoop cluster of yours.
Ambari as a Service is based on Hortonworks Ambari 1.7.0.
You can create Ambari resources in both AWS and standard EPAM Cloud regions. Please, keep in mind the following service performance specifics:
If you need to create at least one Cluster resource in Amazon, Ambari server should also be hosted in AWS, in the same region.
All AWS-hosted Ambari resources should be hosted in the same region.
You can run Cluster resources in several regions simultaneously, including both EPAM and AWS regions. In this case, the server should be hosted in AWS.
When an AWS-based Ambari resource is stopped and started again, it changes DNS and loses connection to other Ambai resources. Please, keep your AWS Ambari resources running.
The table below provides the list of service-related commands and their descriptions.
Command Description
or2-manage-service …. -s ambari -a -c
cluster_name -k key
Starts the service in the specified project and region
or2-ambari-cluster (or2ac) Sets up an Ambari cluster for the project or2-describe-maestro-stack-resources
-p project -r region
-s cluster_stack_name
Retrieves the information on the resources created in the Ambari cluster
or2-describe-instances -p project -r region
-l “cluster_name=your_cluster_name”
Starting a One-Node Ambari Server and Configuring the Cluster
To activate the service and create an Ambari server, run the or2-manage-service (or2ms) command with --activate (-a) , --service (-s) ambari and other necessary flags:or2ms -p project -r region -a -s ambari -c cluster_name -k key -b blueprint
Ambari service has been released recently. If you encounter any issues with it, please do not hesitate to contact our Consulting Team.
EPAM SYSTEMS 31 where:
-c (--cluster-name) specifies the name for the newly created Ambari cluster. -b (--blueprint) specifies the name of a valid Ambari blueprint file you want to use
with your Ambari Server. If you do not specify the blueprint file, the default one will be used (see the details below).
Ambari Blueprint is a declarative definition of a cluster. With a Blueprint, you specify a Stack, the Component layout and the Configurations to materialize a Hadoop cluster instance (via a REST API) without having to use the Ambari Cluster Install Wizard.
-k (--key-name) the SSH key name that will be used for all Ambari resources. The service, when activated, starts an Ambari server (CentOS6_64-bit, MEDIUM) and reserves a cluster with the specified name and configuration parameters.
Configuring and Starting Cluster Nodes
When the Server is up and running, you can start setting up the Ambari-Agents and describe the cluster configuration parameters.
All the settings are taken from two files:
The blueprint file you specified at the Ambari-Serveractivation step. It provides the information on the software stack to be installed on the cluster’s VMs.
The configuration file you specify with the or2-ambari-cluster command describes the cluster’s hardware stack (the number of VMs in each group, additional volumes attached to those, etc.). The command is called as follows:
or2ac -p project -r region --cluster-name name --action run –config-file json
where:
--cluster-name is the name of the Ambari cluster you want to set up
--config-file is the full path to a locally stored .json file with cluster configurations (see Configuration Example).
To make sure that the cluster was started successfully, use the or2-describe-services Maestro CLI command:
32 EPAM SYSTEMS Before you start creating an Ambari cluster, please, make sure that the action won’t exceed the project resource quota (either daily or monthly). If it does, the cluster creation will fail, but some of the resources may remain active and billed.
To see your monthly quota usage info, please, call the command:
or2report -p project -r region -y year -m month -t quota
To see your project daily quota limitation, use:
or2dpro -p project --full
and see the volumeCreationInterval_count, instanceCreationInterval_count and maxVolumeSizw_GB values for resource creation and volumes size limits.
EPAM SYSTEMS 33
Retrieving Information on Ambari resources
There are several ways to get the information on the resources engaged in Ambari Service: To get the service availability, the name of the stack that launched the service and
the details on the Ambari Server, use:
or2-describe-services -p project -r region
To get the information on the resources created in the Ambari cluster, use the following commands:
or2-describe-maestro-stack-resources -p project -r region -s cluster_stack_name
or
or2-describe-instances -p project -r region -l “cluster_name=your_cluster_name”
Web UI
When you start the Ambari service and the server is run, you can loin to it using its DNS name and port 8080:
http://ambari_server:8080
The server URL is also returned as a part of or2-describe-services command output. Use the following credentials to login to the Ambari server in EPAM regions:
Login: admin Password: admin
To login to the Ambari Server hosted in AWS, please, use the ec2-user login and the SSH key you specified at service start.
However, there is no information on the server until the Ambari cluster resources are up and running. After the or2-ambari-cluster command execution, the information on the cluster resources appear on the Server. You will see an operation on maestro on the main toolbar, and if you click it, you will get the statistics on the cluster resources setup:
34 EPAM SYSTEMS
Figure 9 - Cluster resources setup
It is strongly recommended not to perform any operations on the server till the setup is finished.
When the setup is completed, the Ambari service is ready to use.
Pricing
The service usage price is defined by the price of the created Ambari Resources and will depend on the number and parameters of cluster VMs.
EPAM SYSTEMS 35
Default Blueprint
As it has been mentioned before, the blueprint file contains the information on the software that should be installed on Ambari Cluster VMs. In case you don’t specify a Blueprint, the default one will be used. It contains the following settings:
hgroup1
hgroup2
hgroup3
ZOOKEEPER_SERVER
ZOOKEEPER_CLIENT
PIG
HISTORYSERVER
NAMENODE
HCAT
TEZ_CLIENT
AMBARI_SERVER
APP_TIMELINE_SERVER
SQOOP
HDFS_CLIENT
HIVE_CLIENT
NODEMANAGER
YARN_CLIENT
MAPREDUCE2_CLIENT
DATANODE
GANGLIA_MONITOR
ZOOKEEPER_SERVER
ZOOKEEPER_CLIENT
PIG
HIVE_SERVER
HCAT
NAGIOS_SERVER
SECONDARY_NAMENODE
TEZ_CLIENT
HIVE_METASTORE
GANGLIA_SERVER
SQOOP
HDFS_CLIENT
HIVE_CLIENT
NODEMANAGER
YARN_CLIENT
MAPREDUCE2_CLIENT
DATANODE
MYSQL_SERVER
GANGLIA_MONITOR
WEBHCAT_SERVER
RESOURCEMANAGER
ZOOKEEPER_CLIENT
PIG
SQOOP
HIVE_CLIENT
HDFS_CLIENT
YARN_CLIENT
HCAT
MAPREDUCE2_CLIENT
TEZ_CLIENT
GANGLIA_MONITOR
36 EPAM SYSTEMS
Configuration Example
The code below provides an example of a configuration file:
{ instances: [ { zone: "AWS-USEAST", group: "hgroup1", shape: "small", count: 2, volumes: [ { size: 1, mount: "/storage/hadoop1", fs: "ext4" }, { size: 2, mount: "/storage/hadoop2", fs: "ext3"}, { size: 1, mount: "/storage/hadoop3", fs: "ext4"} ]}, { zone: "EPAM-BY1", group: "hgroup2", shape: "small", count: 1}, { zone: "EPAM-RU1", group: "hgroup3", shape: "small", count: 1, volumes: [ { size: 3, mount: "/storage/hadoopcsa1", fs: "ext4"}, { size: 3, mount: "/storage/hadoopcsa2", fs: "ext3"}] } ] }
EPAM SYSTEMS 37
9
Cloudify as a Service (CAS)
The Cloudify Servcie is a PaaS solution that allows you to create your own Private Cloud inside EPAM Private Cloud.
In contrast to DevOps tools that simply assist in installing your applications, the Cloudify Service, built on proven technology (our mission-critical high-performance elastic application platform GigaSpace XAP), provides a mechanism for managing the entire life cycle of your application.
For the detailed description of the Cloudify service, please, see the Cloudify Service Guide.
Cloudify as a Service
To start using the Cloudify Service, you should perform the following steps: Install EPAM Private Cloud Orchestrator CLI
Activate your project in EPAM Orchestration Service
Access the EPAM Private Cloud via EPAM Cloud Orchestrator CLI
Using EPAM Private Cloud Orchestrator CLI, create a key for your project in the selected region.
The Cloudify Service can be started with only one command:
or2-manage-service -s Cloudify -a -p project -r region -k key name
When executed, this command will:
Download Cloudify package with default recipes Unpack it
Set your properties (user, project, region, key, EPAM Private Cloud Orchestrator url - all of them will be taken from EPAM Private Cloud Orchestrator properties)
38 EPAM SYSTEMS
Figure 10 - Cloudify Shell
After that, all you need to do is just to start working with Cloudify as with an independent application.
Cloudify Commands
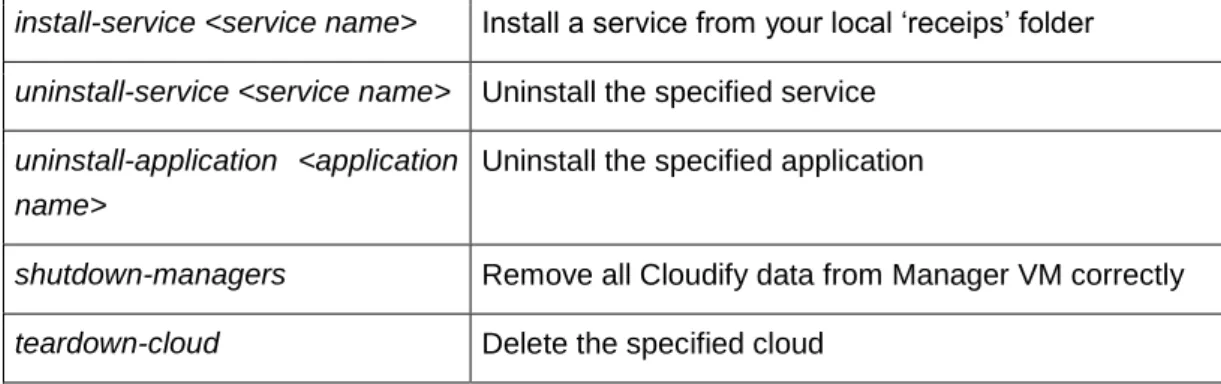
When the Cloudify service is activated, the Cloudify CLI is launched. The Service can be easily operated by the following commands:
Command Description
bootstrap-cloud <cloud name> Create a new Cloudify cloud. The command returns the
IP of the created Cloudify Manager and connects the current CLI session to this manager. To work with EPAM Private Cloud you should use ‘epam’? as a cloud name. Note: Only one Cloudify cloud per project in a region can be created inside EPAM Private Cloud
If a Cloudify cloud has already been created for the project in the given region, the command returns the corresponding Cloudify Manager IP, but CLI session is not connected to the manager.
connect <Cloudify manager IP> Connect to an existing Cloudify manager
install-application <application name>
Install an application from your local ‘receips’ folder NB: It is recommended to use the Cloudify Service with the following images:
CentOS6_64-bit Ubuntu12.04_64-bit
EPAM SYSTEMS 39
install-service <service name> Install a service from your local ‘receips’ folder
uninstall-service <service name> Uninstall the specified service uninstall-application <application
name>
Uninstall the specified application
shutdown-managers Remove all Cloudify data from Manager VM correctly
teardown-cloud Delete the specified cloud
Cloudify UI
Cloudify Service provides you with a web user interface that allows to obtain the data on your cloud performance. The web UI URL is returned as a part of the response displayed by the bootstrap-cloud command used to run the Cloudify Manager machine. Here, you can get the information on the Cloudify Cloud:
40 EPAM SYSTEMS
Changing Credentials
To change the credentials used to work with the Cloudify Service, perform the three steps described below:
Run the shutdown-managers Cloudify command. It will remove all Cloudify data from Manager VM correctly
Change the credentials on your local Cloudify CLI package
Perform bootstrap-cloud -use-existing epam Cloudify command. It will find Cloudify Manager VM, install and run all required data and restore info about existing hosts, applications and services
Pricing
The Cloudify service usage price is defined by the price of the Cloudify manager and all the VMs run under it. These elements are billed the same way the other VMs in Cloud are. To get the approximate cost of a Cloudify cloud, you can use our Cost Estimator tool.
EPAM SYSTEMS 41
10
Infrastructure Scheduling Service
(CRON)
EPAM Orchestrator allows scheduling instances manipulation so that their state is automatically changed when needed, allowing to optimize the infrastructure load and costs.The schedules are set up with cron expressions that are to be specified in the
or2-create-schedule
CLI command according to the specific rules. Maestro CLI allows you to create a schedule, retrieve its info and delete. All these action are performed with different CLI commands described below in this section.The table below provides the list of service-related commands and their descriptions.
Command Description
or2-create-schedule (or2addsch) Schedules a new action for the project and region
or2-schedule-add-instances (or2schaddi) Adds an instance to the existing schedule or2-schedule-remove-instances
(or2schremi)
Removes an instance from the specified schedule
or2-describe-schedules (or2dsch) Describes schedules existing on the specified project and region
or2-delete-schedule (or2delsch) Deletes the specified schedule
Scheduling Activation
Infrastructure scheduling is activated automatically as soon as the user specifies the schedule to be applied to the selected instances. To set up a new schedule, use the or2-create-schedule (or2addsh) command with the following flags:
or2-create-schedule -p project -r region -a action -c cronExpression -i instanceID -n scheduleName
Here, the -a parameter specifies the action to be applied to the instances ('start', 'stop', 'suspend'), -c parameter specifies the Cron expression used for scheduling the action, -i parameter specifies the instance or instances to which the schedule should be applied, and the -n parameter sets the schedule name for further reference.
Below, you can see examples of the most typical schedules used to automate Cloud infrastructure manipulations:
To switch on the VM every morning and shut it down every evening on weekdays, use the following CLI Commands:
or2addsch -a start -c "0 0 5 ? * MON-FRI" -i SAMPLE -n on_schedule -p sample -r sample
42 EPAM SYSTEMS
or2addsch -a stop -c "0 0 15 ? * MON-FRI" -i SAMPLE -n off_schedule -p sample -r sample
The first schedule will start the VM at 8-00 Minsk time (UTC+3), and the second schedule will stop it at 18-00 Minsk Time (UTC+3)
To start the VM on Monday morning and stop it on Friday evening:
or2addsch -a start -c "0 0 5 ? * MON" -i SAMPLE -n sample_schedule -p sample -r sample
or2addsch -a stop -c "0 0 15 ? * FRI" -i SAMPLE -n sample_schedule -p sample -r sample
The first schedule will start the VM on Mondays at 8-00 Minsk time (UTC+3), and the second schedule will stop it on Fridayes at 18-00 Minsk Time (UTC+3)
To add an instance or instances to an existing schedule, use the or2schedule-add-instances (or2schaddi) with the following flags:
or2schaddi -p project -r region -i instanceID> -n scheduleName
The details on the Cron rules creation are given in the section below.
Describing Schedules
It is possible to see the list of the schedules executed for your project. To get such list, use the or2-describe-schedules (or2dscg) CLI Command with the following parameters:
or2dsch -p demopro -r demoreg
Deleting Schedules
To remove a schedule that is no more needed, use the or2-delete-schedule (or2delsch) CLI Command with the following parameters:
or2delsch -p demopro -r demoreg -n schedule_name
Cron Reference
Below is an extract of cron rules, taken the quartz-scheduler.org. For additional information, please see the source page.
Cron expressions are comprised of 6 required fields and one optional field separated by white space. The fields respectively are described as follows:
Field Name
Allowed Values
Allowed Special Characters
EPAM SYSTEMS 43
Minutes
0-59
, - * /
Hours
0-23
, - * /
Day-of-Month
1-31
, - * ? / L W
Month
1-12 or JAN-DEC
, - * /
Day-of-Week
1-7 or SUN-SAT
, - * ? / L #
Year (optional)
empty, 1970-2199
, - * /
The '*' character is used to specify all values. For example, "*" in the minute field means "every minute".
The '?' character is allowed for the day-of-month and day-of-week fields. It is used to specify 'no specific value'. This is useful when you need to specify something in one of the two fields, but not the other.
The '-' character is used to specify ranges For example "10-12" in the hour field means "the hours 10, 11 and 12".
The ',' character is used to specify additional values. For example "MON,WED,FRI" in the day-of-week field means "the days Monday, Wednesday, and Friday".
The '/' character is used to specify increments. For example "0/15" in the seconds field means "the seconds 0, 15, 30, and 45". And "5/15" in the seconds field means "the seconds 5, 20, 35, and 50". Specifying '*' before the '/' is equivalent to specifying 0 is the value to start with. The '/' character simply helps you turn on every "nth" value in the given set. Thus '7/6' in the month field only turns on month '7', it does NOT mean every 6th month, please note that subtlety.
The 'L' character is allowed for the day-of-month and day-of-week fields. This character is short-hand for "last", but it has different meaning in each of the two fields. For example, the value "L" in the day-of-month field means "the last day of the month" - day 31 for January, day 28 for February on non-leap years. If used in the day-of-week field by itself, it simply means "7" or "SAT". But if used in the day-of-day-of-week field after another value, it means "the last xxx day of the month" - for example "6L" means "the last friday of the month". You can also specify an offset from the last day of the month, such as "L-3" which would mean the third-to-last day of the calendar month. When using the 'L' option, it is important not to specify lists, or ranges of values, as you'll get confusing/unexpected results.
The 'W' character is allowed for the day-of-month field. This character is used to specify the weekday (Monday-Friday) nearest the given day. As an example, if you were to specify "15W" as the value for the day-of-month field, the meaning is:"the nearest weekday to the 15th of the month". So if the 15th is a Saturday, the trigger will fire on Friday the 14th.
The 'L' and 'W' characters can also be combined for the day-of-month expression to yield 'LW', which translates to "last weekday of the month".
The '#' character is allowed for the day-of-week field. This character is used to specify "the nth" XXX day of the month. For example, the value of "6#3" in the day-of-week
44 EPAM SYSTEMS field means the third Friday of the month (day 6 = Friday and "#3" = the 3rd one in the month).
The legal characters and the names of months and days of the week are not case sensitive.
Pricing
The Scheduling service is provided for free and is intended to help you optimize
your infrastructure utilization and minimize the costs through switching the VMs to
passive state when they are not needed.
EPAM SYSTEMS 45
Version History
Version Date Summary
1.0 August 9, 2014 First published 1.2 September 20,
2014 Hadoop Service added
1.3 November 1, 2014 Documentation reference updated 1.4 December 6, 2014 CRON service description added 1.5 January 31, 2014 Added Ambari Service description 1.6 March 21, 2015 Updated regions info
1.7 June 7, 2015 Updated Ambari Service info Updated General Notion section Added Services commands lists 1.7.5 July 19, 2015 Updated Docker Servcie info
Global
41 University Drive Suite 202, Newtown (PA), 18940, USA
Phone: +1-267-759-9000 Fax: +1-267-759-8989
EU
Corvin Offices I. Futó st 47-53 Budapest, H-1082, Hungary Phone: +36-1-327-7400 Fax:+36-1-577-2384