6UCSSG0002-42B
January 2013
Interoperability Guide
Configuring SIP Mobility for
CounterPath Bria on the NetVanta
7100 and NetVanta UC Server Systems
This interoperability guide provides instructions for configuring Session Initiation Protocol (SIP) mobility using CounterPath’s Bria voice over IP (VoIP) softphone application with the NetVanta 7100 and NetVanta Unified Communications (UC) Server systems. It provides an overview and instructions for the SIP mobility solution. Also, this guide provides lists of the required equipment and software for the integration, the features supported by the integration, and the verified functionality of the integration.This guide consists of the following sections: • SIP Mobility Overview on page2
• Hardware and Software Requirements and Limitations on page4 • Configuration Overview on page6
• Configuring the NetVanta 7100 for SIP Mobility on page7 • Configuring NetVanta BCS Systems for SIP Mobility on page 10 • Configuring NetVanta ECS Systems for SIP Mobility on page 16 • Downloading and Configuring Bria on a Mobile Device on
page 25
SIP Mobility Overview NetVanta UC Server SIP Mobility
SIP Mobility Overview
The purpose of this solution is to provide mobile SIP-based communication over on-site (local Wi-Fi) and off-site (remote Wi-Fi or cellular data networks) data connections. With the aide of CounterPath’s Bria VoIP softphone application, this SIP mobility solution allows users with iOS and Android mobile devices to make SIP calls, manage voicemail, and perform other tasks on the NetVanta 7100 or NetVanta UC Server system wirelessly, without the need for a dedicated VoIP hard phone.
SIP mobility can be configured on the NetVanta 7100, NetVanta Business Communications Server (BCS) systems using a NetVanta 7100 as an IP private branch exchange (PBX), and NetVanta Enterprise Communications Server (ECS) systems using an ADTRAN IP business gateway with Session Border Controller (SBC). This solution provides two possible configurations, an on-site only configuration and an on-site/off-site configuration. The on-site/off-site configuration, which requires the configuration of the Simple Remote Phone feature on the NetVanta 7100 or the Remote Phone feature on the IP business gateway (for NetVanta ECS systems), is more versatile, allowing users to use their softphone on the local business Wi-Fi network, remote Wi-Fi networks, and their cellular data network.
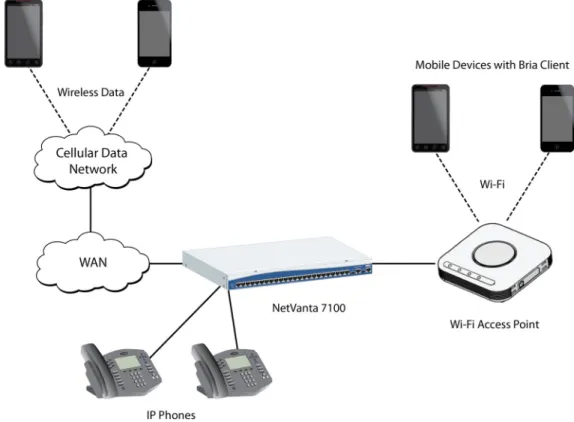
The figure below shows a typical SIP mobility application using a NetVanta 7100.
NetVanta UC Server SIP Mobility SIP Mobility Overview
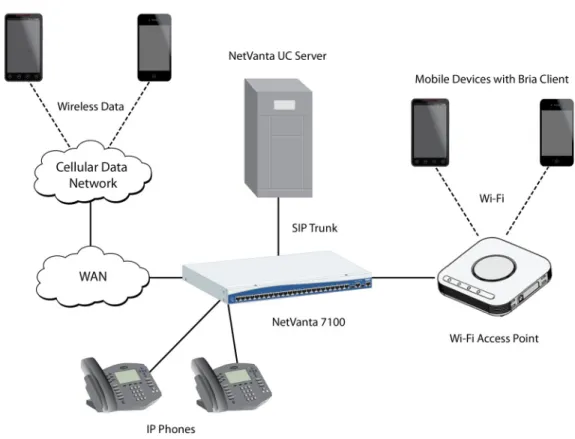
The figure below shows a typical SIP mobility application using a NetVanta BCS system with a NetVanta7100 as an IP private branch exchange (PBX).
Hardware and Software Requirements and Limitations NetVanta UC Server SIP Mobility
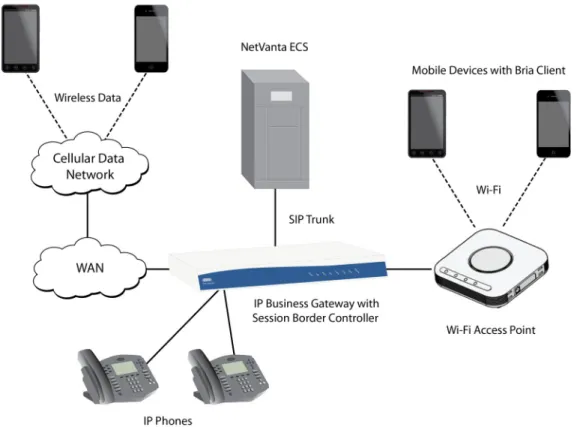
The figure below shows a typical SIP mobility application using a NetVanta ECS system with an ADTRAN IP business gateway with SBC.
Figure 3. SIP Mobility on a NetVanta ECS System
Hardware and Software Requirements and Limitations
NetVanta ECS software version 5.2.0 or later is required for SIP mobility.ADTRAN Operating System (AOS) R10.5.0 or later is required for the IP business gateway unit.
Additionally, on-site/off-site SIP mobility configurations require that the IP business gateway unit have the SBC feature pack to allow remote phone support. For more information on which units are SBC capable, refer to the Feature Matrix available from the ADTRAN Support Community
(https://supportforums.adtran.com)
AOS R10.5.0 or later is required for the NetVanta 7100.
Verified Features and Exceptions
The following sections provide information on the supported features and exceptions of the SIP mobility solution. The features listed in Verified Functionality on page4 are the only features you can expect to function with the configuration provided in this guide.
Verified Functionality
NetVanta UC Server SIP Mobility Hardware and Software Requirements and Limitations
• NetVanta ECS version 5.2.0
• NetVanta 7100 with firmware version R10.3.0 • Bria iPhone Edition version 2.1.2 build 12565 • Bria Android Edition version 2.0.3
The following functions have been verified using the firmware and software versions listed above: • Basic call handling
• Call holding • Blind transfers • Supervised transfers • Call redirect to voicemail • Unconditional call forwarding
Exceptions
This SIP mobility solution has the following exceptions:
• On the NetVanta 7100, if a Bria phone client performs a blind transfer to a Bria desktop client, no ringback is heard while the call is presented to the transfer destination.
• On NetVanta ECS or NetVanta 7100, when a Bria desktop client performs a blind transfer to a Bria phone client, the transfer completes and two-way audio is established; however, the phone client does not show the call as connected.
• Handover of active calls between Wi-Fi and cellular networks is not supported by Bria clients. Consequently, active calls will be dropped on the mobile device when transitioning between Wi-Fi and cellular networks, and the call must be re-established by the user.
• Handover between Wi-Fi access points is not supported. Consequently, active calls may be dropped on the mobile device when transitioning between Wi-Fi access points. If a call is dropped during the transition between Wi-Fi access points, the call must be re-established by the user.
Hardware and Software Requirements and Limitations NetVanta UC Server SIP Mobility
Configuration Overview
Enabling SIP mobility on a NetVanta 7100 requires configuration of the NetVanta 7100 and the mobile device. Enabling SIP mobility on a NetVanta BCS system requires configuration of the NetVanta UC Server, the NetVanta 7100, and the mobile device. Similarly, enabling SIP mobility on a NetVanta ECS system requires configuration of the NetVanta UC Server, IP business gateway, and the mobile device. The configuration steps required on the NetVanta 7100 or IP business gateway differ slightly depending on whether SIP mobility is configured for on-site only or on-site/off-site.
System Type Configuration Checklist NetVanta 7100 On-site only SIP mobility:
On-site/off-site SIP mobility:
NetVanta BCS with NetVanta 7100
On-site only SIP mobility
On-site/off-site SIP mobility:
NetVanta ECS with IP Business Gateway
On-site only SIP mobility:
On-site/off-site SIP mobility:
After making the necessary configurations for SIP mobility on the NetVanta 7100, NetVanta BCS, or NetVanta ECS system, you can download and configure Bria on your mobile device. For directions, refer to Downloading and Configuring Bria on a Mobile Device on page25.
• Step 1:Configure a SIP Mobility User on the NetVanta 7100 on page7
• Step 1: Configure a SIP Mobility User on the NetVanta 7100 on page7
• Step 2:Optional. Configure the NetVanta 7100 for On-site/Off-site SIP Mobility on page
10
• Step 1: Configure a SIP Mobility User on the NetVanta 7100 on page
10
• Step 2: Configure a SIP Mobility User on the NetVanta UC Server on page
12
• Step 1: Configure a SIP Mobility User on the NetVanta 7100 on page
10
• Step 2: Configure a SIP Mobility User on the NetVanta UC Server on page
12
• Step 3: Optional. Configure the NetVanta 7100 for On-site/off-site SIP Mobility on page
16
• Step 1: Configure a SIP Mobility User on the NetVanta UC Server on page
16
• Step 1: Configure a SIP Mobility User on the NetVanta UC Server on page
16
• Step 2: Optional. Configure a SIP Mobility User on the IP Business Gateway on page
21
• Step 3: Optional. Configure the IP Business Gateway for On-site/Off-site SIP Mobility on page
NetVanta UC Server SIP Mobility Hardware and Software Requirements and Limitations
Configuring the NetVanta 7100 for SIP Mobility
The configuration steps provided in this section are for configuring a NetVanta 7100 only for SIP mobility. For more information on configuring the NetVanta 7100 as a part of a NetVanta BCS system, refer to Configuring NetVanta BCS Systems for SIP Mobility on page10.
Both on-site only and on-site/off-site SIP mobility for the NetVanta 7100 require that a SIP user be configured on the NetVanta 7100. The necessary configurations are outlined in the following step:
• Step 1: Configure a SIP Mobility User on the NetVanta 7100 on page7
In addition to the step above, on-site/off-site SIP mobility requires that the Simple Remote Phone feature be configured on the NetVanta 7100. This step is not required for on-site only SIP mobility configurations. Configuring on-site/off-site SIP mobility allows users to use their Bria softphone on-site (with the local Wi-Fi network) and off-site (with remote Wi-Fi networks and their cellular data network). The necessary configurations are outlined in the following step:
• Step 2: Optional. Configure the NetVanta 7100 for On-site/Off-site SIP Mobility on page10 After making the necessary configurations for SIP mobility on the NetVanta 7100, you can download and configure Bria on your mobile device. For directions, refer to Downloading and Configuring Bria on a Mobile Device on page25.
Step 1: Configure a SIP Mobility User on the NetVanta 7100
This section provides the minimum configuration settings on the NetVanta 7100 that are required for either on-site only or on-site/off-site SIP mobility. For more information on configuring the user account, refer to Configuring User Accounts on the NetVanta 7100 available from the ADTRAN support community (https://supportforums.adtran.com). The following steps must be completed for each SIP mobility user: 1. Open a new Web page in your Internet browser.
2. Enter your product’s IP address in the browser’s address field in the format http://<ip address>/admin, for example:
http://10.10.10.1/admin
3. At the prompt, enter your user name and password and select OK. The NetVanta 7100 GUI will appear.
4. In the GUI, navigate to Voice > Stations > User Accounts. The User Accounts menu will appear.
Hardware and Software Requirements and Limitations NetVanta UC Server SIP Mobility
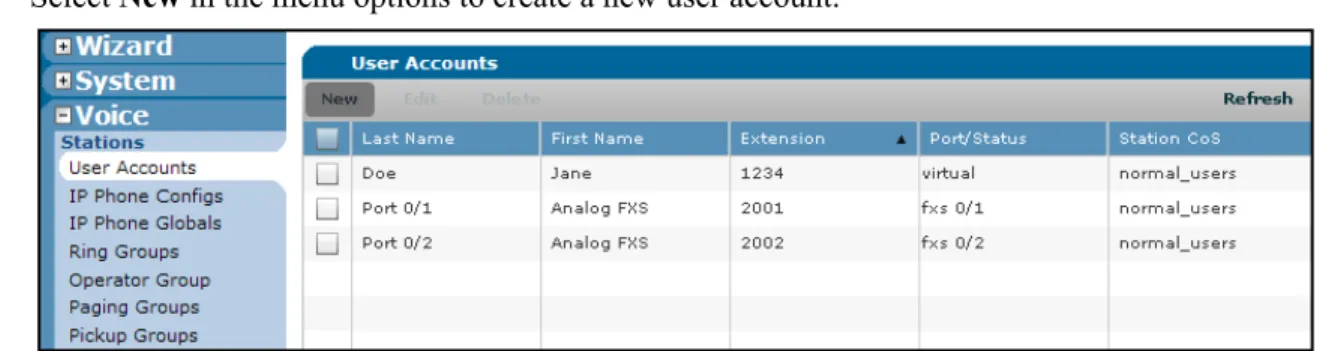
5. Select New in the menu options to create a new user account.
Figure 4. User Accounts Menu
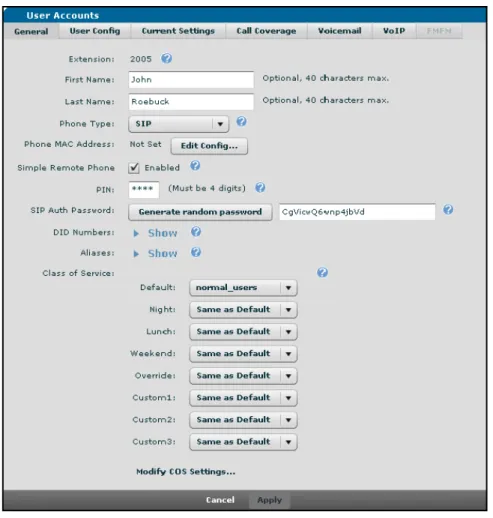
6. In the menu that appears, enter the desired Extension, First Name, and Last Name for the SIP mobility user account, and select SIP using the Phone Type drop-down menu. Record the extension entered for the user account (in this example, 2005). This will be used when setting up the Bria account on the mobile device. Select Apply to apply the configuration settings and continue editing the user account.
NetVanta UC Server SIP Mobility Hardware and Software Requirements and Limitations
7. In the General tab, select the Enabled check box next to Simple Remote Phone to enable the Simple Remote Phone feature for the user account.
Figure 6. New User General Tab
8. In the SIP Auth Password field, enter a SIP authentication password for the user account. If desired, the Generate random password button can be used to generate a random SIP authentication password. Record the SIP authentication password for later use when setting up Bria on the user’s mobile device. 9. Select Apply to save the user account configurations. Then, select Save at the top of the menu to save
Configuration Overview NetVanta UC Server SIP Mobility
Step 2: Optional. Configure the NetVanta 7100 for On-site/Off-site SIP Mobility
In addition to the steps outlined in Configure a SIP Mobility User on the NetVanta 7100 on page10, on-site/off-site SIP mobility requires that the Simple Remote Phone feature be configured on the NetVanta7100. For more information on configuring the Simple Remote Phone feature for softphones refer to the section titled Task 1: Configuring Simple Remote Phones through the GUI in Configuring Simple Remote Phones for the NetVanta 7100, available from the ADTRAN support community (https://supportforums.adtran.com).Configuring Simple Remote Phones for the NetVanta 7100 includes instructions for specifying the registration expire times using header manipulations rules (HMR) in the section titled Task 2: Specifying Registration Expire Times through the AOS CLI.
Additionally, it includes instructions for configuring IP phones for the Simple Remote Phone feature in the section titled Task 3: Altering the IP Phone Configuration Files. These steps are not necessary when configuring SIP mobility for Bria softphones.
During the simple remote phone configuration on the NetVanta 7100, for security purposes, you will add a User Datagram Protocol (UDP) SIP port with a non-standard port number for security. Record the UDP port number you choose (25069 is the port number used in the document). It will be used later when configuring Bria.
Configuring NetVanta BCS Systems for SIP Mobility
Both on-site only and on-site/off-site SIP mobility for NetVanta BCS systems using a NetVanta 7100 require that a SIP user be configured on the NetVanta 7100 and a user identity be configured on the NetVanta UC Server. The necessary configurations are outlined in the following steps:
• Step 1: Configure a SIP Mobility User on the NetVanta 7100 on page 10 • Step 2: Configure a SIP Mobility User on the NetVanta UC Server on page 12
In addition to the steps above, on-site/off-site SIP mobility requires that the Simple Remote Phone feature be configured on the NetVanta 7100. This step is not required for on-site only SIP mobility configurations. Configuring on-site/off-site SIP mobility allows users to use their Bria softphone on-site (with the local Wi-Fi network) and off-site (with remote Wi-Fi networks and their cellular data network). The necessary configuration is outlined in the following step:
• Step 3: Optional. Configure the NetVanta 7100 for On-site/off-site SIP Mobility on page16 After making the necessary configurations for SIP mobility on the NetVanta BCS system, you can download and configure Bria on your mobile device. For directions, refer to Downloading and Configuring Bria on a Mobile Device on page25.
Step 1: Configure a SIP Mobility User on the NetVanta 7100
This section provides the minimum configuration settings on the NetVanta 7100 that are required for either on-site only or on-site/off-site SIP mobility. For more information on configuring the user account, refer to Configuring User Accounts on the NetVanta 7100 available from the ADTRAN support community (https://supportforums.adtran.com). The following steps must be completed for each SIP mobility user: 1. Open a new Web page in your Internet browser.
NetVanta UC Server SIP Mobility Configuring SIP Mobility for NetVanta BCS Systems
2. Enter your product’s IP address in the browser’s address field in the format http://<ip address>/admin, for example:
http://10.10.10.1/admin
3. At the prompt, enter your user name and password and select OK. The NetVanta 7100 GUI will appear.
4. In the GUI, navigate to Voice > Stations > User Accounts. The User Accounts menu will appear. 5. Select New in the menu options to create a new user account.
Figure 7. User Accounts Menu
6. In the menu that appears, enter the desired Extension, First Name, and Last Name for the SIP mobility user account, and select SIP using the Phone Type drop-down menu. Record the extension entered for the user account (in this example, 2005). It will be used later when setting up a user identity on NetVanta UC Server and the Bria account on the mobile device. Select Apply to apply the configuration settings and continue editing the user account.
Configuring SIP Mobility for NetVanta BCS Systems NetVanta UC Server SIP Mobility
7. In the General tab, select the Enabled check box next to Simple Remote Phone to enable the Simple Remote Phone feature for the user account.
Figure 9. New User General Tab
8. In the SIP Auth Password field, enter a SIP authentication password for the user account. If desired, the Generate random password button can be used to generate a random SIP authentication password. Record the SIP authentication password for later use when setting up Bria on the user’s mobile device. 9. Select Apply to save the user account configurations. Then, select Save at the top of the menu to save
the configuration.
Step 2: Configure a SIP Mobility User on the NetVanta UC Server
Whether a user account for the SIP mobility user already exists on the NetVanta UC Server determines what configurations must be performed on the system. If a user account for the SIP mobility user already exists on the NetVanta UC Server, only an identity must be created for the user. If a user account does not exist, a user must be created and an identity assigned to the user.
If a user account for the SIP mobility user exists, follow the steps outlined in Adding an Identity to an Existing User on the NetVanta UC Server on page13.
If no user account for the SIP mobility user exists, follow the steps outlined in Adding a New User and Identity on the NetVanta UC Server on page15.
NetVanta UC Server SIP Mobility Configuring SIP Mobility for NetVanta BCS Systems
Adding an Identity to an Existing User on the NetVanta UC Server
If a user account for the SIP mobility user already exists on the NetVanta UC Server, a new user identity for SIP mobility must be added to the system. This identity must match the extension configured on the NetVanta 7100. Use the steps in this section to create a new user identity.
If a user account for the SIP mobility user does not exist on the NetVanta UC Server, you must create a new user with an identity on the NetVanta UC Server system. For instructions on creating a new user with an identity, please refer to Adding a New User and Identity on the NetVanta UC Server on page15.
1. Log in as an administrator to the NetVanta UC Client on the NetVanta UC Server computer.
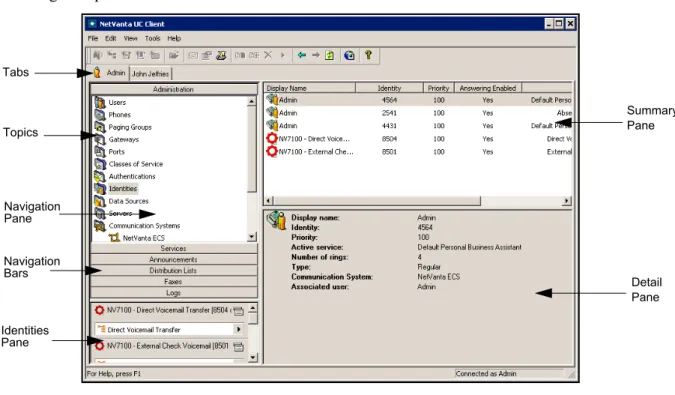
2. On the Admin tab, select the Administration navigation bar, then select the Identities topic from the navigation pane.
Figure 10. NetVanta UC Client Layout
3. Right click in the Identities summary pane, and select New Identity from the drop-down menu that appears. The New Identity Wizard welcome menu appears.
4. Select Next. The Select Identity Type menu appears.
5. In the Select Identity Type menu, use the Select a communication system drop-down menu to select the NetVanta 7000 Series communication system, use the Select a user profile drop-down menu to
Summary Pane
Detail Pane Tabs
Navigation Bars Navigation Pane Topics
Identities Pane
Configuring SIP Mobility for NetVanta BCS Systems NetVanta UC Server SIP Mobility
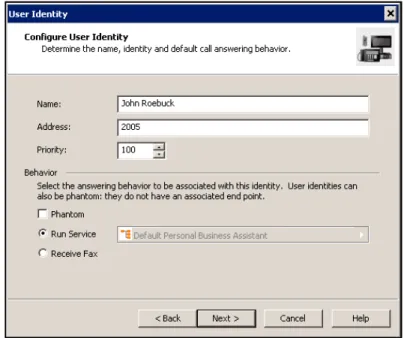
select the NetVanta UC Server user profile of the SIP mobility user. Select the User radio button, and select Next. The Configure User Identity menu will appear.
Figure 11. Select Identity Type Menu
6. In the Configure User Identity menu, enter a display name for the user identity in the Name field (this field is automatically populated with the user profile you associated with the identity in the previous step), and enter the extension of the SIP mobility user account you created on the NetVanta 7100 (refer to Step 6 on page 11 in Configure a SIP Mobility User on the NetVanta 7100) in the Address field. Then, select Next.
Figure 12. Configure User Identity Menu 7. In the menu that appears, select Finish to create the new identity.
NetVanta UC Server SIP Mobility Configuring SIP Mobility for NetVanta BCS Systems
Adding a New User and Identity on the NetVanta UC Server
If a user account for the SIP mobility user does not exist on the NetVanta UC Server, you must create a new user with an identity matching the extension of the SIP mobility user account you created on the NetVanta 7100. For instructions on creating a user using the New User Wizard, refer to the Using the New User Wizard section in the NetVanta Enterprise Communications Server and Business Application Server Administrator Guide available from the ADTRAN support community
(https://supportforums.adtran.com).
If a user account for the SIP mobility user already exists on the NetVanta UC Server, you only need to create an additional identity for the user on the NetVanta UC Server system. For instructions on creating an identity for a user, please refer to Adding an Identity to an Existing User on the NetVanta UC Server on page13.
When configuring the new SIP mobility user with the New User Wizard, the new user’s identity must match the extension of the SIP mobility user account you created on the NetVanta 7100 (refer to Step 6 on page 11 of Configure a SIP Mobility User on the NetVanta 7100), and the identity must be associated with the NetVanta 7000 Series communication system. Both of these configurations are performed in the User Information menu of the New User Wizard. While in the User Information menu, enter the extension of the SIP mobility user account in the Identity # field and select NetVanta 7000 Series using the adjacent drop-down menu.
Configuring SIP Mobility for NetVanta ECS Systems NetVanta UC Server SIP Mobility
Step 3: Optional. Configure the NetVanta 7100 for On-site/off-site SIP Mobility
In addition to the steps outlined in Configure a SIP Mobility User on the NetVanta 7100 on page10, on-site/off-site SIP mobility requires that the Simple Remote Phone feature be configured on the NetVanta7100. For more information on configuring the Simple Remote Phone feature for softphones refer to the section titled Task 1: Configuring Simple Remote Phones through the GUI in Configuring Simple Remote Phones for the NetVanta 7100, available from the ADTRAN support community (https://supportforums.adtran.com).Configuring Simple Remote Phones for the NetVanta 7100 includes instructions for specifying the registration expire times using header manipulations rules (HMR) in the section titled Task 2: Specifying Registration Expire Times through the AOS CLI.
Additionally, it includes instructions for configuring IP phones for the Simple Remote Phone feature in the section titled Task 3: Altering the IP Phone Configuration Files. These steps are not necessary when configuring SIP mobility for Bria softphones.
During the simple remote phone configuration on the NetVanta 7100, for security purposes, you will add a User Datagram Protocol (UDP) SIP port with a non-standard port number. Record the UDP port number you choose (25069 is the port number used in the document). It will be used later when configuring Bria.
Configuring NetVanta ECS Systems for SIP Mobility
On-site only SIP mobility for NetVanta ECS Systems using an IP business gateway with SBC requires that a user identity be configured on the NetVanta UC Server. The necessary configuration is outlined in the following step:
• Step 1: Configure a SIP Mobility User on the NetVanta UC Server on page 16
In addition to the step above, support for on-site/off-site SIP mobility requires that a SIP user be configured on the IP business gateway and the Remote Phone feature be configured on the IP business gateway. These steps are not required for on-site only SIP mobility configurations. Configuring
on-site/off-site SIP mobility allows users to use their Bria softphone on-site (with the local Wi-Fi network) and off-site (with remote Wi-Fi networks and their cellular data network). The necessary configurations are outlined in the following steps:
• Step 2: Optional. Configure a SIP Mobility User on the IP Business Gateway on page21
• Step 3: Optional. Configure the IP Business Gateway for On-site/Off-site SIP Mobility on page 23 After making the necessary configurations for SIP mobility on the NetVanta ECS system, you can download and configure Bria on your mobile device. For directions, refer to Downloading and Configuring Bria on a Mobile Device on page25.
Step 1: Configure a SIP Mobility User on the NetVanta UC Server
Whether a user account for the SIP mobility user already exists on the NetVanta UC Server determines what configurations must be performed on the system. If a user account for the SIP mobility user already exists on the NetVanta UC Server, only an identity must be created for the user. If a user account does not exist, a user must be created and an identity assigned to the user.
If a user account for the SIP mobility user exists, follow the steps outlined in Adding an Identity to an Existing User on the NetVanta UC Server on page17.
NetVanta UC Server SIP Mobility Configuring SIP Mobility for NetVanta ECS Systems
If no user account for the SIP mobility user exists, follow the steps outlined in Adding a New User and Identity on the NetVanta UC Server on page19.
Adding an Identity to an Existing User on the NetVanta UC Server
If a user account for the SIP mobility user already exists on the NetVanta UC Server, a new user identity for SIP mobility must be added to the system. Use the steps in this section to create a new user identity.
If a user account for the SIP mobility user does not exist on the NetVanta UC Server, you must create a new user with an identity on the NetVanta UC Server system. For instructions on creating a new user with an identity, please refer to Adding a New User and Identity on the NetVanta UC Server on page19.
1. Log in as an administrator to the NetVanta UC Client on the NetVanta UC Server computer.
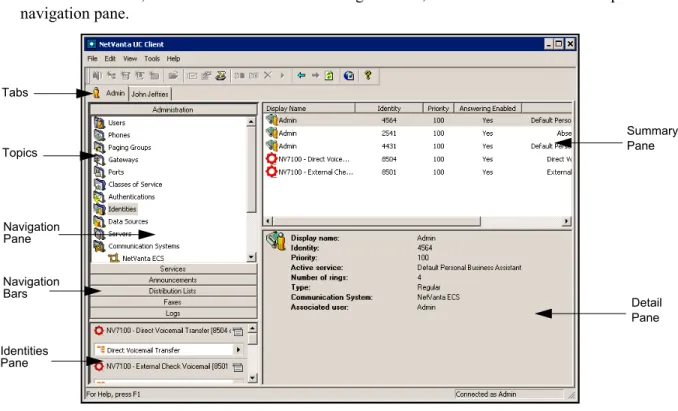
2. On the Admin tab, select the Administration navigation bar, then select the Identities topic from the navigation pane.
Figure 14. NetVanta UC Client Layout
3. Right click in the Identities summary pane, and select New Identity from the drop-down menu that appears. The New Identity Wizard welcome menu appears.
4. Select Next. The Select Identity Type menu appears.
Summary Pane
Detail Pane Tabs
Navigation Bars Navigation Pane Topics
Identities Pane
Configuring SIP Mobility for NetVanta ECS Systems NetVanta UC Server SIP Mobility
5. In the Select Identity Type menu, use the Select a communication system drop-down menu to select the NetVanta ECS communication system, and use the Select a user profile drop-down menu to select the NetVanta UC Server user profile of the SIP mobility user. Select the User radio button. Then, select Next. The Configure User Identity menu will appear.
Figure 15. Select Identity Type Menu
6. In the Configure User Identity menu, enter a display name for the user identity in the Name field (this field is automatically populated with the user profile you associated with the identity in the previous step), and enter the extension of the SIP mobility user in the Address field. Record the extension entered in the Address field. It will be used later when configuring on-site/off-site SIP mobility on the IP business gateway and Bria. Then, select Next. The Configure SIP Authentication menu will appear.
NetVanta UC Server SIP Mobility Configuring SIP Mobility for NetVanta ECS Systems
7. In the Configure SIP Authentication menu, enter the desired SIP authentication password for the SIP mobility user. Record the SIP authentication password. It will be used later when configuring the IP business gateway for on-site/off-site SIP mobility on or when configuring Bria for on-site only SIP mobility.
8. In the menu that appears, select Finish to create the new identity.
Adding a New User and Identity on the NetVanta UC Server
If a user account for the SIP mobility user does not exist on the NetVanta UC Server, you must create a new user and configure the user identity’s SIP authentication password. For instructions on creating a user using the New User Wizard, refer to the Using the New User Wizard section in the NetVanta Enterprise Communications Server and Business Application Server Administrator Guide available from the ADTRAN support community (https://supportforums.adtran.com).
If a user account for the SIP mobility user already exists on the NetVanta UC Server, you only need to create an additional identity for the user on the NetVanta UC Server system. For instructions on creating an identity for a user, please refer to Adding an Identity to an Existing User on the NetVanta UC Server on page17.
When configuring the new SIP mobility user with the New User Wizard, the new user’s identity must be associated with the NetVanta ECS communication system. This configuration is performed in the User Information menu of the New User Wizard. While in the User Information menu, enter the extension of the SIP mobility user account in the Identity # field, and select NetVanta ECS using the adjacent drop-down menu. Record the extension entered in the Identity # field. It will be used later when configuring on-site/off-site SIP mobility on the IP business gateway and Bria.
Configuring SIP Mobility for NetVanta ECS Systems NetVanta UC Server SIP Mobility
After configuring the new SIP mobility user you must manually change the SIP authentication password for the user’s identity and record this password. To manually change the SIP authentication password for the user identity, follow these steps:
1. Log in as an administrator to the NetVanta UC Client on the NetVanta UC Server computer.
2. On the Admin tab of NetVanta UC Client, select the Administration navigation bar, then select the Identities topic from the navigation pane.
3. In the Identities summary pane.double-click the identity assigned to the SIP mobility user you created. The Identity menu will appear.
4. In the Identity menu, select the SIP Authentication button. The SIP Authentication menu will appear.
Figure 18. Identity menu
If the SIP mobility user’s identity is not listed in the Identities summary pane, select View
NetVanta UC Server SIP Mobility Configuring SIP Mobility for NetVanta ECS Systems
5. In the SIP Authentication menu, enter the desired SIP authentication password in the Password field. Record the SIP authentication password. It will be used later when configuring the IP business gateway for on-site/off-site SIP mobility or when configuring Bria for on-site only SIP mobility. Then, select OK.
Figure 19. SIP Authentication menu
6. Select OK in the Identity menu to save the new SIP authentication password for the SIP mobility user’s identity.
Step 2: Optional. Configure a SIP Mobility User on the IP Business Gateway
This section provides the user configuration settings on the IP business gateway that are required for on-site/off-site SIP mobility. The following steps must be completed for each SIP mobility user: 1. Open a new Web page in your Internet browser.2. Enter your product’s IP address in the browser’s address field in the format http://<ip address>, for example:
http://10.10.10.1
3. At the prompt, enter your user name and password and select OK. the IP business gateway’s GUI will appear.
4. In the GUI, navigate to Voice > Stations > User Accounts. The Add/Modify/Delete Users menu will appear.
Configuring SIP Mobility for NetVanta ECS Systems NetVanta UC Server SIP Mobility
5. In the Add/Modify/Delete Users menu, enter the Extension, First Name, and Last Name for the SIP mobility user account, and select SIP using the Phone Type drop-down menu. The Extension number used must be the same as the extension entered when you configured the SIP mobility user identity on the NetVanta UC Server (refer to, Step 1: Configure a SIP Mobility User on the NetVanta UC Server on page
16). Select Apply to apply the configuration settings and continue editing the user account.The Edit User menu will appear.
Figure 20. Add/Modify/Delete Users Menu
6. In the Edit User menu, enter a SIP authentication password in the SIP Auth Password field. This is the SIP authentication password that the softphone will use to register with the IP business gateway. Record the SIP authentication password for later use when setting up Bria on the user’s mobile device.
NetVanta UC Server SIP Mobility Configuring SIP Mobility for NetVanta ECS Systems
7. In the VoIP Settings tab of the Edit User menu, select the Add SIP Identity button to add a SIP identity for the SIP mobility user. The SIP identity is used for registration with the NetVanta UC Server. The Add SIP Identity menu will appear.
Figure 22. VoIP Settings Tab
8. In the Add SIP Identity menu, enter the SIP mobility user extension from Step 5 on page 22 in the SIP Identity field. Use the Associated SIP Trunk menu to select the SIP trunk associated with the NetVanta UC Server. Select the Enabled check box next to Trunk Registration to allow the SIP user to register on the trunk. In the Trunk Authentication section, select the Set radio button, and enter the SIP mobility user extension in the User field. In the Password field, enter the SIP authentication password you configured for the SIP mobility user on the NetVanta UC Server (refer to Step 1: Configure a SIP Mobility User on the NetVanta UC Server on page
16). Then, select the Add SIP
Identity button to add the SIP identity to the user. The Add SIP Identity menu will close.
Figure 23. Add SIP Identity Menu
9. In the Edit User menu, select Apply to apply the user account configurations. Then, select Save at the top of the menu to save the configuration.
Step 3: Optional. Configure the IP Business Gateway for On-site/Off-site SIP
Mobility
Configuring SIP Mobility for NetVanta ECS Systems NetVanta UC Server SIP Mobility
During the remote phone configuration, for security purposes, you will add a UDP port with a
non-standard port number. Record the UDP port number you choose (25069 is the port number used in the document). It will be used later when configuring Bria. Additionally, you will specify the default and maximum SIP registration expires times. Record the default SIP registration expires time value you choose. It will be used later when configuring Bria.
The Configuring Remote Phones with an AOS SIP Gateway configuration guide also contains instructions for configuring SIP users for the remote phones in the section titled Step 3: Configuring a SIP User for Each Remote Phone. Because you previously created SIP users on the IP business gateway in Optional. Configure a SIP Mobility User on the IP Business Gateway on page21, this step is not necessary. However, you must enable the remote phone option for each SIP mobility user you created using the IP business gateway’s command line interface (CLI).
This step can only be accomplished using the CLI on your IP business gateway. To access the CLI on your IP business gateway and enable the remote phone option for each SIP mobility user, follow these steps: 1. Boot up the unit.
2. Telnet to the unit (telnet <ip address>), for example: telnet 10.10.10.1
If during the unit’s setup process you have changed the default IP address (10.10.10.1), use the configured IP address.
3. Enter your user name and password at the prompt.
4. Enable your unit by entering enable at the prompt as follows: >enable
5. If configured, enter your Enable mode password at the prompt. 6. Enter the unit’s Global Configuration mode as follows:
#configure terminal (config)#
7. Access the Voice User Account Configuration mode for the user using the voice user <extension>
command from the Global Configuration mode prompt. For example: (config)#voice user 5555
(config-5555)#
8. Enter the remote-phone command from the Voice User Account Configuration mode to enable the remote phone option for the user. For example:
(config-5555)#remote-phone
The AOS default user name is admin and the default password is password. If your product no longer has the default user name and password, contact your system administrator for the appropriate user name and password.
NetVanta UC Server SIP Mobility Configuring SIP Mobility for NetVanta ECS Systems
9. Exit the Voice User Account Configuration mode for the user using the exit command. For example: (config-5555)#exit
10. Repeat Steps 7 through 9 for each SIP mobility user you created in Optional. Configure a SIP Mobility User on the IP Business Gateway on page
21.
Downloading and Configuring Bria on a Mobile Device
After you or your administrator have made the necessary configurations for SIP mobility on the system, you can download and configure Bria on your mobile device.
Downloading Bria on an iOS Device
You can download the Bria iPhone Edition application or the Bria iPad Edition application using the application Store on your iOS device or iTunes on your computer.
Downloading Bria on an Android Device
You can download the Bria Android Edition application using the Android Market on your device or Google Play on the Internet.
Configuring Bria
The Android, iPhone, and iPad versions of the Bria application have slightly different interfaces; however, the configuration steps used are the same.
In the iPhone application and Android application (left and center figures below), there is a main Settings menu with buttons from which the various configuration menus can be accessed. The Settings menu can be accessed from any configuration menu by tapping the Settings button at the bottom-right corner of the screen. In the iPad application (right figure below), the Settings buttons are located on a persistent menu on the left side of the screen.The configuration instructions and menu illustrations in this section are derived from the iPhone application.
Configuring SIP Mobility for NetVanta ECS Systems NetVanta UC Server SIP Mobility
To configure Bria for SIP mobility on the iPhone, Android, or iPad, follow these steps: 1. Tap the Bria icon to start Bria.
2. If this is you first time running Bria, you will be presented with a menu prompting you to configure a new SIP account. On an iOS device, tap + to add an accounts. The Select VoIP Provider menu will appear.
On an Android device, tap Add Account. The Account Types menu will appear.
If this is not your first time running Bria, you will be presented with the Settings menu. In the Settings menu, tap Accounts. The Accounts menu will appear. In the Accounts menu, tap + to add an account. The Select VoIP Provider (iOS) or Account Types (Android) menu will appear.
3. In the Select VoIP Provider (iOS) or Account Types (Android) menu, tap SIP - Making Calls. The New SIP Account menu will appear.
NetVanta UC Server SIP Mobility Configuring SIP Mobility for NetVanta ECS Systems
4. In the New SIP Account menu, perform the following steps: • In the Account Name field, enter a description for the
account.
• In the Display as and Username fields, enter the SIP mobility extension created for the user during SIP mobility configuration on the system.
• In the Password field, enter the SIP authentication password created for the user during SIP mobility configuration on the system.
– If you are configuring either an on-site only or on-site/off-site SIP mobility user on a NetVanta7100 or NetVanta BCS system, the SIP authentication password is the SIP Auth Password you created when configuring the SIP mobility user on the NetVanta 7100.
– If you are configuring on-site only SIP mobility on a NetVanta ECS system, the SIP authentication password is the SIP authentication password you created when configuring the SIP mobility user on the NetVanta UC Server.
– If you are configuring on-site/off-site SIP mobility on a NetVanta ECS system, the SIP authentication password is the SIP Auth Password you created when configuring the SIP mobility user on the IP business gateway.
• In the Domain field enter one of the following:
– For on-site only SIP mobility, enter the local area network (LAN) IP address of the NetVanta 7100 or IP business gateway.
– For on-site/off-site SIP mobility, enter the wide area network (WAN) IP address and the UDP port number recorded during simple remote phone or remote phone configuration in the form
<IP address>:<UDP port>.
• Enable the account by sliding Enabled to the ON position.
• In the VM Number field, enter the access code used to access voicemail on the system. For example, *98. • Tap Account Advanced. The Account Advanced menu
Configuring SIP Mobility for NetVanta ECS Systems NetVanta UC Server SIP Mobility
5. In the Account Advanced menu, perform the following steps:
• In the Refresh Interval field enter the SIP registration expires time value recorded during the simple remote phone or remote phone configuration.
• If necessary, set the SIP Transport protocol to UDP. • Then, tap SIP Account or use the back key (Android
device) to return to the New SIP Account menu.
6. In the New SIP Account menu, tap Save (iOS) or use the back key (Android) to save the SIP account.
7. If you are configuring Bria for on-site/off-site SIP mobility, perform the following additional steps:
• Navigate to the Settings menu, and tap Advanced Settings. The Advanced menu will appear. In the Advanced menu, turn on Use VPN If Active. This setting is not available in Bria Android Edition.
• Optional. Navigate back to the Settings menu and select Preferences. The Preferences menu will appear. In the Mobile Data Network section, turn on Use When Available. This setting will allow you to use SIP mobility over your cellular data network. It should not be enabled if you only want to use SIP mobility over Wi-Fi networks.
8. The SIP account should now be fully configured and able to register and place calls.