Empower Software
System Administrator’s Guide
34 Maple Street Milford, MA 01757 71500031708, Revision A
NOTICE
The information in this document is subject to change without notice and should not be construed as a commitment by Waters Corporation. Waters Corporation assumes no responsibility for any errors that may appear in this document. This document is believed to be complete and accurate at the time of publication. In no event shall Waters
Corporation be liable for incidental or consequential damages in connection with, or arising from, the use of this document.
© 2002 WATERS CORPORATION. PRINTED IN THE UNITED STATES OF AMERICA. ALL RIGHTS RESERVED. THIS DOCUMENT OR PARTS THEREOF MAY NOT BE REPRODUCED IN ANY FORM WITHOUT THE WRITTEN PERMISSION OF THE PUBLISHER.
Millennium and Waters are registered trademarks, and Empower, LAC/E, and SAT/IN are trademarks of Waters Corporation.
Microsoft, MS, Windows, and Windows NT are registered trademarks of Microsoft Corporation.
Oracle, SQL*Net, and SQL*Plus are registered trademarks, and Oracle8, Oracle8i, and Oracle9i are trademarks of Oracle Corporation.
Pentium and Pentium II are registered trademarks of Intel Corporation. TCP/IP is a trademark of FTP Software, Inc.
All other trademarks or registered trademarks are the sole property of their respective owners.
Table of Contents 3
Preface
... 12
Chapter 1
Introduction ... 18
1.1 System Overview ... 18
1.2 Hardware Configuration Example ... 19
1.3 Software Description... 21
1.3.1 Server Software ... 21
1.3.2 Client Software ... 21
1.4 System Administration ... 23
1.4.1 System Administrator Qualifications ... 23
1.4.2 System Administration Tasks ... 24
1.4.3 User Accounts ... 26
1.5 Empower
Security Features ... 27
1.5.1 Server Security ... 27
1.5.2 Client Security ... 28
Chapter 2
Accessing the Server ... 29
2.1 Logging In to the Operating System ... 29
2.1.1 Windows User Accounts ... 29
2.2 Changing the Windows User Accounts Passwords ... 30
2.3 Oracle Accounts... 31
2.3.1 Logging In to an Oracle Account ... 31
Table of Contents
Table of Contents 4
2.4 Changing the Oracle User Accounts Passwords ... 31
2.5 Changing the Empower System User Account Password .... 32
2.6 Logging Out of the Operating System... 33
Chapter 3
Managing the Server ... 34
3.1 Starting the Server ... 34
3.2 Starting Up and Shutting Down the Empower
Database ... 35
3.2.1 Starting Up the Empower Database ... 35
3.2.2 Shutting Down the Empower Database ... 36
3.3 Shutting Down the Empower System... 36
3.3.1 Shutting Down the Server... 36
3.3.2 Shutting Down the Clients and Chromatographic
Systems... 37
3.4 Managing Operating System and Oracle User
Accounts and Passwords... 37
3.5 Archiving Alert Logs ... 38
3.6 Organizing Server Storage ... 38
3.6.1 Server Hard Drive Organization... 38
3.6.2 Database File Organization ... 39
3.7 Managing the Server Disk Space ... 41
3.7.1 Checking Free Disk Space ... 41
3.7.2 Increasing Free Disk Space... 42
3.7.3 Defragmenting the Hard Disk ... 43
3.7.4 Defragmenting the Database... 43
3.8 Backing Up and Restoring Server Disk Images ... 48
Table of Contents 5
3.9.1 Performing a Hot Backup to Drive... 54
3.9.2 Performing a Hot Backup to Tape ... 55
3.9.3 Performing a Cold Backup to Drive... 55
3.9.4 Performing a Cold Backup to Tape ... 55
3.10 Restoring the Empower Database ... 56
3.10.1 Backup Set Structures ... 57
3.10.2 Recovering from an Empower Database Drive
Failure... 61
3.10.3 Recovering from an Empower Raw Data Drive
Failure... 63
3.10.4 Recovering from an Empower Program Files Disk
Failure... 65
3.10.5 Recovering from a Database and Raw Data Drive
Failure... 66
3.10.6 Unusual Recovery Conditions ... 66
3.11 Configuring a Listener Service... 67
Chapter 4
Managing the Clients ... 72
4.1 Adding a Client Workstation... 73
4.1.1 Before You Begin ... 73
4.1.2 Installing the Empower Client Software ... 73
4.2 Configuring a Database Service Name ... 75
4.2.1 Defining the List of Database Aliases ... 79
4.3 Registering Acquisition Server Printers ... 80
4.4 Deleting a Client Workstation or LAC/E
32
Acquisition
Server ... 81
Table of Contents 6
4.5 Starting and Logging In to Empower Software ... 82
4.6 Logging Out of Empower Software ... 83
4.7 Managing User Types ... 83
4.7.1 Creating User Types ... 83
4.7.2 Modifying or Viewing User Types... 84
4.7.3 Deleting User Types... 84
4.8 Managing User Accounts ... 85
4.8.1 Creating User Accounts... 85
4.8.2 Modifying or Viewing User Accounts ... 86
4.8.3 Deleting User Accounts ... 87
4.9 Managing User Groups... 88
4.9.1 Creating User Groups... 88
4.9.2 Modifying or Viewing User Groups ... 88
4.9.3 Deleting User Groups ... 89
4.10 Managing Raw Data Files ... 89
4.11 Copying User Preferences ... 91
4.12 Managing Database Properties ... 92
4.12.1 Changing the Empower Database Password ... 93
4.12.2 Managing the Tablespaces ... 93
4.13 Backing Up and Restoring Projects ... 95
4.13.1 Configuring the Backup Utility (Optional)... 95
4.13.2 Backing Up Empower Projects ... 96
4.13.3 Restoring Empower Projects ... 98
Table of Contents 7
Chapter 5
Managing the LAC/E
32
Acquisition Server ... 103
5.1 Setting Up a LAC/E
32
Acquisition Server ... 103
5.1.1 Setting Up the Remote Administration Computer .... 103
5.1.2 Setting Up the LAC/E
32
Acquistion Server ... 104
5.2 Starting, Stopping and Rebooting the LAC/E
32
Acquisition
Server ... 105
5.2.1 Starting the LAC/E
32
Acquisition Server... 105
5.2.2 Shutting Down the LAC/E
32
Acquisition Server ... 105
5.2.3 Remotely Rebooting the LAC/E
32
Acquisition
Server ... 105
5.3 Deleting a LAC/E
32
Acquisition Server ... 106
5.4 Buffering and Recovering Data ... 106
Chapter 6
Troubleshooting ... 108
6.1 Isolating Problems ... 108
6.1.1 Recommendations... 109
6.1.2 Recording Problems ... 110
6.2 Reporting Problems ... 110
6.3 Software Problems... 111
6.4 Hardware Problems ... 114
6.5 Troubleshooting Procedures ... 117
6.5.1 Evaluating Windows XP or Windows 2000 Error
Messages ... 117
6.5.2 Evaluating Empower Error Messages... 117
Table of Contents 8
Appendix A
Log Forms ... 118
Appendix B
Glossary
... 125
Index ... 130
List of Figures 9
1-1
Example of Empower Enterprise and Workgroup System
Architecture... 20
2-1
Windows Security Dialog Box ... 30
2-2
Change Password Dialog Box ... 30
3-1
System (C:) Properties Dialog Box with General Tab Selected ... 42
3-2
Windows 2000 Media Pool Names ... 54
3-3
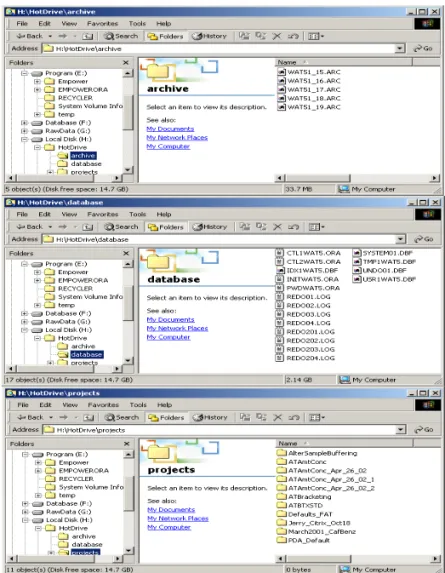
Hot Drive Backup Set Structure ... 58
3-4
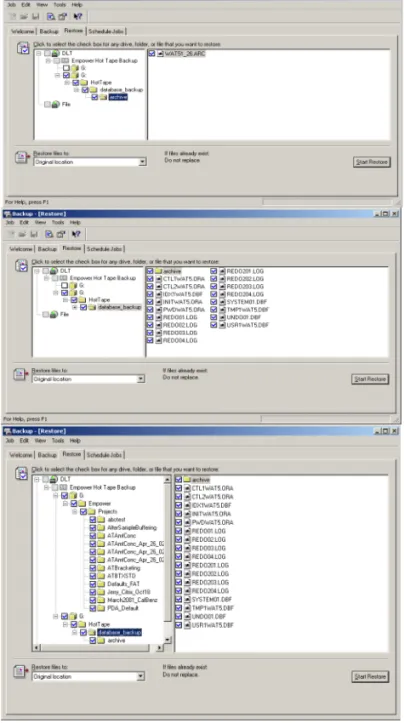
Hot Tape Backup Set Structure ... 59
3-5
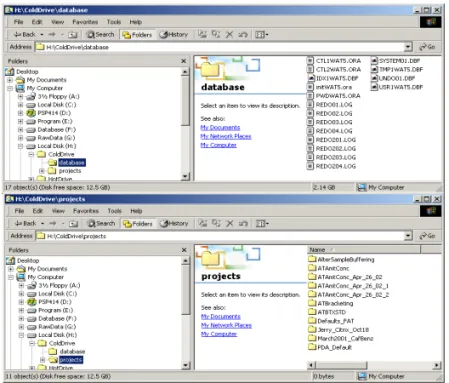
Cold Drive Backup Set Structure ... 60
3-6
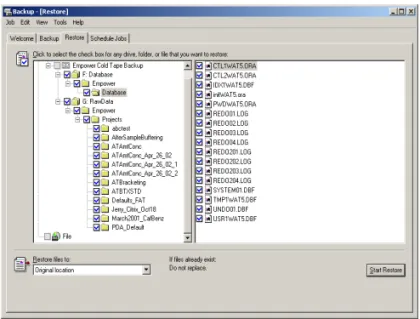
Cold Tape Backup Set Structure, Windows 2000 ... 61
3-7
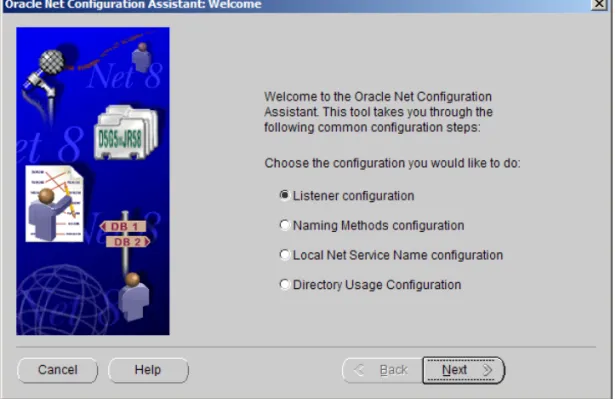
Oracle Net Configuration Assistant: Welcome Page... 68
3-8
Listener Configuration, Listener Name Page ... 69
3-9
Listener Configuration, TCP/IP Protocol Page... 70
3-10
Listener Configuration, Select Listener Page... 71
4-1
Empower Program Folder... 74
4-2
Oracle Net Configuration Assistant: Welcome Page... 75
4-3
Net Service Name Configuration, Database Version Page... 76
4-4
Net Service Name Configuration, Service Name Page ... 77
4-5
Net Service Name Configuration, TCP/IP Protocol Page ... 78
4-6
Sample WatNames.ora File ... 79
4-7
Register Acquisition Server Printers Dialog Box... 81
4-8
Empower Login Dialog Box... 82
4-9
Manage Raw Data Files Dialog Box ... 90
4-10
Copy Preferences Dialog Box ... 92
4-11
Database Properties Dialog Box ... 94
4-12
Backup Options Dialog Box ... 95
List of Figures 10
4-13
Backup Project Wizard - Comment Entry Page ... 96
4-14
Backup Project Wizard - Select Destination Page ... 97
4-15
Backup Project Wizard - Start Page Page ... 98
4-16
Restore Project(s) Wizard - Start Software Page ... 99
4-17
Restore Project Wizard - Quota Entry Page ... 100
List of Tables 11
1-1
Hardware ... 23
1-2
Software ... 23
1-3
Server Tasks ... 24
1-4
Client Tasks ... 25
3-1
Typical Server Disk Configuration ... 39
3-2
Empower Default File Organization ... 40
3-3
Tape Rotation Schedule ... 49
3-4
Database Backup Scripts ... 51
4-1
Origin of Full Audit Trail Settings ... 101
6-1
Troubleshooting Software Problems ... 111
6-2
Troubleshooting the LAC/E
32Acquisition Server ... 114
6-3
Troubleshooting the Printer ... 115
12
Preface
The Empower Software System Administrator’s Guide provides the information you need to perform administrative tasks for the Empower™ Enterpriseclient/server and Workgroup configurations. It includes procedures for performing administrative tasks for server, client, and acquisition server computers in these configurations.
This guide is for experienced system administrators. While the system administrator’s expertise can be in chemistry and/or chromatography with an understanding of
chromatography principles and basic Empower software, the administrator should also have a good understanding of computer concepts and hardware, and a working knowledge of networks in general. In addition, the administrator should be experienced with the following:
• Real-time data acquisition systems • Intel Pentium servers
• Windows 2000 or Windows XP • Networking
• TCP/IP
• Oracle software
Note: Hardware installation and configuration tasks are typically handled by an IT representative using appropriate product documentation. As with network installation and configuration, general hardware installation and configuration tasks are beyond the scope of this document but are critical to the successful operation of the EmpowerSystem. Please consult your hardware documentation for assistance in configuring computer hardware.
Organization
This guide contains the following:
Chapter 1 describes the Empower Enterprise client/server system and Workgroup configuration.
Chapter 2 describes procedures for accessing the server. Chapter 3 describes procedures for managing the server.
Chapter 4 describes how to manage the Empower clients. It includes procedures such as logging in to and out of Empower, managing user accounts and user groups, backing up and restoring projects, and adding and deleting client workstations
13 Chapter 5 describes how to manage the Empower LAC/E™32 Acquisition Servers. It includes procedures such as setting up and configuring the servers, and starting up and shutting down the servers.
Chapter 6 provides troubleshooting information.
Appendix A contains sample log forms for recording important system information. Appendix B defines commonly used Empower terms.
Related Documentation
Waters Licenses, Warranties, and Support: Provides software license and warranty information, describes training and extended support, and tells how Waters handles shipments, damages, claims, and returns.
Online Documentation
Empower Help: Describes all Empower windows, menus, menu selections, and dialog boxes for the base software and software options. Also includes reference information and procedures for performing all tasks required to use Empower software. Included as part of the Empower software.
Empower Read Me File: Describes product features and enhancements, helpful tips, installation and/or configuration considerations, and changes since the previous version.
Empower LIMS Help: Describes how to use the Empower LIMS Interface to export results and import worklists.
Empower Toolkit Professional Help: Describes how to use the common-object- model, message-based protocol to communicate with the Empower software from a third-party application.
Printed Documentation for Base Product
Empower Software Getting Started Guide: Provides an introduction to the Empower software. Describes the basics of how to use Empower software to acquire data, develop a processing method, review results, and print a report. Also covers basic information for managing projects and configuring systems.
Empower Software Data Acquisition and Processing Theory Guide: Provides theories pertaining to data acquisition, peak detection and integration, and quantitation of sample components.
Empower System Installation and Configuration Guide: Describes Empower software installation, including the stand-alone Personal workstation, Workgroup
14 configuration, and the Enterprise client/server system. Discusses how to configure the computer and chromatographic instruments as part of the Empower System. Also covers the installation, configuration, and use of acquisition servers such as the LAC/E32 module, the busLAC/E™ card, and interface cards used to communicate with serial instruments.
Empower System Upgrade and Configuration Guide: Describes how to add hardware and upgrade the Empower software using an import-and-export upgrade method.
Empower Software System Administrator’s Guide: Describes how to administer the Empower Enterprise client/server system and Workgroup configuration.
Empower Software Release Notes: Contains last-minute information about the product. Also provides supplementary information about specific Empower software releases.
Printed Documentation for Software Options
Empower System Suitability Quick Reference Guide: Describes the basics of the Empower System Suitability option and describes the equations used by the System Suitability software.
Empower PDA Software Getting Started Guide: Describes the basics of how to use the Empower PDA option to develop a PDA processing method and to review PDA results.
Empower GC Software Getting Started Guide: Describes how to use the Empower GC option to develop a GC processing method and to review GC results. Empower GPC Software Getting Started Guide: Describes how to use the Empower GPC option to develop a GPC processing method and to review GPC results. Empower GPCV Software Getting Started Guide: Describes how to use the Empower GPCV option to develop a GPCV processing method and to review GPCV results.
Empower Light Scattering Software Getting Started Guide: Describes how to use the Empower Light Scattering option to develop a light scattering processing method and to review light scattering results.
Empower ZQ Mass Detector Software Getting Started Guide: Describes installation, configuration, calibration, and tuning methods, as well as how to operate the ZQ Mass Detector with Empower software.
15
Empower Chromatographic Pattern Matching Software Getting Started Guide: Describes how to use the Chromatographic Pattern Matching option to develop a pattern matching processing method and to review pattern matching results.
Empower Dissolution System Software Quick Start Guide: Describes how to operate the Alliance® Dissolution System using Empower software.
Empower Toolkit Programmer’s Reference Guide: Describes how to use the common-object-model, message-based protocol to communicate with Empower software from a third-party application.
Waters Integrity System Getting Started Guide: Describes features of the Waters Integrity® System and provides step-by-step tutorials that guide a user through the use of the Empower Mass Spectrometry (MS) option.
Empower AutoArchive Software Installation and Configuration Guide:
Describes how to install and configure the Empower AutoArchive option. Documentation on the Web
Related product information and documentation can be found on the World Wide Web. Our address is http://www.Waters.com.
Related Adobe Acrobat Reader Documentation
For detailed information about using Adobe® Acrobat® Reader, see the Adobe Acrobat Reader Online Guide. This guide covers procedures such as viewing, navigating, and printing electronic documentation from Adobe Acrobat Reader.
Printing This Electronic Document
Adobe Acrobat Reader lets you easily print pages, page ranges, or the entire document by selecting File > Print. For optimum print quantity, Waters recommends that you specify a PostScript® printer driver for your printer. Ideally, use a printer that supports 600 dpi print resolution.
16
Documentation Conventions
The following conventions can be used in this guide:
Notes
Notes call out information that is helpful to the operator. For example:
Note: Record your result before you proceed to the next step.
Convention Usage
Purple Purple text indicates user action such as keys to press, menu selec-tions, and commands. For example, “Click Next to go to the next page.”
Italic Italic indicates information that you supply such as variables. It also indicates emphasis and document titles. For example, “Replace file_name with the actual name of your file.”
Courier Courier indicates examples of source code and system output. For example, “The SVRMGR> prompt appears.”
Courier Bold Courier bold indicates characters that you type or keys you press in examples of source code. For example, “At the LSNRCTL> prompt, enter set password oracle to access Oracle.”
Underlined Blue Indicates hypertext cross-references to a specific chapter, section, subsection, or sidehead. Clicking this topic using the hand symbol brings you to this topic within the document. Right-clicking and selecting Go Back from the shortcut menu returns you to the origi-nating topic. For example, “You control and maintain the Empower system by performing system administration tasks as indicated in Section 1.4.2, System Administration Tasks”
Keys The word key refers to a computer key on the keypad or keyboard. Screen keys refer to the keys on the instrument located immedi-ately below the screen. For example, “The A/B screen key on the 2414 Detector displays the selected channel.”
… Three periods indicate that more of the same type of item can optionally follow. For example, “You can store filename1, filename2, … in each folder.”
>
A right arrow between menu options indicates you should choose each option in sequence. For example, “Select File > Exit” means you should select File from the menu bar, then select Exit from the File menu.17
Attentions
Attentions provide information about preventing damage to the system or equipment. For example:
Cautions
Cautions provide information essential to the safety of the operator. For example:
STOP
Attention: To avoid damaging the detector flow cell, do not touch the flow cell window.
Caution: To avoid burns, turn off the lamp at least 30 minutes before removing it for replacement or adjustment.
Caution: To avoid electrical shock and injury, turn off the detector and unplug the power cord before performing maintenance procedures.
Caution: To avoid chemical or electrical hazards, observe safe laboratory practices when operating the system.
System Overview 18
1
Chapter 1
Introduction
This chapter introduces you to the Waters Empower™Enterprise client/server system and the Empower Workgroup configuration. It describes the Empower system, hardware and software requirements, system administrative tasks, and security. Terms that appear in this guide are defined in Appendix B, Glossary, which you can review before using the Empower system.
Note: This guide is for administrators of both the Empower Enterprise client/server system and the Empower Workgroup configuration. Throughout this guide, references to an Enterprise server also pertain to a Workgroup primary PC. References to an Enterprise client also pertain to a Workgroup secondary PC and a Workgroup primary PC.
1.1 System Overview
The Empower Enterprise client/server system and Workgroup configuration are
networked versions of the Empower Personal standalone workstation. The architecture of these systems provide:
• A central database on the server • Distributed acquisition
• Distributed processing • Security
Features
The Empower Enterprise client/server system and Empower Workgroup configuration: • Provide a central password-protected database located on a server running
Windows 2000 Professional
• Support multiple client computers running the Empower software application under Windows 2000 Professional or Windows XP Professional
• Allow client computers to access and use data, methods, and results on the Empower server
Introduction 19
1
• Permit client computers to control and acquire data from chromatography systems:– Locally and remotely through a Waters Bus Laboratory Acquisition and Control/Environment (busLAC/E™) card installed in the client computer – Over the network through a Waters LAC/E™32 Acquisition Server • Allow users to lock methods to prevent modification by other users
• Protect raw data methods and processed results using a sophisticated security grid • Use standard network connections
• Support multiple network printers
• Locate any result quickly and easily using sample identifiers (not just the sample name) suited to your needs
• Locate results using any parameter (or set of parameters) to visualize tracking and trending of results
• Plot trend, control, and run charts (using the Empower System Suitability option) • Calculate means, standard deviation, and relative standard deviation (RSD) for
replicates
• Share chromatographic data among users and projects in a client/server configuration
• Import raw data files into, and exports raw data or results from, the Empower database
• Maintainsan audit trail of system-wide activities such as changes to projects, systems, users, default strings, libraries, and so on
• Maintain an audit trail of project-specific activities such as changes to methods, results, and samples for a project (using the Full Audit Trail Support feature) • Provide full database and raw data backup and restore functions from the server
using Oracle Standard Edition software
• Allows the restoration of projects from previous versions of Millennium32 software
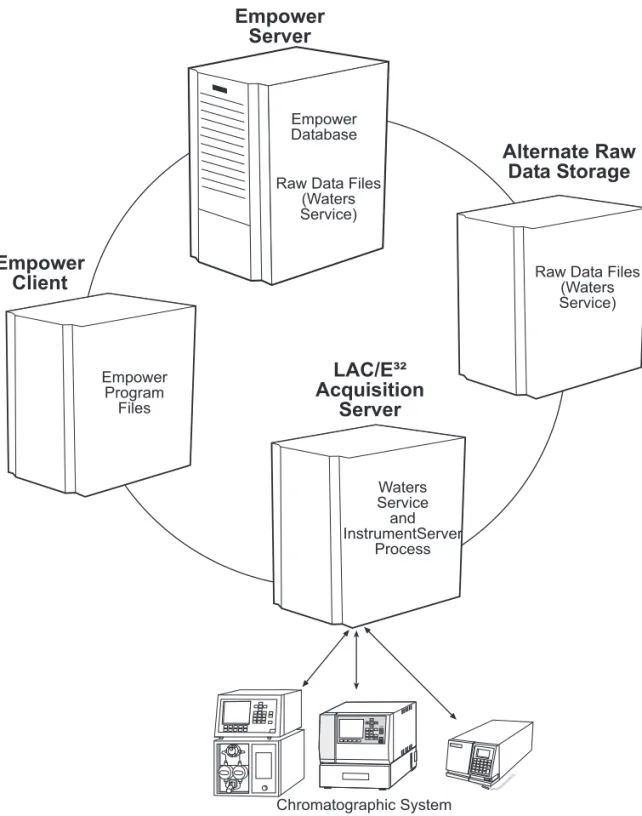
1.2 Hardware Configuration Example
Figure 1-1 illustrates the concept of the EmpowerEnterprise and Workgroup architecture where different components reside on different computers.
Hardware Configuration Example 20
1
Figure 1-1 Example of Empower Enterprise and Workgroup System Architecture
Empower Database Raw Data Files
(Waters Service)
Empower
Server
Empower
Client
Alternate Raw
Data Storage
LAC/E³²
Acquisition
Server
123 456 789 0 Home ClearEnter Display Contrast Waters 2487Dual l Absorbance Detector
Chromatographic System
Raw Data Files (Waters Service) Waters Service and InstrumentServer Process Empower Program Files
Introduction 21
1
1.3 Software Description
This section describes the software components required to implement the Empower Enterprise or Workgroup systems.
1.3.1 Server Software
The server software consists of:
• Windows 2000 Server operating system, Service Pack 2 • Oracle Standard Edition version 9.0.1
• Internet Explorer version 6.0, Internet Explorer version 5.5, Service Pack 1, or Internet Explorer version 5.5, Service Pack 2
Windows 2000 Server Operating System
The Windows 2000 operating system provides built-in networking utilities, protocol handlers, and services, including basic file and print services, and client/server application functionality.
Oracle Standard Edition 9i Server
The Empower relational database resides on the server in an Empower Enterprise client/server system or an Empower Workgroup configuration. Information from projects, such as processed results, sample identifiers, and methods is stored in the Empower database. The chromatographic raw data is not stored in the database. The raw data files are stored on the same or a different server disk.
Oracle client software provides the Empower application running on the client computer with access to the Empower database.
1.3.2 Client Software
The client software runs on the PC and communicates with the corresponding software components on the server, as applicable. The client software includes the following:
• Windows 2000 Professional, Service Pack 2 or Windows XP Professional operating system
• Empower Enterprise or Empower Workgroup software • Oracle Standard Edition version 9.0.1
• Internet Explorer version 6.0, Internet Explorer version 5.5, Service Pack 1, or Internet Explorer version 5.5, Service Pack 2
Software Description 22
1
Windows 2000 or Windows XP Operating System
Windows 2000 or Windows XP on the client provides the connectivity software that communicates with the server through TCP/IP. Windows 2000 or Windows XP combined with TCP/IP services for the operating system provide the Empower application with:
• Access to the Empower client and LAC/E32 setup application on the server • Access to the Empower database information on the server
• Access to raw data files on the server or other computer on the network • Access to network printers
Empower Software
Empower Software is a 32-bit data acquisition and management application with
advanced integrated database architecture. It acquires, processes, reports, and manages chromatographic information. Empower Software offers easy-to-use technology and converts high-quality, accurate results into usable information while meeting security and regulatory compliance requirements. It is a complete chromatography and results management system that links raw data to the acquisition, processing, and reporting methods, as well as processing results. You can adapt it to your individual chromatography requirements by using as many or as few Empower Software capabilities as you require. Empower Software allows you to:
• Acquire data and control chromatographic instrumentation • Process data interactively or in the background
• Customize management of project information • Customize report design and generation
Using Empower Software, you can start out with simple acquisition and processing requirements, such as:
• Making a single injection • Processing data
• Printing a report
You can then progress to more advanced tasks, such as: • Interactively creating and acquiring sample sets • Defining custom reports
• Creating and adding custom fields, and calculating custom database results • Performing tracking and trending of results using the Empower database
Introduction 23
1
Oracle Client Software Using TCP/IP
Oracle client software provides the Empower application with access to the Empower database through TCP/IP.
1.4 System Administration
Managing the Empower Enterprise or Workgroup system involves maintaining all the hardware components, operating system software, networking software, and application programs that make up the Empower software. This includes becoming familiar with the system workload to anticipate changes, problems, and growth.
1.4.1 System Administrator Qualifications
The system administrator is responsible for the smooth and efficient daily operation of the Empower system. You control and maintain the Empower system by performing system administration tasks as indicated in Section 1.4.2, System Administration Tasks.
To effectively administer the Empower system, you must be familiar with the operation of the hardware and software listed in Table 1-1 and Table 1-2.
Table 1-1 Hardware
Hardware Reference
Server computer and peripherals Server documentation
Waters LAC/E32 Acquisition Server Empower System Installation and Configu-ration Guide
Empower Software Empower System Installation and Configu-ration Guide and the Empower Help PCs and printers PC and printer manufacturer’s documentation
Table 1-2 Software
Software Reference
Empower Software Empower System Installation and Configu-ration Guide and the Empower Help
Windows 2000 or Windows XP operating system
Microsoft Windows 2000 or Windows XP Getting Started Guide and the Windows 2000 or Windows XP Help
Oracle9™ Oracle9i Server online documentation
System Administration 24
1
1.4.2 System Administration Tasks
This section describes the routine and periodic system administration tasks you need to perform to keep the Empower system running efficiently. You use a variety of tools to help you perform system administration tasks, including:
• Empower Help
• Empower Configuration Manager
• Windows 2000 and Windows XP Operating System Help Systems and Utilities • Oracle9i Help System and Utilities
Routine Tasks
Routine system administration tasks are those that you should perform regularly, for example, once daily, once each shift (every 8 hours), or once a week. Routine system administration tasks apply to both the server and the client.
Periodic Tasks
Periodic system administration tasks are those that you perform occasionally or as the need arises. As the system administrator, you must determine when to perform periodic system administration tasks based on your Empower system use and requirements. Periodic system administration tasks apply to both the server and the client.
Server Tasks
Typical server tasks and chapter references are in Table 1-3. Table 1-3 Server Tasks
Task Reference Recommended
Frequency Checking disk space and
status
Section 3.7, Managing the Server Disk Space
Daily
Checking project tablespace Section 4.12, Managing Database Properties
Daily
Backing up the Empower database
Section 3.9, Backing Up the Empower Database
Weekly cold backups with daily hot backups Backing up the server Section 3.8, Backing Up and
Restoring Server Disk Images
Weekly or as needed
Introduction 25
1
Client Tasks
You initiate periodic and routine client tasks from the Empower Configuration Manager on the client PC. Typical client routine tasks and chapter references are in Table 1-4.
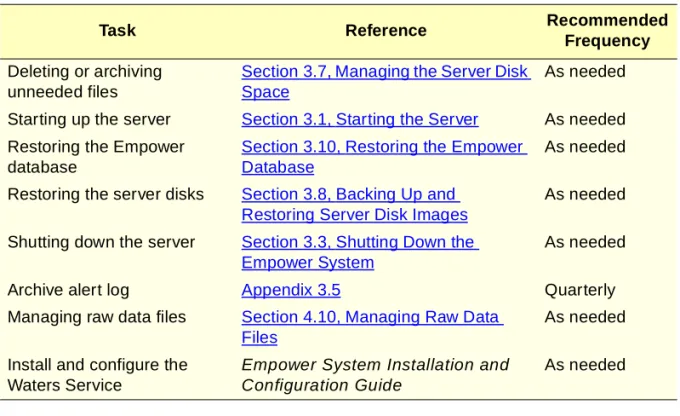
Deleting or archiving unneeded files
Section 3.7, Managing the Server Disk Space
As needed
Starting up the server Section 3.1, Starting the Server As needed Restoring the Empower
database
Section 3.10, Restoring the Empower Database
As needed
Restoring the server disks Section 3.8, Backing Up and Restoring Server Disk Images
As needed
Shutting down the server Section 3.3, Shutting Down the Empower System
As needed
Archive alert log Appendix 3.5 Quarterly
Managing raw data files Section 4.10, Managing Raw Data Files
As needed
Install and configure the Waters Service
Empower System Installation and Configuration Guide
As needed
Table 1-4 Client Tasks
Task Reference Recommended
Frequency Checking tablespace size and
status
Section 4.12.2, Managing the Tablespaces
As needed
Backing up, restoring, and deleting projects
Section 4.13, Backing Up and Restoring Projects
As needed
Installing new clients Section 4.1, Adding a Client Workstation
As needed
Configuring the LAC/E32 Acqui-sition Server
Section 5.1, Setting Up a LAC/E32 Acquisition Server
As needed
Managing user types Section 4.7, Managing User Types
As needed
Managing users Section 4.8, Managing User Accounts
As needed Table 1-3 Server Tasks (Continued)
Task Reference Recommended
System Administration 26
1
System Administrator’s Log
Set up and maintain a system administrator’s log to record all system administration tasks. Keep the log next to the system to record system administration information, such as free disk space or the date of the last backup. Also, keep a record of any problems you have with the system, as well as the resolution of the problems.
See Appendix A, Log Forms, for various types of sample log forms.
1.4.3 User Accounts
User accounts allow access to various system functions. Different types of user accounts are used with the operating system (Windows 2000 or Windows XP), Oracle, and the Empower software.
Operating System Accounts
The operating system accounts include (Windows 2000 or Windows XP accounts): • Administrator
• Typical user accounts (created in the network domain)
Oracle Accounts
The Oracle accounts include: • Sys
• System
Empower Accounts
The Empower accounts include:
• Empower system administrator accounts • Typical user accounts
Managing groups Section 4.9, Managing User Groups
As needed Table 1-4 Client Tasks (Continued)
Task Reference Recommended
Introduction 27
1
Changing Account Passwords
To maintain security, change the passwords for the Windows 2000 Administrator, Oracle accounts, and Empower System accounts immediately after installing your Empower System and, subsequently, as required by your company policy.
Note: Waters recommends that you do not change the internal password that the Empower software uses to log in to the Oracle database. If your company policy requires you to change this password, be certain to change it properly from the Configuration Manager window. Do not change this password directly in Oracle. Follow the procedure exactly as outlined in Section 4.12.1, Changing the Empower Database Password.
Windows 2000 Administrator Account Privileges
The Windows 2000 Administrator account includes all privileges on the server. With Administrator account privileges, you have full access to:
• All public, personal, and system files and directories • Empower database files
• Empower raw data files
• All Windows 2000 user accounts and account information
For more information on Windows 2000 privileges, see the Windows 2000 Help and user documentation.
Empower System Account Privileges
The Empower System account includes all Empower privileges on the client. With the Empower System account privileges, you have full access to:
• All user account information • All group account information • All project information
1.5 Empower
Security Features
The Empower Enterprise and Workgroup systems provide the server and the client with several levels of security that safeguard methods, projects, and raw data in the Empower system.
1.5.1 Server Security
The server provides security through the operating system, and Oracle and Empower software user accounts.
EmpowerSecurity Features 28
1
Windows 2000 Operating System
The Administrator account and the operating system provide security for all files on the server. An Administrator account allows unlimited access to the Empower database files and all Windows 2000 server files.
Other operating system user accounts are created in the network domain and should be supplied with appropriate privileges and user rights.
Oracle Database Users
The Oracle database users protect the Empower database from unauthorized: • Use
• Modification • Startup • Shut down
Only the Oracle database users can provide access to database functions. See the Windows Help and Oracle Help for information on managing accounts and passwords.
1.5.2 Client Security
The Empower client provides security through the: • Windows 2000 or Windows XP login
• Empower login
Logging In to the Operating System 29
2
Chapter 2
Accessing the Server
This chapter explains how to log in to the server to perform system administration tasks. This chapter includes information regarding:
• Logging in to the operating system
• Changing the Windows user accounts passwords • Oracle accounts
• Changing the Oracle user accounts passwords
• Changing the Empower system user account password • Logging out of the operating system
2.1 Logging In to the Operating System
To log in to Windows 2000:1. Turn on the server. The Windows 2000 Log On to Windows dialog box appears. 2. Enter the user name, password, and domain of the account you want to use to log in
to the server. Click OK.
2.1.1 Windows User Accounts
There are different user accounts available to use to access the Windows operating system.
• Administrator accounts • User accounts
Use an Administrator account to log in to the server when you need to perform system administration tasks.
Use a regular user account to log in to the server when you are not performing system administration tasks.
STOP
Attention: Use caution when you access Windows 2000 using the Administrator account. This account allows you unlimited access to the Empower and Windows files and directories on the server.
Accessing the Server 30
2
Windows 2000 computer accounts and user accounts used with the Empower softwaremust be members of the same domain relationship.
2.2 Changing the Windows User Accounts Passwords
Change the Windows user account passwords the first time you log in and regularly thereafter to maintain system security.To change an account password:
1. Log in to Windows 2000 using the account that requires the password change. 2. Press Ctrl+Alt+Delete. The Windows Security dialog box appears (Figure 2-1).
Figure 2-1 Windows Security Dialog Box
3. Click Change Password. The Change Password dialog box appears (Figure 2-2).
Oracle Accounts 31
2
4. Enter passwords in the three password fields.2.3 Oracle Accounts
The Empower system allows you to log in to Oracle using any one of two accounts. The two internal Oracle accounts are:
• Sys • System
Use the Oracle Sys account (user name = Sys, password = oracle) with database
administrator (DBA) privileges to access the server when you want to use Oracle functions or commands that require internal-level access, such as shutting down the database instance.
Use the Oracle System account (user name = System, password = manager) to access the server when you want to use Oracle database functions or commands that require system-level access, such as taking the tablespace online or offline.
2.3.1 Logging In to an Oracle Account
Log in to the Sys account (with DBA privileges) by entering the following: 1. At the command prompt, enter sqlplus /nolog.
2. Enter connect sys/oracle as sysdba
When you are finished using the Oracle account, enter exit to exit SQL. Log in to the System account by entering the following:
1. At the command prompt, enter sqlplus /nolog. 2. Enter connect system/manager
When you are finished using the Oracle account, enter exit to exit SQL.
2.4 Changing the Oracle User Accounts Passwords
Change the Oracle user account passwords the first time you log in and regularly thereafter to maintain system securitySTOP
Attention: Memorize and/or record the password and store it securely. You cannot retrieve a forgotten or lost password. Never store passwords online.
Accessing the Server 32
2
To change the System account password:1. Select Start > Run. In the Run dialog box, enter CMD and click OK. The Command Prompt window appears.
2. Enter the following commands:
C:\> sqlplus /nolog
SQL> connect sys/oracle as sysdba
SQL>Alter user username identified by password;
SQL> exit
Note: password is the new password that you are defining. To change the Sys account password:
1. In Windows Explorer, rename the password file which is located in oracle_home:\Database\PWDWATn.ora.
Note: Because the naming convention of some file names depends on the SID name chosen at installation, the variable n refers to the number within the SID name, where n can be 0 to 9 or A to Z. For example, a file name of Ctl2WAT5.ora corresponds to a SID name of WAT5. This variable is referred to throughout this guide.
oracle_home is in the registry under HKEY_LOCAL_MACHINE\Software\Oracle. 2. Select Start > Run. In the Run dialog box, enter CMD and click OK. The
Command Prompt window appears 3. Enter the following command:
C:\>ORAPWD
FILE=program-drive:\EmpowerOra\Ora\Database\PWDWATn.ora PASSWORD=password ENTRIES=5
Note: password is the new password that you are defining.
2.5 Changing the Empower System User Account
Password
Change the Empower system user account password the first time you log in and regularly thereafter to maintain system security
To change the System account password:
1. In Configuration Manager, select the Users view. In the right pane, select System. 2. Right-click System, then select Properties. In the General tab, enter the new
Logging Out of the Operating System 33
2
Note: You must be logged in as an Administrator to perform this procedure.2.6 Logging Out of the Operating System
To prevent unauthorized use of the system, log out of the server when you are not actively using it. This is especially important when you are logged in with a Windows Administrator account.
To log out of the server:
1. Press Ctrl+Alt+Delete. The Windows Security dialog box appears (Figure 2-1). 2. Click Log Off.
Starting the Server 34
3
Chapter 3
Managing the Server
This chapter provides the information you need to keep the Waters Empower server functioning properly. It covers the following topics:
• Starting the server
• Starting up and shutting down the Empower database • Shutting down the Empower system
• Managing operating system and Oracle user accounts and passwords • Archiving alert logs
• Organizing server storage • Managing the server disk space
• Backing up and restoring server disk images • Backing up the Empowerdatabase
• Restoring the Empower database • Adding a listener service
Some topics are in the Empower Help. To avoid duplication, appropriate references to these topics are in this chapter.
3.1 Starting the Server
The Empower file services (provided by Waters) and the Empower database (provided by the Oracle software) start automatically when you power up the server and start Windows 2000. If you shut down the Oracle database manually, you need to start up the Oracle database manually.
This section presents the procedure to use when you start up the Empower server. To ensure that all Empower system components communicate properly with each other, power on the system devices and the server in the order specified in the following procedure.
To start the Empower system:
1. Power on any expansion boxes connected to the server. See the hardware manual for the particular device.
Managing the Server 35
3
3. Power on the server by pressing the system On/Off switch to the On (1) position.The system begins the self-test powerup sequence. See the server hardware manual for the power-up sequence for your particular server model.
4. After the hardware loading and initializing messages are complete, the Windows Welcome screen with the login message appears.
Note: During the boot procedure, the database starts automatically. To manually start the database, see Section 3.2, Starting Up and Shutting Down the Empower Database.
5. In the Log On to Windows dialog box, enter the user name, password, and domain of the account you want to log in to on the server. See Section 2.1, Logging In to the Operating System.
3.2 Starting Up and Shutting Down the Empower
Database
3.2.1 Starting Up the Empower Database
For various reasons, the Empower database might need to be started manually. For example, the database needs to be manually started in order to perform database recovery or if the database fails to start when the server is rebooted.
To manually start the Empower database:
1. Verify that the OracleServiceWatn service is running by selecting Start > Control Panel > Administrative Tools > Services. If this service is not started, click
Start.
Note: Because the naming convention of some file names depends on the SID name chosen at installation, the variable n refers to the number within the SID name, where n can be 0 to 9 or A to Z. For example, a file name of Ctl2WAT5.ora corresponds to a SID name of WAT5. This variable is referred to throughout this guide.
2. Select Start > Run. In the Run dialog box, enter CMD and click OK. The Command Prompt window appears.
3. Enter the following commands:
C:\> sqlplus /nolog
SQL> connect sys/oracle as sysdba
4. Enter the following command:
Shutting Down the Empower System 36
3
5. To confirm that the Empower database is running, enter the following commands:SQL> select file_name, tablespace_name, bytes, status from dba_data_files;
Note: If the database started successfully, all tablespaces are listed as available.
3.2.2 Shutting Down the Empower Database
For various reasons, the Empower database might need to be shut down. For example, the database needs to be shut down before performing a cold backup or before performing server maintenance. Before shutting down the Empower database, you might want to use System Monitor to confirm that no users are currently connected to the database. To start System Monitor, select View > System Monitor from the Configuration Manager window. To manually shut down the Empower database:
1. Select Start > Run. In the Run dialog box, enter CMD and click OK. The Command Prompt window appears.
2. Enter the following commands:
C:\> sqlplus /nolog
SQL> connect sys/oracle as sysdba
3. Enter the following command:
SQL> shutdown transactional or shutdown immediate
Note: The shutdown transactional command is safer but can take longer than the shutdown immediate command.
3.3 Shutting Down the Empower System
You might find it necessary to shut down the server or clients and chromatographic systems from time to time. For example, you need to shut down the server when you upgrade the server software, or possibly during an electrical storm. (To restart the server after a shutdown, see Section 3.1, Starting the Server.)
This section describes: • Shutting down the server
• Shutting down the clients and chromatographic systems
3.3.1 Shutting Down the Server
To shut down the server:
Managing the Server 37
3
Note: If any acquisition is in progress when the server is shut down, it will bebuffered and then recovered when the server is back online. 2. At the server, manually shut down the Empowerdatabase:
a. Select Start > Run. In the Run dialog box, enter CMD and click OK. The Command Prompt window appears.
b. Enter the following commands:
C:\> sqlplus /nolog
SQL> connect sys/oracle as sysdba
SQL> shutdown transactional or shutdown immediate
SQL> exit
c. Close the Command Prompt window, then select Start > Shut Down. Ensure that
Shut down is selected, then click OK. The computer shuts down.
3. Power off the server by pressing the system On/Off switch to the Off (0) position. 4. Power off any expansion boxes (see the hardware manual for the particular device).
Note: Wait at least 1 minute before powering on the server again.
3.3.2 Shutting Down the Clients and Chromatographic Systems
To shut down and power off the Empower clients and chromatographic systems: 1. Ensure that all data acquisition is complete and all users are logged out of the
Empower application.
2. Using the remote application software, connect to each LAC/E32 Acquisition Server and shut it down.
3. Power off the LAC/E32 Acquisition Server.
4. Power off chromatographic instrumentation connected to the LAC/E32 Acquisition Servers.
5. Shut down client computers by selecting Start > Shut Down.
6. If applicable, power off chromatographic instrumentation that is connected to the client computers.
7. Power off other peripherals such as printers and modems.
3.4 Managing Operating System and Oracle User
Accounts and Passwords
Adding and deleting accounts and changing account passwords is an ongoing activity that a system administrator needs to address for security and administration purposes.
Archiving Alert Logs 38
3
See the Windows Help and Oracle Help for information on managing accounts andpasswords.
Note: The Empower batch files used for database backup call four .sql files located in the Empower\script directory. The files are cs_begin_backup.sql, cs_end_backup.sql,
cs_switch_logfile.sql, and cs_shutdown.sql. All these files use the password of the Oracle system or sys account. If the password is changed from the default password (manager and oracle, respectively), the .sql files must also be edited to incorporate the new password.
3.5 Archiving Alert Logs
The Oracle alert log is a file that Oracle uses to log important database information. As a result, this file continually increases in size. If the file becomes too large, it can affect system performance. You should archive your alert log on a regular basis so that it does not become too large.
To archive the alert log, move it from oracle_home\RDBMS\trace\WATnALRT.log to your storage location, i.e., G:\Backup.
Note: After the alert log is moved, a new one will be recreated automatically.
3.6 Organizing Server Storage
This section describes the storage organization of the Empower server and discusses server hard drives and database file organization.
3.6.1 Server Hard Drive Organization
The default configuration of the Empower server uses four large-capacity hard drives that are partitioned into four logical drives for storing:
• The boot drive
• The Windows 2000 operating system
• Oracle program files, Empower client stack, and Empower scripts • The Empower database
Managing the Server 39
3
Table 3-1 identifies a typical disk configuration and the content for the Empowerserver.3.6.2 Database File Organization
For detailed information on defining the basic database structure, see the Empower System Installation and Configuration Guide. The initWATn.ora file and other parameters used during instance creation define the Empower database. For both performance and reliability reasons, the Oracle archive logs, mirrored control files, and mirrored redo logs are usually located on different physical disks. These locations are defined when the database is generated.
The initWATn.ora file located in the database-drive:\Empower\Database directory contains the following information:
Table 3-1 Typical Server Disk Configuration Hardware
Drive
Drive Lettera
a. Drive letters are for example only.
Drive Name
Volume Labelb
b. Volume labels are for example only.
Type Contents
0 C: Operating
System
System NTFS Boot files and Windows 2000 operating system
1 D: Program
Files
WAT_Prg NTFS Oracle (engine) executable soft-ware, Empowerexecutables, Empowerapplication client share, the Empower script directory, the Oracle home directory, and archive log files
2 E: Empower
Databasec
c. In a Workgroup configuration, two hard drives (three logical hard drives) are used and the database and raw data are contained on the same drive.
WAT_DB NTFS Initialization file (initWATn.ora), all database files (files that make up the database), the first mirrored redo logs, and the first mirrored control file (ctl1WATn.ora)
3 F: Empower
Raw Datac
WAT_DF NTFS Empower raw data files, the second mirrored control file (ctl2WATn.ora)d, and the second mirrored redo logs (redo20n.log, where n is 1 to 4)
d. n refers to the character in the Oracle SID name. By default, this character is 5, although valid characters are 0 to 9 and A to Z.
Organizing Server Storage 40
3
• The location of the mirrored control files• The value of log_archive_dest, which is the location of the archive log files • The value of user_dump_dest, which is the location of the alert log file • The value of background_dump_dest, which is the location of the trace files • Oracle database parameters
For detailed information on the Oracle database files, see the Oracle9i Database Concepts Manual and the EmpowerSystem Installation and Configuration Guide. The Empower database files are organized by default as shown in Table 3-2.
Table 3-2 Empower Default File Organization
Drive Files
oracle_home:\ Databasea
a. oracle_home is in the registry under HKEY_LOCAL_MACHINE\Software\Oracle.
pwdWATn.ora – The Oracle (not Empower) password file
oracle_home:\ Database\Archivea
*.arc – The archive log files used for database recovery
program-drive:\ Empower\...
The Empower software executable files and scripts
program-drive:\ EmpowerOra\Ora\...
The Oracle software executable files
database-drive:\ Empower\Database
For a new installation or an upgrade by export/import: • tmp1WATn.dbf – The initial temporary tablespace file • idx1WATn.dbf – The initial index tablespace file
• usr1WATn.dbf – The initial user data (project) tablespace file
• initWATn.ora – The startup parameters file
• ctl1WATn.ora – One copy of the Oracle control file • Redo0n.log – The redo log files (where n is 1 to 4) • undo01.dbf – The initial undo tablespace file
• system01.dbf – The initial Oracle system tablespace file rawdata-drive:\
Empower
ctl2WATn.ora – Second copy of the Oracle control file redo20n.log – Copy of the redo log files (where n is 1 to 4) rawdata-drive:\
Empower\Projects
This is the default raw data location. The location of raw data can be changed. Raw data belonging in different projects can also be stored in multiple locations. Each raw data path used has project subdirectories that contain the raw chromato-graphic data files using the following name format: Channel ID.dat.
Managing the Server 41
3
Note: Because the naming convention of some file names depends on the SID namechosen at installation, the variable n refers to the number within the SID name, where n can be 0 to 9 or A to Z. For example, a file name of Ctl2WAT5.ora corresponds to a SID name of WAT5. This variable is referred to throughout this guide.
3.7 Managing the Server Disk Space
The Operating System Disk Management Properties dialog box provides several tools to help you manage disk space. This section covers the following topics:
• Checking free disk space • Increasing free disk space • Defragmenting the hard disk
3.7.1 Checking Free Disk Space
To avoid hard disk problems and to maintain server performance, limit server hard drive use to no more than 80% of full capacity. The Windows operating systems provide utilities such as Windows Explorer, System Tools, Disk Management, and the Windows Help to help you manage server disk space.
Use the following procedure to check the free disk space on the server. In a standard configuration, disk space on the server is used mainly by raw data acquired with the Empower software. The size of raw data files created in Empowersoftware is related to the sampling rate and the run time used to collect data. The database size also expands with usage.
In the Empower software, multiple raw data paths can be defined. It is therefore also necessary to check disk space on each drive where raw data is being stored. See Section 4.10, Managing Raw Data Files, for more information.
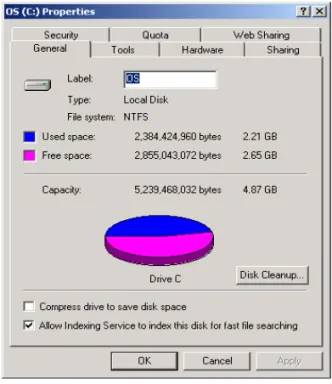
To check free disk space on the server: 1. Select a drive using Windows Explorer.
2. Select File > Properties to open the System (C:) Properties dialog box. In the
General tab (Figure 3-1), the Used space and Free space values are listed as well as the total capacity of the drive.
STOP
Attention: To avoid degradation in system performance, system administrators need to check available disk space at least once a day. On systems with heavy daily usage, check and record available disk space several times a day. If your system is used less
Managing the Server Disk Space 42
3
Figure 3-1 System (C:) Properties Dialog Box with General Tab Selected3. Verify available disk space and click OK.
Note: There are also utilities available to monitor and alarm or send an e-mail when disk space reaches a user-defined size.
3.7.2 Increasing Free Disk Space
You can increase free disk space by: • Archiving projects
• Adding a hard disk
• Moving project raw data to another file share on a separate drive or server
Archiving Projects
Archiving projects involves: 1. Backing up projects
2. Deleting projects from the database
For details, see the procedures on archiving projects in the Empower Help.
Note: Waters offers an AutoArchive option for the Empower Software. This utility uses the Windows Scheduler to automate project backups and perform them on a regular,
Managing the Server 43
3
user-defined basis. For more information, contact your local subsidiary or see www.Waters.com.
Adding a Hard Disk
Another way to increase free disk space is to add a hard disk to your Empower system. For information about adding a hard disk to your Empower system, see the hardware documentation and the Windows documentation that you received with your server.
Moving Project Raw Data
Moving your raw data storage location to another computer or drive on your network allows you to add additional storage capacity. See Section 4.10, Managing Raw Data Files, for information on this procedure.
3.7.3 Defragmenting the Hard Disk
Hard disk fragmentation occurs when you delete files from a disk and then create or add new files on the same disk. Fragmentation inevitably occurs when using a system. If left unchecked, disk fragmentation can slow system performance dramatically. The Windows 2000 operating system contains a defragment utility. To access this utility, select Start > Settings > Control Panel > Administrative Tools > Computer Management. The Disk Defragmenter utility is located under the Storage node of Computer Management. For information on using this utility, see the Windows 2000 Help.
3.7.4 Defragmenting the Database
The Oracle database can become fragmented when you add and delete chromatograms, results, and methods. If left unchecked, database fragmentation can slow system
performance dramatically.
This section describes how to use the Oracle EXP/IMP utilities to defragment the database. Defragmenting the database involves:
1. Checking for fragmentation
2. Exporting and deleting the Empower database 3. Creating the empty database instance
4. Importing the original Empower database
STOP
Attention: Before you delete the project, verify that no one else is using the project in the Users tab of System Monitor. Launch System Monitor from the Configuration Manager window.
Managing the Server Disk Space 44
3
5. Reenabling archive log modeChecking for Fragmentation
To check the database for fragmentation:
1. Select Start > Run. In the Run dialog box, enter CMD and click OK. The Command Prompt window appears.
2. Enter the following commands:
C:\> sqlplus /nolog
SQL> connect system/manager
SQL> select file_ID, tablespace_name, bytes from dba_free_space;
Each tablespace has one or more rows. This shows how free space in each tablespace is grouped into extents (an extent is a contiguous area on the disk and has the same file_id). Five or fewer extents per tablespace is ideal.
3. Enter the following command:
SQL> select owner, segment_name, tablespace_name, bytes, extents from dba_segments where extents > 5;
This shows how many extents each table occupies. Ideally, most tables should occupy five or fewer extents. If the tests reveal heavy fragmentation, you might want to degragment the drive when it is convenient to shut down your server.
4. If you need to degragment the database, enter the following command:
SQL> select file_name, tablespace_name, bytes, status from dba_data_files;
Note: In addition, if you have multiple data files per tablespace, enter the following command to determine the total tablespace in bytes:
select tablespace_name, sum(bytes) from dba_data_files group by tablespace_name;
5. Record all information for later use. If the tablespace files have increased significantly, you might need to adjust their initial size and maximum size in cs_createdatabase.sql, in program-drive:\empower\script.
6. Enter the command:
SQL> exit
STOP
Attention: This procedure permanently deletes database table files. Before performing this procedure, ensure that you have a full cold backup of the entire system.
Managing the Server 45
3
Exporting and Deleting the Empower Database
To export the entire database:
1. Select Start > Run. In the Run dialog box, enter CMD and click OK. The Command Prompt window appears.
2. Enter the command:
C:\> exp system/manager
3. Press Enter, then respond to the prompts as follows:
Array fetch buffer size: 4096 > 10000000
Export file: EXPDAT.DMP > fullDB.dmp
(1) E(ntire database), (2) U(sers), or (3) T(ables): (2) U > E
Accept default values for the remaining prompts by pressing Enter after each prompt:
Export grants (yes/no) : yes > Export table data (yes/no): yes > Compress extents (yes/no): yes >
The database is exported.
4. Shut down the database by entering the following commands:
C:> sqlplus /nolog
SQL> connect sys/oracle as sysdba
SQL> shutdown immediate (or shutdown transactional) SQL> exit
5. Delete the instance:
C:\> oradim -delete -sid WATn
6. Delete the database files:
a. Delete all files in the database-drive:\empower\database directory except initWATn.ora.
b. Delete the file rawdata-drive:\empower\ctl2WATn.ora and rawdata-drive:\ Empower\redo20n.log, where n is 1 to 4).
STOP
Attention: Make sure you have sufficient disk space before you perform this procedure.
STOP
Attention: The next two steps permanently delete the Empower database. Waters strongly recommends that you have a complete cold backup before performing steps 5 and 6.