Performance and
Goals:
©2013. SuccessFactors, Inc. All rights reserved.
No part of this document may be reproduced or transmitted in any form or by any means, electronic or mechanical, without the express written permission of SuccessFactors. This software is commercial computer software developed exclusively at private expense. The software and documentation are provided with RESTRICTED RIGHTS. Use, duplication or disclosure by the U.S. Government is subject to restrictions as set forth in DFARS 252.227.7202-3 or FAR 52.227-19, as applicable. Developer is SuccessFactors Inc., An SAP Company, SuccessFactors Global Headquarters, 1 Tower Place, Suite 1100, South San Francisco, CA 94080.
"Rwiz" is a trademark of Enterprise Information Resources, Inc. The product described herein includes software developed by the Apache Software Foundation
(http://www.apache.org/). All other brand and product names that are mentioned herein are the trademarks or registered trademarks of their respective holders.
All examples, including the names of people in the examples or screen shots are fictitious. No association with any real person (living or deceased), company (existing currently or in the past), or events should be inferred from any example whatsoever. Information in this document is subject to change without notice and does not represent a commitment on the part of SuccessFactors.
SuccessFactors, Inc., An SAP Company SuccessFactors Global Headquarters 1 Tower Place, Suite 1100
South San Francisco, CA 94080 USA
http://www.successfactors.com
CONTRIBUTORS
Kevin Littlechild SuccessFactors
Senior Professional Services Consultant
Lauren Friedberg SuccessFactors
Professional Services Consultant Lauri Armstrong
SuccessFactors Instructional Designer
Table of Contents
Orientation Introduction 1
Orientation Objective ... 1
Orientation Topics ... 1
Target Audience ... 2
Using this Guide ... 2
Why SuccessFactors? ... 3
Additional Resources ... 3
Introduction to SuccessFactors Performance and Goals 5 Overview ... 5
BizX Suite ... 6
The SuccessFactors Home Page ... 7
General Navigation ... 9
Managing User Data ... 12
Security ... 15
Goal Management 19 Introduction to Goal Management ... 19
Goals on the Home Page ... 20
Goal Plans ... 20
Goal Visibility ... 22
Goal Template Main Concepts ... 24
Goal Execution ... 30
Competencies 35 Competency Main Concepts ... 35
Competency Libraries ... 35
Core Competencies ... 36
Job Specific Competencies ... 36
Introduction to Performance Management ... 49
PM v11 vs. PM v12 ... 49
Accessing Performance Review Forms ... 50
Overview of the Performance Review Form ... 52
Performance Review Template Components ... 67
Calibration 79 360 Reviews 83 Introduction to 360 Reviews ... 83
Accessing 360 Review Forms ... 84
Overview of the 360 Review Form ... 85
In Progress 360 Review Management ... 96
Detailed 360 Reviews Report ... 97
360 Review Template Components ... 102
Summary 109 Next Steps 111 Appendix 113 Terms and Definitions ... 113
PTO Introduction
Welcome to the Project Team Orientation (PTO) for SuccessFactors Performance and Goals.
The overall goal for the PTO is to provide a knowledge transfer on the core out-of-the box functionality of SuccessFactors Performance and Goals. This will enable participants to gain a high-level understanding of the concepts and capabilities of the software to prepare you for the upcoming functional
workshops. This will be accomplished through discussion, demonstrations, and group activities.
The knowledge and experiences taken from this session can and should be utilized during the follow-up workshops with the SuccessFactors Professional Services team.
Orientation Objective
Throughout this session, you will learn about key elements of the Performance and Goals bundle and make decisions about how you will use these modules so that your organization can work with SuccessFactors Professional Services consultants in planning and implementing an effective configuration.
Orientation Topics
This session has six sections. Each section introduces you to an aspect of Performance and Goals. The sections are:
Introduction to Performance and Goals
Performance Management
Calibration
360 Reviews
Target Audience
This orientation is designed for major stakeholders within an organization who are responsible for implementing and maintaining SuccessFactors applications. It is strongly recommended that all team members participating in the workshop sessions attend the entire PTO. Discussion and questions are highly
encouraged during this session.
Using this Guide
This PTO guide is intended for use in conjunction with a facilitator. The guide provides general information that will be elaborated upon by the facilitator. Throughout the guide, you encounter icons that call out various types of
information. The following table illustrates how this guide uses icons to indicate different types of comments that support the text.
Note: Indicates additional information that is related to the information presented.
Best Practice: Indicates helpful hints and tips or other guidance that further explains the information it accompanies.
Decision: Indicates key configuration questions/decisions that need to be made during the functional workshops with your SuccessFactors Professional Services Consultant.
Why SuccessFactors?
Additional Resources
There are a number of other resources that can provide you more information about the SuccessFactors system, including:
SuccessFactors, Inc., An SAP Company website: http://www.successfactors.com
SuccessFactors, Inc., An SAP Company monthly newsletter
SuccessFactors Customer Community: http://community.successfactors.com
For more information about other courses and registration, contact Success Academy at [email protected].
Introduction to
SuccessFactors
Performance and Goals
The goal of this section is to provide a general overview of the SuccessFactors Performance and Goals bundle and to begin to make decisions for your
implementation.
Overview
Performance and Goals is a bundle of applications used to develop and manage your organization’s employees through the automation of talent management processes. The goal is to increase efficiencies and enable organizations to continuously manage the performance of their employees.
The SuccessFactors Performance and Goals bundle includes:
Goal Management
Performance Management
Stack Ranker
Calibration
360 Reviews
With Performance and Goals, you will be able to:
Help employees and managers align individual goals to company business objectives
Deliver meaningful reviews to help ensure employee engagement and retention
Calibrate performance by reviewing ratings across even the largest company
Develop employees and help managers provide meaningful feedback and coaching
Cultivate leaders and clearly identify not just high performers—but potential future leaders
Performance and Goals helps to optimize what is arguably your most expensive and valuable asset—your people.
BizX Suite
The Performance and Goals bundle is part of the SuccessFactors BizX
integrated suite of solutions. You may want to focus on Performance today but we provide a platform and roadmap that you can leverage as you look to build out your own Performance & Talent Management vision.
What is Business Execution
Strategy: Knowing what needs to be done
Assets: Securing the resources to do it
Execution: Getting people to do it
The SuccessFactors Home Page
Upon logging in to SuccessFactors, you will see the Home page (Figure 2). It is possible to configure your system to start on a page other than Home after login; however, the most common landing page is the Home page. It is also possible for system administrators to configure the look and feel of the Home page. In this session, we will use the newest user interface (UI) and features available.
Tiles
The Home page displays tiles of information. These tiles are turned on/off by the system administrator and in some cases are able to be configured to show company specific Information.
Some tiles are able to be resized and or moved by each employee to create a personalized Home page. The ability to do so is controlled by the system administrator.
Figure 2. SuccessFactors Home Page with Tiles To Do Tile
The To Do tile (Figure 3) centralizes all the tasks to be completed. Tasks may be viewed by their type or listed by the due date. Tasks requiring actions are active links that take you to the requested action or form to complete the task.
General Navigation
This section provides general tips to navigate within SuccessFactors.
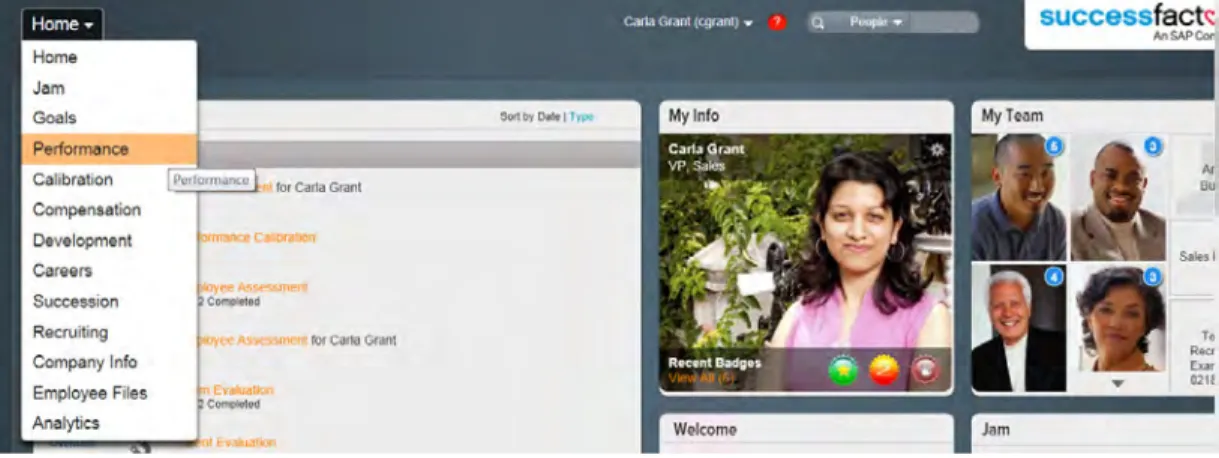
Navigation Options
Navigation options are available in a drop-down menu on the upper-left corner (Figure 4). This menu displays system modules that you have been permitted to access. Depending on your role and/or system configuration, this list may vary. Selecting a module name opens that module in SuccessFactors.
Figure 4. Navigation Options The Name Menu
At the top of the screen on the right-hand side, you will see your name (or the name of the logged in user). Clicking the arrow to the right of the name displays a drop-down menu where you may access Proxy Now (with permission), Options, Logout, or Admin Tools (with permission).
Options allow users to manage their personal settings and preferences
including passwords, notifications, language, forms, proxy, groups, and mobile. To access your options, click the arrow next to your name and select Options from the Name drop-down menu (Figure 5).
Figure 5. The Name Menu
Users are able to change the following options on the Options page (Figure 6):
Change your Password
Change your Start Page
Select/Change your Security Questions (If configured)
Turn on/off you SuccessFactors email Notifications (with permission)
Change Language preference
Assign/Become a Proxy (with permission)
Create Groups (admin only)
Activate a Mobile device for your account (not shown)
Figure 6. Options Menu Showing Start Page Show Me
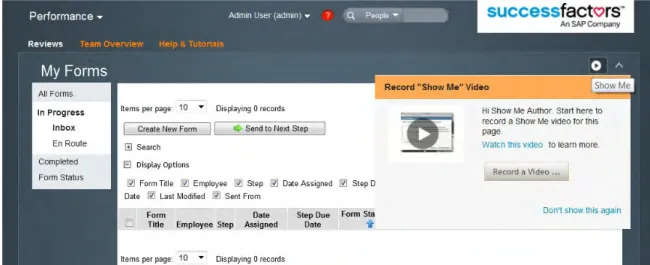
Show Me (Figure 7) is a feature that is designed to allow administrators to create help videos that are associated with their configuration of the application pages. Users will see these help videos as Show Me actions per page.
Figure 7. Access to Show Me from Performance Module
This provides a better experience for end users by empowering customer admins to provide supplemental help in the form of context sensitive videos (Figure 8).
Help & Tutorials
In addition to Show Me, each module of SuccessFactors has its own Help & Tutorials sub-tab. This tab can be turned on or off by the admin and is
customizable so that your organization can add applicable content (Figure 9).
Figure 9. Help & Tutorials
Managing User Data
Prior to using any module in SuccessFactors, you must upload employee data. In this section, you will learn about employee data that is needed to inform the system and how to organize and format the data so that it is accepted by SuccessFactors.
User Data
All activities in SuccessFactors rely on employee data. It is used throughout all SuccessFactors modules. This data can come from multiple sources, including:
An HRIS (either manually or automatically)
A spreadsheet
A database
Regardless of where your data comes from, it must first be organized and formatted to be recognized and accepted by SuccessFactors.
Importing User Data
The basic import file or User Data File (UDF) consists of standard data elements. There are required fields, filter fields, and optional fields. Fields vary based on your configuration and modules.
Table 1 lists and describes the required and standard filter fields.
Table 1. Required Standard Data Elements
System ID Label Description
STATUS STATUS There are 2 status choices, active or
inactive. All users on the initial data load should have an active status.
USERID USERID This is a unique system identifier for each user, and will not be changed once set. USERNAME Username Your employees use this to log in to the
system and must be unique for each user. Consider using the same login information that is used to login to your company network.
FIRSTNAME First Name Employee’s first name. LASTNAME Last Name Employee’s last name.
GENDER Gender This field is required for the Writing Assistant and Succession and Matrix Reports. Only provide the abbreviations of
Mfor male or F for female. A
NO_GENDER value can also be configured, if required.
EMAIL Email The system uses email addresses for notification purposes. Emails are sent, for example, to inform individuals that forms have been routed or to remind individuals that items are due or late.
System ID Label Description
MANAGER Manager This column requires the USERID of the person’s manager to establish the
organizational hierarchy. You will use the
NO_MANAGER value for the person at the top of the hierarchy.
HR Human Resources
This column uses the USERID of the HR representative that is assigned to the employee. It is a required field, so if you do not have data for this you may enter
NO_HR to meet the data requirement. TIMEZONE Time Zone This field is used for time stamping on
screen and in reports. Some organizations use their corporate time zone as the default.
DEFAULT_LOCALE DEFAULT LOCALE
The language that is the default for a particular user. This setting is the default language that is displayed to the user when accessing SuccessFactors. DEPARTMENT Department Standard filter field – the Employee’s
Department.
DIVISION Division Standard filter field – the Employee’s Division.
LOCATION Location Standard filter field – the Employee’s Location.
The three standard filter fields in SuccessFactors are DEPARTMENT, DIVISION, and LOCATION. These fields are displayed throughout SuccessFactors and used for filtering information within reports and permissions.
There are also 15 custom fields that can be defined during configuration. All 15 custom fields can be made into filter fields that can be used in reporting (in addition to DEPARTMENT, DIVISION, and LOCATION).
The JOB_CODE field is an optional field and can be used to associate an individual with a role in the organization. Administrators can assign
competencies to these roles, which can be used in Performance, 360 Reviews, and other modules of the application. Job codes are assigned to employees to correspond to the job code that is set up within the system. This is discussed later in this session.
Your SuccessFactors Professional Services Consultant will provide you with the .csv template. Rows 1 and 2 (System ID and Label, respectively) must be preserved, including all columns in the template. Row 2 labels can be renamed as desired during system configuration. The file format should be saved as a .csv file.
Decision:
Where will you get your user data?
Security
In this section, you will learn about setting up security in SuccessFactors.
Permissions Model Overview
There are currently two permission models in use within SuccessFactors:
In addition to the two permission models, there are different types of permissions in SuccessFactors:
Permissions that are controlled by the system administrator such as:
On/Off access to modules Module-specific settings
Permissions that are embedded within the xml code or template of an object such as:
Form section visibility Goal Plan visibility
Role-Based Permissions
Role-Based Permissions allow for automation of permissions assigned to roles or groups. Groups can be dynamic which allows said automation to take place. For example, a group of granted users can be “All employees in the Sales
department”. As employees are transferred into and out of the sales department, their permissions will automatically adjust accordingly.
Roles can be defined by:
All standard elements in the UDF. Standard elements are user attributes like USERNAME, DEPARTMENT, DIVISION, LOCATION, and the standard CUSTOM01-15 filters.
In addition to standard elements, groups can be defined through relationships like the Manager, Matrix Manager, HR Manager, Custom Manager and Second Manager.
The role-based permission management framework not only allows you to control the permissions granted to an employee but also allows you to restrict the scope of employees an employee can act upon, known as the Target Population.
Legacy Permission Model
In certain cases, a customer may choose to configure their system with the
Administrative Privileges
Regardless of the configured permission model in place, employees can be granted access to all or some of the administrative features by granting full or partial administrative privileges. For example, if your company has remote offices, you can allow a regional on-site manager to reset employee passwords. Warning: We recommend that you strictly limit the number of administrators with full permissions; however, having at least two administrators with full administrative permissions ensures you will always have a backup
administrator.
Types of Administrators
Admin – An admin is any user that has access to functionality in the Admin Tools page. Employees with any administrative privileges will have the AdminTools option in their drop-down menu in the top-right corner (Home menu) and in the name drop-down menu. (Figure 10). The Admin Tools page shows links only to the administrative features for which the
employee has permission.
Super User– A super user is an admin who has the ability to grant admin rights to other users in the organization.
Security Admin– A security admin is responsible for managing all security through roles and permission groups in the role-based permission
framework. Permission to operate as a security admin is granted by the super user.
Decision:
Goal Management
This section will provide a basic overview of Goal Management and provide you with information regarding the configuration decisions you will make during implementation.
Introduction to Goal Management
SuccessFactors Goal Management helps organizations ensure that all employees are aligned and working on the things that matter most so that organizations can bridge the strategy and execution gap and stay on the path to success.
As an integrated part of the SuccessFactors BizX suite of applications, Goal Management drives the success of your company by helping you more tightly align the efforts of your entire workforce while also improving employee accountability. With everyone working together toward the same goals, your company can cover more ground, and really make an impact on the bottom line. Note: The terms Goal and Objective are synonymous in SuccessFactors.
During implementation, you will decide which is to be used for your organization. For the purposes of this session, we use Goal(s).
Goals on the Home Page
The Home page is where users access all the activities and processes in the system, along with an overview of the status of performance activities.
The My Goals tile (Figure 11) displays the user’s current goals and allows easy access to the Goal module by selecting any of the goal names in the tile.
Figure 11. My Goals Tile
Goal Plans
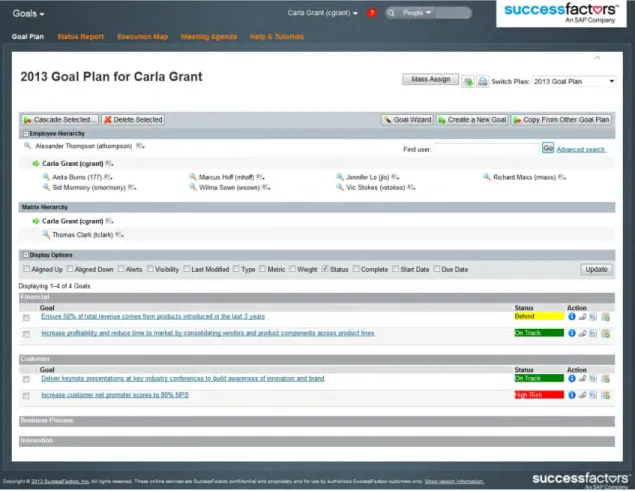
Goal plans are online worksheets (Figure 12) used by the employee and
manager to create performance goals in one central place and track progress on them throughout the year. The look and feel of the goal plan will be controlled by goal plan templates, which will be discussed later.
Goals can be organized into any number of goal categories that will be defined by the organization to help report on goal progress. Employees can choose to make their goals private or public and they can track a goal’s metric, weight, or status, among many other customer-defined attributes.
To stay on task and avoid missing deadlines, employees can seamlessly create calendar events using our built-in integration with Microsoft Outlook.
Figure 12. Goal Plan from a User View Manager’s Role
Manager responsibilities include:
Working collaboratively with each direct report to identify performance expectations for the upcoming review period
Cascading goals to team, to ensure employees’ goals align to achieve role, team, and organizational goals
Actively monitoring goals, to ensure effective communication of progress up and down the organization
Employee’s Role
Responsibilities of employees include:
Creating SMART goals that align with achieving role, team, and organizational goals
Collaborating with manager to regularly update progress on goals
Focusing current job performance on achieving performance goals and pursuing development goals
Goal Visibility
One of the first configuration decisions you will make during your Goal Management implementation is in regard to visibility of goals across the organization.
Goal Plan Read/Write Permissions based on Roles and Relationships
SuccessFactors uses data from the UDF discussed earlier in this orientation to determine the reporting relationships between employees. These reporting relationships are used to determine who can see whose goals in
SuccessFactors. For example, you may allow all managers above an employee to see an employee’s goals but you may choose not to allow peers to see that employee’s goals. These relationships are also used for permissioning goal plan actions like adding, deleting, and cascading goals.
Decision:
Public vs. Private Goals
In addition to the read and write permissions above, it is possible to configure an option to allow a user to mark their goals as public or private. Private goals are accessible to the employee and sometimes to the manager(s). Public goals are accessible to everyone with permission to access your goal plan. A goal is specified as public or private at the time it is added to the goal plan. It can be changed by the employee at any time.
Decision:
Would you like to allow users to add private and public goals?
If so, who should be allowed to see the details of an employee’s private goals, if anyone?
Goal Template Main Concepts
A goal plan template is used to define the categories and fields for your users’ goal plans. The configuration of the goal template is highly dependent on your company’s policies, procedures, and business rules.
Categories
Many organizations configure SuccessFactors to allow goals to be organized by category. This may be the Balanced Scorecard or another set of categories that makes sense for your organization.
Balanced Scorecard
The Balanced Scorecard is a strategic planning and management system that is used extensively in organizations worldwide to align business activities to the organization’s vision and strategy, improve internal and external communications, and monitor organizational performance against strategic goals.
The categories of the Balanced Scorecard are:
Financial
Customer
Internal Business Processes
Learning and Growth
Decision:
Fields
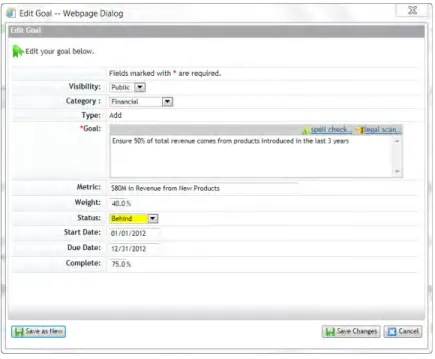
Each goal in SuccessFactors is defined by its fields. These may be as simple as the Goal Name, Metric, Start Date, Due Date, and Status. However, you may also configure other fields of information depending on the tracking and reporting needs of your organization (Figure 13).
Figure 13. Edit Goal Dialog - Goal Fields
Decision:
Think about how you envision your goal plans. What are the most important fields for you to include?
If you will be using goal weights, will the weighting be evenly distributed or will they vary depending on importance?
Should any of the fields be required? If so, which?
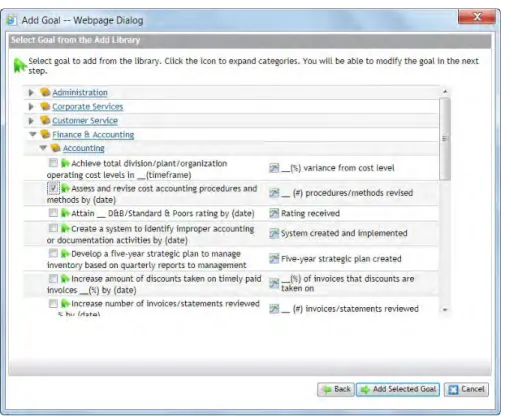
Goal Library Main Concepts
A goal library is a list of goals that the user can select and add to their goal plan or the goal plans of their direct reports, depending on their permissions and your business processes.
Best Practice: Use one goal library.
Your admin may import or export a goal library and then use or modify it as needed. This is useful if your organization has its own specific categories or goals for end users to add to their own goal plan.
When a user creates a new goal using the Goal Library, this is an example of what they will see:
Figure 14. User View of Goal Library
Decision:
You have the option to use the Goal Library; do you see your organization using this feature?
Import Goals
This section focuses on importing goals into SuccessFactors. Importing goals allows your organization to update goals in mass. Use this functionality, during implementation, at the beginning of a performance cycle, or if you have a departmental goal that needs to be corrected or updated for a group of people. Admins can import goals as .csv files (maximum file size is 25 MB) using the Import Goals function.
Decision:
Do you currently have goals for this year stored in another application?
Cascading and Linking Goals Cascading
When setting goals for the period, goals can be aligned by cascading them. Cascading a goal means sharing one employee’s goals with another, such as a manager to a direct report within the hierarchy.
SuccessFactors offers multiple configuration options for cascading.
Cascade Up
Cascade Down
Cascade Across
Once a goal is cascaded, employees have visibility into progress toward the goal’s completion.
Linking
Linking goals is the ability to tie together two existing goals that are related or interdependent between individuals. Once two goals are linked, employees have visibility into progress toward the goal’s completion.
Note: Cascading a goal creates a new goal and links it to the source goal at the same time. Linking creates a link between two already existing goals.
Alignment
The end result of both Cascading and Linking is Goal Alignment. When goals are aligned, SuccessFactors enables managers and others with certain rights to view information regarding the progress of the aligned goals. Goal alignment also allows employees to feel more tied to the organization’s goals.
Decision:
How do you see your organization using the Cascade Goals and Linking Goals functions?
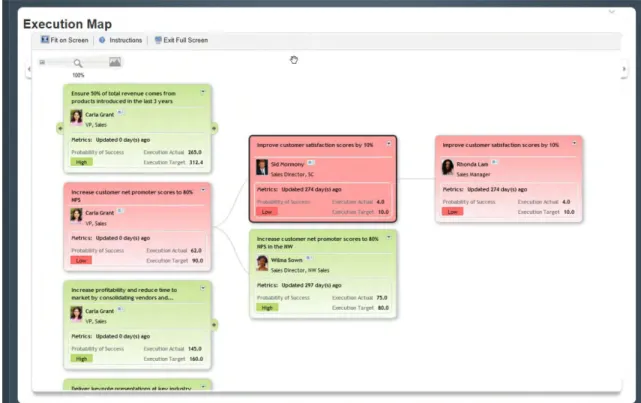
Goal Execution
Goal Execution display aligned goals on the Execution Map. This map allows you to take your large, strategic company goals and break them down so that your employees understand how their daily tasks connect to your overall
strategy. Employees can quickly see how their individual efforts are helping the company.
Managers can use the Execution Map along with the built-in Status Report to instantly see all the pieces of the puzzle, such as who is working on what and the current status of each task, so they can quickly determine if the overall goal is on track or in trouble.
Managers can get a closer look at any task, drilling down to see complete status reports, metrics, and the probability of success. Managers can even
communicate directly with the employee responsible for the goal to get an immediate update. All of this can be done from one place.
Status Report
The Status Report tab (Figure 15) enables users to provide and view status reports on progress toward achieving goals and other accomplishments.
From the Status Report tab users can:
Update goals with current status
Click Comment to add notes
Update My Other Accomplishments section with other activities
Open right panel to see extra information useful for updating status
Click Save to save your work and come back later
Click Send Status Update only when you're ready to send to others Administrators can set notifications to remind user’s to provide status updates.
Execution Map
The Execution Map (Figure 16) provides an at-a-glance overview of progress on goals that are aligned across the organization. The information displayed here comes from the status reports that are submitted for these goals.
Meeting Agenda
The Meeting Agenda tool (Figure 17) allows you to create a list of important goals and print or send it in advance of an upcoming meeting.
Figure 17. Meeting Agenda
Using the Meeting Agenda you can quickly:
Add goals to the Meeting Agenda
Filter the list of your Meeting Agenda goals by Date Submitted, Effort Spent, and Probability of Success
Remove goals from the agenda one by one (you can add them back through the filters)
Decision:
Competencies
In this section, you will learn how the SuccessFactors system tracks competencies (skills, knowledge, and behavioral indicators) that users are required to have and their proficiency levels for those competencies.
Competency Main Concepts
Competencies are the basic abilities employees must have in order to perform their role within the organization successfully. They are observable, measurable, and critical to successful individual and company performance.
Competencies play a central role in several processes supported by
SuccessFactors, such as Performance Management, Succession Management, Career Development, 360 Reviews, Recruiting, and Workforce Planning. As a result, it is important that the competency library used be highly robust and current in its design and content.
Users refer to competencies during a performance review process to evaluate how well an employee fulfilled his/her role requirements according to exhibited effort.
Admins can modify or customize the content of existing competency libraries.
Competency Libraries
During the sales cycle, your organization chose to use one of the
SuccessFactors standard competency libraries or to purchase a separate competency library from a third-party, such as Lominger.
statements, Coaching Assistant comments, and Behavioral statements designed to support various modules.
These libraries are designed to support clients who want to configure the content to create custom models or to map to existing models. If you would like to make changes to, or use additional prepared competency libraries, you can work with your SuccessFactors Professional Services Consultant.
Competency libraries can always be modified by your admin at any time. In fact, your admin can create an entire customized competency library from scratch directly in SuccessFactors.
Best Practice: It is most efficient to import this data and adjust it rather than input it manually, from scratch.
Core Competencies
If your organization has core values or mission competencies, they can be identified as Core competencies (Figure 18) and set to dynamically pull the competencies into Performance or 360 Reviews forms for all employees.
Figure 18. Core Flag
Job Specific Competencies
If your organization has a detailed competency model that specifies
competencies by role, job or other field of information, it is possible to associate these competencies to users in your organization using SuccessFactors. Once
configured, these competencies can be displayed and evaluated on an individual’s Performance and 360 Reviews forms.
Job Families Main Concepts
Job families define broad job categories in your company. You can create any type of Job Family you want. For example, you can create Job families for major functions in your company, such as HR or Information Technology, or you can create job families for the major employment levels in your company, such as
Exempt Employees or Executives.
Establishing job families allow you to establish individual job roles associated with the job family. This, in turn, allows you to associate competencies with a specific job role. You can set up your performance review forms to automatically populate the Competency sections of the form with only the competencies relevant to the job role held by the subject of the review form.
Job Roles
Job roles describe the different types of jobs that are included in a job family. For example, if you have a job family named Information Technology, you might have individual roles such as:
IT Manager
Database Administrator
System Administrator
Similarly, if you have a job family named Executive, you might include roles such as:
Directors
Vice Presidents
CXO
Individual job roles may have one or more competencies associated with them that are specific to that job role, meaning the selected competencies are essential to performing well in that job capacity.
Establishing this sort of profile for a job role allows you to systematically and accurately compare evaluation results in a gap analysis report.
You can create a rob role any time after you've created at least one job family. Job roles are always used within job families. You can create multiple job roles for a single Job Family.
Job Codes
In order for SuccessFactors to recognize which competencies are assigned to which roles, job codes are assigned to each role. Additionally, a job code is assigned to each employee to “map” the competencies for their role to the job code.
For example: Joe Smith is an accountant and his job code is ACCT1
When a form with a job-specific competencies section is created for Joe Smith, the competencies associated with the job role that is associated with the job code ACCT1 will be shown on his form.
The only thing linking a roles and the person in the data file is the job code. Be aware that, if your system is set up to allow it, you can map competencies by items other than job Code; for example, you may also want to map
competencies by department or organization.
Note: Multiple job codes may be assigned to each job role. However, an employee may be assigned only one job code.
Decision:
What does your current competency model look like?
Does your organization have core competencies that apply to all employees?
Are specific behaviors defined for the competencies?
What are some of the job families in your organization and how do the competencies for the job roles vary?
Components of a Competency
Each competency in SuccessFactors has a name, a description, and additional components such as Performance Details.
Competency Name
The competency name appears in many locations in SuccessFactors:
Performance Forms
Career Development
Succession Planning
Reports
This competency name, if edited, should be concise; for example, Teamwork.
Competency Description
The competency description further clarifies the competency name. The description is editable and may be tailored to your organization’s needs.
Performance Details
Performance Details help you customize competencies with text that assists the reviewer when evaluating that competency when using the Writing Assistant and/or Coaching Advisor. The term Performance Details is only visible to the admin in SuccessFactors. Users know this as the Writing Assistant.
Performance Details are available for both competencies and competency behaviors, and work the same way with both. Performance Details are short but specific statements that describe actions, attitudes, or skills that demonstrate proficiency in the competency at a specific performance level. Performance Details can be organized into multiple performance levels, such as Meets Expectations, Exceeds Expectations, or Needs Improvement.
For example, to show that an employee meets the Customer Focus competency, you might create Performance Details that state: Follows through with
actions and attitudes, it demonstrates that the employee meets the definition of the Customer Focus competency.
Similarly, to show that an employee does not meet the Customer Focus competency, you might create Performance Details that state: Appears
unresponsive to customers, or Doesn't understand customer perspective. When an employee exhibits these actions and attitudes, it demonstrates that the employee isn't meeting the definition of the Customer Focus competency, and needs improvement in this competency.
When you create a new competency, you can create new Performance Details for that competency. For existing competencies, you can add new, edit
reorganize, and delete Performance Details for the competency.
A Performance Detail may seem very similar to a description of a competency, but they are not the same thing. The competency description provides a broad sense of the scope of the competency. Performance Details break down the definition of the competency into tangible performance levels. This makes the competency easier to evaluate by your users.
Performance Details are the text that is used for the Writing Assistant and Coaching Advisor.
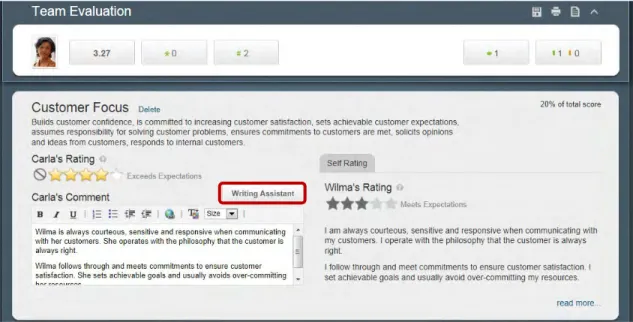
Writing Assistant Overview
The Writing Assistant provides comment verbiage guidance within a
Performance Management or 360 Degree Review form. It is available within the standard SuccessFactors competency library and can also be created for
custom competency libraries. The Writing Assistant consists of Performance Details and can be accessed by users when they are completing a Performance or 360 Review by clicking the Writing Assistant button.
Accessing the Writing Assistant
How users access the Writing Assistant varies depending on whether your organization is implementing PM v12 (Figure 19) or PM v11 (Figure 20).
Note: We will discuss configuration of PM v12 and PM v11 in a later section. In this section, we will show the Writing Assistant for both v12 and v11 PM forms.
Figure 19. User View of Writing Assistant Button from within a PM v12 Form
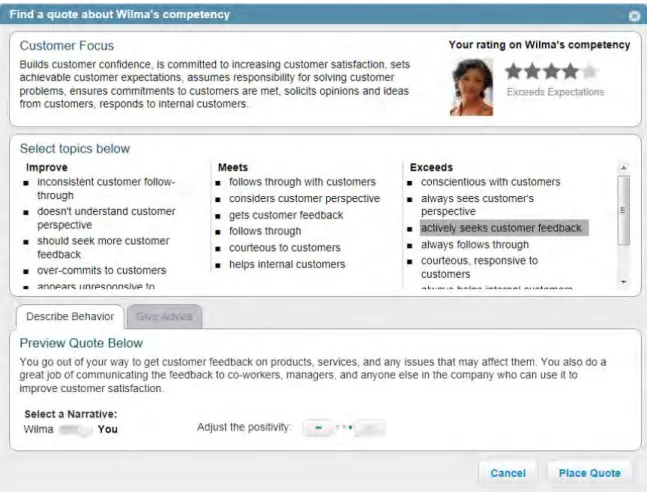
Using the PMv12 Writing Assistant
The Writing Assistant displays information about the user being reviewed, the competency being reviewed, and starter text that you may add to your
comments for the purposes of either describing the behavior or giving advice. To use the Writing Assistant, you select the text that best meets the opinion of the person’s behavior being evaluated. Then decide of you would like to describe the behavior or give advice on the behavior.
Describe Behavior (Figure 21) is the default selection and is most commonly used to provide starter text about an employee’s performance. Once you select the behavior that most closely describes the employee, you have the option of entering text in various narratives (I, You, [Employee Name]) depending on the writer-subject relationship. You also have the option of adjusting the positivity of the language in the text.
Give Advice (Figure 22) provides guidance specific to the manager or
employee and has the same basic functionality as the Writing Assistant. It offers developmental suggestions and concepts that address a defined problem area or encourage an employee’s strength.
Give Advice text displays on the Give Advice tab in the order you determine when configured in Performance Details. We recommend that you create the content in the order you'd like the content to display on the Give Advice tab.
Figure 22. User View of PMv12 Writing Assistant – Give Advice
Describe Behavior and Give Advice content is available within the standard SuccessFactors competency library and can also be created for custom
competency libraries. This information is customizable by the administrator via Performance Details.
Using the PMv11 Writing Assistant
Similar to the PMv12 Writing Assistant, the PMv11 Writing Assistant (Figure 23) displays information about the competency being reviewed and starter text that you may add to your comments for the purposes of either describing the
behavior or giving advice.
To use the Writing Assistant, select the behavior that most closely describes the employee. You then have the option of selecting text in various narratives (I, You, [Employee Name]) depending on the writer-subject relationship. You also have the option of adjusting the positivity of the language in the text.
Figure 23. User View of the PMv11 Writing Assistant
The Coaching Advisor (Figure 24) provides guidance specific to the manager and employee and has the same basic functionality as the Writing Assistant. It offers developmental suggestions and concepts that address a defined problem area or encourage an employee’s strength.
Coaching Advisor text displays on the Coaching Advisor tab in the order you determine when configured in Performance Details. We recommend that you create the content in the order you'd like the content to display on the Coaching Advisor tab.
Figure 24. User View of the PMv11 Coaching Advisor
Writing Assistant and Coaching Advisor content is available within the standard SuccessFactors competency library and can also be created for custom
Decision:
Performance Management
This section will provide a basic overview of Performance Management and provide you with information regarding the configuration decisions you will make during implementation.Introduction to Performance Management
Performance Management fundamentally transforms the employee review process. In addition to streamlining what has traditionally been a cumbersome, inconsistent process, the solution enables you to measure individual employee contributions across the organization—accurately, clearly, and objectively— so you’ll be equipped to decide who you want to keep, reward, or single out for targeted development.
Managers and employees use a Performance Review form to evaluate the employee’s effectiveness in achieving goals, core values, and job-specific competencies. SuccessFactors populates goals from the employee’s Goal Plan onto the employee’s Performance Review form and populates core and /or job-specific competencies on the form based on the configuration options discussed in the Competencies section.
The system allows the admin to create and distribute Performance Review forms when it is time to start a performance cycle.
PM v11 vs. PM v12
In 2012, a redesigned performance form template was introduced in the
SuccessFactors Performance Management module. Where PM v11 was built to support all processes with a best practice point of view, PM v12 is deliberately designed to optimize the user experience of the manager.
SuccessFactors has optimized the process for common manager scenarios. This includes, stack ranking during the review, reading other’s feedback, and understanding their upgrades/downgrades in ratings against the employee’s self-rating.
This helps enable higher value reviews by presenting more contextual
information on the form and making key data readily available on screen or one click away. This also reduces time to it takes to complete a review and provides proper supporting materials to write better reviews.
Configuration Differences
There are some feature differences between the two form templates types. In cases where there are differences as they relate to configuration decisions, they will be highlighted in this session.
Accessing Performance Review Forms
The Home page provides users immediate visibility into the review process, what’s required, and when. The To Do tile (Figure 25) calls out the key next steps in the process, the current review status, and allows managers to easily drill down to get at the details of each review. Tasks related to performance steps are listed as To Do on the Home page and become active links to the form when user input is required. If a user hovers over a step with their mouse, an arrow appears on the right-hand side and enables the user to drill-down for more details.
Figure 25. Example of a To Do List from User View with Expanded To Do Item
Additionally, forms are accessible from the Inbox (Figure 26) in the Performance module whenever user input is required. This Inbox is accessible by clicking on the main navigation drop-down and selecting Performance.
Overview of the Performance Review Form
Both v12 (Figure 27) and v11 (Figure 28) forms contain the following components:
1. Form Title 2. Form Workflow 3. Form Sections
We will discuss each of these in detail and present you with decision points for each component.
Figure 28. Example of a PM v11 Performance Review Form Title
Each form template must have a title. This title should be descriptive of the form and easy for your users to understand. This title is visible in the Performance Inbox and on the open form.
Examples:
Performance Review
2012 Annual Review
FY 2013 Performance Review
Decision:
What will be the name(s) of your form(s)?
Workflow
The workflow controls how it will move throughout the review process. This workflow is controlled by the Route Map. We will discuss form Route Maps in more detail later.
Figure 31. PM v12 Workflow - Team Overview Page
Each organization may develop its own unique set of steps for a performance review. In this section, we will provide a sample performance review workflow and discuss the steps involved.
Performance Review Process: Year-End Assessment
Figure 33. Sample Performance Review Process Cycle – Year-End Assessment
Many end-of-year performance review processes begin with an employee performing a self-evaluation or review. During the Employee Self Review step, the employee uses the Performance Review form to:
Update each goals’ status and comment on completion
Assess competency strengths and areas for development
When finished, the employee sends the form to the next step. In this example, the manager receives the employee’s Performance Review form and reviews the employee’s self-evaluation. Then, the manager conducts his or her own evaluation of the employee’s performance on goals and competencies.
Typically, the manager and employee then meet to discuss the evaluation. The discussion that follows should include:
Reviewing and giving feedback on the employee’s performance
Development needs
After the performance discussion, the form is sent to the employee for electronic signature to confirm the discussion has occurred. It is then forwarded on to the manager for signature. When signed by all, the form is complete.
For reference, a copy of the completed Performance Review form will be available in the employee's and manager’s Completed folder on the Performance module.
Employee Self Review
Manager
Decision:
Will everyone in the company be on the same performance review cycle?
Will reviews happen more frequently than annually?
Who is involved in the performance review cycle per employee?
Form Sections
Each form contains sections that provide the reviewer with additional information, display information from other areas of the software such as Goals, and provide the ability to rate and comment on goals and/or competencies.
In this section, we will explore each of the form sections types and present you with the various decisions you will make during your implementation regarding these sections.
Introduction
The introduction section (Figure 34) may contain text-based content to provide information to your users. This information may be about the purpose of the review, whom to call for assistance, or any other information that you feel is relevant to the review.
Figure 34. Introduction Section (v12)
Decision:
Section Weights
Each of the Goals and Competencies sections on the form can be weighted independently. This weight is used in the overall performance form score calculation. For example, you may set the weight of the Goals section as 30% and the weight of the Competencies section as 70%. Or you may set these sections as 50/50. The overall performance score will take this into
consideration.
Goals
You may add up to 2 Goals sections on a performance form; one for Performance Goals and one for Development Goals. In this section we will discuss Performance Goals (Figure 35).
Performance Goals can be automatically populated into the form from the employee’s goal plan or added manually.
Objectively measuring your employees’ goals in a meaningful way allows the organization to use the full value of establishing individual goal plans. A rating scale can be used, and employees and managers can use tools like spell check and SuccessFactors’ Legal Scan. Legal Scan detects potentially inappropriate language to avoid legally compromising situations and help educate managers on what’s appropriate.
Decision:
Do you assess and rate employees on goals during their performance review?
Would you like to include a performance goals section in your performance form?
What should the name of this section be?
What, if any, introductory text would you like to include in this section?
Competencies
Including core competencies (Figure 36) in the review reinforces to all employees these are important and signals what is expected of them.
Role-based competency models can also be integrated into the performance review process. This is invaluable given that competencies make up the very “nuts and bolts” of what is expected of someone in a given role, and sets the stage for career and development planning.
Your performance form can be configured to present these competencies together in one section or as separate sections.
Competencies can be automatically populated into the form or added manually. A content-rich Writing Assistant and Coaching Advisor help users eliminate “writer’s-block” and provide meaningful feedback.
Decision:
Would you like to include Core Competencies in your performance form?
Would you like to include Job-Specific Competencies in your performance form?
What should the name(s) of your Competency section(s) be?
What are the weights of these sections?
Should employees and/or managers be able to add or remove the competencies in these sections?
Should employees and managers be able to access the Writing Assistant when commenting on competencies?
Development Goals
As previously noted, your form may contain up to two Goals sections. Although Development Goals are typically not rated, they are sometimes part of the end of year evaluation to assist in planning for the upcoming year.
Decision:
Would you like to include Development goals in your performance form?
What should the name of the Development goals section be?
Summary
The Summary section (Figure 37) displays summarized information about the evaluation sections on the form in one central area. For example, if you have two goal sections and two competency sections in your form, summaries about the content in all four sections would be shown in the Overall Summary section. This section is sometimes titled Overall Performance Summary or Assessment Summary. The amount of summarized information is determined by the content in the working sections of the form. For example, if your form includes ratings and weights, the average score from these values is shown for each section, as well as a general overall performance score. Here you can also set the weights for each section.
Figure 37. Summary Section (v12)
Decision:
What, if any, introductory text would you like to include in this section?
Would you like the summary section to display the calculated rating, manual rating, or both?
Signature
The Signature (Figure 38) section displays the names of the people who have been asked to sign the form. Once signed, this section displays the electronic signature of the signer and the date signed.
Figure 38. Signature Section
Decision:
What, if any, introductory text would you like to include in this section?
Who must sign the form in order for it to be considered complete?
Performance Review Template Components
A Form Template is a shell that contains the structure (layout) of the Performance Review. This includes the form title and sections as noted
previously. This template also controls which rating scale is used, which route map is used, and other settings and options.
In this section, we will discuss the various form template components and the configuration decisions asscocited with them
Rating Scale
A Rating Scale is required when creating a form template.
Best Practice: SuccessFactors recommends the use of a 5-point scale. The advantage of using a 5-point rating scale (Figure 39) is that it has a midpoint and allows for just enough differentiation without introducing scores that are too close to be of much value.
With a 7-point scale, there’s too much differentiation; the extra scores aren’t as clearly defined based on the midpoint. Evaluators must artificially determine for themselves how much better than neutral and how much less than best each extra scores means which introduces inconsistencies.
In contrast, a 3-point scale doesn’t allow for enough differentiation. The evaluator can only choose either neutral or best, which completely leaves out potential “better” scores, introducing inaccuracies. This rating scale often results in too many employees rated as neutral.
A 4-point scale lacks a neutral midpoint, forcing evaluations to be lopsided towards one end or the other. Generally, evaluations trend to the high end, resulting in excessive positive evaluations.
Figure 39. Sample Rating Scale
Note: The rating scale can be reversed if necessary. In the default setting, 1 is the lowest rating and 5 is the highest rating. During provisioning it may be reversed so that 1 is the highest rating and 5 is the lowest rating. Once this is reversed, it applies to all rating scales. This change requires the assistance of a SuccessFactors Consultant.
Decision:
Do you have a current rating scale? What are the values?
Would you like to display rating scale number and text or just number or just text?
V11 PM Only
Would you like to display employee and manager ratings side-by side or stacked (one on top of the other)?
V12 PM Only
Would you like the ratings to display on the form as stars (Figure 41), circles (Figure 42), or a drop-down menu (Figure 43)?
Figure 41. Ratings displayed as stars
Route Maps
Route Maps establish the workflow and steps that employees follow during the performance review process. They specify the order in which a form moves from one employee to another and what employees can do during each step;
however, some aspects of form permissions are built at the template level.
Stages of a Route Map
There are three stages in a Route Map (Figure 44):
Modify Stage – During this stage, users edit various aspects of the form including ratings, goal status, and comments.
Signature Stage – During the signature stage, the form is locked for editing and is read-only.
Completion – The completion stage is achieved once the form is signed by all parties.
Steps of a Route map
Stages contain steps. In the Modify Stage, you can edit the Step Name, Step Description, Step Type, Reviewer Roles, and Dates.
The Step Name is the name that will display on the route map within a form.
The Step Description is a description that the users will see in their To Do list on the Home page. This gives more context about the action users are being asked to take. If this field is left blank, the Step Name will be used for the To Do List.
Step Type describes the way the form is routed. Step Types are:
Single Role –Assigns the form to a single role or user. This is used
when the form is shared by only one user, not a group.Use this form when you want an employee to have an assigned action in this part of the process. (V12 Forms may only use Single Role.)
Iterative (v11 only) – Assigns the form to a group of people. This
allows multiple people to loop back and forth before moving onto the next step. With this process, users have a clear definition of who has the form in their inbox for editing and review, and who it will be routed to next. Unlike the collaborative step type, where the group gets the form at the same time. You might use this step type when you want the manager and the employee to be able to make edits and send them back and forth before routing to the next step.
Collaborative (v11 only) – Assigns the form to 2 or more users at the
same time. This allows multiple people to review and make edits to the form at the same time. With this step type, only one user can made edits at a time, but unlike the iterative step type, the form is accessible in all of the users’ inboxes. You might use this step type if you want the manager, second level manager, and HR to be able to access the form for an executive review.
Reviewer Roles are associated to employees when you add them to the SuccessFactors system. The route map you define will uses the roles assigned to these users to determine who to send the form to. The
standard system roles are: Employee, Manager, 2nd Level Manager, First Matrix Manager, All Matrix Managers, HR Rep, HR Rep’s Manager, User, Originator, and Originator’s Manager. There is also a Custom role that can be defined.
Exit User (v11 Only)– Specifies who is assigned to route the form to
the next step in an iterative step
In the Modify and Signature stage steps there are several date fields that can be defined. These are:
Start Date – The date when the specific step starts.
Exit Date – The form cannot be completed until this date has passed. Due Date – The date the step is due.
Best Practice: Using the date fields allows you to more tightly configure and control when the form moves from one step to another.
In the Signature Stage (Figure 46), you can edit the Step Name, Step Description, Step Type, and Dates.
The Step Type is different in the Signature Stage than in the Modify Stage. The form may only be with one employee at a time for signature and therefore, Step Type contains the role of the person who is to sign during this step.
Figure 46. Signature Stage
Decision:
Would you like signers to have the option to “Reject” or send the form back to an editable state?
In the Completion Stage, you can edit the Step Name, and Select Carbon Copy roles which determine who is copied on the form when it is completed.
Figure 47. Completion Stage
Note: Notice that there is a link Show/Hide Advanced options at each stage. These options vary for v11 and v12 forms and are will be discussed with you in more detail during configuration.
Stack Ranker
If enabled on the Performance Management form, it allows managers to rank and view their direct reports’ competency rankings and overall ratings next to each other. Seeing multiple rankings at the same time helps managers quickly identify top performers. Stack Ranker is only compatible with competencies, not behaviors.
Figure 49. Stack Ranker Access in Performance Management Form (v11)
Note: The Stank Ranker feature may be renamed in Admin Tools in Text Replacement.
Best Practice: It is recommended to configure the route map so that the manager will have all the direct report forms in their Inbox at the same time so he or she may rank the employees as a group. Once the manager clicks the Stack Ranker button in a Performance Management form, she may rank her direct reports on specific competencies.
Stack Ranker:
Will only pull the direct reports’ competencies that are in that competency section of the performance review.
Supports three different styles of rating scales – text, alphanumeric and numeric; the system determines which style to display based on form and rating scale configurations.
Supports job specific competencies as well as core competencies; it is recommended to use core competencies so that there is an even list of competencies on which all direct reports will be evaluated.
Decision:
Calibration
Using Calibration, managers can discuss how to apply similar standards for all employees and help eliminate any potential manager bias. For example, prior to using performance review calibrations, all employees working for one manager may receive “outstanding” ratings while employees working for another manager may receive a wide-variety of ratings – anything from “outstanding” to “meets expectations” to “below expectations” for the same job. The reviews between the two teams would need to be calibrated to take into account the different
reviewing styles and get a better idea of who is really doing well and who is not. Ultimately, calibration establishes a common and well-understood definition of performance across the company.
The SuccessFactors Calibration module allows managers to view data for various teams and discuss the ratings they have selected. Facilitators can make changes to the ratings based on the outcome of the session.
Calibration Views
Calibration views provide users an at-a-glance look at the following information:
Dashboard (Figure 51): Provides a high-level overview of the Calibration Session
List View (Figure 52): Lists all the employees in the Calibration Session
Bin Views (Figure 53): Displays employees by ratings distribution
Matrix Views (Figure 54): Graphically displays employees on a matrix grid report based on data selections made during Calibration Setup
Figure 51. Dashboard
Figure 53. Bin View
Decision:
Do you already have a calibration process in place?
Would you like to calibrate ratings for employees using SuccessFactors Calibration?
360 Reviews
This section will provide a basic overview of 360 Reviews and provide you with information regarding the configuration decisions you will make during
implementation.
Introduction to 360 Reviews
SuccessFactors 360 Reviews helps organizations capture a more balanced and complete view of employee performance to more effectively identify gaps and chart an employee’s development course.
As an integrated part of the Performance and Goals bundle, the 360 Review provides a much more balanced assessment of performance by allowing individuals to solicit feedback from a variety of sources. 360 Reviews can be used as developmental surveys to identify employee blind spots and hidden strengths to guide development; or as a multi-rater assessment that can factor into an employee’s formal performance review.
Either way, 360 Reviews give managers and employees critical insight to better align their behaviors with organizational goals and improve their performance.
Decision:
Will you be using 360 degree feedback for developmental purposes or for performance reviews?
Accessing 360 Review Forms
The Home page provides users immediate visibility into the review process, what’s required, and when. The To Do tile (Figure 55) calls out the key next steps in the process, review status, and allows managers to easily drill down to get to the details of each review. Tasks related to performance steps are listed as To Do on the Home page and become active links to the form when user input is required.
Figure 55. Example of To Do tile from User View
Additionally, forms are accessible from the Inbox (Figure 56) in the Performance module whenever user input is required.