DbVisualizer 9.2
Users Guide
Table of Contents
1 DbVisualizer 9.2 ______________________________________________________________________ 12 2 Getting Started _______________________________________________________________________ 13 2.1 Downloading _____________________________________________________________________ 13 2.2 Installing ________________________________________________________________________ 13 2.2.1 Installing with an Installer ____________________________________________________ 14 2.2.2 Installation from an archive file ________________________________________________ 14 2.3 Starting DbVisualizer ______________________________________________________________ 15 2.4 Evaluating the Pro Edition __________________________________________________________ 15 2.5 Installing a Pro Edition License ______________________________________________________ 16 2.5.1 Installing a License Key String ________________________________________________ 16 2.5.2 Installing a License Key File __________________________________________________ 16 2.5.3 Uninstalling the license key ___________________________________________________ 16 2.6 Creating a Connection - basics ______________________________________________________ 17 2.6.1 Using the Connection Wizard _________________________________________________ 17 2.6.2 Setting Up a Connection Manually _____________________________________________ 21 2.7 Creating a Table - basics ___________________________________________________________ 23 2.8 Viewing a Table - basics ___________________________________________________________ 24 2.9 Editing a Table - basics ____________________________________________________________ 26 2.10 Executing SQL - basics ___________________________________________________________ 27 2.11 Checking for Updates _____________________________________________________________ 27 2.12 Printing ________________________________________________________________________ 29 2.12.1 Printer Setup _____________________________________________________________ 30 2.12.2 Printing a Grid, a Chart and Plain Text _________________________________________ 30 2.12.3 Printing a Graph __________________________________________________________ 30 2.12.4 Print Preview _____________________________________________________________ 30 3 Getting the Most Out of the GUI __________________________________________________________ 32 3.1 Main Window Layout ______________________________________________________________ 32 3.2 Tab Types ______________________________________________________________________ 33 3.2.1 Navigation Tabs ___________________________________________________________ 33 3.2.2 Object View Tabs __________________________________________________________ 34 3.2.3 SQL Commander Tabs ______________________________________________________ 35 3.3 Opening a Tab ___________________________________________________________________ 36 3.4 Pinning a Tab ____________________________________________________________________ 37 3.5 Closing a Tab ____________________________________________________________________ 37 3.6 Listing Open Tabs ________________________________________________________________ 38 3.7 Maximizing and Minimizing a Tab ____________________________________________________ 38 3.8 Floating a Tab ___________________________________________________________________ 39 3.9 Rearranging Tabs _________________________________________________________________ 39
3.11 Selecting a Node for a Tab _________________________________________________________ 42 3.12 Preserving Tabs Between Sessions __________________________________________________ 43 3.13 Using Tab Colors and Borders ______________________________________________________ 43 3.14 Changing the GUI Apperance ______________________________________________________ 44 3.15 Changing Keyboard Shortcuts ______________________________________________________ 44 4 Managing Database Objects _____________________________________________________________ 47 4.1 Opening a Database Object _________________________________________________________ 47 4.2 Perform Actions on Multiple Database Objects __________________________________________ 47 4.3 Filtering Database Objects __________________________________________________________ 49 4.3.1 Object Filtering ____________________________________________________________ 51 4.3.2 Object Type Visibility ________________________________________________________ 53 4.3.3 Temporarily Disable Filtering _________________________________________________ 55 4.3.4 Filter Sets ________________________________________________________________ 56 4.3.5 Show Only Default Database/Schema filter ______________________________________ 57 5 Working with Tables ___________________________________________________________________ 58 5.1 Creating a Table __________________________________________________________________ 58 5.1.1 Opening the Create Table Dialog ______________________________________________ 58 5.1.2 Columns Tab ______________________________________________________________ 60 5.1.3 Primary Key Tab ___________________________________________________________ 62 5.1.4 Foreign Keys Tab __________________________________________________________ 62 5.1.5 Unique Constraints Tab _____________________________________________________ 64 5.1.6 Check Constraints Tab ______________________________________________________ 65 5.1.7 Indexes Tab ______________________________________________________________ 65 5.1.8 SQL Preview ______________________________________________________________ 66 5.1.9 Execute __________________________________________________________________ 67 5.2 Altering a Table __________________________________________________________________ 67 5.2.1 Opening the Alter Table Dialog ________________________________________________ 67 5.2.2 Columns Tab ______________________________________________________________ 69 5.2.3 Primary Key Tab ___________________________________________________________ 71 5.2.4 Foreign Keys Tab __________________________________________________________ 72 5.2.5 Unique Constraints Tab _____________________________________________________ 73 5.2.6 Check Constraints Tab ______________________________________________________ 74 5.2.7 Indexes Tab ______________________________________________________________ 75 5.2.8 SQL Preview ______________________________________________________________ 76 5.2.9 Execute __________________________________________________________________ 76 5.3 Creating a Trigger ________________________________________________________________ 76 5.3.1 Opening the Create Trigger Dialog _____________________________________________ 76 5.3.2 Trigger Editor _____________________________________________________________ 78 5.4 Creating an Index _________________________________________________________________ 78 5.5 Viewing Table Data _______________________________________________________________ 80
5.5.4 Quick Filter _______________________________________________________________ 83 5.5.5 Max Rows/Max Chars _______________________________________________________ 85 5.5.6 Max Rows at First Display ____________________________________________________ 86 5.5.7 Column Header Tooltips _____________________________________________________ 87 5.5.8 Highlight Primary Key Columns _______________________________________________ 87 5.5.9 Show Only Some Columns ___________________________________________________ 87 5.5.10 Auto Resize Columns ______________________________________________________ 88 5.5.11 Right-Click Menu Operations ________________________________________________ 88 5.5.12 Creating Monitors _________________________________________________________ 91 5.5.13 Aggregation Data for Selection _______________________________________________ 91 5.6 Editing Table Data ________________________________________________________________ 92 5.6.1 Opening the Data tab _______________________________________________________ 93 5.6.2 Editing Data in the Grid ______________________________________________________ 94 5.6.3 Copy/Paste _______________________________________________________________ 95 5.6.4 Updates and Deletes Must Match Only One Table Row _____________________________ 97 5.6.5 Key Column(s) Chooser _____________________________________________________ 98 5.6.6 Editing Multiple Rows _______________________________________________________ 99 5.6.7 Data Type checking ________________________________________________________ 99 5.6.8 New Line and Carriage Return ________________________________________________ 99 5.6.9 Using the Cell Editor/Viewer _________________________________________________ 100 5.6.10 Using the Form Editor/Viewer _______________________________________________ 101 5.6.11 Preview Changes ________________________________________________________ 103 5.6.12 Editing Binary/BLOB and CLOB Data _________________________________________ 104 5.7 Working with Binary and BLOB Data _________________________________________________ 104 5.8 Working with Large Text/CLOB Data _________________________________________________ 105 5.9 Using Max Rows and Max Chars for a Table ___________________________________________ 105 5.10 Changing the Data Display Format _________________________________________________ 106 5.10.1 Date, Time and Timestamp formats __________________________________________ 107 5.10.2 Number formats _________________________________________________________ 107 5.11 Exporting a Table _______________________________________________________________ 107 5.11.1 Output Format ___________________________________________________________ 108 5.11.2 Output Destination _______________________________________________________ 108 5.11.3 Options ________________________________________________________________ 109 5.11.4 Using Variables in Fields ___________________________________________________ 109 5.11.5 Exporting Binary/BLOB and CLOB Data _______________________________________ 109 5.11.6 Saving And Loading Settings _______________________________________________ 110 5.11.7 Other Ways to Export Table Data ____________________________________________ 110 5.12 Importing Table Data ____________________________________________________________ 110 5.12.1 Input File Format and Other Options __________________________________________ 111 5.12.2 Data Formats and Data Type Per Column _____________________________________ 114 5.12.3 Matching Columns and Data Types for an Existing Table _________________________ 116 5.12.4 Adjusting Table Declaration for a New Table ___________________________________ 118
5.12.6 Saving And Loading Settings _______________________________________________ 120 5.12.7 Other Ways to Import Table Data ____________________________________________ 121 5.12.8 Known limitations ________________________________________________________ 121 5.13 Comparing Tables ______________________________________________________________ 121 5.14 Viewing Table Relationships ______________________________________________________ 122 5.15 Navigating Table Relationships ____________________________________________________ 123 5.15.1 Opening the Navigator ____________________________________________________ 123 5.15.2 Navigating Realtionships ___________________________________________________ 124 5.15.3 Adding Context Information to the Graph ______________________________________ 128 5.15.4 Arranging the Graph ______________________________________________________ 129 5.15.5 Exporting and Printing the Graph ____________________________________________ 130 5.15.6 Opening the Navigator from the Data tab ______________________________________ 131 5.16 Viewing the Table DDL ___________________________________________________________ 131 5.17 Filtering Tables in the Tree ________________________________________________________ 131 5.18 Showing Row Count in the Tree ____________________________________________________ 132 5.19 Using Permissions for Table Data Editing ____________________________________________ 132 5.20 Scripting a Table _______________________________________________________________ 133 6 Working with Views ___________________________________________________________________ 134 6.1 Creating a View _________________________________________________________________ 134 6.2 Altering a View __________________________________________________________________ 134 6.3 Editing a View ___________________________________________________________________ 134 6.4 Exporting a View ________________________________________________________________ 134 6.5 Viewing the View DDL ____________________________________________________________ 135 6.6 Filtering Views in the Tree _________________________________________________________ 135 6.7 Scripting a View _________________________________________________________________ 135 7 Working with Procedures, Functions and Other Code Objects __________________________________ 137 7.1 Creating a Function ______________________________________________________________ 137 7.2 Creating a Procedure _____________________________________________________________ 139 7.3 Creating Other Code Objects _______________________________________________________ 141 7.4 Editing a Code Object ____________________________________________________________ 142 7.5 Executing a Code Object __________________________________________________________ 144 7.5.1 Executing in the Code Editor _________________________________________________ 145 7.5.2 Executing in the SQL Commander ____________________________________________ 145 7.5.3 Using the Script Object Dialog _______________________________________________ 147 7.6 Exporting a Code Object __________________________________________________________ 148 7.7 Scripting a Code Object ___________________________________________________________ 149 8 Working with Schemas ________________________________________________________________ 150 8.1 Creating a Schema _______________________________________________________________ 150 8.2 Comparing Schemas _____________________________________________________________ 150 8.3 Viewing Entity Relationships _______________________________________________________ 151
8.4.3 Object Types _____________________________________________________________ 153 8.4.4 Options _________________________________________________________________ 153 8.4.5 Using Variables in Fields ____________________________________________________ 153 8.4.6 Saving And Loading Settings ________________________________________________ 154 8.5 Filtering Schemas in the Tree ______________________________________________________ 154 9 Working with SQL ____________________________________________________________________ 155 9.1 Selecting Database Connection, Catalog and Schema ___________________________________ 155 9.2 Editing SQL Scripts ______________________________________________________________ 156 9.2.1 Syntax Color Coding _______________________________________________________ 157 9.2.2 Charsets and Fonts ________________________________________________________ 159 9.2.3 Loading and Saving Scripts _________________________________________________ 159 9.2.4 Drag and Drop a File _______________________________________________________ 160 9.2.5 Drag and Drop Database Objects _____________________________________________ 160 9.2.6 Loading and Saving Bookmarks and Monitors ___________________________________ 162 9.2.7 Navigating Between History Entries ___________________________________________ 162 9.2.8 Confirming Overwriting Unsaved Changes ______________________________________ 162 9.2.9 SQL Formatting ___________________________________________________________ 162 9.2.10 Auto Completion _________________________________________________________ 164 9.2.11 Recording and Playing Edit Macros __________________________________________ 168 9.2.12 Folding Selected Text _____________________________________________________ 169 9.2.13 Selecting a Rectangular Area _______________________________________________ 170 9.2.14 Tab Key Treatment _______________________________________________________ 170 9.2.15 Key Bindings ____________________________________________________________ 170 9.3 Using Editor Templates ___________________________________________________________ 170 9.3.1 Using a Template _________________________________________________________ 171 9.3.2 Creating a new Template ___________________________________________________ 172 9.3.3 Editing or Deleting a Template _______________________________________________ 172 9.3.4 Changing the Expand Keybinding _____________________________________________ 173 9.4 Executing SQL Statements ________________________________________________________ 173 9.4.1 Execute Multiple Statements _________________________________________________ 173 9.4.2 Execute Only the Current Statement __________________________________________ 174 9.4.3 Control Execution after a Warning or an Error ___________________________________ 174 9.5 Re-Executing SQL Statements _____________________________________________________ 175 9.5.1 Using Previous and Next in the SQL Commander ________________________________ 175 9.5.2 Using the SQL History Window _______________________________________________ 175 9.5.3 Using Quick Load _________________________________________________________ 176 9.6 Executing Complex Statements _____________________________________________________ 177 9.6.1 Using Execute Buffer ______________________________________________________ 178 9.6.2 Using an SQL Block _______________________________________________________ 178 9.6.3 Using the @delimiter command ______________________________________________ 178 9.7 Executing an External Script _______________________________________________________ 179 9.8 Locating SQL Errors ______________________________________________________________ 180
9.10 Auto Commit, Commit and Rollback ________________________________________________ 183 9.11 Managing Frequently Used SQL ___________________________________________________ 185 9.11.1 Creating, Editing and Organizing Bookmarks ___________________________________ 186 9.11.2 Executing Bookmarks _____________________________________________________ 187 9.11.3 Adding a Bookmark as a Favorite ____________________________________________ 188 9.11.4 Sharing Bookmarks _______________________________________________________ 188 9.11.5 Using Quick Load ________________________________________________________ 188 9.12 Creating Queries Graphically ______________________________________________________ 189 9.12.1 Creating a Query _________________________________________________________ 190 9.12.2 Testing the Query ________________________________________________________ 200 9.12.3 Loading a Query From the Editor ____________________________________________ 201 9.12.4 Properties for the Query Builder _____________________________________________ 201 9.12.5 Current Limitations _______________________________________________________ 203 9.13 Formatting SQL ________________________________________________________________ 203 9.14 Using Max Rows and Max Chars for Queries _________________________________________ 205 9.15 Getting the DDL for an Object _____________________________________________________ 206 9.16 Using the Log Tab ______________________________________________________________ 207 9.17 Writing to the Log Tab ___________________________________________________________ 208 9.18 Using the DBMS Output Tab ______________________________________________________ 208 9.19 Comparing SQL Scripts __________________________________________________________ 209 9.20 Exporting Query Results _________________________________________________________ 209 9.20.1 Automatic table name to file mapping _________________________________________ 213 9.20.2 Multiple results to a single file _______________________________________________ 213 9.20.3 Using predefined settings __________________________________________________ 214 9.20.4 Limit the number of exported rows ___________________________________________ 214 9.21 Using Permissions in the SQL Commander ___________________________________________ 214 9.22 Sending Comments to the Database with Statements ___________________________________ 216 9.23 Using Client-Side Commands _____________________________________________________ 217 9.24 Parameterized SQL - Variables and Parameter Markers _________________________________ 219 9.24.1 Using DbVisualizer Variables _______________________________________________ 221 9.24.2 Using Parameter Markers __________________________________________________ 228 10 Working with Result Sets ______________________________________________________________ 233 10.1 Viewing a Result Set ____________________________________________________________ 233 10.1.1 Viewing as a Grid ________________________________________________________ 233 10.1.2 Viewing as Text __________________________________________________________ 233 10.1.3 Viewing as a Graph _______________________________________________________ 234 10.2 Editing a Result Set _____________________________________________________________ 234 10.3 Exporting a Result Set ___________________________________________________________ 235 10.4 Comparing Result Sets __________________________________________________________ 235 10.5 Pinning Result Sets _____________________________________________________________ 236
11.1.1 Selecting Category Column ________________________________________________ 240 11.1.2 Selecting Series _________________________________________________________ 241 11.1.3 Chart Type _____________________________________________________________ 242 11.2 Chart Preferences ______________________________________________________________ 243 11.2.1 Appearance Preferences __________________________________________________ 243 11.2.2 Series Preferences _______________________________________________________ 245 11.3 Zooming ______________________________________________________________________ 245 11.4 Export ________________________________________________________________________ 245 12 Exporting a Grid _____________________________________________________________________ 247 12.1 Settings page __________________________________________________________________ 247 12.2 Data page _____________________________________________________________________ 249 12.2.1 Generating Test Data _____________________________________________________ 250 12.3 Preview _______________________________________________________________________ 253 12.4 Output Destination ______________________________________________________________ 253 12.5 Settings Menu _________________________________________________________________ 254 13 Comparing Data _____________________________________________________________________ 255 13.1 Selecting the Objects to Compare __________________________________________________ 255 13.2 Comparing Text Data ____________________________________________________________ 256 13.3 Comparing Grids _______________________________________________________________ 258 13.4 Comparing Cell Values ___________________________________________________________ 263 14 Monitoring Data Changes ______________________________________________________________ 264 14.1 Creating a Monitored Query _______________________________________________________ 264 14.1.1 Monitor table row count ____________________________________________________ 266 14.1.2 Monitor table row count difference ___________________________________________ 268 14.2 Running a Monitored Query _______________________________________________________ 269 15 Accessing Frequently Used Objects ______________________________________________________ 272 15.1 Keeping Tabs Open Between Sessions ______________________________________________ 272 15.2 Using Favorites ________________________________________________________________ 272 15.3 Using Scripts __________________________________________________________________ 275 16 Delimited Identifiers and Qualifiers _______________________________________________________ 276 17 Handling Transactions ________________________________________________________________ 277 17.1 Changing the Auto Commit Setting _________________________________________________ 277 17.1.1 Changing Auto-Commit for a Database Type ___________________________________ 277 17.1.2 Changing Auto-Commit for a Connection ______________________________________ 277 17.1.3 Changing Auto-Commit for an SQL Commander tab _____________________________ 277 17.1.4 Changing Auto-Commit for a Statement Block __________________________________ 278 17.2 Setting Transaction Isolation ______________________________________________________ 278 18 Database Connection Options __________________________________________________________ 280 18.1 Setting Up a Connection Manually __________________________________________________ 280 18.1.1 Setting Up a Connection Manually ___________________________________________ 280 18.2 Configuring Connection Properties _________________________________________________ 282 18.3 Copying an Existing Connection ___________________________________________________ 286
18.4.1 Changing the database driver _______________________________________________ 288 18.5 Removing a Connection __________________________________________________________ 288 18.6 Organizing Connections in Folders _________________________________________________ 288 18.7 Rearranging Connections and Folders _______________________________________________ 289 18.8 Setting Common Authentication Options _____________________________________________ 289 18.9 Setting a Master Password _______________________________________________________ 290 18.9.1 Specifying a Master Password ______________________________________________ 291 18.9.2 Changing a Master Password _______________________________________________ 291 18.9.3 Resetting the Master Password _____________________________________________ 292 18.9.4 Connecting with a Master Password specified __________________________________ 292 18.9.5 Manually Requesting the Master Password for New Connections ___________________ 293 18.9.6 Showing the Encrypted Password in Cleartext __________________________________ 293 18.9.7 Declaring a Master Password Rule ___________________________________________ 293 18.10 Using Connection Keep-Alive _____________________________________________________ 294 18.11 Using an SSH Tunnel ___________________________________________________________ 294 18.12 Using Oracle TNS Names _______________________________________________________ 297 18.13 Using SQL Server Single-Sign-On or Windows Authentication ___________________________ 298 18.14 Using Variables in Connection Fields _______________________________________________ 299 18.15 Automatically Connecting at Startup _______________________________________________ 300 18.16 Executing SQL at Connect and Disconnect __________________________________________ 300 18.17 Using a Single Shared Physical Connection _________________________________________ 301 18.17.1 Selecting the Single Shared Physical Connection Mode _________________________ 301 18.17.2 Data Manipulation with a Single Shared Physical Connection _____________________ 301 18.17.3 Transaction Handling with a Single Shared Physical Connection ___________________ 302 19 Finding Database Objects and Data ______________________________________________________ 303 19.1 Finding and Replacing Text in the Editor _____________________________________________ 303 19.2 Finding Data in a Grid ___________________________________________________________ 303 19.3 Locating an Object in an SQL Statement _____________________________________________ 303 19.4 Locating an Object in the Databases tab _____________________________________________ 304 19.5 Searching a Connection __________________________________________________________ 304 20 Exporting and Importing Settings ________________________________________________________ 306 20.1 Export Settings _________________________________________________________________ 306 20.2 Import Settings _________________________________________________________________ 308 21 Command Line Interface ______________________________________________________________ 311 21.1 Command Line Options __________________________________________________________ 311 21.2 Examples _____________________________________________________________________ 312 21.2.1 Executing single statements ________________________________________________ 312 21.2.2 Executing scripts _________________________________________________________ 314 21.2.3 Controlling the output _____________________________________________________ 315 21.2.4 Combining OS scripts, the command line interface and DbVisualizer variables _________ 316
22.1.2 How a Database Profile is loaded ____________________________________________ 322 22.2 Creating a Database Profile _______________________________________________________ 323 22.3 Extending a Database Profile ______________________________________________________ 323 22.3.1 Extending Commands _____________________________________________________ 324 22.3.2 Extending Database Objects Tree ___________________________________________ 325 22.3.3 Extending Actions ________________________________________________________ 329 22.3.4 Extending Object Views ___________________________________________________ 330 22.3.5 Remove an Element ______________________________________________________ 331 22.3.6 Complete sample Database Profile ___________________________________________ 331 22.4 Top level XML Elements _________________________________________________________ 333 22.4.1 XML template ___________________________________________________________ 334 22.4.2 XML element - DatabaseProfile _____________________________________________ 335 22.4.3 XML element - InitCommands _______________________________________________ 336 22.4.4 XML element - Commands _________________________________________________ 339 22.4.5 XML element - ObjectsTreeDef ______________________________________________ 345 22.4.6 XML element - ObjectsViewDef _____________________________________________ 355 22.4.7 XML element - ObjectsActionDef ____________________________________________ 371 22.5 Icons _________________________________________________________________________ 393 22.5.1 Introduction _____________________________________________________________ 393 22.5.2 icons.prefs file ___________________________________________________________ 393 22.5.3 Icons Search Path ________________________________________________________ 394 22.6 Conditional Processing ___________________________________________________________ 395 22.6.1 Introduction _____________________________________________________________ 395 22.6.2 Conditional processing when database connection is established ___________________ 396 22.6.3 Conditional processing during command execution ______________________________ 397 22.7 Database Profile Utilities _________________________________________________________ 398 22.7.1 Analyze Database Profile __________________________________________________ 398 22.7.2 Show All Type and Icon Attributes ___________________________________________ 399 22.7.3 Show Available Icons _____________________________________________________ 400 22.7.4 Export Merged Profile _____________________________________________________ 400 22.7.5 Configure Search Path ____________________________________________________ 400 22.7.6 Reload Database Profiles List _______________________________________________ 400 23 Troubleshooting _____________________________________________________________________ 401 23.1 Debugging DbVisualizer __________________________________________________________ 401 23.2 Fixing Connection Issues _________________________________________________________ 402 23.3 Handling Dropped Connections ____________________________________________________ 403 23.4 Handling Memory Constraints _____________________________________________________ 404 23.5 Reporting Issues _______________________________________________________________ 406 23.6 Using special characters in passwords ______________________________________________ 407 24 Reference Material ___________________________________________________________________ 408 24.1 GUI Command Line Arguments ____________________________________________________ 408 24.2 Installation Structure _____________________________________________________________ 409
24.3.1 What is a JDBC Driver? ___________________________________________________ 410 24.3.2 Get the JDBC driver file(s) _________________________________________________ 410 24.3.3 Driver Manager __________________________________________________________ 411 24.4 Setting Up a JNDI Connection _____________________________________________________ 419 24.5 Special Properties ______________________________________________________________ 421 25 Index ______________________________________________________________________________ 424
1. 2. 3. 4.
2 Getting Started
DbVisualizer is a feature rich, intuitive multi-database tool for developers and database administrators, providing a single powerful interface across a wide variety of operating systems. With its easy-to-use and clean interface, DbVisualizer has proven to be one of the most cost effective database tools available, yet to mention that it runs on all major operating systems and supports all major RDBMS that are available. Users only need to learn and master one application. DbVisualizer integrates transparently with the operating system being used.
The screenshots throughout the users guide are produced on Windows 7 using the Windows Look and Feel, but DbVisualizer lets you choose among other Look and Feels as well.
In addition to this Users Guide, the following online resources may be be useful: The home of DbVisualizer (http://www.dbvis.com/),
The FAQ (http://confluence.dbvis.com/display/FAQ) which is regularly updated with frequently asked questions and known problems,
The Databases and JDBC Drivers (http://www.dbvis.com/doc/database-drivers/) online page. This page gives information about supported databases and JDBC drivers,
The DbVisualizer forums (http://www.dbvis.com/forum/).
2.1 Downloading
DbVisualizer installers are available on our web site at http://www.dbvis.com/download/. Download the installer for your operating system that fits your needs:
Without Java VM if you already have Java installed,
WIth Java VM if you do not have Java installed, or if you want to use the recommended Java version for DbVisualizer and another Java version for other applications,
An Installer unless you must use an archive format for some reason.
2.2 Installing
There are two ways to install DbVisualizer: using an Installer or extracting files from an archive file.
Installing with an Installer (see page 14) Installation from an archive file (see page 14)
2.2.1 Installing with an Installer
To install DbVisualizer, just execute the Installer you have downloaded and follow the instructions in the screens .
2.2.2 Installation from an archive file
Installation Notes for ZIP archives (Windows)
All files are contained in an enclosing folder named DbVisualizer.Unpack the distribution file with the built-in zip archive extraction utility in Windows or with the winzip utility. The ZIP archive installer will not add any entries to the Start menu, add desktop launchers or even register the software in the Windows registry.
Start DbVisualizer by clicking the dbvis.exe file in the installation directory for DbVisualizer.
To uninstall DbVisualizer installed via a ZIP archive, simply delete the complete DbVisualizer directory.
Installation Notes for TAR archives (Unix)
All files are contained in an enclosing folder named DbVisualizer. Unpack the distribution file with:gunzip dbvis_unix_9_1.tar.gz tar xf dbvis_unix_9_1.tar
Start DbVisualizer by executing the shell script in the installation directory, e.g. DbVisualizer/dbvis.sh. To uninstall DbVisualizer installed via a TAR archive, simply delete the complete DbVisualizer directory.
Installation Notes for RPM archives (Linux)
Install the rpm with rpm -i <download_filename> or your favorite rpm tool.
Start DbVisualizer by executing the shell script in the installation directory, e.g. DbVisualizer/dbvis. To uninstall DbVisualizer installed via an RPM archive, use the rpm utilities.
Installation Notes for DEB archives (Linux)
1.
2. 3.
Start DbVisualizer by executing the shell script in the installation directory, e.g. DbVisualizer/dbvis. To uninstall DbVisualizer installed via an DEB archive, use dpkg --remove .
2.3 Starting DbVisualizer
How to start DbVisualizer depends on the operating system you are using. Windows
In the Start menu, select the DbVisualizer menu item. Linux/Unix
Open a shell and change directory to the DbVisualizer installation directory. Execute the dbvis program Mac OS X
Double click on the DbVisualizer application or the DbVisualizer.app application bundle.
You can also start DbVisualizer with the bundled script files, please see the GUI Command Line Arguments (see
page for details. For tasks that do not require a GUI, such as tasks scheduled via the operating
page 408)
system's scheduling tool, you can also use the pure command line interface (see page 311).
2.4 Evaluating the Pro Edition
The DbVisualizer Pro edition offers far more features than the Free edition. If you are using the Free edition, it is easy to activate a Pro edition evaluation to see if suits your needs:
Open Help->Evaluate Pro Edition
Enter your email address and click Evaluate,
Click Restart when prompted after the activation of the evaluation.
1. 2. 3. 4. 5. 6. 1. 2. 3. 4. 5. 6.
2.5 Installing a Pro Edition License
To enable the Pro edition features, you need to install the License Key String or License Key File that you received after purchasing the license.
Installing a License Key String (see page 16) Installing a License Key File (see page 16) Uninstalling the license key (see page 16)
2.5.1 Installing a License Key String
Select and copy the License Key String included in the email,Start DbVisualizer and select the Help->License Key main menu choice, Select License Key String as the License Type,
Paste the key string into the text area, Click Install License,
Restart DbVisualizer when prompted to do so.
The DbVisualizer main window should now say DbVisualizer Pro in the window title. You're ready to go.
2.5.2 Installing a License Key File
Save the dbvis.license file attached to the email to disk,Start DbVisualizer and select the Help->License Key main menu choice, Select License Key File as the License Type,
In the License Key File field, enter the path to the newly saved dbvis.license file or click the button to the right of the field to open a file browser to locate the file,
Click Install License,
Restart DbVisualizer when prompted to do so.
An option to saving the dbvis.license file to disk is to drag it from you mail application (or elsewhere) into the License Key File field in the Help->License Key window.
The DbVisualizer main window should now say DbVisualizer Pro in the window title. You're ready to go.
2.5.3 Uninstalling the license key
1. 2.
Operating System Filename
Windows C:\Documents and Settings\<user>\.dbvis\dbvis.license
UNIX/Linux /home/<user>/.dbvis/dbvis.license
Mac OS X /Users/<user>/.dbvis/dbvis.license
2.6 Creating a Connection - basics
To access a database with DbVisualizer, you must first create and setup a Database Connection. The easiest way to set up a connection is to use the Connection Wizard, but you can also do it manually.
Using the Connection Wizard (see page 17) Setting Up a Connection Manually (see page 21)
2.6.1 Using the Connection Wizard
Launch the wizard from Database->Create Database Connection and click Use Wizard when prompted ,
DbVisualizer 9.2 Users Guide
3. Select an installed JDBC driver (marked with a green checkmark) on the second wizard page (see for how to install a JDBC driver manually),
DbVisualizer 9.2 Users Guide
4.
The JDBC-ODBC bridge driver is not intended for production use and is known to be limited and unreliable. Use it only if there is no pure JDBC driver for your database.
DbVisualizer 9.2 Users Guide
5. 6.
Verify that a network connection can be established to the specified address and port by clicking the Ping button,
Server
If Ping Server shows that the server can be reached, click the Finish button to create the connection.
See Fixing Connection Issues (see page 402) for some tips if you have problems connecting to the database.
The information about the database server that needs to be entered depends on the which JDBC driver you use. For most drivers, you need to specify:
Field Description
1.
Field Description
Database Port The TCP/IP port used by the database.
Database Userid The database user account name. Enter (null) to not send an account name. Database Password The database user account password. Enter (null) to not send a password.
For some database such as Oracle, you may use a TNS name (see page 297) instead of specifying the server and port. Other drivers may add more fields that are driver specific.
You may also optionally specify SSH tunneling information (see page 294) and Options, such as:
Option Description
Auto Commit Check if you want to enable auto commit in the SQL Commander by default for the connection.
Save Database Password
Check if you want the password to be saved (encrypted) between sessions.
Connection Mode One of Development Test, or or Production to select which set of Permissions (see
to use.
page 282)
Additional options are available for some JDBC drivers, such as Authentication Method (see page 298) for the SQL Server jTDS driver.
See the Configuring Connection Properties (see page 282) page for related topics.
2.6.2 Setting Up a Connection Manually
Create a new connection from Database->Create Database Connection and click No Wizard when prompted. An Object View tab for the new connection is opened,
DbVisualizer 9.2 Users Guide
2. 3. 4. 5. 6. 7.
Enter a name for the connection in the Name field, Leave the Database Type as Auto Detect,
Select an installed JDBC driver (marked with a green checkmark) from the Driver (JDBC) list (see for how to install a JDBC driver manually),
Installing a JDBC Driver (see page 409)
Enter information about the database server in the remaining fields (see below for details),
Verify that a network connection can be established to the specified address and port by clicking the Ping button,
Server
If Ping Server shows that the server can be reached, click Connect to actually connect to the database server.
See Fixing Connection Issues (see page 402) for some tips if you have problems connecting to the database.
Alternatively, you can set the Settings Format to Database URL (this is the only choice for some custom JDBC drivers). This replaces the fields for information about the database server with a single Database URL field, where you can enter the JDBC URL.
The information about the database server that needs to be entered depends on the which JDBC driver you use. For most drivers, you need to specify:
Field Description
Database Server The IP address or DNS name for the server where the database runs. Database Port The TCP/IP port used by the database.
Database Userid The database user account name. Enter (null) to not send an account name. Database Password The database user account password. Enter (null) to not send a password.
For some database such as Oracle, you may use a TNS name (see page 297) instead of specifying the server and port. Other drivers may add more fields that are driver specific.
You may also optionally specify SSH tunneling information (see page 294) and Options, such as:
Option Description
Auto Commit Check if you want to enable auto commit in the SQL Commander by default for the connection.
Save Database Password
Check if you want the password to be saved (encrypted) between sessions.
Connection Mode One of Development Test, or or Production to select which set of Permissions (see
to use.
page 282)
Additional options are available for some JDBC drivers, such as Authentication Method (see page 298) for the SQL Server jTDS driver.
See the Configuring Connection Properties (see page 282) page for related topics.
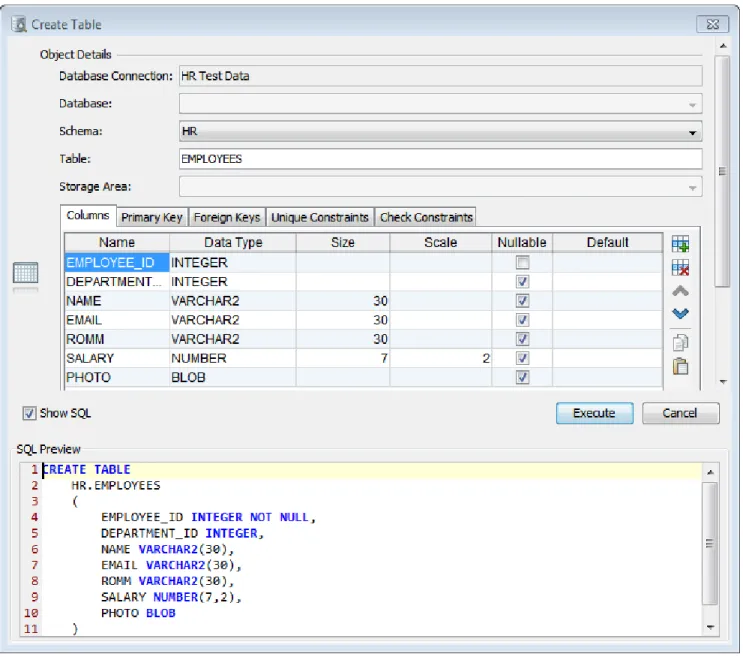
2.7 Creating a Table - basics
1. 2.
3. 4.
1.
To create a new table:
Expand nodes in the Databases tab tree under the connection node until you reach the Tables node, Select the Tables node and launch the Create Table dialog from the right-click menu:
Add columns and constraints in the different tabs, Click the Execute button to create the table.
You can learn more about the Create Table dialog in the Creating a Table (see page 58) page.
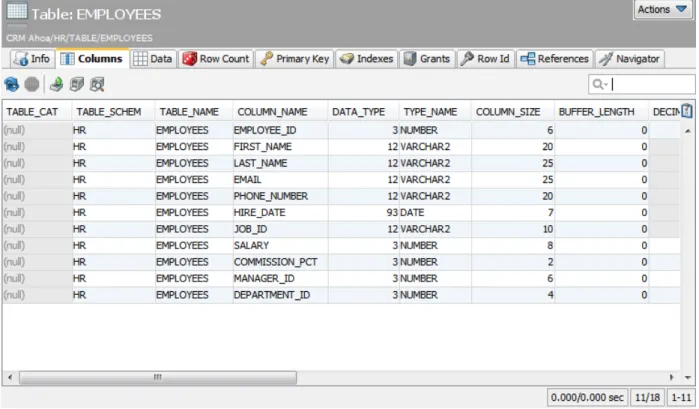
2.8 Viewing a Table - basics
To view details about a database table:
The Object View has a number of sub tabs. Exactly which sub tabs are available depends on the database type, but these are common:
Subtab Description
Info Brief information about the table.
Columns Information about all table columns, e.g. data types and sizes.
Data Then table data. Here you can view (see page 80) and edit (see page 92) the data. Row Count The number of rows in the table.
Primary Keys
Information about the table's primary key columns, if any.
Indexes Information about the table's indexes, if any. Grants Information about granted privileges for the table. DDL Shows the CREATE statement for the table.
References Shows declared primary/foreign key relationships to other tables. Please read more in Viewing
.
1. 2. 3.
4. 5.
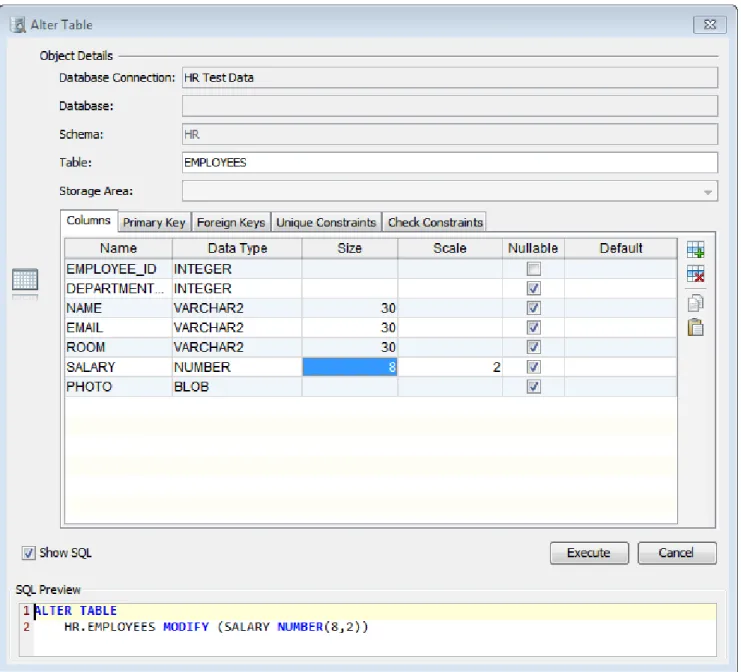
2.9 Editing a Table - basics
Only in DbVisualizer Pro
This feature is only available in the Pro edition. In the Free edition, please execute the corresponding SQL in the SQL Commander (see page 155).
To edit table data:
Expand nodes in the Databases tab tree under the connection node until you find the table, Double-click on the table node to open its Object View tab,
Open the Data sub tab
Edit column values directly in the grid, add and remove rows by clicking on the buttons in the toolbar, Save the edited data by clicking on the Save button in the toolbar.
Note that if the table does not have any declared Primary Key, you will be prompted to select the column(s) that uniquely identify a row.
1.
2. 3. 4. 5.
2.10 Executing SQL - basics
To execute SQL statements:
Open an SQL Commander window from SQL Commander->New SQL Commander or by clicking the button in the main toolbar,
New SQL Commander
Select the database connection, catalog and schema to use, Enter the SQL statements in the editor area,
Execute the statements by clicking the Execute button in the toolbar or choosing SQL Commander-> Execute,
The execution log and possible result sets are shown as tabs in the results area below the editor. You can learn more about editing, saving and executing SQL statements in the Working with SQL (see page
section.
155)
1.
2.
Open Help->Check for Updates,
Change the interval to one of Every Start-Up Daily Weekly Monthly, , , or Never, or click the Check Now button to see if there is a new versions available right now.
If you are interested in getting information about Beta versions to help us fine tune upcoming versions, check the corresponding checkbox. By default, Beta versions are not considered when checking for updates (unless you are already running a Beta version).
If a newer version is available, a dialog is displayed from where you can install the new version, read release notes, or in case your license is not valid for the new version, open our purchase page in your web browser.
Upgrading the currently used version is done by clicking the Upgrade link in the above dialog and then follow the instructions.
In some organizations, decisions about about software versions and installation is handled as a centralized process and individual users not allowed to upgrade or install software. The Check for Update feature and auto-update of new versions can be disabled by adding the following row in the
:
DBVIS-HOME/resources/dbvis-custom.prefs
dbvis.url.checkforupdate=
With this setting, no entry for Check for Update will appear in the Help menu.
2.12 Printing
DbVisualizer supports printing of grids, graphs, charts and plain text, such as the content of an SQL Editor. The print dialog looks somewhat different depending on what is printed. In all cases, you launch the print dialog by clicking on the Print button in the toolbar for the object you want to print, or by choosing Print from the
right-click menu. The right-click menu also contains a Print Preview choice, if you want to see what the printout will look like before you actually print.
Printer Setup (see page 30)
Printing a Grid, a Chart and Plain Text (see page 30) Printing a Graph (see page 30)
2.12.1 Printer Setup
If you want to set the page orientation (e.g., portrait or landscape) and paper size, you must launch the Printer Setup dialog, using the File->Printer Setup main menu option, before you print. Printing varies widely between platforms, so even though the Print dialog (as opposed to the Printer Setup dialog) on some platforms also lets you choose a page orientation and other options, they may be ignored if specified in that dialog. The only supported way to specify the page orientation and other options is via the Printer Setup dialog.
2.12.2 Printing a Grid, a Chart and Plain Text
For a grid, chart and plain text, DbVisualizer launches the platform's native Print dialog, so it looks different on different platforms. The two options available on all platforms are a choice of printer and the page range. On some platforms, the dialog may offer additional options, but they may be ignored by DbVisualizer. Use the Printer Setup dialog to set other options besides which printer to use and the page range, as described above When you print a grid in DbVisualizer, the grid is printed as it is shown on the screen, i.e., with the table headers , sort and primary key indicator, etc. It is printed as a screenshot that may span several pages, depending on the number of rows and columns that are printed. For a grid, the right-click menu contains a Print Selection choice that you can use if you just want to print selected rows and columns.
An alternative to printing a grid as a screenshot is to export the grid to HTML and then use a web browser to print it.
Printing a chart scales the chart to the size of the paper. Plain text is printed as-is and may span multiple pages, both in height and width.
2.12.3 Printing a Graph
Printing a graph adds a custom dialog before the native Print dialog is displayed. You can specify the number of rows (pages) and columns (pages) that the complete image will be split into. You can also select whether the view as it appears on the screen or the complete graph should be printed. When you click Ok, the native Print dialog is displayed, where you can select the printer.
2.12.4 Print Preview
3 Getting the Most Out of the GUI
DbVisualizer has a tab-based user interface that gives you a lot of control over the layout and how to work with your database objects. This section describes how you can open as many tabs as you need, arrange them to focus on what is important to you, and more.
3.1 Main Window Layout
The DbVisualizer GUI main window contains a navigation area to the left and an area for working with database objects and scripts to the right.
At the top of the window, you find the main menus and a toolbar.
Tooltips are used to provide more details about a component throughout the GUI. They are also used to express status information. An example is the grid column header tooltip that shows information about the column. To see a tooltip, let the mouse hover over an area of the user interface, e.g., a button or grid header. If there is a
3.2 Tab Types
There are three main types of tabs in DbVisualizer:
Navigation Tabs (see page 33) Object View Tabs (see page 34) SQL Commander Tabs (see page 35)
3.2.1 Navigation Tabs
The left part of the DbVisualizer window holds a navigation area with three tabs: Databases Scripts, and . They all contain an object tree where you can select the objects you want to work with.
Favorites
The Databases tab tree contains you database connections at the top and, when connected, the database objects they contain. If you have many database connections, you can also create folder objects in this tree to organize them.
The Scripts tab tree contains Bookmarks and Monitors, see the Managing Frequently Used SQL (see page 185
and the pages for details.
) Monitoring Data Changes (see page 264)
Finally, the Favorites tab tree contains objects that you want to have easy access to, either database objects ( such as tables, views, or procedures) or scripts. You can read more about Favorites in the Favorites (see page
page.
3.2.2 Object View Tabs
An Object View tab shows information about a database object, such as the data and DDL for a table, or the source code for a stored procedure. The different types of information are shown as sub tabs within the Object View tab.
3.2.3 SQL Commander Tabs
An SQL Commander tab contains an editor for editing SQL scripts, controls for executing the script and a results area with a Log tab and possibly Result Set tabs and a DMBS Output tab.
3.3 Opening a Tab
You can open an object by double-clicking on the object node, or by pressing Enter with the node selected, in all navigation tab trees. This opens either an Object View tab or an SQL Commander tab, depending on the object type: database object or script.
By default, a database object is opened in an Object View tab that is "available," meaning it is not pinned, busy running a task, or contains pending edits. The current tab is choosen if it is available, otherwise any other available tab is used. If none of the tabs is available, a new tab is created for the object. You can change this behavior in the General/Tabs category in Tools->Tool Properties, so that a new tab is always used instead of using an available tab.
If a tab is already open for the object, it is made the active tab. An alternative to double-clicking a database object is to use the Open in Tab choice from the node's right-click menu. Open in Tab is also available in the
drop-down menu button in the tab toolbar.
Open Object Databases
If you want to open a database object in a new tab instead of an available tab, hold down the Alt key when you double-click the node, use the Open in New Tab choice from the node's right-click menu or from the Open
drop-down menu button in the tab toolbar. The drop-down button keeps the last choice as
Object Databases
the default, so once you have choosed Open in New Tab once, you only need to click the button to do the same.
Both Open in Tab and Open in New Tab can also be used when multiple nodes are selected in the tree to open multiple tabs in one go.
To replace the content in a specific Object View tab with information for another object, drag the node for the new object from the object tree and drop it on the Object View tab header.
Scripts (Bookmarks and Monitors) are always opened in a new SQL Commander tab unless the script is already opened in a tab. If so, that tab is activated instead. An alternative to double-clicking the node is to use
in the right-click menu or the corresponding button in the tab toolbar. The
Open in SQL Commander Scripts
righ-click menu also holds an Open in SQL Commander and Execute choice.
A new, empty SQL Commander tab is created by clicking the Create SQL Commander button in the main toolbar or using the corresponding File menu item. You can use this kind of SQL Commander tab for ad-hoc statement execution or to create a new script.
SQL Commander tabs can also be opened for files in the file system. Click the Open File button in the main toolbar or choose File->Open to open the file chooser window and select one of more files. Alternatively, you can drag files from your platform's file browser and drop them in the main toolbar area.
Only in DbVisualizer Pro
Multiple SQL Commander tabs are only available in the DbVisualizer Pro edition.
3.4 Pinning a Tab
To prevent an Object View tab to be reused for another object or to prevent any tab to be removed unless you explicitly asks for it, you can "pin" it. In the right-click menu for a tab you find a Pin Tab toggle to accomplish this .
You can also click on the icon in the tab header as a shortcut for toggling between the "pinned" and "unpinned" states.
3.5 Closing a Tab
A top level tab and a Result Set tab in an SQL Commander tab can be closed by clicking the cross to the right of the tab label, or clicking the tab header with the middle mouse button.
If you want to close a number of tabs at the same time, you can use the tab header menu choices: Close Tab Close just the current tab.
Close Other Tabs
Close Closeable Tabs
Close all tabs that are in a state where they can be closed with no action required by the user, e.g. not pinned and no pending edits.
Close All Pinned Tabs
Close all pinned tabs.
Close All Tabs Close all tabs, regardless of state
You can also hide Object View sub tabs that you are not interested in. Use the Close Tab right-click menu choice to do so. To see the hidden tabs again, use Restore Hidden Tabs in the right-click menu.
3.6 Listing Open Tabs
If you have many tabs opened, there may not be room enough to show them all at the same time. In this case, you can scroll through them using the arrow buttons that appear to the right of the tabs. It is, however, often faster to locate the tab you want to work with by clicking the list icon next to the arrow buttons. This brings up a list of all open tabs so you can select the one you want directly.
3.7 Maximizing and Minimizing a Tab
The three Navigation tabs can be minimized either by double-clicking on the tab header or using Minimize Tab in the tab's right-click menu. Clicking on a minimized tab brings it back to its regular place and size again. All other tabs can be maximized by double-clicking on the tab header or using Maximize Tab in the tab's right-click menu. When you maximize a tab, the Navigation tabs are minimized to make as much room as possible available and the tab you maximized fills all available space. Double-clicking on the the tab again restores all tabs back to their original size.
An icon in the main status bar indicates when a tab is maximized. An alternative for restoring the original size of all tabs is to double-click on this icon.
3.8 Floating a Tab
Sometimes it is handy to break up the user interface in multiple freestanding windows. Every tab in DbVisualizer can be placed in a separate window by "floating" the tab. Use the Floating menu choice in the tab header right-click menu to float the tab in a separate window.
When you close a floating tab, a dialog is displayed where you can choose to really close the tab or restore it back into the main window.
3.9 Rearranging Tabs
When you drag a tab, and outline of the tab borders shows what will happen when you drop it: place it in above, below or next to another tab, or simply move it to another location among its siblings.
The tab header right-click menu also has a couple of choices for arranging all tabs at the same level as either " tiled" (the content of all tabs visible side-by-side) or "collapsed" (only the content of the active tab visible).
You can save your rearranged layout of an Object View tab so that it is applied for all objects of the the same type for the same database type. In the sub tab header right-click menu, just select Save as Default Layout. To restore the default layout, use Reset to Factory Layout.
Only in DbVisualizer Pro
This feature is only available in the DbVisualizer Pro edition.
3.10 Changing the Tab Label
The tab labels are set based on a pattern that you can change in Tools->Tool Properties, in the Appearance/ category.
Tabs
You can select one of the predefined patterns or create your own by editing the pattern. The variables available for these patterns are:
Variable Available For Description ${connectionname
}
All Connection name
${filename} SQL Commander
Tabs
Script filename, or "Untitled" if no file is loaded
${index} All A unique index
${longfilename} SQL Commander Tabs
Absolute path for the script, or "Untitled" if no file is loaded
${objectname} Object View Tabs Object name
${objecttype} Object View Tabs Object type, e.g. Table, View etc.
${catalog} Object View Tabs The database (if any) for the currently open object ${schema} Object View Tabs The schema (if any) for the currently open object ${rows} Result Set Tabs Number of rows in the result set
${sql} Result Set Tabs Part of the SQL statement that produced the result set
${table} Result Set Tabs Name of the table (first if more than one) the result set comes from
${time} Result Set Tabs Time when the result set was produced
${userid} All Userid used for the connection
${vendor} Result Set Tabs Database vendor name
You can also manually change the label for Object View, SQL Commander and Result Set tabs, using the menu choice in the tab right-click menu.
Rename
3.11 Selecting a Node for a Tab
To quickly navigate to and select the node in the Databases tab tree that an Object View tab belongs to, you can click on the object path in the Object View header area. Alternatively, you can use Select in Databases
in the tab right-click menu. Tab
Similarly, you can navigate to the object represented by a Favorite object using its Select Target Object right-click menu choice. It selects the object in the Databases or Scripts tab, depending on the Favorite type.
1. 2. 3. 4.
For an SQL Commander tab that is associated with a connection, you can use Select in Databases Tab in the tab right-click menu to select the connection node.
3.12 Preserving Tabs Between Sessions
If you often work with the same objects and a few scripts, you can ensure that the Object View and SQL Commander tabs for these objects remain open between DbVisualizer sessions.
Open Tools->Tool Properties,
Select the Appearance/Tabs category,
Enable one or both of Preserve SQL Commander tabs between Sessions and Preserve Object View ,
tabs between Sessions
Click Apply or OK to apply the new settings.
This feature is enabled by default for SQL Commander tabs but not for Object View tabs.
The content of the SQL Commander tabs is saved at regular intervals so when you restart DbVisualizer, the content is the same as where you left off.
For Object View tabs, you can also enable Preserve Object View tabs at Disconnect. By default, Object View tabs for objects that belong to a connection are closed when it is disconnected.
3.13 Using Tab Colors and Borders
Only in DbVisualizer Pro
This feature is only available in the DbVisualizer Pro edition.
If you like to distinguish tabs and other GUI components for a specific connection from those of others, you can specify a tab background color and/or border to use for a connection. If you set these in the Tool Properties window, they apply to all connections with the corresponding database type. Therefore these properties are typically set in the Properties tab for a specific connection instead.
For the border, you can either select one of the predefined styles or specify a small image file to use for the border.
The selected color and border are also shown in the connection tab node in the Databases tab and in the Database Connection list in the SQL Commander.
1. 2.
3.14 Changing the GUI Apperance
To change how the DbVisualizer GUI is displayed: Open Tools->Tool Properties,
Select the Appearance category under the General tab.
Here you can select a different Look and Feel and adjust the size and use of icons.
In the subcategories Fonts and Colors you can adjust the fonts used for different parts of the GUI and the colors used to highlight grid elements.
The main View menu also contains a number of toggle controls for showing or hiding GUI elements, such as toolbars and status bars.
3.15 Changing Keyboard Shortcuts
systems. These key maps cannot be deleted or modified. To customize key bindings, copy an existing key map and make your changes.
All user defined key maps are stored in your $HOME/.dbvis/config70/keymaps directory. A key map file contain only the differences between the copied key map and the current.
To create a new key map, select the map you want to copy and click the Make Copy button. Set a name on the new key map and activate it with the Set Active button. The newly created key map now has the exact same key bindings as the parent key map.
The action list is organized in folders. The Editor Commands folder lists all actions available in the SQL Commander editor and their current key bindings. The Main Menu folder contains subfolders, each representing a main window menu. The other folders group feature specific actions, such as actions to control the references graph, form editor, etc.
To modify the key bindings for an action, select the action from the action list. The current key bindings are listed in the Key Bindings list.
The keystroke dialog controls whether a key binding is already assigned somewhere else. If there is a conflict with another binding, the Conflicts area shows the names of the actions that are conflicting. The modifier keys Shift, Alt, Ctrl and Command can be used to form the final key binding.
4 Managing Database Objects
4.1 Opening a Database Object
To open an Object View tab with the details for a database connection or for a specific database object, the simplest way is to double-click the object node in the Databases tab. For more information about tabs check the
section.
Opening a Tab (see page 36)
4.2 Perform Actions on Multiple Database Objects
The actions menu for a database object in the Databases tab consists of actions that are available for the selected object type. Some of the operations are common for any currently selected object while others are only available for the current object. Sometimes it is convenient to run a single action on multiple nodes at once. To do this, select the nodes (make sure all are of the same object type) and then right-click in the object list. The menu will now highlight those actions that are valid to use.
Choosing for example the Drop Table action shows the following window in which the drop can then be performed on multiple tables.
1.
2.
4.3 Filtering Database Objects
Only in DbVisualizer Pro
This feature is only available in the DbVisualizer Pro edition.
Object Filtering (see page 51)
Inline Objects Filtering (see page 52) Object Type Visibility (see page 53)
Temporarily Disable Filtering (see page 55) Filter Sets (see page 56)
Switching Filter Set (see page 57)
Show Only Default Database/Schema filter (see page 57)
Managing what database objects are listed in the Databases tab is done at two levels: Objects Filtering
Defines what individual object nodes are listed for a specific object type. This allows filtering on for example Table objects so that only tables matching a condition are listed.
Object Type Visibility
Defines what object types such as views, tables, indexes, procedures, etc. are listed. Every database in DbVisualizer supports all sorts of database objects. Having the ability to hide some object types makes it
The Filter Editor is used to manage both object type visibility and object filters. The Filter Editor is opened from one of:
Database main menu and the Database Objects Filters->Open Filter Editor
Right-click in the Databases tab and chose Database Objects Filters->Open Filter Editor Click the drop-down button on the funnel icon in the Databases tab toolbar and chose Open Filter
. Editor
Managing filters and opening the filter editor requires that a node is selected in the Databases tab tree and that the related database connection is connected.