Backup and Restore of SAP Systems on
Amazon Web Services Infrastructure
For MaxDB and DB2 LUW Databases on Linux
Authors:
Amazon Web Services
sap-‐on-‐[email protected]
Protera Technologies
http://www.protera.biz
Version:
1.6 – March 2012
Table of Contents
Prerequisite Documents ... 4
SAP on Amazon Web Services ... 4
SAP on MaxDB ... 4
SAP on DB2 UDB ... 4
Scope of this Document ... 5
Components for SAP Backup and Restore on AWS infrastructure ... 5
Amazon Elastic Compute Cloud (EC2) ... 5
Amazon Simple Storage Service (Amazon S3) ... 5
Amazon Elastic Block Storage (EBS) ... 6
Amazon Virtual Private Cloud (VPC) ... 6
Storage layout of SAP systems on EBS volumes ... 6
Backup and Restore procedures using AWS infrastructure ... 8
SAP on MaxDB backups using AWS Infrastructure ... 8
SAP on DB2 backups using AWS Infrastructure ... 10
Restore ... 11
Common backup and restore operations on Amazon EC2 instances and EBS volumes ... 11
Backup: creating a new EBS volume with an empty file system ... 11
Backup: creating an EBS snapshot onto Amazon S3 of an EBS volume ... 12
Backup: dismounting file system(s) and detaching an EBS Volume ... 12
Backup: creating a full offline Amazon EC2 Amazon Machine Image (AMI) ... 12
Detailed steps to create the Amazon Machine Image (AMI) ... 13
Examples for backing up SAP System components using AWS infrastructure ... 14
Example 1: database backup to an EBS backup file system ... 14
Example 1a: full online data and log backup for MaxDB ... 15
Create MaxDB backup templates ... 15
Back up the database using Database Studio ... 16
Back up the database transaction logs using Database Studio ... 16
Schedule hourly automatic log backup using Database Studio ... 16
Create a snapshot to send the backup to Amazon S3 ... 17
Example 1b: full online backup for DB2 LUW ... 17
Steps to enable rollforward recovery and set up DB2 logfile management: ... 17
Option 1: back up the database directly from the SAP system ... 18
Option 2: back up the database using the CLI ... 18
DB2 transaction log file management ... 19
Create a snapshot to send the backup to Amazon S3 ... 19
Example 2: OS backup to S3 using the TAR command ... 20
Examples for restoring SAP systems using AWS infrastructure ... 22
Example 1: restore OS from Amazon S3 using TAR ... 22
Create an Amazon instance using the “golden backup” AMI of the original system ... 22
Recreate the file systems required for the recovery ... 22
Restore the OS ... 23
Reboot the instance ... 24
Example 2: Restoring and Recovering the Database from Amazon S3 ... 24
Example 2a: MaxDB restore and recovery from Amazon S3 ... 25
Example 2b: DB2 LUW restore and recovery from Amazon S3 ... 29
Prerequisite Documents
The following information should be read carefully before continuing with this guide. Especially, this document cannot serve as a replacement for the MaxDB and DB2 Backup and Restore information resources that are referenced below.
SAP on Amazon Web Services
• SAP on AWS Implementation Guide http://aws.amazon.com/sap
Information on deploying SAP systems on AWS Infrastructure
• SAP note 1588667 – SAP on Amazon Web Services (AWS)
Entry SAP note for Amazon Web Services
• SAP note 1677381 – Backup and Restore guidelines
Errata and feedback reference for this guide
SAP on MaxDB
• MaxDB Backup and Restore
SAP SDN page on MaxDB Backup and Restore
• SAP Library – Database Studio – Backing up Databases: Overview
SAP Library documentation on MaxDB Backup and Restore
• SAP note 1377148 -‐-‐ FAQ: SAP MaxDB backup/recovery
Answers to Frequently Asked Questions on SAP MaxDB backup and recovery
• SAP note 767598 -‐-‐ Available SAP MaxDB documentation
General overview of SAP MaxDB documentation
SAP on DB2 UDB
• Database Administration Guide "SAP on IBM DB2 for Linux, Unix and Windows"
This document provides specific information about the administration of IBM DB2 for Linux, UNIX, and Windows (in the following referred to as DB2) in an SAP environment. In addition, it provides references to additional documentation and guidelines as well as recommendations from SAP that are only available in this document. It also helps you to plan, install, and maintain SAP systems and the database.
• IBM DB2 Universal Database for UNIX and Windows -‐ New Log File Management
This documentation describes the concepts of the new DB2 log file management and how you can migrate from the existing SAP DB2 log file management solution to the DB2 V8.2 log file management solution.
• A Practical Guide to Backup and Recovery of IBM DB2 for Linux, UNIX and Windows in SAP Environments
Introduction to the basics of backup and recovery for DB2 databases. This guide explains the architecture for backup and recovery, the most relevant commands and discusses the DB2 log file management. In addition, the integration of the DB2 backup and recovery architecture into SAP NetWeaver is described.
Scope of this Document
This document will cover backing up and restoring of a SAP ECC 6.0 system on MaxDB or DB2 on SLES in the Amazon AWS environment. Steps for performing both OS and Database backups for MaxDB and DB2 are provided.
Amazon Elastic Block Store (EBS) snapshots are point in time images of volumes which are persisted to Amazon S3. These snapshots can be used as the starting point for new Amazon EBS volumes, and protect data for long-‐term durability. The same snapshot can be used to instantiate as many volumes as desired.
Database and OS backups can be accomplished via provided OS and DBMS backup tools and in addition utilizing Amazon EBS snapshots to secure these backups. Complete offline system backups to a so called Amazon machine Image (AMI) will also be described.
Components for SAP Backup and Restore on AWS infrastructure
Apart from an SAP system on a platform that is supported by SAP on Amazon Web Services (AWS) infrastructure, the following AWS products are required to perform the backup and restore operations that are described in this document.
• Amazon Elastic Compute Cloud (Amazon EC2) • Amazon Elastic Block Storage (EBS)
• Amazon Simple Storage Service (Amazon S3)
• Indirectly: Amazon Virtual Private Cloud (Amazon VPC)
Amazon Elastic Compute Cloud (EC2)
Amazon Elastic Compute Cloud (Amazon EC2) is a web service that provides resizable compute capacity in the cloud. Amazon EC2 presents a virtual computing environment, allowing one to use web service interfaces to launch instances with a variety of pre-‐imaged operating systems, load them with an own custom application environment and manage network’s access permissions. A customized image can be persisted as own Amazon Machine Image (AMI), and can be redeployed to as many or few instances as desired.
Amazon EC2 provides different instance types to meet different computing needs. The specific Amazon EC2 instance types that are currently supported for SAP application deployments are listed in SAP note 1588667.
Further information on Amazon EC2 can be found at http://aws.amazon.com/ec2/.
Amazon Simple Storage Service (Amazon S3)
Amazon S3 is storage for the Internet. Amazon S3 provides a simple web services interface that can be used to store and retrieve any amount of data, at any time, from anywhere on the web. The service is
also designed to provide 99.999999999% durability and 99.99% availability over a given year. These and other Amazon S3 properties make it the ideal storage for enterprise backups.
Further information on Amazon S3 can be found at http://aws.amazon.com/s3/.
Amazon Elastic Block Storage (EBS)
Amazon Elastic Block Store (EBS) provides block level storage volumes for use with Amazon EC2 instances. EBS volumes are off-‐instance storage that persists independently from the life of an EC2 instance. EBS provides highly available, highly reliable storage volumes that can be attached to a running Amazon EC2 instance and exposed as a device within the instance.
EBS also provides the ability to create point-‐in-‐time snapshots of volumes, which are persisted to Amazon S3. These snapshots can be used as the starting point for new EBS volumes, and protect data for long-‐term durability. The same snapshot can be used to instantiate as many volumes as required. Further information on EBS can be found at http://aws.amazon.com/ebs/.
Amazon Virtual Private Cloud (VPC)
Amazon Virtual Private Cloud (Amazon VPC) lets one provision a private, isolated section of the Amazon Web Services (AWS) Cloud, where AWS resources like Amazon EC2 instances and EBS volumes can be launched in a self-‐defined virtual network. With Amazon VPC, a virtual network can be defined that closely resembles, and can be connected securely to, the own traditional on-‐premise network.
Amazon VPC is not a direct prerequisite for the backup-‐ and restore-‐operations that are described in this guide. However, SAP systems themselves are only supported on Amazon Web Services infrastructure when deployed within an Amazon VPC.
Further information on Amazon VPC can be found at http://aws.amazon.com/vpc/.
Storage layout of SAP systems on EBS volumes
Foremost, please refer to the White Paper for SAP Systems on Amazon AWS as a baseline guide on building SAP systems on AWS. The most recent version of this document can accessed at
http://media.amazonwebservices.com/Operating%20SAP%20Solutions%20on%20AWS%20White%20Pa per.pdf.
It is recommended to separate OS, SAP, DBMS, DB Data and DB transaction log components onto different EBS volumes. In addition, separate file systems will be used to store the following types of backups on MaxDB:
1. OS, SAP and DBMS system backups (binaries, profiles, etc.) 2. Full and/or incremental database data backups
3. Database transaction log backups
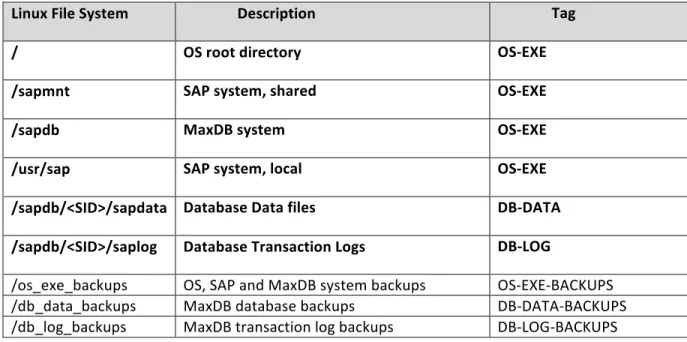
Table 1: A recommended file system layout for an SAP system on MaxDB on linux
Note that file systems printed in bold belong to the usual SAP system, and the other file systems are additional ones to store backups. The tags will be used in the following sections to
distinguish the file system groups.
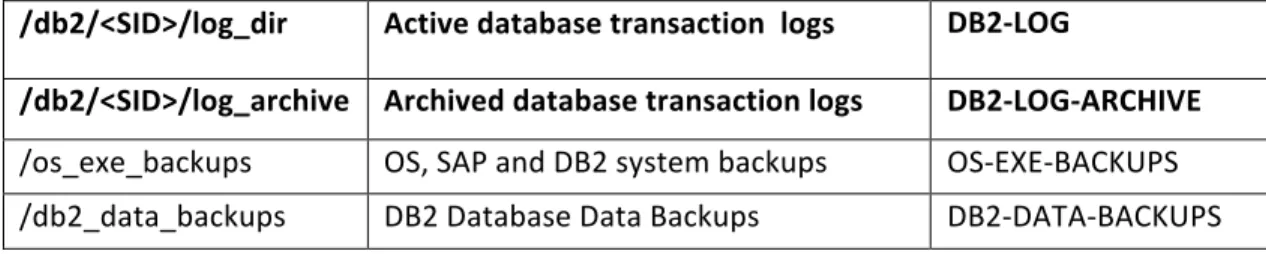
As DB2 can be configured to have a separate file system to archive its transaction logs
automatically, a file system for transaction log backups like we have on MaxDB is not required for DB2. Table 2 shows how a recommended file system layout could look like for DB2 on Linux.
Table 2: A recommended file system layout for an SAP system on DB2 on Linux
Linux File System Description Tags
/ OS root directory OS-‐EXE
/sapmnt SAP system, shared OS-‐EXE
/db2 DB2 LUW binaries, configuration and trace files
DB2-‐EXE
/usr/sap SAP system, local OS-‐EXE
/db2/<SID>/sapdata1 :
/db2/<SID>/sapdata<n>
Database data files DB2-‐DATA
Linux File System Description Tag
/ OS root directory OS-‐EXE
/sapmnt SAP system, shared OS-‐EXE
/sapdb MaxDB system OS-‐EXE
/usr/sap SAP system, local OS-‐EXE
/sapdb/<SID>/sapdata Database Data files DB-‐DATA /sapdb/<SID>/saplog Database Transaction Logs DB-‐LOG
/os_exe_backups OS, SAP and MaxDB system backups OS-‐EXE-‐BACKUPS /db_data_backups MaxDB database backups DB-‐DATA-‐BACKUPS /db_log_backups MaxDB transaction log backups DB-‐LOG-‐BACKUPS
/db2/<SID>/log_dir Active database transaction logs DB2-‐LOG
/db2/<SID>/log_archive Archived database transaction logs DB2-‐LOG-‐ARCHIVE /os_exe_backups OS, SAP and DB2 system backups OS-‐EXE-‐BACKUPS /db2_data_backups DB2 Database Data Backups DB2-‐DATA-‐BACKUPS
Note that the file system for MaxDB transaction log backups /db_log_backups in Table 1 been replaced by /db2/<SID>/log_archive for DB2 (Table 2). The content of this DB2 file systems is managed by the DB2 RDBMS itself.
Backup and Restore procedures using AWS infrastructure
Apart from creating a full offline Amazon EC2 machine image, the following generalized procedure will be used to create more fine-‐grained and online backups:
1. Create a classical backup to a separate staging file system (on EBS storage) 2. Create an EBS snapshot of the staging file system
An EBS snapshot is automatically persisted onto highly available Amazon S3 storage. Multiple snapshots of a file system will be stored incrementally, which means that only changed blocks with respect to the previous snapshot will be stored to Amazon S3.
The following sections will apply the above described general procedure to the different backup types for SAP systems on MaxDB or DB2.
SAP on MaxDB backups using AWS Infrastructure
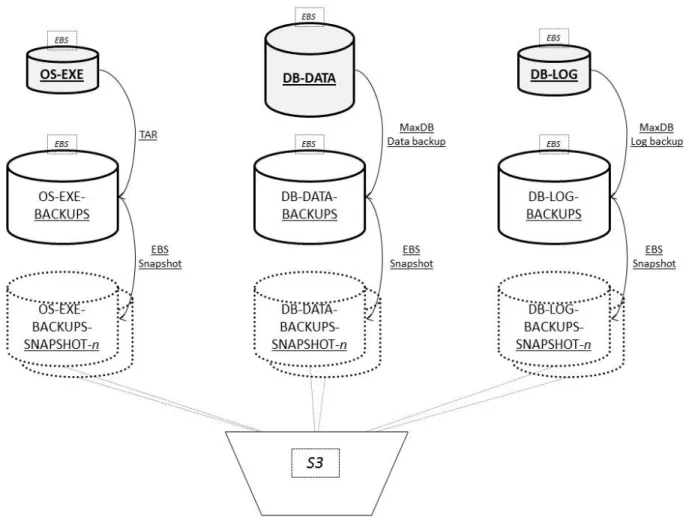
Figure 1 illustrates the previously described backup procedure as applied to an SAP system installed on MaxDB on Linux.
Figure 1: SAP on MaxDB, overview of backup types and procedures using AWS infrastructure
In the figure, each file system tag listed in Table 1 is represented by an EBS volume symbol. The following 3 types of backup sequences are displayed:
1. OS-‐EXE: backup of the OS-‐EXE file systems to the OS-‐EXE-‐BACKUPS file system, using an OS specific copy program like tar on Linux. Subsequent persistence into Amazon S3 by creating a snapshot of the EBS volume that holds the OS-‐EXE-‐BACKUPS file system.
2. DB-‐DATA: MaxDB COMPLETE or INCREMENTAL backup to the DB-‐DATA-‐BACKUPS file system. Subsequent persistence onto Amazon S3 by creating an EBS snapshot of the volume that holds the DB-‐DATA-‐BACKUPS file system.
NOTE: DIRECT SNAPSHOTS OF DB-‐DATA AND DB-‐LOG VOLUMES ARE ALSO POSSIBLE USING MAXDB I/O SUSPEND/RESUME FUNCTIONALITY, BUT THESE METHODS ARE NOT WITHIN THE SCOPE OF THIS GUIDE.
3. DB-‐LOG: MaxDB LOG backup to the DB-‐LOG-‐BACKUPS file system. Subsequent persistence into Amazon S3 by creating an EBS snapshot of the volume that holds the DB-‐LOG-‐BACKUPS file system.
NOTE: MAXDB LOG BACKUPS CAN ALSO BE AUTOMATED USING ITS AUTOSAVE LOG MECHANISM. THIS WILL BE DESCRIBED LATER IN THIS GUIDE.
SAP on DB2 backups using AWS Infrastructure
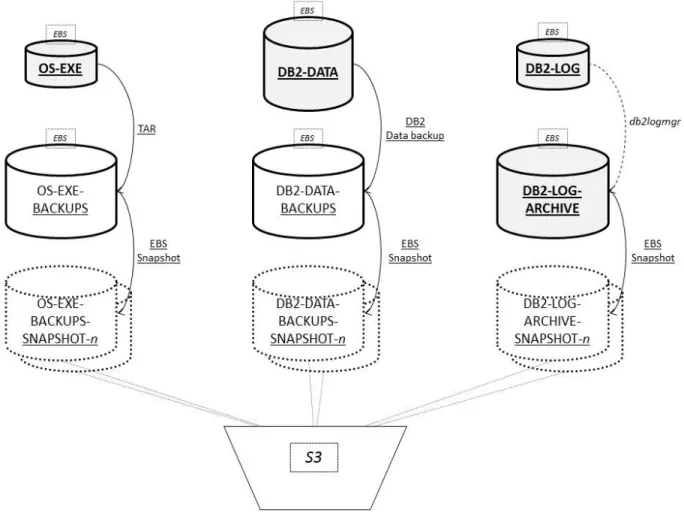
Similar as for MaxDB, Figure 2 displays the data types and its associated backups of an SAP system on DB2 on Linux.
Figure 2: SAP on DB2, overview of backup types and procedures using AWS infrastructure
As mentioned before in the section “Storage layout of SAP systems on EBS volumes”, DB2 functionality is used to manage transaction log archiving itself to the DB2-‐LOG-‐ARCHIVE file system, which also resides on an EBS volume (Figure 2). Direct EBS snapshots can be made of this file system, so that its contents are regularly persisted onto Amazon S3 storage. It is recommended to create an EBS snapshot of the associated volume each time a new transaction log has been archived into the DB2-‐LOG-‐ARCHIVE file system.
Note that EBS snapshots are written incrementally to Amazon S3, differential to the previous snapshot, which means that previously snapshotted data are not stored over and over again, just once. This makes the snapshot procedure fast and cost efficient.
1. OS-‐EXE: backup of the OS-‐EXE file systems to the OS-‐EXE-‐BACKUPS file system, using an OS specific copy program like tar on Linux. Subsequent persistence onto Amazon S3 by creating a snapshot of the EBS volume that holds the OS-‐EXE-‐BACKUPS file system.
2. DB2-‐DATA: DB2 full and/or incremental backups to the DB-‐DATA-‐BACKUPS file system.
Subsequent persistence onto Amazon S3 by creating an EBS snapshot of the volume that holds the DB-‐DATA-‐BACKUPS file system.
NOTE: DIRECT SNAPSHOTS OF DB2-‐DATA AND DB2-‐LOG VOLUMES ARE ALSO POSSIBLE LEVERAGING DB2 I/O SUSPEND/RESUME FUNCTIONALITY, BUT THESE METHODS ARE NOT WITHIN THE SCOPE OF THIS GUIDE.
3. DB2-‐LOG-‐ARCHIVE: direct persistence onto Amazon S3 by creating an EBS snapshot of the volume that holds the DB2-‐LOG-‐ARCHIVE file system, each time a new DB2 transaction log has been archived by the DBMS into this file system.
Restore
For each backup type, its last backup can usually directly be restored from its associated staging file system. If the file staging system is not accessible anymore or an older backup is required, a new EBS volume can be created out of a snapshot that was created in the past of the parent EBS volume. The new EBS volume can then be attached and mounted onto the Amazon EC2 instance where restore and (database) recovery is taking place.
Common backup and restore operations on Amazon EC2 instances and EBS
volumes
This section briefly documents some common operations on Amazon EC2 instances and EBS volumes that are used for backup and restore purposes. The operations are described as if they would be performed from the graphical Amazon Management Console, available at
https://console.aws.amazon.com/ec2
However, all operations can be fully automated using the Amazon EC2 web service API and/or Command Line Tools. For more information please visit:
http://aws.amazon.com/documentation/ec2/
Backup: creating a new EBS volume with an empty file system
1) Create a new EBS volume
a. Log in to AWS EC2 Management Console https://console.aws.amazon.com/ec2
1. On Volumes, click on Create Volume 2. Type the size
3. Select the same availability zone as the AWS instance to be attached b. Select the volume
c. Click on Attach Volume 1. Select the instance
2) Create the file system
a. Log in to the instance and create the file system pvcreate /dev/sdX
vgcreate vgbackup /dev/sdX
lvcreate -L <SIZE> -n backups vgbackup mkfs.ext3 /dev/vgbackup/backups
mkdir -p /backups
mount /dev/vgbackup/backups /backups
NOTE: THE COMMAND HAS BEEN PROVIDED AS AN EXAMPLE; YOU CAN USE LVM2 OR DIRECT PARTITIONS TO STORE BACKUPS. THE SELECTION OF THE MOUNT POINT (/BACKUPS) IS ARBITRARY
Backup: creating an EBS snapshot onto Amazon S3 of an EBS volume
1) Make sure that the EBS volume is not written to.
NOTE: IF POSSIBLE, THE FILE SYSTEM(S) ON THE EBS VOLUME CAN BE DISMOUNTED TO ENSURE THAT NO WRITE I/O IS OCCURRING. WRITE I/O TO A FILE SYSTEM BEING SNAPPED CAN CAUSE INCONSISTENCIES ON THE SNAPSHOT COPY.
2) Log in to AWS EC2 Management Console https://console.aws.amazon.com/ec2 3) Go to volumes and select the volume to snapshot
4) Click on Create Snapshot 5) Type the name and description.
NOTE: CHOOSE A UNIQUE BUT EASILY IDENTIFIABLE NAME THAT INCLUDES A TIMESTAMP AND/OR SEQUENCE NUMBER
6) Click on Yes Create
7) You can monitor the progress on Snapshot navigation menu
Backup: dismounting file system(s) and detaching an EBS Volume
a. Log in to the EC2 instance, dismount and remove the volume umount /backups
vgchange vgbackup –a n vgexport vgbackup
b. Log in to AWS EC2 Management Console https://console.aws.amazon.com/ec2
c. Go to Volumes and select the volume to remove d. Click on Detach Volume
e. Click on Yes, Detach on the popup window f. When detached, click on Delete volume
Backup: creating a full offline Amazon EC2 Amazon Machine Image (AMI)
If the SAP system can be shut down for a period of time, a full image of the system can be created. The Amazon Machine Image (AMI) offline backup creates a snapshot of each EBS volume and stores it onto Amazon S3 storage. The AMI can be used as a golden image, to spin up new instances in case of:
1. Recovery from a complete source system loss (DR)
To restore the root volume and bare structure of the system. Typically, the database file systems will be outdated too much to be rolled forward, so these should be restored separately as described in subsequent sections.
2. Set up of new systems
A full AMI backup should be performed (at least) after the SAP system is installed, but best after each low-‐level change of the OS, SAP or DBMS, like for instance:
• Changing the file system layout • Upgrading OS, SAP or DBMS binaries
• Installing new additional software dependencies
Briefly, the steps to create a full offline AMI are as follows: 1. Stop the SAP and database instances
2. Select the instance and create the AMI from the AWS Management Console
The operating system will be stopped and started again automatically during the process. 3. Monitor the AMI creation until successful completion
4. Start the database and SAP instances again The detailed steps will be described next.
Detailed steps to create the Amazon Machine Image (AMI)
1) Log on into the OS and shutdown SAP su - <sidadm>
stopsap all
2) Make sure that the SAP and database instances are shut down completely by monitoring the processes and logs. If the database was not able to shut down due to still active connections, then issue the following commands:
For MaxDB su – <sidadm> dbmcli db_offline For DB2 su – db2<sid> db2stop force
3) Log in to AWS EC2 Management Console https://console.aws.amazon.com/ec2
4) Click ‘Instances‘
5) Click on the Instance you wish to create a AMI of 6) Right-‐mouse click ‘Create Image (EBS AMI)’ 7) Type the AMI name and description 8) Click on ‘Create This Image‘
9) A snapshot will be created in parallel for each EBS volume in the Amazon EC2 instance Snapshot and AMI creation can be monitored within the ‘Snapshots‘ or ‘AMIs‘ section.
As the Amazon EC2 instance will be restarted automatically after EBS AMI creation has finished, you can also monitor in parallel to see when the system comes back up again, by for instance pinging its IP address.
10)Log on into the instance and startup SAP su - <sidadm> startsap all
The AMI should now be available for Amazon EC2 instance deployment in the ‘AMIs’ section.
Examples for backing up SAP System components using AWS infrastructure
The following sections merely provide basic examples for backing up MaxDB and DB2 LUW databases on AWS infrastructure. Please consult the documentation referenced in section “Prerequisite Documents” at the beginning of this guide as a complete reference.
In addition, specific references will be provided within the sections wherever suitable.
Example 1: database backup to an EBS backup file system
To recapitulate, the following general procedure will be followed:
1) Online Database backups are performed to EBS volume dedicated for backups
2) Transaction log backups are performed to EBS volume dedicated to offline (archived) DB logs 3) The EBS volumes for DB backups and offline/archived logs are snapshot on a recurring basis to
Amazon S3. The incremental snapshots ensure point in time database recovery in case of disaster.
4) Snapshots are tagged with descriptions of backup type and time. Backups are created using the DBMS tools listed in Table 3.
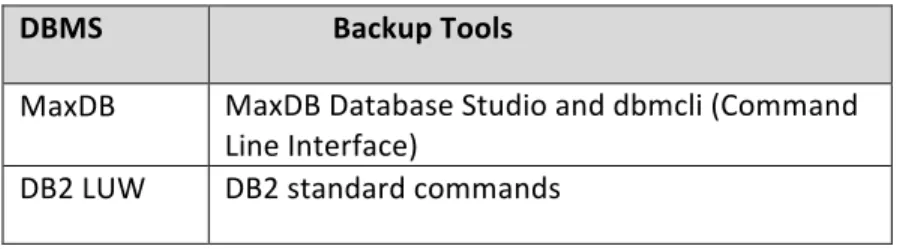
Table 3: DBMS tools used for backup
DBMS Backup Tools
MaxDB MaxDB Database Studio and dbmcli (Command Line Interface)
Example 1a: full online data and log backup for MaxDB
Make sure the DB-‐DATA-‐BACKUPS and DB-‐LOG-‐BACKUPS file systems have enough storage space, and ensure proper read/write permissions for these file systems. The file system names listed in Table 1 will be used in this example. If required, please follow steps described in the section “Backup: creating a new EBS volume with an empty file system”.
Apart from the general references mentioned in section “Prerequisite Documents”, specific MaxDB Backup / Recovery examples can also be found at “SAP MaxDB HowTo” on the SAP Community Network (SCN).
Create MaxDB backup templates
a. Start the SAP MaxDB Database Studio If not installed, it can be downloaded from
http://www.sdn.sap.com/irj/scn/maxdb-‐downloads and installed on any computer for remote management b. Add the server and database into the landscape (if required)
Go to: My Landscape / Servers / (right click) /Add/”Server/Database”) c. Type the server name or ip: on “Server Name:” and click next
d. Select the Databases and click on Finish
e. Log in to the database using the CONTROL user
(My Landscape / Servers / <servername/ip>/<DB>/(right click) /Login) f. (Right click) on the database and click on Administration
g. Go to the Backup Tab h. Expand Templates
i. Create a Backup template for FULL Backup j. Choose New…
k. Click Ok
l. Create a Backup template for LOG Backup
Name <Template Name> can be FULL Backup Type COMPLETE DATA
Device Type FILE Backup Tool NONE
Device/File /db_data_backups/<SID>_FULL Compressed Unselect
Name <Template Name> can be LOG Backup Type LOG
Device Type FILE Backup Tool NONE
Device/File /db_log_backups/<SID>_LOG Compressed Unselect
Back up the database using Database Studio
1) Start the SAP MaxDB Database Studio
2) Log in to the database using the CONTROL user
(My Landscape / Servers / <servername/ip>/<DB>/ (right click) /Login) 3) (Right click) on the database and click on Administration
4) Go to the Backup Tab 5) Expand Templates
6) Right click on the template “FULL” and click on Backup
Back up the database transaction logs using Database Studio
1) Start the SAP MaxDB Database Studio
2) Log in to the database using the CONTROL user
(My Landscape / Servers / <servername/ip>/<DB>/ (right click) /Login) 3) (Right click) on the database and click on Administration
4) Go to the Backup Tab 5) Expand Templates
6) Right click on the template “LOG” and click on Backup
Back up the database using DBMCLI
1) Log in to the Amazon EC2 instance 2) Execute the following commands
su - <sid>adm
#start an utility session dbmcli –d <SID> -U c -uUTL
#start backup using the template FULL backup_start FULL
3) Wait until the backup has completed
Back up the database log using DBMCLI
1) Log in to the Amazon EC2 instance 2) Execute the following commands
su - <sid>adm
#start an utility session dbmcli –d <SID> -U c -uUTL
#start backup using the template FULL backup_start LOG
3) Wait until the backup has completed
Schedule hourly automatic log backup using Database Studio
1) Start the SAP MaxDB Database Studio
3) (Righ click) on the database and click on Administration Tasks/Automatic Log Backup 4) Select the template “LOG” from the list
5) Select “Create a log backup every <XX> minutes” 6) Type 60 on the <XX> field
7) Click on Activate
The EBS snapshot creation of the volume that holds the DB-‐LOG-‐BACKUPS file system can now be automated through a script, time-‐synchronized with the automatic log backup.
Create a snapshot to send the backup to Amazon S3
Please refer to the section “Backup: creating an EBS snapshot onto Amazon S3 of an EBS volume” for the detailed steps.
It is recommended to tag snapshots with a description like
• “<SID>_MAXDB_DATA_BACKUPS_<YYYY-MM-DD>” for the database data backups
• “<SID>_MAXDB_LOG_BACKUPS_<YYYY-MM-DD-HH-MM-SS>” for the database log backups
Example 1b: full online backup for DB2 LUW
Make sure that you have enabled your DB2 database for rollforward recovery. Rollforward recovery mode enables you to recover from a database backup to the most recent point in time using archived database log files and is a prerequisite for taking DB2 online backups. If you have not configured your DB2 database for rollforward recovery mode, you cannot take online backups. Instead you will need to shutdown the SAP system and DB2 to take offline backups. For production systems, your database must be in rollforward recovery mode. For more details refer to the „Database Administration Guide SAP on IBM DB2 for Linux, UNIX, and Windows”
Steps to enable rollforward recovery and set up DB2 logfile management:
1) Stop SAP and DB2
2) Enable rollforward recovery by updating the database configuration parameter LOGARCHMETH1:
su – db2<sid>
db2 update db cfg for <SID> using logarchmeth1 DISK:/db2/<SID>/log_archive
The database will now be placed in backup pending state. A full database backup must be taken. From this point onwards DB2 will automatically archive log files from the /db2/<SID>/log_dir filesystem to the /db2/<SID>/log_archive filesystem.
3) Take a full database offline backup
db2 backup database <sid> to "/backups" compress
4) Configure a retention period for your database backups and the corresponding database log files. For example if you want to keep at least 4 database backups and you want to remove surplus backups older than 30 days and all corresponding database log files, configure DB2 in the following way:
db2 update db cfg for <sid> using NUM_DB_BACKUP 4 db2 update db cfg for <sid> using REC_HIS_RETENTN 30 db2 update db cfg for <sid> using AUTO_DEL_REC_OBJ ON
5) Start SAP
Make sure the DB2-‐DATA-‐BACKUPS file system has enough storage space, and proper read/write permissions. The file system names listed in Table 2 will be used for the examples.
If required, please follow steps described in the section “Backup: creating a new EBS volume with an empty file system”.
Please remember to use the references mentioned in section “Prerequisite Documents” as primary documentation. In addition the SAP on DB2 UDB for Unix and Windows (DB6) forum on the SAP
Community Network (SCN) can be consulted for other questions. The following sections merely provide examples and should not be used as a general reference.
Two options to back up the DB2 LUW database will be shown in the following sections:
• Option 1: back up the database directly from the SAP system • Option 2: back up the database using the CLI
Option 1: back up the database directly from the SAP system
1) Log in to the SAP system with an admin user 2) Execute the transaction /nDBACOCKPIT 3) On the left screen panel, navigate to
Jobs/DBA Planning Calendar
4) In the calendar area, select any cell representing time older than current time and click on ‘Add’ button.
5) On the pop-‐up window, select ‘Database Backup to Device’ action, choose ‘Online’ backup mode with ‘Include Logs’ option and enter /db2_data_backups in the ‘Device/Directory’ field 6) Click on ‘Execute Immediately’ button
Option 2: back up the database using the CLI
1) Log in to the Amazon EC2 instance 2) Execute the following commands:
su – db2<sid>
3) Wait until the backup has completed.
You will see the following message when the backup has completed:
Backup successful. The timestamp for this backup image is : 20111220221428
This message is shown in the following log file, located in the backup directory: <SID>.0.db2<sid>.NODE0000.CATN0000.<datetime stamp>.001
4) Backup the database manager configuration required to rebuild the database: su – db2<sid>
cd /db2_data_backups
db2cfexp <SID>_cfg_backup.txt BACKUP
5) Backup the DB2 recovery history file: su – db2<sid>
cp /db2/<SID>/db2<sid>/NODE0000/SQL00001/db2rhist.asc \ /db2_data_backups
DB2 transaction log file management
It is recommended to configure the DB2 transaction log management as mentioned in the example above and described in “IBM DB2 Universal Database for UNIX and Windows -‐ New Log File
Management”, section 2.2.1.
As from DB2 UDB V9.5, automatic log file retention management can be configured in addition. This is described in the example above and in the Database Administration Guide "SAP on IBM DB2 for Linux, Unix and Windows", section “DB2 V9.5 and Higher Only: Automatic Log File and Backup Retention”. The EBS volume holding DB2-‐LOG-‐ARCHIVE file system should be sent to Amazon S3 on a regular basis by creating a direct snapshot, optimally each time after a transaction log was written into the DB2-‐LOG-‐ ARCHIVE file system. The snapshot can be taken directly without dismounting the file system.
Create a snapshot to send the backup to Amazon S3
Please refer to the section “Backup: creating an EBS snapshot onto Amazon S3 of an EBS volume” for the detailed steps.
It is recommended to tag snapshots with a description like
• “<SID>_DB2_DATA_BACKUPS_<YYYY-MM-DD>” for the database data backups
• “<SID>_DB2_LOG_ARCHIVE_<YYYY-MM-DD-HH-MM-SS>” for the database archive log
Example 2: OS backup to S3 using the TAR command
This chapter provides an example for creating a low-‐level operating system backup that can be used in case of a full system loss (DR).
NOTE: THIS OS BACKUP CANNOT BE USED TO RESTORE THE DATABASE, AS DATABASE DATA AND TRANSACTION LOGS ARE SPECIFICALLY EXCLUDED FROM THE BACKUP. AFTER RESTORING THIS BACKUP, RESTORE AND RECOVERY OF THE DATABASE SHOULD FOLLOW.
The example procedure is as follows:
1) Ensure you have enough space on the file system /os_exe_backups for the OS backup. NOTE: DATABASE DATA, TRANSACTION LOGS AND MOUNTED BACKUP FILE SYSTEMS WILL BE EXCLUDED FROM THIS BACKUP
2) Start the OS backup
a. Logon into the OS start a tar backup on the /os_exe_backups file system
NOTE: THE USE OF COMPRESSION AFFECTS THE CPU UTILIZATION AND BACKUP TIME. CHOOSE TO USE COMPRESSION OR NOT BY ADDING OR REMOVING THE “-‐-‐GZIP” PARAMETER OF THE TAR COMMAND
For database type of MaxDB use this script as an example:
export exclusion_file=/os_exe_backups/backup-exclude-dirs.txt export backup_file=/os_exe_backups/backup.tar.gz
export log_file=/os_exe_backups/backup.stdout export error_log_file=/os_exe_backups/backup.stderr
#Create the exclusion file #Exclude OS directories
>$exclusion_file
echo "/tmp" >>$exclusion_file echo "/proc" >>$exclusion_file echo "/sys" >>$exclusion_file echo "/dev" >>$exclusion_file
#Exclude database files
echo "/sapdb/<SID>/sapdata1" >>$exclusion_file echo "/sapdb/<SID>/saplog" >>$exclusion_file
#Exclude the backup directories
echo "/os_exe_backups" >>$exclusion_file echo "/db_data_backups" >>$exclusion_file echo "/db_log_backups" >>$exclusion_file
#Run the backup
cd /os_exe_backups
tar -v --gzip -cf $backup_file / --exclude-from=$exclusion_file > $log_file 2> $error_log_file
#to monitor #tail -f $log_file #tail -f $error_log_file
NOTE: THE COMMAND HAS BEEN PROVIDED AS AN EXAMPLE, PLEASE TEST AND CHANGE AS REQUIRED. For database type of DB2 use this script as an example:
export exclusion_file=/os-exe-backups/exclude-dirs.txt export backup_file=/os-exe-backups/backup.tar.gz export log_file=/os-exe-backups/backup.stdout export error_log_file=/os-exe-backups/backup.stderr
#Create the exclusion file #Exclude OS directories
>$exclusion_file
echo "/tmp" >>$exclusion_file echo "/proc" >>$exclusion_file echo "/sys" >>$exclusion_file echo "/dev" >>$exclusion_file
#Exclude database-related filesystems
echo "/db2/<SID>/sapdata1" >>$exclusion_file :
echo "/db2/<SID>/sapdata<n>" >>$exclusion_file echo "/db2/<SID>/log_dir" >>$exclusion_file echo "/db2/<SID>/log_archive" >>$exclusion_file
#Exclude the backup directories
echo "/os-exe-backups" >>$exclusion_file echo "/db2-data-backups" >>$exclusion_file
#Run the backup
cd /os-exe-backups
tar -v --gzip -cf $backup_file /
--exclude-from=$exclusion_file > $log_file 2> $error_log_file
#to monitor #tail -f $log_file #tail -f $error_log_file
NOTE: THE COMMANDS HAVE BEEN PROVIDED AS AN EXAMPLE, PLEASE TEST AND CHANGE AS REQUIRED. To send the backup to Amazon S3, create an EBS snapshot of the EBS volume that holds the
/os_exe_backups file system. You can refer to the section “Backup: creating an EBS snapshot onto Amazon S3 of an EBS volume” for the required steps.
It is recommended to tag the snapshot with a description like “<EC2-INSTANCE-ID>_OS_EXE_BACKUPS_<YYYY-MM-DD>”,
where <EC2-INSTANCE-ID> can be retrieved from the EC2 metadata web service through
“GET http://169.254.169.254/latest/meta-data/instance-id”
Linux tools like curl or wget can be used to issue the above HTTP command from a local shell on the Amazon EC2 instance.
More information on using Amazon EC2 instance metadata is available at
http://docs.amazonwebservices.com/AWSEC2/latest/UserGuide/AESDG-‐chapter-‐instancedata.html
Examples for restoring SAP systems using AWS infrastructure
Example 1: restore OS from Amazon S3 using TAR
Create an Amazon instance using the “golden backup” AMI of the original system 1) Log in to the AWS EC2 Management Console
https://console.aws.amazon.com/ec2
2) Within AMIs select your “golden backup” AMI and click Launch
The “golden backup” AMI should be created before, as described in the previous section “Backup: creating a full offline Amazon EC2 Amazon Machine Image (AMI)”
a. On Instance Details
1. Choose an instance type that is supported for SAP
Check SAP note 1588667 – SAP on Amazon Web Services (AWS) 2. Select the VPC and Subnet
3. Click on Continue
4. Type the IP Address (Select the same IP address of the server you want to recover) 5. Check the Termination Protection
6. Click on Continue
7. On Name, type the name of the instance b. On Create Key Pair
1. Select the existing Key Pairs from Choose From your existing Key Pairs 2. Click on Continue
c. On CONFIGURE FIREWALL
1. Choose an existing SG or Create a new one
NOTE: DEPENDING ON THE SAP INSTANCE TYPE, THE PORTS REQUIRED WOULD BE TCP/22, TCP/3200, TCP/3300, TCP/3600.
d. On REVIEW
1. Click on Launch
Recreate the file systems required for the recovery
NOTE: IT IS REQUIRED TO HAVE EBS SIZES AT LEAST THE SAME SIZE OR LARGER THAN THE ORIGINAL SYSTEM. ALSO THE NAMES OF THE MOUNT POINTS MUST BE IDENTICAL.
1) To create a new EBS volume
a. On Volumes, click on Create Volumes b. Type the Size of the Volume
c. Select the same Availability Zone as the Instance d. Click on Yes, Create
2) To attach the EBS volume an instance a. On Volumes, select the volume b. Click on Attach Volume
d. Type the Device the EBS will be presented on the Instance (write it down)
e. Click on Yes, Attach
3) To create a file system using LVM a. Log in to the Amazon EC2 instance
For the MaxDB database type, use this script as an example: #To Create swap
pvcreate /dev/sdX
vgcreate vgswap /dev/sdX
lvcreate -L <size>M -n swap vgswap mkswap /dev/vgswap/swap
swapon –a #
pvcreate /dev/sdY
vgcreate vgsapdb /dev/sdY
lvcreate -L <size>M -n sapdb vgsapdb mkfs.ext3 /dev/vgsapdb/sapdb
mkdir /sapdb
mount /dev/vgsapdb/sapdb /sapdb
#Add the mount points into the /etc/fstab
/dev/vgsapdb/sapdb /sapdb ext3 acl,user_xattr 1 1 /dev/vgswap/swap swap swap defaults 0 0
NOTE: THESE COMMANDS HAVE BEEN PROVIDED AS AN EXAMPLE, YOU CAN USE LVM2 OR LINUX PARTITION.
THIS SCENARIO WAS TESTED WITH LVM2
For the DB2 LUW database type, use this script as an example: #To Create swap
pvcreate /dev/sdX
vgcreate vgswap /dev/sdX
lvcreate -L <size>M -n swap vgswap mkswap /dev/vgswap/swap swapon –a # pvcreate /dev/sdY vgcreate vgdb2 /dev/sdY lvcreate -L <size>M -n db2 vgdb2 mkfs.ext3 /dev/vgdb2/db2 mkdir /db2 mount /dev/vgdb2/db2 /db2
#Add the mount points into the /etc/fstab
/dev/vgdb2/db2 /db2 ext3 acl,user_xattr 1 1 /dev/vgswap/swap swap swap defaults 0 0
NOTE: THESE COMMANDS HAVE BEEN PROVIDED AS AN EXAMPLE, YOU CAN USE LVM OR LINUX PARTITION. THIS SCENARIO WAS TESTED WITH LVM
Restore the OS
a. On Volumes, click on Create Volumes b. Type the Size of the Volume
c. Select the same Availability Zone as the Instance d. On Snapshot select the latest OS backup
e. Click on Yes, Create
2) Attach the volume to the Instance 3) Mount the file system
a. Log in to the Amazon EC2 instance b. Mount the /os_exe_backup file system Example:
vgscan
vgimport vgbackup vgchange vgbackup -a y mkdir /os_exe_backups
mount /dev/vgbackup/os_exe /os_exe_backups
4) Restore the OS
Example:
#Backup the current fstab
cp /etc/fstab /etc/fstab.<timestamp> #Restore the OS
cd /
tar -zxvf /os_exe_backups/backup.tar.gz #Rewrite the lvm information
vgcfgbackup
#restore the original fstab
cp /etc/fstab.<timestamp> /etc/fstab
#Update the /etc/hosts file and update the IP if necessary
vi /etc/hosts
Reboot the instance
shutdown –r –y 0
The system is now ready for database restore and recovery.
Example 2: Restoring and Recovering the Database from Amazon S3
In general, restore and recovery of databases requires careful planning and preparation before execution. Take time for root-‐cause analysis to be better able to identify the most efficient recovery strategy before executing.
For example, data only need to be restored from Amazon S3 if recovery is not possible anymore from data and backups that are already available on the system. If a database needs to be recovered to the latest possible point in time, always make sure to not overwrite and destroy the latest database transaction logs. As these are typically not yet archived and/or backed up to Amazon S3, the latest transactions contained in these logs could then get lost forever!
This guide does not intend to replace the original backup and restore documentation of the database vendors that was referenced in section “Prerequisite Documents”. As restore and recovery scenarios are most diverse and dependent on the environment and failure cause, it is strongly recommended to follow the original documentation in case of a real failure.
The following sections describe some basic examples of MaxDB and DB2 database restore and recovery, to get an initial idea how that works on Amazon infrastructure.
Example 2a: MaxDB restore and recovery from Amazon S3
1) If this is a DR, make sure you have restored the OS as described in section “Example 1: restore OS from Amazon S3 using TAR”
2) If required, mount the Amazon S3 Database backup on the Amazon EC2 instance
NOTE: NORMALLY, THE MOST RECENT BACKUP SHOULD ALREADY BE AVAILABLE ON THE AMAZON EC2 INSTANCE a. Only if required, create a new EBS volume based on an Amazon S3 snapshot backup
1. On Volumes, click on Create Volumes 2. Type the Size of the Volume
3. Select the same Availability Zone as the Instance 4. On Snapshot select the latest OS backup
5. Click on Yes, Create b. Attach the volume to the Instance c. Mount the file system
1. Log in to the EC2 instance
2. Mount the /db_data_backups file system Example if using LVM2:
vgscan
vgimport vgbackup vgchange vgbackup -a y mkdir /db_data_backups
mount /dev/vgbackup/db_data /db_data_backups
3) If required, repeat the previous step, but now for the /db_log_backups file system NOTE: NORMALLY THE MOST RECENT BACKUP SHOULD ALREADY BE AVAILABLE ON THE EC2 INSTANCE
4) Restore the database using Database Studio
a. Logon into the instance as root
c. Logon into the database using the CONTROL user
(My Landscape / Servers / <servername/ip>/<DB>/(right click) /Login)
d. Set the database in admin mode: (Right click) on the database and click on Administration Tasks/Set State/Admin
e. Start the recovery: (Right click) on the database and click on Administration Tasks/Recovery…
f. On the Recovery of Database window, click on Recover a medium
g. Select FULL from the template list and then Next
h. Click on Start
i. Click Ok on the in the Confirmation Initialization database window
j. Wait until the restore has completed.
5) Apply transaction logs using Database Studio
a. First restore the database using dbmcli or Database Studio without restarting the database b. Logon into the database using the CONTROL user (My Landscape / Servers /
<servername/ip>/<DB>/(right click) /Login)
c. Start the recovery: (Right click) on the database and click on “Administration Tasks/Recovery…”
d. You can select if you want to restore until a specific time (Point in time recovery), in this example we will restore until the last available log, so do not select “Recover until a specific time.” Select Recover a medium and then Click Next
NOTE: CREATE AN EBS VOLUME FROM AN AMAZONS3 LOG BACKUP SNAPSHOT – FOLLOWING THE LOG SEQUENCE – AND MOUNT IT TO THE /DB_LOG_BACKUPS IF IT IS REQUIRED TO APPLY OLDER LOGS AS THE ONES AVAILABLE ON THE SYSTEM. HOWEVER, BEFORE DOING SO, MAKE SURE TO HAVE A SNAPSHOT AVAILABLE OF THE LATEST CONTENT OF /DB_LOG_BACKUPS FILE SYSTEM, AS THAT MIGHT BE REQUIRED LATER IN THE RECOVERY PROCESS.
e. Select LOG from the template list and then Next
f. Select the Log File Number and Then Next (In this case put the next log after the backup) and click Next
g. Click Start
h. The recovery session will try to recover all consecutive logs until it fails with a missing log. You can choose to restore more logs and continue…
i. Choose Start Database and then Continue
6) Restore the database using DBMCLI
a. Log in to the Amazon EC2 instance as root b. Execute the following example commands
#Fix permissions
chown sdb:sdba /sapdb/<SID>/sapdata chown sdb:sdba /sapdb/<SID>/saplog #logon as <sid>adm
su - <sid>adm
#Logon a recovery session dbmcli -U c
#List the backup history, and last logs #take notes of the next log number
backup_history_open
backup_history_list -r last -c
label,action,pages,firstlog,lastlog,media #If possible, check if the backup is accessed as expected
recover_check FULL data #Restore the database db_connect
recover_start FULL data c. Wait until the restore is completed
To monitor the restore session, use the following command Example:
#logon as <sid>adm su - <sid>adm
#start restore session session dbmcli -U c -uUTL -d <SID> recover_state
Monitor the “Pages Transferred” and “Pages Left”
7) Restore the database logs using CLI
a. Before restoring logs, you should have had restored a database without restarting, (see step 1) or step 3)). The DB should be in ADMIN mode
b. Logon into the instance as root c. Execute the following
su - <sid>adm
#Logon a recovery session dbmcli -U c
#List the backup history, and last logs #take notes of the next log number
backup_history_open
backup_history_list -r last -c
label,action,pages,firstlog,lastlog,media service_connect
#Restore the Logs where <XXX> is the next log sequence. db_connect
recover_start LOG log <XXX>
#If the recovery ends with -8020 error code and you still
have logs to recover that are not listed in the backup history, you can continue with the following commands, where <YYY> is the next log to recover, recover log by log until you restore the latest available log.
recover_replace LOG /backuplog/<SID>_LOG.<YYY>
#Use the following command to review the status of the database after the restore
db_restartinfo
#If the consistent=1 the database can start
d. Use the following commands to start the recovery if you want to restore in point in time recovery
su - <sid>adm
#Logon a recovery session dbmcli -U c
#List the backup history, and last logs #take notes of the next log number
backup_history_open
backup_history_list -r last -c
label,action,pages,firstlog,lastlog,media service_connect
#Restore the Logs where <XXX> is the next log sequence. db_connect
recover_start LOG log <XXX> UNTIL <date> <time>
#If the recovery ends with -8020 error code and you still
have logs to recover that are not listed in the backup history, you can continue with the following commands, where <YYY> is the next log to recover, recover log by log until you restore the latest available log.
recover_replace LOG /backuplog/<SID>_LOG.<YYY>
#Note: the database will be put on ONLINE automatically after the DB is recovered until the time specified
su - <sidadm> startsap all
At this point the SAP instance should be started with no issues
9) After restoring the database, you can remove the EBS if required a. Logon into the Amazon EC2 instance
b. dismount and remove the volume Example:
umount /db_data_backups vgchange vgbackup –a n vgexport vgbackup
c. Logon in to the AWS EC2 Management Console https://console.aws.amazon.com/ec2/
d. Go to Volumes and select the volume to remove e. Click on Detach Volume
f. Click on Yes, Detach on the popup window g. When detached, click on Delete Volume
Example 2b: DB2 LUW restore and recovery from Amazon S3 1) If this is an DR, make sure you have restored the OS
2) Mount the Amazon S3 Database backup on the instance
a. Create an EBS volume based on an Amazon S3 DB backup snapshot 1. On Volumes, click on Create Volumes
2. Type the Size of the Volume
3. Select the same Availability Zone as the Instance 4. On Snapshot select the latest DB backup
5. Click on Yes, Create b. Attach the volume to the Instance c. Mount the file system
1. Logon to the instance using putty, or any other ssh client 2. Mount the backup filesystem
Example: vgscan
vgimport vgbackup vgchange vgbackup -a y mkdir /backups
mount /dev/vgbackup/backups /db2_data_backups