System Administration
Reference Guide
PROGRESS DATABASE
ON WINDOWS NT SERVER 78-0460A MFG/PRO Version 9.0 Printed in the U.S.A. March 1999QAD Inc. The information contained in this document is subject to change without notice. QAD Inc. provides this material as is and makes no warranty of any kind, expressed or implied, including, but not limited to, the implied warranties of merchantability and fitness for a particular purpose. QAD Inc. shall not be liable for errors contained herein or for incidental or consequential damages (including lost profits) in connection with the furnishing, performance, or use of this material whether based on warranty, contract, or other legal theory.
Some states do not allow the exclusion of implied warranties or the limitation or exclusion of liability for incidental or consequential damages, so the above limitations and exclusion may not be applicable.
PROGRESS® is a registered trademark of Progress Software Corporation. Windows™ is a trademark of Microsoft Corporation.
MFG/PRO® is a registered trademark of QAD Inc. Copyright © 1999 by QAD Inc.
78-0460A QAD Inc. 6450 Via Real Carpinteria, California 93013 Phone (805) 684-6614 Fax (805) 684-1890
Contents
P
REFACE. . . 1
Using This Guide . . . 2
Audience . . . 2
MFG/PRO Manager Functions Information . . . 2
Configuration and Sizing Information . . . 2
Organization . . . 3
Document Conventions . . . 3
C
HAPTER1
I
NTRODUCTION. . . 5
System Administration Tasks . . . 6
PROGRESS Basics . . . 6
PROGRESS Version Number . . . 6
PROGRESS Executables . . . 7
PROGRESS Parameters . . . 7
PROGRESS Database Architecture . . . 8
MFG/PRO Basics . . . 9
MFG/PRO Version Number . . . 10
MFG/PRO Compiled and Source Code . . . 10
Empty Databases . . . 11
Main MFG/PRO Databases . . . 12
Help, User Interface (GUI), and Configurator Databases . . . 12
Database Sequences . . . 13
C
HAPTER2
D
ATABASEM
ANAGEMENT. . . 15
Large Scale Data Movements . . . 16
Database Backup . . . 16
Types of Backup . . . 17
PROGRESS Backup Utilities . . . 17
Validating the Backup . . . 18
Offsite Storage . . . 19
Delete/Archive and Database Fragmentation . . . 19
Dump and Load . . . 20
Reasons for Dumping and Loading Data . . . 21
Normal Dump/Load Procedure . . . 21
About PROGRESS Bulk Loader . . . 22
Dumping Through MFG/PRO . . . 23
Dumping Through PROGRESS Data Administration Tool . . . 24
Limited Disk Space Dump Procedure . . . 24
Preparing an Empty Database . . . 25
Bulk Load: Creating the Bulk Loader Description File . . . 25
Bulk Loading the Data . . . 26
Bulk Load: Rebuilding the Indexes . . . 27
Loading Through Progress Data Dictionary . . . 27
Post Dump/Load Sequence Initialization . . . 28
C
HAPTER3
P
ERFORMANCET
UNING. . . 29
Start-Up Parameters and Performance . . . 30
Parameter Applicability . . . 30
Parameters Affecting Performance . . . 31
Relocation of the Before-Image File . . . 33
PROGRESS Performance Aids . . . 34
Before-Image Writers . . . 34
After-Image Writers . . . 34
Asynchronous Page Writers . . . 34
Watchdog . . . 35
Performance Aid Summary . . . 35
CONTENTS V
User Control (PROMON Item 1) . . . 37
Locking and Waiting Statistics (PROMON Item 2) . . . 37
Block Access (PROMON Item 3) . . . 38
Record Locking Table (PROMON Item 4) . . . 39
Activity (PROMON Item 5) . . . 39
Shared Resources (PROMON Item 6) . . . 39
Database Status (PROMON Item 7) . . . 40
Shut Down Database (PROMON Item 8) . . . 40
C
HAPTER4
M
ULTI-V
OLUMED
ATABASE. . . 43
Multi-Volume Database Overview . . . 44
Multi-Volume Database Advantages . . . 45
Multi-Volume Components . . . 45
Multi-Volume Set-Up Steps . . . 46
Determining the Allocation Sizes . . . 47
Creating the Structure Description File . . . 47
Converting the Extent Size to Blocks . . . 48
Example Structure File . . . 49
Before-Image Extents . . . 49
Creating a Void Multi-Volume Database . . . 51
Load Schema and Data . . . 52
Multi-Volume Database Administration . . . 53
Adding Extents . . . 53
C
HAPTER5
S
PLITS
CHEMAD
ATABASE. . . 55
Reasons for Splitting Database Schema . . . 56
Enhance Database Administration . . . 56
Increase Performance . . . 56
Create Common Files . . . 57
Determining How to Split the Schema . . . 57
Recommended Split for ECommerce . . . 58
System Requirements . . . 59
Physical Disk Requirements . . . 59
Creating a Split Schema Database . . . 60
Administering the Database . . . 62
C
HAPTER6
G
ENERALA
DMINISTRATION. . . 63
Maintaining MFG/PRO Scripts and Database Sets . . . 64
Setting Up Training Databases . . . 64
Setting Up the Training Database Server . . . 65
Setting Up the Training Database Client . . . 66
Compiling Programs . . . 68
Using MFG/UTIL to Compile . . . 68
Non-English Language Compile . . . 68
Compiling Character Code . . . 69
Compiling Code . . . 71
Batch Processes with PROGRESS Prowin32 Batch Client . . . 74
Overview . . . 74
Editing the Batch Program and Input Control File . . . 75
Copying and Editing the progress.ini File . . . 76
Modifying the batch.pf File . . . 77
Creating Unique Batch Directories . . . 78
Defining Batch IDs for MRP and Hotbatch . . . 79
Submitting Batch Jobs in MFG/PRO . . . 81
Scheduling Batch Jobs in Windows NT . . . 82
C
HAPTER7
U
SINGPROGRESS RESULTS
WITHMFG/PRO . . . 87
About RESULTS . . . 88
RESULTS Setup Overview . . . 88
Setting Up RESULTS to Start from a MFG/PRO Menu . . . 88
C
HAPTER8
MFG/UTIL R
EFERENCEI
NFORMATION. . . 91
Database Menu . . . 92
Create Database . . . 92
Load Data File into Existing Database . . . 93
Update Schema . . . 93
CONTENTS VII
Connect to a Database . . . 95
Create Dump/Load Procs . . . 96
Load Translated Labels . . . 96
Program Menu . . . 97
Compile Procedure Files . . . 97
DataServer Menu . . . 99
Generate Oracle Database Scripts . . . 99
Change Oracle Connection Parameters . . . 99
Scripts Menu . . . 99
Generate Server Startup and Shutdown . . . 99
Generate User Startup . . . 100
Configure Menu . . . 100
DLC and PROPATH Variables (Set MFG/PRO Paths) . . . 100
Company Information . . . 100
Any Database Set (Database Set Configuration) . . . 101
Database Set Parameters . . . 101
Client View of Database Parameters . . . 102
Server View of Database Parameters . . . 103
Sections in mfgutil.ini . . . 103
Summary of Sections . . . 104
ClientSetup Section (mfgutil.ini) . . . 104
Compile Section (mfgutil.ini) . . . 105
OracleValues Section (mfgutil.ini) . . . 105
ServerSetup Section (mfgutil.ini) . . . 106
DBSET Section (mfgutil.ini) . . . 106
General Section (mfgutil.ini) . . . 108
HasRun Section (mfgutil.ini) . . . 108
Paths Section (mfgutil.ini) . . . 108
Site Section (mfgutil.ini) . . . 109
C
HAPTER9
M
ODIFIEDB
ROWSEP
ROGRAMN
AMES. . . 111
Preface
Using This Guide 2 Organization 3
Using This Guide
Use this guide for background and reference information on MFG/PRO system administration, especially database management and related tasks.
Audience
These instructions are for the MFG/PRO system administrator who manages the MFG/PRO database and is familiar with Microsoft Windows NT and networking.
MFG/PRO Manager Functions Information
Although it is involved with system administration, this guide does not include documentation for the MFG/PRO Manager Functions (menu 36). For that information, refer to User Guide Volume 11: Manager Functions. However, because this guide discusses various dump/load methods, it also covers the MFG/PRO dump/load programs found on the Manager Functions menu.
Configuration and Sizing Information
Refer to your MFG/PRO installation guide for the following types of information:
• Configuration overview
• Minimum system requirements
PREFACE 3
Organization
This guide is organized as follows.
Document Conventions
Command prompts use the conventions listed in the following table. 1 Introduction Explains the basic concepts of PROGRESS and the
MFG/PRO system.
2 Database Management Explains the common database management tasks, along with some step-by-step instructions. 3 Performance Tuning Offers advice on how to boost system performance. 4 Multi-Volume Database Explains how to set up a multi-volume database,
which is recommended for best performance. 5 Split Schema Database Explains the reasons and procedure for splitting the
MFG/PRO production database.
6 General Administration Covers various tasks that support the MFG/PRO application, particularly how to schedule and process batch jobs.
7 Using PROGRESS RESULTS with MFG/PRO
Explains how to set up the custom reporting tool RESULTS.
8 MFG/UTIL Reference Information
Provides MFG/UTIL reference information. 9 Modified Browse Program
Names
Lists the old and current names for MFG/PRO browse programs.
If you see: It means:
monospaced text A command or file name. italicized
monospaced text
Italicized monospaced text indicates a variable name for a value you enter as part of an operating system command. For example, YourCDROMDir.
indented command line
A long command that you enter as one line (although it appears in the text as two lines).
CHAPTER 1
Introduction
This chapter presents general information you need to know for successful system administration. The topics in this chapter are:System Administration Tasks 6 PROGRESS Basics 6
System Administration Tasks
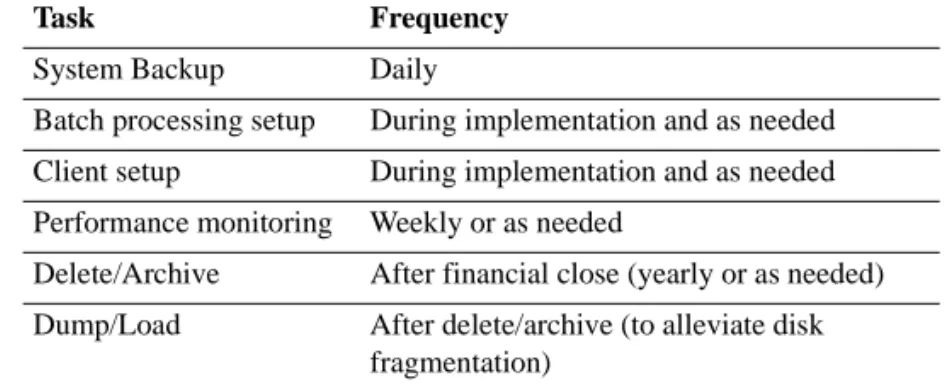
The following table summarizes the major tasks involved with system administration, along with how often they typically occur.
Table 1.1
System Administration Tasks
PROGRESS Basics
PROGRESS is both a relation database management system (RDBMS) and a fourth-generation (4GL) programming language. It is installed by default in the DLC directory. (DLC stands for Data Language
Corporation, the previous name for PROGRESS, Inc.)
PROGRESS Version Number
To find the PROGRESS version number, use a text editor to open a file called version, located in the main PROGRESS installation directory. A single line appears in this file, listing the version number and a revision letter. For example:
PROGRESS version 8.3A as of Mon Mar 8 1999
Another important file is PROGRESS.cfg, located in the PROGRESS installation directory. This file is a text file containing the serial numbers and other details about the installed PROGRESS products. To open it, double-click the file name in Explorer or File Manager.
Note To determine which PROGRESS version is required for a given MFG/PRO release, refer to the MFG/PRO Installation Guide.
Task Frequency System Backup Daily
Batch processing setup During implementation and as needed Client setup During implementation and as needed Performance monitoring Weekly or as needed
Delete/Archive After financial close (yearly or as needed) Dump/Load After delete/archive (to alleviate disk
INTRODUCTION 7
PROGRESS Executables
As you maintain start-up scripts and other parts of the system, keep in mind the various PROGRESS executables that perform tasks such as starting application sessions and database servers. These executables are located in sub-directories of the PROGRESS installation directory and typically have an underscore ( _ ) in the first character of the name. For example, the PROGRESS executable that starts multiuser database servers is called _mprosrv.exe, located in the bin sub-directory.
MFG/PRO runs PROGRESS executables as needed; you normally do not need to run them directly. To start _mprosrv.exe, MFG/PRO uses the following command, where PROGRESSInstallDir is your PROGRESS installation directory and DbName is the name of an existing database.
ProgressInstallDir\bin\_mprosrv DbName
PROGRESS Parameters
A PROGRESS parameter is a setting that instructs the RDBMS how to handle hardware factors such as memory and I/O resources. Parameters pass to the RDBMS when a PROGRESS executable starts or when connecting to a database.
You specify parameters after the PROGRESS executable command statement. For example, you can type the -B parameter (database buffer memory) in the following command line to allocate 8MB of memory as a database buffer:
ProgressInstallDir\bin\_mprosrv DbName -B 2000 When you use parameters, keep in mind the following tips.
• Each parameter works with a particular PROGRESS executable. For example, the -B parameter does not work with the executable _prowin32.exe.
• Each parameter takes affect at a specific point, such as program startup or database connection.
• You cannot specify parameters when running a PROGRESS script, such as procopy.
For a complete listing of PROGRESS startup parameters, refer to the PROGRESS system administration manuals. Also refer to for
information on the main parameters: -B, -g, -L, -s, -H, -N, -S, and -mmax.
PROGRESS Database Architecture
In its simplest form, a PROGRESS database is a single physical file on the computer. The file extension is .db. There are also related files, such as the before-image file (extension .bi).
Like any RDBMS system, PROGRESS databases have a structure, called a schema, that defines how data is stored and accessed. The schema consists of:
• Tables (also called files): logical groupings of data, such as customer information.
• Fields (known as columns in other systems): the data elements within tables, such as address.
• Indexes: a map of the fields within tables.
Before-Image (.bi) File
PROGRESS employs a mandatory recovery technique called roll-backward recovery. Any time a transaction is called against a database, a snapshot of the data is recorded prior to alteration. The snapshot is held in the .bi file. If a transaction is aborted, PROGRESS resets the database record to the .bi file snapshot.
The .bi file incurs heavy use during I/O operations. Relocating this file to a different drive from the database file (.db, also an I/O intensive file) allows for less contention. Refer to Chapter 3, “Performance Tuning,” for more information on relocating the .bi file.
INTRODUCTION 9
Related Database Files
Some of the main files involved with building and running a PROGRESS database are:
• Empty Database (empty.db): Included with every PROGRESS release, this database has some version-specific header information, but is otherwise empty. By making a copy of empty.db and loading a database definition file, you create a working PROGRESS database.
• Database Definition (extension .df): An ASCII text file with
descriptions of the tables and fields used to create the schema. Before MFG/PRO is shipped, database definitions are loaded into a copy of empty.db in order to create a given MFG/PRO database.
• Data files (extension .d): ASCII text files containing database records to be dumped from or loaded into a database.
• Bulkload definition file (extension .fd): Like the database definition file, this file lists all tables and fields in the schema. However, its purpose is to define how to insert records from data files into the database during a bulkload process.
• Lock file (extension .lk): A file created when you start a PROGRESS session against a database. If your database was shut down
abnormally (such as a system failure), you may need to delete the lock file in order to connect to the database.
• Log file (extension .lg): A file containing a database event history, such as startup, shutdown, and errors.
MFG/PRO Basics
MFG/PRO is a global supply chain management software package offered by QAD Inc. MFG/PRO programs are written in the PROGRESS 4GL programming language and the MFG/PRO databases run on the PROGRESS RDBMS. MFG/PRO is dependent on the installation of PROGRESS to function.
MFG/PRO Version Number
Because MFG/PRO is supported on certain versions of PROGRESS, you must know how to identify the software version. To find the MFG/PRO version number, use a text editor to open a file called version.mfg, located in the main MFG/PRO installation directory. Like PROGRESS, the version number includes a revision letter. In some cases, it also includes an enhancement code at the end. For example:
"Release 9.0 02 as of Mar 8 1999"
MFG/PRO Compiled and Source Code
The MFG/PRO programs are delivered as compiled code (also called object code). The file extension is .r and it is sometimes called r-code. The programs are grouped into modules, so your installation contains only those programs needed for the modules you purchased.
In addition to compiled code, the system includes source code (file extension .p). Source code is the high-level 4GL programming syntax. You may need to use source code to recompile MFG/PRO or make programming customizations.
Note You can also run directly from source code, in which case PROGRESS creates the compiled code in system memory at run time. However, running from source code is significantly slower.
There are two versions of source programs:
• Encrypted Code: This source code is passed through an encoder to prevent custom programming; however, you can use it to recompile MFG/PRO. It is provided for all modules purchased.
• Non-Encrypted Code: If you plan to customize MFG/PRO programs, you can purchase the non-encrypted source code. When purchased, the source code is provided for all modules.
INTRODUCTION 11
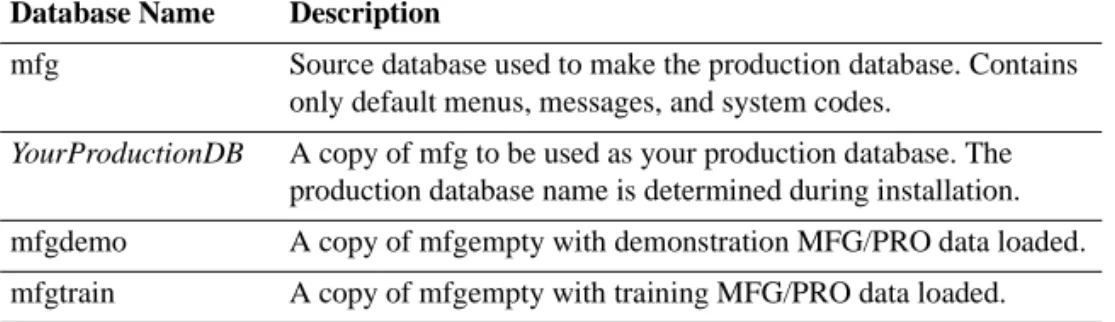
Empty Databases
The sources for all MFG/PRO databases are called empty databases because they only contain the schema and not any data. You can use these empty databases in case one of the standard databases is damaged and you need to replace it.
Table 1.2
Empty Databases
The data that are loaded into standard databases are kept in sub-directories under the MFG/PRO installation directory. The directory names correspond to the name of the standard database. For example, directory mfg contains data (.d files) for the mfg.db database.
Fig. 1.1
Empty and Built Databases mfgempty Source database for mfg, mfgdemo, and mfgtrain.
hlpempty Source database for mfghelp. guiempty Source database for gui. cfempty Source database for cfg.
mfgempty hlpempty guiempty cfempty mfghelp cfg gui + /qad/mfg/*.d + /qad/mfghelp/*.d + /qad/gui/*.d + /qad/cfg/*.d mfg
Main MFG/PRO Databases
For Windows NT, the MFG/PRO databases come pre-built from the CD-ROM. A pre-built database means the schema is loaded, as well as any default data.
The bulk of MFG/PRO tables appear in one database. The source version of this database is called mfgempty. Copies of mfgempty are made to support different types of data: demonstration, training, and your production data.
Table 1.3
Main MFG/PRO Databases
Help, User Interface (GUI), and Configurator Databases
In addition to the main database, MFG/PRO also uses the databases listed in Table 1.4. Table 1.4 Help, User Interface, and Configurator DatabasesDatabase Name Description
mfg Source database used to make the production database. Contains only default menus, messages, and system codes.
YourProductionDB A copy of mfg to be used as your production database. The production database name is determined during installation. mfgdemo A copy of mfgempty with demonstration MFG/PRO data loaded. mfgtrain A copy of mfgempty with training MFG/PRO data loaded.
Database Name Description
mfghelp Contains all data for the system help feature. It is therefore mostly read-only information.
gui Contains data used to create the MFG/PRO user interface, including the interface for MFG/PRO object programs.
cfg Contains the data from the Component Configurator Maintenance programs. This module enables you to customize MFG/PRO object programs.
INTRODUCTION 13
Fig. 1.2
The cfg, gui, and mfghelp Databases
Database Sequences
Sequences are a data structure in PROGRESS Version 7 and higher. Sequences generate a sequential stream of values for records that must be uniquely identified, such as the Inventory Transaction History file (tr_hist). Starting with MFG/PRO Version 8.5, several control file numbering fields were replaced by sequences, which are faster, require less error checking, and reduce the amount of time MFG/PRO spends validating uniqueness.
In general, sequences are self-maintained. However, you may need to update sequence values when you perform a delete/archive. The sequencing functionality in MFG/PRO helps you maintain sequence values both manually and through the CIM interface.
Multiple and Custom Databases
From the client’s perspective, the existence of multiple databases and custom (side) databases merely requires that the client connects to additional databases at client start-up time, using the script or start-up icon and configuration files. The creation of the multiple databases and custom (side) databases occurs on the database server. This overview explains why a system administrator might be required to connect to these additional databases. mfghelp (online help) cfg: (object components) gui: (browses, user interface)
Database: Related Application Item:
%URZVH
Multiple Database
To operate multiple inventory sites while consolidating financial information, you must set up a multiple database environment. Use the Multiple Database module to set up and operate the multiple database environment. Multiple Database functions retrieve and update data in other databases. Database connections can be either automatic, manual, or scripted.
Database connection information is accessed for all multiple database functions: central sales orders, distributed purchase orders, and DRP. When these functions are called, MFG/PRO accesses the database connected to the site specified on the transaction. As long as the network connection is operating, the connection is invisible to the user.
Custom (Side) Databases
If you customize MFG/PRO and the standard user fields provided for each file are not adequate, you can create custom (side) databases. These databases should be created and used to hold the new table and field definitions required for the custom programs.
The standard MFG/PRO schema should never be modified to add new tables and fields, since this could complicate subsequent updates. Instead, a copy of the PROGRESS empty database should be modified to create the tables and fields required by the custom programs.
When a client runs the custom code, the client must connect to the custom (side) database to ensure that the custom code will execute.
CHAPTER 2
Database
Management
Topics in this chapter:Large Scale Data Movements 16 Database Backup 16
Delete/Archive and Database Fragmentation 19 Dump and Load 20
Dumping Through MFG/PRO 23
Dumping Through PROGRESS Data Administration Tool 24 Limited Disk Space Dump Procedure 24
Preparing an Empty Database 25
Bulk Load: Creating the Bulk Loader Description File 25 Bulk Loading the Data 26
Bulk Load: Rebuilding the Indexes 27
Loading Through Progress Data Dictionary 27 Post Dump/Load Sequence Initialization 28
Large Scale Data Movements
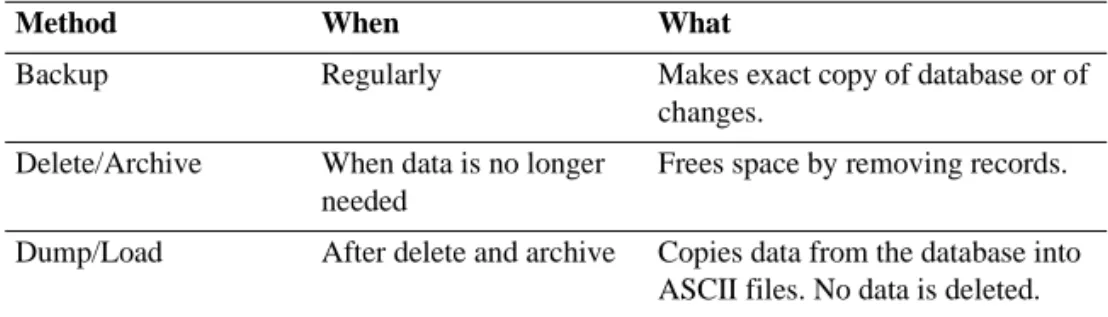
There are three types of large scale data movements, described in Table 2.1.
Table 2.1
Types of Data Movement
Database Backup
Regular database backups are crucial to ensure against data loss. You should back up as often as practical, at least every day. Whatever your schedule, consistency is important.
Database backup involves transferring the database file (single-volume) or files (multi-volume) to media such as tape. Also, you must back up all related database files, including:
• Before-image (.bi) file because it is time-stamped to the database
• After-image (.ai) files, if after-imaging is enabled
However, if you truncate the before-image file, you do not need to back it up. When you truncate the .bi file, PROGRESS updates the database with pertinent before-image information and then empties the .bi file to its minimum length. PROGRESS recreates the .bi file at the next server startup. Truncating is recommended to save time and space during the backup, but it requires you to shut down the database, which may not be feasible if you must operate 24 hours per day, 7 days per week.
The command for truncating the database is:
ProgressDir\bin\_proutil.exe YourDbName -C truncate bi
Method When What
Backup Regularly Makes exact copy of database or of changes.
Delete/Archive When data is no longer needed
Frees space by removing records. Dump/Load After delete and archive Copies data from the database into
DATABASE MANAGEMENT 17
Types of Backup
There are various types of backup.
• Off-line backup means the database is shut down. This method ensures database integrity.
• On-line backup means the database is still running during the backup. It is about 99.9 percent accurate. This method is only available with the PROGRESS backup utility.
• Full backup includes all records and can be time consuming.
• Incremental backup includes only the differences since the date of the last full or incremental backup. For this reason, it is faster.
Backup Schemes
When you choose your type of backup, you must also plan for how you will restore the data. In the simplest case, you perform a daily full backup and, in the event of a failure, restore the whole database.
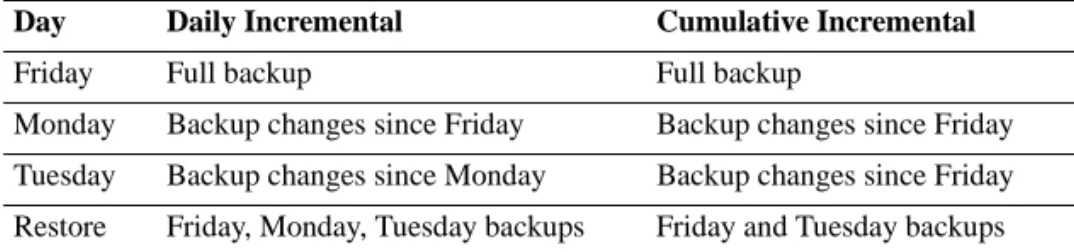
If you choose incremental backups, you must choose whether to back up the changes for each day or to back up the cumulative changes since the last full backup. Table 2.2 presents two examples.
Table 2.2
Backup Scheme Examples
PROGRESS Backup Utilities
You can perform the backup with various third-party utilities or with the PROGRESS utilities. If you run your database 24-hours, 7 days a week, then you must do your backups online. In this case, the only option is to use the PROGRESS backup utility probkup.
Day Daily Incremental Cumulative Incremental
Friday Full backup Full backup
Monday Backup changes since Friday Backup changes since Friday Tuesday Backup changes since Monday Backup changes since Friday Restore Friday, Monday, Tuesday backups Friday and Tuesday backups
With probkup and its counterpart, prorest (for restoration), you can:
• Back up online (servers up) or offline (servers down)
• Perform incremental backups
It is also advantageous to use probkup if you are running after-imaging. After-imaging is an optional type of recovery known as roll forward recovery. It requires a separate disk drive. It can be used without probkup, but some RFUTIL commands will need to be started.
Validating the Backup
Validate the ability to back up and restore your database at least once a month, if not once a week. Use the production database if space is available. Otherwise, use a test database or the default mfg database.
Reliability Test Procedure
You can use this procedure to validate your ability to back up and restore your database.
1 Shut down the database with the standard MFG/PRO shut-down icon.
2 Truncate the .bi file using the PROGRESS proutil utility.
3 Back up the database.
4 Restore the database to a different directory.
5 Run MFG/PRO against the restored database, or you can compare the two databases.
DATABASE MANAGEMENT 19
Offsite Storage
It is a good idea to regularly rotate your backups to an offsite storage area. This provides you with greater security. There are numerous service providers who will assist you with this. Check your yellow pages under Data Storage. An alternative is to rent a bank safety deposit box and store backups there. Offsite storage is less a matter of theft prevention than security should your site burn down or be subject to a natural disaster. Offsite storage should be, if possible, at least 10 miles away.
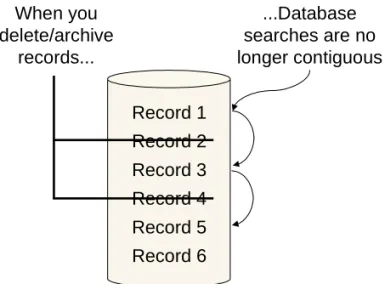
Delete/Archive and Database
Fragmentation
When you perform a delete/archive, the actual database records are deleted, fragmenting your logical database file. Whenever a deletion occurs within the database, the storage area occupied by that data record becomes available to the database to reuse. (The space is not available to the operating system; the .db file size does not decrease.) Quite possibly the deleted record was stored in a larger storage area that held many similar type records.
For example, you have deleted a group of work orders. The storage area they resided in becomes available for use. The RDBMS uses this area within the database file the next time someone enters any type of record(s) that can physically fit in the vacated storage area. For the purpose of this example, a sales quote is the next record entered, and it is placed in the newly vacated area.
Due to the way an indexed database retrieves records, both the work order and sales quote retrieval process will now be more complex. Both these files are fragmented, and so are their indexes.
For the system to retrieve a particular record within these files (work order and sales quote), it starts searching the disk at some point and reads a part of the entire file. It then needs to reposition the physical disk read/write head, and recommence the read process.
Fig. 2.1
Database Fragmentation
Obviously the more fragmented any file becomes the more inefficient the search becomes. For this reason it is best to perform all sub-function delete/archive processes during one particular period, and then defragment your database by performing a dump and load.
Dump and Load
A database dump replicates all data records from selected database tables into ASCII files. The dump does not delete any data from the database. The ASCII files are named after their source tables and have a .d
extension. For example, if you dump the menu detail table (mnd_det), the resulting file would be: mnd_det.d.
The logic for a MFG/PRO dump, or load, is supplied using the programs contained in the dmpprocs (dump procedures) or ldprocs (load procedures) sub-directories. These sub-directories are found off the main MFG/PRO install directory.
If any errors occur during the dump/load, PROGRESS creates an error file (.e extension) in the dump/load directory.
Note Since the MFG/PRO application could produce several related file records during any single transaction, loading of single files into
populated databases could result in loss of integrity between files and needed related files. For this reason, a database should be dumped as a whole, and loaded as a whole.
When you delete/archive records... ...Database searches are no longer contiguous Record 1 Record 2 Record 3 Record 4 Record 5 Record 6
DATABASE MANAGEMENT 21
Reasons for Dumping and Loading Data
The main reasons for a full dump/load of a database data are:
• Resolve database fragmentation, especially after a delete/archive
• Convert from one MFG/PRO version to another
A dump/load reduces the database fragmentation because records that were once scattered within the database are reloaded from the ASCII files in sequential order, creating one continuous logical file order in the database.
Normal Dump/Load Procedure
These are the general steps to follow for a dump/load. Before you perform these steps on a production database, you should perform a test
dump/load on a non-production database in order to estimate the amount of time your machine will take.
To help estimate the time, you can run Database File Size Report
(36.16.2) and chose a representative 5-10% of the files (in terms of size). Dump and load these files and time the process.
1 Check the primary indexes using Database File Size Report (36.16.2). The primary indexes must be all right. If not, you need to rebuild the indexes using the proutil idxbuild command.
2 Create a dump directory on the server.
3 Check for adequate disk space. You will need about 75% of the database size in free space. If you do not have enough space, it is possible to perform a series of partial dumps. Refer to “Limited Disk Space Dump Procedure” on page 24.
4 Make sure all users are logged off.
5 Choose one of the following dump methods:
• From MFG/PRO, use Database File Dump/Load w/Batch (36.16.4).
• From PROGRESS, use the Data Administration Dump/Load.
6 When the dump is complete, shut down the database you dumped and back it up.
7 Prepare a copy of the empty MFG/PRO database (mfgempty) to load the dumped data.
8 Load the dumped data using one of the following methods:
• Run the Bulk Loader option of the PROGRESS PROUTIL utility (recommended)
• Use the PROGRESS Data Administration Dump/Load
Note Although you can use Database File Dump/Load w/ Batch to load data, it is not recommended for loading an entire database because of the performance impact on the network.
9 Once the data is loaded, initialize sequences with Database Sequence Initialization (36.16.17).
10 Back up the database.
Note In general, you should perform all dump and loads on your server machine. However, on DEC Alpha Windows NT machines, you cannot complete dump and loads on the server because ProVISION, which is required, is not available for DEC Alpha on Windows NT. In this case, you must install ProVISION on a client machine and build the .fd file using the client’s Database Dictionary Admin Menu. You then transfer this file to the server using ftp, or another applicable file transfer method. You should always use ftp in binary mode.
About PROGRESS Bulk Loader
The PROGRESS Bulk Loader utility is the fastest load method because it is the only method that does not maintain the indexes at load time. It discards them. This requires a separate index rebuild, but it is still faster than other methods, which reproduce indexes during the load. The overall tasks for performing a bulk load are:
• Create a bulk loader description file from the PROGRESS Data Administration tool. This file maps all of the tables and fields so that PROGRESS can place the data from the .d files.
• Run the proutil utility, bulkload option.
DATABASE MANAGEMENT 23
Dumping Through MFG/PRO
Prerequisites:
• Your dump directory must be created on the server.
• If you have not done so, you must build the dump/load procedures for the Windows client PC. (Dump/load procedures are delivered pre-built with the server media, but they are only used for dumping through a non-interactive batch process.) To create the dump/load procedures, run utmkdl from any MFG/PRO menu. This step takes several minutes.
1 In an MFG/PRO session against your training database, start Batch ID Maintenance (36.14.1). Create two batch IDs called Dump and Load.
2 Select Database File Dump/Load w/Batch (36.16.4), and enter the following
3 Choose Go when ready.
4 Process the dump batch job with one of the following methods.
• Run Batch Request Processor (36.14.13). Type Dump in the Batch IDs field. This method works for a small number of tables, but is not recommended when dumping the whole database.
• If you are dumping an entire database, run a non-interactive batch process on the database server. Refer to “Batch Processes with PROGRESS Prowin32 Batch Client” on page 74 for instructions on setting up non-interactive batch processes.
Field Enter
Database Name Defaults to physical name of primary database. Dumpfile Directory YourDumpDir
Dump/Load Dump
File Name Leave blank to include all fields. To Leave blank to include all fields. Allow Errors, Log file These fields are display only. Output Leave this field blank.
Dumping Through PROGRESS Data
Administration Tool
As an alternative to dumping through MFG/PRO, you can use the tools from PROGRESS.
1 If you have not already done so, create a dump directory.
2 From an MFG/PRO session, start the PROGRESS Data Administration tool using the following substeps.
a From any menu, select the User Menu and choose PROGRESS Editor.
b In the PROGRESS Procedure Editor, select the Tools menu and choose Data Administration.
3 When the Data Administration tool starts, select the Admin menu, choose Dump Data and Definitions, and choose Table Contents.
4 In the Select Tables window, select all or some of the tables and choose OK.
5 In the next dialog, specify your dump directory in the Output File field. In the Code Page field, accept the default. Choose OK to continue.
6 Once the process is complete, you can find the .d file in the dump directory and view it using any text editor.
Limited Disk Space Dump Procedure
If you do not have 75% of the database size in free disk space, you could perform partial dumps (for example, files a-g) into limited disk space. Then run these files to tape, delete them from the disk, and restart the dump/load, selecting files h-x, and so on.
Of course, you absolutely must have at least as much space as your single largest logical database file, typically tr_hist (plus an additional 10% as a safety factor). You can determine these file sizes by running the Database File Size Report (36.16.2).
DATABASE MANAGEMENT 25
Preparing an Empty Database
Always load your dumped data into a copy of the mfgempty database, located in your MFG/PRO installation directory.
Use the PROGRESS prodb command and give the new database a meaningful name. Type the following DOS prompt command from the MFG/PRO installation directory.
ProgressDir\prodb NewProdDb.db mfgempty
If you plan to set up a multi-volume database (which is recommended), you can do so before loading the data. Refer to Chapter 4, “Multi-Volume Database,” on page 43 for further instructions.
Bulk Load: Creating the Bulk Loader
Description File
If you are using the bulk load method, you must create a bulk loader description file of the database.
1 From an MFG/PRO session, start the PROGRESS Data Administration tool using the following steps.
a From any menu, select the User Menu and choose PROGRESS Editor.
b In the PROGRESS Procedure Editor, select the Tools menu and choose Data Administration.
2 When Data Administration starts, select the Admin menu and choose Create Bulk Loader Description File.
3 In the Select Tables window, select all or some of the tables and choose OK.
4 In the next dialog, specify your dump directory in the Output File field. In the Code Page field, accept the default. Choose OK to continue.
6 You can find the .fd file in the dump directory. You can also open it in a text editor to view the results.
7 Exit Data Administration.
Bulk Loading the Data
Bulk loading data is the recommended method because it is the fastest. Prerequisite: Complete the instructions “Preparing an Empty Database” on page 25 and “Bulk Load: Creating the Bulk Loader Description File” on page 25.
1 Verify no server is running against the database using one of the following methods.
• Look in the database directory for the database lock file (.lk).
• Use the Windows NT Task Manager to look for the
_mprosrv.exe process.
If a server is running, shut it down by choosing the Shut Down icon.
2 Open a DOS window.
3 Change to your dump directory.
4 From the dump directory, type the PROUTIL Bulk Loader command. YourPROGRESSDir\bin\_proutil YourDBDir\NewProdDb.db
-C bulkload *.fd
The system proceeds to deactivate all the indexes, then load the .d files, as directed by the .fd file.
DATABASE MANAGEMENT 27
Bulk Load: Rebuilding the Indexes
Upon completion of a Bulk Loader process, you must run an index rebuild. This task is required because the Bulk Loader does not construct indexes at load time. Since a relational database is useless without indexes, they must be rebuilt.
1 To run the index rebuild, enter the following:
YourPROGRESSDir\bin\_proutil YourDBDir\NewProdDb.db -C idxbuild -TM 30 -TB 30
The TM parameter controls the sort speed, and the TB parameter controls blocking sizes.
2 At the following prompt, enter A (all) or S (some). Select one of the following
All - Rebuild all of the indexes
Some - Rebuild only some of the indexes
3 If rebuilding only some indexes, enter the appropriate table and index names one at a time. When you have entered the last table and index, enter: !
4 If the data is correct, answer Yes at the confirmation prompt.
5 Answer Yes at the system prompt Do you have enough disk space for index sorting?
The index sort requires about 75% of the total size of the database.
Loading Through Progress Data
Dictionary
As an option, you can perform this type of load instead of a bulk load. Prerequisite: Complete the instructions “Preparing an Empty Database” on page 25.
1 Start a Progress Procedure Editor session, and connect to your empty target database.
3 In the Data Administration tool, select the Admin menu, choose Load Data and Definitions, and choose Table Contents.
4 In the Select Tables window, select all or some of the tables and choose OK.
5 In the next dialog, specify your dump directory in the Output File field. In the Code Page field, accept the default. Choose OK to continue.
Post Dump/Load Sequence Initialization
After a dump and load, you must initialize the database sequences. Sequences are mechanisms used to obtain system-generated sequential numbers.Start an MFG/PRO session, and choose Database Sequence Initialization (36.16.17) or type utsequp.p at any menu.
CHAPTER 3
Performance Tuning
This chapter summarizes some of steps you can take to tune the database performance. For further details, refer to the PROGRESSSystem Administration Guide, “Managing PROGRESS Performance.”
Topics in this chapter:
Start-Up Parameters and Performance 30 Parameters Affecting Performance 31 Relocation of the Before-Image File 33 PROGRESS Performance Aids 34 PROMON – PROGRESS Monitor 36
Start-Up Parameters and Performance
There are several PROGRESS parameters available to make the system perform better and be more stable. You specify the parameters as part of the command statement that starts a certain PROGRESS task. For example, the following command starts a database server with the database buffer parameter (-B), which allots a specified amount of memory to the database.ProgressDir\bin\_mprosrv.exe \Path\YourProd.db -B 8000 Typically, you specify parameters within a .bat file script. Parameters can also be specified in a separate parameter file (.pf). You cannot specify parameters at the time you invoke the script unless the script was set up with variables. For example, in the following .bat file script, there is a variable (%1) that acts as a placeholder for the database name.
set DLC = \usr\dlc
set PROMSGS = %DLC%\promsgs set PROTERMCAP = %DLC%\protermcap %DLC%\bin\_mprosrv.exe %1
You use this script by entering the script name (for example, startdb), followed by the database name.
startdb mfgtrain.db
However, if you type the script name, followed by the -B parameter, it would have no effect because the script startup has no provisions to accept the –B parameter input. You have to edit the command line of the script to read:
%DLC%\bin\_mprosrv.exe %1 -B 8000
Parameter Applicability
Keep in mind that parameters apply to specific PROGRESS executables. In the above example, the -B parameter was passed to the _mprosrv.exe (multiuser PROGRESS server) task. The -B parameter does not apply to the user session task, _prowin32.exe.
Also, some parameters apply at the execution of a program while others apply at the time you connect to a database.
PERFORMANCE TUNING 31
Parameters Affecting Performance
This section discusses some of the more commonly used PROGRESS startup parameters. For a more comprehensive list and explanation, refer to PROGRESS System Administration Reference.
Table 3.1
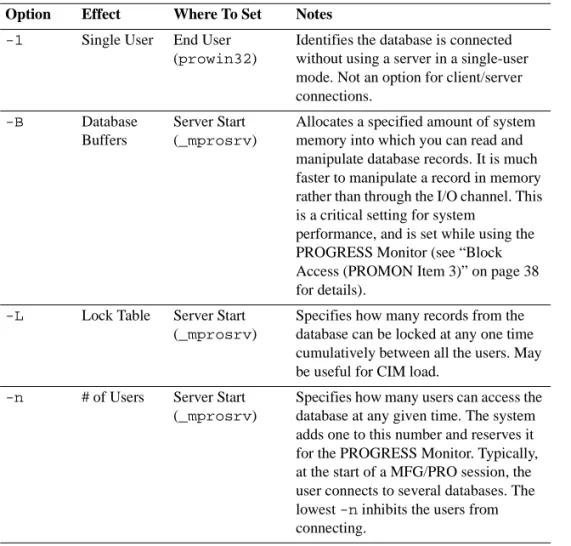
Performance Parameters Option Effect Where To Set Notes
-1 Single User End User (prowin32)
Identifies the database is connected without using a server in a single-user mode. Not an option for client/server connections.
-B Database
Buffers
Server Start (_mprosrv)
Allocates a specified amount of system memory into which you can read and manipulate database records. It is much faster to manipulate a record in memory rather than through the I/O channel. This is a critical setting for system
performance, and is set while using the PROGRESS Monitor (see “Block Access (PROMON Item 3)” on page 38 for details).
-L Lock Table Server Start (_mprosrv)
Specifies how many records from the database can be locked at any one time cumulatively between all the users. May be useful for CIM load.
-n # of Users Server Start (_mprosrv)
Specifies how many users can access the database at any given time. The system adds one to this number and reserves it for the PROGRESS Monitor. Typically, at the start of a MFG/PRO session, the user connects to several databases. The lowest -n inhibits the users from connecting.
-g Before-Image File Name
Everywhere Used by _mprosrv if the database is accessed using a server. It is passed to _progres if needed during single-user access, as well as to PROUTIL or other PROGRESS tasks connecting single users. Its purpose is to direct the system to the location of the .bi file if it has been moved anywhere other than the database directory.
NOTE: PROGRESS recommends not using this parameter and instead relocating the .bi file through a multi-volume structure.
-mmax Maximum Memory
Client Start (prowin32)
Specifies an allocation of memory for the end user. This memory is where compiled procedures can reside in memory, and scratch-pad work can be done.
-D Directory Entries
Client Start (prowin32)
Specifies the length of the user’s directory tables; i.e., the number of files a user can have open at any given point. -a After-Image
File Location
Everywhere Same as -g, but pertains to the .ai file, which is optional. If you use roll forward recovery, the server, or the user’s session, needs to know where the .ai file is. This specifies where to find the file.
-T Temp Files Client Start (prowin32)
PROGRESS creates temp files, and sort files are created in the directory MFG/PRO was started from. You can redirect these files by using the -T followed by the directory. -TB Temp File
Block Size
Client Start (prowin32) IDXBUILD
PROGRESS allocates a certain size to temporary files. When this size is exceeded, system operation halts, and then reallocates a new size. By using -TB, you can specify a larger block size for temporary files so that the system does not have to stop and reallocate as often. This parameter is particularly helpful during an index build. Option Effect Where To Set Notes
PERFORMANCE TUNING 33
Relocation of the Before-Image File
One of the biggest factors contributing to poor system performance is I/O contention. In a multiuser system, you have several users simultaneously reading or writing to the database file. If there is only one physical I/O channel to the database, all users must wait their turn. In addition, with each potential record update operation, PROGRESS writes to the before-image (.bi) file. This additional file has an excessive amount of I/O. By default, both the database and before-image files reside on the same physical disk drive (I/O channel), together creating severe I/O contention. For this reason, you can make your system more efficient by relocating the .bi file to a separate I/O channel and disk drive.
When you relocate the before-image file, you must specify to the system where it is. You can use one of the following methods.
• Set up a multi-volume database with .bi extents specified for a separate disk drive. This is the recommended method.
• If you do not set up a multi-volume database, you can move the .bi file with standard operating system commands and use the -g
parameter in your start-up scripts and other operations.
Also, the system needs the -g parameter incorporated into any PROUTIL, DBUTIL, or RFUTIL command, whether called using a script, an icon, or on the command line.
-TM Sort Speed IDXBUILD Increases the speed at which the idxbuild sort is performed. -by Bypass Server Shut
(_mprshut)
When the database is shut down, you are given a four-selection menu. Using -by bypasses this menu for unattended shutdown operations.
PROGRESS Performance Aids
There are several other performance aids available for use. Among these are:
• Before-Image Writers
• After-Image Writers
• Asynchronous Page Writers
• Watchdog
• PROMON
Before-Image Writers
The before-image writer (BIW) queues up the before-image data in a memory cache area and actually performs the write at one time, after an entire block has been accumulated.
You can start only one BIW per database. To start the BIW use: ProgressDir\bin\probiw dbpath\dbname
After-Image Writers
The after-image writer (AIW) is similar to the before-image writer, except it deals with writes to the after-image file, if you enacted the roll-forward recovery feature. To start the AIW, use:
ProgressDir\bin\proaiw dbpath\dbname
Asynchronous Page Writers
Similar to the before-image and after-image writers, an Asynchronous Page Writer (APW) queues up database writes, waiting for an entire page of data to be accumulated prior to performing the write. You can start as many APWs as needed per database; however, we recommend no more than two.
Using PROMON (PROGRESS Monitor) you can determine how many writes are being performed by the APW, and determine when starting another may be needed.
PERFORMANCE TUNING 35
To start an APW enter:
ProgressDir\bin\proapw dbpath\dbname
Watchdog
Watchdog is a PROGRESS task that monitors the system for abandoned processes, such as an end-user’s session still connected to a database whose server has been shut down. This situation can occur when a user fails to log off. Watchdog kills the end-user session after a predetermined length of time. It is advisable to use this task on your production database. To start Watchdog enter:
ProgressDir\bin\prowdog dbpath\dbname
Performance Aid Summary
You should modify your server startup script or batch file to start up one BIW, one APW, WATCHDOG, and one AIW (if using after imaging) at production database startup time. At this point, you should be able to set up an advantageous client/server environment, coupled with efficiently defined startup parameters, to achieve a well-performing database system.
PROMON – PROGRESS Monitor
PROGRESS offers a monitor utility, PROMON, that can be started against any multiuser database. It can be used to monitor your database setup to determine efficiency or problem areas. PROMON gives you some insight into current users, locked records, system resource settings, and so forth.
You start PROMON by typing:
ProgressDir\bin\promon dbpath\dbname You receive the following menu:
PROGRESS MONITOR Version 8 Database: QAD\mfgpro\mfgtrain
1. User Control
2. Locking and Waiting Statistics 3. Block Access
4. Record Locking Table 5. Activity
6. Shared Resources 7. Database Status 8. Shut Down Database
T. Transactions Control L. Resolve Limbo Transactions C. Coordinator Information
M. Modify Defaults Q. Quit
Selections 1-4 present you with a secondary menu with the following options:
1. Display all entries 2. Match a user number
3. Match a range of user numbers
4. Match a record id (only on 4-Record Locking Table)
PERFORMANCE TUNING 37
The following sections discuss some of the more commonly used features of the monitor. The remainder of the PROMON utility is to be used in distributed database environment only, or to modify the defaults of the PROMON utility itself. For more information, refer to the PROGRESS
System Administration Reference manual.
User Control (PROMON Item 1)
This selection shows you all/specific users logged on to the database. You see the user number (as referred to by PROMON), login name, Type (broker, monitor, self-service user, server, etc.), previous and current transactions, process identifier, semaphores, server used, login date and time.
Locking and Waiting Statistics (PROMON Item 2)
This selection shows you all/specific users that are holding, or have held (during this database session), any record locks, or are currently waiting for specific records. The statistics are shown individually and
cumulatively. This also shows completed transactions and schema changes.
8VHU 1DPH 7\SH :DLW 7UDQV 3,' 6HP 659 /RJLQ 7LPH
URRW %52.
VMWUDLQ 6(/)
VMWUDLQ 021
7\SH 8VU 1DPH 5HFRUG 7UDQV 6FKHPD
/RFN 727$/ :DLW 727$/ /RFN URRW :DLW URRW /RFN VMWUDLQ :DLW VMWUDLQ
Block Access (PROMON Item 3)
This selection shows the number of database requests users have made, along with total requests. It also breaks down the requests into database writes and database reads from the .db, .bi, and .ai files.
The number of database reads vs the number of database requests is a critical measurement when determining the -B (database buffers) parameter setting.
As shown, we requested data from the database 804590 times. Of those requests, we had to go to the database through the relatively slow I/O channel 72152 times. This means that the other 732438 times we were able to retrieve database records directly from relatively fast buffer memory. This equates to a buffer hit percentage of 91% (732438 ÷ 804590 x 100). This is how you determine the setting for the -B
parameter.
During peak transaction volume, monitor this selection and selection 5, Activity, which shows buffers hits as a percentage. After monitoring for one to two weeks, do the following.
• Shut down the database server
• Modify the startup script with a higher -B
• Restart the server
• Monitor again during peak load
Your buffer hits should increase. Continue this process until at some point the buffer hits percentage drops off. This is due to the system going into swapping. Revert the -B parameter to your previous setting, or split the difference and monitor again. You will zero in on the most optimal buffer hits percentage, ideally 85% or greater.
This selection can also aid in determining when to start additional APWs since the writes are shown here. If the APW writes account for 50% or less, start another one.
7\SH 8VU 1DPH '%5HTVW '%5HDG '%:ULWHV %,5HDGV %,:ULWHV $,5HDGV $,:ULWHV $&& 727$/ $&& URRW $&& VMWUDLQ
PERFORMANCE TUNING 39
Record Locking Table (PROMON Item 4)
This selection shows you the exact record ID and the chain number of each record a user currently has locked. It also shows the type of lock the user is holding (exclusive, shared, etc.).
Activity (PROMON Item 5)
This selection has a large amount of data and is useful when trying to calculate the -B parameter because it shows the buffer hits as a percentage. Also use this selection to determine when to start APWs, BIWs, and AIWs.
Shared Resources (PROMON Item 6)
This selection shows the setting of the current system parameters. It also shows other information, such as whether a BIW is running, an AIW, Watchdog, how many APWs, how many monitors, etc.
8VU 1DPH &KDLQ 5HFLG /RFN )ODJV
VMWUDLQ 5(& 6+5
VMWUDLQ 5(& 6+5
VMWUDLQ 5(& (;&/
6KDUHG5HVRXUFHV $IWHULPDJHILOHQDPHD 1XPEHURIGDWDEDVHEXIIHUV% 1XPEHURIEHIRUHLPDJHEXIIHUVELEXIV 1XPEHURIDIWHULPDJHEXIIHUVDLEXIV %HIRUHLPDJHILOHQDPHJ &XUUHQWVL]HRIORFNLQJWDEOH/ 0D[LPXPQXPEHURIXVHUVQ
Database Status (PROMON Item 7)
This selection gives physical characteristics about the database, the version number, whether it is open, whether it is damaged, total number of blocks, last transaction number, character set, last two open date and times, last two times the .bi file was opened, schema time stamp, last backup time, last bi truncation, etc.
Shut Down Database (PROMON Item 8)
This selection gives you the same menu you get if you run the _mprshut task without using the -by (bypass menu) option.
Using this, you could shut down the database and disconnect users. This is how you could shutdown an APW, BIW, Watchdog, AIW, or disconnect a certain user.
The following submenu appears. 1 Disconnect a User 2 Unconditional Shutdown 3 Emergency Shutdown x Exit
Enter Choice >
Disconnect a User. This option lets you disconnect a user. Selecting 1 results in a prompt asking for the user to be disconnected. If you wanted to stop the APW, choose User 1, and this would disconnect/stop the user. Unconditional Shutdown. This option is a gracious shutdown. Any pending transactions are rolled backward from the .bi file as the users are disconnected.
8VU SLG WLPHRIORJLQ XVHULG
)UL'HF DSZ
PERFORMANCE TUNING 41
Emergency Shutdown. This option kills all user processes. This is not a gracious shutdown, since the pending transactions are not rolled back from the .bi file. At next server startup, this condition is detected, and the transactions cleaned up at that point. Of course, you are vulnerable to any damage that occurs to your .bi file in this interim.
CHAPTER 4
Multi-Volume
Database
This chapter summarizes the PROGRESS multi-volume database feature, which is recommended for better performance. For full details on multi-volume databases, refer to the PROGRESS SystemAdministration Guide.
Topics in this chapter:
Multi-Volume Database Overview 44 Multi-Volume Components 45 Multi-Volume Set-Up Steps 46 Determining the Allocation Sizes 47 Creating the Structure Description File 47 Creating a Void Multi-Volume Database 51 Load Schema and Data 52
Multi-Volume Database Overview
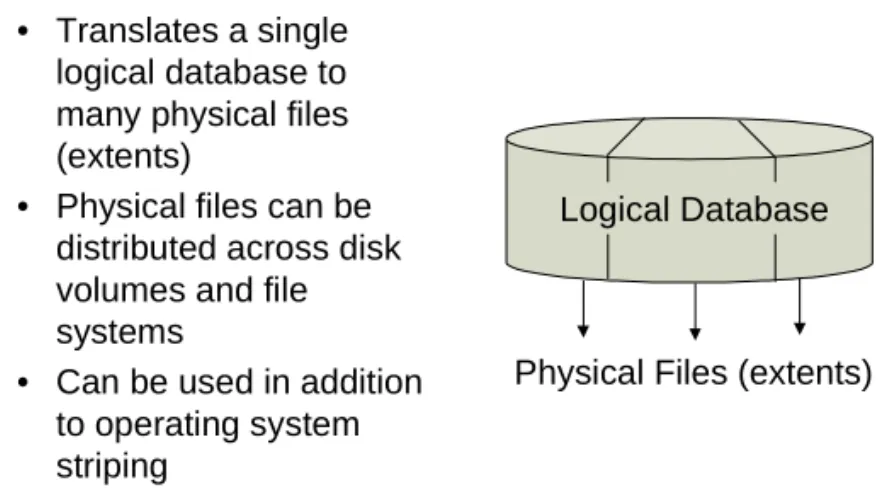
By default, PROGRESS databases–including the MFG/PROdatabases–are single-volume, meaning the database equates to a single physical file on disk. Reading and writing to a single physical file often causes input and output (I/O) contention. To alleviate this problem and others, PROGRESS offers a multi-volume database configuration. With a multi-volume database, one logical database is comprised of many physical files. These physical files have a pre-allocated size and directory location, usually scattered across many physical disks, I/O channels, or both. All these physical files together constitute the database.
Note Some operating systems offer a similar feature, called disk striping, that packages several physical disks into one logical disk volume. You can use striping in addition to the multi-volume database feature. Fig. 4.1
Multi-Volume
Database Feature • Translates a single
logical database to many physical files (extents)
• Physical files can be distributed across disk volumes and file systems
• Can be used in addition to operating system striping
Logical Database
MULTI-VOLUME DATABASE 45
Multi-Volume Database Advantages
In general, a multi-volume database configuration:• Improves performance by avoiding disk channel I/O contention: With the physical files scattered across your disk drives, simultaneous read and write requests process more efficiently.
• Overcomes problems with operating system file size limits: For example, if your database was 5 gigabyte (GB) in size, but your operating system had a file size limitation of 2GB, you could create a multi-volume database using 25 200MB extents.
Multi-Volume Components
The components of a multi-volume database are:• Structure description file (extension .st): a text file used during the creation of the multi-volume database. It defines the number, location, and size of each extent.
• Database structure extent (extension .db): the main database extent that defines the location of all other extents. The physical .db file contains no data.
• Database extents (extension .dn): the files that contain database records.
• Before-image (BI) extents (extension .bn): the files containing before-image records.
Note A multi-volume database can also include after-image (AI) extents, if you implement the after-imaging feature. Since after-imaging is an optional feature, this chapter does not discuss it.
Fig. 4.2
Components of a Multi-Volume Database
Multi-Volume Set-Up Steps
The general set-up steps are:1 Determine the number and size of extents.
2 Create a structure description file (.st extension) to identify the extents, sizes, and locations.
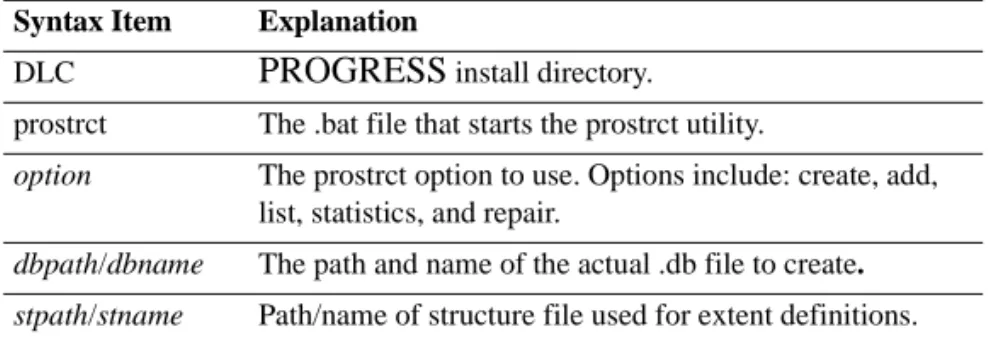
3 Run the PROSTRCT CREATE utility against the structure
description file. This utility creates a void multi-volume database with no schema or data.
4 Load data definitions and, if applicable, data. Typically, you do this by copying an existing database to the multi-volume database structure. Database Structure Extent (.db) Structure Description File (.st) Structure Description File (.st) Database Extent 1 (.d1) Database Extent 2 (.d2) Before Image Extent 1 (.b1) . . . . . .
Determine the number and size of the extents.
Determine the number and size of the extents.
Create the structure description file.
Create the structure description file.
Run the prostrct utility. Creates a void multi-volume database.
Run the prostrct utility. Creates a void multi-volume database.
Load database definitions and data (you can copy an existing database).
Load database definitions and data (you can copy an existing database).
MULTI-VOLUME DATABASE 47
Determining the Allocation Sizes
To set up the multi-volume structure, you must decide how much space to allocate for the database, including the size and number of extents. There is no exact science for this task, but you can follow these guidelines:
• Target a total database size that allows for at least a year’s growth. If your database has grown from 1GB to 2GB over the past year, and you foresee the same approximate growth rate, target at least a 3GB multi-volume structure.
• For a new installation, start off with a 2GB total database size at a minimum.
• Make no single extent greater than 500MB. The preferred extent size is 200MB.
• Limit your database to 20 fixed extents, unless this exceeds the 500MB size. The maximum is 256 extents.
• Pay attention to the operating system limits on the maximum number of open files or file handles per user. Because each extent is a separate file, they may add to this operating system limitation.
Example size allocations:
A 2GB database should have 10 extents, 200MB each. A 6GB database should have 20 extents, 300MB each. A 10GB database should have 20 extents, 500MB each. A 20GB database should have 40 extents, 500MB each.
Creating the Structure Description File
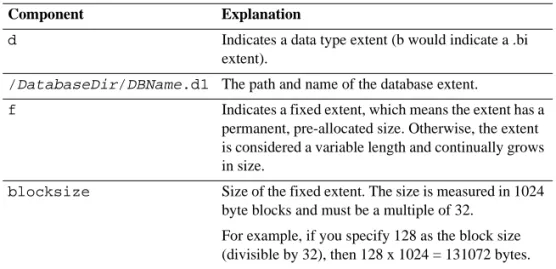
Once you have determined the allocation sizes, you must describe this data to the PROGRESS system. This is done by creating a structure description file in a text editor.A line from a structure file looks like:
d /DatabaseDir/DBName.d1 f blocksize
Table 4.1
Structure Description File Components
Converting the Extent Size to Blocks
Use the following to determine the block size for each extent in the structure description file.
Table 4.2
Extent Block Size
The example block size–195,328–yields an extent size of 200,015,872 (195328 x 1024). This is as close to the 200MB target as you can get.
Component Explanation
d Indicates a data type extent (b would indicate a .bi extent).
/DatabaseDir/DBName.d1 The path and name of the database extent.
f Indicates a fixed extent, which means the extent has a permanent, pre-allocated size. Otherwise, the extent is considered a variable length and continually grows in size.
blocksize Size of the fixed extent. The size is measured in 1024 byte blocks and must be a multiple of 32.
For example, if you specify 128 as the block size (divisible by 32), then 128 x 1024 = 131072 bytes.
Step Example
1 Start with the extent size 200MB = 200,000,000 bytes 2 Divide by 1024 (bytes in each block) 200,000,000 ÷ 1024 = 195312.5
3 Divide by 32 195312.5 ÷ 32 = 6103.515625
4 Round up if necessary 6104