Grid Computing in SAS
®
9.3
Second Edition
Grid Computing in SAS® 9.3, Second Edition
Copyright © 2012, SAS Institute Inc., Cary, NC, USA All rights reserved. Produced in the United States of America.
For a hardcopy book: No part of this publication may be reproduced, stored in a retrieval system, or transmitted, in any form or by any means, electronic, mechanical, photocopying, or otherwise, without the prior written permission of the publisher, SAS Institute Inc.
For a Web download or e-book:Your use of this publication shall be governed by the terms established by the vendor at the time you acquire this publication.
The scanning, uploading, and distribution of this book via the Internet or any other means without the permission of the publisher is illegal and punishable by law. Please purchase only authorized electronic editions and do not participate in or encourage electronic piracy of copyrighted materials. Your support of others' rights is appreciated.
U.S. Government Restricted Rights Notice: Use, duplication, or disclosure of this software and related documentation by the U.S. government is subject to the Agreement with SAS Institute and the restrictions set forth in FAR 52.227–19 Commercial Computer Software-Restricted Rights (June 1987).
SAS Institute Inc., SAS Campus Drive, Cary, North Carolina 27513. 1st printing, March 2012
SAS® Publishing provides a complete selection of books and electronic products to help customers use SAS software to its fullest potential. For
more information about our e-books, e-learning products, CDs, and hard-copy books, visit the SAS Publishing Web site at
support.sas.com/publishing or call 1-800-727-3228.
SAS® and all other SAS Institute Inc. product or service names are registered trademarks or trademarks of SAS Institute Inc. in the USA and other
countries. ® indicates USA registration.
Contents
What’s New in SAS Grid Manager 9.3 . . . v
Recommended Reading . . . vii
PART 1
Grid Computing for SAS
1 Chapter 1 • What Is SAS Grid Computing? . . . 3SAS Grid Computing Basics . . . 3
SAS Grid Topology . . . 5
What Types of Processing Does a Grid Support? . . . 6
What Business Problems Can a Grid Solve? . . . 8
Chapter 2 • Planning and Configuring a Grid Environment . . . 11
Installation and Configuration Overview . . . 11
Configuring the File Server . . . 12
Installing Platform Suite for SAS . . . 12
Configuring the Grid Control Server . . . 12
Configuring the Grid Nodes . . . 17
Configuring Client Applications . . . 17
Modifying SAS Logical Grid Server Definitions . . . 17
Modifying Grid Monitoring Server Definitions . . . 20
Naming the WORK Library . . . 21
Installing and Configuring SAS Grid Manager Client Utility . . . 21
Chapter 3 • Managing the Grid . . . 25
Overview of Grid Management . . . 25
Modifying Configuration Files with Platform RTM for SAS . . . 26
Specifying Job Slots for Machines . . . 27
Using Queues . . . 28
Defining and Specifying Resources . . . 31
Using Multiple Application Server Contexts . . . 33
Chapter 4 • Enabling SAS Applications to Run on a Grid . . . 37
Overview of Grid Enabling . . . 38
Using SAS Display Manager with a SAS Grid . . . 38
Submitting Batch SAS Jobs to the Grid . . . 40
Scheduling Jobs on a Grid . . . 44
Comparing Grid Submission Methods . . . 44
Enabling Distributed Parallel Execution of SAS Jobs . . . 45
Using SAS Enterprise Guide and SAS Add-In for Microsoft Office with a SAS Grid . 46 Using SAS Stored Processes with a SAS Grid . . . 48
Using SAS Data Integration Studio with a SAS Grid . . . 48
Using SAS Enterprise Miner with a SAS Grid . . . 51
Using SAS Risk Dimensions with a SAS Grid . . . 53
Using SAS Grid Manager for Server Load Balancing . . . 53
Chapter 5 • High Availability . . . 57
Setting Up High Availability for Critical Applications . . . 58
Restarting Jobs . . . 61
Chapter 6 • Using Grid Management Applications . . . 65
Using Platform RTM for SAS . . . 65
Using Grid Manager Plug-in . . . 66
Chapter 7 • Troubleshooting . . . 73
Overview of the Troubleshooting Process . . . 73
Verifying the Network Setup . . . 73
Verifying the Platform Suite for SAS Environment . . . 75
Verifying the SAS Environment . . . 77
PART 2
SAS Grid Language Reference
81 Chapter 8 • SAS Functions for SAS Grid . . . 83Dictionary . . . 83
Chapter 9 • SASGSUB Command . . . 97
SASGSUB Overview . . . 97
Dictionary . . . 97
PART 3
Appendix
111 Appendix 1 • Supported Job Options . . . 113Glossary . . . 115
What’s New in SAS Grid Manager
9.3
Overview
SAS Grid Manager has the following new features and enhancements:
• The capability for SAS Grid Manager to provide load balancing for stored process servers, OLAP servers, and pooled workspace servers has been added.
• Support has been added in the SAS Add-In 4.3 for Microsoft Office to enable tasks to be processed on a grid.
• Support has been added in SAS Enterprise Guide 5.1 and the SAS Add-In 5.1 for Microsoft Office to automatically run jobs on a grid.
• New options have been added to SAS Grid Manager Client Utility, including the ability to stage files into and out of the grid.
Grid Support for SAS Servers
SAS Grid Manager can now be used to provide load balancing for the following types of servers (in addition to workspace servers) running in a grid:
• stored process servers • OLAP servers
• pooled workspace servers
This capability provides a robust way to enable load balancing for any clients that use these servers.
Grid Support for the SAS Add-In for Microsoft
Office
The SAS Add-In 4.3 for Microsoft Office provides the capability to process tasks on a grid. Options are provided to include the pre- and post-code required to submit tasks to the grid and to generate ODS macros.
Automatic Grid Processing for SAS Enterprise
Guide and the SAS Add-In for Microsoft Office
SAS Enterprise Guide 5.1 and the SAS Add-In 5.1 for Microsoft Office provide support for automatically running jobs on a grid. The Use grid if available option on the Project Properties window and the Task Properties window specify that the project or task automatically runs on an available grid.
New Options for SAS Grid Manager Client Utility
The following new options have been added to the SAS Grid Manager Client Utility (SASGSUB):
GRIDWAIT
specifies that the SAS Grid Manager Client Utility waits until the job has completed running, either successfully or with an error. If the job does not complete, it must be ended manually.
GRIDLRESTARTOK
specifies that a job can be restarted at a labeled section GRIDRUNCMD
specifies a command (other than a SAS command) that is run on the grid
In addition to using a shared directory, you can use staging to move files into and out of the grid. The files to be moved to the grid are stored in a specified staging directory, and a specified transfer program moves the files into the grid. When processing is complete, the files are transferred back to the staging directory. Use the SAS Deployment Wizard during the installation process to specify whether your grid will use a shared directory or staging. If you use staging, you must specify a staging directory and transfer program. The following new options have been added to SASGSUB to support staging: GRDISTAGECMD
specifies the remote copy command used to stage files to the grid GRIDSTAGEFILEHOST
specifies the name of the host that stores files that are staged into the grid GRIDFORCECLEAN
specifies that the job directory on the grid is deleted, regardless of whether the job was successful or not
The Grid Manager Client Utility can now read license file information from metadata, rather than having to specify it on the -GRIDLICENSEFILE option.
Recommended Reading
• SAS/CONNECT User's Guide
• SAS Deployment Wizard User's Guide
• SAS Intelligence Platform: Installation and Configuration Guide
• SAS Language Reference: Dictionary
• SAS Macro Language: Reference
• Scheduling in SAS
For a complete list of SAS publications, go to support.sas.com/bookstore. If you have questions about which titles you need, please contact a SAS Publishing Sales
Representative: SAS Publishing Sales SAS Campus Drive Cary, NC 27513-2414 Phone: 1-800-727-3228 Fax: 1-919-677-8166 E-mail: [email protected]
Web address: support.sas.com/bookstore
Part 1
Grid Computing for SAS
Chapter 1
What Is SAS Grid Computing? . . . 3
Chapter 2
Planning and Configuring a Grid Environment . . . 11
Chapter 3
Managing the Grid . . . 25
Chapter 4
Enabling SAS Applications to Run on a Grid . . . 37
Chapter 5
High Availability . . . 57
Chapter 6
Using Grid Management Applications . . . 65
Chapter 7
Troubleshooting . . . 73 1
Chapter 1
What Is SAS Grid Computing?
SAS Grid Computing Basics . . . 3
SAS Grid Topology . . . 5
What Types of Processing Does a Grid Support? . . . 6
Multi-User Workload Balancing . . . 6
Parallel Workload Balancing . . . 7
Distributed Enterprise Scheduling . . . 7
SAS Applications That Support Grid Processing . . . 7
What Business Problems Can a Grid Solve? . . . 8
Many Users on Single Resource . . . 8
High Availability . . . 8
Increased Data Growth . . . 9
Running Larger and More Complex Analysis . . . 9
Need for a Flexible IT Infrastructure . . . 9
SAS Grid Computing Basics
A SAS grid computing environment is one in which SAS computing tasks are distributed among multiple computers on a network, all under the control of SAS Grid Manager. In this environment, workloads are distributed across a grid of computers. This workload distribution enables the following functionality:
Workload balancing
enabling multiple users in a SAS environment to distribute workloads to a shared pool of resources.
Accelerated processing
allowing users to distribute subtasks of individual SAS jobs to a shared pool of resources. The grid enables the subtasks to run in parallel on different parts of the grid, which completes the job much faster.
Scheduling jobs
allowing users to schedule jobs, which are automatically routed to the shared resource pool at an appropriate time.
SAS Grid Manager provides load balancing, policy enforcement, efficient resource allocation, prioritization, and a highly available analytic environment for SAS products and solutions running in a shared grid environment. It also separates the SAS
applications from the infrastructure used to execute the applications. This enables you to transparently add or remove hardware resources as needed and also provides tolerance of
hardware failures within the grid infrastructure. SAS Grid Manager integrates the resource management and scheduling capabilities of the Platform Suite for SAS with the SAS 4GL syntax and subsequently with several SAS products and solutions.
SAS Grid Manager includes these components, as illustrated in Figure 1.1 on page 5. :
Grid Manager plug-in
a plug-in for SAS Management Console that provides a monitoring and management interface for the jobs and resources in your grid
grid syntax
the SAS syntax necessary to grid-enable the SAS workload Platform Suite for SAS
components provided by Platform Computing to provide efficient resource allocation, policy management, and load balancing of SAS workload requests. The Platform Suite for SAS includes these components:
Load Sharing Facility (LSF)
this facility dispatches all jobs submitted to it, either by Process Manager or directly by SAS, and returns the status of each job. LSF also manages any resource requirements and performs load balancing across machines in a grid environment.
Process Manager (PM)
this is the interface used by the SAS scheduling framework to control the submission of scheduled jobs to LSF and manage any dependencies between the jobs. Process Manager includes two optional components, Calendar Editor and Flow Manager.
Calendar Editor is a scheduling client for a Process Manager server. It enables you to create new calendar entries for time dependencies.
Flow Manager provides a visual representation of flows that are created and scheduled through the Schedule Manager plug-in as well as reports scheduled through SAS Web Report Studio. Flow Manager enables you to view and update the status of jobs in a flow and rerun jobs.
Grid Management Services (GMS)
this is the interface to the Grid Manager plug-in in SAS Management Console. It provides the run-time information about jobs, hosts, and queues for display in SAS Management Console.
Platform MPI
this is a high-performance implementation of the Message Passing Interface (MPI) standard for both the Linux and Microsoft Windows operating systems. It provides the middleware used by grid-enabled SAS procedures.
Platform RTM for SAS
a Web-based tool that enables you to graphically view the status of devices and services in a SAS grid environment as well as manage the policies and configuration of the grid. This application is not part of Platform Suite for SAS, but can be downloaded separately from http://www.sas.com/apps/demosdownloads/ platformRTM_PROD__sysdep.jsp?packageID=000669
SAS Grid Topology
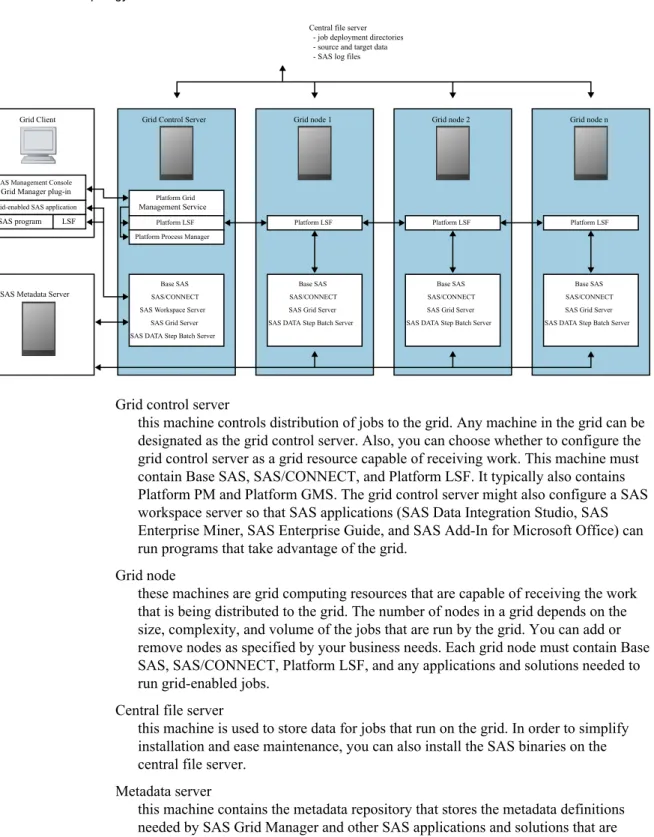
As illustrated below, a grid configuration consists of these main components: Figure 1.1 Grid Topology
SAS Management Console
Grid-enabled SAS application
SAS program LSF Grid Manager plug-in
Grid Control Server
Platform Grid
Platform LSF Platform Process Manager
Base SAS SAS/CONNECT SAS Workspace Server
SAS Grid Server SAS DATA Step Batch Server
Management Service
Grid node 1
Base SAS SAS/CONNECT SAS Grid Server SAS DATA Step Batch Server
Platform LSF
Grid node 2
Base SAS SAS/CONNECT SAS Grid Server SAS DATA Step Batch Server
Platform LSF
Grid node n
Base SAS SAS/CONNECT SAS Grid Server SAS DATA Step Batch Server
Platform LSF
Central file server - job deployment directories - source and target data - SAS log files
Grid Client
SAS Metadata Server
Grid control server
this machine controls distribution of jobs to the grid. Any machine in the grid can be designated as the grid control server. Also, you can choose whether to configure the grid control server as a grid resource capable of receiving work. This machine must contain Base SAS, SAS/CONNECT, and Platform LSF. It typically also contains Platform PM and Platform GMS. The grid control server might also configure a SAS workspace server so that SAS applications (SAS Data Integration Studio, SAS Enterprise Miner, SAS Enterprise Guide, and SAS Add-In for Microsoft Office) can run programs that take advantage of the grid.
Grid node
these machines are grid computing resources that are capable of receiving the work that is being distributed to the grid. The number of nodes in a grid depends on the size, complexity, and volume of the jobs that are run by the grid. You can add or remove nodes as specified by your business needs. Each grid node must contain Base SAS, SAS/CONNECT, Platform LSF, and any applications and solutions needed to run grid-enabled jobs.
Central file server
this machine is used to store data for jobs that run on the grid. In order to simplify installation and ease maintenance, you can also install the SAS binaries on the central file server.
Metadata server
this machine contains the metadata repository that stores the metadata definitions needed by SAS Grid Manager and other SAS applications and solutions that are
running on the grid. Although it is recommended that the SAS Metadata Server be on a dedicated machine, it can be run on the grid control server.
SAS Management Console
this application is used to manage the definitions in the metadata repository, to submit jobs to the grid through the Schedule Manager plug-in, and to monitor and manage the grid through the Grid Manager plug-in.
Grid clients
submits jobs to the grid for processing, but is not part of the grid resources available to execute work.
Examples of grid clients are:
• a SAS Data Integration Studio client, a SAS Enterprise Miner client, or a SAS Enterprise Guide client that uses a workspace server in the grid. Platform LSF is not required on this client machine.
• a SAS Management Console client, that uses the Schedule Manager plug-in or another application to schedule SAS workflows. Platform LSF is not required on this client machine.
• a SAS Foundation install that is used to run a program that submits work to the grid. The submitted work can be entire programs or programs broken into parallel chunks. This client must have Base SAS, SAS/CONNECT, and Platform LSF installed. Platform LSF is required to submit the SAS workload to the grid. • a SAS Grid Manager Client Utility. SAS is not required to be installed on this
client, but Platform LSF is required to submit the SAS workload to the grid.
What Types of Processing Does a Grid Support?
Multi-User Workload BalancingMost organizations have many SAS users performing a variety of query, reporting, and modeling tasks and competing for the same resources. SAS Grid Manager can help bring order to this environment by providing capabilities such as the following:
• specifying which jobs get priority
• deciding the share of computing resources used by each job • controlling the number of jobs that are executing at any one time
In practice, SAS Grid Manager acts as a gatekeeper for the jobs submitted to the grid. As jobs are submitted, SAS Grid Manager dispatches the job to grid nodes, preventing any one machine from being overloaded. If more jobs are submitted than can be run at once, SAS Grid Manager submits as many jobs as can be run. The rest of the jobs are held in a queue until resources are free, and then the jobs are dispatched to be run. SAS Grid Manager can also use job priority to determine whether a job is run immediately or held in a queue.
The application user notices little or no difference when working with a grid. For example, users can define a key sequence to submit a job to a grid rather than running it on their local workstation. Batch jobs can be run using wrapper code that adds the commands needed to run the job in the grid. SAS Enterprise Guide applications can be set up to automatically insert the code needed to submit the job to the grid.
Parallel Workload Balancing
Some SAS programs consist of subtasks that are independent units of work and can be distributed across a grid and executed in parallel. You can use SAS syntax to identify the parallel units of work in these programs, and then use SAS Grid Manager to distribute the programs across the grid. Using parallel workload balancing can substantially accelerate the entire application.
Applications such as SAS Data Integration Studio, SAS Risk Dimensions, and SAS Enterprise Miner are often used for iterative processing. In this type of processing, the same analysis is applied to different subsets of data or different analysis is applied to a single subset of data. Using SAS Grid Manager can improve the efficiency of these processes, because the iterations can be assigned to different grid nodes. Because the jobs run in parallel, the analysis completes more quickly and with less strain on computing resources.
Distributed Enterprise Scheduling
The Schedule Manager plug-in for SAS Management Console provides the ability to schedule user-written SAS programs as well as jobs from numerous SAS applications. You can schedule the jobs and programs to run when specified time or file events occur. The jobs are then run on the grid using the resource and prioritization policies
established by SAS Grid Manager. SAS Applications That Support Grid Processing
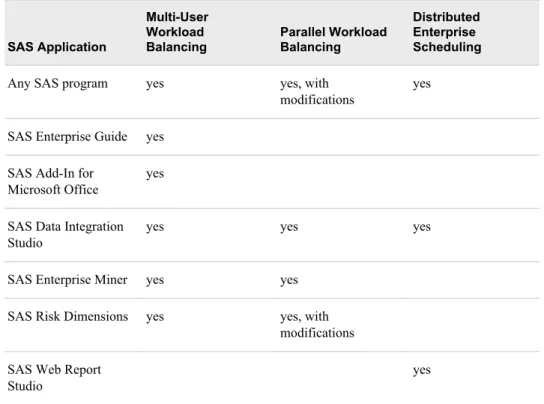
The following table lists the SAS applications that currently support grid processing and the type of processing that each supports.
Table 1.1 Grid Support in SAS Applications
SAS Application
Multi-User Workload Balancing
Parallel Workload Balancing
Distributed Enterprise Scheduling
Any SAS program yes yes, with modifications
yes
SAS Enterprise Guide yes SAS Add-In for
Microsoft Office
yes
SAS Data Integration Studio
yes yes yes
SAS Enterprise Miner yes yes SAS Risk Dimensions yes yes, with
modifications SAS Web Report
Studio
yes
SAS Application
Multi-User Workload Balancing
Parallel Workload Balancing
Distributed Enterprise Scheduling
SAS Marketing Automation
yes
SAS Marketing Optimization
yes
SAS JMP Genomics yes
SAS Demand Forecasting for Retail
yes
SAS products or solutions that use workspace server load balancing
yes
SAS stored processes yes, with limitations yes, with limitations
For a current list of SAS applications that support grid processing, see http:// support.sas.com/rnd/scalability/grid/index.html.
What Business Problems Can a Grid Solve?
Many Users on Single ResourceAn organization might have multiple users submitting jobs to run on one server. When the environment is first configured, the server might have been sufficient to handle the number of users and jobs. However, as the number of users submitting jobs grows, the load on the server grows. The increased load might lead to slower processing times and system crashes. In a SAS grid environment, jobs are automatically routed to any one of the servers on the grid. This spreads the computing load over multiple servers, and diminishes the chances of a server becoming overloaded. If the number of jobs exceeds the resources available, the jobs are queued until resources become available. If the number of users continues to increase, you can increase capacity by adding servers to the grid.
High Availability
Your organization might have services and long-running SAS programs that are critical to your operations. The services must be available at all times, even if the servers that are running them become unavailable. The SAS programs must complete in a timely manner, even if something happens to cause them to fail. For a SAS program that takes a long time to run, this means that the program cannot be required to restart from the beginning if it ends prematurely.
You can configure the critical services within your SAS grid environment to be highly available. SAS Grid Manager can monitor the critical services, detect if they fail or if the machine on which they are running fails, and automatically start the services on a
failover host. Either a hardware load balancer or DNS name resolution is used to redirect clients to the service running on the failover host. This ensures that critical services remain available to clients without any manual intervention.
By using options on the SAS Grid Manager Client Utility, you can specify that SAS programs submitted to the grid are automatically restarted from the point where they stopped if they end before completion. The job restarts from the last completed procedure, DATA step, or labeled section. Jobs that take a long time to run do not have to start over at the beginning. You can also use the restart capability with queue options that automatically requeue jobs that end prematurely to provide a complete high-availability environment for SAS programs.
Increased Data Growth
Your organization might have a process running to analyze a certain volume of data. Although the server that is processing the job is sufficient to handle the current volume of data, the situation might change if the volume of data increases. As the amount of data increases, the load on the server increases, which can lead to longer processing times or other problems. Changing to a larger-capacity server can involve considerable expense and service interruption.
A SAS grid environment can grow to meet increases in the amount of data processed. If the volume of data exceeds the capacity of a server on the grid, the processing load can be shared by other grid servers. If the volume continues to increase, you can add servers to the grid without having to make configuration changes to your processes. Adding servers to the grid is also more cost-effective than replacing a single large server, because you can add smaller servers to handle incremental increases in data volume. Running Larger and More Complex Analysis
Your organization might have a process running to perform a certain level of analysis on data. If you want to increase the complexity of the analysis being performed, the increased workload puts a greater strain on the processing server. Changing the computing power of the server involves considerable expense and interrupts network availability.
Using a SAS grid environment enables you to add computing power by adding additional computers on the grid. The analysis job can be divided up among the grid nodes, which enables you to perform more complex analysis without increasing the load on any single machine.
Need for a Flexible IT Infrastructure
Your organization's ability to perform the data analysis that you need depends on a flexible computing infrastructure. You must be able to add needed resources quickly and in a cost-effective manner as the load increases. You must also be able to handle maintenance issues (such as adding or replacing resources) without disrupting your work. A SAS grid environment enables you to maintain a flexible infrastructure without disrupting your operations.
As your data-processing needs grow, you can incrementally add computing resources to your grid by adding smaller, less-expensive servers as new server nodes. This ability prevents you from having to make large additions to your environment by adding large and expensive servers.
When you need to perform maintenance on machines in the grid, the grid can still operate without disruption. When you take the servers offline for maintenance or
upgrades, SAS Grid Manager routes to work to the machines that are still online. Users who send work to the grid for processing do not have to change their way of working. Work that is sent to the grid is processed just as before.
Likewise, the SAS grid environment adapts if a computer fails on the grid. Because SAS Grid Manager automatically avoids sending work to the failed machine, the rest of the grid is still available for processing and users do not see any disruption.
Chapter 2
Planning and Configuring a Grid
Environment
Installation and Configuration Overview . . . 11
Configuring the File Server . . . 12
Installing Platform Suite for SAS . . . 12
Configuring the Grid Control Server . . . 12
Configuring the Grid Nodes . . . 17
Configuring Client Applications . . . 17
Modifying SAS Logical Grid Server Definitions . . . 17
Modifying Grid Monitoring Server Definitions . . . 20
Naming the WORK Library . . . 21
Installing and Configuring SAS Grid Manager Client Utility . . . 21
Installation Overview . . . 21
Installation Prerequisites . . . 21
Configuring the SAS Grid Manager Client Utility . . . 21
Using the SASGSUB Configuration File . . . 24
Installation and Configuration Overview
The process of configuring a grid consists of two main tasks:
1. Installing and configuring Platform Suite for SAS. Instructions for installing and configuring Platform Suite for SAS are found on the SAS Web site at http:// support.sas.com/rnd/scalability/grid/gridinstall.html 2. Installing and configuring SAS products and metadata definitions on the grid. You
can either install all SAS products on all machines in the grid or install different sets of SAS applications on sets of machines in the grid. However, Base SAS,
SAS/CONNECT, and SAS Grid Manager must be installed on all grid machines. Using a grid plan file with the SAS Deployment Wizard guides you through the process of installing and configuring the SAS applications and metadata definitions on each machine in the grid. It is recommended that you specify the same directory structure on all machines in the grid.
For information about performing a planned installation, see SAS Intelligence Platform:
Installation and Configuration Guide.
Configuring the File Server
The central file server is a critical component of a grid environment. It is essential for each application on a grid node to be able to efficiently access data. Slowdowns caused by the performance of the file storage system could reduce the effectiveness and benefit of using a grid. The amount of storage required and the type of I/O transactions help determine the type of file storage system that best meets your needs.
Assuming that the SAS jobs running on the grid perform an equal number of reads and writes, it is recommended that the file system be able to sustain 50–70 MB per second per core. This level can be adjusted up or down, depending on the level of I/O activity of your SAS jobs. For information about choosing and configuring a file system, see Best
Practices for Data Sharing in a Grid Distributed SAS Environment, which is available at
http://support.sas.com/rnd/scalability/grid/gridpapers.html.
Installing Platform Suite for SAS
SAS Grid Manager includes Platform Suite for SAS from Platform Computing. The SAS Web site provides step-by-step instructions on installing and configuring the Platform Suite for SAS. These instructions are available from http://support.sas.com/ rnd/scalability/grid/gridinstall.html.
Information for installing Platform Suite for SAS is available for both Windows and UNIX platforms.
The installation process for Platform Suite for SAS installs these components: • Platform Process Manager
• Platform LSF
• Platform Grid Management Service • Platform MPI
Configuring the Grid Control Server
After you install and configure Platform Suite for SAS, you can use the SAS
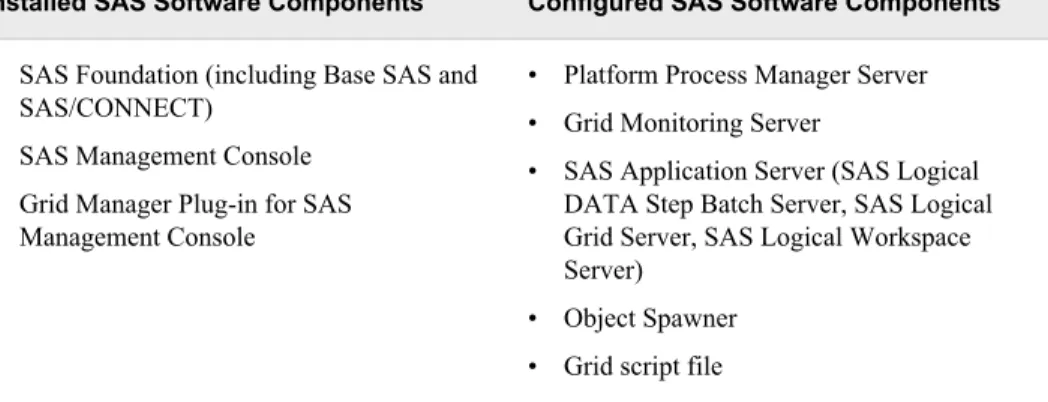
Deployment Wizard to configure the grid control server. The SAS Deployment Wizard installs and configures these components:
Table 2.1 SAS Deployment Wizard Grid Control Server Components
Installed SAS Software Components Configured SAS Software Components
• SAS Foundation (including Base SAS and SAS/CONNECT)
• SAS Management Console • Grid Manager Plug-in for SAS
Management Console
• Platform Process Manager Server • Grid Monitoring Server
• SAS Application Server (SAS Logical DATA Step Batch Server, SAS Logical Grid Server, SAS Logical Workspace Server)
• Object Spawner • Grid script file
If you are installing Platform Suite for SAS on a UNIX machine, you might need to source the profile.lsf file before you start the SAS Deployment Wizard. The hostsetup command in the installation procedure for Platform LSF version 7 includes the ability to source the LSF profile to the default profile for all users. If this option was not used in the installation process or did not work correctly, you must use the following procedure. This procedure enables the SAS Deployment Wizard to find the addresource utility. To source the file, follow these steps:
1. Start the LSF daemons. The easiest method for doing this is to reboot the computer on which Platform Suite for SAS is installed.
2. Using the default profile for the machine, issue this command:
. LSF_TOP/conf/profile.lsf
Replace LSF_TOP with the directory in which Platform LSF is installed. Note that the command starts with a period.
The amount of user input that is required during the installation and configuration process depends on whether you choose an Express, Typical, or Custom install. For information about running the SAS Deployment Wizard, see SAS Deployment Wizard
User's Guide.
An Express installation does not request any grid-specific information. Default values are used in all cases, so you must verify that these values match the values needed for your environment
The Platform Process Manager information page enables you to specify the host name and port of the machine on which Platform Process Manager installed.
Figure 2.1 Platform Process Manager Page for Express Install
During the installation and configuration process for a Custom install, the SAS Deployment Wizard displays these pages that request grid-specific information:
1. The Platform Process Manager information page enables you to specify the server on which you installed Platform Suite for SAS and the port used to connect to the server.
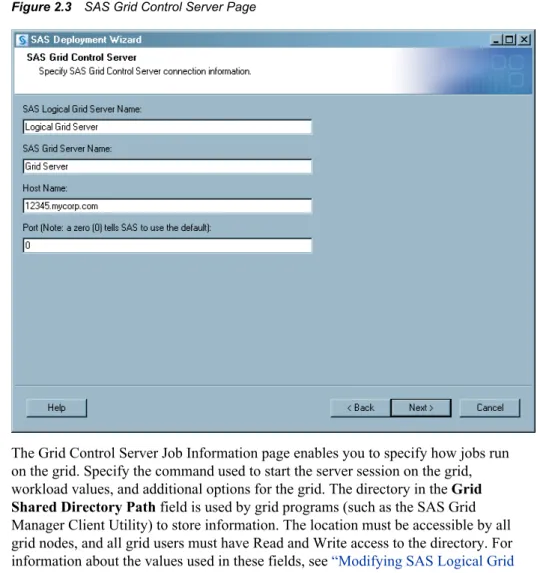
2. The SAS Grid Control Server page enables you to specify the name of the SAS Logical Grid Server and the SAS Grid Server. Specify the grid control server machine and port number. For Platform Suite for SAS, specify a value of 0 in the Port field.
Figure 2.3 SAS Grid Control Server Page
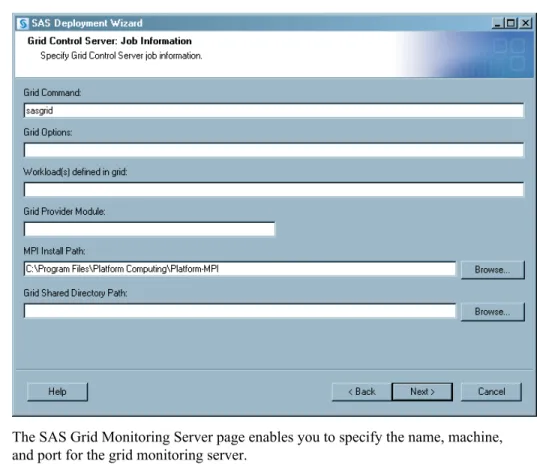
3. The Grid Control Server Job Information page enables you to specify how jobs run on the grid. Specify the command used to start the server session on the grid, workload values, and additional options for the grid. The directory in the Grid Shared Directory Path field is used by grid programs (such as the SAS Grid Manager Client Utility) to store information. The location must be accessible by all grid nodes, and all grid users must have Read and Write access to the directory. For information about the values used in these fields, see “Modifying SAS Logical Grid Server Definitions” on page 17.
Figure 2.4 Grid Control Server: Job Information Page
4. The SAS Grid Monitoring Server page enables you to specify the name, machine, and port for the grid monitoring server.
Configuring the Grid Nodes
After you have installed and configured the grid control server, you can use the SAS Deployment Wizard to configure the grid nodes. The SAS Deployment Wizard installs and configures these components:
Table 2.2 Required Software Components for Grid Nodes
Installed SAS Software Components Configured SAS Software Components
SAS Foundation (Base SAS, SAS/CONNECT) SAS Grid Node, script file
If more than one application server contains a logical grid server, you must choose which application server to use.
For information about the values required during a planned installation, see SAS
Intelligence Platform: Installation and Configuration Guide.
Note: The configuration directory structure for each grid node must be the same as that
of the grid control server.
Configuring Client Applications
After the grid nodes have been installed and configured, you can install and configure the software required for the client applications that will use the grid. The software required depends on the type of client application. Applications such as SAS Data Integration Studio that can submit jobs through a workspace server do not need to install anything other than the client application. Applications such as Base SAS that submit jobs to the grid must also install Platform Suite for SAS in order to send jobs to the grid. When you install SAS Management Console, which is used to monitor and control the grid, you must also install the SAS Grid Manager plug-in.
Modifying SAS Logical Grid Server Definitions
The initial configuration of the logical grid servers is performed by the SAS Deployment Wizard. However, a SAS grid administrator might need to modify the existing grid metadata or add new grid metadata definitions.
A SAS administrator performs these steps to specify or modify the required and optional properties as metadata for the SAS Grid Server:
1. In SAS Management Console, open the metadata repository that contains the metadata for the Logical Grid Server.
2. In the navigation tree, select Server Manager.
3. Expand the folders under Server Manager until you see the metadata objects for the SAS application server, such as SASApp, and its Logical Grid Server component.
4. Expand the Logical Grid Server component so that you see the metadata object for the Grid Server.
5. Right-click the metadata object for the Grid Server, and select Properties. 6. In the Properties window for the Grid Server, click the Options tab.
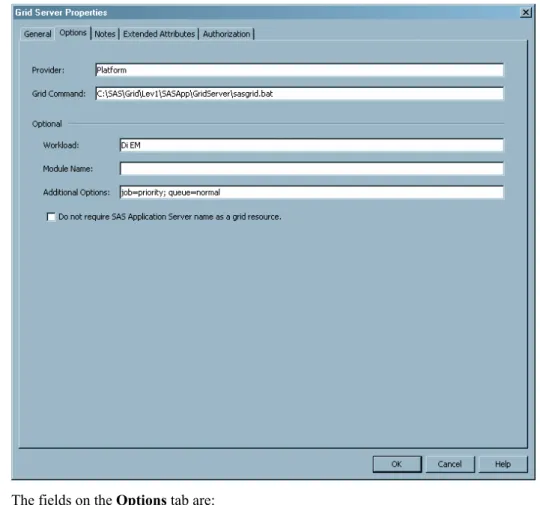
Figure 2.6 Grid Server Properties
7. The fields on the Options tab are: Provider
the grid middleware provider. This value is Platform. This value is used to communicate with the grid control server.
Grid Command
the script, application, or service that Platform Suite for SAS uses to start server sessions on the grid nodes. Any SAS options that are included in this command are passed to the grid jobs.
This value is the path to the sasgrid.cmd file (Windows) or sasgrid script file (UNIX). Because this same command is used to start the servers on all grid nodes, the path to the directory on each grid node must be the same. For example: C:\SAS\Grid\Lev1\SASApp\GridServer\sasgrid Workload
a user-defined string that specifies the resources or the types of jobs that can be processed on the grid. For example, the grid administrator could create resources named di_short and di_long for short- and long-running SAS Data Integration Studio jobs. By placing those values in this field, SAS Data Integration Studio users can select one of those values from the SAS Data Integration Studio options dialog boxes.See “Using SAS Data Integration Studio with a SAS Grid ” on page 48. After the values are selected, the value is sent with the job to the
grid so that the job runs only on the machines that have the specified resource defined.
Workload values can be separated by a space. For information about specifying resources, see “Defining and Specifying Resources” on page 31.
Module Name
specifies the shared library name or the class name of the support plug-in for Platform Suite for SAS. Leave blank unless directed otherwise by SAS Technical Support.
Additional Options
the options used by the SAS command to start a session on the grid node or to control the operation of the job. Examples include the job priority, the job queue, or user group that is associated with the job. Job options are specified as name/ value pairs in this format:
option-1=value-1;option-2="value-2 with spaces"; ... option-n='value-n with spaces'; Here is an example of additional options that specify that all jobs that use this logical grid server go to the priority queue in the project “payroll”:
queue=priority; project='payroll'
For a complete list of job options, see “Supported Job Options” on page 113. Do not require SAS Application Server name as a grid resource
if selected, specifies that the SAS Application Server name is not used by the grid to determine which grid node processes the requests. If this check box is cleared, the SAS Application Server name is included as a required resource. This option is typically not selected. Select this option if you are implementing a SAS floating license grid and no resources are defined on the individual grid nodes. For more information, see “Removing the Resource Name Requirement” on page 32.
8. After you complete the field entries, click OK to save the changes and close the Grid Server Properties window.
9. In the display area (right-hand side) on SAS Management Console, right-click the Connection object for the Grid Server, and then select Properties.
10. In the Properties window for the Grid Server Connection, click the Options tab. The fields on this tab are:
Authentication Domain
the authentication domain used for connections to the server. Set this value to <none>
Grid Server Address
the host name or network address of the grid control server. Grid Server Port
the port used to connect to the grid control server. This value should always be set to 0 (zero).
Modifying Grid Monitoring Server Definitions
The initial configuration of the grid monitoring server is performed by the SAS Deployment Wizard. However, a SAS grid administrator might need to modify the existing grid metadata or add new grid metadata definitions.
A SAS administrator performs these steps to specify or modify the required and optional properties as metadata for the Grid Monitoring Server:
1. In SAS Management Console, open the metadata repository that contains the metadata for the SAS Grid Server.
2. In the navigation tree, select Server Manager.
3. Find the metadata object for the Grid Monitoring Server.
4. Right-click the metadata object for the Grid Monitoring Server, and then select Properties.
5. In the Properties window for the Grid Monitoring Server, click the Options tab. 6. The fields on the Options tab are:
Provider
the grid middleware provider. This value is Platform. This value is used to communicate with the grid control server.
Module Name
specifies the shared library name or the class name of the support plug-in for Platform Suite for SAS. Leave this field blank unless directed otherwise by SAS Technical Support.
RTM Host Name
specifies the URL for the RTM host. Options
the options needed by the grid monitoring server to connect to the grid server. 7. After you complete the field entries, click OK to save the changes and close the Grid
Monitoring Server Properties window.
8. In the display area (right side) on SAS Management Console, right-click the Connection object for the Grid Monitoring Server, and then select Properties. 9. In the Properties window for the Grid Monitoring Server Connection, click the
Options tab. The fields on this tab are: Authentication Domain
the authentication domain used for connections to the server. This value is the authentication domain of the machine that Grid Management Services (GMS) is running on.
Host Name
the network address of the grid control server. Port
the port used to connect to the grid control server. The default value is 1976. 10. After you complete the entries, click OK to save the changes and close the Grid
Naming the WORK Library
If you are using a shared file system for the SASWORK libraries created by each SAS grid session, each SASWORK subdirectory must have a unique name. The default method used by SAS to generate unique work directories does not maintain unique directories across grid nodes.
To ensure unique work directory names across grid nodes, you can add a machine name component to the -work parameter in the Grid Command field of the Grid Server metadata definition. Alternatively, you could include the parameters in the sasgrid.cmd file (on Windows) or the sasgrid file (on UNIX).
An example command is -work S:\SASWork\%COMPUTERNAME%.
An example invocation line is: C:\SAS\Grid\Lev1\SASApp\GridServer \sasgrid —work S:\SASWork\%COMPUTERNAME%
Installing and Configuring SAS Grid Manager
Client Utility
Installation Overview
The SAS Grid Manager Client Utility enables users to submit SAS programs to a grid for processing without requiring SAS to be installed on the machine performing the submission. Platform LSF must be installed on any machine on which the SAS Grid Manager Client Utility runs.
The SAS Grid Manager Client Utility is automatically installed and configured using the SAS Deployment Wizard if the utility is in the plan file.
Installation Prerequisites
The configuration for the SAS Grid Manager Client Utility assumes that all of the following actions have been performed:
• The grid control server has already been installed. The configuration must retrieve the logical grid server definition from metadata.
• The user name under which jobs are submitted is defined in metadata. If not, jobs submitted to the grid fail.
Configuring the SAS Grid Manager Client Utility
The amount of user input that is required during the installation and configuration process depends on whether you chose an Express, Typical, or Custom install. For information about running the SAS Deployment Wizard, see SAS Deployment Wizard
User's Guide.
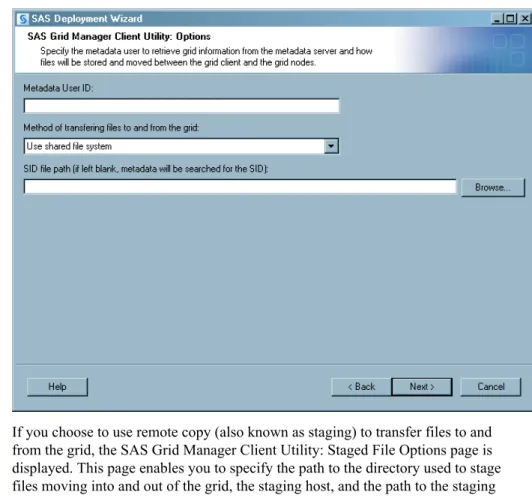
1. The SAS Grid Manager Client Utility: Options page enables you to specify the user credentials used to connect to the SAS Metadata Server, the method for transferring files to and from the grid (either through a shared file system or remote copy), and
the path to a SAS license file that contains a SAS Grid Manager license (only shown during a custom installation). By default, the metadata is searched for the SAS license file.
Figure 2.7 Grid Manager Client Utility: Options Page
2. If you choose to use remote copy (also known as staging) to transfer files to and from the grid, the SAS Grid Manager Client Utility: Staged File Options page is displayed. This page enables you to specify the path to the directory used to stage files moving into and out of the grid, the staging host, and the path to the staging directory as seen by the staging host.
Figure 2.8 SAS Grid Manager Client Utility: Staged File Options Page
If you choose to use a shared directory to copy files to and from the grid, the SAS Grid Manager: Shared Directory Options page appears. This page enables you to specify the grid shared directory on the grid control server.
Figure 2.9 SAS Grid Manager Client Utility: Shared Directory Options Page
Using the SASGSUB Configuration File
Most of the options that are used by the SAS Grid Manager Client Utility are contained in the sasgsub.cfg file, which is automatically created by the SAS Deployment Wizard. These options specify the information that the SAS Grid Manager Client Utility uses every time it runs. The sasgsub.cfg file is located in the Applications/
SASGridManagerClientUtility/<version> directory of the configuration directory. The following information from the SAS Deployment Wizard is collected in the sasgsub.cfg file:
• information to connect to the SAS Metadata Server (SAS Metadata Server name, port, user ID, and password). By default, the metadata password value is set to _PROMPT_, and the user is prompted for a password.
• the path used to store files used by the grid. If you are using a shared file system, then this is the path to the shared file system. If you are staging files, this is the location where grid clients store files that are retrieved by the grid.
• the name of the SAS Application Server that contains the logical grid server definition.
Chapter 3
Managing the Grid
Overview of Grid Management . . . 25 Modifying Configuration Files with Platform RTM for SAS . . . 26 Specifying Job Slots for Machines . . . 27 Using Queues . . . 28 Understanding Queues . . . 28
Configuring Queues . . . 28
Using the Normal Queue . . . 28
Example: A High-Priority Queue . . . 29
Example: A Night Queue . . . 29
Example: A Queue for Short Jobs . . . 30
Specifying Job Slot Limits on a Queue . . . 30
Defining and Specifying Resources . . . 31 Overview . . . 31
Defining Resource Names Using Addresource . . . 31
Specifying Resource Names Using GRDSVC_ENABLE . . . 32
Specifying Resource Names Using the SAS Grid Manager Client Utility . . . 32
Specifying Resource Names in SAS Data Integration Studio . . . 32
Removing the Resource Name Requirement . . . 32
Using Multiple Application Server Contexts . . . 33
Overview of Grid Management
Most organizations that use SAS consist of a variety of categories of users, with each category having its own needs and expectations. For example, your organization might have these users:
SAS Enterprise Guide and SAS Add-in for Microsoft Office users
these users are usually running interactive programs, and expect immediate results. SAS Enterprise Miner users
these users might be using multiple machines to train models. SAS Web Report Studio users
these users might be scheduling reports to run at a specified time. SAS Risk Dimensions users
these users might be running jobs at night.
Some users in your environment might be running jobs that have a high priority. Other users might be running jobs that require a large number of computing resources. A SAS grid environment must be able to account for all of these different needs, priorities, and workloads.
In order to manage this type of environment, you must be able to control when and where jobs can run in the grid. You can manage grid resources using these strategies: • Job slots. They enable you to control how many jobs can run concurrently on each
machine in the grid. This enables you to tune the load that each machine in the grid can accept. For example, you can assign a higher number of job slots to higher-capacity machines, which specifies that those machines can process more jobs concurrently.
• Queues. They enable you to control when jobs can run and what computing resources are available to the jobs that are submitted to the queue. You can create queues based on factors such as job size or priority. You can also define job dispatch windows and run windows for each queue. When you submit a job to a particular queue, the queue settings determine when the job runs and what priority the job has compared to other jobs that have been submitted to the grid. You can also specify the number of job slots across the grid that a queue can use at any one time. By
combining the job-slot specification on the hosts and queues, you can specify how work is distributed across the grid.
• Resources. They enable you to specify where jobs are run on the grid by specifying resource names on hosts and using matching resource names on jobs. The resource names are specified on machines in the grid to indicate what type of job each machine should run. When you submit jobs to the grid, you can specify resource names to specify which machines should be used to process the job.
• Multiple application server contexts. They enable you to set up a grid environment that provides application servers and associated queues for specific needs or
workloads. For example, you might want to define policies for different applications running on the grid (such as SAS Enterprise Miner, SAS Data Integration Studio, and batch SAS programs), or you might want to define policies for different business units that are using the grid. After defining the grid, you can define an application server and logical grid server for each of the contexts that you need. You can also define a queue that is associated with each logical grid server. When you use a SAS application to submit a job to the grid, you specify the grid server that corresponds to the context that you need (SAS Enterprise Miner, SAS Data Integration Studio, and batch SAS programs, for example).
Modifying Configuration Files with Platform RTM
for SAS
You can use Platform RTM for SAS to modify the configuration files that define queues and resources on the grid. The Platform RTM download package contains
documentation on performing this task. However, if you use Platform RTM for SAS to change any configuration files, you cannot make any further changes to the files outside of Platform RTM for SAS. Changes in the configuration files are not synchronized with Platform RTM for SAS.
Download Platform RTM for SAS from http://www.sas.com/apps/
Specifying Job Slots for Machines
Platform LSF uses job slots to specify the number of processes that are allowed to run concurrently on a machine. A machine cannot run more concurrent processes than it has job slots. The default number of job slots for a machine is the same as the number of processor cores in the machine.
However, you can configure hosts with fast processors to have more jobs slots than the number of cores by setting the MXJ value for the given host to a fixed number of job slots. This enables the more powerful host to execute more jobs concurrently to take advantage of the processor’s speed.
To change the number of job slots on a grid node, follow these steps: 1. Log on to the grid control server as the LSF Administrator (lsfadmin).
2. Open the file lsb.hosts, which is located in the directory LSF-install-dir\conf \lsbatch\cluster-name\configdir. This is the LSF batch configuration file. Locate the Host section of the file, which contains an entry for a default grid node.
Begin Host
HOST_NAME MXJ r1m pg ls tmp DISPATCH_WINDOW #Keywords default ! () () () () () #Example End Host
3. Edit this file to specify the maximum number of job slots for all nodes or for each node.
• To specify the total number of job slots per node, edit the line for the default node. Here is an example:
Begin Host
HOST_NAME MXJ r1m pg ls tmp DISPATCH_WINDOW #Keywords default ! () () () () () #Example End Host
The value ! represents one job slot per core for each node in the grid. You can replace this value with a number that specifies the maximum number of job slots on each node, regardless of the number of cores. For example, a value of ! on a machine with 16 cores results in 16 job slots, while a value of 2 on a machine with 16 cores results in just 2 job slots.
• To specify the total number of jobs slots per node, add a line for each node in the grid. Here is an example:
Begin Host
HOST_NAME MXJ r1m pg ls tmp DISPATCH_WINDOW #Keywords default ! () () () () () #Example D1234 16 () () () () () #Example D1235 16 () () () () () #Example D1236 16 () () () () () #Example D1237 16 () () () () () #Example D1238 16 () () () () () #Example End Host
Each line designates the concurrent execution of 16 jobs on each node. 4. Save and close the file.
5. Verify the LSF batch configuration file by entering this command at the command prompt: badmin reconfig
6. For details about using this command, see Platform LSF Reference.
Using Queues
Understanding QueuesWhen a job is submitted for processing on the grid, it is placed in a queue and is held until resources are available for the job. LSF processes the jobs in the queues based on parameters in the queue definitions that establish criteria such as which jobs are processed first, what hosts can process a job, and when a job can be processed. All jobs submitted to the same queue share the same scheduling and control policy. By using multiple queues, you can control the workflow of jobs that are processed on the grid. By default, SAS uses a queue named NORMAL. To use another queue that is already defined in the LSB.QUEUES file, specify the queue using a queue=queue_name option. You can specify this option either in the metadata for the SAS logical grid server (in the Additional Options field), or in the job options macro variable referenced in the GRDSVC_ENABLE statement. For information about specifying a queue in the logical grid server metadata, see “Modifying SAS Logical Grid Server Definitions” on page 17. For information about specifying a queue in a GRDSVC_ENABLE statement, see
“GRDSVC_ENABLE Function” on page 83. Configuring Queues
Queues are defined in the LSB.QUEUES file, which is located in the directory
LSF-install-dir\conf\lsbatch\cluster-name\configdir. The file contains an entry for each defined queue. Each entry names and describes the queue and contains
parameters that specify the queue's priority and the attributes associated with the queue. For a complete list of parameters allowed in the lsb.queues file, refer to Platform LSF
Reference.
Using the Normal Queue
As installed, SAS Grid Manager uses a default queue called NORMAL. If you do not specify the use of a different queue, all jobs are routed to this queue and are processed with the same priority. Other queues enable you to use priorities to control the work on the queues. The queue definition for a normal queue looks like the following:
Begin Queue
QUEUE_NAME = normal PRIORITY = 30
DESCRIPTION = default queue End Queue
Example: A High-Priority Queue
This example shows the existing queue for high priority jobs. Any jobs in the high-priority queue are sent to the grid for execution before jobs in the normal queue. The relative priorities are set by specifying a higher value for the PRIORITY attribute on the high priority queue.
Begin Queue
QUEUE_NAME = normal PRIORITY = 30
DESCRIPTION = default queue End Queue
Begin Queue
QUEUE_NAME = priority PRIORITY = 40
DESCRIPTION = high priority users End Queue
Example: A Night Queue
This example shows the existing queue for processing jobs (such as batch jobs) at night. The queue uses these features:
• The DISPATCH_WINDOW parameter specifies that jobs are sent to the grid for processing only between the hours of 6:00 PM and 7:30 AM.
• The RUN_WINDOW parameter specifies that jobs from this queue can run only between 6:00 PM and 8:00 AM. Any job that has not completed by 8:00 AM is suspended and resumed the next day at 6:00 PM.
• The HOSTS parameter specifies that all hosts on the grid except for host1 can run jobs from this queue. Because the queue uses the same priority as the normal queue, jobs from the high-priority queue are still dispatched first. Excluding host1 from the hosts available for the night queue leaves one host always available for processing jobs from other queues:
Begin Queue
QUEUE_NAME = normal PRIORITY = 30
DESCRIPTION = default queue End Queue
Begin Queue
QUEUE_NAME = priority PRIORITY = 40
DESCRIPTION = high priority users End Queue
Begin Queue QUEUE_NAME = night PRIORITY = 30
DISPATCH_WINDOW = (18:00-07:30) RUN_WINDOW = (18:00-08:00) HOSTS = all ~host1
DESCRIPTION = night time batch jobs
End Queue
Example: A Queue for Short Jobs
This example shows the existing queue for jobs that need to preempt longer-running jobs. The PREEMPTION parameter specifies which queues can be preempted as well as the queues that take precedence. Adding a value of PREEMPTABLE[short] to the normal queue specifies that jobs from the normal queue can be preempted by jobs from the short queue. Using a value of PREEMPTIVE[normal] to the short queue specifies that jobs from the short queue can preempt jobs from the normal queue. Using a value for PRIORITY on the short queue ensures that the jobs are dispatched before jobs from the normal queue, but that the jobs from the priority queue still take precedence.
Begin Queue
QUEUE_NAME = normal PRIORITY = 30
PREEMPTION = PREEMPTABLE[short] DESCRIPTION = default queue End Queue
Begin Queue
QUEUE_NAME = priority PRIORITY = 40
DESCRIPTION = high priority users End Queue
Begin Queue QUEUE_NAME = short PRIORITY = 35
PREEMPTION = PREEMPTIVE[normal] DESCRIPTION = short duration jobs End Queue
Specifying Job Slot Limits on a Queue
A job slot is a position on a grid node that can accept a single unit of work or SAS process. Each host has a specified number of available job slots. By default, each host is configured with a single job slot for each core on the machine, so a multiple-core machine would have multiple job slots. For information about specifying job slots for a host, see Platform LSF Reference.
You can also use a queue definition to control the number of job slots on the grid or on an individual host that are used by the jobs from a queue. The QJOB_LIMIT parameter specifies the maximum number of job slots on the grid that can be used by jobs from the queue. The HJOB_LIMIT parameter specifies the maximum number of job slots on any one host that can be used by the queue. The following example sets a limit of 60 job slots across the grid that can be used concurrently by the normal queue and a limit of 2 job slots on any host that can be used.
Begin Queue
QUEUE_NAME = normal PRIORITY = 30
DESCRIPTION = default queue QJOB_LIMIT = 60
HJOB_LIMIT = 2 End Queue
Defining and Specifying Resources
OverviewDefining resources enables you to specify where jobs are run on the grid. You can define resource names on grid nodes and then specify those same resource names on jobs that are sent to the grid. The resource names specified on grid machines indicate the type of job each machine runs (for example, jobs from specified applications or high-priority jobs), so you can direct specific types of work to the nodes that are best suited for processing them.
By default, when a job is sent to the grid, the name of the SAS application server is sent as a resource name along with the job. You can further specify the type of machine used to run a job by specifying the WORKLOAD= parameter on the GRDSVC_ENABLE call.
For example, assume that you have installed and configured a grid that uses the
application server name of SASApp. You now want to specify that SAS Data Integration Studio jobs should run on certain machines in the grid. To make this happen, follow these steps:
1. Create a resource name of DI for SAS Data Integration Studio jobs. (DI is only an example; you can use any user-defined string.)
2. Assign the resource names DI and SASApp to the machines that you want to use for processing SAS Data Integration Studio jobs.
3. Add the value DI to the Workload field for the logical grid server definition. 4. In SAS Data Integration Studio, choose the workload named DI in the Loop
Properties window. This specifies that the job is sent to the DI workload, which sends the job to one of the machines with SASApp as a resource name and DI as a resource name. If there are no grid servers with resource names that match the value on the job, the job is not processed.
Defining Resource Names Using Addresource
SAS Grid Manager provides the addresource command to define hosts and resources. To use this command to specify resource names, follow these steps:
1. Log on to the grid control machine as the LSF administrator. 2. Issue the command addresource -r <resource_name> -m
<machine_name>. If the machine_name contains spaces, you must change the spaces to underscores.
For example, the command addresource -r DI -m D1234 assigns the resource name DI to the machine D1234.
3. Run the LSF commands to reconfigure the grid to recognize the new resources.
Specifying Resource Names Using GRDSVC_ENABLE
You can use the GRDSVC_ENABLE function to specify resource names for jobs that run on the grid. Use the SERVER= option to specify the SAS application server and the WORKLOAD= option to specify resource requirements for jobs. For more information, see “GRDSVC_ENABLE Function” on page 83.
Specifying Resource Names Using the SAS Grid Manager Client Utility
You can specify resource names when submitting SAS programs to the grid using the SAS Grid Manager Client Utility. Use the -GRIDWORKLOAD option to specify a resource name for the job. For more information, see “SASGSUB Syntax: Submitting a Job” on page 97.
Specifying Resource Names in SAS Data Integration Studio
In order to specify the resource name for SAS Data Integration Studio jobs, you must complete these tasks:
• Add the resource name as an allowed value for the logical grid server to which you send jobs.
• Specify the workload that corresponds to the resource name in the loop transformation properties.
To add the resource name to the logical grid server metadata's Workload values, see
“Modifying SAS Logical Grid Server Definitions” on page 17.
To specify the workload value in SAS Data Integration Studio, follow these steps: 1. On the SAS Data Integration Studio menu bar, select Tools ð Options, and then
select the SAS Server tab on the Options dialog box. 2. Select the SAS grid server in the Server field.
3. Select the workload to use for the submitted jobs in the Grid workload specification field.
Removing the Resource Name Requirement
If you have a floating grid license and do not define resources on any grid nodes, sending the SAS application server name as a required resource causes all jobs sent to the grid to fail. A floating grid license enables you to have a large number of grid resources available for use (300 cores, for example) but use SAS Grid Manager to limit the number of SAS processes that can run concurrently on the grid to a smaller number (for example, 175). In this environment, you can change the metadata definition of the grid server to not require a resource name. To change the definition, follow these steps: 1. In SAS Management Console, open the Server Manager plug-in and locate the
logical server definition for one of the servers identified in the lsf.cluster file. 2. Expand the logical Grid Server node and select the Grid Server node. 3. Select Properties from the pop-up menu or the File menu.
5. Select the check box Do not require SAS Application Server name as a grid resource.
6. Save and close the definition.
7. Repeat this process for all grid servers.
If you remove the SAS application server name as a required resource, you can direct jobs to a specific queue that you have defined to limit the hosts and jobs slots that can be used. To set up this environment, follow these steps:
1. Follow the preceding procedure to remove the SAS application server name as a required resource.
2. Do not specify a workload value on the server definition.
3. In the Additional Options field for the SAS Logical Grid Server definition, specify `queue=<new_queue_name>'.
4. Define a new queue new_queue_name in the lsb.queues file. Use the definition to limit the hosts and job slots.
Using Multiple Application Server Contexts
Using multiple queues enables you to control the workflow of jobs that are processed on the grid. For example, you can set up queues to handle jobs based on priority, type, or SAS application. However, using multiple queues requires you to specify the queue name each time you submit a job to the queue. By creating multiple application server contexts, you can create a separate logical grid server for each queue, making it easier to process the job using the proper set of resources. By sending the job to the appropriate application server, you automatically send it to the appropriate queue.
For example, you might use this capability to set up a grid where each department has its own queue. You might want to specify different parameters depending on which department is submitting a job. Once you create a queue definition for each type of processing, you can create a SAS application server and logical grid server for each type of processing, specifying the appropriate queue definition on each one. Because you specify the same grid command on each server definition, all jobs are processed by the same grid (although you can specify different SAS start-up commands with each command). However, jobs sent to the dept2 application server are processed using the dept2 queue definition, and jobs sent to the dept3 server are processed using the dept3 queue definition. See Figure 3.1 on page 34 for a diagram of this configuration.
Figure 3.1 Multiple Application Servers for Multiple Departments
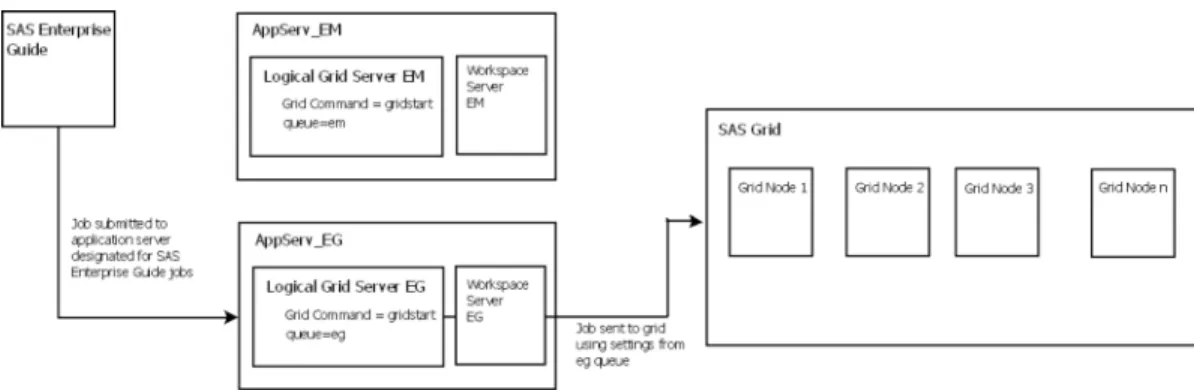
You can also use this capability to set up queues based on the applications that send jobs to the grid. For example, you might have one queue for jobs that are sent to the grid from SAS Enterprise Guide and another for jobs sent from SAS Enterprise Miner. You would still create a queue, a SAS application server, and a logical grid server for each queue that you define. However, because jobs from these applications require a workspace server to process them, you would also need to add a workspace server component to each SAS application server definition. See Figure 3.2 on page 34 for a diagram of this configuration.
Figure 3.2 Multiple Application Servers for Application Processing
To set up an environment with multiple application server contexts, follow these steps: 1. Install and configure the grid normally. As part of the installation and configuration
process, you configure a grid control server and a logical grid server. Note the value that you specify in the Grid Command field when configuring the grid control server.
2. Define the queues that you want to use or a grid command that is specific to the application or business group that will be using this application server context. See
“Using Queues ” on page 28 for more information.
3. When the installation and configuration process is complete, start SAS Management Console.
4. Expand the Server Manager node, and then expand both the SAS Application server node and the Logical Grid Server node.