Visual Designer Development and
Runtime Software License Upgrades
VISUALWEB1, VISUALWEB3, VISUALWEB7, VISUALRT4KCE, VISUALRT64KXP,
VI-SUALDCE2XP, VISUALDPBCU, VISUALRTUPPC, VISUALDUPCE and VISUALDUPXP.
Thank you for purchasing a Visual Designer™
soft-ware license upgrade. With this purchase, you received a Serial Number identifier used to vali-date this upgrade along with these instructions. There are a number of types of license upgrades. Catalog numbers VISUALWEB1, VISUALWEB3, and VISUALWEB7 provide license upgrades for developing additional simultaneous web client ses-sions to a Visual Designer runtime license on an Eaton XV, XP, or ePro operator interface or on an Open PC platform. Each of those products comes standard with a single web client session license and these upgrades add 1, 3, or 7 web sessions to those. Catalog numbers VISUALRT4KCE and
VISUALRT64KXP provide license upgrades for increasing the number of tags and the number of communications drivers you can use in the applications running on Eaton’s XV and XP families of operator interfaces, and certain PanelMate®
ePro™ PS models running Visual Designer. The first
takes the tag count on an XV model from 1500 to 4000 and the driver count from 3 to 5. The second takes the tag count on an XP or ePro model from 4000 to 64,000 and the driver count from 5 to 8. Catalog number VISUALDCE2XP upgrades the license on the development hardkey from one that can develop applications for only XV models to one that can develop for XV, XP, ePro and Open PC applications. VISUALDPBCU upgrades the license on the development hardkey to enable the Import Wizard for converting Allen Bradley® PanelBuilder
applications to Visual Designer. VISUALRTUPPC
updates the PC Runtime version softkey license.
VISUALDUPCE and VISUALDUPXP update the development hardkey licenses of VISUALDCE and VISUALDXP to a newer version of Visual Designer respectively. This document covers how to apply these software license upgrades to systems/PCs in the field.
The remainder of this document describes:
1. How to generate the Site Code of your current license
2. Registering your software upgrade on the Internet
3. Applying the Site Key which updates the license
4. Receiving technical support
Generating the Site Code
There are two different mechanisms you use to generate the Site Code. One is for XV systems which run the Microsoft Windows CE operating system and the other is for all other system types including XP and ePro models as well as PC’s running Visual Designer runtime or development software.
Windows CE models
1. Once you have received the upgrade product which includes a serial number and Product ID, connect a PC that runs Visual Designer to the XV over Ethernet.
2. On the XV unit the Remote agent should automatically be running, if not the remote user will need to start it. Note the IP address in the Remote Agent window which will be used in step 4.
3. On the PC insert the Visual Designer USB license key and launch Visual Designer software, then start the Remote Management tool from the Home tab of the ribbon by clicking “Connect”.
4. In the Remote Management window as shown in Figure 1, select the Network IP radio button and type in the IP address of the XV unit from step 2, and hit the “Connect” button.
Figure 1. Remote Management window
5. Select the Embedded License Tab as shown in Figure 2 and copy the site code to the Windows Clipboard with the copy button to the right of the site code box.
Figure 2. Embedded License Tab
6. Select the Target tab, click on the “Disconnect” button and the “Close” button then skip to the Registering Visual Designer Software section of this document.
Non-Windows CE models
7. Once you have received the upgrade product which includes a serial number and Product ID, connect a USB keyboard and mouse to the XP unit, ePro unit, Visual Designer Runtime PC or Development PC.
8. If the upgrade is for a runtime feature, close the Visual Designer runtime application on the XP unit, ePro unit or Visual Designer Runtime PC. If there is no exit function built into the application then a keyboard combination of <ALT> F4 will shut it down. If the upgrade is for a development feature then close the Visual Designer development software.
9. Next select Start > Programs > Eaton > Visual Designer > Register. The Protection Manager dialog shown in Figure 3 will appear. Note that if this is for a development PC that the Hardkey Protection type will be selected rather than Softkey as shown in Figure 3. Click “Check”.
Figure 3. Protection Manager
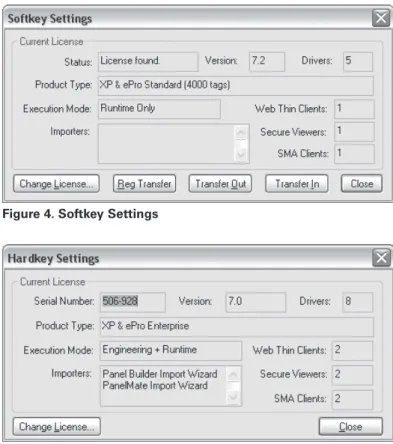
10. The Softkey or Hardkey Settings dialog shown in Figure 4 or 5 will appear. Click on “Change License”.
Figure 4. Softkey Settings
11. The Change License – Softkey (or Hardkey) dialog shown in Figure 6 will appear. Copy the site code to the Windows Clipboard with the copy button to the right of the site code box then click “Cancel”, then “Close” and proceed to Registering Visual Designer software.
Figure 6. Change License - Softkey
registering Visual Designer Software
If your development or runtime system/PC has Internet access, then within the Visual Designer software select Register Software
from the Help menu. This will launch the OPERATOR INTERFACE SOFTWARE REGISTRATION Web page.
If your PC does not have Internet access then you should write down the Site Code or, to minimize typing errors, paste it into an electronic document (using Notepad or Microsoft Word) that you can open on a PC that has Internet access. Then copy and paste the Site Code from that document into the OPERATOR INTERFACE SOFTWARE REGISTRATION Web page. To get to the Web page from any PC with Internet access do the following:
1. Open your Web browser and browse to
www.Eaton.com/Electrical.
2. From the left navigation column, choose “Products and Services” then the sub-links “Automation and Control”, “Operator Interface (HMI)”, and “Operator Interface Software”. 3. Under Software Downloads click on “Operator Interface
Software Registration”
Complete the form entering your contact information, the serial number of the license upgrade, the license upgrade catalog number, and paste the Site Code into the Site Code field (using <CTRL> V or
right-click > Paste) and click Submit. Within one business day you will receive an e-mail from Eaton Care with your new Site Key.
applying the Site Key
When you receive the e-mail with your new Site Key you should fol-low these steps to complete the software license upgrade process. Just as there were two different mechanisms you used to generate the Site Code, there are two to use to apply the Site key. The first is for XV systems which run the Microsoft Windows CE operating system and the other is for all other system types including XP and ePro models as well as PC’s running Visual Designer runtime or development software.
Windows CE models
12. The remote user must reconnect to the XV unit over Ethernet from the user’s PC running Visual Designer. Open Visual
Designer start the Remote Management tool from the Home tab
13. Go to the Embedded License tab and paste the Site Key into the Site Key field (<CTRL> V) as shown in Figure 7 and click on “Send”.
Figure 7. Embedded License
14. The warning dialog shown in Figure 8 will appear, click on “OK”.
Figure 8. Warning
15. The Remote Management dialog will then change to reflect the new upgraded license status of the XV unit as shown in Figure 9.
Figure 9. Remote Management
16. Go to the Target tab and click on “Disconnect” then close Visual Designer software. On the XV unit close the Remote Agent by clicking on “Exit”, then reboot the unit by clicking
Start>Programs>System>Reboot.
17. Once the XV unit reboots the license upgrade process is complete.
19. Select Start > Programs > Eaton > Visual Designer > Register. The Protection Manager dialog shown in Figure 10 will appear. Note that if this is for a development PC that the Hardkey Protection type will be selected rather than Softkey as shown in Figure 3. Click “Check”.
Figure 10. Protection Manager
20. The Softkey or Hardkey Settings dialog shown in Figure 11 or 12 will appear. Click on “Change License”.
Figure 11. Softkey Settings
Figure 12. Hardkey Settings
21. In the Change License – Softkey (or Hardkey) dialog, paste the Site Key from the returned e-mail from Eaton into the Site Key field (<CTRL> V) as shown in Figure 13 and click on “Authorize”.
Figure 13. Change License – Softkey
22. For Softkey licensing (runtime upgrade), the confirming Register dialog shown in Figure 14 will appear, click on “OK”. For hardkey licensing (development upgrade) the dialog shown in Figure 15 will appear, click on “Yes” and then the confirming dialog shown in Figure 16 will appear, click on “OK”.
Figure 14. Confirming Register
Figure 15. Hardkey Licensing
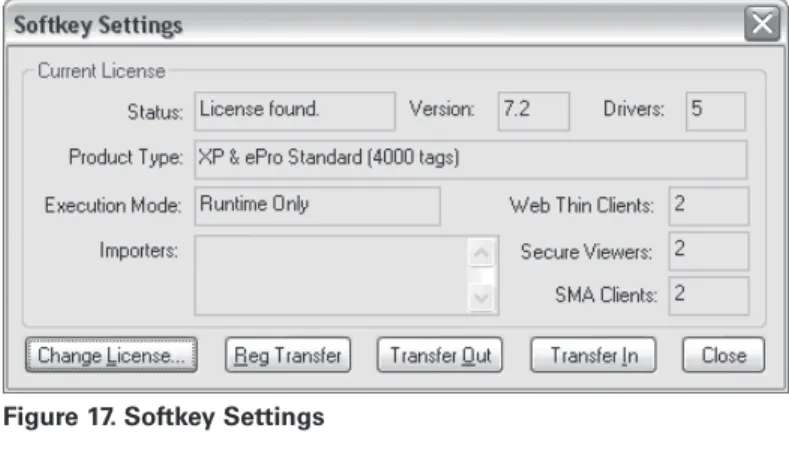
23. The Softkey or Hardkey Settings dialog shown in Figure 17 or 18 will appear with the upgraded license information. Click “Close”.
Figure 17. Softkey Settings
Figure 18. Hardkey Settings
24. On a standard PC (development or runtime) the license upgrade process is complete, but on an ePro PS or XP unit the user must then initiate the Protect Mode Save function to make the license upgrade permanent. Once the Protect Mode Save function is completed the license upgrade process will be complete. Refer to you ePro PS or XP Hardware User’s Guide for information on Protect Mode and the Protect Mode Save function.
technical Support
You can receive free technical support from Eaton’s Technical Resource Center. The TRC can be reached at 877-ETN-CARE (877-386-2273) Monday through Friday from 8:00 AM to 5:00 PM Eastern. This is a global number that is toll free when calling from within the United States. You may also contact the TRC’s automation group via e-mail at [email protected].