ePass2003
User Guide
Revision History:
Date Revision Description
Software Developer’s Agreement
All Products of Feitian Technologies Co., Ltd. (Feitian) including, but not limited to, evaluation copies, diskettes, CD-ROMs, hardware and documentation, and all future orders, are subject to the terms of this Agreement. If you do not agree with the terms herein, please return the evaluation package to us, postage and insurance prepaid, within seven days of their receipt, and we will reimburse you the cost of the Product, less freight and reasonable handling charges.
1. Allowable Use – You may merge and link the Software with other programs for the sole purpose of protecting those programs in accordance with the usage described in the Developer’s Guide. You may make archival copies of the Software.
2. Prohibited Use – The Software or hardware or any other part of the Product may not be copied, reengineered, disassembled, decompiled, revised, enhanced or otherwise modified, except as specifically allowed in item 1. You may not reverse engineer the Software or any part of the product or attempt to discover the Software’s source code. You may not use the magnetic or optical media included with the Product for the purposes of transferring or storing data that was not either an original part of the Product, or a Feitian provided enhancement or upgrade to the Product.
3. Warranty – Feitian warrants that the hardware and Software storage media are substantially free from significant defects of workmanship or materials for a time period of twelve (12) months from the date of delivery of the Product to you.
4. Breach of Warranty – In the event of breach of this warranty, Feitian’s sole obligation is to replace or repair, at the discretion of Feitian, any Product free of charge. Any replaced Product becomes the property of Feitian. Warranty claims must be made in writing to Feitian during the warranty period and within fourteen (14) days after the observation of the defect. All warranty claims must be accompanied by evidence of the defect that is deemed satisfactory by Feitian. Any Products that you return to Feitian, or a Feitian authorized distributor, must be sent with freight and insurance prepaid.
EXCEPT AS STATED ABOVE, THERE IS NO OTHER WARRANTY OR REPRESENTATION OF THE PRODUCT, EXPRESSED OR IMPLIED, INCLUDING, BUT NOT LIMITED TO, THE IMPLIED WARRANTIES OF MERCHANTABILITY AND FITNESS FOR A PARTICULAR PURPOSE.
5. Limitation of Feitian’s Liability – Feitian’s entire liability to you or any other party for any cause whatsoever, whether in contract or in tort, including negligence, shall not exceed the price you paid for the unit of the Product that caused the damages or are the subject of, or indirectly related to the cause of action. In no event shall Feitian be liable for any damages caused by your failure to meet your obligations, nor for any loss of data, profit or savings, or any other consequential and incidental damages, even if Feitian has been advised of the possibility of damages, or for any claim by you based on any third-party claim.
6. Termination – This Agreement shall terminate if you fail to comply with the terms herein. Items 2, 3, 4 and 5 shall survive any termination of this Agreement.
Contents
Chapter 1 RunTime Installation ... 4
1.1 Supported Platform ... 4
1.2 Preparing for Installing ePass2003 ... 4
1.3 Installing ePass2003 Runtime ... 4
1.4 Uninstalling ePass2003 Runtime ... 8
Chapter 2 ePass2003 Token Manager ... 11
2.1 Prerequisite ... 11
2.2 Overview ... 11
2.2.1 Interface without USB Key Insertion ... 11
2.2.2 Interface with USB Key Insertion ... 12
2.2.3 Interface Buttons ... 12
2.3 Login... 12
2.4 Certificate Management ... 14
2.4.1 Viewing Certificate Information ... 15
2.4.2 Importing ... 16
2.4.3 Exporting ... 17
2.4.4 Deletion ... 18
2.5 Changing Token Name ... 19
2.6 Changing User PIN ... 19
2.7 Initializing ... 22
Chapter 3 Windows PIN Management ... 23
3.1 Overview ... 23
3.2 EnterSafe Minidriver PIN Management for Windows ... 23
3.2.1 Changing a User PIN ... 23
3.2.2 Unblocking EnterSafe Minideriver ... 25
Chapter 1
Runtime Installation
1.1 Supported Platform
Windows Platform:
Windows 2000
Windows XP x86/x64
Windows 2003 x86/x64
Windows Vista x86/64
Windows 2008 x86/x64
Windows 7 x86/x64
Windows8 x86/x64
Linux Mac OS
1.2 Preparing for installing ePass2003
Before installing ePass2003 Runtime, make sure the following requirements are satisfied:
Your operating system is one in the above list
Your computer has at least one USB port available
Your BIOS supports the USB device, and USB support has been enabled in CMOS settings
USB extension or hub available (optional)
ePass2003 Token available
1.3 Installing ePass2003 Runtime
1.
Before you can use the ePass2003, you must install the Runtime library. Execute ePass2003-Setup.exe. The following select language interface appears:Figure 1 select language
2.
After select language, click “OK”, the following welcome interface appears:Figure 2 welcome interface
3.
Click “Next”, the following select install path interface appears:Figure 3 select install path
4.
Click “Next”, the following choose CSP interface appears:Note: ePass2003 supports Private CSP and Microsoft CSP.
For older windows systems such as Windows2000/XP, users must install patch KB909520 to enable the option ‘Microsoft CSP’.
Private CSP is provided by FEITIAN, the CSP name is “EnterSafe ePass2003 CSP v1.0”.
Microsoft CSP means Microsoft Base CSP (Microsoft Base Smart Card Crypto Provider), it supports
Minidriver, and user can install the middleware through system update, no redundant installation package, no complicated installation process; we also have installation package for the user who doesn’t have the Internet. But please pay attention, from Vista and above, Microsoft has integrated Minidriver into Windows system, for XP and below, Windows system doesn’t install Base CSP (Microsoft CSP option disable), user can add Base CSP through system patch KB909520.
5.
After select CSP, click “Install” to continue, the following interface appears:Figure 5 install process
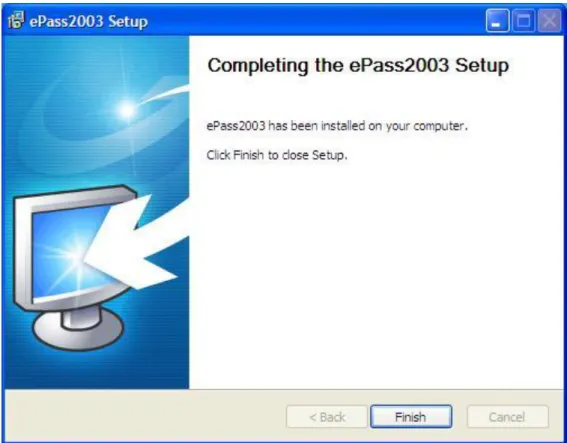
6.
After install process finish, the following interface appears:Figure 6 install completed
7.
Click “Finish” to finish the installation.1.4 Uninstalling ePass2003 Runtime
After install the ePass2003 runtime, you can uninstall it through following methods:
Use “Add or Remove Programs” to uninstall
Open “start” menu select “Control Panel”, double click “Add or Remove Programs”, choose “ePass2003 (Remove only)” in the “Currently installed programs” list, then click “Change/Remove”.
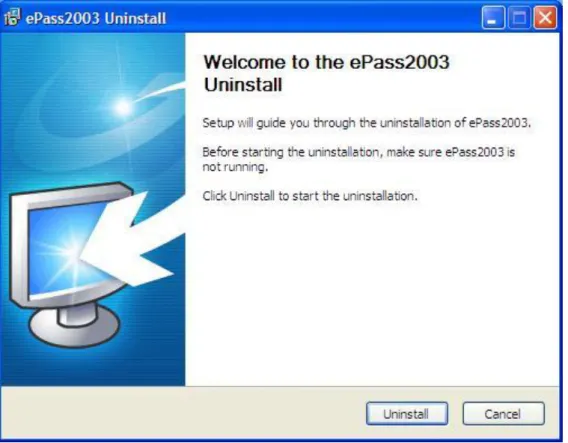
Uninstall it from start menu
Open “start” menu “All Programs” “Feitian” “ePass2003” “Uninstall ePass2003”.
Figure 7 uninstall wizard interface
2.
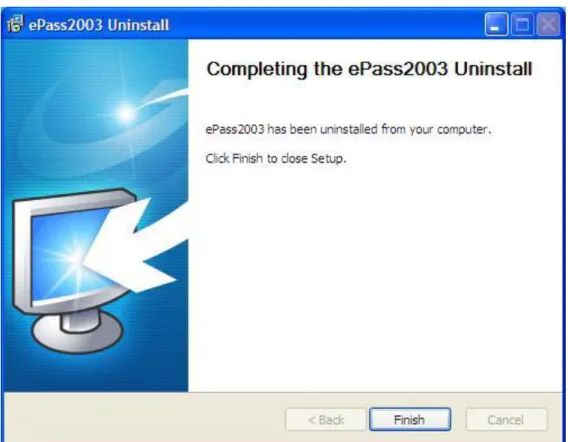
Click “Uninstall”, the following uninstall process interface appears:3.
After uninstall process finish, the following interface appears:Figure 9 uninstall completed
Chapter 2
ePass2003 Token Manager
2.1 Prerequisite
Because the Manager is based on the middleware of ePass2003 and it needs to access the token, you must have installed ePass2003 product on your computer before using the Manager.
The token must be PKI initialized before use.
2.2 Overview
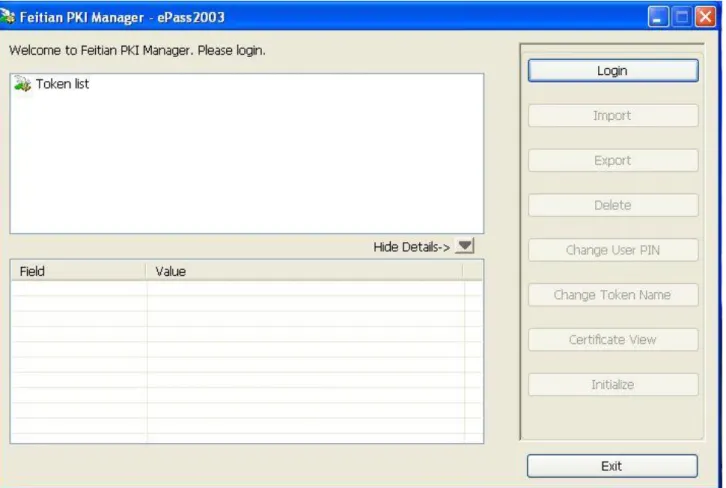
2.2.1 Interface without USB Key Insertion
You can find the shortcut for the Manager by clicking Start -> All Programs -> Feitian -> ePass2003. Click the shortcut to start the Manager. The following interface appears:
2.2.2 Interface with USB Key Insertion
Connect ePass2003 to a USB port on your computer. The Manager will recognize it immediately as follows:
Figure 11 USB Key Inserted
Note: The total private memory space and the free private memory space refer to the PIN protected spaces. Since the private key is extremely sensitive and it is managed by the COS, it doesn’t show the total private memory space and the free private memory space.
2.2.3 Interface Buttons
The buttons on the interface are: Login, Import, Export, Delete, Change User PIN, Change USB Key Name, View Certificate Information and Exit.
2.3 Login
Select a USB key from the list on the right to which you want to log in and click Login. The following interface appears:
Figure 12 Login dialog box
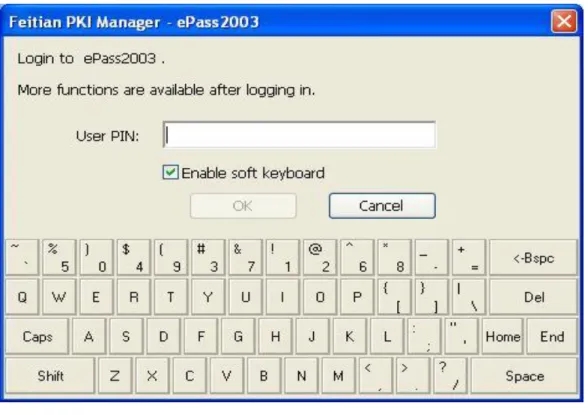
Note: When the PIN input dialog is displayed, the Manager will start the safe desktop. In this status, only the box is highlighted. Except input in the box, most of other operations are disabled. Default password is 12345678. Optionally, you can use a soft keyboard by checking Soft keyboard option here to avoid monitoring of a potential Trojan program.
Figure 13 Soft Keyboard
Note: The physical keyboard is disabled when you are using the soft keyboard.
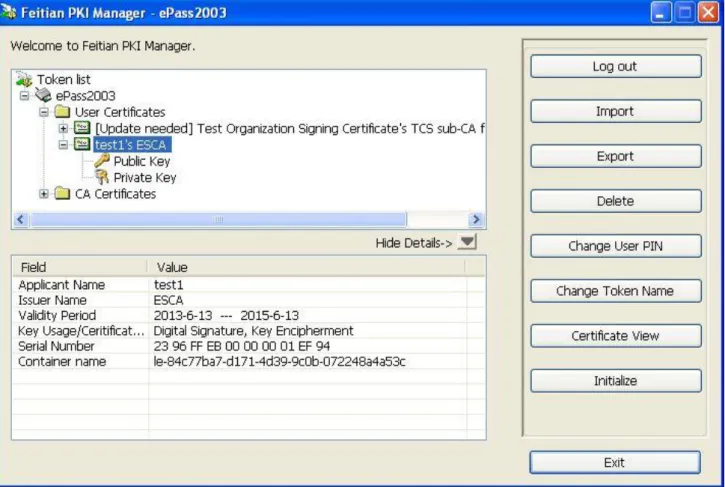
After you enter a proper PIN and click OK, the interface as shown in Figure 5 appears. A token list is displayed on the top. Below are the properties and their values. By clicking Hide Details or More Details button, you can hide the details or show them. After you have logged in, you can view not only the public data but the private data. In addition, the Login button changes to Log out button. To securely log out, click this button.
Figure 14 Logged In
If you type an incorrect password in the PIN input box, the following interface appears:
Figure 15 Incorrect PIN Prompt
Note: There is a limit on the number of incorrect PIN inputs. If this number reaches 9, the token will be locked. You cannot perform any operations with it in this case.
2.4 Certificate Management
After you have logged into the Manager, you can view certificate information, import a certificate, delete a certificate etc.
2.4.1 Viewing Certificate Information
1.
Click the “+” on the left side of a container (folder icon) in the token list or double-click the icon to display its content. Click the “+” on the left side of a certificate icon to display the key-pair. When a certificate is selected, the Certificate View button is enabled.Figure 16 Viewing Certificate Information
Figure 17 Certificate Information You can view the information of your interest.
2.4.2 Importing
Currently, ePass2003 supports to import the certificate from file or from Certificate Store. The following certificate types: P12, PFX and CER. The P12 and PFX types contain a key-pair (a public key and a private key), while the CER type does not. The PFX and CER types are used as examples below.
2.4.2.1 Importing the certificate from file
Click Import button in the main interface of the Manager. The following interface appears. Click Browse button to choose a certificate file to be imported. If necessary, enter a password below. Click OK.
Figure 18 Certificate Import
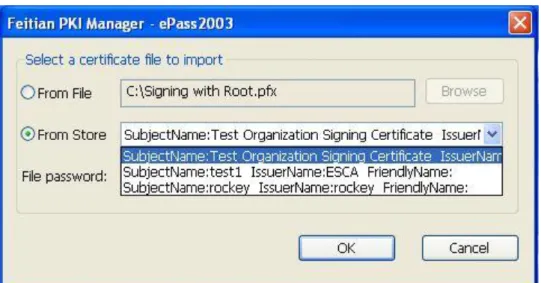
2.4.2.2 Importing the certificate from Certificate Store
Click Import button in the main interface of the Manager. The following interface appears. Click “From Store” option to import a certificate from Certificate Store. It will list the certificates, and then you could choose one to import the certificate to the ePass2003 token. Click OK.
Figure 19 Certificate Import
2.4.3 Exporting
You can export a certificate from ePass2003 token to a file.
From the tree view in the main interface of the Manager, choose the certificate to be exported and click Export button. A dialog box appears. Specify a path to the certificate file and its name.
Figure 20 Certificate Export Path Click Save. If the operation has succeeded, the following message will appear:
Figure 21 Successful Export
Note: The private/public key-pair cannot be exported.
2.4.4
Deletion
From the tree view of the main interface of the Manager, choose the certificate you want to delete and click Delete. The following interface appears:
Figure 22 Deleting Certificate Click Yes to delete the selected certificate if you do want.
2.5 Changing Token Name
Generally, the token is distinguished by serial number. For intuitive purpose, the token can be given a common name.
1.
Click Change Token Name button. The following interface appears:Figure 23 Changing Token Name
2.
Enter a name for the token and click OK.Note: At most a 32-character name can be provided.
2.6 Changing User PIN
You can change the PIN of your token. In the main interface of the Manager, click Change User PIN button. The following interface appears. Enter the old and new PINs and confirm the new PIN. Click OK.
Figure 24 Changing User PIN
Figure 25 Soft Keyboard Input
You can check Check intensity option to get aware of the security strength of the PIN you have set. “L” surrounded by red means “Low”.
Figure 26 Low Strength If the strength is higher, the following interface appears:
Figure 27 Medium Strength
We recommend long PINs made up of lower and upper-case letters, numbers and special characters.
Figure 28 High Strength By clicking OK, the following interface may appear:
Figure 29 PIN Changed
2.7 Initializing
Click Initialize button in the main interface. The following interface appears:
Figure 30 Confirming Initialization
Click Yes to start initializing operation. If the operation is performed successfully, the following interface appears:
Figure 31 Successful Initialization
After finishing initializing, all the data (include Certificates) will be deleted. The PIN of token will be reset to be “12345678”.
Chapter 3
Windows PIN Management
3.1 Overview
EnterSafe Minidriver is a new smart card minidriver developed by EnterSafe according to Microsoft Windows Smart Card Framework.
The new Windows smart card architecture leverages the fact that the cryptography required in common at the top is separate from the unique smart card hardware interfaces at the bottom. Windows now has a simple smart card interface layer, called smart card minidriver, which leverages common cryptographic components now included in the Windows platform.
The cryptography for smart cards has been implemented both in the legacy Cryptography API as well as the Cryptography API Next Generation (CNG) in Microsoft Windows Vista™ and 2008. The CSP implementation for CAPI is called the Microsoft Base Smart Card Cryptographic Service Provider, and the CNG implementation is called the Microsoft Smart Card Key Storage Provider. The Base CSP is not supported natively in those legacy Operating Systems, but it is available as Microsoft Windows Update # KB909520.
Base CSP and KSP provide the common software cryptographic portions, while the minidriver of a given smart card compliant with this architecture simply plugs in to provide access to the hardware and software of that particular smart card.
From an application developer perspective, the Base CSP, KSP and Minidriver interfaces provide a common way to access smart card features, regardless of the card type.
For users, the new architecture includes support for all preexistent smart card scenarios, and it also provides new tools for the management of the Personal Identification Number (PIN).
3.2 EnterSafe Minidriver PIN Management for Windows
3.2.1 Changing a User PIN
Generally, the User PIN is a password used to protect the data on the token. If a user operation (Windows logon, email signature, email encryption, VPN access, etc.) should access the Private Memory, the user will be asked for a User PIN.
It is recommended that users should often change their PIN to better protect the data on the token. In order to allow users to change the value of their PIN, several interfaces are available to do so in Windows Vista/2008 and in
legacy versions of Windows. Users can change the PIN as described below.
3.2.1.1 Changing a User PIN with Windows 2000, XP or Server 2003
Before changing a user PIN with Windows 2000, XP or 2003, users should download and install the update package # KB909520 to enable the Smart Card PIN Tool. After installing the update package, users can use the PIN Tool to change a User PIN as follows:
1.
Select the Option Start/Run and type PinTool. The following dialog box appears.Figure 41 Smart Card PIN Tool – Change a User PIN
2.
Input the Old PIN, the New PIN and then confirm the New PIN.3.
Click Change Pin button to finish changing the User PIN.Note: The EnterSafe_Minidriver default PIN is 12345678.
3.2.1.2 Changing a User PIN with Windows Vista, 2008 and Windows 7
In Windows Vista , 2008 and Windows 7, users can change their smart card user PIN using the secure desktop. The secure desktop is the most trusted context in the operating system. The most common use of the Secure Desktop is the User Log on to Windows. However, it is also used for other secure operations with user credentials,
such as password changes and now smart card PIN management.
To change the PIN of the smart card in Windows Vista, perform operations as follows:
1.
Press Ctrl+Alt+Delete to access the Secure Desktop screen.2.
Select the Change a Password option.3.
Attach EnterSafe Minidriver to a USB Port of the computer.4.
Select the smart card user tile.5.
Enter the old PIN, the new PIN and confirm the new PIN in the appropriate fields. As shown in following image:Figure 42 Secure Desktop - Change a User PIN
3.2.2 Unblocking EnterSafe Minideriver
Private data stored on EnterSafe Minidriver is protected by the User PIN. The PIN code retry number is limited by hardware. Once the preset maximum retry number is exceeded, EnterSafe Minidriver Token will be blocked. Once the card is blocked, it can no longer be used even you have the correct User PIN. The only way to restore it is by using the Unblock Card procedure.
Note: The EnterSafe Minidriver default maximum number of wrong PIN attempts is 10.
3.2.2.1 Example Unblock Procedure
The smart card unblock functionality require the use of an Administrative key that the regular end user should not have direct access to. The user will require support from a Security Officer to complete this operation.
To protect the confidentiality of the Admin Key, the Unblock Card procedure does not require the end user to present the Admin key directly. Instead, a challenge-response mechanism is used:
1.
The user retrieves a Challenge from the card.2.
The user communicates the Challenge to the IT Admin/Helpdesk.3.
IT Admin/Helpdesk combine the Challenge (8 bytes) and the user’s Admin Key (24 bytes) using the Triple DES algorithm to calculate the unique Response (8 bytes) to the challenge.4.
IT Admin/Helpdesk communicates the Response to the end user.5.
The end user enters the Response value and defines a new value for the User PIN, which will be established once the Card Unblock has completed.6.
The smart card confirms that the Response provided is correct, by comparing the value entered by the user with one generated within the card using the Challenge generated by the card and the Admin Key stored in the card. If both values match, the card unblock is successful, the new user PIN is established and the PIN attempt counter is reset.It is important to note that, like the Verify PIN procedure, the Unblock Card procedure is protected by a maximum number of unsuccessful unblock attempts. Once the maximum number of unsuccessful unblock attempts is reached the card will be permanently blocked even to an administrator, and all data stored in the card becomes permanently inaccessible. For this reason it is important to perform the unblock procedure with great care. Like the Change PIN procedure, the process and tools used to unblock a Smart Card in Windows Vista/2008 and the legacy versions of Windows operating systems are different.
3.2.2.2 Unblocking a Smart Card with Windows 2000, XP or Server 2003
For Windows 2000, XP, and Server 2003 and later, the Smart Card PIN Tool used for changing the value of the User PIN can also be used to unblock the card.
Note that in order to use the PIN Tool the user must have access to a machine that is to be logged on. The user cannot logon using smart card credentials because the card has already been blocked. Accordingly, if the user’s organization security policy introduces a smart card logon mechanism, the user will have to access another already logged machine in order to gain access to the PIN Tool to perform the Card Unblock procedure.
Figure 43 Smart Card PIN Tool – Unblock
With the blocked Token attached to the USB port, when the user clicks on the Unblock button, the Smart Card will return the 16 digits of Challenge, and will enable the Response, New PIN and Confirm New PIN fields to allow the user to enter the corresponding values according to the process previously described. Once the user clicks the OK button, the Response and New PIN values will be transmitted to the card to complete the card unblock procedure.
3.2.2.3 Unblocking a Smart Card with Windows Vista, 2008 and Windows 7
Smart Card Unblock is integrated into the Windows Vista, 2008 and Windows 7 Secure Desktop. However, it is not configured by default and must be explicitly enabled with Group Policy. When this feature is enabled, the user is presented with the Smart Card Unblock screen when logon is attempted using a blocked smart card.
Note: Smart card unblock requires that smart cards are assigned an administrator key before they are provided to users, and that the IT infrastructure includes a secure way to store and access these keys when a user needs assistance.
3.2.2.3.1 Enabling Unblock Card with Windows Vista, 2008 and Windows 7
The Unblock Card function in the secure desktop user interface is not enabled by default for Windows Vista ,2008 and Windows 7. To enable unblock in the secure desktop user interface, an administrator can use the Group Policy
Object Editor snap-in in the Microsoft Management Console (MMC).
1.
Click Start button, type MMC in the Start Search field and then press Enter.2.
When prompted to run Command Prompt as an administrator, click Allow. This will open the Microsoft Management Console dialog.3.
In the Console 1 dialog, click on the File menu and select Add/Remove Snap-in.4.
In the Add or Remove Snap-ins dialog box, select Group Policy Object Editor in the Available Snap-ins pane on the left side, and then click Add, as shown in following image:Figure 44 Add Group Policy Object Editor
5.
You can either enable unblock for the local computer only, or for all computers in the domain.1) To enable unblock on the local machine (only), you must be an administrator on the local computer. Select Local Computer in the Group Policy Object control. Click Finish to close the Select Group Policy dialog.
2) To enable unblock on all machines in the domain, you must be a Domain Administrator logged on to a Domain Controller and select Default Domain Policy in the Group Policy Object control. In the Select Group Policy Object dialog box, click Finish.
6.
Click OK in the Add or Remove Snap-ins dialog box to close it.7.
Click on the Local Computer Policy node in the left side pane, then click on Computer configuration—>Administrative Templates—>Windows Components—> Smart Card. And then double-Click Allow Integrated Unblock screen to be displayed at time of logon in the Setting list, as shown in following image:Figure 45 Unblock Smart Card setting
Figure 46 Enabled Unblock Smart Card
At this point, the Smart Card Unblock screen can also be configured via Group Policy to display a custom string. This string can be used to provide a deployment-specific phone number for users to call to obtain the response to the smart card administrator challenge. You can set the custom string as follows:
9.
Back in the Console 1 dialog, select the Local Computer Policy —> Computer Configuration —> Administrative Templates —> Windows Components —> Smart Card, and double-click on Display string when smart card is blocked on the right side pane.10.
Select the Enabled option button and type the string to display on the Unblock screen in the Display sting when smart card is blocked text box, and then press OK, as shown in following image:Figure 47 Display string when smart card is blocked Properties
3.2.2.3.2 Unblocking a Smart Card with Windows Vista, 2008 and Windows 7
Same as for the Change PIN function, the Smart Card Unblock is integrated into the Windows Vista, 2008 and Windows 7 Secure Desktop. However, it is not configured by default and must be explicitly enabled via Group Policy as 2.2.3.1 described. When this feature is enabled, the user is presented with the Smart Card Unblock screen when logon is attempted using a blocked smart card,, as shown in following image:
Figure 48 Secure Desktop – Smart Card Unblock
3.2.2.4 Administrator Tools for Card Unblock
The Smart Card Unblock procedure requires the administrator to be able to calculate the Response to a Challenge provided by the smart card of any end users that he/she is responsible for. This in turn means that the administrator shall:
1.
Know or somehow have access to, the administrative key values for all smart cards in use.2.
Have access to a Triple DES tool to calculate the Response based on the Challenge and the administrative key of a given user’s smart card.None of the Windows operating systems provide any means for administrators to handle the secure back-end storage of the user’s smart cards Administrative keys, nor do they provide a back-end tool to calculate the response to a challenge.
These features will be commonly provided by any commercial Base CSP compliant Card Management System (CMS), including Microsoft’s Identity Lifecycle Manager (ILM).
Appendix: Terms and Abbreviations
Entry Description
ePass2003
A smart card based token with FIPS proved for PKI applications, introduced by Feitian Technologies. It is designed for PKI application systems.
CryptoAPI
Interface (CAPI) An interface used for cryptography operations, provided by Microsoft. It provides cryptographic algorithm encapsulation of equipment irrelevant or implemented by software. With this interface, it is easy to develop PKI applications for data encryption/decryption, authentication and signature on Windows platforms.
Smart Card
Minidriver Interface An interface used for cryptography operations, provided by Microsoft. It provides cryptographic algorithm encapsulation of equipment irrelevant or implemented by software for Microsoft Base Smart Card Crypto Provider and Microsoft Smart Card Key Storage Provider.
PKCS#11 Interface
A programming interface introduced by RSA. It abstracts the cryptographic device into a universal logic view - Cryptographic Token, for use by upper-level applications, providing device independency and a manner of resource sharing.