DOCUMENT ID: DC01389-01-0210-01 LAST REVISED: November 2011
Copyright © 2011 by Sybase, Inc. All rights reserved.
This publication pertains to Sybase software and to any subsequent release until otherwise indicated in new editions or technical notes. Information in this document is subject to change without notice. The software described herein is furnished under a license agreement, and it may be used or copied only in accordance with the terms of that agreement.
To order additional documents, U.S. and Canadian customers should call Customer Fulfillment at (800) 685-8225, fax (617) 229-9845.
Customers in other countries with a U.S. license agreement may contact Customer Fulfillment via the above fax number. All other international customers should contact their Sybase subsidiary or local distributor. Upgrades are provided only at regularly scheduled software release dates. No part of this publication may be reproduced, transmitted, or translated in any form or by any means, electronic, mechanical, manual, optical, or otherwise, without the prior written permission of Sybase, Inc.
Sybase trademarks can be viewed at the Sybase trademarks page at http://www.sybase.com/detail?id=1011207. Sybase and the marks listed are trademarks of Sybase, Inc. ® indicates registration in the United States of America.
SAP and other SAP products and services mentioned herein as well as their respective logos are trademarks or registered trademarks of SAP AG in Germany and in several other countries all over the world.
Java and all Java-based marks are trademarks or registered trademarks of Sun Microsystems, Inc. in the U.S. and other countries.
Unicode and the Unicode Logo are registered trademarks of Unicode, Inc.
All other company and product names mentioned may be trademarks of the respective companies with which they are associated.
Use, duplication, or disclosure by the government is subject to the restrictions set forth in subparagraph (c)(1)(ii) of DFARS 52.227-7013 for the DOD and as set forth in FAR 52.227-19(a)-(d) for civilian agencies.
Context Summary ...1
Usage Scenario ...3
Get Started ...5
Sybase Unwired Platform Prerequisites ...5
SAP System Prerequisites ...5
Importing the Sales Force Automation Sample into
Unwired WorkSpace ...5
Opening the Sample Project ...7
Connecting to the SAP Data Source ...9
Connecting to Unwired Server ...12
Deploying the Sample Mobile Business Objects
(MBOs) to Unwired Server ...13
Try It Out ...19
Exploring MBOs ...19
Mobile Business Objects ...20
Running the Field Sales Agent Application ...21
Setting Up the Field Sales Agent Application in
Visual Studio ...21
Using the Field Sales Agent Functions ...27
Running the Sales Manager Application ...33
Setting Up the Sales Manager Application in
Visual Studio ...33
Using the Sales Manager Functions ...39
Learn More ...45
Related Reference ...45
Sample File Reference ...45
MBO-to-SAP BAPI/RFC Mapping ...46
Learn More about Sybase Unwired Platform ...50
Configuring Business Objects and Sample Data ...53
Configuring Data Change Notification (DCN) ...84
Index
...89
Context Summary
The Sales Force Automation sample contains everything you need to explore Unwired Platform features.
The Sales Force Automation sample is based on this development environment: • Sybase® Unwired Platform for Eclipse
• Windows Mobile device development with custom C# coding • Integration with your SAP® BAPIs
• Standard SAP JCo connection
Use the Sales Force Automation sample to explore the interaction of a native Windows Mobile application written in C# and Mobile Business Objects within the Sybase Unwired
WorkSpace Server. By using this sample, you will have a comprehensive preview of the benefits Unwired Platform can offer, without having to program the application yourself. If you would like to learn how to use Unwired Platform to create a Windows Mobile Application, review the available tutorials created expressly for this purpose.
Usage Scenario
Sales Force Automation (SFA) Sample is a smart mobile application for field sales agents and sales managers. For field sales agents, the role can be enterprise specific (such as sales representatives and field sales representatives), as can sales managers (such as sales officers). Sales Force Automation:
• Enables field sales agents to manage customers, manage orders (as well as smart material selection for order booking), and perform online availability check for the materials before confirming orders.
• Enables sales managers to approve or reject blocked orders, and view Management Information System (MIS) reports, (such as sales reports for the responsible sales areas, and outstanding for set of dealers belonging to responsible sales areas).
• Leverages business processes configured in SAP ERP Sales and Distribution (ECC 6.0), and leverages the technical capabilities of Sybase Unwired Platform to mobilize the stated processes.
Get Started
Complete the prerequisites, then follow the tasks in order.
Sybase Unwired Platform Prerequisites
Before you begin, review and complete these prerequisites for the system where you will install, or have already installed, a developer edition of Unwired Platform.
• Unzip the SUP21_SalesForceAutomation.zip file into a temporary location on the same machine as Unwired WorkSpace. For example, C:\temp.
• Install either the Personal or Enterprise Developer Edition of Unwired Platform version 2.1. See Installation Guide for Sybase Mobile SDK.
• Install Microsoft Visual Studio 2008.
• Install the Windows Mobile 6 Professional SDK Refresh. • Install ActiveSync 4.5.
SAP System Prerequisites
Before you begin, review and complete these prerequisites for the SAP system you will use with this sample.
• Create supporting RFCs in your SAP system by copying the code from the corresponding text files in SFA_FunctionModules folder. See Creating RFCs on page 53.
• Configure supporting business objects in your SAP system. See Configuring Business Objects and Sample Data on page 53.
• Set up the HTTP connection to allow DCN to automatically send updates to your Unwired Server. See Configuring Data Change Notification (DCN) on page 84.
Importing the Sales Force Automation Sample into Unwired
WorkSpace
From Unwired WorkSpace you can deploy the MBOs to Unwired Server.
Task
1. Start Sybase Unwired Sybase Unwired Platform services.
From Windows, select Start > Programs > Sybase > Unwired Platform > Start
Unwired Platform Services. 2. Start Unwired WorkSpace.
From Windows, select Start > Programs > Sybase > Unwired Platform > Unwired
WorkSpace.
3. If prompted to select a workspace, just click OK.
4. If you do not see WorkSpace Navigator and Enterprise Explorer tabs, click a Start Development link.
5. Select File > Import.
6. In the Import wizard, select General > Existing Projects into Workspace and click Next.
7. Select Select root directory and Browse to the location where you unzipped the
SUP21_SalesForceAutomation.zip file, and select the
SalesForceAutomation_MBO directory.
For example, if you unzipped the SUP21_SalesForceAutomation.zip file into
C:\temp, you would now select the SalesForceAutomation_MBO directory under
C:\temp.
The SalesForceAutomation_MBO directory contains the Sales Force Automation sample Mobile Application Project, including the defined mobile business objects (MBOs).
8. Click OK.
The SalesForceAutomation project displays in the Projects section.
9. Select the project and click Finish to import the project.
The project is imported into Unwired WorkSpace and is now available from WorkSpace Navigator.
Opening the Sample Project
Browse the Sales Force Automation project contents and open it in the Mobile Application Diagram.
1. In WorkSpace Navigator, expand the Sales Force Automation folder to view the project
artifacts.
When you import the project, errors are generated, as indicated by the red “x” beside the top level SalesForceAutomation project folder and the
SalesForceAutomation.pkg project file. These errors are resolved as you set up your project for your environment.
Mobile business objects are contained in the Mobile Business Objects folder. Project artifacts, generated code, and so on, are contained in the other folders.
2. Open the project in the Mobile Application Diagram.
3. Right-click the SalesForceAutomation project folder and select Open in Diagram
Editor.
The Mobile Application Diagram opens and displays the MBOs, including their operations and attributes. The red error icons indicate that the Sales Force Automation connection profile which provides access to the data source to which the MBOs are bound does not yet exist. These errors are resolved once you create connection profile. From the Properties view you can explore other aspects of MBO definition. Once created, most MBO configuration is performed from the Properties view.
4. Activate the Problem tab and expand Errors.
5. In the Problems tab, under Errors, right-click the first "Project
'SalesForceAutomation'..." item and select Quick Fix.
6. In the Quick Fix dialog, under Select a fix, select Configure build path... and click Finish.
7. In the Edit JAR dialog, browse to the sapjco.jar file and click Open. The default installation location is <UnwiredPlatform_InstallDir>
\Unwired_WorkSpace\Eclipse\sybase_workspace\mobile\eclipse \plugins
\com.sybase.uep.com.sap.mw.jco_2.1.0.201109131337\lib.
8. In the Properties for SalesForceAutomation dialog, Libraries tab, select the sup-ds.jar...
entry, and click Edit.
9. In the Edit JAR dialog, browse to <UnwiredPlatform_InstallDir>
\Unwired_WorkSpace\Eclipse\sybase_workspace\mobile\eclipse \plugins\com.sybase.uep.tooling.api_2.1.0.201105030306\lib. If you installed in the default location, this would be C:\Sybase
\UnwiredPlatform\Unwired_WorkSpace\Eclipse \sybase_workspace\mobile\eclipse\plugins
\com.sybase.uep.tooling.api_2.1.0.201105030306\lib.
10. Select the sup-ds.jar file and click Open.
11. In the Properties for SalesForceAutomation dialog, click OK.
After a few seconds, the Problems tab shows only warnings. You can expand the Warnings item to show the details:
Connecting to the SAP Data Source
Obtain the information necessary to connect to your SAP system from your SAP system administrator and create a connection profile in Unwired WorkSpace.
1. In Enterprise Explorer, click the New Connection Profile icon to launch the New
Connection Profile wizard.
2. On the Connection Profile page: 1. Select SAP Server.
2. Under Name, enter My SAP System.
3. Click Next.
3. On the SAP Connection Properties Page, fill in the information for your SAP system.
4. Click Test Connection.
You should see a Ping succeeded! message. If you see a Ping failed! message, verify the information you entered with your SAP system administrator and make changes as necessary until the Test Connection button returns a Ping succeeded! message.
5. Click Finish.
The new connection profile appears under the SAP Servers folder.
6. In Enterprise Explorer, right-click the My SAP System connection profile and select Connect.
7. Expand the My SAP System connection profile to show the SAP application components
Connecting to Unwired Server
Use the My Unwired Server connection profile to connect to Unwired Server.
Prerequisites
• Start Unwired Platform Services. • Start Unwired WorkSpace.
• Import the Sales Force Automation project.
Task
Unwired Platform includes the My Unwired Server connection profile that provides access to Unwired Server. Use this to connect to Unwired Server so that you can deploy the mobile business objects (MBOs) in your project to Unwired Server.
1. In Enterprise Explorer, expand the Unwired Server folder. 2. Right-click the My Unwired Server folder and select Connect.
If the connection fails, make sure all Unwired Server services are started – from Windows,
Start > Programs > Sybase > Sybase Unwired Platform > Start Unwired Platform Services – and try again.
3. Expand each element in the tree below My Unwired Server.
When you connect to the server, all the elements that can be administered appear below the server icon.
Deploying the Sample Mobile Business Objects (MBOs) to
Unwired Server
Deploy the sample to Unwired Server to make the MBO logic available to the two applications.
Prerequisites
Ensure you are connected to Unwired Server.
Task
1. Right-click in the Mobile Application Diagram and select Switch Developer Profile > Advanced.
2. From WorkSpace Navigator, right-click the SalesForceAutomation project and select Deploy Project.
3. Accept the defaults for the deploy mode, target version, and package name, then select Replication-based and click Next.
4. Select all boxes to deploy all MBOs and click Next.
5. On the Package User-defined Classes page, click Add JAR.
The filters.jar file now appears in the list of JARs for user-defined classes in the
Package User-defined Classes page. 7. Click Next.
8. From the Target Server page select My Unwired Server and click Refresh. 9. Select the default domain, then the admin security configuration, then click Next. 10. From the Server Connection Mapping page, under Connection profile, select My SAP
System, then drop down the list under Server connection and click <New Server Connection...>.
11. In the Create New Server Connection dialog, click OK.
12. From the Server Connection Mapping page, under Connection profile, select My SAP System, then drop down the list under Server connection and click <New Server Connection...>.
After the deployment process completes, a Deployment Status message appears, confirming that the deployment succeeded.
13. Click OK to clear the message.
Expand the My Unwired Server folder and subfolders to view the deployed MBOs.
Try It Out
Use the sample to view customers, create sales orders, approve blocked sales orders, and view management reports.
Before you can try out these features, you must:
1. Make sure you have met the prerequisites and completed the tasks in Get Started on page
5.
2. Deploy the sample MBOs to Unwired Server.
3. Set up each Sales Force Automation application in Visual Studio.
4. Run each Sales Force Automation application on Windows Mobile emulator.
Exploring MBOs
Review the existing attributes and operations for mobile business objects, see what
relationships among various mobile business objects are, and explore how MBOs are bound to the PurchaseOrder database as their back-end data source.
1. In WorkSpace Navigator, expand the Mobile Business Objects folder to view the MBOs
created for this sample: Approval, Customer, CustomerOutstanding, ErrorList, ET_CUSTOMER, Global, Material, Salesorder, SalesReport, and StockCheck. Three types of objects are listed under the Mobile Business Objects folder – all can be opened and viewed in the Diagram Editor:
• – Server MBOs • – Client MBOs • – SAP Structure
2. To see the relationships among these MBOs and SAP structures, and to gather insights on
the business logic behind them, right-click any MBO or structure and select Open in
Mobile Business Objects
Mobile business objects form the business logic for mobile applications and workflows. A mobile business object (MBO) is derived from a data source (database server, Web Service, SAP® server, and so on). MBOs form the business logic for mobile workflows that can be
deployed to an Unwired Server and referenced in mobile devices (clients). MBOs include: • Implementation-level details – read-only metadata columns that include information
about the data in the implementation.
• Abstract-level details – attributes correspond to class-level properties on the mobile client and map to columns. Parameters correspond to synchronization parameters on the mobile client and map to arguments. MBOs can also contain operations, which themselves contain parameters and arguments, and can be used to update, create, or delete data. For native applications a database runs on the mobile device. When users makes changes, those changes only apply to their local copy of the data. When a sync happens, the changes are sent to the Sybase Unwired Platform server and changes in the actual enterprise database are sent to the mobile device. With Mobile Workflow, even though the user exchanges data with the server, there is no client-side store that is synchronized with the server's consolidated database.
• Relationships – defined between MBOs, link attributes, and parameters in one MBO to attributes and parameters in another MBO.
You can define MBOs using either a top-down approach – designing attributes and parameters first, and later binding them to a data source, or a bottom-up approach – specifying a data source, and automatically generating attributes and parameters from it.
A mobile application includes MBOs, as well as role and server mappings, and other artifacts that are delivered to the Unwired Server during deployment.
Running the Field Sales Agent Application
A field sales agent would use the Sales Force Automation application for field sales agents to enter and submit sales orders for customers.
Setting Up the Field Sales Agent Application in Visual Studio
Use Visual Studio to deploy the Sales Force Automation client application for field sales agents to the Windows Mobile emulator.
Prerequisites
• Visual Studio 2008 with Windows Mobile 6 SDK is installed on the system where Unwired WorkSpace is running.
• If you have previously set up either the Field Sales Agent application or the Sales Manager application in Visual Studio, make sure you have closed the emulator, without saving the state, and then closed Visual Studio.
Task
1. In Windows Explorer, navigate to the SalesForceAutomation directory under the folder where you unzipped the SUP21_SalesForceAutomation.zip file. If you unzipped the SUP21_SalesForceAutomation.zip file into C:\temp, you would navigate to C:\temp\SalesForceAutomation.
2. Double-click the SalesForceAutomation.sln file to open it in Visual Studio 2008. The two projects in the solution file are displayed in the Solution Explorer.
3. In Solution Explorer, expand the src folder, then the SalesForceAutomation
folder under it, and locate the SalesForceAutomationDB.cs file.
4. Open the SalesForceAutomationDB.cs file and search for 2480 (port number for Unwired Server).
5. In the line directly above 2480, select the name entered for ServerName. In the picture below, this is KPATILXP.
6. Enter the host name of the machine where Unwired Server is installed, replacing the name
that is there – KPATILXP in the picture above.
In the example below, KPATILXP has been replaced by myserver.
7. Save the SalesForceAutomationDB.cs file.
8. Start ActiveSync by double-clicking the ActiveSync icon in the Windows system tray, or
by choosing Start > Programs > Microsoft ActiveSync.
9. From the ActiveSync menu bar, choose File > Connection Settings.
10. In the Connection Settings dialog, make sure your settings match the settings shown
below, then click OK.
11. In Visual Studio, make sure Windows Mobile 6 Professional Emulator is selected.
12. In Visual Studio, choose Tools > Device Emulator Manager.
13. Scroll down to the entry for Windows Mobile 6 Professional, right-click that entry and
select Connect.
14. Right-click the entry for Windows Mobile 6 Professional again and select Cradle.
Wait for Active Sync to indicate that the emulator is connected.
15. Press F5, or choose Debug > Start Debugging.
16. If you are prompted to select a device, select Windows Mobile Professional 6 Emulator
The login screen for the Sales Force Automation field sales agent application appears in the emulator.
Using the Field Sales Agent Functions
A field sales agent can view a list of customers, view information for individual customers, and create sales orders for customers.
Prerequisites
Launch the application on Windows Mobile 6 Professional emulator.
Task
A field sales agent can:
• View details of an assigned customer. • Create orders for a specific customer. • Assign materials while creating an order.
• Check availability of a material while creating an order.
1. Log in to the Sales Force Automation application.
• RFC – None
• MBO – Global (local MBO)
• Technical details –
• LDAP authentication • Local MBO
2. Click Login.
The home page of the application displays.
Source details: • RFC – None
• MBO – Global (local MBO) 3. Click Synchronize.
This updates device data from the SAP server.
4. Click Customer.
The Customers screen displays, showing summary information for the customers listed.
Source details:
• RFC – ZTEST_CUSTOMER_PROFILE
• MBO – Customer &ET_Customer
• Technical details – Comingled MBO 5. Select CUST1 and click Details.
The Customer Profile screen displays, showing more detailed information for the selected customer.
Source details:
• RFC – ZTEST_CUSTOMER_PROFILE
• MBO – Customer &ET_Customer
• Technical details – Comingled MBO 6. Create a sales order for the customer.
a) Click the Home icon to return to the application home screen. b) Click Create Sales Order to display the New Sales Order screen.
7. Fill in the information for an item.
a) From the Customer drop-down list, select CUST1.
b) From the Material drop-down list, select WIN1-AirConditioner. c) Click Live Stock to retrieve the Available Qty number.
d) In the Required Qty box, enter to 7.
You have now added the information for one item to the new sales order for CUST1:
Source details: • RFC – • ZWW_MATERIAL_GETLIST • ZWW_STOCK_CHECK • SalesOrder.CreateFromDat2 • MBO – • Material • StockCheck • Operation – CreateFromDat2 • Technical details – • Complex MBO
• Load on Demand Cache policy for Stock Check • Personalization Key
• Resultset Checker/Filter
8. Add the item to the new sales order.
Source details: • RFC – • ZWW_MATERIAL_GETLIST • ZWW_STOCK_CHECK • SalesOrder.CreateFromDat2 • MBO – • Material • StockCheck • Operation – CreateFromDat2 • Technical details – • Complex MBO
• Load on Demand Cache policy for Stock Check • Personalization Key
• Resultset Checker/Filter
9. Add more items to the new sales order.
a) Click Add Item.
b) Continue with step 7 on page 30.
c) When finished adding items to the sales order, select Menu > Save and Submit.
10. When finished:
a) Close the emulator, without saving the state. b) Close Visual Studio.
These steps leave the environment in a state in which it is ready for you to perform the steps for setting up and using the other application.
Running the Sales Manager Application
A sales manager would use the Sales Force Automation application for sales managers to approve blocked sales orders and view MIS reports.
Setting Up the Sales Manager Application in Visual Studio
Use Visual Studio to deploy the Sales Force Automation client application for sales managers to the Windows Mobile emulator.
Prerequisites
• Visual Studio 2008 with Windows Mobile 6 SDK is installed on the system where Unwired WorkSpace is running.
• If you have previously set up either the Field Sales Agent application or the Sales Manager application in Visual Studio, make sure you have closed the emulator, without saving the state, and then closed Visual Studio.
Task
1. In Windows Explorer, navigate to the SFAApproval directory under the folder where you unzipped the SUP21_SalesForceAutomation.zip file.
If you unzipped the SUP21_SalesForceAutomation.zip file into C:\temp, you would navigate to C:\temp\SFAApproval.
2. Double-click the SFAApproval.sln file to open it in Visual Studio 2008. The two projects in the solution file are displayed in the Solution Explorer.
3. In Solution Explorer, expand the src folder, then the SalesForceAutomation
folder under it, and locate the SalesForceAutomationDB.cs file.
4. Open the SalesForceAutomationDB.cs file and search for "2480" (port number for Unwired Server).
5. In the line directly above 2480, select the name entered for ServerName. In the picture below, this is 10.22.118.105.
6. Enter the name of the server where Unwired Server is installed, replacing the name that is
there – 10.22.118.105 in the picture above.
In the example below, 10.22.118.105 has been replaced by myserver.
7. Save the SalesForceAutomationDB.cs file.
8. Start ActiveSync by double-clicking the ActiveSync icon in the Windows system tray, or
by choosing Start > Programs > Microsoft ActiveSync.
9. From the ActiveSync menu bar, choose File > Connection Settings.
10. In the Connection Settings dialog, make sure your settings match the settings shown
below, then click OK.
11. In Visual Studio, make sure Windows Mobile 6 Professional Emulator is selected.
12. In Visual Studio, choose Tools > Device Emulator Manager.
13. Scroll down to the entry for Windows Mobile 6 Professional, right-click that entry and
select Connect.
14. Right-click the entry for Windows Mobile 6 Professional again and select Cradle.
Wait for Active Sync to indicate that the emulator is connected.
15. Press F5, or choose Debug > Start Debugging.
16. If you are prompted to select a device, select Windows Mobile Professional 6 Emulator
The login screen for the Sales Force Automation sales manager application appears in the emulator.
Using the Sales Manager Functions
A manager can view a list of blocked orders, view information for individual blocked orders, view a list of outstanding orders, and view information for individual outstanding orders.
Prerequisites
Launch the application on Windows Mobile 6 Professional emulator.
Task
A sales manager can: • Approve a blocked order.
• View and analyze information via MIS.
1. Log in to the Sales Force Automation application with a sales manager's credentials.
• Technical details –
• LDAP authentication • DCN
2. Click Login.
The home page of the application displays.
Source details: • RFC – None
• MBO – Global (local MBO) 3. Click Synchronize.
This updates device data from the SAP server.
4. Click Blocked Orders.
The Blocked Orders List screen displays.
Source details: • RFC – • ZWW_SALES_DOCUMENT_LIST • ZWW_SALES_DOCUMENT_RELEASE • MBO – Approval • Operation – Approve • Technical details –
• Cache Update Policy for Operation • Push implementation
5. Select a blocked order and click Details.
The Sales Order Detail screen displays, showing detailed information for the selected blocked order. As a sales manager, you have the authority to approve a blocked order. Click
6. Display the MIS reports screen.
a) Click the Home icon to return to the application home page. b) Click MIS to display the MIS reports screen.
c) Scroll down to see the tabs at the bottom of the screen that you use to select a report:
Sales Register or Outstanding:
Source details:
• RFC – ZWW_SALES_ORDERS_LIST
• MBO – Sales Report
• Technical details – Object Query
7. View the sales order register report for a customer.
a) From the Customer drop-down list, select a customer. b) Set the number of months to report and click Go.
The sales order register report displays for the selected customer. If the customer has no open sales orders, the report is blank.
Source details:
• RFC – ZWW_SALES_ORDERS_LIST
• MBO – Sales Report
• Technical details – Object Query
8. View the outstanding MIS report for all customers.
9. View the outstanding MIS report for a customer.
a) From the Customer drop-down list, select a customer. b) Click Go.
The outstanding MIS report screen is displayed for the selected customer. If the customer has no outstanding items, the report is blank.
10. When finished:
a) Close the emulator, without saving the state. b) Close Visual Studio.
These steps leave the environment in a state in which it is ready for you to perform the steps for setting up and using the other application.
Learn More
For more information about this sample, or to get additional help on using Unwired Platform in your enterprise environment, review these sections as required by your business needs. • For information about project artifacts, database schemas, and other detailed information
on this sample, see Related Reference on page 45.
• For information on how to coordinate your self-directed exploration of Unwired Platform samples, tutorials, and documentation, see Learn More about Sybase Unwired Platform on page 50.
• To get help or more information, see Getting Help on page 51.
Related Reference
Review reference information to understand the implementational and architectural details of this sample.
Sample File Reference
Familiarize yourself with files provided for this sample. All project files are extracted into a local directory from the
SUP21_SalesForceAutomation.zip file. The table below describes the contents of that file.
Folder Contents
[root] README.txt file, with instructions for setting up sample files, and the PDF file for this document
SalesForceAutomation The SalesForceAutomation.sln Visu-al Studio solution file, containing two projects that make up the Sales Force Automation application for field sales agents that you deploy to the Windows Mobile emulator.
SalesForceAutomation_MBO Sales Force Automation sample Mobile Applica-tion Project, including the defined mobile business objects (MBOs), that you deploy to Unwired Serv-er.
Folder Contents
SFAApproval The SFAApproval.sln Visual Studio solu-tion file, containing two projects that make up the Sales Force Automation application for sales man-agers that you deploy to the Windows Mobile em-ulator.
MBO-to-SAP BAPI/RFC Mapping
Describes the SAP attributes that are mapped to Mobile Business Objects (MBOs) for the roles used in the Sales Force Automation sample.
Field Sales Agent
Table 1. Business Operation Mapping Business Operation Mobile Business
Ob-ject
SAP BAPI/RFC
Customer Profile Customer ZTEST_CUSTOMER_PROFILE Stock Check StockCheck ZWW_STOCK_CHECK Material Master Material ZWW_MATERIAL_GETLIST
Table 2. Function Module: ZTEST_CUSTOMER_PROFILE SL No. Input Field Name Output Field Name
1 VKORG Sales Organization KUNNR Customer Number 1 VTWEG Distribution Channel NAME1 Name1
SPART Division NAME2 Name2 ORT01 City
STRAS House number and street LAND1 Country Key
TELF1 First telephone number TELFX Fax Number
KLIMK Customer's credit limit SKFOR Total receivables (for credit
limit check)
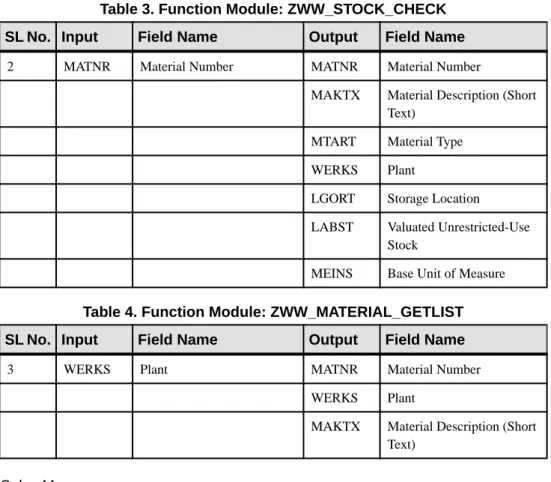
Table 3. Function Module: ZWW_STOCK_CHECK SL No. Input Field Name Output Field Name
2 MATNR Material Number MATNR Material Number
MAKTX Material Description (Short Text)
MTART Material Type WERKS Plant
LGORT Storage Location LABST Valuated Unrestricted-Use
Stock
MEINS Base Unit of Measure
Table 4. Function Module: ZWW_MATERIAL_GETLIST SL No. Input Field Name Output Field Name
3 WERKS Plant MATNR Material Number WERKS Plant
MAKTX Material Description (Short Text)
Sales Manager
Table 5. Business Operation Mapping Business Operation Mobile Business
Ob-ject
SAP BAPI/RFC
Blocked Order List Approve ZWW_SALES_DOCUMENT_LIST Released Blocked Order Approval (Operation)
ZWW_SALES_DOCUMENT_RE-LEASE
Sales Report SalesReport ZWW_SALES_ORDERS_LIST Customer Outstanding
Report
CustomerOutstanding ZWW_CUSTOMER_OUTSTAND-ING1
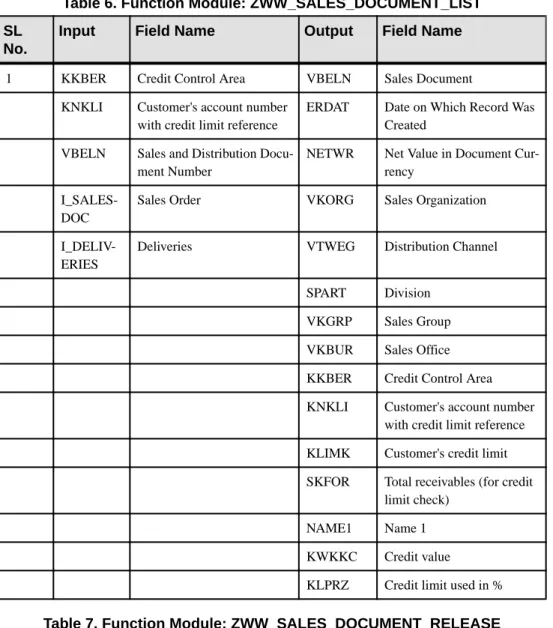
Table 6. Function Module: ZWW_SALES_DOCUMENT_LIST SL
No.
Input Field Name Output Field Name
1 KKBER Credit Control Area VBELN Sales Document KNKLI Customer's account number
with credit limit reference
ERDAT Date on Which Record Was Created
VBELN Sales and Distribution Docu-ment Number
NETWR Net Value in Document Cur-rency
I_SALES-DOC
Sales Order VKORG Sales Organization
I_DELIV-ERIES
Deliveries VTWEG Distribution Channel
SPART Division VKGRP Sales Group VKBUR Sales Office KKBER Credit Control Area KNKLI Customer's account number
with credit limit reference KLIMK Customer's credit limit SKFOR Total receivables (for credit
limit check) NAME1 Name 1 KWKKC Credit value
KLPRZ Credit limit used in %
Table 7. Function Module: ZWW_SALES_DOCUMENT_RELEASE SL No. Input Field Name Output Field Name
2 VBELN Sales Document
Table 8. Function Module: ZWW_SALES_ORDERS_LIST SL No. Input Field Name Output Field Name
3 KUNNR Customer Number 1 NAME1 Name 1
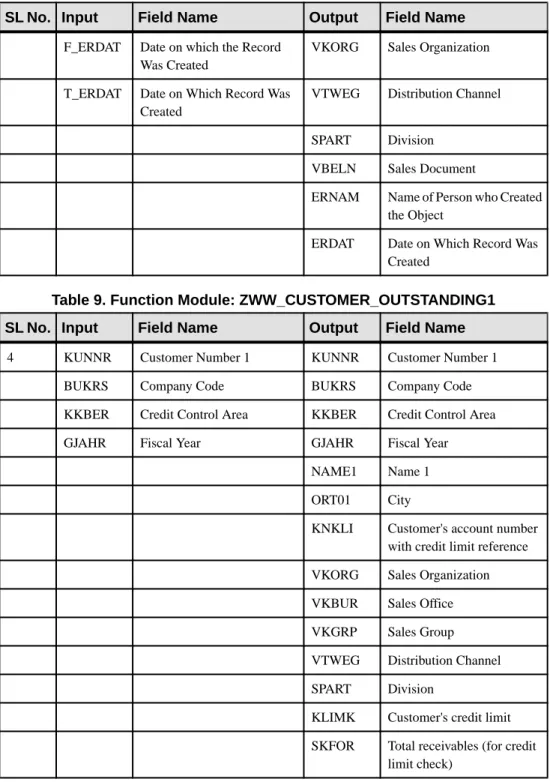
SL No. Input Field Name Output Field Name
F_ERDAT Date on which the Record Was Created
VKORG Sales Organization
T_ERDAT Date on Which Record Was Created
VTWEG Distribution Channel
SPART Division VBELN Sales Document
ERNAM Name of Person who Created the Object
ERDAT Date on Which Record Was Created
Table 9. Function Module: ZWW_CUSTOMER_OUTSTANDING1 SL No. Input Field Name Output Field Name
4 KUNNR Customer Number 1 KUNNR Customer Number 1 BUKRS Company Code BUKRS Company Code KKBER Credit Control Area KKBER Credit Control Area GJAHR Fiscal Year GJAHR Fiscal Year
NAME1 Name 1 ORT01 City
KNKLI Customer's account number with credit limit reference VKORG Sales Organization VKBUR Sales Office VKGRP Sales Group VTWEG Distribution Channel SPART Division
KLIMK Customer's credit limit SKFOR Total receivables (for credit
Learn More about Sybase Unwired Platform
Once you have finished, try some of the other samples or tutorials, or refer to other development documents in the Sybase Unwired Platform documentation set.
Check the Sybase Product Documentation Web site regularly for updates: access http:// sybooks.sybase.com/nav/summary.do?prod=1289, then navigate to the most current version.
Tutorials
Try out some of the other getting started tutorials available on Product Documentation to get a broad view of the development tools available to you.
Tutorial Projects
Tutorial projects are available for download, if you want the finished tutorial without going through the steps. Download tutorial projects from: http://www.sdn.sap.com/irj/sdn/mobile? rid=/webcontent/uuid/40ea4956-b95c-2e10-11b3-e68c73b2280e.
Samples
Sample applications are fully developed, working applications that demonstrate the features and capabilities of Sybase Unwired Platform.
Check the SAP® Development Network (SDN) Web site regularly for new and updated
samples: https://cw.sdn.sap.com/cw/groups/sup-apps.
Online Help
See the online help that is installed with the product, or the Product Documentation Web site.
Developer Guides
Learn about using the API to create device applications: • Developer Guide: BlackBerry Native Applications • Developer Guide: iOS Native Applications
• Developer Guide: Windows and Windows Mobile Native Applications • Developer Guide: Mobile Workflow Packages
Customize and automate:
• Developer Guide for Unwired Server Management API – customize and automate system administration features.
• Developer Guide: Unwired Server – customize and automate server-side implementations for device applications, and administration, such as data handling.
Javadoc and HeaderDoc are also available in the installation directory.
Getting Help
Each Sybase installation that has purchased a support contract has one or more designated people who are authorized to contact Sybase Technical Support.
If you cannot resolve a problem using the online help or other technical documents, have the designated person contact Sybase Technical Support or the Sybase subsidiary in your area.
APPENDIX: Configuring Your SAP System
Before you can run the sample application, you must set up several RFCs and configure several business objects on the SAP system that the sample will use.
Creating RFCs
Copy the source code for ten RFCs into the SAP system supporting this sample.
The SAP RFC source files are contained in the SFA_FunctionModules folder, in the directory into which you extracted SUP21_SalesForceAutomation.zip. If you extracted into C:\temp, the RFC source files would be in C:\temp
\SFA_FunctionModules.
The source for each RFC is in a separate text file. Each text file has the name of the RFC, with a .txt extension.
Manually copy the source code for each RFC into the SAP system supporting this sample.
Configuring Business Objects and Sample Data
Through the user interface in the SAP system supporting this sample, configure a number of business objects and add some sample data.
1. Create a Company Code.
Company Code is an organizational unit used in accounting. It is used to structure the business organization from a financial accounting perspective.
Path: Enterprise Structure > Definition > Financial Accounting > Edit, Copy, Delete,
Check Company Code
2. Create a Controlling Area.
Controlling Area is an organizational unit in Accounting used to subdivide the business organization from a cost accounting standpoint.
Path: Enterprise Structure > Definition > Controlling > Maintain Controlling Area T-Code: OX06 [2010 – Controlling Area]
3. Create a Credit Control Area.
Credit Control Area is an organizational unit that specifies and checks the credit limit for customers.
Path: Enterprise Structure > Definition > Financial Accounting > Define Credit
Control Area
4. Create global parameters for Company Code.
Chart of Accounts – CAIN, Fiscal Year Variant – K4, Credit Control Area – 2010. Path: Financial Accounting > Financial Accounting Global Settings > Company
Code > Enter Global Parameters
T-Code: [OBY6]
5. Assign Company Code to Controlling Area.
Path: Enterprise Structure > Assignment > Controlling > Assign Company Code to
Controlling Area
6. Create plants.
Path: Enterprise Structure > Definition > Logistics-General > Define, Copy, Delete,
Check Plant
T-Code: [OX10 – 2010 (Plant 1), 2011 (Plant 2), DE01 (Depot 1), DE02 (Depot 2)]
7. Create storage locations.
Path: Enterprise Structure > Definition > Materials Management > Maintain Storage
Location
8. Assign plants to company code.
Path: Enterprise Structure > Assignment > Logistics-General > Assign Plant to
Company Code
T-Code: [OX18] [2010, 2011, DE01, DE02 – (2010)]
9. Create Purchasing Organizations.
A Purchasing Organization negotiates the conditions of purchase with vendors for one or more Plants.
Path: Enterprise Structure > Definition > Materials Management > Maintain
Purchasing Organization
10. Assign Purchasing Organizations to Company Code.
Path: Enterprise Structure > Assignment > Materials Management > Assign
Purchasing Organization to Company Code
T-Code: [OX01] [P100, P200 - 2010]
11. Create Personnel Areas.
Path: Enterprise Structure > Definition > Human Resource Management > Personnel
Areas
12. Assign Personnel Areas to Company Code.
Path: Enterprise Structure > Assignment > Human Resource Management >
Assignment of Personnel Areas to Company Code
T-Code: [SPRO]
13. Create Sales Organizations.
Path: Enterprise Structure > Definition > Sales & Distribution > Delete, Copy, Check
Sales Organization
T-Code: [OVX5] [2010, 2011]
T-Code: [OVX3] [2010, 2011 - 2010]
15. Create Distribution Channels.
Path: Enterprise Structure > Definition > Sales & Distribution > Define, Copy, Check
Distribution Channel
T-Code: [OVXI] [01, 02]
16. Assign Distribution Channels to Sales Organizations,
Path: Enterprise Structure > Assignment > Sales & Distribution > Assign
Distribution Channel to Sales Organization
T-Code: [01, 02 – 2010, 2011]
17. Assign Divisions to Sales Organizations.
Path: Enterprise Structure > Assignment > Sales & Distribution > Assign Division to
Sales Organization
T-Code:[OVXA] [01 – 2010, 2011]
T-Code: [OVXG] [Sales Organization > Distribution Channel > Division]
19. Create Sales Offices.
Path: Enterprise Structure > Definition > Sales & Distribution > Maintain Sales
Office
T-Code: [OVX1] [2010, 2011]
20. Create Sales Groups.
Path: Enterprise Structure > Definition > Sales & Distribution > Maintain Sales
Group
T-Code: [OVX4] [001, 002, 003, 004]
21. Assign Sales Areas to Sales Offices.
Path: Enterprise Structure > Assignment > Sales & Distribution > Assign Sales Area
to Sales Office
T-Code: [SPRO] [Sales Organization > Distribution Channel > Division > Sales Office]
22. Assign Sales Groups to Sales Offices.
Path: Enterprise Structure > Assignment > Sales & Distribution > Assign Sales
23. Assign Sales Organizations and Distribution Channels to Plants.
Path: Enterprise Structure > Assignment > Sales & Distribution > Assign Sales
Organization, Distribution Channel, Plant Combination
T-Code: [OVX6] [Sales Organization > Distribution Channel > Plant]
24. Define Shipping Points.
Path: Enterprise Structure > Definition > Logistics Execution > Define, Copy, Delete,
Check Shipping Point
T-Code: [OVXD] [2010, 2011, 2012, 2013]
25. Assign Shipping Points to Plants.
Path: Enterprise Structure > Assignment > Logistics Execution > Assign Shipping
Point to Plant
26. Create a Loading Point.
Path: Enterprise Structure > Definition > Logistics Execution > Maintain Loading
Point
T-Code: [SPRO] [Loading Point > Shipping Point] [01 (2010), 02 (2011), 03 (2012), 04 (2013)]
27. Create a Transportation Planning Point.
Path: Enterprise Structure > Definition > Logistics Execution > Maintain
Transportation Planning Point
T-Code: XXX
28. Define Loading Groups.
Path: Enterprise Structure > Shipping > Basic Shipping Functions > Shipping Point
29. Define Shipping Conditions.
Path: Logistics Execution > Shipping > Basic Shipping Functions > Shipping Point &
Goods Receiving Point Determination > Define Shipping Conditions
T-Code: [01 (Standard), 02 (Pick-Up), 03 (Immediately), 04 (Transport Service), RE (Returns)]
30. Assign Shipping Points.
Path: Logistics Execution > Shipping > Basic Shipping Functions > Shipping Point &
Goods Receiving Point Determination > Assign Shipping Points
T-Code: [SPRO] [Shipping Conditions > Loading group > Plant > Shipping Point]
31. Define Transportation Zones.
Path: Sales & Distribution > Basic Functions > Routes > Route Determination >
Define Transportation Zone
32. Determine Routes.
Path: Logistics Execution > Shipping > Routes > Route Determination T-Code: [SPRO] [000021 (South-North Route)]
33. Set up Partner Determination for Customer Master.
Path: Sales & Distribution > Basic Functions > Partner Determination > Set up
Partner Determination > Set up Partner Determination for Customer Master
T-Code: [SPRO]
34. Set up Partner Determination: Account Groups – Function Assignment.
Path: Sales & Distribution > Basic Functions > Partner Determination > Set up
Partner Determination
T-Code: T-Code: [SPRO] General Data:
• Name: Hindustan Lever
• Street/House Number: Central Street, Kumara Park West/44 • Postal Code: 560020
• City: Bangalore • Country: IN (INDIA) • Region: 10 (Karnataka)
• Transportation Zone: 0000000001 (Region South) • Telephone: 080-20109777
• Fax: 080-20109777
Company Code Data:
• Reconciliation Account: 40001000 • Terms of Payment: 0001
Sales Area Data:
• Sales District: CENTRE • Customer Group: 01 • Currency: INR
• Price group: 01 (Bulk Buyer) • Customer Price Group: 1 (Standard) • Delivery Priority: 2 (Normal Item) • Shipping Conditions: 01 (Standard)
• Incoterms: CIF (Costs, Insurance & Freight)
Basic Data 1:
• Material Name: Win1 (Air conditioner) • Base Unit of Measure: EA (Each) • Material Group: 01
Sales, General/Plant:
• Transportation Group: 0001 (On Pallets) • Loading Group: 0001 (Crane)
Accounting 1: • Currency: INR • Valuation Class: 7900
• Price Control: S (Standard Price)
35. Set up Credit Check for Item Category.
Path: Sales & Distribution > Basic Functions > Credit Management / Risk
Management > Credit Management/Risk Management Settings > Determine Active Receivables per Item Category
Configuring Data Change Notification (DCN)
Through the user interface in the SAP system supporting this sample, set up the HTTP connection to allow DCN to automatically send updates to your Unwired Server.
1. Use T-Code SM59. 2. Press Enter:
3. Collapse HTTP Connections to External Server, then double click on ZWW_SALES_DOCUMENT_RELEASE in the tree view.
4. Fill in this information:
• RFC Destination – ZWW_SALES_DOCUMENT_RELEASE
• Connection Type – G
• Description 1 – To Connect to URL
5. On the Technical Settings tab, enter the Target Host, Service Number, and Path Prefix:
7. On the Special Options tab, set these values:
• Timeout – ICM Default Timeout
• HTTP Version – HTTP 1.1 8. Click Save:
A message displays at the bottom of the screen saying, "Destination ZWW_SALES_DOCUMENT_RELEASE saved."
9. Click Connection Test.
One of the following messages displays:
Either message indicates that the Unwired Server is accessible from this SAP system and the DCN setup is done correctly.
Index
A
ActiveSync
configuring to work with emulator 21, 33 requirements for sample 5
application
field sales agent functions 27 sales manager functions 39 viewing in emulator 21, 33 articles 50
B
business requirements 3C
connectingto SAP data source 9 to Unwired Server 12 connection profile
creating 9
errors before one is created 7 My SAP System 9
context summary 1
D
data change notification (DCN) 84
F
features, Unwired Platform 19
H
help, getting 51
I
importing
project file into Unwired WorkSpace 5
M
MBOs
deploying to Unwired Server 13 mapped to RFCs 46
overview 20
viewing diagrams of 19 mobile business objects
See MBOs
P
prerequisites SAP 5
Sybase Unwired Platform 5 projects
importing project file into Unwired WorkSpace 5
sample file reference 45
R
reference
data change notification (DCN) 84 MBO-to-SAP BAPI/RFC mapping 46 sample files 45
SAP business objects and sample data 53 requirements
business 3 SAP 5
Sybase Unwired Platform 5 RFCs
creating 53
mapped to MBOs 46
S
sample
opening in Unwired WorkSpace 7 overview 1
importing into Unwired WorkSpace 5 reference 45
samples 50 SAP
business objects and sample data 53 connecting to SAP data source 9 data change notification (DCN) 84 JCo connection requirements for sample 5 Sybase Unwired Platform
features demonstrated 19 getting help 51
learning more about 50 requirements for sample 5 Technical Support, contacting 51 system requirements
SAP 5
Sybase Unwired Platform 5
T
tutorial projects 50 tutorials 50
U
Unwired Platform
See Sybase Unwired Platform Unwired Server
connecting to 12 deploying MBOs to 13 starting 5, 12
Unwired WorkSpace
importing project file into 5 starting 5
usage scenario 3
V
Visual Studio
importing solution file into 21, 33 requirements for sample 5 setting up application in 21, 33
W
Windows Mobile 6 Professional SDK Refresh requirements for sample 5