J2UL-1563-02ENZ0(00)
October 2013
Linux(64)
FUJITSU Software
Interstage Big Data
Parallel Processing Server
V1.0.1
User's Guide
Preface
Purpose of this document
This document gives an overview of the features of Interstage Big Data Parallel Processing Server (hereafter, referred to as "this product"). It also describes the operations required during installation and the settings and operations of this product.
Intended readers
This document is intended for administrators building Big Data analysis systems using this product and who have the knowledge of building infrastructure, along with the knowledge of building and operating Apache Hadoop systems, and of developing Apache Hadoop applications.
Structure of this document
This document is structured as follows:Part 1 - Product Overview
Chapter 1 Overview Provides an overview of this product
Chapter 2 Functions Describes the features provided by this product
Part 2 - Installation
Chapter 3 System Configuration and Design
Explains the server configuration, file system configuration, network configuration, and user account design that should be considered when using this product
Chapter 4 System Requirements Explains the hardware and software requirements for using this product Chapter 5 Preparing to Build the System Describes the preparatory tasks that should be performed prior to installing
this product
Chapter 6 Installation Explains how to install and set up this product Chapter 7 Uninstallation Explains how to uninstall this product
Part 3 - Operations
Chapter 8 Starting and Stopping Explains how to start and stop Hadoop on this product Chapter 9 Developing and Registering
Applications
Describes how to develop applications executed by Hadoop
Chapter 10 Executing and Stopping Jobs Explains how to use this product to execute and stop Hadoop jobs Chapter 11 Managing Job Execution Users Explains the management of job execution users who perform Hadoop job
operations Chapter 12 Adding and Deleting Slave
Servers
Explains how to add and delete slave servers after installing this product (after starting operations)
Chapter 13 Adding and Deleting Storage Systems
Explains how to add and delete storage systems after installing this product (after starting operations)
Chapter 14 Backup and Restore Explains how to back up and restore the system configuration of this product
Chapter 15 Operations when There are Errors
Describes the corrective action to take when an error occurs on a system that uses this product
Chapter 16 Troubleshooting Describes the troubleshooting data to collect when an issue occurs with a system that uses this product
Appendixes
Appendix B Definition Files Describes the definition files for the system configuration information used by this product
Appendix C Hadoop Configuration Parameters
Explains the various parameters to configure for using Hadoop on this product
Appendix D Port List Describes the ports used by this product
Appendix E Messages Explains the meaning of messages output by this product and the corresponding action that should be taken
Appendix F Mandatory Packages Covers the packages required for the system software that runs this product Glossary Explains the terminology used for this product.
Conventions
The following notation is used in this document:
-
Where features differ in accordance with the system software required to use this product, information is distinguished as shown below.[Master server] Information intended for master servers [Slave server] Information intended for slave servers [Development server] Information intended for development servers [Collaboration server] Information intended for collaboration servers
-
Unless indicated otherwise, "rack server" in this document refers to the PRIMERGY RX Series.-
References are enclosed in " ".-
Variable information or content that can be modified is italicized and written in mixed case (for example: newBkpDir).-
GUI elements, such as window, menu, and tab names, are formatted bold (for example: File).-
Key names are enclosed in < >.-
Strings and numeric values requiring special emphasis are enclosed in double quotation marks (").-
In usage examples, the prompt is represented by the Linux "#".Interstage Big Data Parallel Processing Server website
The latest manuals and technical information is published on the Interstage Big Data Parallel Processing Server website. It is recommended to refer to that website before using this product. The URL is shown below.
URL:
http://www.fujitsu.com/global/services/software/interstage/solutions/big-data/bdpp/ (as of October2013)
Related documents
The following manuals are bundled with this product:
-
PRIMECLUSTER 4.3A10-
ServerView Resource Orchestrator Virtual Edition V3.1.0-
Primesoft Distributed File System V1To refer to the contents of the manuals bundled with this product, refer to the manuals stored at the following locations in the product media:
DISK1: PRIMECLUSTER manuals
dvdDrive:\DISK1\products\PCL\documents\manuals\En
DISK1: ServerView Resource Orchestrator Virtual Edition manual
dvdDrive:\DISK1\products\ROR\DISK1\Manual\en\VirtualEdition
DISK1: Primesoft Distributed File System for Hadoop manual dvdDrive:\DISK1\products\PDFS\documents\manuals\en
In the bundled manuals, only the features provided by Interstage Big Data Parallel Processing Server can be used.
Abbreviation
The following abbreviations are used in this document:
Abbreviation Product
Linux or
Red Hat Enterprise Linux
Red Hat(R) Enterprise Linux(R) 5.6 (for Intel64) Red Hat(R) Enterprise Linux(R) 5.7 (for Intel64) Red Hat(R) Enterprise Linux(R) 5.8 (for Intel64) Red Hat(R) Enterprise Linux(R) 5.9 (for Intel64) Red Hat(R) Enterprise Linux(R) 6 (for Intel64) Red Hat(R) Enterprise Linux(R) 6.1 (for Intel64) Red Hat(R) Enterprise Linux(R) 6.2 (for Intel64) Red Hat(R) Enterprise Linux(R) 6.3 (for Intel64) Red Hat(R) Enterprise Linux(R) 6.4 (for Intel64)
Export restriction
If this document is to be exported or provided overseas, confirm legal requirements for the Foreign Exchange and Foreign Trade Act as well as other laws and regulations, including U.S. Export Administration Regulations, and follow the required procedures.
Trademarks
-
Apache Hadoop, Hadoop, HDFS, HBase, Hive, and Pig are trademarks of The Apache Software Foundation in the United States and/ or other countries.-
Adobe, Adobe Reader, and Flash are either registered trademarks or trademarks of Adobe Systems Incorporated in the United States and/or other countries.-
Linux is a registered trademark of Linus Torvalds.-
Red Hat, RPM, and all Red Hat-based trademarks and logos are trademarks or registered trademarks of Red Hat, Inc. in the United States and other countries.-
Oracle and Java are registered trademarks of Oracle and/or its affiliates. Other names may be trademarks of their respective owners.-
Microsoft, Windows, MS, MS-DOS, Windows XP, Windows Server, Windows Vista, Windows 7, Excel, and Internet Explorer are either registered trademarks or trademarks of Microsoft Corporation in the United States and/or other countries.-
VMware, the VMware logo, VMware vSphere, VMware vCenter, ESXi, vMotion, Storage DRS, Server Appliance, and DirectPath I/O are trademarks or registered trademarks of VMware, Inc. in the United States and other countries.-
Interstage, ServerView, Symfoware, and Systemwalker are registered trademarks of Fujitsu Limited.-
Other company names and product names used in this document are trademarks or registered trademarks of their respective owners. Note that registration symbols (TM or R) are not appended to system names or product names in this manual.Issue date and version
Edition Manual code
October 2013: Second edition J2UL-1563-02ENZ0(00)
Notice
No part of the content of this manual may be reproduced without the written permission of Fujitsu Limited. The contents of this manual may be changed without notice.
Contents
Part 1 Product Overview...1
Chapter 1 Overview...2 1.1 Product Summary...2 1.2 Features...3 1.2.1 High Performance...4 1.2.2 High Reliability...4 1.2.3 High Operability...5 Chapter 2 Functions...7
2.1 Fujitsu Distributed File System (DFS)...7
2.2 Master Server Replication...7
2.3 Smart Setup...8
Part 2 Installation...9
Chapter 3 System Configuration and Design...10
3.1 Design Overview...10
3.2 Server Design...10
3.2.1 Server Configuration...11
3.2.2 Design the Server Configuration...12
3.2.3 Designing System Resources...13
3.2.3.1 Static Disk Size...13
3.2.3.2 Dynamic Disk Size...15
3.2.3.3 Memory Size...16
3.2.3.4 System Parameters...16
3.3 File System Design...19
3.3.1 File System Configuration...19
3.3.2 File System Configuration Design...19
3.3.2.1 Relationship between File System Size, Data Block Size and Maximum File Size...21
3.4 Network Design...22
3.4.1 Network Configuration...22
3.4.2 Network Configuration Design...24
3.5 Designing User Accounts...25
Chapter 4 System Requirements... 27
4.1 Hardware Requirements...27
4.1.1 Hardware Conditions...27
4.1.2 Expansion Card Options...27
4.2 Software Configuration...27 4.3 Software Requirements...28 4.3.1 System Software...28 4.3.2 Mandatory Software...29 4.3.3 Exclusive Software...29 4.3.4 Related Software...30
Chapter 5 Preparing to Build the System...31
5.1 Server BIOS Settings...31
5.2 File System When Installing the OS...32
5.3 Disabling SELinux Functionality...32
5.4 System Parameter Settings...33
5.5 Firewall Settings...34
5.6 Host Name Settings...34
5.7 Server Name Settings...36
5.8 Public LAN Network Interface Settings...36
5.10 Storage System Environment Preparations...37
5.11 ssh Settings...37
5.12 SNMP Trap Daemon Settings...38
5.13 ServerView Agent Settings...38
5.14 kdump Shutdown Agent Settings...39
5.15 KVM Shutdown Agent Settings...39
5.16 Expanding the Microsoft LAN Manager Module...41
Chapter 6 Installation...43
6.1 Installing to Master Servers...44
6.1.1 Installing the Master Server Functionality...45
6.1.1.1 Creating bdpp.conf...45
6.1.1.2 Installing the Master Server Functionality...46
6.1.1.3 Applying Software Updates...47
6.1.2 HA Cluster Setup...47
6.1.2.1 HA Cluster Setup 1...48
6.1.2.2 HA Cluster Setup 2...48
6.1.2.3 Restarting the System...48
6.1.3 DFS Setup...48
6.1.3.1 Checking Shared Disk Settings...51
6.1.3.2 Checking Cluster Status...52
6.1.3.3 Management Partition Initialization...52
6.1.3.4 Registering DFS Management Server Information to the Management Partition...52
6.1.3.5 Starting the pdfsfrmd daemon...53
6.1.3.6 Creating the File System...53
6.1.3.7 Setting the User ID for Executing MapReduce...54
6.1.3.8 Registering the DFS Client Information...54
6.1.3.9 Creating the Mount Point and Configure fstab Settings...56
6.1.3.10 Mounting...57
6.1.3.11 Generating the DFS File System Configuration Information...58
6.1.4 Network Replication and Hadoop Setup...59
6.1.4.1 Creating the Slave Server Definition File 'slaves'...59
6.1.4.2 Network Replication and Hadoop Setup...60
6.2 Installing to a Slave Server...60
6.2.1 Installing the Slave Server Functionality...60
6.2.1.1 Creating bdpp.conf...60
6.2.1.2 Installing the Slave Server Functionality...61
6.2.1.3 Applying Software Updates...61
6.2.2 DFS Setup...62
6.2.2.1 Creating the Mount Point and Configuring fstab Settings...62
6.2.2.2 Mounting...63
6.2.3 Network Replication and Hadoop Setup...64
6.2.4 Checking the Connection to the Slave Server...64
6.3 Adding Second and Subsequent Slave Servers...65
6.3.1 Adding a Slave Server to a Physical Environment...66
6.3.1.1 Installing the Slave Server...68
6.3.1.2 Registering the Slave Server...68
6.3.1.3 Registering the Network Parameter and iSCSI Name Automatic Configuration Feature...69
6.3.1.4 Creating a Clone Image...70
6.3.1.5 Restarting the System...71
6.3.1.6 Cloning...71
6.3.1.7 Restarting the System...71
6.3.2 Adding a Slave Server to a Virtual Environment...71
6.3.2.1 Installing the Slave Server...72
6.3.2.2 Registering the Network Parameter and iSCSI Name Automatic Configuration Feature...72
6.3.2.3 Cloning...74
6.3.2.5 Restarting the Virtual Machine...74
6.4 Installing to a Development Server...74
6.4.1 Installing the Development Server Functionality...75
6.4.1.1 Creating bdpp.conf...75
6.4.1.2 Installing the Development Server Functionality...75
6.4.1.3 Applying Software Updates...76
6.4.2 DFS Setup...76
6.4.2.1 Mount Point Creation and fstab Settings...76
6.4.2.2 Mounting...77
6.4.3 Hadoop Setup...78
6.5 Installing to a Collaboration Server...78
6.5.1 Installing the Collaboration Server Functionality...78
6.5.1.1 Creating bdpp.conf...78
6.5.1.2 Installing the Collaboration Server Functionality...79
6.5.1.3 Applying Software Updates...79
6.5.2 DFS Setup...80
6.5.2.1 Mount Point Creation and fstab Settings...80
6.5.2.2 Registering the hadoop Group and mapred User...81
6.5.2.3 Mounting...81
Chapter 7 Uninstallation...83
7.1 Uninstalling from a Master Server...83
7.1.1 Removing the Network Replication Setup...84
7.1.2 Removing the DFS Setup...84
7.1.3 Removing the HA Cluster Setup...86
7.1.4 Uninstalling the Master Server Functionality...86
7.1.5 Post-Uninstallation Tasks...87
7.1.5.1 Directories and Files Remaining after an Uninstall...87
7.1.5.2 Uninstalling "Uninstall (middleware)"...88
7.1.6 Restarting the System...89
7.2 Uninstalling from a Slave Server...89
7.2.1 Removing the Network Replication Setup...89
7.2.2 Removing the DFS Setup...89
7.2.3 Uninstalling the Slave Server Functionality...90
7.2.4 Post-Uninstallation Tasks...91
7.2.4.1 Directories and Files Remaining after an Uninstall...91
7.2.5 Restarting the System...92
7.3 Uninstalling from a Development Server...92
7.3.1 Removing the DFS Setup...92
7.3.2 Uninstalling the Development Server Functionality...92
7.3.3 Post-Uninstallation Tasks...94
7.3.3.1 Directories and Files Remaining after an Uninstall...94
7.3.4 Restarting the System...94
7.4 Uninstalling from a Collaboration Server...94
7.4.1 Removing the DFS Setup...94
7.4.2 Uninstalling the Collaboration Server Functionality...95
7.4.3 Post-Uninstallation Tasks...96
7.4.3.1 Directories and Files Remaining after an Uninstall...96
7.4.4 Restarting the System...96
Part 3 Operations...97
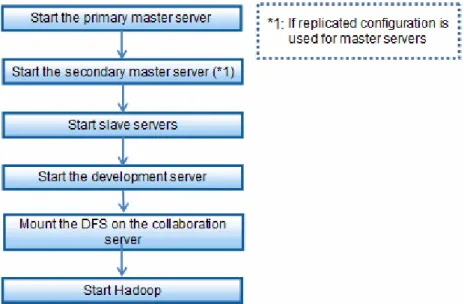
Chapter 8 Starting and Stopping...98
8.1 Starting...98
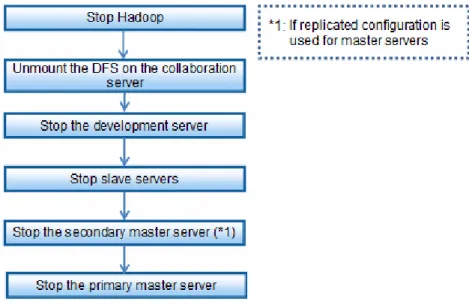
8.2 Stopping...99
8.3 Displaying Status...100
9.1 Application Development Environment...101
9.2 Developing Applications...101
9.2.1 Application Overview...101
9.2.2 Designing Applications...102
9.2.3 Creating Applications...102
9.2.4 References for Developing MapReduce Applications...102
9.3 Registering Applications...103
Chapter 10 Executing and Stopping Jobs...104
10.1 Executing Jobs...104
10.2 Stopping Jobs...104
10.3 Displaying Job Status...104
Chapter 11 Managing Job Execution Users...105
11.1 Adding Job Execution Users...105
11.1.1 Create a User Account...105
11.1.2 Create a Home Directory for the User on the DFS...106
11.1.3 Configure SSH Authentication Keys to be Used by the Cache Local Feature...106
11.1.4 Configure MapReduce Job User Authentication Keys...107
11.2 Deleting Job Execution Users...107
11.2.1 Deleting the Home Directory of the User Created on the DFS...107
11.2.2 Deleting the User Account...108
Chapter 12 Adding and Deleting Slave Servers...109
12.1 Adding Slave Servers...109
12.1.1 Configuring Host Name Settings...110
12.1.2 Registering the DFS Client Information...111
12.1.3 Adding by Cloning...112
12.1.4 Stopping Hadoop...113
12.1.5 Remounting...113
12.1.6 Editing and Reflecting the Slave Server Definition File...113
12.1.7 Changing Hadoop Configuration Parameters...114
12.1.8 Starting Hadoop...114
12.2 Deleting Slave Servers...115
12.2.1 Stopping Hadoop...116
12.2.2 Editing and Reflecting the Slave Server Definition File...116
12.2.3 Changing Hadoop Configuration Parameters...117
12.2.4 Starting Hadoop...117
12.2.5 Unmounting and Removing the fstab Configuration...117
12.2.6 Deleting the DFS Client Information...118
Chapter 13 Adding and Deleting Storage Systems...119
13.1 Adding a Storage System...119
13.1.1 Stopping Hadoop...120
13.1.2 Unmounting...121
13.1.3 Adding a Partition...121
13.1.4 Recreating and Distributing the DFS File System Configuration Information...121
13.1.5 Mounting...122
13.1.6 Starting Hadoop...122
13.2 Deleting a Storage System...122
13.2.1 Stopping Hadoop...124
13.2.2 Unmounting...124
13.2.3 Deleting a File System...124
13.2.4 Creating a File System...125
13.2.5 Setting the User ID for Executing MapReduce...125
13.2.6 Recreating and Distributing the DFS File System Configuration Information...125
13.2.7 Mounting...126
Chapter 14 Backup and Restore...127
14.1 Backup...127
14.1.1 Resources Saved when the Backup Command is Executed...127
14.1.2 Backup Method...129
14.1.2.1 Backing Up a Master Server, Development Server, or Collaboration Server...129
14.1.2.2 Backing Up a Slave Server...130
14.2 Restore...131
14.2.1 Restore Method...131
14.2.1.1 Restoring a Master Server, Development Server, or Collaboration Server...131
14.2.1.2 Restoring a Slave Server...133
Chapter 15 Operations when There are Errors...135
15.1 Operations when Errors Occur on a Master Server...136
15.1.1 If the Master Servers Use Replicated Configuration...136
15.1.2 If the Master Server Does Not Use Replicated Configuration...141
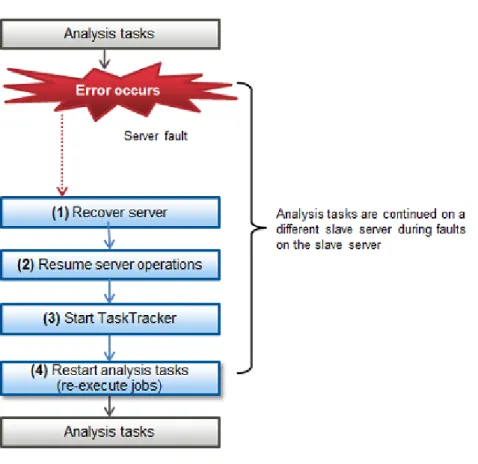
15.2 Operations when Errors Occur on a Slave Server...143
15.3 Operations when Errors Occur on a Development Server...145
15.4 Operations when Errors Occur on a Collaboration Server...145
15.5 Operations when Errors Occur on the File System...146
15.6 How to Check Errors...147
Chapter 16 Troubleshooting...150
16.1 When a Problem Occurs with an HA Cluster...151
16.1.1 Collecting Troubleshooting Data...151
16.2 When a Problem Occurs during Cloning...154
16.2.1 Types of Troubleshooting Data...154
16.2.2 Collecting Initial Troubleshooting Data...155
16.2.3 Collecting Detailed Troubleshooting Data...156
16.3 If DFS Setup or Shared Disk Problems Occurred...157
16.3.1 Collecting DFS Troubleshooting Data...157
16.4 When a Problem Occurs in Hadoop...159
Appendix A Commands...160 A.1 bdpp_addserver...161 A.2 bdpp_backup...162 A.3 bdpp_changeimagedir...163 A.4 bdpp_changeslaves...164 A.5 bdpp_deployimage...165 A.6 bdpp_getimage...166 A.7 bdpp_lanctl...167 A.8 bdpp_listimage...168 A.9 bdpp_listserver...169 A.10 bdpp_prepareserver...171 A.11 bdpp_removeimage...172 A.12 bdpp_removeserver...173 A.13 bdpp_restore...173 A.14 bdpp_start...174 A.15 bdpp_stat...176 A.16 bdpp_stop...177
Appendix B Definition Files...179
B.1 bdpp.conf...179 B.2 slaves...195 B.3 clone.conf...195 B.4 FJSVrcx.conf...198 B.5 ipaddr.conf...199 B.6 initiator.conf...202
Appendix C Hadoop Configuration Parameters...203 C.1 hadoop-env.sh...203 C.2 core-site.xml...205 C.3 mapred-site.xml...205 C.4 pdfs-site.xml...207 C.5 sysctl.conf...209 C.6 limits.conf...209
C.7 HDFS Settings (Reference Information)...209
Appendix D Port List...212
Appendix E Messages...216
E.1 Messages During Installation...216
E.2 Messages During Setup...218
E.3 Messages Output During Operation...220
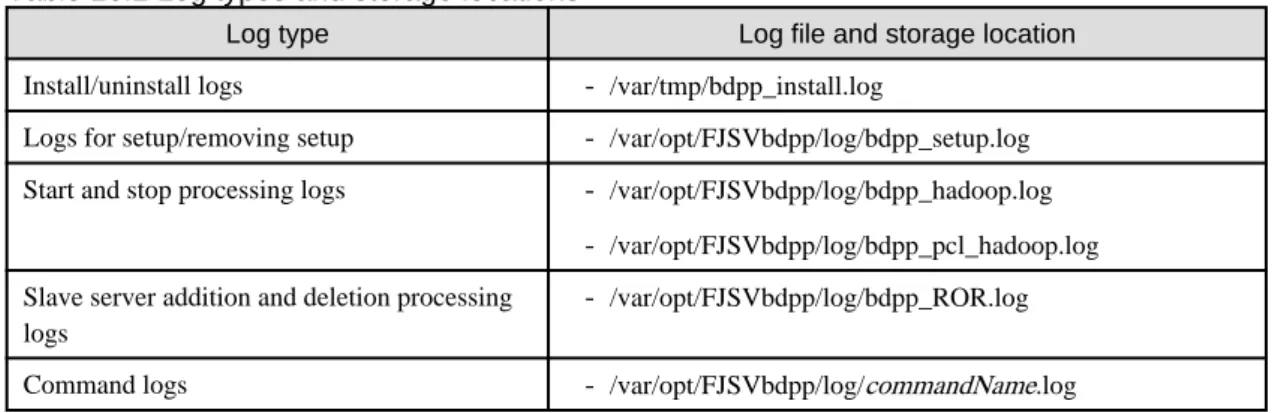
E.3.1 Messages Output During Command Execution...220
E.3.2 Other Messages...225
Appendix F Mandatory Packages...227
Part 1 Product Overview
This part describes the features and functionality of this product.Chapter 1 Overview...2
Chapter 1 Overview
This chapter presents an overview of this product and a description of its features.
1.1 Product Summary
The Interstage Big Data Parallel Processing Server uses the industry standard for Big Data processing, "Apache Hadoop", with Fujitsu proprietary technology incorporated.
In recent years, not only are massive amounts of data collected from sensors and smart devices, such as smart phones and tablets, but also the formats and structures are many and varied, and these are continuously increasing. This is known as Big Data, and it is increasingly being adopted, particularly by leading corporations, and is gathering a lot of attention, because it is providing unprecedented business advantages.
This product vastly improves reliability and processing performance, decreases system installation time, reduces the burden in operation management, and supports Big Data in enterprise systems.
Features of Big Data
Big Data has the following features:
1.
Massive size of dataEnormous amounts of data, with data sizes reaching the terabyte to petabyte range
2.
Variety of dataData in a variety of formats: structured data (database data), non-structured data (sensor information, text data such as access log information), semi-structured data (data having the qualities of both structured data and non-structured data)
3.
Data frequently generatedContinuous generation of new data from sensors and similar
4.
Need to use data in real-timePerforming analysis in a short amount of time and using the data in real-time
Apache Hadoop (*1) is widely used and is the world standard for applications that can resolve the above Items 1 and 2 in Big Data processing (processing data of massive size, and variety of data).
*1 Apache Hadoop: Open source software, developed by Apache Software Foundation (ASF), that efficiently performs distribution and parallel processing of Big Data
Apache Hadoop
Apache Hadoop technology splits Big Data, distributes it to tens or tens of thousands of servers, and performs parallel processing, thereby performing batch processing of Big Data in a small amount of time. This technology has the following features:
-
Low costEconomical systems can be built by using large numbers of comparatively cheap servers that perform parallel processing.
-
High availabilityProcessing can continue even if two machines stop simultaneously because the split data is distributed to three or more of the servers (slave servers) that execute parallel processing.
-
ScalabilitySystems can be scaled-out easily by adding slave servers.
-
Variety of data processesParallel analysis processing applications (MapReduce applications) can be developed for a range of uses, from simple analysis such as character string searches through to high-level analysis logic for image analysis or similar, and can process data in a variety of formats.
1.2 Features
This section describes the features of this product.
-
High performance-
High reliability1.2.1 High Performance
Reducing time for data transfer to Hadoop processing server
The data stored in the storage system can be accessed directly, and processed, using the Fujitsu distributed file system in addition to the Apache Hadoop distributed file system.
Under Hadoop, business application data is temporarily transferred to "HDFS" before it is processed. In contrast, when the Fujitsu distributed file system is used, data transfer is not necessary, greatly reducing the processing time.
Use of existing tools without modification
Existing tools, such as backup and print tools, can be used without modification because the interface with the storage system used to store data is the Linux standard interface.
1.2.2 High Reliability
Resolving the single point of failure issue
When a fault occurs in the master server that manages the entire system under "Apache Hadoop", "HDFS" cannot be used while the cause of the fault is being removed and the master server is being restored. This causes the stoppage time to extend over a long period (single point of failure). With this product, Fujitsu HA cluster technology provides duplicated master server operation, thus avoiding a single point of failure and achieving high reliability with restarts completed in a small timeframe.
1.2.3 High Operability
Quick and simple setup
This product has in-built "Smart Setup" based on Fujitsu smart software technology (*1).
System installation time is short because a clone of an already created slave server can be deployed and set automatically at multiple servers as a batch.
Scale-out is amazingly easy because images can be deployed automatically when servers are added.
*1: Smart software technology: Fujitsu proprietary technology itself judges hardware and software conditions and is designed to perform optimization in order to improve ease of use and give peace of mind.
Cost reduction by virtualizing servers
Apache Hadoop allows you to improve the performance of distributed processing by increasing the number of slave servers, but this entails increased costs.
It is possible to use hypervisor-type virtualization software to build the system with this product. By efficiently using resources such as CPUs and memory on the minimum number of physical machines, installation and running costs can be reduced.
Chapter 2 Functions
This chapter describes the functions provided by this product.
-
Fujitsu Distributed File System (DFS)-
Master Server Replication-
Smart Setup2.1 Fujitsu Distributed File System (DFS)
The Fujitsu distributed file system (DFS) provides the following features:
Use of external storage devices
It can use ETERNUS, Fujitsu's external storage device that boasts high reliability and operability.
Using RAID, it is not necessary to produce data replicas with software such as HDFS, meaning much faster access.
Furthermore, you can add just the resources currently required, since it is possible to size slave servers and disks individually.
POSIX compliant interface
This product supports the standard Linux file access interface (POSIX).
Integration is easy and efficient, since data input and output are possible without having to change the application.
Speed acceleration due to memory caching
Memory caches in the slave servers can be allocated efficiently, leading to improved processing speeds.
The management data information (metadata) acquired on the various servers is maintained in caches, and this means that there is no need to constantly access the network to acquire this information.
2.2 Master Server Replication
By using replicated configuration with two master servers (a primary and a secondary), the secondary master server can take over processing even if there is a failure in the primary master server. By registering JobTracker (MapReduce) that makes up Hadoop as a cluster application, the secondary master server can take over processing if an error occurs in Hadoop.
Furthermore, you can also have redundancy in the transmission route between the master server and the slave server. Replicating by using two transmission networks means that the route where a failure occurs can be isolated so that network communications can continue.
Point
A Hadoop network can also be made up of one master server or one transmission network.
However, it is recommended to use a replicated master server configuration so that operations can continue if there is a failure in the master server, which is the single point of failure for Hadoop, as explained in "1.2.2 High Reliability".
2.3 Smart Setup
Cloning automates the process of building slave servers after the first one has been built.
The cloning images gathered from a slave server can be distributed to multiple slave servers so that scaling up can be achieved over a short period. Furthermore, network settings such as host name and slave server IP address are also configured automatically. This means that physical servers can be cloned, as well as slave servers built on virtual environments.
There are commands provided with this product for calling the cloning functionality, making it easy to perform all cloning operations, from gathering the cloning image, to distribution and configuration.
Part 2 Installation
This part describes how to build a system for this product to be installed.
Chapter 3 System Configuration and Design...10
Chapter 4 System Requirements...27
Chapter 5 Preparing to Build the System...31
Chapter 6 Installation...43
Chapter 3 System Configuration and Design
This chapter explains the configuration and design of the system for this product.
3.1 Design Overview
This section describes the items that need to be set before installing this product.
Category Design item Overview Remarks
Server design Environment to install the server
Decide whether to install on a physical environment or a virtual environment.
-Master server configuration
Decide whether to have replicated configuration for the master servers.
Specify in bdpp.conf used during installation. Slave server
configuration
Decide the number of slave servers to install initially.
You can build as many slave servers as you need after the first one during installation. Number of
machines in the virtual environment
Decide the number of machines to use as the virtual environment. (When installing on a virtual environment)
-Designing system resources
Confirm the disk capacity, memory capacity, and tuning parameters required to install and operate this product.
Ensure that the servers meet the requirements before installing.
File system design
Capacity to be allocated to shared disk devices
Estimate the total size of the file data and determine the disk capacity to put in the storage device.
Specify this when constructing the DFS file system during installation.
You need to complete storage system installation and configuration before installation. Partitions used Determine the partitions to be used in the
DFS. Size of the file data area
Determine the maximum size, including partitions, that may be added in the future (optional).
Data block size Determine the data block size required for optimum input/output processing (optional). Network
design
Replication of the public LAN
Determine whether to have LAN redundancy so that Hadoop parallel distribution processing is possible.
Specify in bdpp.conf used during installation. The servers and storage systems must be physically connected before installation. Replication of CIP Determine whether to have LAN redundancy
so that alive monitoring of the master server's status is possible.
Replication of iSCSI
Determine whether to have LAN redundancy for the connection of the storage systems. Designing user
accounts
Deciding users of Hadoop
Decide the user for executing Hadoop jobs. Specify in bdpp.conf used during installation.
3.2 Server Design
3.2.1 Server Configuration
This section describes the server configurations and server types using this product.
Master server
A master server splits large data files into blocks and makes files (distributed file system), and centrally manages those file names and storage locations.
A master server can also receive requests to execute analysis processing application jobs, and cause parallel distributed processing on slave servers.
Replication of the master server is possible with this product. Install the master server feature of this product on the master server.
Slave server
Analysis processing can be performed in a short amount of time because the data file, split into blocks by the master server, is processed using parallel distributed processing on multiple slave servers.
Furthermore, the data that is split into blocks is stored in a high-reliability system. This product's slave server functionality is installed at each slave server.
Development server
The development server is a server where Pig or Hive is installed and executed. They enable easy development of applications that perform parallel distribution (MapReduce).
Collaboration server
With Apache Hadoop, it was necessary to register in HDFS (the distributed file system for Hadoop) in order to analyze. Analysis can be performed by directly transferring the large amount of data on the business system to the DFS (Distributed File System), which is built on the high reliability storage system that is one of the main features of this product, from the collaboration server using the Linux standard file interface.
Installation of an existing data backup system on the collaboration server enables easy use of data backups. This product's collaboration server functionality is installed at the collaboration server.
Note
Make sure that the data stored in the DFS using data transfer is the data that is to be analyzed using Hadoop. Other data cannot be stored.
3.2.2 Design the Server Configuration
Make the following design decisions for each server type when designing server configuration.
Environment to install the server
Decide whether to install this product on a physical environment or a virtual environment.
When installing on a virtual environment, install the master server (both primary and secondary), slave servers, and development servers on the virtual environment.
Install the virtualization software and build the virtual environment beforehand.
Note
Apart from the collaboration servers, it is not possible to have a server configuration with a mix of installations on physical environments and virtual environments.
See
Refer to the manuals of the server virtualization software you are using for information on how to build virtual environments.
Master server configuration
Decide whether to have replicated configuration for the master servers.
This product supports replicated configuration for the master server (1 to 1 active/standby type HA cluster configuration). Replicated configuration requires two master servers (a primary and a secondary one). You can configure a system using only one master server if replicated configuration is not necessary.
The replicated configuration is recommended to resolve the single point of failure issue with Hadoop.
Note
When installing on a virtual environment (VMware)
Do not deploy the virtual machine with the master server installed on it to a VMware HA cluster. Also note that the virtual machine with the master server installed on it cannot use features such as VMware vMotion.
Refer to "Appendix H Using PRIMECLUSTER in a VMware Environment" in the "PRIMECLUSTER Installation and Administration Guide 4.3" for points to note when using VMware.
Slave server configuration
This product allows scaling out slave servers, which improves scalability. It is recommended to make an estimate of how many servers are required by performing prototype tests before using the system in a production environment, as the time required for processing depends on factors such as the number of slave servers, the Hadoop applications, and the volume and characteristics of data to be processed. On top of this, determine the maximum number of slave servers, including any future expansion.
Point
A maximum of 128 master servers, slave servers, development servers, and collaboration servers can be set up.
Number of machines in the virtual environment
Decide the number of physical machines to use as the virtual environment.
When many virtual machines are built on one physical machine, you may not achieve the desired results as distributed processing performance reaches a ceiling, determined by things such as the Hadoop application, the amount of data being processed, and other characteristics. For this reason, perform validation using prototypes before using in actual operations, so that you can properly estimate the number of virtual machines for each physical machine.
Note that the virtual machines (guest OS's) where this product is to be installed should be created beforehand.
See
Refer to the manuals of the server virtualization software product for information on how to create virtual machines.
Note
When installing on a virtual environment (KVM)
The name of the virtual machine where the master server is installed (domain name of the guest OS) must match the host name of the virtual machine. Apart from the virtual machine where the collaboration server is installed, the names of the virtual machines should be specified to match the following parameters in bdpp.conf specified during installation:
-
BDPP_PRIMARY_NAME (primary master server host name)-
BDPP_SECONDARY_NAME (secondary master server host name)-
BDPP_SERVER_NAME (slave server host name, development server host name)3.2.3 Designing System Resources
This section describes the system resources required to install this product.
3.2.3.1 Static Disk Size
[Master server]
Installation environment Directory Disk size (in MB)
Physical environment Primary master server
/opt 1090
/etc 15
/var 470
/usr 280
Physical environment Secondary master server
/opt 385 /etc 2 /var 80 /usr 280 Virtual environment /opt 380 /etc 2 /var 40 /usr 280 [Slave server]
Installation environment Directory Disk size (in MB)
Physical environment /opt 330 /etc 1 /var 20 /usr 270 Virtual environment /opt 260 /etc 1 /var 20 /usr 270 [Development server]
Installation environment Directory Disk size (in MB)
Physical environment /opt 230 /etc 1 /var 20 /usr 400 Virtual environment /opt 240 /etc 1 /var 20 /usr 400 [Collaboration server]
Installation environment Directory Disk size (in MB)
Physical environment
/opt 35
/etc 1
Installation environment Directory Disk size (in MB)
Virtual environment
/opt 40
/etc 1
/var 20
3.2.3.2 Dynamic Disk Size
When using this product, the disk sizes below are required in addition to the static disk size, in the master server and slave server directories.
[Master server]
Installation environment Directory Disk size (in MB)
Physical environment
/etc 2
/var/opt 2520
Clone image file storage directory Default:
/var/opt/FJSVscw-deploysv/depot
Refer to "Clone image file storage area" below.
Directory for backup and restore
Refer to "Chapter 14 Backup and Restore" for details. 150 Virtual environment /etc 1 /var/opt 5 [Slave server]
Installation environment Directory Disk size (in MB)
Physical environment/ virtual environment
/etc 1
/var/opt 1
Clone image file storage area
A clone image file storage area is required if cloning is to be performed.
Allocate area on the master server as an area to store the clone image files belonging to the cloned slave server (excluding slave servers built in virtual environments).
Note
-
Create the clone image file storage area at the Master Server local disk or at SAN storage. Folders on network drives, shared Folders (NFS, SMB, etc.) on other machines on the network, or UNC format folders cannot be specified.-
The server used to create the clone image and the servers targeted as clones must be the same model. If there are different models, a separate clone image must be created for each model. Refer to the Note in "6.3 Adding Second and Subsequent Slave Servers" for details.Clone image file storage area = Disk space used by one slave server * Compression ratio * Number of models
Disk size used by one slave server
If actual results are available from a system build having the same software configuration, use the same disk size as that system. If one disk is split into multiple sections, use the total size used in all sections.
Use the operating system features to check the disk size used.
If actual results are not available from a system build having the same software configuration, make an estimation on the basis of the disk space given in software installation guides or similar.
Compression ratio
This is the compression ratio when the disk area used at the slave server is stored at the master server as an image file. The compression ratio depends on the file content, but generally a ratio of about 50% can be expected.
3.2.3.3 Memory Size
The following amount of memory (excluding the OS) is required in order to use this product.
[Master server]
Installation environment Memory size (in GB)
Physical environment/virtual
environment 8.0 or more
[Slave server]
Installation environment Memory size (in GB)
Physical environment/virtual
environment 4.0 or more
[Development server]
Installation environment Memory size (in GB)
Physical environment/virtual
environment 4.0 or more
[Collaboration server]
Installation environment Memory size (in GB)
Physical environment/virtual
environment 4.0 or more
3.2.3.4 System Parameters
This section explains the system parameters that need tuning in order to guarantee stability of this product.
[Master Server] Primary master server in a physical environment
The following are the tuning values for system parameters required for the primary master server installed on a physical environment.
Parameter Explanation Value to be set Type
kernel.shmmax Maximum segment size in shared memory 53116928 Maximum kernel.shmall Total amount of shared memory available 655360 Maximum kernel.shmmni Maximum number of shared memory
segments
113 Additional
Semaphore
For semaphore settings, set the values for each parameter in the following format:
kernel.sem = SEMMSLvalue SEMMNSvalue SEMOPMvalue SEMMNIvalue
Parameter Explanation Value to be set Type
SEMMSLvalue Maximum number of semaphores for each semaphore identifier
512 Maximu m SEMMNSvalue Number of semaphores for the system as a
whole
14862 Addition al SEMOPMvalue Maximum number of operators for each
semaphore call
50 Maximu m SEMMNIvalue Number of semaphore operators for the system
as a whole
2208 Addition al
Message queue
Parameter Explanation Value to be set Type
kernel.msgmax Maximum message size 16384 Maximum
kernel.msgmnb Maximum value for messages that can be held in one message queue
4194304 Maximum
kernel.msgmni Maximum value for message queues in the system as a whole
1578 Minimum of 8192 required
Additional
[Master Server] Other than the above
The following are the tuning values for system parameters required for the primary master server and the secondary master server installed on a virtual environment.
Shared memory
Parameter Explanation Value to be set Type
kernel.shmmax Maximum segment size in shared memory 1048576 +
2776 * Number of disks for the shared disk device (*1) * 3* 2
Maximu m
kernel.shmall Total amount of shared memory available No change -kernel.shmmni Maximum number of shared memory
segments
30 Maximu m *1: "Number of disks for the shared disk device" refers to the following:
-
In the case of a disk array unit, this is the number of logical units (LUN).-
In all other cases, this is the number of physical disks.Semaphore
For semaphore settings, set the values for each parameter in the following format:
kernel.sem = SEMMSLvalue SEMMNSvalue SEMOPMvalue SEMMNIvalue
Parameter Explanation Value to be set Type
SEMMSLvalue Maximum number of semaphores for each semaphore identifier
No change
-SEMMNSvalue Number of semaphores for the system as a whole
11 Minimum of 41 required
Additional
SEMOPMvalue Maximum number of operators for each semaphore call
No change
-SEMMNIvalue Number of semaphore operators for the system as a whole 2 Minimum of 22 required Additional Message queue
Parameter Explanation Value to be set Type
kernel.msgmax Maximum message size 16384 Maximu
m kernel.msgmnb Maximum value for messages that can be held
in one message queue
4194304 Maximu m kernel.msgmni Maximum value for message queues in the
system as a whole
8192 Maximu m
[Slave server]/[Development server]/[Collaboration server]
The following are the tuning values for system parameters required for the slave server, development server, and collaboration server.
Semaphore
For semaphore settings, set the values for each parameter in the following format:
kernel.sem = SEMMSLvalue SEMMNSvalue SEMOPMvalue SEMMNIvalue
Parameter Explanation Value to be set Type
SEMMSLvalue Maximum number of semaphores for each semaphore identifier
No change
-SEMMNSvalue Number of semaphores for the system as a whole
11 Minimum of 41 required
Additional
SEMOPMvalue Maximum number of operators for each semaphore call
-Parameter Explanation Value to be set Type
SEMMNIvalue Number of semaphore operators for the system as a whole
2 Minimum of 22 required
Additional
3.3 File System Design
This section describes how to design the DFS file system of this product.
3.3.1 File System Configuration
This section describes the configuration of the file system using this product.
The DFS consists of the DFS management server and the DFS client.
The DFS management server (MDS) runs on the master server. DFS client functions (AC) run on slave servers, development servers and collaboration servers.
The partitions that comprise a file system in a DFS are split into three areas.
Area type Component used
Metadata area MDS
Update log area
File data area AC
3.3.2 File System Configuration Design
Capacity to be allocated to shared disk devices
Estimate the total size of the file data to be stored in the DFS, then based on that, estimate the capacity required by the latter on shared disk devices.
Area type Estimation method
(a) File data area Space required for file data (b) Metadata area If file data area <= 1 TB: 100 GB
If file data area > 1 TB: 300 GB
(c) Update log area Estimation is not required because it is contained within the metadata area.
(d) Management partition Constant value (no estimation required): 1 GB
Total (a)+(b)+(d)
Partitions used
Determine the shared disk device partitions to be used in the DFS based on the size estimated above, and check the device name. Determine the areas to be used as the management partitions, representative partitions, and file data partitions of the multiple partitions available.
Example
Examples of the partitions for the areas that comprise the file systems:
- Management partition :/dev/disk/by-id/scsi-1FUJITSU_300000370105 - Representative partition :/dev/disk/by-id/scsi-1FUJITSU_300000370106 - File data partitions: :/dev/disk/by-id/scsi-1FUJITSU_300000370107 /dev/disk/by-id/scsi-1FUJITSU_300000370108
Point
-
Separate the metadata area and file data area and allocate them to separate partitions. The management partition also needs a separate partition.-
The metadata area and file data area of the DFS can be deployed to a single partition, but by deploying them to separate partitions, the I/O distribution can result in improved throughput.If the DFS is constructed with multiple partitions, representative partitions are used as the partitions for the metadata area.
-
A maximum of 256 partitions can be used.-
A by-id name generated by the udev function is used for shared disk device names (refer to "6.1.3.1 Checking Shared Disk Settings" for details).Information
Deploying the metadata area and file data area to separate partitions distributes the I/O processes to each area, thus avoiding conflicts. Specify separation of the file data area using pdfsmkfs with the dataopt option when creating the file system.
Size of the file data area
If it is likely that the DFS size will be extended, allow for future extensions by estimating the maximum extended size when creating the file system.
Specify the maximum size using pdfsmkfs with the maxdsz option when creating the file system.
See
Refer to "pdfsmkfs" in the "Appendix A Command Reference" of the "Primesoft Distributed File System for Hadoop V1 User's Guide" for information on the size of the file data area.
Data block size
The blocksz option of the pdfsmkfs command can be used to specify the data block size during DFS creation. Specification of the data block size enables contiguous allocation of shared disk device area, which enables efficient input-output processing.
A data block size of 8 MB is recommended if the DFS is used by Hadoop.
Note
If 8 MB is specified as the data block size, an 8 MB area is used on the shared disk even if the file size is less than 8 MB. If a large quantity of small-sized files are stored, give priority to space efficiency and do not specify a data block size.
See
Refer to "3.3.2.1 Relationship between File System Size, Data Block Size and Maximum File Size" for the relationship between the data block size the maximum file system size, and maximum file size.
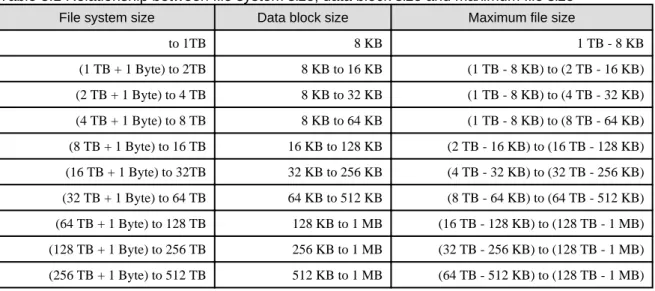
3.3.2.1 Relationship between File System Size, Data Block Size and Maximum File Size
If a file system is created without specifying a data block size value, the data block size is calculated automatically on the basis of the file data area size or the maximum size of the partitions comprising the file system. The greater the file system size, the greater the data block size. The greater the data block size, the greater the maximum file size.
The table below shows the relationship between the file system size, the data block size and the maximum file size when a file system is created without the data block size being specified.
Table 3.1 Relationship between file system size, data block size and maximum file size
File system size Data block size Maximum file size
to 1TB 8 KB 1 TB - 8 KB (1 TB + 1 Byte) to 2TB 8 KB to 16 KB (1 TB - 8 KB) to (2 TB - 16 KB) (2 TB + 1 Byte) to 4 TB 8 KB to 32 KB (1 TB - 8 KB) to (4 TB - 32 KB) (4 TB + 1 Byte) to 8 TB 8 KB to 64 KB (1 TB - 8 KB) to (8 TB - 64 KB) (8 TB + 1 Byte) to 16 TB 16 KB to 128 KB (2 TB - 16 KB) to (16 TB - 128 KB) (16 TB + 1 Byte) to 32TB 32 KB to 256 KB (4 TB - 32 KB) to (32 TB - 256 KB) (32 TB + 1 Byte) to 64 TB 64 KB to 512 KB (8 TB - 64 KB) to (64 TB - 512 KB) (64 TB + 1 Byte) to 128 TB 128 KB to 1 MB (16 TB - 128 KB) to (128 TB - 1 MB) (128 TB + 1 Byte) to 256 TB 256 KB to 1 MB (32 TB - 256 KB) to (128 TB - 1 MB) (256 TB + 1 Byte) to 512 TB 512 KB to 1 MB (64 TB - 512 KB) to (128 TB - 1 MB)
File system size Data block size Maximum file size
(512 TB + 1 Byte) to 1 PB 1 MB 128 TB - 1 MB
(1 PB + 1 Byte) to 2 PB 2 MB 256 TB - 2 MB
Note
The file system size is not just the file data area size. It also includes the sizes of areas such as the metadata area and the update log area. Therefore, near the boundary values for file system sizes in the above table, the data block size values might be one step smaller.
See
Refer to "B.3 Limit Values" in the "Primesoft Distributed File System for Hadoop V1 User's Guide" for the file system maximum values. The file system data block size can be changed during file system creation. Refer to pdfsmkfs under "Appendix A Command Reference" in the "Primesoft Distributed File System for Hadoop V1 User's Guide" for details.
3.4 Network Design
This section explains how to design the network for this product.
3.4.1 Network Configuration
Admin LAN
LAN used to perform the cloning processes in Smart Setup.
This is established separately to the public LAN used for Hadoop parallel distributed processing. Use the first network interface as the connection for the admin LAN.
Note
When installing on a virtual environment (VMware)
When configuring a replicated master server for installation, make sure you match the names of the NIC interfaces connected to the admin LAN.
For example, if the name of the admin LAN interface of the primary master server is 'eth0', then configure the network so that the admin LAN interface of the secondary master server is also 'eth0'.
Public LAN
This is the LAN for parallel distribution processing between a master server and slave servers.
You can add redundancy to the public LAN using the network redundancy software included with this product.
When installing on a virtual environment, public LAN redundancy can be realized using the NIC teaming feature on the host machine.
Information
Public LAN redundancy using network redundancy software
Switching of transmission routes is controlled with NIC switching on the master server and slave server. IP inheritance occurs as follows with NIC switching:
-
Master server: logical IP address inheritance-
Slave server: physical IP address inheritanceSee
Refer to the manuals of the server virtualization software product for information on the NIC teaming feature.
Cluster interconnect (CIP) LAN
This is the LAN used for a HA cluster configuration for the primary server and the secondary server. You can add redundancy using the high-reliability infrastructure software included with this product.
When installing on a virtual environment, cluster interconnect (CIP) LAN redundancy can be realized using the NIC teaming feature on the host machine.
Note
Cluster interconnect (CIP) settings are still required even if the master server is not to be replicated.
See
-
Refer to "3.2.2 Design the Server Configuration" for information on how to design replicated configuration for the master server.iSCSI-LAN
This product uses Internet Small Computer System Interface (iSCSI) as the interface between the servers and the storage systems. This is the LAN for this iSCSI connection.
A redundancy configuration by means of the ETERNUS multipath driver is possible. Note that redundancy is not possible when installed on a virtual environment.
Point
It is recommended to make the transfer speed between the storage systems and the network switch 10Gbit/s or more.
Note
When installing on a virtual environment
-
For the admin LAN, public LAN, and cluster interconnect (CIP) LAN to communicate with outside networks, it is necessary to have a bridge connection to the physical NIC corresponding to the virtual machine.-
If the virtual machine (virtual disk image) is to be stored in shared storage, configure a separate storage network to connect the host machine and the shared storage.-
If network communication is required by features of the virtualization software, configure so that it does not share with the public LAN, iSCSI-LAN, and cluster interconnect (CIP) LAN used by this product.3.4.2 Network Configuration Design
Make decisions regarding the various LANs indicated in the figure in "3.4.1 Network Configuration" when determining the design of the network configuration.
Replication of the public LAN
Decide whether to have public LAN redundancy.
This is recommended so that parallel distribution processing can continue even when some parts of the LAN experiences a failure.
Replication of CIP
When the master server is replicated, decide whether to have cluster interconnect (CIP) redundancy.
Cluster interconnect (CIP) is required to perform alive monitoring between the primary master server and the secondary master server, so it is recommended to introduce redundancy to prepare for any failures in the LAN.
Replication of iSCSI
When using the ETERNUS external storage device, decide whether to have redundancy for the iSCSI-LAN that connects the storage systems.
When installed on a physical environment, it is recommended to have redundancy in preparation for LAN failures.
Point
LAN type Physical environment Virtual environment
Public LAN Redundancy is achieved by setting the following parameters in bdpp.conf. [Master server] BDPP_GLS_PRIMARY_CONNECT2 BDPP_GLS_SECONDARY_CONNECT2 BDPP_GLS_POLLING2_IP [Slave server] BDPP_GLS_SERVER_CONNECT2 BDPP_GLS_SERVER_POLLING2_IP
Redundancy on the host machine (required). In this case, the parameters listed in the previous cell do not need to be set.
CIP LAN Redundancy is achieved by setting the following parameters in bdpp.conf .
[Master server]
BDPP_PCL_PRIMARY_CONNECT2 BDPP_PCL_SECONDARY_CONNECT2
Redundancy on the host machine (recommended). In this case, the parameters listed in the previous cell do not need to be set.
If redundancy is required on the virtual machine, configure in the same way as the physical environment.
iSCSI-LAN Redundancy using the ETERNUS multipath driver is performed.
Redundancy unavailable.
See
Refer to "B.1 bdpp.conf" for information on bdpp.conf.
3.5 Designing User Accounts
This section explains the user accounts for installing, running, and maintaining this product.
User type User name Description
System administrator root System administrator with root permissions (superuser) Installs and maintains this product, and starts and stops Hadoop. MapReduce executing user mapred (fixed) Executes JobTracker and TaskTracker processes.
Hadoop user Optional Executes, stops, and displays status of Hadoop jobs (job executing user)
Make the following design decisions in order to operate this product.
Deciding users of Hadoop
You can register more than one user account for the Hadoop user.
You can register Hadoop users by specifying the user accounts and groups that users belong to when installing and setting up this product.
See
Chapter 4 System Requirements
This chapter explains the system requirements for this product.
4.1 Hardware Requirements
This section describes the hardware requirements for using this product.
4.1.1 Hardware Conditions
The following hardware conditions must be met for each of the features.
Functionality Hardware Notes
Master server PRIMERGY RX Series,
PRIMERGY TX Series The CPU must be at least a dual-core CPU. Slave server PRIMERGY RX Series,
PRIMERGY TX Series (*1) The CPU must be at least a dual-core CPU. Development server PRIMERGY RX Series,
PRIMERGY TX Series The CPU must be at least a dual-core CPU. Collaboration server PRIMERGY RX Series,
PRIMERGY TX Series The CPU must be at least a dual-core CPU. External storage device ETERNUS DX series
*1: Refer to the supported model information at the following site for the PRIMERGY RX and TX Series models supported by this product. Note that there are no restrictions on supported models when building virtual environments.
-
Supported model informationRefer to following URL for detail information on supported PRIMERGY RX/TX:
http://globalsp.ts.fujitsu.com/dmsp/Publications/public/ds-ror-ve-v3-0-ww-en.pdf
4.1.2 Expansion Card Options
Additional network interface cards are required when building LAN redundancy.
Add network interface cards according to the design prepared in "3.4.1 Network Configuration".
4.2 Software Configuration
This product is comprised of the following DVD-ROMs:
-
Interstage Big Data Parallel Processing ServerThis product is comprised of the following software:
Software name Functionality overview
Software name Functionality overview Master server
Interstage Big Data Parallel Processing Server Standard Edition V1.0.1
Slave server
The slave server functionality of this product Interstage Big Data Parallel Processing Server Standard Edition V1.0.1
Development server
The development server functionality of this product
Interstage Big Data Parallel Processing Server Standard Edition V1.0.1 Collaboration server
The collaboration server functionality of this product
4.3 Software Requirements
This section describes the software requirements for using this product.
4.3.1 System Software
The following system software is required in order to use this product:
[Master server], [Slave server]
OS type System software Notes
Linux
Red Hat(R) Enterprise Linux(R) 5.6 (for Intel64) (*1) Red Hat(R) Enterprise Linux(R) 5.7 (for Intel64) (*1) Red Hat(R) Enterprise Linux(R) 5.8 (for Intel64) (*1) Red Hat(R) Enterprise Linux(R) 5.9 (for Intel64) (*1) Red Hat(R) Enterprise Linux(R) 6 (for Intel64) (*1) Red Hat(R) Enterprise Linux(R) 6.1 (for Intel64) (*1) Red Hat(R) Enterprise Linux(R) 6.2 (for Intel64) (*1) Red Hat(R) Enterprise Linux(R) 6.3 (for Intel64) (*1) Red Hat(R) Enterprise Linux(R) 6.4 (for Intel64) (*1)
If software such as driver or update kits is mandatory, prepare the software.
Refer to the server manual or the Linux installation guide for information on mandatory software.
*1: Only the cloning functionality runs as a 32-bit application on the WOW64 (Windows 32-bit On Windows 64-bit) subsystem.
[Development server], [Collaboration server]
OS type System software Notes
Linux
Red Hat(R) Enterprise Linux(R) 5.6 (for Intel64) Red Hat(R) Enterprise Linux(R) 5.7 (for Intel64) Red Hat(R) Enterprise Linux(R) 5.8 (for Intel64) Red Hat(R) Enterprise Linux(R) 5.9 (for Intel64) Red Hat(R) Enterprise Linux(R) 6 (for Intel64) Red Hat(R) Enterprise Linux(R) 6.1 (for Intel64) Red Hat(R) Enterprise Linux(R) 6.2 (for Intel64) Red Hat(R) Enterprise Linux(R) 6.3 (for Intel64) Red Hat(R) Enterprise Linux(R) 6.4 (for Intel64)
If software such as driver or update kits is mandatory, prepare the software.
Refer to the server manual or the Linux installation guide for information on mandatory software.
When installing on a virtual environment
When installing this product on a virtual environment, the following virtualization system software is required on the host machine. Build virtual machines on these host machines (host OS's), and install the system software (guest OS's) on the servers above.
Virtual environment
type
Operating system (host OS) Remarks
KVM
Red Hat(R) Enterprise Linux(R) 6 (for Intel64) Red Hat(R) Enterprise Linux(R) 6.1 (for Intel64) Red Hat(R) Enterprise Linux(R) 6.2 (for Intel64) Red Hat(R) Enterprise Linux(R) 6.3 (for Intel64) Red Hat(R) Enterprise Linux(R) 6.4 (for Intel64)
If software such as driver or update kits is mandatory, prepare the software.
Refer to the server manual or the Linux installation guide for information on mandatory software.
VMware (vSphere ESXi)
VMware vSphere 5.0 Standard VMware vSphere 5.0 Enterprise VMware vSphere 5.0 Enterprise Plus VMware vSphere 5.1 Standard VMware vSphere 5.1 Enterprise VMware vSphere 5.1 Enterprise Plus
Mandatory Packages
The mandatory packages shown in "Appendix F Mandatory Packages" are required in order to use this product.
If any packages are not installed during installation of this product, an error occurs. Check the message and install the required packages.
4.3.2 Mandatory Software
The following software is required in order to use this product:
[Master server]
Software name Version Notes
Microsoft(R) LAN Manager module
-Only required for the primary master server. Obtain from the Microsoft FTP site. (*1) This is not required when installing on a virtual environment.
*1: Obtain from the following Microsoft FTP site:
URL:
ftp://ftp.microsoft.com/bussys/clients/msclient/DSK3-1.EXE (as of October 2013)
Note that the Microsoft LAN Manager module can be used regardless of the CPU architecture (x86, x64).
If this product is being installed in an environment where ServerView Deployment Manager is installed, it is not necessary to obtain the Microsoft LAN Manager module.
[Slave server]
Software name Version Notes
ServerView Agent for Linux V4.50.12 or later This is not required when installing on a virtual environment.
4.3.3 Exclusive Software
None.4.3.4 Related Software
Consider installation of the following software, if required:
[Master server]
Software name Version Notes
ETERNUS Multipath Driver V2.0L22 or later
Required if providing redundant connections to the storage system
This is not required when installing on a virtual environment.
[Slave server]
Software name Version Notes
ETERNUS Multipath Driver V2.0L22 or later
Required if providing redundant connections to the storage system
This is not required when installing on a virtual environment.
[Development server]
Software name Version Notes
Interstage Application Server Enterprise Edition or Interstage Application Server Standard-J Edition
V10.0.0 or later
Required if developing analysis applications (MapReduce applications) that run under Hadoop
ETERNUS Multipath Driver V2.0L22 or later
Required if providing redundant connections to the storage system
This is not required when installing on a virtual environment.
[Collaboration server]
Software name Version Notes
ETERNUS Multipath Driver V2.0L22 or later
Required if providing redundant connections to the storage system
This is not required when installing on a virtual environment.
Others
Software name Version Notes
VMware vCenter Server 5.0
5.1
When using a virtual environment that uses VMware vSphere, this software is required for managing VM guests and VM hosts.
VMware vSphere Client 5.0
5.1
When using a virtual environment that uses VMware vSphere, this software is required to use functionality that links to the VM management product or the VMware for Managed Servers on the management client.
Chapter 5 Preparing to Build the System
This chapter describes tasks that must be performed before installing this product.
Setting sequence/Setting items Installation environment Master server Slave
server Development server Collaboration server Primary Secondary
1 Server BIOS Settings Y Y Y Y N
2 File System When Installing the OS
N N Y (*1) N N
3 Disabling SELinux Functionality
Y Y Y Y Y
4 System Parameter Settings Y Y Y Y Y
5 Firewall Settings Y Y Y Y N
6 Host Name Settings Y Y Y Y Y
7 Server Name Settings Y Y Y Y N
8 Public LAN Network Interface Settings
Y Y Y Y Y
9 System Time Settings Y Y Y Y Y
10 Storage System Environment Preparations
Y Y Y Y Y
11 ssh Settings Y Y N N N
12 SNMP Trap Daemon Settings Y (*1) N N N N
13 ServerView Agent Settings N N Y (*1) N N
14 kdump Shutdown Agent Settings
Y (*1) Y (*1) N N N
15 KVM Shutdown Agent Settings
Y (*2) Y (*2) N N N
16 Expanding the Microsoft LAN Manager Module
Y (*1) N N N N
Y: Required N: Not required
*1: Required only when installing in a physical environment *2: Required only when installing in a virtual environment (KVM)
5.1 Server BIOS Settings
This section describes the system BIOS configuration required.
Hyper-threading