Parts General Information
Parts Illustrations
The linking of detailed, exploded diagrams and text in each section helps you note all of the affected parts. Those parts most likely to be damaged together are displayed together.
Part Numbers
Part numbers are included to facilitate estimating. It is recommended, how-ever, that the year, make, model and VIN or model code information be given to dealership personnel for verification of application and most current pricing. There are often non-interchangeable right-hand and left-hand parts which have the same price and are similar in format. Those right and left part numbers are combined on one line, always listing the right part first (example: 4016306-7). This means the right number is 4016306 and the left number is 4016307. This applies whether the right number is the higher or the lower. If the right and left numbers differ widely, each is listed on a sepa-rate line.
Discontinued Parts
Occasionally parts are discontinued by manufacturers. Any discontinued parts that Mitchell can identify will continue to be carried in the Guide, but will be identified by a "d" preceding the part price. Any part number and part price listed with a preceding "d" should be considered to be the last avail-able factory information.
Remanufactured Parts
Where possible, remanufactured parts are listed by vehicle manufacturer. From time to time, however, the manufacturer may supersede a new part to a remanufactured part and/or not identify a part as being remanufactured. Therefore, care should be exercised when ordering parts that are often remanufactured, including, but not limited to alternators, water pumps, start-ers, brake calipstart-ers, control modules, A/C compressors, air flow metstart-ers, igni-tion distributors, axle shafts, power steering pumps, radios, steering racks, and turbochargers. All known remanufactured parts will be identified by a
"R" preceding the part price. Any part number and part price listed with a preceding "R" should be considered to be the last available factory informa-tion. These remanufactured parts may have a core charge in addition to the part price listed. Often, collision damage makes a core ineligible for return. Contact the dealer for policy clarification before remanufactured parts are purchased.
OEM Refinished Parts
Mitchell lists as many colors of OEM pre-painted, high impact parts as is practical. The manufacturer will sometimes, without notice, replace a pre-painted part with a part that requires refinishing. Dealer contact may be required for these items.
Non-Reusable Parts
Some attachment components may not be suitable for reuse (examples: plastic clips, fasteners, suspension bolts). Caution should be taken when estimating removal and/or replacement. It should be agreed upon as to what parts may require replacement even though not noticeably damaged.
Federal Motor Vehicle Theft Prevention Act
Federal Motor Vehicle Theft Prevention Action of 1984 mandates that high theft vehicles carry a VIN identification sticker on major components. This law also mandates replacement parts must carry this identification in the form of an R-DOT (Replacement-Department of Transportation) label. Pen-alties may apply to their removal or alteration. Contact NHTSA or the part manufacturer for further information.
Price General Information
Parts Prices
Each issue of the Guide reflects the latest pricing activity available from the vehicle manufacturers at time of printing. The prices shown in each issue are MANUFACTURERS’ SUGGESTED RETAIL PRICES. PRICES AND AVAILABILITY OF PARTS VARY FROM TIME TO TIME AND BY GEO-GRAPHICAL AREA, AND ARE SUBJECT TO CHANGE WITHOUT NOTICE.
Special Pricing
As described below, certain replacement parts are included in the General Motors Goodwrench Service Merchandising Parts (GSMP) Program or the Mopar Competitive Crash Parts Program. These parts are designated by either a “black box” or the “§” symbol in the parts price column.
General Motors Goodwrench Service Merchandising Parts (GSMP) Program: Parts included in this program may not have a manufacturer’s suggested retail price. The price, if any, following this symbol is an approxi-mation that you may find helpful. The actual price may be higher or lower, and can be determined by contacting your local dealer.
Mopar Competitive Crash Parts Program: Parts included in this pro-gram may be available with special pricing. Additional purchase discounts may apply. See your Chrysler Corporation dealership for availability and participation. Dealers are not required to adhere to suggested prices and are free to set their own prices for parts.
Glass Prices
There are instances where the vehicle manufacturer does not provide replacement glass. Therefore, both the manufacturers’ and National Auto Glass Specifications (NAGS) prices are listed throughout the Guide. NAGS part numbers and prices are produced under license from NAGS INTERNA-TIONAL—All rights reserved.
Database Inquiries/Toll-Free Number
Your comments and suggestions are appreciated and invaluable to us. Call us toll-free at 800-854-7030 or 858-368-7000. You can also fax us toll-free at 888-256-7969 or 858-549-0629. Inquiries via email may also be sent to [email protected]. You will receive a prompt response to each inquiry.
Symbols
The following symbols are used throughout Mitchell
Estimating information and are explained in detail in
each section.
d — Discontinued Part: Refer to Parts General Information for full expla-nation.
§ or “black box” — Special Pricing: Refer to Price General Information
for full explanation.
¶
— Part Footnote: Special part situations or requirements are denoted with a footnote symbol. The explanation follows as closely as possible to the part referenced.(P) — Paint to Match: A designation that appears immediately after a part description or application to identify components that must be painted to match the exterior/interior color of the vehicle.
(R) — Remanufactured Part: Refer to Parts General Information for full explanation.
# — Labor Footnote: Special labor situations or requirements are denot-ed with a footnote symbol. The explanation follows as closely as possible to the time referenced.
m — Mechanical Operation: A designation that appears in a separate text column to the left of the labor time column to identify components for which R&I or R&R is commonly considered to be a mechanical operation when performed in a collision repair environment.
s — Unibody Structural Component: A designation that appears in a separate text column to the left of the labor time column to identify unibody
structural components—those which support the weight of the vehicle and absorb the energy of the impact as well as road shock.
Guide Layout Sequence
Identify the Vehicle
Models are often combined in one service because there is enough similar-ity between them that a separate service for each is not necessary. Record all model identification information on the damage report. Paint code loca-tions are found in the front of the Guide and/or the beginning of each ser-vice. This will save time in searching for refinish codes or touchup paint.
Use the Layout as a Guide
An alphabetized Section Index can be found at the beginning of each ser-vice. Arranged from front to rear and from outside the vehicle inward are about 30 sections for each service (example: grille, quarter panel, luggage lid). Most have illustrations in which the components are identified and described, and part numbers, part prices, and labor times are shown. The descriptions are carefully arranged to depict the most frequent kinds of colli-sion damage.
Work Through the First Section
From the outside inward, note each part that is damaged and its attach-ments. For each part, list the part number, the price and the labor time.
Work Through Each Section
Use the sequence in the book as a guide and a reminder, and observe the notes that apply to specific situations. For the first few damage reports it is well worth reading through the Procedure Explanations to become thor-oughly familiar with the approach used, and to know which parts and opera-tions are included and which are not.
Complete the Damage Report
Add up all the labor times and calculate the total. Add up total part prices and material costs. Total, and you have a complete and accurate damage report.
Definitions
Bolted Parts and Assemblies
Refers to items bolted to inner structures, radiator supports, cowl and dash, etc., that may need to be removed for access. Due to the variety of these items and vehicles, time to remove and install or replace them is not included. Refer to the specific Procedure Explanation for examples of these items.
Disconnect & Connect
Disconnect a part or assembly by unbolting and/or unplug, and set it aside without physically removing it from the vehicle to gain access or removal of an adjacent part. The disconnected part or assembly is then reconnected during the assembly process.
High Strength Steels
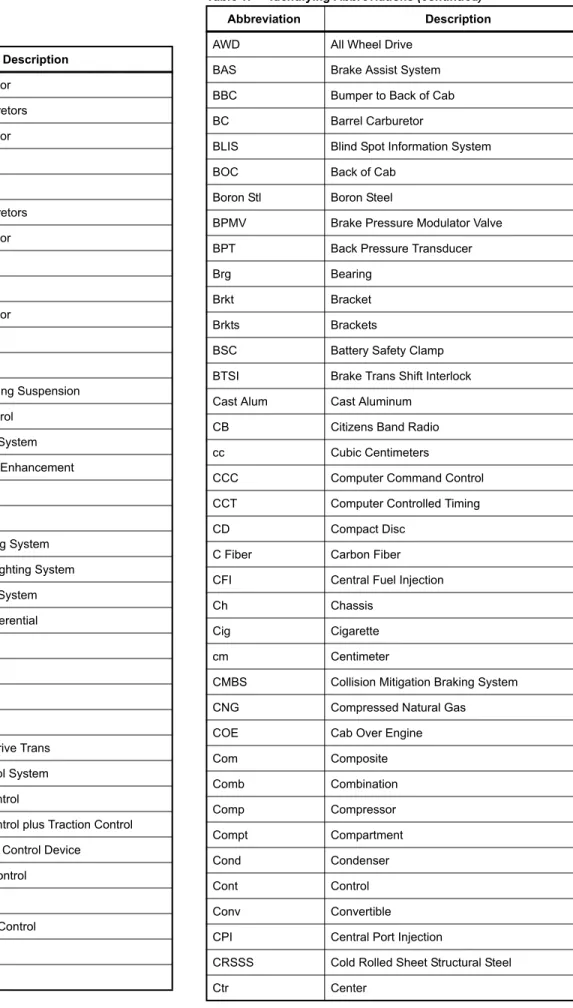
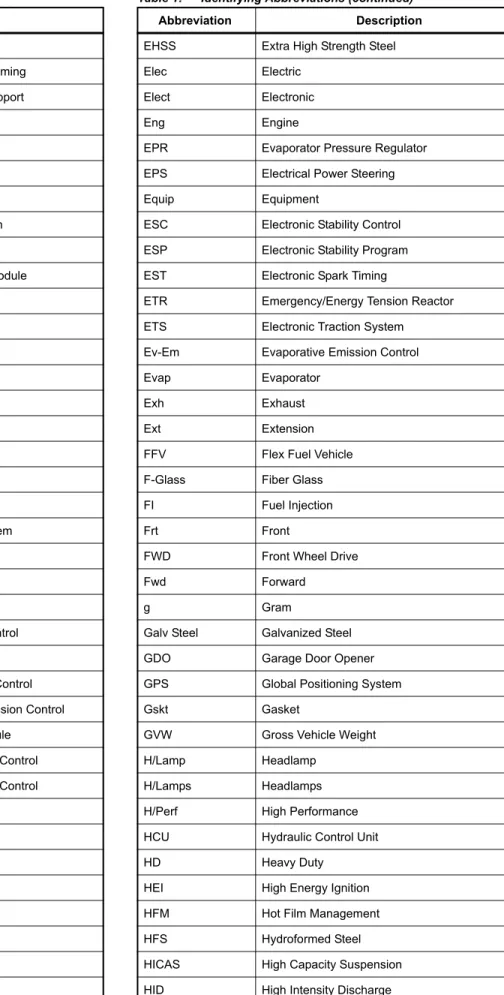
Complete HSS information is not available from the vehicle manufacturers. When information is available, the components will be called out by the appropriate acronym (HSS/UHSS etc.) within the text after the name of the part identified. See Abbreviations in Reference Information for a list of acro-nyms and their definitions.
New Undamaged Part
Refers to a replacement part from the vehicle manufacturer without exterior or interior trim or attached parts.
Overhaul (O/H)
Remove an assembly, disassemble, clean and visually inspect it, replace needed parts, reassemble and reinstall on the vehicle making any neces-sary adjustments. Items which can only be changed by using the overhaul operation are shown by placing "IOH" (Included in Overhaul) in the column. There are other items which are included in the overhaul operation that may be replaced individually. These will have a time assigned for a stand-alone operation. For verification, refer to the Procedure Explanation for the opera-tion being performed.
Overlap
If adjoining parts are being replaced (example: quarter and rear body pan-els), there is an overlap in that both individual operations include common welded surfaces or parts attached to both panels. A deduction must, there-fore, be made from the total of the individual operations to compensate for the two or more repeated operations in each sub-task. Similarly, if a part has already been removed, it makes access to other parts easier.
Remove and Install (R&I)
Remove a part or assembly, set it aside and reinstall it later. The time shown includes the alignment that can be done by shifting the part or assembly.
Remove and Replace (R&R)
Remove a part or assembly identified as included within the Procedure Explanation and replace the part or assembly with a new one. The time shown includes the alignment that can be done by shifting the part or assembly.
Underhood Dimensions
Engine compartment views are shown as if you are above the vehicle look-ing down. A centerline is provided for measurlook-ing strut widths. The illustration is an exact view of the engine compartment showing all bolts, holes, sup-ports and other structural components. Measurements can be duplicated with tape measure or with tram bar pointers set at equal lengths. Dimen-sions are given, whether symmetrical or non-symmetrical. All round holes are measured to center. Oval holes are usually measured to the front or rear center. Measurements are shown in millimeters. These dimensions are for estimating purposes only. See Vehicle Dimension topic in the Mitchell Infor-mation Center.
Order by Application
Many parts vary in usage according to differences in colors, materials, engines, transmissions, VIN, year and other factors. Where there are occa-sional variations regarding the part price, a representative part number at times is selected and the phrase "Order By Application" is footnoted to the part’s description. Consult the dealer parts department for exact price and/or part number information.
Labor General Information
IMPORTANT REMINDER: Labor related notes in the text portion override the Procedure Explanation pages.
Aluminum
The labor times shown for aluminum panel R&R represent replacement according to the manufacturer’s recommended procedures and guidelines. Within the published labor times Mitchell has also taken into consideration these commonly asked about items; Remove and Replace: Rivets, Drill and de-burr rivet holes, EMC screws, Flow drill screws, Body pretreat-ment: Flame coat treatment, Application of bonding adhesives, Welding (if applicable): Welding equipment set-up, "Run-on" or "Cold start" tabs.
NOTE: In addition, Aluminum panel replacement follows the guidelines out-lined in specific applicable panel P-Pages. e.g. Aluminum Quarter Panel replacement follows Procedure 20, Quarter Panel R&R.
IMPORTANT REMINDER: The cost of aluminum panel replacement materi-als is not included in panel replacement R&R times. (example: Rivets, Panel bonding, Adhesives, Bonding primer, EMC screws, Flow drill screws etc.).
Labor Times
THE LABOR TIMES SHOWN IN THE GUIDE ARE IN HOURS AND TENTHS OF AN HOUR (6 MINUTES) AND ARE FOR REPLACEMENT WITH NEW, UNDAMAGED PARTS FROM THE VEHICLE MANUFAC-TURER ON A NEW, UNDAMAGED VEHICLE. Any additional time needed for collision DAMAGE ACCESS, ALIGNMENT PULLS, NON-ORIGINAL EQUIPMENT or USED PARTS should be agreed upon by all parties. Times for some operations are applicable after necessary bolted, attached or related parts have been removed. Exceptional circumstances, including all the sub-operations or extra operations, are indicated as notes throughout the text or are identified in the Procedure Explanations. The actual time taken by individual repair facilities to replace collision damaged parts can be expected to vary due to severity of collision, vehicle condition, equipment used, etc.
Labor Categories
The labor times shown in the Guide fall into various categories (for example, body, frame, mechanical) as determined by the repair facility’s operating procedures. As a guide, components for which R&I or R&R is commonly considered to be a mechanical operation when performed in a collision repair environment are designated with the letter "m" in the text. These des-ignations are only a guide. They are not necessarily all inclusive, nor do they suggest the application of a labor rate.
Welded Panels
Replacement labor times for new panels that are joined by welding include the necessary use of inserts and accepted sectioning guidelines developed by OEMs, I-CAR, and TECH-COR. The labor times for welded panels include grinding, filling and final sanding with up to 150 grit sandpaper to match the original panel contour. Labor times do Not-Include the Feather, Prime and Block refinish operation. See Procedure 28 in Procedure Expla-nation section, for information on Feather, Prime and Block.
Adhesive Panel Bonding
Replacement labor times for panel bonding include all necessary weld appli-cations identified by adhesive material manufacturers and OEM guidelines. Users should reference best practices procedures from bonding material manufacturers and/or OEM guidelines before selecting this replacement method option.
Shop Material
The labor times shown in the Guide do not take into account the cost of any materials, or the cost of hazardous materials recycling or disposal.
Disable and Enable Air Bag System
The labor times shown in the Guide represent the procedures necessary to disable and enable the air bag system in order to replace air bag system components and/or to perform repairs not related to the air bag system, e.g., welding. This procedure includes visually monitoring the air bag warn-ing light to verify proper system functionality. The allowance does not include troubleshooting of the system if proper system functionality is not present.
Diagnose Air Bag System
The labor times shown in the Guide to diagnose air bag systems include system disable and enable, removal and installation of air bag module(s) (where required), installation of appropriate simulators, and retrieving and clearing of trouble codes. Time for specific troubleshooting of Diagnostic Trouble Codes (DTCs) is not included.
Glass Labor Times
The labor times shown in the Guide for glass listed with the NAGS part num-bers are Mitchell times, not times from NAGS. Glass labor times are for remove and replace (R&R), i.e., removal of the existing glass and its replacement with new glass. Some glass labor times are also shown for removal and the later installation (R&I) of the same glass.
Stripes, Decals and Overlays
The labor times shown in the Guide for these items refer to installation only.
TECH-COR Repair Information
The labor times shown in the Guide for TECH-COR repair procedures are supplied by Mitchell. TECH-COR does not endorse, sanction or otherwise approve such times. TECH-COR publications are copyrighted material. However, reproduction of TECH-COR bulletins is permitted as long as the bulletin is reproduced in its entirety, including source attribution. TECH-COR bulletins may be obtained by contacting: TECH-COR, Inc., Technical Com-munications Dept., 100 East Palatine Road, Wheeling, IL 60090; Phone: 847-667-2341.
Base Model Vehicle
Vehicle with the minimal level of equipment available from the manufacturer.
Types of Vehicles
The types of vehicles covered are regular production models only.
Comprehensive Labor Time
While completeness is strived for in each Guide, there will be instances, however, in which a labor time has not been established for an operation at the time of publication. If an item requires replacement and can be replaced as an individual item but shows no time, a time should be agreed upon among all parties and recorded on the damage report. It also should not be inferred that a component with no established Mitchell labor time has been included in another component’s replacement allowance.
Procedure Reference
Throughout each vehicle "service" there are Procedure Explanation refer-ence notes located immediately following the main section headings. Exam-ple: BUMPER/FRONT PANEL is followed by, "Use Procedure Explanations 1, 3 and 28 with the following text." This indicates that the text portion and the Procedure Explanations for Front Bumper, Front Panel and Refinish should be used in conjunction with one another when writing a damage report. LABOR RELATED NOTES IN THE TEXT PORTION OVERRIDE THE PROCEDURE EXPLANATION PAGES.
Procedures
The Procedure Explanations on the following pages outline the operations which are or are not included in the labor time listed in each vehicle "ser-vice." You are encouraged to become familiar with these procedure pages to be sure you have a thorough understanding of the Mitchell approach to collision estimating.
The left Included Operations column means that the labor time shown in the Mitchell Collision Estimating Guide text includes that particular operation or operations.
The right Not Included Operations column means that the labor time in the text does not include that particular operation or operations. Performance of one or more of these operations may or may not be necessary as deter-mined by the individual job requirements. If an add-on time has been estab-lished for any of these operations it will be shown in the text. If a time has not been established or if the add-on time is dependent on conditions that vary due to collision damage (example: access time, free up parts), the additional time should be recorded on the damage report. Labor times relat-ing to the repair of a damaged panel or the use of used parts would come under this category.
Additions to Labor Times
Due to the wide range of collision damage and vehicle conditions, labor times for the following operations are not included in the Guide.
Access Time
Remove extensively damaged parts by cutting, pushing, pulling, etc.
Anti-Corrosion Rust Resistant Material
Remove and/or apply weldable zinc primers, wax, petroleum based coat-ings, undercoating or any type of added conditioning.
Broken Glass Clean Up
Clean vehicle of all broken glass.
Detail
Clean vehicle to pre-accident condition.
Drain & Refill
Fuel (see fuel tank)
Electronic Components
•
Time to remove and install as necessary; includes wiring and/or wiring harness and computer module.•
Time to reset memory code function (example: seat position, radio pre-sets) when battery has been disconnected to perform repairs.•
Time to complete computer relearn procedures for proper operation of vehicle systems (example: power sunroof, power window) when battery has been disconnected to perform repairs.Fabrication
Fabrication of reinforcements or inserts (new component not cut or manu-factured from existing or new part, but from raw stock).
Free Up Parts
Time necessary to free up parts frozen by rust or corrosion.
Measure and Identify
Structural damage by comparing vehicle underbody, underhood, and upper-body reference points to accepted, OEM-based dimension specification to identify damage to unibody vehicles.
Plug and Finish Holes
Time to plug and finish unneeded holes on parts being installed.
Repair or Align
Parts or adjacent to parts being replaced.
Rework Parts
To fit a particular year or model (example: cutting holes for lamps, modifying a radiator support).
Tar and Grease
Removal of these or any other materials that would interfere with operation.
Transfer Time
For welded, riveted or bonded brackets, braces or reinforcements from old part to new part.
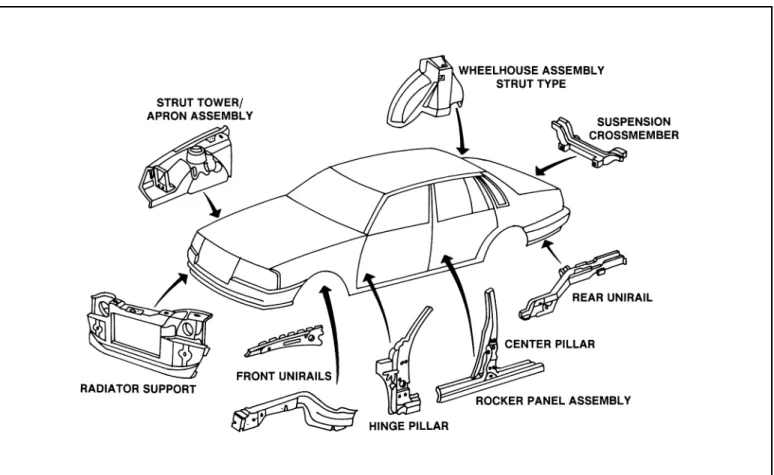
Unibody Structural Components
Unibody structural components are parts which support the weight of the vehicle and absorb the energy of the impact as well as road shock. These components are designated with the letter "s" in the text. The components are the radiator support, front and rear unirails, apron and wheelhouse (strut type) assemblies, rocker panel assemblies and suspension crossmembers. Body pillars, while not primary load-bearing structures, also require special treatment and are considered structural components.
Rev. 2-10
Procedure 1—Front Bumper
Bumper Assembly R&I
Included Operations•
Remove assembly from frame, impact absorbers or mounting arms•
Reinstall assembly•
Adjust alignment to vehicleNot Included Operations
•
Refinish bumper•
Remove and install optional accessories (example: auxiliary lamps, brush guard, fog lamps, headlamp washer systems, laser/radar cruise control sensors, parking aid sensors, spoilers)Bumper Assembly O/H
Included Operations•
Remove assembly from frame, impact absorbers or mounting arms•
Disassemble and replace damaged parts•
Assemble and install•
Adjust alignment to vehicle•
Remove and install or replace: License plate/bracket, Parklamp if so equippedNot Included Operations
•
Refinish bumper•
Remove and replace impact absorbers or mounting arms•
Remove and install or replace optional accessories (example: auxiliary lamps, brush guard, fog lamps, headlamp washer systems, laser/radar cruise control sensors, parking aid sensors, spoilers)•
Remove and install adhesive exterior trim; add to clean and retape•
Replace new adhesive exterior trim; deduct one-half of R&R time•
Install stripes, decals, transfers or overlaysProcedure 2—Front Bumper & Grille
Bumper/Grille Assembly R&I
Included Operations•
Remove assembly from frame, impact absorbers or mounting arms•
Reinstall assembly•
Adjust alignment to vehicleNot Included Operations
•
Refinish cover•
Aim lamps•
Remove and install optional accessories (example: auxiliary lamps, brush guard, fog lamps, headlamp washer systems, laser/radar cruise control sensors, parking aid sensors, spoilers)Bumper/Grille Assembly O/H
Included Operations•
Remove assembly from frame, impact absorbers or mounting arms•
Replace or transfer parts attached except those listed in Not IncludedSection
•
Disassemble and replace damaged parts•
Assemble and install•
Adjust alignment to vehicle•
Remove and install or replace: Grille, Headlamps as an assembly, License plate/bracket, Parklamp if so equippedNot Included Operations
•
Refinish bumper•
Aim lamps•
Overhaul or replace headlamp parts•
Remove and replace impact absorbers or mounting arms•
Remove and install or replace optional accessories (example: auxiliary lamps, brush guard, fog lamps, headlamp washer systems, laser/radar cruise control sensors, parking aid sensors, spoilers)•
Remove and install adhesive exterior trim; add to clean and retape•
Replace new adhesive exterior trim; deduct one-half of R&R time•
Install stripes, decals, transfers or overlaysProcedure 3—Front Panel
Front Panel R&R
Included Operations•
Remove and replace panel assembly•
Replace or transfer attached bolted parts•
Remove and install or replace: Grille, Headlamps as an assembly, Parklamp if so equipped•
Loosen fender(s) for access, if necessary•
Replace clip type moulding for base model vehicleNot Included Operations
•
Refinish front panel•
Aim lamps•
Overhaul or replace headlamp parts•
Remove and install: Front bumper unless noted otherwise, Fender(s) unless noted otherwise, Adhesive exterior trim; add to clean and retape•
Replace new adhesive exterior trim; deduct one-half of R&R time•
Install stripes, decals, transfers or overlays•
Drill holes for installing exterior trimProcedure 4—Hood
Hood Panel R&R
Included Operations•
Remove and replace hood assembly•
Remove and install or replace: Parts attached to hood except those listed in Not Included Section•
Replace clip type moulding for base model vehicle•
Replace caulking for standard factory application if necessaryNot Included Operations
•
Refinish hood panel•
Remove and install or replace: Hinges, Gas prop rod•
Remove and install adhesive insulator•
Remove and install adhesive exterior trim; add to clean and retape•
Replace new adhesive exterior trim; deduct one-half of R&R time•
Install stripes, decals, transfers or overlays•
Drill holes for installing exterior trimProcedure 5—Cooling
Radiator Support R&R
Included Operations•
Remove and install or replace: Shroud when support is serviced by man-ufacturer as a one piece unit, Radiator assembly when support is ser-viced by manufacturer as a one piece unit, Impact absorbers or mounting arms if necessary to perform operation.Not Included Operations
•
Refinish radiator support•
Aim lamps if attached to support•
Remove and/or apply: Anti-corrosion rust resistant materials•
Remove and install: Front bumper, Hood panel if necessary, Front header panel, Front fenders, Wiring and/or wiring harness•
Remove and replace: Radiator hoses, Fan, pulley, fan clutch or belts, Decals (example: EPA, body identification, caution/danger)•
Remove and install or replace: Suspension assemblies, Bolted parts and assemblies (example: fluid reservoirs and coolers, vapor canister, cruise control, air conditioning components)IMPORTANT REMINDER: Labor times for inner panels, rails or reinforce-ments are with outer panels removed.
NOTE: For Unibody type vehicles see Procedure 8—Front Inner Structure -Unibody.
Radiator R&R
Included Operations•
Remove and install or replace: Shroud, Electric fan if necessary•
Drain, refill and check coolant•
Visual check for leaksNot Included Operations
•
Remove and install or replace: Fan, Pulley, Fan clutch, Belts, Hoses if necessary; add .1 hour for one, .2 hour for all hoses•
Pressure test system if necessary (example: check for damage due to collision); add .3 hourProcedure 6—Air Conditioning
Air Conditioning R&R
Included Operations•
Each operation identified in the text is considered to be a stand-alone operation.Not Included Operations
•
Evacuate and recharge system•
Refrigerant recovery•
Remove and install or replace: Receiver drier•
Leak checkIMPORTANT REMINDER: If all refrigerant has been lost by collision dam-age, or if refrigerant lines have been opened and not immediately sealed, the receiver drier should be replaced. Replacement of collision damaged parts on a system that is still pressurized should not require replacement of receiver drier.
NOTE: Refrigerant recovery is the removal of refrigerant from the vehicle A/C system as specified by SAE standard J-2209 and its transfer to a hold-ing tank. The recovery operation does not include recyclhold-ing of the used refrigerant.
Procedure 7—Front Fender
Front Fender R&R
Included Operations•
Remove and install or replace: Headlamp assembly if attached to fender, Cornering lamp if so equipped, Side marker lamp if so equipped, Turn indicator if so equipped, Parts attached to fender except those listed inNot Included Section
•
Replace clip type moulding for base model vehicleNot Included Operations
•
Refinish front fender•
Aim lamps•
Remove and install front bumper•
Remove and install or replace: Front header panel, Skirt or liner, Wheel, Antenna, Rocker moulding•
Remove and install adhesive exterior trim; add to clean and retape•
Install stripes, decals, transfers or overlays•
Drill holes for installing exterior trim•
Cut holes for installing lampsProcedure 8—Front Inner Structure -
Unibody
Inner Structure Assembly R&R
Included Operations•
Remove and install: Cowl trim•
Remove and install or replace: Shroud and radiator assembly, Impact absorbers or mounting arms if necessary to perform operation, Cowl top panel if assembly includes dash panel•
Loosen and pull back carpet and insulation as required•
Remove and replace caulking for standard factory applicationNot Included Operations
•
Refinish radiator support, apron and/or front rail•
Aim lamps•
Remove and/or apply: Anti-corrosion rust resistant materials•
Remove and install: Front bumper, Hood panel, Front header panel, Front fenders, Engine, Wiring and/or wiring harness•
Remove and replace: Radiator hoses, Fan, pulley, fan clutch or belts, Decals (example: EPA, body identification, caution/danger)•
Remove and install or replace: Suspension assemblies, Bolted parts and assemblies (example: fluid reservoirs and coolers, vapor canister, cruise control, air conditioning components), Instrument panel and center con-sole, Seat assemblies, Windshield and mouldings, Air safety bag•
Wheel alignmentIMPORTANT REMINDER: Labor times for inner panels, rails or reinforce-ments are with outer panels removed.
IMPORTANT REMINDER: Sectioning of a panel may or may not be recom-mended by vehicle manufacturer. This procedure should only be performed when a qualified and knowledgeable technician has determined that the operation does not jeopardize the integrity of the vehicle.
Radiator R&R
Included Operations•
Remove and install or replace: Shroud, Electric fan if necessary•
Disconnect and connect: Hoses at radiator, Transmission coolant lines•
Drain, refill and check coolant•
Visual check for leaksNot Included Operations
•
Remove and install or replace: Fan, Pulley, Fan clutch, Belts, Hoses if necessary; add .1 hour for one, .2 hour for all hoses•
Pressure test system if necessary (example: check for damage due to collision); add .3 hourRadiator Support R&R
Included Operations•
Remove and install or replace: Shroud when support is being replaced as a complete unit, Radiator assembly when support is being replaced as a complete unit, Impact absorbers or mounting arms if necessary to per-form operation•
Remove and replace caulking for standard factory applicationNot Included Operations
•
Refinish radiator support•
Aim lamps•
Remove and/or apply: Anti-corrosion rust resistant materials•
Remove and install: Front bumper, Hood panel if necessary, Front header panel, Front fenders, Wiring and/or wiring harness•
Remove and replace: Radiator hoses, Fan, pulley, fan clutch or belts, Decals (example: EPA, body identification, caution/danger)•
Remove and install or replace: Bolted parts and assemblies (example: fluid reservoirs and coolers, vapor canister, cruise control, air condition-ing components)IMPORTANT REMINDER: Sectioning of a panel may or may not be per-formed by vehicle manufacturer. This procedure should only be perper-formed when a qualified and knowledgeable technician has determined that the operation does not jeopardize the integrity of the vehicle.
Apron Panel and/or Front Rail R&R
Included Operations•
Remove and install: Cowl trim•
Remove and install or replace: Impact absorbers or mounting arms if necessary to perform operation•
Loosen and pull back carpet and insulation as required•
Remove and replace caulking for standard factory applicationNot Included Operations
•
Refinish apron support and/or front rail•
Remove and/or apply: Anti-corrosion rust resistant materials•
Remove and install: Engine, Wiring and/or wiring harness•
Remove and install or replace: Front bumper, Front header panel, Front fender, Hood panel and Cowl top panel, Suspension assemblies, Upper reinforcement, Bolted parts and assemblies (example: fluid reservoirs and coolers, vapor canister, cruise control, air conditioning components),Decals (example: EPA, body identification, caution/danger), Instrument panel and center console, Seat assemblies
•
Wheel alignmentIMPORTANT REMINDER: Sectioning of a panel may or may not be recom-mended by vehicle manufacturer. This procedure should only be performed when a qualified and knowledgeable technician has determined that the operation does not jeopardize the integrity of the vehicle.
Engine Subframe/Crossmember R&R
Included Operations•
Suspend/Support assemblies (except if required to R&I for access): Engine, Suspension•
Remove and install assemblies: Exhaust, Hood, Steering gear•
Remove and install or replace: Engine mounts/absorbers (mounted on subframe), Engine undercovers, Stabilizer bar and bracketsNot Included Operations
•
Remove and install assemblies: Engine, Suspensions•
Overhaul or replace: Exhaust system components, Hood, Steering gear components, Suspension components, Wheel alignment•
Bleed brakes if necessaryProcedure 9—Frame
Frame Assembly R&R
Included Operations•
Remove and install: Front and rear bumpers, Front sheet metal as an assembly, Hood, Body assembly, Pickup bed, Spare tire (when attached to frame), Mechanical assemblies (example: engine, transmission, sus-pension, fuel tank, differential and components)•
Remove and install or replace: Radiator, Wiring and/or wiring harness if necessary, Exhaust system, Fluid lines, Engine mounts/absorbers, Vapor canister, Clips and bolted brackets attached to frameNot Included Operations
•
Overhaul assemblies or replace parts of assemblies that are transferred•
Remove and/or apply: Anti-corrosion rust resistant materials•
Remove and install: Seats, Interior trim if necessary•
Remove and install or replace: Welded or riveted assemblies of the frame (see Note), Optional accessories (example: auxiliary lamps and fuel tanks, brush guard, trailer hitch, trailer connector)•
Wheel alignment•
Adjust control linkage•
Bleed brakes if necessary•
Evacuate and recharge Air Conditioning if so equipped and necessary•
Refrigerant recovery if necessary•
Pull back carpet as requiredNOTE: Frame Assembly R&R requires planning. Proper preparation and job sequencing are key to performing this operation. Also, special equipment, additional work space and manpower may be needed.
NOTE: It may be necessary to transfer parts from the damaged frame or order new parts to use on the new frame. This cannot be determined until you see the new frame. The needed additional time for this operation must be estimated.
Front Suspension Crossmember R&R
Included Operations•
Remove and/or disconnect necessary attaching bolts and components to frame and raise front sheet as an assembly•
Loosen or remove and install: Suspension assemblies as necessaryNot Included Operations
•
Remove and install front bumper•
Remove and install or replace: Steering gear•
Remove and install or suspend: Engine assembly•
Overhaul and replace suspension parts•
Wheel alignment•
Bleed brakes if necessaryRear Crossmember R&R
Included Operations•
Remove and install: Rear gravel shield if necessary, Tailpipe or rear muf-fler if necessaryNot Included Operations
•
Remove and install rear bumper•
Remove and replace fuel tankProcedure 10—Wheel/Wheel Alignment
Wheel and Tire R&I
Included Operations•
Jack up and support vehicle•
Remove and install wheel and tire assembly on hub•
Remove and install or replace: Wheel cover or hub capNot Included Operations
•
Refinish wheel•
Remove and install or replace: Valve stem, Locking type lugs, Locking type wheel covers•
Mount and balance tireIMPORTANT REMINDER: Labor times with part numbers shown in the text are for Remove and Install (R&I) of the Wheel and Tire Assembly. When necessary to R&I a damaged Wheel and Tire Assembly for repair or sublet and substitute with the vehicle’s existing spare wheel and tire for temporary mobility, an additional .2 hour is provided in the Wheel Section headnotes.
Adjust Front Alignment
Included Operations•
Position vehicle on alignment rack and check/adjust tire pressure•
Check ride height and adjust to vehicle manufacturer specifications•
Set-up gauges on all 4 wheels and check wheel run out and front sus-pension for wear•
Determine vehicle tracking by checking thrust angle to vehicle center line•
Center steering wheel•
Adjust front caster, camber and toe-in where applicable•
Perform vehicle manufacturer recommended shimming procedures if necessary•
Remove vehicle from alignment equipment•
Verify alignment by road testNot Included Operations
•
Diagnostic road test to determine if alignment operations are necessary•
Straighten or replace suspension parts and/or structural components•
Shift or align engine subframe/crossmember and/or axle housing•
Remove and install steering wheel•
Non-vehicle manufacturer shimming•
Adjust wheel bearings•
Adjust rear wheel alignmentNOTE: Labor times for Wheel Alignment are based on the use of Four Wheel Alignment equipment to ensure that a minimum Thrust Angle Align-ment is provided in all instances where a Four Wheel AlignAlign-ment cannot be performed. If other than Four Wheel Alignment equipment is used, some adjustment in labor times may be appropriate.
Adjust Four Wheel Alignment
Included Operations•
Position vehicle on alignment rack and check/adjust tire pressure•
Check ride height and adjust to vehicle manufacturer specifications•
Set-up gauges on all 4 wheels and check wheel run out and front sus-pension for wear•
Determine vehicle tracking by checking thrust angle to vehicle center line•
Center steering wheel•
Adjust front and rear caster, camber and toe-in where applicable•
Perform vehicle manufacturer recommended shimming procedures if necessary•
Remove vehicle from alignment equipmentNot Included Operations
•
Diagnostic road test to determine if alignment operations are necessary•
Straighten or replace suspension parts and/or structural components•
Shift or align engine subframe/crossmember and/or axle housing•
Remove and install steering wheel•
Non-vehicle manufacturer shimming•
Adjust wheel bearingsAdjust Rear Alignment
Included Operations•
Position vehicle on alignment rack and check/adjust tire pressure•
Check ride height and adjust to vehicle manufacturer specifications•
Set-up gauges on all 4 wheels and check wheel run out and front sus-pension for wear•
Determine vehicle tracking by checking thrust angle to vehicle center line•
Adjust rear caster, camber and toe-in where applicable•
Perform vehicle manufacturer recommended shimming procedures if necessary•
Remove vehicle from alignment equipment•
Verify alignment by road testNot Included Operations
•
Diagnostic road test to determine if alignment operations are necessary•
Straighten or replace suspension parts and/or structural components•
Shift or align rear suspension axle assembly carrier and/or housing•
Remove and install, or center steering wheel•
Non-vehicle manufacturer shimming•
Adjust wheel bearings•
Adjust front wheel alignmentNOTE: If Front Wheel Adjustment is necessary, cancel Adjust Rear Align-ment procedure and use Adjust Four Wheel AlignAlign-ment procedure.
Procedure 11—Front Suspension
Front Suspension Component R&R
Included Operations•
Each operation identified in the text is considered to be a stand-alone operation unless noted otherwise•
Remove and install wheelNot Included Operations
•
Wheel alignment•
Bleed brakes if necessaryFront Suspension O/H
Included Operations•
Remove and install wheel•
Disassemble and clean parts•
Visual check for damage•
Replace needed parts•
AssembleNot Included Operations
•
Replace steering linkage parts•
Remove and replace: Torsion or stabilizer bar, Drive axle parts•
Bleed brakes if necessary•
Wheel alignmentIMPORTANT REMINDER: Due to the design of suspension on unibody vehicles, it may be necessary to perform four wheel alignment.
Procedure 12—Engine/Fuel Tank
Engine & Transmission R&I
Included Operations•
Disconnect and connect: Necessary components to remove and install engine/transmission as an assembly•
Remove and install hood assemblyNot Included Operations
•
Remove and install: Radiator if necessary, Any parts on engine if neces-sary•
Adjust linkage if adjustable type•
Evacuate and recharge air conditioning if so equipped and necessaryNOTE: Labor times shown in the text are only to remove and install the engine and/or transmission assembly in order to facilitate other work. The times are not for engine or transmission replacement.
Fuel Tank R&R
Included Operations•
Disconnect & Connect: Fuel Lines at tank, Wiring at tank•
Remove and install or replace: Fuel pump (tank mounted), Interior trim (if necessary), Sending unit, Stone shields/protectors, Tank strapsNot Included Operations
•
Drain & Refill•
Remove & install or replace: Exhaust system, Suspension/drive train, Skid plates or specialty equipmentProcedure 13—Windshield
Windshield R&R
Included Operations•
Remove and replace: Reveal mouldings, Garnish mouldings, Wiper arms, Rear view mirror•
Replace weatherstrip if so installed•
Replace necessary adhesive/urethane•
Clean up old adhesive in opening area•
Test for leaksNot Included Operations
•
Remove and replace: Aftermarket window tint•
Broken glass clean upIMPORTANT REMINDER: Urethane set glass may typically be considered a structural component. Refer to OEM replacement procedures for installa-tion methods and materials necessary to restore structural integrity.
IMPORTANT REMINDER: No windshield or flush mounted reveal mould-ings can be removed without the possibility of breakage or damage that will require replacement. Unintentional damage to glass that is considered a structural member by the vehicle manufacturer may occur when attempting alignment pulls to correct unibody collision damage. Agree beforehand who will incur the charge for damage occurring during normal R&R and R&I operations.
Procedure 14—Cowl & Dash
Hinge and/or Windshield Pillar R&R
Included Operations•
Remove and install: Front door•
Remove and install or replace: Sun visor, if replaced at roof, Sill plates, Jamb switches•
Loosen and pull back: Front area of cloth type headliner, Carpet and insulation as required•
Remove and replace caulking for standard factory applicationNot Included Operations
•
Refinish pillar•
Remove and/or apply: Anti-corrosion rust resistant materials•
Remove and install: Front fender•
Remove and install or replace: Windshield and mouldings, Instrument panel assembly, Door hinges, Air conditioning and heater parts that inter-fere, Wiring and/or wiring harness•
Remove and install preformed or molded type headliner•
Broken glass clean upIMPORTANT REMINDER: No windshield or flush mounted reveal mould-ings can be removed without the possibility of breakage or damage that will require replacement. Unintentional damage to glass that is considered a structural member by the vehicle manufacturer may occur when attempting alignment pulls to correct unibody collision damage. Agree beforehand who
will incur the charge for damage occurring during normal R&R and R&I operations.
IMPORTANT REMINDER: Sectioning of a panel may or may not be recom-mended by vehicle manufacturer. This procedure should only be performed when a qualified and knowledgeable technician has determined that the operation does not jeopardize the integrity of the vehicle.
NOTE:FULL PANEL REPLACEMENT PROCEDURE - Labor times are for replacement at factory seams if feasible. However, many windshield pillars cannot be replaced at roof seams because the roof panel overlaps the pillar. If a windshield pillar is designed in this manner and a section time is not listed, the time in the text represents replacement of the panel at the most practical area—usually below the roof seam. This method is considered a full panel replacement.
Cowl & Dash R&R
Included Operations•
Remove and install or replace: Cowl top panel, Cowl trim, Weathercords and weatherstrips•
Loosen and pull back carpet and insulation as required•
Remove and replace caulking for standard factory applicationNot Included Operations
•
Refinish cowl and dash•
Remove and/or apply: Anti-corrosion rust resistant materials•
Remove and install: Engine, Front door assemblies, Front fender assem-blies•
Remove and install or replace: Windshield and mouldings, Air safety bag, Instrument panel assembly, Air conditioning and heater parts that inter-fere, Wiring and/or wiring harness, Bolted part and assemblies (example: wiper components, master cylinder)•
Broken glass clean upInstrument Panel R&R
Included Operations•
Disconnect and connect: Necessary wiring, hoses and cables•
Remove and install: Instrument cluster, Standard gauges, switches and lamps, Trim and attached parts (example: glove box), Heater/Air Condi-tioning controls if so equipped, Release levers (example: brake, hood, fuel door, trunk)•
Remove and install or replace: Passenger air bag, Crash pad, Standard audio system, Attached brackets and reinforcements (non-welded type)•
Loosen steering column for access•
Test all necessary functions of electrical components for correct opera-tion and reset as requiredNot Included Operations
•
Refinish instrument panel or crash pad•
Remove and install: Front seats, Steering column, Main wiring harness•
Remove and install or replace: Windshield, Optional equipment (exam-ple: electronic components, center console, cruise control), Control cables (example: hood release, remote mirrors), Remote mirrors•
Repair/Rework parts (example: cut holes for modification)•
Drill holes for installing trim•
Broken glass clean upCenter Console R&R
Included Operations•
Disconnect and connect: Necessary wiring, hoses and cables•
Remove and install: Shift lever if necessary (includes adjust neutral safety switch), Standard gauges, switches and lamps, Front seats if nec-essary, Trim and attached parts, Heater/Air Conditioning controls if so equipped, Release levers (example: seat belt)•
Remove and install or replace: Standard audio system if so equipped, Attached brackets and reinforcements (non-welded type)•
Test all necessary functions of electrical components for correct opera-tion and reset as requiredNot Included Operations
•
Refinish console or compartment door•
Remove and install: Main wiring harness•
Remove and install or replace: Optional equipment (example: electronic components, air cond. ducts)•
Repair/Rework parts (example: cut holes for modification)•
Drill holes for installing trimDriver Air Bag Module R&R
Included Operations•
Remove and install or replace: Driver air bag module, Switches attached to steering wheel, if necessaryNot Included Operations
•
Remove and install or replace: Impact sensors, Control modules, Wire harness, Steering column•
Disable and enable air bag system•
Diagnose air bag system•
Deployed air bag residue clean-upClockspring R&R
Included Operations•
Remove and install or replace: Clockspring, Steering wheel, Driver air bag moduleNot Included Operations
•
Remove and install or replace: Impact sensors, Control modules, Wire harness, Steering column•
Disable and enable air bag system•
Diagnose air bag system•
Deployed air bag residue clean-upPassenger Air Bag Module R&R
Included Operations•
Remove and install or replace: Passenger air bag module, Instrument panel, if necessary, Glove box, if necessaryNot Included Operations
•
Remove and install or replace: Impact sensors, Control modules, Wire harness, Windshield•
Disable and enable air bag system•
Diagnose air bag system•
Deployed air bag residue clean upKnee Air Bag Module R&R
Included Operations•
Remove and replace: Knee air bag moduleNot Included Operations
•
Remove and install or replace: Impact sensors, Control modules, Wire harness, Glove box assembly, Instrument panel grilles, Instrument panel trim panels•
Disable and enable air bag system•
Diagnose air bag system•
Deployed air bag residue clean upSeat Air Bag Module R&R
Included Operations•
Remove and replace: Seat air bag moduleNot Included Operations
•
Remove and install or replace: Impact sensors, Control modules, Wire harness, Seat assembly, Seat cover•
Disable and enable air bag system•
Diagnose air bag system•
Deployed air bag residue clean upDoor Air Bag Module R&R
Included Operations•
Remove and replace: Door air bag module•
Remove and install or replace: Impact sensors, Control modules, Wire harness, Door glass, Trim panel•
Disable and enable air bag system•
Diagnose air bag system•
Deployed air bag residue clean upSide Curtain Air Bag Module R&R
Included Operations•
Remove and replace: Side curtain air bag moduleNot Included Operations
•
Remove and install or replace: Impact sensors, Control modules, Wire harness, Headliner•
Disable and enable air bag system•
Diagnose air bag system•
Deployed air bag residue clean upIMPORTANT REMINDER: Vehicle manufacturer’s recommended service and repair procedures must be followed when servicing any Supplemental Restraint/Air Bag System. Certain safety precautions and disabling proce-dures must be observed when performing repairs.
Procedure 15—Rocker Panel/Side Body
Panel/Center Pillar
Rocker Outer Panel R&R
Included Operations•
Remove and install: Quarter trim at sill•
Remove and install or replace: Cowl trim, Center pillar trim, Sill plates, Rear seat cushion•
Loosen and pull back carpet and/or insulation as required•
Remove and replace caulking for standard factory applicationNot Included Operations
•
Refinish rocker panel•
Remove and/or apply: Anti-corrosion rust resistant materials•
Remove and install: Front or rear doors•
Remove and replace: Hinge pillar, Center pillar, Lock pillar, Quarter panel•
Remove and install or loosen rear edge of front fender•
Remove and install or replace: Rocker moulding, Wiring and/or wiring harness, Control cables (example: latch release), Fluid lines•
Drill holes for installing trimNOTE:FULL PANEL REPLACEMENT PROCEDURE - Labor times are for replacement at factory seams if feasible. However, many rocker panels can-not be replaced at factory seams because the hinge pillar, center pillar, lock pillar and/or quarter panel overlaps the rocker panel. If a rocker panel is designed in this manner and a section time is not listed, the time in the text represents replacement of the panel at the most practical area. This reduces repair damage to overlapping panels and is considered a full panel replacement.
IMPORTANT REMINDER: Sectioning of a panel may or may not be recom-mended by vehicle manufacturer. This procedure should only be performed when a qualified and knowledgeable technician has determined that the operation does not jeopardize the integrity of the vehicle.
IMPORTANT REMINDER: Labor times for inner panels, rails or reinforce-ments are with outer panels removed.
NOTE: Deduct 1.0 hour each for hinge, center and lock pillar if these items are also replaced.
Side Body Panel R&R
Included Operations•
Remove and install: Front door, Rear door, Front seat, Rear seat, Parcel shelf trim, Quarter trim, Plastic wheelhouse liner, Luggage compartment trim, Rear lamp assemblies, Rear bumper, Filler panel, stone deflector, or rear lower valance•
Remove and install or replace: Non urethane set glass (Windshield and moulding, Back window and moulding), Quarter window and moulding, Sun visor, if replaced at roof, Roof rail moulding, if replaced at roof, Cowl top panel, Cowl trim, Weathercords and weatherstrips, Pillar trim, Sill plates, Jamb switches, Lock striker, Bolt-on extension•
Remove and replace urethane set glass: Windshield and mouldings, Back window and moulding, Quarter window and moulding•
Loosen and pull back: Cloth type headliner as required, carpet and/or insulation as required•
Remove and replace caulking for standard factory application•
Replace clip type moulding for base model vehicleNot Included Operations
•
Refinish side body panel•
Remove and/or apply: Anti-corrosion rust resistant materials•
Remove and install: Front fender, Preformed or molded type headliner, Fuel tank•
Remove undamaged urethane set glass: Windshield and moulding, Back window and moulding, Quarter window and moulding•
Remove and install or replace: Instrument panel assembly, Door hinges, Air conditioning and heater parts that interfere, Wiring and/or wiring har-ness, Control cables (example: latch release), Fluid lines, Decals (exam-ple: EPA, body identification, caution/danger), Rocker moulding, Wheel, Antenna•
Remove and replace inner panels•
Replace sound deadening•
Remove and install adhesive exterior trim; add to clean and retape•
Replace new adhesive exterior trim; deduct one half of R&R time•
Install stripes, decals, transfers or overlays•
Drill holes for installing trim•
Cut holes for installing lamps•
Broken glass clean upIMPORTANT REMINDER: Labor times for inner panels, rails or reinforce-ments are with outer panels removed. Also, no windshield, back or quarter glass (if applicable), or flush mounted reveal mouldings can be removed without the possibility of breakage.
Side Body Sectioning Explanation:See Procedure 20—Quarter Panel.
SPECIAL NOTE: Procedure Number 15 includes removal of damaged ure-thane set glass and replacement with new glass. The Procedure does not include allowances for necessary precautionary measures to remove undamaged urethane set glass, nor clean up of the old adhesive on the glass. If the existing urethane set glass is undamaged and will be reused, the labor time difference between the glass R&R and R&I represents the not included allowance.
Example: A Side Body Panel allowance includes a Back Glass R&R of 2.0 hr. The R&I of the back glass is 2.3 hr. The difference of .3 hr. between Back Glass R&R (2.0 hr.) and R&I (2.3 hr.) has not been factored into the Side Body Panel allowance.
Door Opening Panel R&R
Included Operations•
Remove and install: Front door, Rear door, Front seat, Rear seat, Quarter trim•
Remove and install or replace: Sun visor, if replaced at roof, Roof rail moulding, if replaced at roof, Cowl top panel, Cowl trim, Weathercords and weatherstrips, Pillar trim, Sill plates, Jamb switches, Lock striker•
Remove and replace urethane set glass: Windshield and mouldings•
Loosen and pull back: Cloth type headliner as required, Carpet and/or insulation as required•
Remove and replace caulking for standard factory applicationNot Included Operations
•
Refinish door opening panel•
Remove and/or apply: Anti-corrosion rust resistant materials•
Remove and install: Front fender, Preformed or molded type headliner•
Remove undamaged urethane set glass: Windshield and moulding•
Remove and install or replace: Instrument panel assembly, Door hinges, Air conditioning and heater parts that interfere, Wiring and/or wiring har-ness, Control cables (example: latch release), Fluid lines, Decals (exam-ple: EPA, body identification, caution/danger), Rocker moulding, Antenna•
Remove and replace inner panels•
Replace sound deadening•
Remove and install adhesive exterior trim: add to clean and retape•
Replace new adhesive exterior trim: deduct one half of R&R time•
Install stripes, decals, transfers or overlays•
Drill holes for installing exterior trimIMPORTANT REMINDER: Labor times for inner panels, rails or reinforce-ments are with outer panels removed. No windshield, back or quarter glass (if applicable), or flush mounted reveal mouldings can be removed without the possibility of breakage or damage that will require replacement. Unin-tentional damage to glass that is considered a structural member by the vehicle manufacturer may occur when attempting alignment pulls to correct unibody collision damage. Agree beforehand who will incur the charge for damage occurring during normal R&R or R&I operations.
IMPORTANT REMINDER: Sectioning of a panel may or may not be recom-mended by vehicle manufacturer. This procedure should only be performed when a qualified and knowledgeable technician has determined that the operation does not jeopardize the integrity of the vehicle.
SPECIAL NOTE: Procedure Number 15 includes removal of damaged ure-thane set glass and replacement with new glass. The Procedure does not include allowances for necessary precautionary measures to remove undamaged urethane set glass, nor clean up of the old adhesive on the glass. If the existing urethane set glass is undamaged and will be reused, the labor time difference between the glass R&R and R&I represents the not included allowance.
Example: A Door Opening Panel allowance includes a windshield R&R of 2.0 hr. The R&I of the windshield is 2.3 hr. The difference of .3 hr. between windshield R&R (2.0 hr.) and R&I (2.3 hr.) has not been factored into the Door Opening Panel allowance.
Center Pillar R&R
Included Operations•
Remove and install: Rear door, Front seat•
Remove and install or replace: Pillar trim, Lock striker, Sill plates•
Loosen and pull back: Carpet and/or insulation as required, Cloth type headliner at pillar•
Remove and replace caulking for standard factory applicationNot Included Operations
•
Refinish center pillar•
Remove and/or apply: Anti-corrosion rust resistant materials•
Remove and install preformed or molded type headliner•
Remove and install or replace: Door hinges, Wiring and/or wiring har-ness, Decals (example: EPA, body identification, caution/danger)•
Drill holes for installing exterior trimNOTE: Deduct 1.0 hour if roof also replaced.
NOTE:FULL PANEL REPLACEMENT PROCEDURE - Labor times are for replacement at factory seams if feasible. However, many center pillars can-not be replaced at factory seams because the roof panel overlaps the center pillar. If a center pillar is designed in this manner and a section time is not listed, the time in the text represents replacement of the panel at the most practical area - usually below the roof seam. This method is considered a full panel replacement.
IMPORTANT REMINDER: Sectioning of a panel may or may not be recom-mended by vehicle manufacturer. This procedure should only be performed when a qualified and knowledgeable technician has determined that the operation does not jeopardize the integrity of the vehicle.
Center Pillar & Rocker Panel R&R
Included Operations•
Remove and install: Rear door, Front seat, Quarter trim at sill•
Remove and install or replace: Cowl trim, Pillar trim, Lock striker, Sill plates, Rear seat cushion•
Loosen and pull back: Carpet and/or insulation as required, Cloth type headliner at pillar•
Remove and replace caulking for standard factory applicationNot Included Operations
•
Refinish center pillar and rocker panel•
Remove and/or apply: Anti-corrosion rust resistant materials•
Remove and install: Front door, Preformed or molded type headliner•
Remove and replace: Hinge pillar, Lock pillar, Quarter panel•
Remove and install or loosen rear edge of front fender•
Remove and install or replace: Door hinges, Wiring and/or wiring har-ness, Rocker moulding, Decals (example: EPA, body identification, cau-tion/danger), Control cables (example: latch release), Fluid lines•
Drill holes for installing trimNOTE:FULL PANEL REPLACEMENT PROCEDURE - Labor times are for replacement at factory seams if feasible. However, many center pil-lars/rocker panels cannot be replaced at factory seams because the hinge pillar, lock pillar, quarter panel and/or roof overlaps the panel. If a panel is designed in this manner and a section time is not listed, the time in the text represents replacement of the panel at the most practical area. This reduces repair damage to overlapping panels and is considered a full panel replacement.
IMPORTANT REMINDER: Sectioning of a panel may or may not be recom-mended by vehicle manufacturer. This procedure should only be performed when a qualified and knowledgeable technician has determined that the operation does not jeopardize the integrity of the vehicle.
IMPORTANT REMINDER: Labor times for inner panels, rails or reinforce-ments are with outer panels removed.
NOTE: Deduct 1.0 hour each for hinge pillar, lock pillar and roof if these items are also replaced.
Procedure 16—Front/Rear or Back Door
Door Shell R&R
Included Operations•
Remove and install trim panel•
Remove and install or replace: Lock cylinder, Water/dust barrier•
Replace or transfer parts attached to door (example: outside handle, glass, run channels, regulator, vent assembly, weatherstrip)•
Replace caulking for standard factory application if necessary•
Replace clip type moulding for base model vehicle (example: window surround moulding, belt moulding)Not Included Operations
•
Refinish door panel•
Replace channels attached to glass; add .2 hour for lower and .3 hour for upper and lower•
Replace sound deadening•
Remove and install or replace: Rear view mirror, Hinges, Hinge anchor plates, Decals (example: EPA, body identification, caution/danger)•
Recode lock cylinderRemove and install adhesive exterior trim: deduct one-half of R&R time
•
Install stripes, decals, transfer or overlays•
Drill holes for installing trim•
Broken glass clean upIMPORTANT REMINDER: Labor times for reinforcements are with outer panels removed.
Door Repair Panel R&R
Included Operations•
Remove and install: Door assembly, Trim panel•
Remove and replace caulking for standard factory application•
Remove and install or replace: Outside handle, Lock cylinder, Water/dust barrier, Weatherstrip on door edge, Belt moulding/weatherstrip•
Replace clip type moulding for base model vehicleNot Included Operations