SAP CRM AUTHORIZATIONS
Concepts and examplesAbout the Author:
Davy Pelssers his background includes Applied Economics, which he studied at the University L.U.C. in Diepenbeek, Belgium.
His experience with SAP began right after he started working as SAP Consultant for his first company in the year 2000.
During his career he has worked for CSC Belgium (www.csc.com) and Cernum (www.cernum.com) in the role of SAP Consultant.
Working with SAP, he has worked in different modules and areas such as: - SAP Authorizations
- SAP BW (Business Warehouse)
- SAP CRM (Customer Relationship Management) - SAP IS-U (Industry Solution for Utility Companies)
As of April 2006 he started his own legal company DASAP Consulting BVBA in Belgium, where he now is working as a freelancer (www.dasap.be).
The past 6 years he is focusing on the SAP CRM module.
Contact details: Davy Pelssers
Email: [email protected]
ATTENTION:
All the money you spent by donating will 100% be transferred for medical or educational purposes in those countries that are far worse off then the readers of this book probably are. In most cases everyone in contact with SAP (and therefore being a potential reader) is either working as consultant, or working internally at a large national or international company. This implies that most of you have a decent and nice job and might be willing to donate a small amount of money for a good cause.
On my personal website www.dasap.be you will be able to make a contribution. I will also further update the knowledge base section. Please visit the section about “Charity Projects”.
1. Introduction... 7
2. SAP Authorization Concept... 7
2.1. Authorization Components and their Relationships ... 8
2.2. The Profile Generator (PFCG)... 11
2.2.1. Installing the Profile Generator... 12
2.2.2. Creation of a new Role... 22
2.2.3. Single Role versus Composite Role (collective role)... 22
2.2.4. Master role and Derived Role... 25
2.2.5. Assigning Users... 32
2.2.6. Transporting Roles... 36
2.3. Organizing Authorization Administration ... 37
2.3.1. Creating administrator roles... 37
2.3.2. List of available templates... 43
2.3.3. Authorization Objects checked in role maintenance... 44
2.3.4. Relevant SAP Tables for Authorizations and Roles... 44
2.3.5. System Settings-profile parameters... 45
2.3.6. Protective measures for Special profiles SAP_ALL & SAP_NEW... 46
2.4. Authorization Checks... 47
2.4.1. Checking at program level with AUTHORITY-CHECK... 47
2.4.2. Starting SAP Transactions... 49
2.4.3. Starting Report Classes... 54
2.4.4. Calling RFC Function Modules... 55
2.4.5. Checking assignment of Authorization Groups to Tables... 55
2.5. Analyzing Authorization Checks... 56
2.5.1. System Trace... 56
2.5.2. Authorization error Analysis... 59
3. Testing the roles... 61
4. User Maintenance ... 63
4.1. Creation of a User in the CRM system ... 63
4.1.1. Display user information... 64
4.1.2. Initial Data load for Users and Authorizations... 73
4.2. Creation of a User in the SAP Enterprise Portal... 74
4.3. Creation of an Employee in the CRM system ... 81
4.4. Maintaining the Organizational Model... 84
5. CRM specific Authorizations ... 88
5.1. Marketing and Campaign Management... 88
5.1.1. Role for creating marketing plan and campaign... 90
5.1.2. Restrictions made based on person responsible... 97
5.1.3. Restrictions made based on Authorization Group... 99
5.1.4. Restrictions made based on the Campaign Type... 101
5.1.5. Set Restrictions for assigning Attribute Sets and Attributes... 101
5.2. Business Partner Security ... 125
5.2.1. Functional insight into Account and Contact Management... 126
5.2.3. Restrictions for certain input fields based on Authorization Type... 146
5.2.4. Restrictions for certain field groups... 149
5.2.5. Restrictions based on Authorization Group... 152
5.2.6. Restrictions for maintaining certain Business Partner Roles... 154
5.2.7. Perform authorization checks for sales area related data for business partners... 160
5.2.8. Restriction of business partner role in the BP transaction... 160
5.3. Product Security... 162
5.3.1. Relevant SAP Authorization objects... 162
5.3.2. Product maintenance... 163
5.3.3. Product Proposals... 168
5.4. Authorization check in Business Transactions ... 169
5.4.1. Relationship Business Transactions, Types and Categories... 169
5.4.2. Process flow authorization check... 182
5.4.3. Examples of the authorization assignment... 185
5.4.5 Authorization Check at Field Level... 188
5.4.6. Business add-in for authorization check in business transactions... 191
5.5. Authorizations in E-commerce (Internet Sales)... 191
5.5.1. Customizing settings for Internet Sales... 191
5.5.2. User Administration... 195
5.6. Interaction Center Winclient... 210
5.6.1. Technical System Landscape... 210
5.6.2. User Administration and authentication... 211
5.6.3. Users Overview... 211
5.6.4. Data synchronization between CRM system and other systems... 212
5.6.5. Authorizations... 212
5.7. CRM IC Webclient ... 213
5.7.1. Customizing of the IC Webclient... 214
5.7.2. Assignment of the IC Webclient Profile... 216
5.7.3. How to launch the IC Webclient... 218
5.7.4. Useful Parameters... 219
5.7.5. Useful information about the IC Webclient... 220
5.8. ACE (Access Control Engine) ... 222
5.8.1. Introduction... 222
6. BW specific authorizations (TO BE ELABORATED) ... 223
7. Frequently Asked Questions ... 223
8. Tips and Tricks ... 224
9. Relevant OSS notes regarding SAP Authorizations ... 225
9.1. SAP CRM related ... 225
2007 by Pelssers Davy. All rights reserved.
No part of this e-book may be reproduced or transmitted in any form or by any means, electronic or mechanical, including photocopying, recording, or by any information storage or retrieval system without written permission of the author.
SAP, R/3, SAP CRM, SAP BW, ABAP/4 are either registered trademarks or trademarks of SAP Aktiengesellschaft, Systems, Applications and Products in Data Processing, Neurottstrasse 16, 69190 Walldorf, Germany. SAP AG is not the publisher of this book and is not responsible for it under any aspect of press law.
Information contained in this book has been obtained by doing a lot of research on help.sap.com, following the most common standard SAP Courses, by reading SAP Press books, but most important by combining the authors’ functional knowledge of R/3, SAP CRM, SAP BW and his understanding of the SAP Authorization concept.
The publisher does not guarantee the accuracy, adequacy, or completeness of any
information and is not responsible for any errors or omissions or the results obtained from the use of such information. Readers should be particularly aware of the fact that the product SAP is a continuously changing entity. Some facts may have changed since the writing of the e-book.
The book is a private initiative of the author and is started as a personal SAP CRM security bible in order to keep all relevant experience he obtained during his SAP
consultant career into one central document. Due to the lack of a good specific SAP CRM security guide, SAP Course or centralized information about this topic at the time of writing, the author decided to make this book publicly available for sale. The choice of e-book instead of hardcopy is due to the fact that the author is continuously working on this topic, and all updates will be included from time to time.
The price any reader would pay for this e-book is for the effort the author has put into centralizing all relevant information into one document, but will be 100% donated to a good cause. This can be functional know-how, technical knowledge and step-by-step examples of the usage of available authorization objects in the different SAP Modules. The book is not intended to replace any SAP course and the author strongly advises to attend the basic courses for every SAP Module such as SAP CRM and SAP BW. Furthermore it is also advised to follow the specific SAP Authorization related courses such as:
A) BW365: Business Information Warehouse - Authorizations B) ADM940: SAP Authorization Concept
C) HR940: Authorizations in HR
Foreword
This guide has been written to elaborate the SAP Authorization concept and to give concrete system examples to understand the design and implementation.
Today a lot of large national and international companies are using SAP as an ERP system to automate their business processes. They often use the well-known R/3 modules such as SD, FI/CO, MM and so on, but also new technologies such as Business
Warehouse (BW) and Customer Relationship Management (CRM) and SAP Enterprise Portal.
Business processes are defined and elaborated in those systems by Customizing and developments. Now the way people work with these systems or should be able to work with is being defined by implementing the authorization concept.
In the first chapters I will try to give a solid overview of the general authorization concept, which in fact is valid not only for R/3, but also for other SAP modules such as SAP CRM and BW.
Next I will try to elaborate some concrete examples within the domain of SAP CRM, since this is the module I am working on, on a day-to-day basis.
Because I try to share knowledge within my company but also with fellow SAP CRM colleagues and authorization specialists, I decided to write this manual.
1. Introduction
Those people that already obtained the book should know that it is not finished yet. When I find the time in between projects I will try to concentrate on some specific topics such as ACE (Access Control Engine). Furthermore I will elaborate an example for usage of every Authorisation object in SAP CRM, since this is the module I work in on a day-to-day basis.
2. SAP Authorization Concept
The SAP Authorization concept allows you to define what people can do in the SAP System, but more importantly what they are NOT allowed to do.
When doing their day to day job, people are performing actions in the system such as creating sales orders, creating/changing master data (products, business partners), or entering leads/opportunities in the CRM system.
Of course some information should not be accessed by everyone, or at least not be changeable.
Examples:
- Employees should not be able to change their salary records.
- Only certain employees are responsible for creating sales orders in the system - Account Managers should only be able to change master data information for
their own business partners (sales prospects/customers).
The SAP authorization concept protects transactions and programs in SAP systems from unauthorized access. On the basis of the authorization concept, the administrator assigns authorizations to the users that determine which actions a user can perform in the SAP System, after he or she has logged on to the system by entering his/her username and password.
Most components concerning authorizations can be found in the SAP menu:
2.1. Authorization Components and their Relationships
A user will have one or more roles assigned to his user master record (maintenance can be done via the transaction code SU01). These roles can be single roles or composite roles. Furthermore the user also can have authorization profiles assigned to the user master record (a generated authorization profile via the profile generator, or a manual created authorization profile or standard SAP authorization profile such as SAP_ALL.
A role usually contains one or more transactions. Every transaction contains a number of authorization objects that are being checked to see if the user has the right authorization to perform a specific action in the system. An authorization object in its turn can contain one or more authorization fields.
Explanation of the Graphic:
- User Master Record: These enable the user to log onto the SAP system and allow access to the functions and objects in it within the limits of the authorization profiles specified in the role.
Changes only take effect when the user next logs on to the system. Users who are logged on when the changes take place are not affected in their current session. - Single Role: Is created with the profile generator and allows the automatic
generation of an authorization profile. The role contains the authorization data and the logon menu for the user.
- Composite Role: Consists of any number of single roles.
- Generated authorization profile: Is generated in role maintenance from the role data.
- Authorization object: An authorization object groups up to ten authorization fields that are related by AND. An authorization object allows complex tests of an Authorization for multiple conditions. Authorizations allow users to execute actions within the system. For an authorization check to be successful, all field values of the authorization object must be appropriately maintained in the user master (the SY_SUBRC must equal 0 during the authority check).
Authorization objects are divided into authorization classes for
comprehensibility. An object class is a logical combination of authorization objects and corresponds for example, to an application (financial accounting, human resources, and so on).
2.2. The Profile Generator (PFCG)
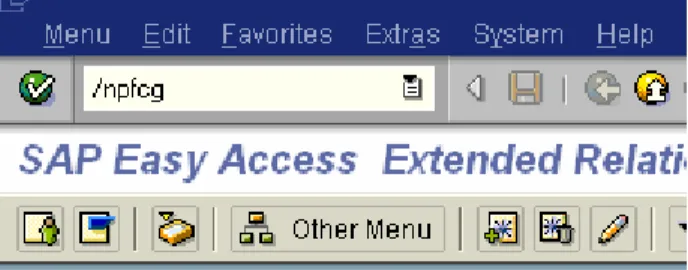
In the CRM system (release 4.0) you start the Profile generator in the SAP Menu via the path:
Architecture and Technology System AdministrationUser MaintenanceRole Administration Roles
Or directly by using the transaction code “/npfcg” in the command field.
You can use the Profile Generator to manage roles and authorization data. You can automatically create the authorization profiles with this tool.
Figure 2.3: Screenshot of the profile generator screen
Remark: depending on the release of your system (being R/3, BW or CRM) the access to the profile generator might be different, so the easiest way is to use the Transaction code PFCG immediately.
2.2.1. Installing the Profile Generator
You must first configure the system so that you can use the role maintenance function and the Profile Generator. To do this, perform the following steps:
1. Set the profile parameter auth/no_check_in_some_cases to the value Y.
Profile parameters can be displayed/changed via the transaction code RZ11.
You could also look at the full overview of the configured parameters in transaction code TU02 or report RSPARAM (called in transaction code SA38).
2. Execute transaction SU25.
Transaction SU25 copies the proposals for check indicators and authorization field values delivered by SAP to the customer tables USOBX_C and USOBT_C, which you can then change by using the transaction code SU24.
You can then use the role maintenance functions and the Profile Generator to manage the authorization information for your users.
You can set the tables to the check indicators described below. It is important to note that the check of a specific authorization object during the processing of a transaction cannot be simply forced by simply maintaining the object in tables USOBT_C and USOBX_C.
Instead, the check indicators in table USOBX_C only define how the system responds to the authorization checks that are contained in the ABAP coding of the respective
transaction. Check Indicator
Description Explanation
U Not maintained No indicator has been set. The check is always performed. The object is not proposed in the Profile Generator. N No check The check is not active. The object is not processed in the
Profile Generator.
C Check The check is always performed. The object is not proposed in the Profile Generator.
CM Check/Maintain The check is always performed. The object is proposed for maintenance in the Profile Generator.
With the transaction SU24, you can check/change the authorization objects that are relevant for a specific transaction.
First of all, this allows you to check upon the relevant authorization objects that are checked/ checked-Maintained within a transaction. If an authorization object is checked/maintained, this means that relevant SAP-fields (like BUKRS for company code) can be maintained/restricted in the profile Generator when adding this
transaction into a role.
Let’s take an example:
Suppose we would like to see what authorization objects are relevant for the transaction “BP”.
You launch the transaction SU24, and enter the transaction.
The other option: “edit check indicator in all transactions” is used to see in what transactions a certain authorization object is used and which status it has for that transaction (Checked; Check/Maintain…).
For example, you could give in the auth. Object K_ORDER and press execute. This returns a list with all Transaction Codes where the authorization object is relevant for the transaction.
Now, to continue, when we press execute for the above screen, we would get the following:
Here you see three buttons: 1) Display Value list
Here you only see the relevant authorization objects with the status (check indicator) and the object description.
You also see the fields (if status is check/maintain) that you are able to restrict upon in the profile generator: e.g. example below authorization object B_BUPA_RLT for Transaction code BP.
.
When pressing the button , you get a list similar to the display value list; so with the authorization objects, the status and the description.
Here you can go in change mode, meaning you can change the status of each authorization object: U N CCM
When you go into change mode, you immediately get a pop-up for a transport request.
Here you create a new request, give it an appropriate name: e.g. Change authorization checks for Tcode BP.
The Request number generated by the system is the following:
Press ok.
Now you are in change mode and can either change the status of existing
authorization objects in the transaction or add a new authorization object into the transaction.
This you can do by pressing the button Auth. Object with the plus sign. This launches a pop-up where you enter the name of the authorization object.
Press ok.
You now see that the authorization object is in the list for this transaction and can change the status if you want.
Example below: for financial report (with tcode /PEU/FI_E0006_3) the authorization object Z_ACCRUAL was added.
In this case the status is on Check/Maintain.
After you have made the necessary changes into the transaction you save.
Now, you can immediately check (in development where you made the change) this change of the transaction by adding this transaction into a role via the profile
generator. You will see that the authorization object is automatically taken up into the tab “Authorizations” where you can set restrictions for the relevant fields within this auth. Object.
Remarks:
1) Changes that you made for a transaction, after testing for restrictions on this
transaction need to be transported to QA and the Production system. This is necessary if you create a role with this transaction and want to transport the role to production, so that change for the transaction you made is also available in the other clients.
1) If you would change a transaction that is already used in other roles, this could affect the authorizations within that role, so always check what the effect is, because it might be possible that the tab “authorizations” in the role where the transaction was in before becomes red now.
2) In our example we used an authorization object that was standard SAP.
It is also possible to have a completely new Authorization object created (with own development class) and where the code (program) behind is changed to add a check. (This will be done by the ABAP-team).
Once they have created the new authorization object in development, you can either add this authorization object to the role (manually) or into the relevant transaction. Either way, it needs to be in one of the two options. Where you will add the authorization object is up to you. But the person, who needs to have authorization, needs to have this allocated to his user profile. This is either done by allocating the role to his user-profile (with the changed transaction) or by adding the auth. Object manually into the role.
3) When your test results turn out to be all right, then you need to pay attention with the order of transports:
In development you already can create the role with: • The changed transaction in it
• Or with the auth. Object manually added into the role
If you changed the transaction, then you will have a transport request for this transaction change, which will update the table: USOBT_C.
It will look as the one above.
In the case where you changed the transaction itself, first transport the change of the transaction that you made by using the transaction SU24 and the transport for the creation of the new authorization object. (A person of the ABAP-team normally made this request).
Next you transport the roles you created with either the auth. Object manually added, or with the changed transaction in it.
Ones the roles are in production, you best do the user-allocation first and as last you transport the change in code that was made by the ABAP-team.
From that moment on the user should be able to use the transaction(s) with the relevant restrictions you wanted to make.
2.2.2. Creation of a new Role
Naming conventions:
The roles that are standard delivered by SAP correspond to the working environment of certain users. As these roles are only templates; that is, examples of work centers, you must still adjust these roles to the requirements of your users.
Standard SAP roles start with “SAP_”. The predefined roles are delivered as templates. Do not change the delivered standard roles (SAP_*), but rather only the copies of these roles.
For your own roles, instead of using the SAP namespace, use the customer namespace. This means that the prefix is “Y_” or “Z_”. Since you cannot tell from the names of the delivered roles whether they are single or composite roles, you should create a naming convention for your roles so that you can differentiate between single and composite roles.
Types of roles:
First of all you should know that there exist different types of roles. The different types and purpose I will explain are the following:
- Single role - Composite role - Master Role - Derived Role
As soon as you start the Profile Generator, when creating a new role, you should make a choice between creating a Single role or a Composite role.
2.2.3. Single Role versus Composite Role (collective role)
You could look at it like this:
A single role usually is made to define all necessary transactions and/or reports used to perform a certain specific task such as master data maintenance or product maintenance.
Let’s take a specific example for the module CRM.
In a company you have 20 employees using the CRM system. Persons with functions like:
- marketing manager - marketing assistant - Master data administrator - Call center agent
- ….
You have created for example several single roles such as: Z_MARKETING_PLAN (create/change marketing plans)
Z_MARKETING_CAMPAIGN (create/change marketing campaigns) Z_BP_DISP (display business partners)
Z_BP_ALL (create/change/display business partners) Z_PROD_DISP (display all products)
Z_PROD_ALL (create/change products) Z_LEADS (create/change/display leads)
Z_OPPORTUNITIES (create/change/display opportunities)
Now you can imagine that the Role Z_MARKETING_PLAN only should be assigned to the marketing manager and not to his assistant for example.
Furthermore, you will also see that one person (with a certain function) will need to have more than one single role assigned to his user master record, since the marketing manager will also need to be able to display products and business partners.
Therefore you will make a COMPOSITE role per function in your company, where you assign the different single roles needed to perform the processes in the system needed to do his job.
The advantage is that you do not need to assign every time every single role to a new person when for example someone leaves the company and a new marketing manager is hired. In that case you just create a new User in the system and assign the composite role. Procedure for creating a Composite Role:
Remember to indicate in the technical name that you indicate that you are creating a composite role! This facilitates finding back composite roles for assignment to users but also for maintenance purposes.
To create the composite role, you press the button “Comp. Role”. You will get the following screen:
2) On the tab ‘Roles’ enter the different single roles that should be contained in the composite role that make up all the necessary functions and authorizations that the marketing manager will need to perform his processes and actions in the system.
3) Last you assign the composite role to one or more people that share the same function as marketing responsible.
2.2.4. Master role and Derived Role
For a single role you should also now that there is the definition of a Master role and a Derived role.
Example:
You have implemented the R/3 SD module in an international Organization. Operations happen in the same way for all countries. So the processes as they are customized and setup are the same, but of course in one country people should only be allowed to create sales orders for a certain company code.
This means you need to use authorizations to limit on organizational elements.
What you can do in such a case is create a general template role where you define what activities/transactions can be used, but do not set any limitations on organizational level. Next, you create for each country a derived role, where you put the right authorizations in place.
Creation of the Master Role (template Role)
The role we wanted to create was the Master Role for a local Sales Administration Operator. This was done as follows:
So you type in the name of the master role to be created and press the Create Button. In the following screen, you type in the description and press the save button.
In this starting screen, you see a number of tabs: Description, Menu, Authorizations, User etc.
These are important and will be explained further on.
Go to the tab “Menu” where you will enter the transactions that need to be assigned to the master role.
When you press the “Transaction button”, you get the following pop-up screen, where you enter manually the Transaction codes. By pressing enter, the description for this transaction appears on the right side of the transaction-code. When you have finished entering your list of transactions, press the button ‘Assign Transactions’.
By using the Transaction button, you add transactions in this role.
Now that you have entered the necessary transactions in the master role, you go to the tab ‘Authorizations’, where you enter the profile name and the profile text.
Press the Save button.
Now you will maintain the authorization data for this role! Press the “change authorization data” button.
This will probably bring up a popup, where the relevant organization levels for the transactions you entered in the role, are already predefined by the system. When no Organization level is relevant for the transaction(s) you entered, then off course you don’t get this pop-up.
In the master role, in the case where you will create derived roles, you usually give full authorization. This can be done by manually entering a * or by pressing the button “Full authorization”.
Then press save.
You automatically return in the screen, where the relevant authorization objects for the entered transactions are in the screen.
In this case, since the role was already created (saved and generated) all the bolls have a green light. But when you create a new role, they have a yellow/red color and need to be maintained. This involves clicking everything open and press for each object on the * so that it becomes green. But at this moment, you also can decide whether you want to limit
authorizations for an activity, or some other field of an authorization object that can be maintained. This can be done by clicking on the change button ( ).
Note: A red color means that you have not specified an Organization level yet. To do this, you press the “organization levels” button, where you can maintain them.
Once you have made all the traffic lights green (with or without setting restrictions on fields that are checked upon in the authorization objects, you can save the role and generate it.
When you have done all these things, go back in the Description tab where you fill in the organization levels, other localization objects and other specific remarks concerning this role (for example manually entered authorization objects (SAP or own developments), etc.
In the derived roles you will do the same, but there you will have the restrictions on the organization levels in the long text, so when viewing the role, you immediately can see for which fields there are restrictions set.
Creation of a Derived Role
In this example I show you an example of how one or more derived Roles can be created. In the master role you already put in the relevant and necessary transactions. So maintenance concerning transactions ALWAYS happens in the master role (Delete/add transactions).
Start the transaction PFCG (profile generator) where you put in the name for the derived role.
Fill in the description and press save.
Next you put the name of the master role in the field “Derive from Role”.
You get a pop-up asking if you want to derive all characteristics from the Master role, where you answer yes.
Then, you can look in the tab “Menu” where you’ll see that the transactions from within the master role are also taken over in the derived role.
Go further into the tab ‘Authorizations’ where you now can change the Organization levels, and other restrictions for fields that are included in the authorization objects. (Make again sure that all the traffic lights are green.)
As you can see below, we set the restriction on Company code and Sales Organization. By doing so, the system automatically puts these values in the relevant fields in the authorization objects below.
2.2.5. Assigning Users
To assign users to a certain role (being single role or a composite role) you open the role in the profile generator and select the tab ‘User’. The status display on the tab page tells you whether users have already been assigned to the role.
• Red: No users are assigned
• Green: At least one user is assigned
• Yellow: Although users are assigned, user master comparison is not current. For composite roles, the status display refers only to the assignment of users.
Procedure:
1) Enter as many user IDs as desired in the list.
Enter the user IDs directly or from the possible entries help. You can make multiple selections with the ‘Selection’ pushbutton, such as all users in a user group.
2) Perform a user comparison if necessary.
The generated profile is not entered in the user master record until the users have been compared. Changes to the users assigned the roles and the generation of an authorization profile also requires a comparison.
3) The default validity date when entering a new User ID into the role assignment is the following:
From: Date of today To: 31.12.9999
If you want to restrict this validity date, just enter the dates according to you wishes. If you want to limit the validity period, you must periodically schedule the report transaction PFUD daily to update the user master records. Is must also be scheduled if you use the organizational management.
Never enter generated authorization profiles directly into user master records, as these are deleted if the corresponding role is not contained in the user master record.
For user comparison you have the following options:
1) Choose the “User comparison” button on the ‘User’ tab page. The users are then compared for the selected role you created. The status for that role will next change into green after the comparison is finished successfully.
2) Choose UtilitiesSettings Automatic comparison at save. When you save the role, a user comparison is performed automatically.
3) Wait until the user comparison is made with the program “PFCG_TIME_DEPENDENCY”. Set the indicator HR-OrgComparison indicator on the selection screen of the report.
You should schedule the report PFCG_TIME_DEPENDENCY periodically (preferably daily) as a background job. This ensures that user authorizations are regularly updated. The program performs a complete user master comparison for all roles. The authorizations are updated in the user master records. The authorization profiles of user assignments which have become invalid are removed from the user master record. The authorization profiles of valid user assignments to the role are entered.
2.2.6. Transporting Roles
To transport a role you have created, launch the profile generator and enter the name of the role you want to transport.
To transport the role, press the ‘transport’ button.
In this case I choose a composite role and get the following screen:
The system asks you if you also want to transport the single roles of this composite role, and if you want to transport the generated profiles of the single role.
Select both entries!
You should not change the authorization profiles of the role after you have included the role in a transport request. If you need to change the profiles or generate them for the first time, transport the entire role again afterwards!
In the following dialog box, specify whether the user assignment and the personalization data should also be transported!
Next you need to enter a transport request. (You can check the transport request afterwards with transaction SE10).
2.3.
Organizing Authorization Administration
The authorization system allows you great flexibility in organizing and authoring the maintenance of user master records and roles:
1) If your company is a small or medium sized company, you can have all
maintenance of user master records and authorization components executed by a single person or super user.
2) Depending on the size of your company you should think about distributing responsibilities between more teams responsible each for another purpose. On the one hand you have one team/person responsible for the maintenance of user master records and assigning the appropriate roles. On the other hand you have the second team responsible for the authorization administration, meaning the creation of new roles and authorization profiles.
Since you can precisely restrict authorizations for user and authorization maintenance, the administrators do not have to be privileged users in your organization. You can assign user and authorization maintenance to ordinary users.
2.3.1. Creating administrator roles
Administrator Permissible Tasks Impermissible Tasks Templates User Admin Create/change user
master records
Change role data SAP_ADM_US Assigning roles to users Changing or generating profiles Assigning profiles beginning with “T” to users. Displaying authorizations and profiles
Using the User Information system Authorization Data
Admin
Creating/changing roles
Changing users SAP_ADM_AU Changing
authorization data and transaction selection in roles
Generating Profiles
Using the User Information System
Authorization Profile Admin
Displaying roles and the associated data
Changing users SAP_ADM_PR Using tcode PFCG
or SUPC to generate the authorizations and profiles that begin with “T” for roles that have authorization data
Changing role data
Checking roles for the existence of authorization data (tcode SUPC) Generating authorization profiles with authorization objects that begin with S_USER Performing a user master comparison (tcode PFUD, performing a profile comparison of the user master comparison Using the User
Information System
Example: Creation of a User Administrator Role 1) Launch the profile generator (PFCG)
On the initial screen, fill out the technical name of your role: Z_USERADMIN and press the “create single role” button.
2) Fill out the Description Field and extra info
When selecting another Tab to maintain, you get a popup asking you to save the role, so press ‘yes’.
3) On the Tab “Menu” you can create your own user menu if you want. You are able to take over certain parts from the standard SAP menu; from another role, or create a new user menu from scratch. Next, you can also add transactions, reports or other things to the role.
4) On the tab “Authorizations” you will use the template SAP_ADM_US
Use a profile name that does NOT begin with ‘’T’’, so that the authorization data
administrator cannot change his or her own authorizations. Now press the button change authorization data.
Again you will receive a popup asking you to save the role (press yes). Press the ‘propose profile name’ button to generate automatically a profile name or give a logical name (with regard to SAP naming
After saving you get a list of templates that you can use to create your role. Since we want to create a User Administrator, choose the template SAP_ADM_US.
You will need to maintain all authorization fields of the available authorization objects. In this case, you can see that the ‘Plan version’ has a red status. Maintain it either by pressing the red ‘star *’ to give all authorization or by pressing the change button and select the right field value.
After every authorization object is correctly maintained, you can save and generate the role.
5) On the Tab ‘Users” you can assign this role to an EXISTING user.
You can also enter a valid-from and valid-to date if you want. Otherwise the system will automatically take the date of today until 31.12.9999.
After filling in one or more users that will perform the task of User Administrator, perform a ‘User Comparison’ in order that the role will be updated in their User Master Record.
Now the person with Username ZPERSONRESP will be able to do the user administration after the user comparison has finished.
2.3.2. List of available templates
TEMPLATE Description
SAP_ADM_AU Administration: Authorization data administrator SAP_ADM_PR Administration: Authorization profile administrator SAP_ADM_US Administration: User administrator
SAP_ALL Complete authorization with all authorization objects
SAP_PRINT Print Authorization
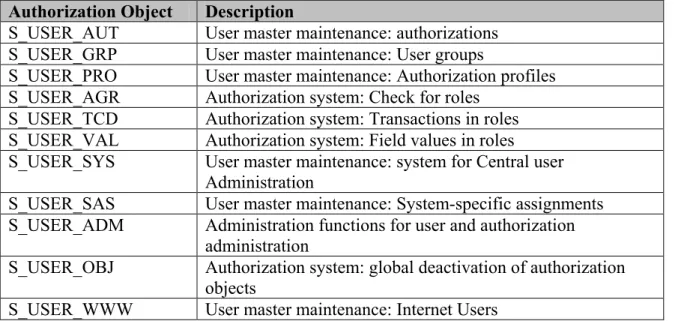
2.3.3. Authorization Objects checked in role maintenance
Authorization Object Description
S_USER_AUT User master maintenance: authorizations S_USER_GRP User master maintenance: User groups
S_USER_PRO User master maintenance: Authorization profiles S_USER_AGR Authorization system: Check for roles
S_USER_TCD Authorization system: Transactions in roles S_USER_VAL Authorization system: Field values in roles S_USER_SYS User master maintenance: system for Central user
Administration
S_USER_SAS User master maintenance: System-specific assignments S_USER_ADM Administration functions for user and authorization
administration
S_USER_OBJ Authorization system: global deactivation of authorization objects
S_USER_WWW User master maintenance: Internet Users
2.3.4. Relevant SAP Tables for Authorizations and Roles
Table Description
AGR_1016 Name of profile for activity group AGR_1250 Authorization data for activity group AGR_1251 Authorization data for activity group AGR_1252 Organizational levels for authorizations AGR_PROF Profile name for activity group
AGR_SELECT Assignment of activity groups to transaction codes AGR_TCDTXT Assignment of activity groups to transaction codes AGR_TCODES Assignment of activity groups to transaction codes AGR_USERS Assignment of activity groups to users
TOBJ Objects
TOBJC Classification of authorization objects TOBJT Texts for objects (for TOBJ)
TSTC SAP Transaction Codes
TSTCA Values for transaction code authorizations TSTCP Parameters for transactions
TSTCT Transaction texts
USH04 Change history: authorizations
USH10 Change history: authorization profiles USH12 Change history: authorization values
SUKRI Security-critical combinations of transactions USOBT Relation transaction Authorization object
USOBT_C Relation transaction Authorization object (customer) USOBT_CD Change history for field values
USOBX Check table for table USOBT USOBX_C Check table for table USOBT_C
USORG Organizational levels for Profile Generator USPRO Authorization Profiles
USR07 Object and values of the last failed authorization check USR08 Table for entries in the user menus
USR09 Entries for the user menus (work areas) USR13 Short texts for the authorizations
2.3.5. System Settings-profile parameters
In order to configure system-wide settings in SAP, you have to maintain the profile parameters in the Computing Center Management System (CCMS).
You can do this via transaction code RZ11.
Transaction RZ10 provides more information on the different profile parameters. Most of the relevant parameters begin with “auth” or “login” and can easily be found back.
Next to RZ10 you can also display a full overview of the configured parameters via transaction code TU02 or report RSPARAM (called via SA38).
Note:
Remember that changing profile parameters CAN have a serious impact on your system and therefore should best be restricted to change by a Basis Administrator.
Also know that a change of profile parameters can only be visible after restarting the application server.
2.3.6. Protective measures for Special profiles SAP_ALL & SAP_NEW
Authorization Profile SAP_ALL
This composite profile contains all SAP authorizations, meaning that a user with this profile can perform all tasks in the SAP system. You should therefore not assign this authorization profile to any of your users. Try to maintain only one user with this profile and keep the password of this user secret! (Only to be used in emergencies).
Authorization Profile SAP_NEW
This composite profile contains a single profile for each release that contains the authorizations that the users require to be able to continue using the functions that they have used until now, but which are protected with new authorization checks. However, you should not leave this profile active for a long period of time.
SAP recommends that you perform the following steps:
1) After the upgrade, delete the SAP_NEW_* profiles from the composite profile SAP_NEW for releases before the last revision of your authorization concept.
2) Assign the composite profile SAP_NE to all users. This means that they can continue to use the functions that they have used until now.
3) Distribute the authorizations contained in the SAP_NEW single profiles to the roles or profiles that you use productively and maintain the authorization values.
4) Delete the profile assignment for SAP_NEW and the SAP_NEW profile. A long list of SAP_NEW profiles (for example, after multiple upgrades) indicates that it is time to revise and redefine your authorization concept.
2.4.
Authorization Checks
To ensure that a user has the appropriate authorizations when he or she performs an action, users are subject to authorization checks.
The following actions are subject to authorization checks that are performed before the start of program or table maintenance and which the SAP applications cannot avoid:
• Starting SAP transactions (authorization object S_TCODE) • Starting reports (authorization object S_PROGRAM)
• Calling RFC function modules (authorization object S_RFC) • Table maintenance with generic tools (S_TABU_DIS)
2.4.1. Checking at program level with AUTHORITY-CHECK
Applications use the ABAP statement AUTHORITY-CHECK, which is inserted in the source code of the program, to check whether users have the appropriate authorization and whether these authorizations are suitably defined; that is, whether the user
administrator has assigned the values required for the fields by the programmer. In this way, you can also protect transactions that are called indirectly by other programs. AUTHORITY-CHECK searches profiles specified in the user master record to see whether the user has authorization for the authorization object specified in the
AUTHORITY-CHECK. If one of the authorizations found matches the required values, the check is successful.
One way of finding authority checks in the program code is to search the source text of the ABAP program for the string “AUTHORITY” in the ABAP Editor (transaction SE38). This search displays all the authorization checks within the respective program.
You can see that a check is made on the authorization object “S_CARRID”.
When executing this report the system will check the profiles assigned to the user and look if this authorization object is available. If not, the system will respond with a Sy-subrc <>0 and display the output message ‘User is not authorized’. If the authorization object is available via one of the profiles in the user master record, then the system will check if the field values for this authorization object correspond to the ones defined in the coding. If this is not the case, the Sy-subrc will also <>0.
If every check is ok; then the report will be executed as normal.
2.4.2. Starting SAP Transactions
When a user starts a transaction, the system performs the following checks:
• The system checks in table TSTC whether the transaction code is valid and whether the system administrator has locked the transaction.
• The system then checks whether the user has authorization to start the transaction. The SAP system performs the authorization checks every time a user starts a transaction from the menu of by entering a command (directly entering the transaction code into the command field). Indirectly called transactions are not included in this authorization check.
• The authorization object S_TCODE (transaction start) contains the field TCD (transaction code). The user must have an authorization with a value for the selected transaction code.
• If an additional authorization is entered using transaction SE93 for the transaction to be started, the user also requires the suitable defined authorization object (TSTA, table TSTCA).
If you make a copy of a standard transaction such as “BP” (business partner maintenance), and display the information, you see the following:
You can enter an authorization object and authorization field values at this level, meaning that when starting this transaction this authorization object will be checked.
You can use existing authorization objects, but if a standard authorization object does not fulfill your needs, you can also enter a new authorization object that you have created via transaction SU21.
Creation of new authorization fields via SU20
Select the correct Object class, and you get a list of all authorization object for this object class.
Example: for object class “CRM”.
• The system checks whether the transaction code is assigned an authorization object. If so, a check is made that the user has authorization for this authorization object.
You can check this via Transaction code SU24.
Name of the new authorization object
Name of Object class
Enter here the authorization fields, which should be checked for this authorization object! You can use existing ones, or a new one created via transaction SU20.
2.4.3. Starting Report Classes
You can perform additional authorization checks by assigning reports to authorization classes (using report RSCSAUTH).
You can, for example, assign all PA* reports to an authorization class for PA (such as PAxxx). If a user wants to start a PA report, he or she requires the appropriate
authorization to execute reports in this class. Predefined report classes are not delivered. You must decide yourself, which reports you want to protect in this way.
Consider the following:
• After you have assigned reports to authorization classes or have changed
assignments, you may have to adjust objects in your authorization concept (such as roles (activity groups), profiles, or user master records.
• There are certain system reports that you cannot assign to any authorization class. These include:
o RSRZZLG0
o Reports that are called using SUBMIT in a customer exit at logon (such as SUSR0001, ZXUSRU01).
• Authorization assignments for reports are overwritten during an upgrade. After an upgrade, you must therefore restore your customer-specific report authorizations.
2.4.4. Calling RFC Function Modules
When RFC Function modules are called by an RFC client program or another system, an authorization check is performed for the authorization object S_RFC in the called system. This check uses the name of the function group to which the function module belongs. You can deactivate this check with parameter auth/rfc_authority_check.
2.4.5. Checking assignment of Authorization Groups to Tables
You can also assign authorization groups to tables to avoid users accessing tables using generic access tools (such as transaction SE11, SE16, SM31, OBA5 and so on). A user requires not only authorization to execute the tool, but must also have authorization to be permitted to access tables with the relevant group assignments. For this case, tables are delivered with predefined assignments to authorization groups. The assignments are defined in table TDDAT; the checked authorization object is S_TABU_DIS.
Remember that changing the assignment of tables is a modification of standard SAP; you are recommended to only modify those tables where the risk is very high. (i.e., that incorrect changes can result in inconsistent data or an unwanted system response for Customizing tables).
If necessary you can also use authorization object S_TABU_CLI for cross-client table maintenance, in addition to authorization object S_TABU_DIS.
As of SAP release 4.6. You can also use the new authorization object S_TABU_LIN, which enables you to grant authorization for specific lines of a table. You can use this object to restrict access to certain data ranges and work areas within the table, for example, to specific plants, or company codes.
2.5.
Analyzing Authorization Checks
If you do not know the required authorizations for a transaction, you can determine them in the following ways:
2.5.1. System Trace
You can use the system trance function (transaction ST01) to record authorization checks in your own and in external sessions, if the trace and the transaction to be traced are running on the same application server. The trace records each authorization object that is tested, along with the object’s fields and the values tested.
You will use this in certain cases to check authorization problems when you’re not using the standard SAP GUI. (Example, in the Bex analyzer, the IC Webclient, PCUI screens)
Suppose you are launching a BW report in the BEX analyzer. The consultant (who has SAP_ALL authorization) is able to launch this report without any problem, but the end-user which has certain Customer Defined roles, is having problems when launching the same report.
Since performing an SU53 authorization check is useless in such a case, you still can use the ST01 trace.
This trace is also useful in case you use PCUI screens or the IC Webclient. Procedure:
Flag the ‘authorization check’ field and next, by pressing the button ‘general filters’ you can choose for which user you want to activate the trace!
Next, push the button “Trace on”.
Let the user who has the authorization problem perform the action(s) again in the system. After the user encountered the problem again, push the button “trace off” and press the “analysis button”.
On the next screen below, check/flag the ‘authorization check’ field and press the execute button.
In your result screen below, you can see that all checks were positive (dark green color) meaning that all authorization checks so far did not pose any problem. In case of a lack of authorization you will see another color, and a return code (RC = 0) different from “0”.
2.5.2. Authorization error Analysis
You can use transaction SU53 to analyze an access-denied error in your system that just occurred. You can use transaction SU53 from any of your sessions, not just the one in which the error occurred. You cannot analyze an authorization error in another user’s logon session from your own session.
With this transaction you can check what authorizations are checked when a user is using a transaction and seems to be blocked because of authorization issues.
(Usually he gets the message: “you have no authorization ….”.)
Although the user has a role (profile) allocated to his user-profile with the transaction in that role, he is blocked at a certain moment. This may be possible, because when performing a certain transaction, the first thing that is checked is whether you have
authorization for the object “S_TCODE”. If so, and this will always be the case when you have added the transaction into the role, then he will be able to launch the transaction, but that’s all. If relevant transactions are used or authorization objects that are not standard in the transaction, but for which the user needs to have authorization, then you need to perform the transaction SU53 at the moment you are blocked to see what is checked on the one hand, and what the user has authorization for on the other hand.
This allows you to make the necessary changes to the role by manually adding the necessary authorization objects into that role with the limitations on the fields you want.
You can perform this SU53 by typing in /nsu53 in the screen where you were blocked for this transaction:
Example:
This is the result of performing the transaction SU53.
The first part always shows you what the system checks, and the part below shows you the authorizations that are available for the user and in what role(s).
You can see that the check on the authorization object S_TCODE is relevant in this case, and that it’s not available in the role Z_PEE_SN_DISPLAY for the transaction VA01, since the only transaction he may execute are /PEU/MM02 and SU53.
3. Testing the roles
During an implementation of for example the SAP CRM module, you will make up the necessary single and composite roles.
As I explained before you will create the following:
• A basic role, which will be assigned to every SAP user (it contains authorizations that are necessary for all end-users such as printing authorizations, possibly SU3 for maintaining his/her preferences, SU53 to check for authorization errors and so on.
• Single Roles: a single role usually contains the authorizations to perform a specific task such as creating a Marketing plan, or creating target groups in case of marketing and campaign management.
• Composite roles: composite roles could contain several single roles. Depending on how you want to setup your role definitions, you could decide in this case to create a composite role for a Marketing manager who will have several single roles.
During an implementation it is important that you test the complete functionality (customizing and developments) initially with a super-user who has the authorization profile SAP_ALL, to ensure that everything works as designed independent of authorization issues.
UNIT TESTING
Next you will start with the unit testing, where you will test every single role you have defined. This can be tested by the corresponding key-users (it is best to have the single roles tested by a key-user for the specific domain/module like FI, MM, SD and so on. You should make sure not only that you are able to perform the tasks such as processing transactions in the system (positive testing), but also check that you are NOT able to perform things in the system you should not be allowed to (Negative testing). Once you have done the entire unit testing you can start with the integration tests. INTEGRATION TESTS
Once the unit tests are done, the roles must also be tested during the role integration test phase. The objective of the unit tests was to ensure that the role functions properly, meaning that the transactions contained in the role can be executed.
For integration testing, the responsibility usually lies in the hands of key users and/or power users who are well familiar with the business processes that need to be tested and who have a basic understanding of the authorization concept and checks.
Usually the key user will logon with a user who acts in a certain function such as marketing manager or master data administrator and who has assigned one or more composite roles to his user-id.
Again you will do positive and negative testing during this integration test. First you will make sure that all activities, transactions, reports and so on can be executed. Next you will ensure that for example a specific transaction can be executed, but for example only in display mode or for a certain organizational level (such as company code, sales organization).
Often you will see that a single role works as designed, but that the combination of several roles (assigned in a composite role) can cause security problems, since an
authorization object can occur in more than 1 transaction and have different values in one single role opposed to another single role. Since the SAP system does the authorization check on the entire authorization profiles you have assigned to your user-id and adds up the authorizations you have, this could result in conflicts.
Example:
Suppose you have a single role Z_MARKETING_PLAN where you have values maintained for authorization object CRM_CPG where you are allowed only to DISPLAY marketing campaigns (Value 03).
In another single role Z_MARKETING_CAMPAIGN you also have this authorization object where you are allowed to create/change and display a marketing campaign. Both single roles are assigned into the composite role Z_COMP_MARKETING. Since you have the composite role assigned to your user-id and in one role you have all authorizations assigned for maintaining campaigns, this value will overrule the
4. User Maintenance
With user maintenance, an administrator can create a user master record for every user, so that the user can log on the SAP System. You assign one or more roles to the user using the user master record to determine which activities are contained in the user menu and which authorizations the user has.
User master records are client-specific. You therefore need to maintain separate user master records for each client in your SAP System. You can use “Central User Administration” to simplify cross-client user administration. Maintaining centrally administered users is slightly different from user maintenance without CUA. The overview in this book is restricted to user administration without CUA.
4.1. Creation of a User in the CRM system
The existence of a User Master Record is a prerequisite for logging on the SAP system, being R/3, CRM, BW, SAP Portal. To uniquely identify a SAP user, each user must have a unique master record, where personal data is saved and authorizations are granted by assigning (composite) roles. Technically, authorizations can also be assigned to users through single roles, composite profiles and single profiles. But from my point of view, the best way is assigning roles, and more specific composite roles.
Note: the procedure for creating users is the same in R/3, BW or CRM system. Below I explain this for the CRM System.
Procedure:
Start user maintenance via the menu:
Sap Menu Architecture and technology System Administration User Maintenance Users (SU01)
You can also directly access user maintenance via the command SU01. The initial screen will look like this:
4.1.1. Display user information
To display a user, just type in the username and press the display button.
If you don’t know the username by heart, you can look up any user by pressing the input-help button.
You get a popup screen with different search criteria.
You will see that there are different tabs on the user maintenance screen. 1) Address Data
Use the address data tab page to record a specific user’s address data. You must enter at least the user’s last name here. This information is meant to identify the actual employee (first name, last name, department, phone number, business address and so on).
The User ID can be up to 12 characters. When creating usernames it is useful to make up naming conventions to make the usernames transparent for maintenance purposes. Example: First 8 characters of the last name, followed by the first two characters of the first name.
Pelssers Davy PELSSERSDA Clinton Bill CLINTONBI
Use the Logon data tab page to maintain user information in the user master record. Here you can set the initial password (this is the password the end-user or employee needs to enter the first time he logs on to the SAP system – at that moment he will get a popup asking him to re-enter a new password of his own choice) and the user group.
If necessary, the administrator can restrict the validity period of the user master record. You also can assign an alias up to 40 characters to a user to specify more descriptive names.
User Groups
User groups are basically used to distribute user maintenance among several user administrators. Only the administrator that has authorization for a group can maintain users of the group. If you leave the field empty, the user is not assigned to any group. This means the user can be maintained by any user administrator.
You can create and maintain user groups within the user maintenance screen, via the menu path: Environment User groups Maintain
User Types
The user type attribute indicates how the user’s access to the SAP system is defined. SAP distinguishes among the following user types:
• Dialog user:
User type for exactly one interactive user (all logon types including Internet users). During a dialog log on, the system checks whether the password has expired or is initial. The user can change his or her password himself or herself. Multiple dialog logons are checked and, where appropriate, logged.
Every employee should generally be defined as a dialog user. • Communications:
User type for dialog-free communication between systems (such as RFC users for ALE, Workflow, TMS and CUA):
A dialog logon is not possible
Whether the system checks for expired or initial passwords depends on the logon method (interactive or not interactive). Due to a lack of interaction, no request for a change of password occurs.
• System:
User type for background processing and communication within a system (internal RFC calls).
A dialog logon is not possible
The password change requirement does not apply to the passwords, that is, they cannot be initial or expired. Only a user administrator can change the password.
Multiple logons are permissible. • Service:
User type that is a dialog user available to a larger, anonymous group of users. Assign only very restricted authorizations for this user type.
During a log on, the system does not check whether the password has expired or is initial. Only the user administrator can change the password.
Multiple logons are permissible.
Service users are user, for example, for an anonymous system access through an ITS service. After an individual authentication, an anonymous session begun with a service user can be continued as a person related session with a dialog user.
• Reference:
User type for general, non-person related users that allows the assignment of additional identical authorizations, such as for Internet users created with transaction SU01. You cannot log on to the system with a reference user. (You can deactivate this field in accordance with SAP note 330067.
3) Defaults
You can use the defaults tab page to specify user defaults, such as the standard printer, the start menu, date and decimal formats and logon language.
The user administrator does not have to maintain these settings necessarily, because users can also maintain their own user defaults via transaction SU3. In that case however, the users need to have this authorization in their basic user role assigned to their user master record.
Use the tab page ‘parameters’ to set or get parameters to save default values for fields, such as the company code, plant and so on.
Defining these preassigned values makes it easier for users to enter organizational units when they encounter the units again. Maintaining the parameter values can help to reduce mistakes during input.
Set/Get parameter ID
A field can be filled with proposed values from SAP memory using a parameter ID.
Example
A user only has authorization for company code 001. This company code is stored in memory at the beginning of a transaction under the corresponding parameter ID. Fields that refer to the data element are automatically filled with the value 001 in all subsequent screen templates.
Dependencies
A field in the screen template is only filled automatically with the value stored under the
parameter ID of the data element if this was explicitly permitted in the Screen Painter.
5) Roles
Use the tab page roles to assign composite and/or single roles to assign the correct authorizations to the end-user or employee. You can also enter validity dates, supposing that you give authorization to someone on a temporary basis. By assigning a role to the user, the corresponding active authorization profile will automatically entered on the tab page profiles.
6) Profiles
On the profiles tab page, you assign manually created authorization profiles and therefore authorizations to a user. The generated profiles of the roles assigned to the user are also displayed here.
Example:
In the screenshot above you can see that for my User ID two standard SAP Profiles have been assigned (SAP_ALL and SAP_NEW). The other profiles are generated profiles which are automatically displayed on this tab page, because they correspond to the roles which are assigned to my user master record on the tab page ‘roles’.
Remember that end-users usually should not get those special profiles SAP_ALL and SAP_NEW as explained in chapter 2.3.6.
7) Groups
You assign the user to a user group on this tab page. This is purely a grouping that is suitable, for example, for mass maintenance of user data (transaction SU10).
Assignments that you make on the ‘groups’ tab page are not used for authorization checks that are specified on the logon data tab page using the User Group field.
8) Personalization
On the personalization tab page, you can make person-related settings using
personalization objects. You can call this tab page both in role maintenance and in user maintenance. Here you can preassign application parameters that include more
parameters than the user parameters provided by transaction code SU3.
Other Functions
On the initial screen you have several buttons, which allow you to do the following things: