PACK ANIMALS IN SUPPORT OF
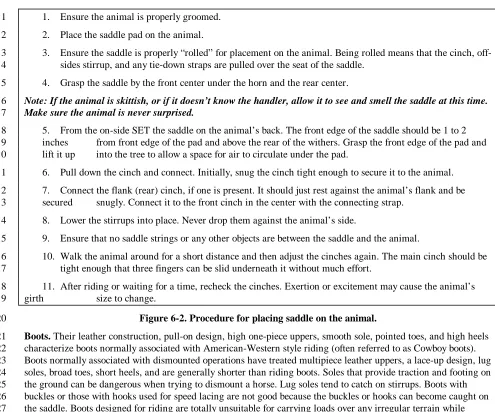
SPECIAL OPERATIONS
I N I T I A L D R A F T
MARCH 1998
TABLE OF CONTENTS
1
PAGE 2
PREFACE... iv 3
CHAPTER 1. OVERVIEW 4
PURPOSE... 1-1 5
MISSION... 1-1 6
CAPABILITIES... 1-1 7
CHAPTER 2. ANIMAL MANAGEMENT 8
SELECTION... 2-1 9
HEALTH AND WELFARE... 2-3 10
FEED AND WATER... 2-4 11
FEEDING IN GARRISON... 2-8 12
FEEDING IN THE FIELD... 2-9 13
CARE OF FORAGE... 2-10 14
CHAPTER 3. ANIMAL CARE AND TRAINING 15
GROOMING... 3-1 16
FARRIER SCIENCE... 3-2 17
TRAINING... 3-6 18
CHAPTER 4. ANIMAL HEALTH MANAGEMENT 19
ANIMAL BEHAVIOR... 4-1 20
PHYSICAL EXAMINATION... 4-2 21
FIRST AID SUPPLIES... 4-4 22
FIRST AID TREATMENT... 4-5 23
PARASITICINFESTATION... 4-9 24
DISEASES... 4-9 25
IMMUNIZATION SCHEDULE... 4-11 26
MEDICAL SUPPLY LIST... 4-11 27
EUTHANASIA... 4-12 28
PHARMACOLOGICAL LISTING... 4-13 29
CHAPTER 5. PACKING EQUIPMENT 30
PACK SADDLES... 5-1 31
HALTER AND PACKING EQUIPMENT... 5-2 32
PAGE 1
FITTING AND ADJUSTING THE SADDLE... 5-4 2
UNSADDLING THE ANIMAL... 5-6 3
SADDLING WITH A FITTED SADDLE... 5-7 4
CHAPTER 6. HORSEMANSHIP 5
EQUIPMENT... 6-1 6
RIDING TECHNIQUES... 6-4 7
LEADING A PACK STRING... 6-6 8
COMBAT CONSIDERATIONS... 6-7 9
CHAPTER 7. TECHNIQUES AND PROCEDURES 10
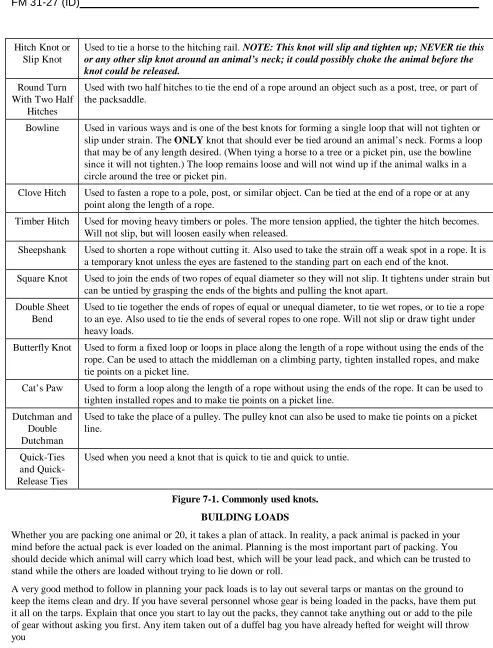
TYING AND USING KNOTS... 7-1 11
WRAPPING CARGO WITH A MANTA... 7-1 12
BUILDING LOADS... 7-2 13
SADDLING... 7-3 14
SLINGS AND HITCHES... 7-5 15
THE PACK STRING... 7-6 16
CAMPSITES... 7-8 17
TRANSPORTING SICK AND WOUNDED PERSONNEL... 7-10 18
CHAPTER 8. ORGANIZATION AND MOVEMENT 19
ORGANIZATION... 8-1 20
DUTIES AND RESPONSIBILITIES... 8-1 21
MOVEMENT PROCEDURES... 8-2 22
BIVOUAC... 8-3 23
CHAPTER 9. TACTICAL CONSIDERATIONS 24
SECURITY... 9-1 25
COVER AND CONCEALMENT... 9-1 26
ACTIONS ON CONTACT... 9-2 27
GLOSSARY... Glossary-1 28
PREFACE
1
This manual provides guidance for training selected personnel in the techniques of animal pack transport and for 2
organizing and operating pack animal units. It tries to capture some of the expertise and techniques that have been 3
lost in the Army over the years. The sections on care, feeding, and veterinary medicine compose a considerable 4
portion of the manual; however, this material is not intended as a substitute for veterinary expertise nor will it 5
make a veterinarian out of the reader. Personnel still must have a rudimentary knowledge of anatomy and 6
physiology, common injuries and diseases (particularly of the feet), and feeding and watering to properly care for 7
the animals and avoid abusing them from overloading or overworking. 8
Though many different types of animals can be used for pack transportation, this manual focuses on horses and 9
mules. You cannot learn how to pack by reading about it; there is no substitute for having a horse or mule standing 10
in front of you while you practice putting a pack saddle and load on him. However, the manual is useful for anyone 11
going into an environment where he will have to learn these skills. 12
FM 31-27 is a guide for personnel being employed in a training or combat situation using pack animals. It is not a 13
substitute for training conducted by personnel having hands-on experience with pack animals in the field. As with 14
all manuals, simply reading this material will not make you an expert in the subject matter. 15
The proponent of this publication is the United States Army John F. Kennedy Special Warfare Center and School 16
(USAJFKSWCS), Fort Bragg, NC. Reviewers and users of this manual should submit comments and recommended 17
changes on DA Form 2028 to Commander, USAJFKSWCS, ATTN: AOJK-DT-SFD, Fort Bragg, NC 28307-5000. 18
CHAPTER 1
1
OVERVIEW
2
The last pack transport unit in the United States Army was deactivated after the Korean War. Before then, pack 3
animals were employed in every war fought by the United States (U.S.) Army. The Army used approximately 4
350,000 horses and mules during World War I. Unconventional forces in Italy and in Burma used mules during 5
World War II. Mules were also used in Korea. 6
Since the deactivation of the pack transport units, the Army has relied on air and ground mobility for transporting 7
equipment. Today and throughout the spectrum of conflict, the Army Special Operations Forces (ARSOF) may 8
find themselves involved in operations in unsophisticated environments. In many of these environments, the 9
indigenous population uses pack animal transportation. Therefore, it may not be possible or practical to use air or 10
ground mobility to move supplies and equipment to the desired locations. 11
The information in this manual is a collection of ideas and techniques from many different sources and individual 12
experiences. Almost every animal packer has a technique that works for him. The techniques discussed in this 13
manual about packing and operating with animals are general. As the reader gains experience, he may develop 14
other techniques. Remember, however, to use the basic packing principles. Beyond that, the ingenuity of the packer 15
is paramount. 16
PURPOSE 17
This manual is a guide for select personnel assigned to train personnel and select animals used during the conduct 18
of transport operations using pack animals. It is not meant to be a substitute for trained personnel that have hands-19
on experience. 20
The success of pack operations, under extreme weather and terrain conditions, will depend on the selection and 21
training of personnel and animals. The proper and efficient use of available equipment, the sensible care of 22
animals in the field, and the employment of acceptable movement techniques are essential to accomplish the 23
mission. The limited time allowed for this type of training requires consistently high standards of planning, 24
instruction, and supervision. 25
MISSION 26
The mission of animal pack transport systems is to extend or replace other transport means in the support of 27
special operations (SO) missions (tactical or strategic). Animal transport systems can greatly increase mission 28
success when hostile elements and conditions require the movement of combat troops and equipment by foot. The 29
animal’s capabilities allow the unit to move quicker and with less personnel fatigue. 30
CAPABILITIES 31
Pack animals can transport limited quantities of cargo and weapons over any terrain and under virtually any 32
condition passable by an individual on foot. The pack detachment can traverse steep grades and heavily wooded 33
areas without trail preparation and can maintain acceptable speeds under the most extreme conditions. 34
Over terrain that is not mountainous, carrying approximately 25 percent of their body weight, well-conditioned 35
The legs should be short, straight, and powerful. Avoid animals with cowhocks (knock-knees) and animals that are 1
toed-in (pigeon-toed) or toed-out. The knees should be straight, broad, and deep. The cannon bones should be 2
short, strong, and broad. The fetlocks also should be broad and deep and rounded in appearance. The pasterns 3
short and strong and have a moderate slope. A long pastern has too great a slope and is weak, which causes the 1
animal to cripple quickly. 2
The feet are a critical factor in the animal’s ability to perform, stay physically sound, and endure the hardships of 3
packing. Ideally, the horse should stand with its feet at a forty-five to fifty-degree angle to the ground. The size of 4
the foot should be in proportion to the size of the animal. Small feet are often brittle and do not have the base to 5
support a heavy load or absorb concussion. Large feet could cause the animal to be clumsy and awkward. Mules 6
have a tendency to have smaller feet, but this fact does not present a problem. The sole should be slightly concave 7
and the frog prominent, elastic, and tough. Again, when viewed from the front, an animal that is toed-out should 8
be avoided. 9
The girth should be deep from the withers to the floor of the body, and the body should be wide and flat. This size 10
indicates ample space for vital organs, such as the heart and lungs. The barrel should be large. A large barrel 11
shows a good spread of the ribs that, in turn, give a good load-bearing surface on top. 12
The back should be short, strong, and well-muscled. A short back is better equipped to carry a load without 13
sagging. Horses with one less vertebrae than others would be good selections. The back bone should be prominent. 14
A pack animal with a rounded back and ill-defined backbone is difficult to pack so that the load rides properly. 15
Chances are good the load will slip or roll and the unit will waste valuable time repacking the load during 16
movement. 17
The loin should be of moderate length, well-muscled, and broad. A long loin will cause weakness at that point. 18
The croup should be low and of moderate width and slope. The hindquarters should be strong and well-developed 19
to provide power to the animal. 20
21 22
Figure 2-1. Animal conformation. 23
Conformation Defects 24
In the selection of a pack animal the above criteria are ideal, but many serviceable pack animals have defects in 25
their conformation and still perform well. However, it is better in the long run to avoid animals with many defects. 26
Try to ensure that the larger animals carry the heaviest loads, and the gentle, experienced animals carry the fragile, 27
easily breakable items. The smaller animals or animals with certain conformation defects should be tasked with 28
carrying the light and not so fragile loads. 29
HEALTH AND WELFARE 30
The health and welfare of the pack animal is the major concern of the pack animal handlers in garrison and in the 31
field. Each individual is responsible for the welfare of the pack animals. Whole pack trains have been lost due to 32
poor animal care. 33
Stable Management 34
In an unconventional warfare (UW) scenario the pack animal unit will probably not have the luxury of a 35
permanent or semi-permanent stable facility. However, most of the routines at the stables are applied in the field. 36
The unit commander has command responsibility for stable management and the training of his soldiers. However, 37
subordinate leaders are directly responsible for stable management and the stable routine. 38
Stable Building 1
The design and construction of a stable facility may be limited to the materials at hand. Regardless of the materials 2
used, the stable should provide adequate shelter, good ventilation, and few maintenance requirements. The stable 3
building should provide ready access to the corrals and storage for feed and packing equipment. 4
Stalls 5
Stalls vary in size depending on the average size of the animals, amount of time the animals are expected to spend 6
in the stall, and available space. A 12-foot by 12-foot stall allows freedom for a large horse or mule to maintain fair 7
physical condition during long periods of idleness while confined to stables. Stalls of this size are normally used 8
for recuperation, foaling of mares, and protection in extreme climates. A 10-foot by 10-foot stall is normally 9
satisfactory when animals are in stables only for feeding and rest. To reduce waste in feeding hay and grain, the 10
stalls should be equipped with hayracks and feedboxes. Stall walls must be free of sharp or rough projections and 11
unfinished woodwork. A major concern when dealing with animal care is the construction and maintenance of stall 12
floors. The floors should be level and have good drainage. It should also be resilient to help maintain a healthy 13
condition of the animals’ feet and legs. The floor should also be nonabsorptive for cleanliness and sanitation. 14
Earthen floors composed of clay are satisfactory but require continual work to clean, level, and smooth. Rough-15
finished concrete provides the best type of floor because it is sanitary, is easy to clean, and requires little 16
maintenance. However, a concrete floor having little resilience must be covered with a bedding of straw or hay for 17
cushion. Wooden floors, unless impregnated, are not desirable since they are slippery and unsanitary. Regardless of 18
the floor chosen, a good bed contributes to the comfort and efficiency of the animals. A clean, comfortable bed will 19
induce the animal to lie down and get better rest. It provides a soft surface that will prevent bruising or abrasion of 20
elbows, hocks, and other body parts. It also provides insulation for the body and a comfortable surface for the 21
Storage 1
Storage facilities are needed for the protection and security of feed and tack. The facilities should also be 2
convenient to the stables and corral. Feed storage should provide protection from spoilage, rodents, and loose 3
animals and should have feeding equipment. In addition, it should be arranged to minimize time and personnel 4
necessary for feeding. A tack room should be planned for each stable and partitioned from the stall area. It should 5
have facilities for inspection, cleaning, preserving, repair, and storage of all pack and riding saddles, bridles, 6
halters, panniers, and accessories for the unit. 7
Corrals 8
The pack animal unit should provide corrals for the animals’ free movement and exercise when they are not in use 9
or in the stalls. Make sure the corrals are close and easily accessible to the stables, well drained, and provide good 10
footing. Fill and level, as much as possible, any depressions and heavily traveled areas where water can collect. Set 11
fences at a sufficient height and strength to ensure the safekeeping of the animals. Make sure the fence is free of 12
sharp or rough projections. Provide water troughs or tanks to give animals free access to water and make sure they 13
are large enough to allow the watering of several animals without congestion. Position hayracks and feedboxes at 14
distances where one dominant animal will not receive more feed than another. Establish hitching posts or a picket 15
line to groom and/or pack the animals. Again, make sure the footing at the picket line or hitching posts receives 16
the same special attention as the heavily traveled areas. A foundation of stone with a covering of finely crushed 17
stone or gravel could be laid. In wet climates, this area is located above the level ground. If there is no natural 18
shelter from the sun and adverse weather, provide one for the animals’ protection. 19
Sanitation 20
Sanitation at the stables and in the field is a continuous process for maintaining the health of both animals and 21
personnel. Stables and corrals must be kept clean to reduce the breeding of flies, which is one of the most serious 22
sanitation problems that lead to disease and infection. The most effective countermeasure for fly control is to 23
remove manure and soiled bedding daily. You should always locate a compost pile away from the immediate 24
vicinity of the stable area or operational base camp. You should brush out all feed boxes daily and scrub them 25
monthly. Always drain and clean the water tanks each week. Only allow the animals belonging to the unit to drink 26
from these tanks. 27
Also be sure to water any animals suffering from communicable disease from buckets; then thoroughly clean and 28
disinfect the buckets. 29
FEED AND WATER 30
The health, condition, and effectiveness of a pack animal directly relate to the type and amount of food being 31
consumed. The pack animal handler determines the amount and types of food by the amount and type of work to be 32
performed. The working animal needs a diet containing more concentrates than the idle animal to supply the fuel 33
for energy and the proteins and minerals for the replacement of tissue and maintenance of condition. Personnel in 34
the pack animal unit need to have a basic knowledge of feed grains and roughage, their characteristics, and 35
geographical availability. This information is also critical for operational planning. 36
Feed Requirements 37
The body requires food for growth, repair of body tissue, and energy for movement. It also needs food to maintain 38
body temperature and energy for such vital body functions as circulation, respiration, and digestion. Protein from 39
feeds such as linseed meal, oats, and bran provide for body growth and repair of tissue. Minerals from feeds such 40
A ration is the feed allowed one animal for twenty-four hours, usually fed in two portions, morning and evening. 1
The components of a ration depend upon the class and condition of the animals, the work being done, the variety of 2
available foods, the kind of shelter provided, the climate, and the season. Feed must be selected and combined, 3
proportionately, to form a balanced ration that consists of proteins, carbohydrates, fats, minerals, and vitamins. 4
Pack animals cannot thrive on concentrated foods alone. Bulk is absolutely essential if the digestive tract is to 5
expand and digestion is to be unimpaired. Excessive amounts of proteins or fats and carbohydrates decrease 6
digestibility of the whole ration. Quantities of feed in one ration vary depending on the amount of idle time the 7
animals have, work being performed, and availability of the feed. Insufficient feed, particularly bulky feed, causes 8
loss of conditioning and general weakness and predisposes an animal to disease. More food than the body needs is 9
wasteful and harmful. It overtaxes the digestive system and may cause either diarrhea, due to irritation, or colic, 10
due to constipation. 11
Types of Rations 12
There are three basic types of rations that can be used: the garrison ration, the field ration, and the emergency 13
ration. All three can be altered in quantities and substance depending on conditioning and training taking place, 14
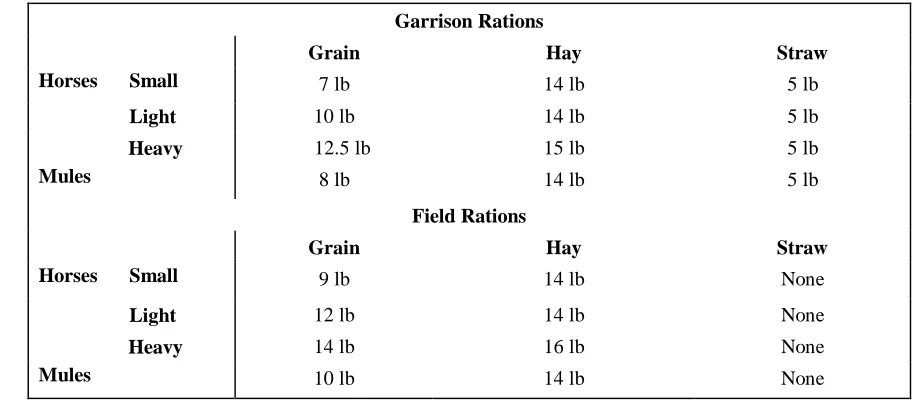
type and health of the animals, season, and combat situation. Table 2-1 shows a recommended allowance for 15
garrison and field rations. 16
Garrison Ration. It is used at permanent or semipermanent operational bases where the pack animals are fairly 17
idle. It contains a standard feed allowance of approximately 10 pounds of grain (8 for mules), 14 pounds of hay, 18
and 5 pounds of bedding. Again, this ration can be increased slightly depending on the animal’s condition or the 19
training taking place. 20
Field Ration. The unit uses this rationwhile it is deployed so the pack animals can maintain condition and 21
strength during heavy work. The field ration contains an allowance of about 12 pounds of grain (10 for mules), 14 22
pounds of hay, and no bedding. Such quantities and combinations of feed could cause a logistic problem in a 23
combat situation and may be altered. If the situation permits, consider pre-position or caching the feed. Another 24
way to prevent having to carry all the feed is to consider aerial delivery. 25
Garrison Rations
Grain Hay Straw
Horses Small 7 lb 14 lb 5 lb
Light 10 lb 14 lb 5 lb
Heavy 12.5 lb 15 lb 5 lb
Mules 8 lb 14 lb 5 lb
Field Rations
Grain Hay Straw
Horses Small 9 lb 14 lb None
Light 12 lb 14 lb None
Heavy 14 lb 16 lb None
[image:10.612.58.516.435.637.2]Mules 10 lb 14 lb None
Table 2-1. Recommended ration allowances. 26
Notes: 1. Bran may be substituted in amounts not to exceed three pounds for a like amount of grain. One-half
27
pound of linseed meal may be substituted for one pound of grain.
28
2. The substitution of barley, rice, copra meal or any other local product can be made for the grain ration.
29
3. The substitution of native grasses, bamboo shoots, or banana stalks can be made for the hay ration.
4. Fifteen pounds of corn fodder or grain sorghum is considered the equivalent of ten pounds of hay.
Emergency Ration. The unit usesthis temporary ration for a short time when the combat situation or environment 1
prohibits the use of a field ration. An emergency ration is a modification of a field ration for reasons such as 2
logistic problems or the lack of forage in the operational area. Remember that this ration can vary greatly 3
depending on the situation. Small horses are classed as those usually found in overseas areas. Light horses are 4
those weighing less than 1,150 pounds. Heavy horses are those weighing more than 1,150 pounds. 5
Feed Components 6
Types of grains and hay or combinations of available grains and hay will depend on the geographic location of the 7
unit. It is important, however, to come as close as possible to meeting all the nutritional requirements of the pack 8
animals. Some of the grains, hay, and other items that may constitute a ration are described below. 9
Oats are the safest and most commonly used of all grains for the pack animal. Usually all other grains are 10
combined with oats or regarded as substitutes. Oats may be safely fed in quantities up to 10 pounds per day but no 11
more than 6 pounds when the animals are idle. Oats may be fed whole or crushed; however, crushing ensures more 12
thorough chewing and digestion. Oats can be steamed or boiled for ill animals but new oats should not be fed until 13
a month after thrashing. 14
Corn is best combined with oats and hay for feeding during the colder months since it has a tendency to produce 15
heat and fat. Corn is best fed on the cob, but the animals can be fed shelled corn if it is mixed with oats or bran. 16
When feeding ear corn, 6 to 12 ears are recommended depending on the amount of work being performed and the 17
individual animal. If substituting corn for oats, make the change gradually. Take care because corn is considered a 18
“hot” feed. That means it contains greater than 16 percent protein. If the change is made too quickly or the animal 19
is fed too much, it could lead to colic or founder (lameness). Substitute about two pounds of corn for an equal 20
quantity of oats weekly. 21
Barley is used extensively in Asia, Southeast Asia, and parts of Europe. It is considered a good grain and may be 22
safely substituted for oats and fed in the same quantities. The change from oats to barley should be made gradually 23
over an extended period, substituting two pounds of barley for an equal amount of oats weekly. Barley is very hard 24
and should be crushed or soaked in water for two to three hours before feeding, but it may be fed whole. Barley is a 25
“hot” feed and the same care taken with corn must be taken with barley. 26
Rye is not regarded as a very good feed for horses and mules. If other feeds are scarce, it may be mixed with other 27
feed such as oats or bran when necessary. Rye is very hard and should be rolled or crushed before feeding. 28
Wheat alone is not a safe feed for horses. It should be rolled and combined with a bulky grain or mixed with chaff 29
or hay before feeding. One or two pounds should be given at first and the amount gradually increased to a 30
maximum of six pounds per day. 31
Bran is the seed husk of grains such as wheat, rye, and oats, separated from the flour by sifting. It is an excellent 32
food for the pack animal. Bran, having a mild laxative effect, is most useful as a supplement to a ration consisting 33
largely of grains. It helps in building bone and muscle, has no tendency to fatten, and adds to the general tone and 34
condition of animals. To supply the desired laxative and tonic effect, add necessary bulk, and stimulate more 35
thorough chewing, feed about two pounds of dry bran mixed with oats or other grain every day. 36
Rice,that is, rough rice, when rolled, crushed, or coarsely ground, may be fed in quantities up to one-half the grain 37
ration. In an emergency it may be fed in quantities up to eight pounds daily. 38
Grain sorghum has a general food value of slightly less than that of corn. Feed the pack animal the same amount 39
of grain sorghum as you would feed corn and under the same circumstances. Grain sorghum is less fattening than 40
corn and has a higher protein content. 41
Salt is essential to the health and well-being of all animals. The pack animal’s need for salt is greatly influenced by 42
the amount and type of work he is performing since a considerable amount is excreted in his sweat. A supply of 43
salt, adequate to replace that lost through sweating, is an important factor in preventing heat exhaustion during hot 44
salt blocks can be used, they should be placed where the animals have free access to them. The availability of a salt 1
block eliminates the requirement to add salt to the feed. 2
Hay is the basic element of the ration that provides the bulk necessary for the proper performance of the digestive 3
system. The pack animal should not be deprived of hay or something with similar bulk, such as straw, for any 4
considerable length of time. Animals will suffer more on a ration of grain than on one of hay alone. Should the 5
supply of hay normally required for the daily rations be diminished, the animals should be grazed or fed such 6
roughage as can be gathered or produced locally. Oat straw is one of the best substitutes for hay if the oat heads are 7
still on it. Otherwise, it is not a good substitute. Any straw, not spoiled, may be used, but barley and rye straw is 8
not recommended. Do NOT feed wet hay to the animals because it can cause compaction in the intestines and may 9
lead to colic. Do NOT feed moldy hay to horses and mules; cows can eat it without suffering ill effects, but horses 10
and mules cannot. Not having bulky feed, give the animals green or dried weeds or leaves as substitute roughage. 11
All hays, except for the legumes, have nearly equal feeding values. Some of the more common hays are alfalfa, 12
timothy, prairie, and grain. 13
Alfalfais a protein-rich roughage of high nutritive value that more closely approximates that of grains than the 14
common roughage. Alfalfa is an excellent source of calcium and vitamins. Being high in protein, alfalfa combines 15
well with corn to create a laxative effect. When changing to a ration containing alfalfa, do it gradually; give about 16
two or three pounds daily. It should compose not more than one-half of the hay allowance. Because of its high 17
protein content, alfalfa is not desirable for hot weather use. 18
Timothy is usually considered the standard hay, although it is not particularly rich in digestible nutrients. Timothy 19
mixed with clover gives a higher nutritive value and a better supply and balance of minerals and vitamins. 20
However, the clover content should not exceed 50 percent. This mixture is common in areas where timothy is 21
available, as timothy and clover are frequently seeded together. 22
Prairie hay, or wild hay, is produced from the natural grass growing on prairie land. Upland prairie hay, its 23
feeding value being slightly higher than timothy, makes an excellent hay when properly cured. Midland prairie 24
hay, which is produced from coarser wild grasses growing on low land, is of lower feeding value and is not 25
considered desirable. 26
Grain hay is made from oats, wheat, and barley, cut before maturity, and cured in the same manner as other hay. It 27
has a nutrient value about equal to that of timothy but is richer in protein. Care must be taken when feeding grain 28
hay because it may have high amounts of oats still in it. 29
Grazing 30
Grazing alone can maintain idle animals satisfactorily. It provides good feed and moreover provides exercise for 31
the animals. As with any change in feed components, grazing periods should increase gradually over the first few 32
days to condition the animal’s digestive system. For pack animals in the field, grazing is an important source of 33
roughage and should be used at every opportunity to reduce the consumption of hay, which may be difficult to 34
obtain or be of questionable quality. It also reduces the load that must be carried by the unit. Grazing on wet or 35
frosted alfalfa or clover should be avoided to prevent gas colic. Except in an emergency, Johnson grass and grain 36
sorghum should not be grazed. 37
Pellet Feed 38
This type of feed has several advantages over conventional hay or grain rations. Storage requirements are 39
decreased, it is easily deliverable by air, and nutritious by-products can be included. Total feed intake is usually 40
Water 1
Drinking water as a feed component is of utmost importance. The nutrients of the feed must be in a solution before 2
they can be absorbed. During work, sweating and other physiological functions greatly deplete the water content of 3
the body’s tissues. To compensate for this loss, the body draws from the digestive tract. A deficiency of water in the 4
digestive tract not only affects digestion but may affect the general health of the animal by causing such problems 5
as colic and debility. An animal can survive for a considerable time on water alone but succumbs in a few days if 6
deprived of water. 7
FEEDING IN GARRISON 8
The times of feeding and watering while in the operational base or rear area should be fixed and regular. Feeding 9
and watering, both as to time and amount, are based on the training, conditioning, and work being performed. 10
Watering the Animals 11
It is important to offer the animals water and give them plenty of time to drink before feeding time. Normally, a 12
pack animal requires about eight gallons of water per day. However, the temperature and amount of work being 13
performed will determine water requirements. The animals should be watered three times per day under normal 14
conditions and four times per day when operating in an extremely warm climate. Under ideal conditions, water 15
should be available to the animals at all times when they are not being used. Feed should not be distributed while 16
the animals are being watered because they will not water properly when they have feed available. If the animal 17
drinks immediately after feeding, the food in the stomach only partially mixes with the gastric juices, causing 18
digestion to be incomplete. The flow of water through the stomach then washes a considerable portion of the 19
stomach contents into the bowels. A loss of nourishment and indigestion or colic may result. Water may be given 20
approximately one hour after feeding. 21
Quantity and Frequency of Feeding 22
The stomach of the horse and mule is small and is unable to function properly while holding large quantities of 23
food. Once the stomach is two-thirds full, the feed will pass through the stomach at the rate it is taken into the 24
mouth. Therefore, the stomach functions properly when it is two-thirds full. If the animal is fed too much at one 25
time, the stomach may become excessively distended and feed will be wasted by not being properly digested. A feed 26
of three to four pounds of grain represents the approximate amount an average animal should be fed at a single 27
meal. This feeding may be followed by a long and slow consumption of hay. Under these conditions the gradual 28
passage of food into the intestines then takes place under favorable conditions. If the total amount of grain is 29
increased, it is better to increase the number of feeds rather than to increase the size of the ration at each meal. 30
Working After Feeding 31
Working an animal hard after a full feed interferes with its ability to work and with its ability to digest the feed 32
properly. The animal’s ability to work is hampered by difficulty in breathing, which is caused by the swelling of 33
the stomach and bowels against the diaphragm and lungs. Digestion is also accompanied by an increased flow of 34
blood and secretions and increased muscular activity in the bowels. Hard work diverts blood to other parts of the 35
body, tires the intestinal muscles, and reduces secretions needed to aid digestion. As a result, the animal suffers a 36
loss of nourishment from the feed, may develop serious disorders of the digestive tract, and may die. The animals 37
may be worked safely one hour after feeding. 38
Feeding After Working 39
The digestive organs of a tired animal are just as fatigued as the rest of the body. Therefore, a tired animal should 40
not be fed a full ration. Most of the blood supply is still in the muscles, the muscles of the digestive tract are tired, 41
and the glands used to secrete digestive fluids are not ready to function properly. The animal must be cooled and 42
rested before feeding. Give the animal small amounts of water at frequent intervals and permit him to eat long hay. 43
After about 30 minutes of rest, give him a small portion of grain followed by the balance, a little at a time, after an 44
the feet), or both. The method of feeding just mentioned is time consuming. If it is not possible to use that method, 1
feed the animals once after waiting one to two hours after work. 2
Feeding Procedures 3
Feeding a small amount of hay before feeding grain stimulates an increased flow of saliva and gastric juices, takes 4
the edge off the appetite, and quiets the nervous animal. In the morning, it is not necessary to feed hay first because 5
the animal has probably been eating hay all night. An ideal way to feed hay is to keep it before the animal 6
continuously by replenishing the supply frequently with small quantities. Feeding chaff with the grain adds bulk 7
and forces the animal to eat more slowly, ensuring more thorough mastication. 8
FEEDING IN THE FIELD 9
Feeding pack animals away from garrison in a field or combat environment presents problems that are not present 10
in garrison. The greatest problem is setting a regular schedule of feeding times. The hours animals are worked in 11
the field or under combat conditions are seldom the same every day. Therefore, to adhere to the principles outlined 12
above, the animals must be fed smaller rations at more frequent intervals. It is very important to ensure every 13
animal is fed a full ration every day to maintain the strength required to work in the field. 14
Due to logistic constraints, there may not be enough hay available to ensure the animal receives the required 15
roughage. In this case, the animal must be allowed to graze at every opportunity to obtain sufficient roughage. 16
Grazing should be allowed while at a bivouac location and at halts while on the march. A halt of an hour or more 17
to feed grain should be planned if the duration of the movement will exceed five hours. Important points to 18
consider when feeding in the field are covered below. 19
Watering on the March 20
Watering on the march should be done whenever possible, especially on hot days. When watering a string of 21
animals on the move, such as at a stream crossing, allow the entire string to get in the water before letting any of 22
the animals drink. Otherwise, the lead animals will drink and then try to move down the trail before the rest of the 23
animals in the string have had a chance to drink. Watch to ensure all animals have had the opportunity to drink 24
before moving the string. Angle the string upstream so the animals ahead do not foul the water. Give the animals 25
ample opportunity to drink their fill and not be led away the first time they raise their heads. After watering, keep 26
the animals at a walk for 10 to 15 minutes before increasing the gait or coming to a long halt. This action will 27
prevent digestive disturbances. 28
Feeding Halts 29
Try to plan the place for a feeding halt two or three miles past a watering point. Give the animals a little hay after 30
arriving at the feeding point and tying them to the night line. This procedure will help relax the animals and start 31
the secretion of the gastric fluids. 32
Feeding at Bivouac 33
When it is necessary to feed and water at a bivouac location, wait at least 45 minutes after arrival to water the 34
animals. Remove the bits if a full watering will be allowed. When watering at the bivouac location, an individual 35
should lead the animals to the water on foot. A person should not lead more than two animals at a time. When they 36
are drinking, he should stand between the animals so they do not crowd each other. As stated before, the animals 37
should be given ample time to drink and should not be led away from the water the first time they raise their heads. 38
The animals should go to the water and leave the water together. Watch that the animals do not start pawing the 39
water or lie down in it after being watered, as they often do. These actions will stir sediment on the bottom and 40
Water Shortages 1
When water is scarce, its consumption will have to be regulated. If the bits are removed, animals can drink from a 2
very shallow container. A small quantity will let an animal keep moving if you give the water by the swallow 3
instead of allowing him to take one long draft. 4
Feeding Hay 5
When the animals are on a night line, break the hay from the bales and distribute it along the night line. Feed the 6
hay in small quantities and replenish it frequently. This procedure is especially important in damp climates or 7
while it is raining. If the rain is expected to be continuous over a long period of time, it is best not to feed hay at 8
all. Feeding damp hay will cause serious colic in the animal, and moldy hay should never be given. As mentioned 9
before, cattle can eat moldy hay without problems, but horses and mules cannot. Wait until the rain is finished. 10
Break the bales of hay apart and distribute only as needed. Personnel should ensure the animals do not work the 11
hay beneath them where they cannot get to it. 12
Feeding Grain 13
When feeding grain in the field, feed the animals from a feedbag and ensure the feedbags fit properly. If they are 14
too loose, the animals will toss their heads trying to get to the feed and grain will be spilled and wasted. Watch the 15
animals while they are feeding from a feedbag, and never allow them access to water until they have finished 16
eating and the feedbags are removed. They could get the feedbag filled with water while attempting to drink and 17
drown. To conserve feed, spread any feed left in the feedbags on a cloth to dry. The feed can then be used for the 18
next feed. Grain should not be spread on the ground for the animals to eat. When the animals eat it, they also 19
ingest dirt, which can lead to colic. Any grain spilled on the ground in front of the animals should be swept. 20
CARE OF FORAGE 21
The care of forage is extremely important to the health of the herd. Feeding damp or moldy hay can cause colic and 22
could disable a large portion of the herd at once. Inspect the forage at the time of delivery to ensure the quality of 23
it. In garrison, shelters are available to keep the forage dry. In the field, make every attempt to keep it dry. When 24
the feed is packed on animals for transportation, cover it with a manta. This precaution will protect the feed from 25
the elements and keep the animals from getting into it during the movement. During temporary storage, raise the 26
forage off the ground by timbers (or whatever else is available) and cover it to keep it from getting wet and keep 27
loose or stray animals from getting into it. 28
29
30
31
32
33
34
35
36
37
38
39
40
CHAPTER 3
1
ANIMAL CARE AND TRAINING
2
The proper care and training of pack animals is essential to the health of the animals and their performance in the 3
field. Without proper care, the animal’s health and the unit’s ability to complete its mission will suffer. Without 4
proper training, the unit cannot rely upon the animal to behave in a manner that ensures mission accomplishment. 5
GROOMING 6
Grooming is essential to the general health, condition, and appearance of animals. It also provides an excellent 7
time to inspect them for injuries. When grooming before movement, check the animals for injuries. Also, check the 8
condition of past injuries, if any, at this time. When grooming after movement, check the animals for injuries 9
sustained on the trail and for any evidence the saddle or harness may have chafed the animal. These precautions 10
permit treatment of any problems before they get to the point of incapacitating the animal. The value of grooming 11
depends on how thorough the handler does it. The animal handler obtains efficient grooming when he takes pride 12
in the appearance of his animals. 13
When to Groom 14
The animal handler should groom every animal thoroughly at least once each day. Always groom an animal before 15
leaving the stable area for work or exercise. Before saddling the animal, be sure the area where the saddle pad and 16
cinch ride are free of dirt and foreign objects. Failure to clean these areas will result in sores and could cause the 17
animal to be unusable. On return from work or exercise, remove, clean, and put away any equipment. Cool a 18
heated, wet, or sweating animal before grooming it. Give it a brisk rubbing with a cloth to partially dry the coat, 19
then blanket the animal (if a blanket is not available, leave the saddle pad on) and walk it until it is cool. Check for 20
injuries that may have occurred during movement. 21
Equipment 22
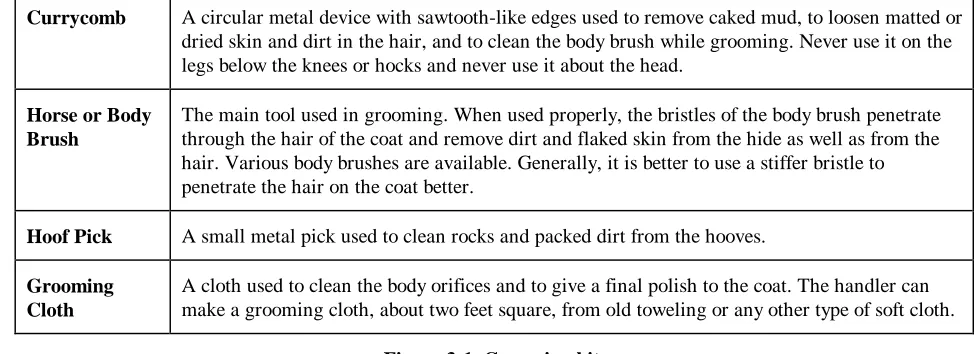
Each individual, responsible for the care of animals, should have a grooming kit. The basic kit consists of a 23
currycomb, horse or body brush, hoof pick, and a grooming cloth (Figure 3-1). 24
Currycomb A circular metal device with sawtooth-like edges used to remove caked mud, to loosen matted or dried skin and dirt in the hair, and to clean the body brush while grooming. Never use it on the legs below the knees or hocks and never use it about the head.
Horse or Body Brush
The main tool used in grooming. When used properly, the bristles of the body brush penetrate through the hair of the coat and remove dirt and flaked skin from the hide as well as from the hair. Various body brushes are available. Generally, it is better to use a stiffer bristle to penetrate the hair on the coat better.
Hoof Pick A small metal pick used to clean rocks and packed dirt from the hooves.
Grooming Cloth
[image:17.612.59.546.478.655.2]Check the animal for any signs of lameness as you walk it to the grooming area. If any exist, thoroughly clean the 1
hoof of the affected leg with the hoof pick and look for rocks or other debris causing the problem. Each hoof does 2
not need cleaning every day in working animals. One school of thought is that the soft dirt and debris packed in the 3
hoof gives the animal extra cushion to walk on in rough terrain. Whether cleaned daily or not, the handler should 4
check the animals’ feet for thrush, torn frog, loose or missing shoes, and cracks. Report defects at once to the 5
medic or veterinarian. 6
Take the currycomb in the right hand and the brush in the left. Go over the left side of the animal with the 7
currycomb beginning at the neck. Continue down to the breast, withers, shoulders, foreleg and knee; then smoothly 8
transition to the back, side, belly, croup, and hind leg to the hock. Strike the currycomb frequently against the heel 9
or side of the brush to free the accumulated dirt and dried skin. Ensure the currycomb follows the natural lay of the 10
hair. 11
Brush the entire left side of the animal in the same order as above except brush the legs down to the hoofs. After a 12
few strokes, clean the brush with the currycomb. In using the brush, stand well away from the animal, keeping 13
your arm stiff, and throw the weight of your body behind the brush. A twist of the wrist at the end of each stroke 14
will flick the dirt away from the hair. Ensure the brush follows the natural lay of the hair. This use of the brush is 15
not necessarily a separate activity from currying; you can do both at the same time with a brush stroke following 16
each currycomb stroke. 17
Pass to the right side of the animal, change hands with the brush and currycomb, and groom the right side in the 18
same order as above. 19
Brush head, mane, and tail. In cleaning the mane and tail, begin brushing at the ends of the hair and gradually to 20
the roots, separating the locks with your fingers to remove dried skin and dirt. Wipe eyes, nostrils, and lips and rub 21
the head, ears, and muzzle with the grooming cloth. Clean the dock (fleshy part of the tail) and give a final polish 22
to the coat. 23
NOTE: As a precaution against the spread of skin diseases, wash grooming equipment and drying cloths with
24
soap and water once a week.
25
Animal Inspection 26
Inspect the animals, as indicated above, while grooming them. Good grooming offers the opportunity for close 27
examination of the animal and the discovery of injuries or defects that otherwise might pass unnoticed. Correcting 28
or treating these defects or injuries greatly reduces the number of non-effective animals in a unit. Along with 29
wounds or other injuries present, there are others that are not immediately visible to the naked eye. For example, 30
you can check for sore kidneys by placing your hand on the animal’s back at the withers. Apply pressure with the 31
thumb and fingers on either side of the spine as you slide your hand along his back, toward the tail. If the animal 32
flinches, as you get to the area just to the rear of where the saddle rides, it is a sign that his kidneys are sore. This 33
might result from poor saddle placement or improper riding position. 34
Grooming Sick Animals 35
Do not groom animals that are sick, weak, or depressed. They should be hand-rubbed at least once a day. Wipe 36
their eyes and nostrils out with a damp sponge or soft cloth and clean their feet. Groom animals with minor 37
ailments in the usual manner. Do not clean animals with tetanus at all. 38
FARRIER SCIENCE 39
While not farriers, individuals must be able to replace, at least, a loose or missing shoe when they are not available. 40
The usefulness of a pack animal depends on the health and condition of its feet. The feet of a normal animal, due to 41
their structure, require very little care or protection while on free pasture or even under light working conditions. At 42
moderate work levels on good footing, an animal may require no more than cleaning and periodic rasping to trim and 43
level its feet. The hind feet need only moderate care since they receive less shock. The front feet carry 60 to 65 44
additional care and protection. Shoeing protects the feet from excessive wear and enhances balance, support, and 1
Basic Shoeing 1
Hoof growth, shoe wear, and the work required of the animal governs the frequency of shoeing. On the average, 2
shoes may remain on the animal without change or adjustment for one to two months, though three to four months 3
wear is occasionally possible. A farrier does the routine refitting. However, all handlers should have a basic 4
understanding of the shoeing process, and several in each unit can replace or refit a lost or outgrown shoe. 5
Farrier Tools 6
A farrier’s kit should contain pincers, a pritchel, clench cutter, hoof knife, hoof nipper, hoof rasp, blacksmith and 7
driving hammers, clincher, and fencing pliers (Figure 3-2). 8
Pincers Used to remove the shoe from the hoof, cut off excess length of clinches, or remove improperly driven nails.
Pritchel Used to enlarge the nail holes on shoes or to assist in extracting re-usable nails from shoes.
Clench Cutter Used to cut or straighten the nail clench before removing the shoe. The handler uses the blade end for that purpose. He can use the other end as a pritchel.
Hoof Knife Used for cutting excess horn from the sole of the hoof and for trimming the frog, if necessary. It is available in right- and left-handed models.
Hoof Nipper Used to remove the excess growth of wall from the hoof when preparing to replace or refit a shoe.
Hoof Rasp Used to remove excess hoof wall and to level the bottom surface of the hoof. The rough rasp is a hoof rasp that has become dulled. The handler can use it to remove the burr under the clinches and to smooth the clinch after the shoe has been replaced. He can also use the rough rasp to file away the clinches when removing a shoe.
Blacksmith Hammer
Used to shape the shoes to the animal’s feet.
Driving Hammer
Used for driving the nails that secure the shoe to the hoof and for forming the clinches.
Clincher Useful in finishing the clinches, especially when working on young or lame horses that object to having their feet struck with the hammer.
Fencing Pliers Have several uses in the farrier kit. The handler can use them as a hammer or for cutting nails and many other functions in caring for animals’ feet. He can also use them to repair saddles and harnesses.
Figure 3-2. Farrier tools. 9
Raising and Holding the Foot 10
It is important to know the proper way to raise and hold an animal’s foot before doing any farrier work so that you 11
can control the animal and have both hands free to work. Working with the front and hind legs is slightly different. 12
Front Foot. To raise a front foot, face the rear and place the hand nearest the animal on its withers and talk to it. 13
Run your hand down the animal’s shoulder and leg to the tendon in the back of the leg just above the hoof. Grasp 14
Allow time for the animal to lift his foot, then slip your hand around and lower on the leg until you are cradling 1
the hoof in the palm of your hand. Move closer to the animal and pass his foot behind your knee nearest the animal 2
and into your other hand, which has been passed between your legs to receive it. To free both your hands for work, 3
press your legs together just above the knees. 4
Do not raise the animal’s foot too high or too far away from his body. Stand with a pigeon-toed stance, bend your 5
legs, and keep your back straight. This posture will free you to work with both hands. While you are working on 6
the animal’s leg, you should be very aware of things around you so that you can predict the intentions of the 7
animal. Unless suddenly frightened, an animal is quite predictable about wanting his feet on the ground. When an 8
animal is getting a little tired and wants the front leg down, he will test your grasp of his leg with a few jerks. If he 9
is going to hop on his other foot to get away, he will invariably move forward slightly with both hind feet in 10
preparation for this move. 11
The farrier should not let an animal take his leg away every time he wants it. Be considerate of the animal, but do 12
not let the animal be the boss. The animal will soon get the idea that he can set his foot down as he sees fit, which 13
can be dangerous. 14
Hind Foot. To raise a hind foot, face the rear, place your closer hand on the animal’s withers and stroke it across 15
the back to the hip, then down the hip and leg to the fetlock. Grasp the fetlock with your fingers. Draw the leg 16
toward you. The animal will shift his weight and pick up his foot. 17
With one fluid motion, slide into position by moving toward the raised leg and put the leg in your lap. Your leg 18
(the one nearest the animal) presses against the inside surface of the fetlock joint, your outer leg holds the other 19
side of the fetlock. The animal’s cannon bone presses against your ribs, with your upper arm, while the tibia rests 20
upon your hip. 21
An animal will indicate when he wants his hind leg down. He will “cock” his leg by drawing it forward and 22
upward toward his stomach, as if to “cowkick.” If he does not cock his leg, he cannot kick with any force. 23
Shoe Removal 24
To replace a shoe that has not come off the animal, you must follow a specific sequence to correctly remove the old 25
or damaged shoe. 26
Look at the hoof approximately 1/2 to 5/8 of an inch from the shoe. You should see where the nails holding the 27
shoe have come out of the hoof and are bent over or clinched. Using the clinch cutter and driving hammer, cut or 28
straighten the clinches of the nails holding the shoe in place. Place the blade end of the clinch cutter under the nail 29
point and tap the other end with the driving hammer. You can also use the rough rasp to accomplish the same 30
thing by filing down the clinches. 31
Pull the shoe by wedging the cutting edges of the pincers between the shoe and hoof at the heel and then exert a 32
quick thrust toward the toe. Repeat the procedure, alternating from one side of the shoe to the other, progressing 33
toward the toe until the shoe is removed. Once you remove the shoe, check to see if all the nails came out with the 34
shoe. If they did not, check the hoof to see if any nails remain. Remove any remaining nails with the pincers. 35
Hoof Preparation 36
Using the hoof pick (found in the grooming kit), thoroughly clean dirt and debris from the hoof. Then pare away 37
the dead horn over the white line with the hoof knife. Do not touch the frog unless you cannot insert a hoof pick 38
Shoe Replacement 1
Fit the shoe to the hoof by holding it so that you can see the white line through the nail holes. See that the shoe lays 2
flat on the hoof surface without rocking. Eliminate any wobble between the shoe and hoof by rasping the high spot 3
on the hoof. You may have to bend or shape the shoe as needed since it may have become deformed if it was worn 4
loose for a time. Do not worry about the excess hoof wall in front of the toe of the shoe. You will rasp the excess 5
away later in the shoeing process. 6
Secure the shoe to the hoof with nails and the driving hammer. You should bevel the horseshoe nails near the point 7
so that they will turn out of the hoof when pounded into it. The other side of the nail is flat. Always place the flat 8
side of the nail so that it faces the outer edge of the hoof. You can be sure the nail is facing the right way by 9
looking at its head: there is checkering on one side of the nail head. The checkering should always face the inside 10
of the hoof. Grasp the nail between your thumb and forefinger and make sure the flat side of the nail faces the outer 11
surface of the hoof. Place the point of the first nail through the third nail hole on one side of the shoe, pointing 12
parallel to the horn fibers of the hoof. Tap the nail lightly several times to start it into the hoof wall. 13
To force the point of the nail through the outer surface of the wall at the desired spot, continue to apply light blows 14
until the nail is driven approximately two-thirds of the required distance. You should then apply one sharp heavy 15
blow on the head of the nail to force the point through the wall. The bevel on the point of the nail is effective only 16
when driven rapidly through the horn. If the animal twitches or jerks away at any time during the nailing, pull the 17
nail and check for moisture or blood on it. The nail should exit approximately 3/4 of an inch above the ground 18
surface of the foot to sufficiently hold the shoe. If there are old nail holes in the wall, the new nails should emerge 19
at least 3/8 of an inch from the old holes. This length puts the new nails in hoof fibers strong enough to properly 20
hold the nail. After the point emerges and you drive the nail head solidly into the crease of the shoe, immediately 21
remove the point of the nail. Do this quickly to avoid serious injury to you should the animal decide to pull his leg 22
away suddenly. To remove the point of the nail, point the claws of the hammer toward the toe of the hoof. Place the 23
claws onto the nail point as deep as possible and close to the hoof wall, bend the nail straight out from the wall, 24
and rotate the hammer. This procedure will “wring” off the point and excess length of the nail. Repeat the process 25
with the same hole on the opposite side of the shoe. 26
After you drive in two nails, check the shoe to ensure it still fits properly. You can adjust the fit by tapping lightly 27
with the hammer to move it into place. Then put the remaining nails in the shoe. You may find it easier to “start” 28
the first nail on each side of the shoe before driving either of them all of the way. “Set” the nails by striking the 29
heads sharply with the driving hammer. Make sure you hold a solid metal object (such as the flat side of the 30
pincers) firmly against the end of the nail that protrudes through the hoof when you strike. Some farriers think that 31
the order in which you set the clinches is very important. The recommended sequence is to set the two nails nearest 32
the toe on the opposite side, then the quarter and heel nail on the first side, followed by the remaining heel nail. 33
Cut off the nail points with the pincers. Leave enough length for a proper clinch. The clinch should be 34
approximately 1/8 of an inch long. A clinch that is too long can cause the wall to break should the shoe become 35
caught on something and pulled off. The wall fibers of the hoof will break when the nail emerges. Remove the 36
resulting burr under the seated clinch with the file side of the rough rasp. Be careful to file away only the burr. Do 37
not file a deep groove around the hoof; make it just large enough to contain the clinch. Use the clincher to bend the 38
clinches down into the groove. 39
Once again, take the pincers and the hammer to finish forming the clinch. Hold the pincer jaws against the head of 40
the nail and strike the end of the nail to seat it even with the wall surface. You should bend the nail abruptly at the 41
hoof wall. Ensure the hammer travels parallel and as close to the hoof wall as possible. You can use the clincher 42
for this step if one is available. The clinches are now finished. Using the file side of the rough rasp, smooth the 43
nails leaving no sharp edges on the wall of the hoof. Rasp and shape the hoof to the shape of the shoe. Most of this 44
rasping will take place in the area of the toe and anterior quarter. Be careful not to rasp too much and rasp away 45
Farrier’s Objective 1
The shoeing process will become more clear when you have seen it done once. Remember, the intent of this section 2
and hind shoe. These shoes, their nails, extra nails, and farrier tools should be part of the standard equipment 1
packed whenever you take the animals out. If a shoe becomes loose on the trail, remove it if possible, to avoid its 2
loss or injury to the animal. It would be ideal to replace lost or loosened shoes immediately, in garrison or on the 3
trail. However, there will be times in the field when it is impossible to replace a shoe before two or more days have 4
elapsed. This delay is typical and may have little or no adverse results. If this situation occurs, reduce the load of 5
the pack animal or have a rider spend more time walking than riding his mount if it is a riding animal. 6
TRAINING 7
A pack animal detachment will not always be able to work with animals that are trained and conditioned to pack. 8
Even if the animals are trained to pack, they may need retraining or conditioning. In such cases, you need to know 9
some of the basics of training and conditioning animals. The purpose of this section is to give you enough 10
information to evaluate the level of their training and to train and condition them as necessary for pack operations. 11
Trainers 12
The attitude of personnel training pack animals is extremely important. A person assigned to train animals must 13
have a better than average knowledge of animals. He must also have patience, tact, firmness, and a liking and 14
aptitude for animal management. A person who is afraid of animals or who will become frustrated easily with them 15
will not do well. Above all, the trainer must not take out his frustrations on the animal by beating, kicking, or 16
using excessive restraint on the animal. A good animal trainer combines an intelligent respect for animals with a 17
lack of fear. 18
An ideal animal trainer will be— 19
• Systematic. 20
• Patient. 21
• Tactful and resourceful. 22
• Moderate. 23
• Observant. 24
• Exacting. 25
• Logical. 26
• Tenacious. 27
• Consistent. 28
Requirements 29
Previous experience and current abilities will determine the training needs of animals. Along with their physical 30
conditioning, trainers must evaluate the animals on their level of proficiency in leading; packing; riding; picketing; 31
standing; gaiting; swimming; balance; and conditioning to the sights, sounds, and smells of battle. Untrained 32
animals never used for pack purposes will require a complete training and conditioning program. 33
Exercise and Conditioning 34
An animal requires good conditioning to perform the work demanded of it without injury to its body and muscular 35
organs. You can acquire and maintain good conditioning through a progressive program of proper exercise and 36
feeding. Objectives of the program are endurance, stamina, a good state of flesh, and resistance to disease. You can 37
attain these objectives only by proper feeding and long periods of conditioning work at the slower gaits, mostly the 38
walk. You must condition both pack and riding animals to carry the weights required in field operations. 39
Exercise must be regular, graduated, and always within the capabilities of the animal. Working tired or unfit 40
animals can cause accidents. If an animal is idle for a considerable time, you must repeat its process of 41
daily. Animals need not be maintained in peak condition for field duty at all times. However, they should remain in 1
relatively short period of carefully scheduled work will put them in fit condition for anticipated duty. The kind and 1
amount of exercise given to animals depend on the type of work they are to perform, their current condition, and 2
the number of individuals available to exercise them. Although the most satisfactory exercise is gained by 3
assigning one or two animals to an individual, pack units (with limited manpower) will normally have to adopt 4
other methods. Begin any period of exercise with 10 to 15 minutes of walking to ensure good circulation, 5
particularly in the feet. Instead of hard surface roads, try to select dirt roads for exercise because they are easier on 6
the animals’ feet and legs. Also, work the animals on trails or cross-country to maintain their fit condition. If you 7
are exercising two animals, try to always ride one out and the other in and lead each alternately on his right and 8
left. This habit will get the animals used to both being led and ridden. End each exercise period with a 10-minute 9
walk to return the animals to the stables dry and breathing normally. The walk is the prime conditioning gait. 10
Walking develops muscle, while trotting improves balance, and galloping develops wind. If you use either of the 11
faster gaits in excess, the animal will lose rather than gain condition. Determine the length of trot periods by the 12
condition of the animals but in no case should you exceed seven minutes. Vary the routes for exercise from day to 13
day so that the animals will not recognize the route and try to hurry back to the stables. Also use different routes to 14
relieve monotony. Try to set up the training and conditioning program according to the amount of time available 15
and the level of proficiency of the animals and handlers. 16
Program Development 17
At the beginning of training, animals may be in poor physical condition and unaccustomed to hard work. To 18
properly condition animals, yet avoid injury, ensure operations are long in duration but mild in character. 19
According to the training principles mentioned above, each animal should receive advanced training that includes 20
gentling, leading, riding, standing, packing, gaiting, swimming, and seasoning to battle conditions. Use actual 21
field movements, progressive in length, throughout the training period to build up endurance. Conduct a part of 22
such field movements and other phases of training at night to prepare the animals for night operations. Pay close 23
attention to the animals during night training to determine if any are night blind. Personnel responsible for 24
training animals should know the use of restraining devices for controlling animals. Such devices include the 25
twitch, cross tie, and blinds. Exercise great care, however, in the use of such devices. It is advisable to select the 26
mildest and least dangerous method of restraint necessary to achieve the desired results. Remember, kindness, 27
perseverance, and tact will often accomplish the desired purpose without the need for restraint. 28
Restraint of Animals. Many ingenious devices have been developed over the years for restraining animals. Some 29
have proven useful and humane and have helped to quiet and train animals. Others, while they temporarily quiet 30
and subdue the animal, make its attitude worse than it was originally. Once you use these methods on an animal, it 31
will get to the point where it is neither gentle nor likely to carry a load. It will start showing many bad habits, such 32
as bucking off the pack load. Remember, use restraints only when needed and use the least amount of restraint 33
needed. 34
Blinding.This methodis the easiest way to restrain an animal. Make sure you tie the animal securely to a tree or 35
post. Then take a piece of cloth (a gunny sack, a jacket) or anything else that you can place over its eyes and tie it 36
around the back of the animal’s head. When blinded, an animal will seldom try to move because he will not be able 37
to see. 38
NOTE: Under no circumstances should you move an animal, no matter how slightly, while it is blinded.
39
Twitches. Animal handlers use twitches because they are the handiest and most common method of restraint. As it 40
shuts off circulation in the lip, never use it continuously for an extended time and never with greater force than is 41
necessary. Make a twitch by running a small piece of rope or rawhide through a hole in the end of a rounded piece 42
of wood two- to five-feet long, such as a pick handle, and tying it in a short loop. Pass the loop of the twitch over 43
the upper lip, which you seize by your hand and draw it forward, taking care to turn the edges of the lip in to 44
prevent injury to the mucous membranes. Then tighten the loop by twisting the stick until you obtain sufficient 45
pressure. Light changes in pressure with increases against resistance and decreases as the reward for obedience will 46
help in training him to be more controllable. You should seldom use the twitch as a restraint while saddling or 1