.
.
T207M and T208M
IP Telephone
© Copyright by TADIRAN TELECOM LTD., 2006-2007. All rights reserved worldwide.
The Coral is Protected by U.S. Patents 6,594,255; 6,598,098; 6,608,895; 6,615,404 All trademarks contained herein are the property of their respective holders.
The information contained in this document is proprietary and is subject to all relevant copyright, patent and
other laws protecting intellectual property, as well as any specific agreement protecting TADIRAN TELECOM
LTD.'s (herein referred to as the "Manufacturer") rights in the aforesaid information. Neither this document nor
the information contained herein may be published, reproduced or disclosed to third parties, in whole or in part,
without the express, prior, written permission of the Manufacturer. In addition, any use of this document or the
information contained herein for any purposes other than those for which it was disclosed is strictly forbidden.
The Manufacturer reserves the right, without prior notice or liability, to make changes in equipment design or
specifications.
Information supplied by the Manufacturer is believed to be accurate and reliable. However, no responsibility is
assumed by the Manufacturer for the use thereof nor for the rights of third parties which may be affected in any
way by the use thereof.
Any representation(s) in this document concerning performance of the Manufacturer's product(s) are for
informational purposes only and are not warranties of future performance, either express or implied. The
Manufacturer's standard limited warranty, stated in its sales contract or order confirmation form, is the only
warranty offered by the Manufacturer in relation thereto.
Table of Contents
Introduction... 1
Conventions... 2
Related Documentation ... 3
Phone Overview... 4
T207M Front View ... 4
T207M with TEM Front View ... 5
T208M Front View ... 6
T208M with TEM Front View ... 7
Input/Output Ports and Switches ... 8
PC Connection ... 9
Bottom and Side View ... 10
Component Descriptions ... 11
Desk Elevation Installation ... 13
Wall Mounting... 14
Operating the Phone ... 18
Overview... 18
Using the Telephony Features ... 19
Using the Fixed Function Keys... 20
Second Party Speaker Status ... 22
Using the Speakerphone or Headset ... 23
Volume Adjustment ... 28
Ring Adjustment ... 29
Making Calls ... 30
Making Internal Calls ... 31
Making External Calls... 39
Receiving and Answering Calls ... 46
During Idle ... 48
Station Telephony Features... 56
Overview... 56
Account Code ... 57
ACD and UCD Hunt Groups... 59
Activation Code ... 63
Auto Set Relocate... 64
Auto Set Relocate: Permanent ... 65
Auto Set Relocate: Temporary ... 66
Boss Groups... 67
Boss Groups: Using... 68
Boss Groups: Privacy ... 69
Boss Groups: Exclusive Hold ... 70
Boss Groups: Call Forwarding... 71
Call Forwarding / Follow Me ... 73
Call Log ... 77
Caller ID Control ... 81
Calls Waiting: Receiving... 82
Camp On (Call Back)... 84
Cancellation Code ... 86
Canned Messages... 87
Conference (Multi-Party) Calls ... 89
Conference Calls: Meet Me ... 90
Conference Calls: Conference Multi-Party Lock... 91
Conference Calls: Conference View/Release ... 92
COS Switchover ... 93
Directory ... 94
Divert Call ... 100
Do Not Disturb (DND)... 101
ELA (Extension Line Appearance) ... 103
ELA Group Line Keys: Programming ... 104
ELA Groups: Privacy ... 108
ELA Groups: Exclusive Hold ... 109
Executive Privilege ... 110
FlexiCall... 111
Freedom ... 116
Group Calls... 117
Group Calls: Preset Conference Activation ... 120
Group Calls: Temporary Conference Activation ... 121
Group Calls: Joining ... 122
Group Calls: Adding Participants (when not part of the Call) ... 123
Group Calls: Adding Participants (by Group Operator) ... 124
Group Calls: Submitting Request to Speak ... 125
Group Calls: Controlling Permission to Speak ... 126
Group Calls: Forced Release of a Participant ... 127
Group Calls: Forced Release of an Entire Group Call... 128
Help: Requesting ... 130
Help: Answering ... 131
Hold ... 132
Individual Remote System Services (IRSS) - Freedom... 133
Malicious Call Trace ... 140
Messages: Options... 141
Messages: Voice Mail... 144
Mute Microphone... 155
Page Queue ... 156
Paging: Announcing, Public Address ... 160
Paging: Voice Paging ... 161
Paging: Zone Page... 163
Park ... 164
Phone Lock... 166
Programming: Feature Keys... 167
Recording a Call ... 178
Redial ... 179
Relay (Accessory) ... 182
Reminder ... 183
Room Status... 184
Series Call ... 186
Silent Monitoring... 187
Speed Dialing: Private Library ... 190
Speed Dialing: Using Private and Public Libraries ... 194
Touch-Tone Dialing (DTMF) for Other Common Carriers (OCC)... 195
Transfer (Xfer) ... 196
Transfer: Broker/Consultation/3-Way Conference Call ... 200
Wakeup ... 204
Attendant Features ... 208
Available Functions ... 208
Call Forward ... 211
Canned Messages... 213
Malicious Call Trace ... 216
Room Status... 217
WakeUp... 219
Call Charge... 221
Station Setup Features... 223
System Features ... 226
Trunk Setup Features... 232
Setup... 237
Overview... 237
Coral Telephony Features ... 238
User Definitions Menu ... 244
Appendix A: Glossary ... 329
Appendix B: Tones ... 334
Appendix C: LED Indications (Programmable Keys) ... 337
Appendix D: ISDN Cause Numbers... 338
Appendix E: Troubleshooting ... 344
Introduction
The T207M/T208M or Terminal with soft keys meets all your telephony and office needs. It combines the ability to
communicate with the IP world with the solid dependability and high level of functionality available from the Coral. It can be used in a typical office environment or can connect to the Coral via the IP environment from an external location, enabling telecommuting without losing the benefits of the Coral’s rich features.
The benefits you receive from working with the phone will become an invaluable part of your work environment. While the technology employed in the phone is state of the art, using the telephone is simple and straightforward. You will immediately appreciate the easy to reach soft keys. Depending on the state of the telephone, the display automatically changes to provide you with the appropriate options.
The phone or Terminal with soft keys is a fully functional keyset that meets all your telephony and office needs. It combines the ability to communicate with the IP world with the solid dependability and high level of functionality available from the Coral.Many of the feature options, which have been assigned during initial installation, are provided on an extension (station) basis. Feature allocation may also be redefined to suit changing working stations or adapted to your individual requirements by your system administrator. Not every feature in this guide may have been installed in your system, or at your extension. Check with your system administrator for a list of the specific features installed. This User Guide provides a full description of the capabilities and operation of the T207M/T208M terminals.
The main section of this guide is organized according to the two distinct feature types – Station Features and Attendant Features. The appendices, located at the end of this guide, give basic explanations of special terms and operations used throughout the guide, and are useful to consult for a fuller explanation of telephony terms.
Conventions
The following typographical conventions are used throughout this guide.
Example Description
Icons are used to represent the actual fixed and navigator keys. See page 17 and page 12 for a complete listing.
[ARdl] Soft key names appear in a clear distinctive box. See page 265 for a complete listing.
HOLD Emphasized (bold) text indicates fixed function keys or Direct Station Selection (DSS) user programmable keys.
See page 20 for a complete listing.
Press [SRm#] and enter the station/room number, or scroll through the list using .
The scroll icon ( ) indicates that the following soft keys (when available) can be used to scroll through lists:[Next], [Prev], [f-Up], [f-Dn], [p-Up], [p-Dn].
“See Ring Adjustment” Text in italics refers you to another section of the guide or to other Coral system manuals. The blue font indicates that this is a clickable cross-reference link. Italicized text is also used for notes.
Related Documentation
• Attendant Console User Guide
• FlexSet 280, 280D, 280D-Z, 120, 120D and 120L User Guide • Program Interface and Database Reference Manual (Version 15.5)
Phone Overview
T207M Front View
Volume button
4 User programmed keys with removable faceplate
9 Fixed
Microphone Dial pad
(key pad) Handset
Speaker
Graphic display 4 Soft keys Flashing ring
and message waiting indicator
Navigator keys
T207M with TEM Front View
Volume button
TEM expansion module 2x 22 user programmable keys with removable faceplate Handset
Speaker
4 Soft keys Flashing ring
and message waiting indicator
Dial pad (key pad)
Graphic display
Navigator keys
9 Fixed function keys
Microphone
T208M Front View
Volume button
4 User programmed keys with removable faceplate
Microphone Dial pad
(key pad) Handset
Speaker
Graphic display 4 Soft keys and messageFlashing ring
waiting indicator
Navigator keys
T208M with TEM Front View
Volume button
4 User programmed keys with removable faceplate
9 Fixed function keys
Microphone Dial pad
(key pad) Handset
Speaker
Graphic display 4 Soft keys and messageFlashing ring
waiting indicator
Navigator keys
Input/Output Ports and Switches
These ports are located on the bottom of the phone (see the figure on page 10).
Component Description
Reset Button Used to reset the phone to its factory set default values. Link/Activity
Indicators
Indicates whether there is LAN/Intranet and/or PC activity.
LAN Connector Socket
Use this RJ-45 connector port to connect your phone to the LAN/WAN.
PC Connector Socket Use this RJ-45 connector port when only one LAN/WAN outlet is available in your immediate vicinity. Connect your PC’s LAN wire to this connection socket while the phone is connected to the LAN/WAN.
Power Adapter Input Used to connect the AC power adapter to the phone to supply the required DC power when PoE is unavailable.
Note: An AC power adapter supplying 5 VDC/ 2000 mA is required. It is not supplied with the phone and must be ordered from the manufacturer only. The use of any other power adapter will void the warranty.
Power Source
Selector (available on some models)
• Adapter — Switch to this option when a power adapter is connected to the phone. • PoE: Power over Ethernet — Switch to this option to enable power for the phone
over your LAN/WAN connection.
Note: This feature is not available for T207M/NP and T207S/NP models. Handset Cord Port Connect the Handset cord to this RJ-9 port.
PC Connection
The PC can be connected to the LAN/WAN via the phone. The phone will always be active, even when the PC is turned off.
CAUTION!
The phone is not shipped with an AC power adapter. The ONLY AC power adapter that may be used with the phone is one purchased from the manufacturer.
*The use of any other AC power adapter will void the warranty*
LAN PC
DC-IN
5VDC...2A AC
power adapter
-Bottom and Side View
Handset connection TEM connector Headset connections Service port Do not openSource Adapter PoE Reset Wall-mount hole Service door Left view Bottom view Right view Product label Power Source DC-IN Adapter PoE Reset
button Activity Link/ green LED
indicators
LAN PC Power
adapter input
Power source selector
(available on some models,
not T207M/NP available on and T207S/NP)
Handset
RJ-9
Component Descriptions
The following table defines controls, buttons and keys found on the T207M/T208M.
Component Description
Dial Pad (Key Pad) Digit buttons used for dialing phone numbers or extension numbers.
T207M Display Displays pertinent calling/menu/line information, based on the phone status (e.g., idle, busy, dialing...).
The display is composed of three lines (128x32 pixels): System lines (1st and 2nd lines), and function options (on 3rd line) according to phone status. See page 15.
T208M Display Displays pertinent calling/menu/line information, based on the phone status (e.g., idle, busy, dialing...).
The display is composed of six lines (128x64 pixels): System lines (1st, 2nd, 3rd, 4th and 5th lines), and function options (on 6th line) according to phone status. See page 16.
Handset Works as typical phone handset.
Headset Non-manufacturer headset purchased by customer (see page 22, page 27, and page 239). Hook Switch On-hook or off-hook for handset.
Handset Latch Used to catch the handset when wall mounted or for elevated (60° or higher) desktop mounts. Loudspeaker Output sound device used in hands free operation, paging and ringing.
Microphone Input sound device used in hands free operation. Ring and Message
Waiting Lamp
Lamp flashes at a slow rate, indicating that a message is waiting.
Programmable Keys (DSS)
Provides a shortcut to a string of dial commands or telephone number, by using a pre-defined key, known as a DSS (Direct Station Selection) key. Instead of dialing a number or dial commands, this can be done by pressing the programmed key.
Several dial commands, in a series, may be programmed into one DSS key - useful for one-button speed dialing, voice response and voice mail system access, and other complex dialing patterns. There are Four user programmable keys on the T207M and T208M. A green LED lights when a key is activated. See Programming: Feature Keys on page 167.
Fixed Function Keys
Nine keys for basic features: MSG, CONF, DIR, HEADSET, XFER, REDIAL, HOLD, MUTE, SPKR (see page 20).
Fixed key OK(seeUsing the Fixed and Navigator Keys on page 17). Navigator Keys
and Up/down, right/left arrows used to move from one option to another on the display. Used for selecting without choosing or activating the option. See Using the Fixed and Navigator Keys on page 17.
Soft keys Located below the display panel, keys used to directly activate the feature option. See Using the Telephony Features on page 19.
Volume Button Adjust the volume (seeVolume Adjustment on page 28) of the following components: • Ringer - from idle or while the phone is ringing (see Ring Adjustment on page 29)
• Speaker/Handset/Headset - during a conversation (see Using the Speakerphone or Headset on page 23)
TEM Optional expansion module used to add additional programmable buttons to the phone. These programmable buttons may be configured only from the phone or its web page.
2 x 22 programmable buttons.
Desk Elevation Installation
The T207M/T208M can be placed on your desk at different angles.
NOTE! For full instructions regarding desk elevation, refer to the T207 and T208 Installation Manual.
Step A Step B Step C
Step D
Low Medium High
30
Step E Step F
Wall Mounting
The T207M/T208M can be wall mounted when required.
NOTE! For full instructions regarding wall mounting your phone, refer to the T207 and T208 Installation Manual.
Wall Phone
Using the Display Panel
The phoneDisplay provides an easy-to-use control interface. On this display several different classes of function information and controls are found. During normal operation the active function assumes control over the entire area of the display and all of the soft keys. Meanwhile, the System Lines (1st and 2nd lines) which usually, in idle state, include the time, date, site name (T208M only), station name and number, automatically change to relay pertinent information about telephony states and operations, and the calling party’s information.
Four soft keys located immediately below the display screen, act as triggers for any currently displayedphone function or option. All of the information on the display panel (bottom line) continually changes to reflect options related to the current state of the phone. In this manner, no matter which state the telephone is in (i.e. Idle, Ringing, etc.) the relevant option is always next to and enabled by one of the soft keys.
T207M Display Panel 10:50 26 May 2007
User Name Station Number
Ring and Message Waiting Indicator
Soft Keys Feature Options
Msg Log Dir Fwd
Time & Date
T208M Display Panel 10:50 26 May 2007
Site Name
User Name Station Number Ring and Message
Waiting Indicator
Soft Keys Feature Options
Msg Log Dir Fwd
Time & Date
Using the Fixed and Navigator Keys
The following table lists all theT207M/T208M fixed keys and describes the actions they invoke.
Fixed Key Action
Activates a telephony feature after selecting it with the navigator keys (same as using the soft key).
Press and hold down
Provides access to all theT207M/T208M functions availabe during idle via the Features menu and provides access to the other Main Menu options (see page 48). NOTE! In order for the Main Menu options to appear on the display panel, you must press and hold the OK button for at least three seconds.
Moves the cursor (→) left and right, or goes to the next or previous menu or list when the cursor is at the end of a line.
Used to scroll soft key option lists when ↓ , or ↑ appear on the display line above the soft keys. Press to scroll back one menu or list; to scroll forward one menu or list.
OK
OK
OK
Operating the Phone
Overview
Operating the phone is as simple as pressing a button. Operate the phone using a combination of soft and fixed keys. The phone options appear in the display area on the bottom line of the display panel, and automatically change to reflect the current state of the telephone.
Four soft keys, located immediately below the display panel, allow you to enable the relevant options as they appear. The soft key options change every time the phone status changes.
Nine fixed function keys are provided, the functions of which are system-wide programmable. Typical functions for these keys are:MSG, XFER, CONF, REDIAL, DIR, HOLD, HEADSET, MUTE, AND SPKR (seeUsing the Fixed and Navigator Keys on page 17).
Soft key functions can also be selected by pressing on the navigator keys. Pressing on the respective arrow moves the location of the cursor to the next function. To activate the required function, press the OK key.
Use [Esc] to bring theT207M/T208M display to the beginning of the soft key options. When the [Esc] soft key does not appear on the display panel, press the left key instead to return to the previous soft key options.
Press up/down keys and to scroll through lines of the soft key feature options. Press left/right keys and to move from one option to the next on the displayed line.
A selected option is indicated by an arrow at its left (→Fwd).
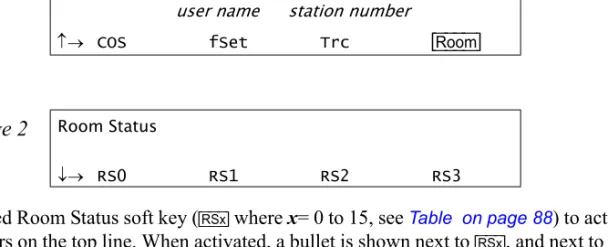
Additional options on a lower line of the display are indicated by a down arrow (↓ Msg). Additional options on a higher line of the display are indicated by an up arrow (↑ Room).
Using the Telephony Features
You do not have to memorize any access codes to activate any of the rich array of Coral system telephony features.
Each state change in the phone (such as from idle to ring, ring to answer, answer to transfer, etc.) causes the associated state-related features to appear on the display panel. Simply choose the feature you would like to activate by pressing its associated soft key. When the feature is activated, a bullet appears next to the feature. As shown below, while in Idle mode when DND (Do Not Disturb) is off, no bullet appears next to DND. When DND is activated, a bullet is displayed next to DND.
DND OFF
DND ON
NOTE! Figures depicting the various display panel (4-soft key) options appear throughout this guide. Where a list, menu or sub-menu continues through several lines, these are indicated as Page 1, Page 2, etc. The location of the soft key options that appear in the figures in this guide may differ from their actual locations on your phone.
Several telephony features are toggle switches. Therefore, the first time you press a feature’s soft key, the feature is activated or turned on. The second time you press the same feature’s soft key, the feature is canceled or turns off automatically.
See Index: Soft Keys and Feature Codes on page 264 for an alphabetic list of all available feature options.
Page 1
10:50 26 May 2007 Company xyzuser name station number
→ DND FlxC Redl PgQ
Page 2
*DND*user name station number
Using the Fixed Function Keys
Ninephone buttons are programmed during installation, and are the same for each keyset system-wide. These fixed system keys cannot be programmed from the telephone, and can only be changed by the system administrator. The nine fixed keys features are:
Feature Description
/ MSG Used to leave messages at other stations, view and answer messages left at your station,and access your personal voice messaging system. See “Messages: Options” on page 141 and “Messages: Voice Mail” on page 144.
/ CONF Used as 3-Way when COS is defined for 3-Way Conference Call. See “Transfer: 3-Way Conference”
on page 202.
DIR Used to search and place calls from the Shared and Personal directories. See “Directory” on page 94.
MSG
DIR CONF REDIAL
XFER
HOLD
HEADSET MUTE SPKR
VOL
2
1 abc def
5 6 4ghi jkl mno
8
7pqrs tuv wxyz
/ HEADSET Used to activate/deactivate Headset mode. A green LED indicates that Headset mode is activated.
See “Headset Only” on page 129.
/ XFER While engaged on a call you can activate a feature by pressing the Transfer key. When using Transfer, a special distinctive dial tone is heard, enabling you to either transfer the call, or activate a feature. Transfer puts the second party on Hold and provides one of the following: music, ring-back tone, busy tone or no sound at all, as defined system-wide. See “Transfer (Xfer)” on page 196.
/ REDIAL Used to redial the last number (most recent number) dialed from this phone. See “Redial” on
page 179.
/ HOLD The Hold key is used for placing a party on Hold while another call is made or received. The held party can hear one of the following: music, ring-back tone, busy tone or no sound at all, as defined system-wide. See “Hold” on page 132.
/ MUTE Used to activate/deactivate the voice transmit from this phone. A red LED indicates that the Mute feature in on. (seeMute Microphone on page 155).
/ SPKR The Speaker key is used to converse hands-free. When conversing through the speaker, voice volume can be adjusted. Volume of call monitoring, paging, etc. can also be adjusted by using the volume control button. A green LED is associated to indicate its status. See page 23 andpage 28.
Feature Description
HEADSET
XFER
REDIAL
HOLD
MUTE
Second Party Speaker Status
This feature alerts you when the loudspeaker of the party you are conversing with is activated for hands-free or group conversation. A Speaker tone and display message notify you when the called/calling party is in SPKR mode, or if they switch to SPKR mode during a call.
Therefore, when advised that the second party's keyset (FlexSet, DKT, T207M or T208M) is in Speakerphone mode, you can choose to refrain from publicizing private information.
Detection of your party's activated loudspeaker:
A speaker tone is heard and the SPKR ON message flashes on the second line of the display:
• when you answer a call initiated with an activated loudspeaker • when the called party answered you with an activated loudspeaker • during a call, when the second party activates the loudspeaker
ANSWER (2nd party) (2nd party) SPKR ON
Using the Speakerphone or Headset
The phone is equipped with a speaker so that it can operate as a speakerphone. This enables you to converse without lifting the handset. Pressing the speakerphone (SPKR) key automatically switches on the microphone and speaker. All dialing or conversation is automatically hands-free; the handset remains on the cradle.
There are, however, several ways of using the speaker key, such as: in conjunction with a headset, or when SPKR is programmed for on/off operation, and using the[S/HS](Speaker/Handset) soft key to switch between the handset and the speaker.
Hands-Free Conversation
With handset on cradle:When the handset is on the cradle and SPKR flashes, you can speak hands-free by pressing the flashing SPKR key or by using one of the methods described in Making Calls on page 30.
Switchover from speakerphone to handset:
When you are using the speakerphone and want to use the handset for private conversation, lift the handset. The SPKR key LED will go off.
Switchover from handset to speakerphone:
When you are using the handset and want to use the speakerphone, first press SPKR. When the SPKR key LED is lit, replace the handset on the cradle.
Disconnecting calls:
Either press the lit SPKR key when the handset is on the cradle or replace the handset onto the cradle when the SPKR key LED is off.
Call monitoring (when programmed for combined audio):
Using the S/HS Soft key (when the phone is programmed for SPKR On/Off key):
When using headset (or handset is off cradle):When your phone is equipped with a headset, you can answer and disconnect calls by pressing the SPKR On/Off key. When the SPKR key LED is lit, you are connected. Pressing the lit key will disconnect the call. To switch between handset and hands-free operation, you must press[S/HS] from the phone display.
With handset on cradle:
If the phone rings and SPKR flashes, you can speak hands-free by pressing the flashing SPKR key. The key LED will now be steadily lit.
Switchover from speakerphone to handset:
When you are using the speakerphone and want to use the handset for private conversation, lift the handset. The SPKR key LED will remain lit.
Switchover from handset to speakerphone:
When you are using the handset and want to use the speakerphone, first press[S/HS], then when the LED is lit, place the handset on the cradle.
Disconnecting calls:
There are two ways to disconnect calls: • Pressing the lit SPKR key.
When the Phone is programmed as Headset Only and for SPKR On/Off key
When your phone is equipped with a headset:When the Headset Only feature is activated (seeHeadset Only on page 129), and SPKR is set to operate as On/Off (connect/ release) switch, you can answer and disconnect calls by pressing SPKR.
When the key LED is lit:
You are connected. Pressing the lit key will disconnect the call. Disconnecting calls:
Press the lit SPKR key.
NOTES!
• See your system administrator to program SPKR to operate as an On/Off switch.
• When the phone is set for Zip Tone mode (see page 246), the ring sounds at the headset only, rather than through the speaker.
Volume
TEM expansion module 2x 22 user programmable keys with removable faceplate Handset
Headset
(purchased by the customer)
Speaker Microphone
Earpiece, electronic ringer
4 Soft keys Flashing ring and message waiting indicator
Dial pad (key pad)
Graphic display
Navigator keys
Microphone
Headset Cord Disconnect
• Headset Cord Disconnect enables activating a selected preprogrammed key by disconnecting the handset/headset cord. The feature enables you to automatically invoke a keyset function such as Do Not Disturb, Login/Logout, Attended/ Unattended, Call Forward, or any other preprogrammed key function, upon disconnection of the headset cord. • One of the Headset Cord Disconnect purposes is to block a telephone from accepting calls when the headset cord is
disconnected. Any call forwarding to the keyset will be automatically cancelled when the feature is activated.
• This feature is generally combined with the Headset Only feature to allow calls to be conducted via the headset/handset even if the cradle switch is on-hook.
NOTE! The Headset Cord Disconnect feature does not work with all headset equipment. The feature is operable only with headsets that do not use auxiliary equipment, such as splitters, volume amplifiers, external headset/handset switches.
• See your system administrator for the programmable button assigned for this feature. • The corresponding button should be programmed to perform the required function. Operation
• If a key is preprogrammed with a feature having ON/OFF states (e.g. Do Not Disturb), the system will toggle the feature Off when the Cord is connected, and On when the Cord is disconnected. The Login/Logout function is excluded from this rule, as it operates in the reverse mode.
• If the key is programmed with a feature without ON/OFF states, the system will operate the same key contents when connecting/disconnecting the cord (e.g. dialing an external number).
• When enabled by disconnecting the cord, the feature can be disabled also by pressing the button.
• The feature activated by pressing a button when the cord is plugged in, will remain active when the cord is disconnected. • Connecting the cord will cancel the feature that has been activated by pressing a programmable key or dialing a feature
Volume Adjustment
Press the volume button to increase or decrease the volume of the phone loudspeaker and handset. While the volume is being changed, the top line of the display shows the volume level.
Speaker volume levels range from a MIN unit value of 0 to a MAX unit value of 9 (14dB range). The Handset volume level ranges from a MIN unit value of 0 to a MAX unit value of 9 (14dB range).
Speaker and Handset each has its own audio level and is independently influenced by volume buttons as follows:
• Speaker: When conversing through the speaker, voice volume can be adjusted. Volume of call monitoring, paging, etc. can also be adjusted. This can also be done from idle.
• Speakerphone: When conversing hands-free, the built-in sensitive microphone is used to amplify your voice. The system operates in such a way that the two connecting parties (i.e. you and the far side) cannot be heard simultaneously; the stronger party is heard. Press VOL
+
to hear the far side more strongly, press VOL-
to be heard more easily (or to break in).Ring Adjustment
The phone ring volume can be changed from idle, or by using the volume button while the phone is ringing. You can use this to change the ring of two different telephones in the same room. Also note that the Message Lamp lights in beat with the ring while the phone is ringing.
Adjusting the ring volume level while ringing:
Press the up or down volume button. The ring volume level ranges from 0 (MIN ring) to 9 (MAX ring).
Adjusting the ring level from idle:
1. Press and hold OK and choose [Userdef]. 2. Choose Ring Volume.3. Adjust volume using the volume button (seeVolume Adjustment on page 28).
4. Press [Save].
.
CAUTION!
Making Calls
To place a call use any of the following methods:
• Lift the handset and dial from the dial pad.
• Press SPKR and begin dialing directly from the dial pad.
• Begin dialing without lifting the handset. The Speaker is automatically activated.
• Press any idle (LED not lit) DSS or LOOP, LOOP originating only, or LINE key, and after hearing a dial tone begin dialing.
NOTE! If you receive error messages when attempting to connect, refer to Appendix E: Troubleshooting on page 262 at the end of this document.
The options available in each of the selected phone states are described on the following pages:
Internal Calls
Upon Hearing Ringback Tone...page 31 Upon Hearing Reorder Tone...page 33 Upon Hearing Busy Tone...page 34 During a Call...page 36 During a Break In...page 38
External Calls
Making Internal Calls
Upon Hearing Ringback Tone
After dialing an internal destination number, the following features appear on your phone display when you hear a ringback tone. Wait for answer or press the nearby soft key to activate the required feature.
See page 19 for further details.
NOTE! A message indicating the called party’s status (or other relevant information) may appear on the second line of the display until you answer the call (seeCanned Messages on page 87).
[Msg.] or MSG Leave Message. If no one answers your call, use this feature to leave a “message” at the called party’s station. This feature lights the message waiting lamp at the called party’s station indicating that a message was left, and it leaves a simple message such as CALL SUSAN on the destination station’s keyset display. See Messages: Options on page 141.
[MsgW] Message Waiting.The Attendant can use this feature to leave a message waiting indication at a busy or idle station, room or group. See Leaving a message indication at a busy or non-answering station: on page 143.
[Camp] Camp On, also known as Call Back. When a station does not answer, you may request that the system automatically call you back when the required destination number is available. See Camp On (Call Back) on page 84.
[VPg] Voice Page the called party’s keyset station using this feature. Your call is automatically answered and your voice heard over the called party’s speakerphone. See Paging: Voice Paging on page 161.
INTERNAL called number or name
[Mute] or MUTE Mute can be activated during ringback so that when the call is answered your side of the conversation is muted and the called party will not hear you. When this feature is activated by the MUTE on/off toggle switch, a bullet appears to the left of [Mute] and MUTE LED is lit red. The mute feature deactivates the microphone for your speakerphone and handset or headset. Press the toggle key again to reactivate the microphone (seeMute Microphone on page 155).
Upon Hearing Reorder Tone
After dialing an internal station that is idle, but has been set to Do Not Disturb or UNATTEND, the following features are
available. After dialing a station and receiving a reorder tone, override can be applied by pressing [oDND].
[Camp] Camp On, also known as Call Back. Use this feature to have the system automatically call you back when the DND destination station becomes available. See Camp On (Call Back) on page 84.
[2Rng] Not used during reorder tone.
[VPg] Voice Page the called party’s keyset station using this feature. Your call is automatically answered and your voice heard over the called party’s speakerphone after the Voice Page tone stops. See Paging: Voice Paging on page 161.
[Mute] or MUTE Mute can be activated during reorder tone so that when the Do Not Disturb is overridden, your side of the conversation is muted and the called party will not hear anything. When this feature is activated by the [Mute]
or MUTE on/off toggle switch, a bullet appears to the left of [Mute] and MUTE LED is lit red. The mute feature deactivates the microphone for your speakerphone and handset or headset. Press the toggle key again to reactivate the microphone. See Mute Microphone on page 155.
[Msg.] or MSG Leave Message. Use this feature to leave a “message” at the called party’s station. This feature lights the message waiting lamp at the called party’s station indicating that a message was left, and it leaves a simple message such as CALL SUSAN on the destination station’s display. See Messages: Options on page 141.
[BrkI] Break Inoperates as [oDND].
[oDND] DND Override enables an authorized user to send a ring tone thus overriding the Do Not Disturb status. When you hear the reorder tone, if DON’T DIST or UNATTENDED message appears, override can be applied and your call can be put through to the station.
DONT DIST called number or name
Upon Hearing Busy Tone
After dialing an internal destination number, the following features appear on your display when you hear a busy tone. Hang up or press one of the soft keys.
[Msg.] or MSG Leave Message. Use this feature to leave a “message” at a busy station. This feature lights the message waiting lamp at the busy station and leaves a simple message such as CALL SUSAN on the destination
station’s keyset display. See Messages: Options on page 141.
[MsgW] Message Waiting.The Attendant can use this feature to leave a message waiting indication at a busy or idle station, room or group. See Leaving a message indication at an idle station: on page 142.
[Camp] Camp On, also known as Call Back. Use this feature to have the system automatically call you back when the busy destination station is available. See Calls Waiting: Receiving on page 82.
[BrkI] Break-In enables an authorized user to break into an established two party call. Both conversing parties will hear the Break In warning tone. Your voice will be heard after the warning tone stops. During Break-In you can release the ports or alternate between parties. See During a Break In on page 38.
NOTE! Only stations with appropriate COS may activate the Break-In feature.
[2Rng] Send Call Waiting is used to send a call waiting tone to the busy party. This feature is also known as Call Waiting or Call Offer. The station is now aware that another call is waiting. Your side hears a second (quicker) ringback tone (system-wide defined).
BUSY called number or name
[VPg] Voice Page the called party’s keyset station using this feature. The other party receives a message that they are being paged. Your voice is heard over the called party’s speakerphone after the warbling tone stops. See Paging: Voice Paging on page 161.
[Num] Number is used to briefly display the caller’s dial number instead of the name.
[Mute] or MUTE Mute can be activated during busy tone so that if you break-in, your side of the conversation is muted for silent monitoring (handset, headset and speakerphone). When this feature is activated by the [Mute] or MUTE on/off toggle switch, a bullet appears to the left of [Mute] and MUTE LED is lit red. The mute feature deactivates the microphone for your speakerphone and handset or headset. Press the toggle key again to reactivate the microphone. See Mute Microphone on page 155.
[SM2] 2-Way Silent Monitoring is used to monitor both sides of a 2-way conversation simultaneously. This feature can be activated from idle, or while attempting to call a busy or non-answering destination. At the prompt, dial the station or dial number. See Silent Monitoring on page 187.
During a Call
The following features are available during an internal call:
[PgQ] Page Queue places your call on hold by sending it to one of ten Page Queue destinations. You are then free to page all the system members from your phone and announce that there is a call for Mr. Doe on a specific Page Queue Line. The call can be picked up from any system station. See Page Queue on page 156.
[Xfer] Transfer passes your call to another destination. Pressing[Xfer]places the called party on Hold. Dial a number (internal or external), and disconnect to transfer the call, or first announce the call and then disconnect. See Transfer (Xfer) on page 196.
[Hold] Hold places the active call on hold. See Hold on page 132.
[Mute] or MUTE Mute can be activated during a conversation to mute your side of the conversation (handset, headset and speaker-phone). When this feature is activated by the [Mute] or MUTE on/off toggle switch, a bullet appears to the left of [Mute] and MUTE LED is lit red. The mute feature deactivates the microphone for your
speakerphone and handset or headset. Press the toggle key again to reactivate the microphone. (seeMute Microphone on page 155).
[Wait] Calls Waiting can be used to view the number of calls waiting for you during a conversation. See ACD and UCD Hunt Groups on page 59.
[Park] Park your call at your station so that you can pick it up at another system station. See Park on page 164.
[Num] Number is used to briefly display the caller’s dial number instead of the name.
ANSWER 2nd party name or number
[S/HS] Speaker/Headset toggles between speaker and the handset operation. See Using the Speakerphone or Headset on page 23.
[Priv] Privacy puts your phone into Privacy mode. This prevents other members of your Boss Group or ELA Group from accidentally joining your conversations.
[eHld] Exclusive Hold puts your phone into ExclusiveHold mode. This ensures that a call placed on hold can be retrieved only at your station. If Exclusive Hold is cancelled, the call put on hold can be retrieved by any other member of your Boss Group or ELA Group.
[WDND] Do Not Disturb - Whisper Page is used to enable or block your phone from receiving a message whispered by another station. When this feature is activated, a bullet appears next to [WDND]. If you press while on a call, the feature will be active for the duration of the current call only.
During a Break In
After dialing a busy destination number and choosing [BrkI] (seeUpon Hearing Busy Tone on page 34), both conversing parties can hear your voice. You may press SPKR or hang up in order to allow the continuation of the call, or press on one of the following soft keys.
[Xfer] Transfer is used to converse in private with the caller party (from the original 2-way call). The called party is released. See Transfer (Xfer) on page 196.
[Mute] or MUTE Mute can be activated during a Break In to mute your side, allowing you to listen to the conversation but not speak. When this feature is activated by [Mute] or MUTE on/off toggle switch, a bullet appears to the left of
[Mute] and MUTE LED is lit red. The mute feature deactivates the microphone for your speakerphone and handset or headset. Press the toggle key again to reactivate the microphone (see page 155).
[fRls] Forced Release enables an authorized user to end the conversation and release two ports actively connected to each other.
[Dest] Destination is used to converse, in private, with the 3rd party. The called party is put on hold. Press again for 3-way conversation.
[Src] Source is used to converse, in private, with the called party. The 3rd party is put on hold. Press again for 3-way conversation.
[Wait] Calls Waiting can be used to view the number of calls waiting for you during a conversation.
[Num] Number is used to briefly display the two port dial numbers instead of the names.
B TO called number or name
Making External Calls
When Making External Calls:
• In some systems an outside dial tone must be heard before dialing can begin.
• In some systems using Automatic Routing Selection, internal dial tone or no tone is heard after dialing the access code. • In some cases (as defined by Class of Service) dialing must begin with a Forced Account code before the called number
can be dialed. When Forced Account code is required, the distinctive dial tone will be heard after dialing the external line code, and the ENTER ACCOUNT # message appears on the top line. See Account Code on page 57 and Caller ID
Control on page 81.
• Stop Dial. Press[Stop]or # after the external number to tell the system that you have finished sending digits over a trunk line. In response the system sends your call immediately towards the destination without waiting for inter-digit time out. • In certain systems the cost, or number of meter units of the call are displayed, after an external call terminates. This
appears for a short while, or until another call is made or received, in the format defined for your system.
• Some systems may be programmed with a limit to the duration of outgoing externals calls. Once the limit is reached, the call will be automatically disconnected.
• On external calls routed via an ISDN trunk, call messages are displayed (such as connection status, call fail, etc.). Most messages are for system administrators and technicians and will not be seen during normal operation (see the Message Definitions table below).
Message Definition
NO B.C: If the Bearer Capability of the trunk or dial service you are attempting to connect to does not match your station’s COS.
NON ISDN ROUTE: If your station’s COS is set to ISDN only and call attempts are made through a trunk group not defined as ISDN only.
CO DISC./USER BUSY: The party called is engaged.
ON HOOK BY/NORMAL CLEAR:
The called party has hung up (on hook, idle).
CO DISC./CALL REJECTED: The call cannot be completed because the called party does not allow it.
CO DISC./CAUSE #: ISDN protocols define error messages, with codes indicating the cause of failed connections. See Appendix D: ISDN Cause Numbers on page 256.
Upon Hearing Ringback Tone
After dialing an external destination number, the following features appear on your phone display when you hear the ringback tone. Wait for an answer or press one of the soft keys to activate the required feature.
[Msg.] or MSG Leave Message is used when dialing a network destination.
If no one answers your call, use this feature to leave a “message” at the called party’s station. This feature lights the message lamp at the called party’s station indicating that a message was left, and a simple message such as CALL SUSAN is left on the destination station’s keyset display. See Messages: Options on
page 141.
[Mute] or MUTE Mute can be activated during ringback so that when the call is answered your side of the conversation is muted and the called party will not hear you. When this feature is activated by the [Mute] or MUTE on/off toggle switch, a bullet appears to the left of [Mute] and MUTE LED is lit red. The mute feature deactivates the microphone for your speakerphone and handset or headset. Press the toggle key again to reactivate the microphone. (seeMute Microphone on page 155).
[ARdl] Auto Redial is used to have the system automatically redial the unanswered destination. Further redial options are available after activation (seeRedial on page 179).
1. Press [ARdl]. The system will now automatically redial at timed intervals.
2. When the called party answers, press the flashing SPKR key or lift the handset to enable conversation.
[Elps] Elapsed Time - not used during ringback.
[Wait] Calls Waiting is used to view the number of calls waiting for you. See ACD and UCD Hunt Groups on page 59.
OUT trunk line
DIAL outside telephone number
[Flsh] Flash on Trunk is used to send a signal through the system to trunk lines in order to operate certain types of features that are available on the second system. The second system is a telephone switching center, PABX or another Coral system. This feature is also known as Calibrated Opening.
[Num] Number is used to briefly display the trunk dial number instead of the name.
[Park] Not used during ringback.
[Stop] Stop Dialing is not used during ringback. Press this button before you hear ringback tone, in order to notify the system when dialing out has been completed. In response the system sends your call immediately towards the destination without waiting inter-digit time out.
[OCC] OCC is used for users connected with pulse trunks and/or for when your phone is defined with Auto Transfer. This feature enables you to send touch-tone dialing (DTMF tones) over non-DTMF trunks or stations for applications or services (such as Voice Mail) requiring DTMF tones. See Touch-Tone Dialing (DTMF) for Other Common Carriers (OCC) on page 195.
[Ser] Not used during ringback.
Upon Hearing Busy Tone
After dialing an external destination, the following features appear on your phone display when you hear a busy tone. Hang up and dial later or press the nearby soft key to activate the required feature.
[Msg.] or MSG Leave Message is used when dialing network destinations and not external destinations.
Use this feature to leave a “message” at a busy station. This feature lights the message waiting lamp at the called party’s station indicating that a message was left, and it leaves a simple message such as CALL SUSAN on the destination station’s keyset display. See Messages: Options on page 141.
[Camp] Camp On, also known as Call Back. Used only when dialing network destinations and not external
destinations. When the network station is busy, you may request that the system automatically call you back when the required destination number is available. See Calls Waiting: Receiving on page 82.
[ARdl] Auto Redial is used to have the system automatically redial the unanswered destination. Further redial options are available after activation (seeRedial on page 179).
[Save] Save Number is used to save the dial number of the busy destination. The saved number can then be redialed by pressing [Redl] [Save] from idle (seeRedial on page 179).
NOTE! The saved number will remain in memory until another number is saved by repeating the above procedure.
OUT trunk line
USER BUSY
During a Call
The following features are available during an external call:
[PgQ] Page Queue places your call on hold by sending it to one of ten Page Queue destinations. You are then free to page all the system members from your phone and announce that there is a call for Mr. Doe on a specific Page Queue Line. The call can be picked up from any system station. See Page Queue on page 156.
[Xfer] Transfer passes your call to another destination. Pressing[Xfer]places the called party on hold. Dial a number (internal or external). Disconnect to transfer the call, or first announce the call and then disconnect. See Transfer (Xfer) on page 196.
[ARdl] Auto Redial is used for outgoing calls only. Use Auto Redial to have the system automatically redial the unanswered destination. Further redial options are available after activation. See Redial on page 179.
[Hold] Holdplaces the active call on hold. See Hold on page 132.
[Mute] or MUTE Mute can be activated during a conversation to mute your side of the conversation (handset, headset and speakerphone). When this feature is activated by the [Mute] or MUTE on/off toggle switch, a bullet appears to the left of [Mute] and MUTE LED is lit red. The mute feature deactivates the microphone for your
speakerphone and handset or headset. Press the toggle key again to reactivate the microphone. (seeMute Microphone on page 155).
[Elps] Elapsed Time toggle feature is used to view or cancel the call duration in HH:MM:SS format up to 13 hours (12:59:59). See Setup on page 237.
EXT ANS trunk line
DIAL outside telephone number
[Save] Save Number is used to save the dial number of the called external destination. The saved number can then be redialed by pressing [Redl] [Save] from idle (seeRedial on page 179).
NOTE! The saved number will remain in memory until another number is saved by repeating the above. [Park] Park your call at your station so that you can pick it up at another system station. See Park on page 164.
[Wait] Calls Waiting is used to view the number of calls waiting for you during a conversation.
[Flsh] Flash on Trunk is used to send a signal through the system to trunk lines in order to operate certain types of features that are available on the second system. The second system is a telephone switching center, PABX or another Coral system. This feature is also known as Calibrated Opening.
[Num] Number is used to briefly display the trunk dial number instead of the name.
[OCC] OCC is used for users connected with pulse trunks and/or when your phone is defined with Auto Transfer. This feature enables you to send touch-tone dialing (DTMF tones) over non-DTMF trunks and stations6 for applications or services (such as Voice Mail) requiring DTMF tones. See Touch-Tone Dialing (DTMF) for Other Common Carriers (OCC) on page 195.
[Ser] Series is used to mark an external call before transferring it to a third party. This causes the call to return to you after the third party hangs up. This feature can only be used during conversation.
[ActC] Account Code is used to enter an account code for the current external call. The code is marked on the SMDR printout. See Account Code on page 57.
[Priv] Privacy puts your phone into Privacy mode. This prevents other members of your Boss Group or ELA Group from accidentally joining your conversations.
Receiving and Answering Calls
There are several ways to answer calls. Answer the call directly by using the conventional methods such as pressing the flashing SPKR key, lifting the handset or pressing any flashing key (DSS, LOOP, Line, etc). Other options include using one of the state-related Coral system telephony features before you answer or diverting the unanswered call. The state related features automatically appear, as shown in the display below:
The caller ID is displayed on the top line.
NOTE! If caller ID has been blocked (seeCaller ID Control on page 81), the # RESTRICTED message for incoming internal calls or # UNAVA message for incoming external calls appears on the top line instead.
[DND] Do Not Disturb is used to send a reorder (busy) tone to the incoming call, thus avoiding answering the call. Once DND is activated, all incoming calls will receive reorder tones. See Do Not Disturb (DND) on page 101.
[Mute] or MUTE Mute can be activated during ringing (before answering) so that when the call is answered your side of the conversation is muted, and the caller will not hear you. When this feature is activated by the [Mute] or MUTE on/off toggle switch, a bullet appears to the left of [Mute] and MUTE LED is lit red. The mute feature deactivates the microphone for your speakerphone and handset or headset. Press the toggle key again to reactivate the microphone. (seeMute Microphone on page 155).
[FwdA] Call Forward All. Use this feature to forward all incoming calls to another destination. To operate, press
[FwdA] when your phone is ringing and select the destination. See Call Forwarding / Follow Me on page 73.
caller #
[eAll] Call Forward All External. Relevant for external calls only. Use this feature to forward all incoming external calls to another destination. To operate, press [eAll] when your phone is ringing and select the destination. See Call Forwarding / Follow Me on page 73.
[Num] Number is used to briefly display the caller’s dial number instead of the name.
[Wait] Calls Waiting is used to view the number of calls waiting for you (including this incoming call).
During Idle
The following telephony features appear by default on the third line of your phone display during idle. Alternatively, they can be reached by pressing and holding (for at least three seconds) OK until the Main Main appears, and then choosing Features .
Tip: Features and their locations in the idle state may be redefined to suit changing working stations or adapted to your individual requirements by your system administrator. Not every feature in this guide may have been installed in your system, or at your extension. Check with your system administrator for a list of the specific features installed.
T207M Features Menu T208M Features Menu
10:50 26 May 2007 Company xyz
user name station number
↓→ Msg Log Dir Fwd
Esc Main Menu:
Sysdef
Features
Esc Main Menu:
Sysdef Userdef
[Msg] Message is used to view, answer and delete messages, or to leave a message at another system station or at a network number. See Messages: Options on page 141.
[Log] Call Log allows you to view and redial themost recent incoming/ outgoing calls. See Call Log on page 77.
[Dir] Directory provides you with a searchable directory listing. Both Shared and Personal records are combined and organized alphabetically, for easy retrieval. See Directory on page 94.
[Fwd] Call Forward enables you to define the conditions under which incoming calls to your station are forwarded to another destination. See Call Forwarding / Follow Me on page 73.
[DND] Do Not Disturb is used to block all incoming calls to your station. See Do Not Disturb (DND) on page 101.
[FlxC] FlexiCall allows you to set a telephone located outside the enterprise as your phone’s double. Use this feature to edit FlexiCall options. See FlexiCall on page 111.
[Redl] Redial is used to redial the last dialed number, or a number that has been saved. See Redial on page 179.
[PgQ] Page Queue retrieves a held Page Queue call. A Page Queue call can be picked up from any system station. See Page Queue on page 156.
[Hold] Hold retrieves a call from hold. See Hold on page 132.
[Remd] Reminder is used to set, review, or cancel reminders, which will ring your phone at a designated time. More than one reminder can be programmed. See Reminder on page 183.
[PkUp] Call Pickup enables you to pickup another ringing station in your system. See Call Pickup on page 80.
[Camp] Camp On, also known as Call Back. When a network station is busy or does not answer, you may request that the system automatically call you back when the required destination number is available. See page 84.
[Park] Park.When a call is parked at your station, [Park] appears with a bullet to the left. Use this function to retrieve the call. See Park on page 164.
[WPg] Whisper Page is used to quietly page one party of a two party call. The other party does not hear the whisper page. See Whisper Paging on page 206.
[SM] Silent Monitor enables an authorized (COS and AUTHORIZATION) user to monitor any port, station or trunk (except conference), without warning to the monitored party. See Silent Monitoring on page 187.
[ActC] Account Code is used to mark an external call (incoming or outgoing) with an account code, which can be used for later reference/billing. Used to enter an account code for the current external call.. See Account Code on page 57.
[CID] Caller ID Control overrides the system-defined caller ID defaults when making external calls (as well as internal calls, depending on system-wide settings). Thus, if your ID is sent by default when calling external numbers, selecting this will block the number, and vice versa. See Caller ID Control on page 81.
[Wake] Wake Up is used to set, review, or cancel wakeup calls which will ring your phone at a designated time. Wakeup on page 204
[aWk] Attendant WakeUp is relevant for Attendant Console only. Press [aWk] to access the attendant wakeup options. See WakeUp on page 219.
[CIns] Conference Inspect allows you to release a conference participant from an ongoing conference. You may also view the participant list. See Conference Calls: Conference View/Release on page 92.
[GpCl] Group Calls is used to activate Group Call Conference features. See Group Calls on page 117.
[ACD] ACD/UCD Options is used to activate ACD/UCD features for Call Center or Hunt group agents. See ACD and UCD Hunt Groups on page 59.
[Lock] Phone Lock is used to prevent unauthorized persons from using your phone line. Incoming calls may still be answered. See Phone Lock on page 166.
[fSet] Setup is used to program your station for specific feature activation. See Setup on page 237.
[Trc] Malicious Call Trace is used to record the next x (a system-defined variable) calls to your phone. A list of these calls can be sent to a printer or terminal. See Individual Remote System Services (IRSS) - Freedom on page 133.
[aTrc] Attendant Call Trace is relevant for Attendant Console only. Use Attendant Malicious Call Trace to set or print a call trace for any station. See Malicious Call Trace on page 216.
[Room] Room Status (or Canned Messages) is used to toggle the room status definition (or canned message) of your station on or off. See Room Status on page 184 or Canned Messages on page 87.
[aRS] Attendant Room Status (or Attendant Canned Messages) is relevant for Attendant Console only. Use the Attendant Room Status feature to toggle the room status definition (or canned message) of any station on or off. See Room Status on page 217 or Canned Messages on page 213.
[bFwd] Boss Group: Call Forward enables you to define the conditions under which incoming calls to your Boss Group are forwarded to another destination. See Boss Groups: Call Forwarding on page 71.
[aFwd] Attendant Call Forward is relevant for Attendant Console only. Used by the attendant to program stations, boss groups and ACD/UCD groups so that incoming calls ring at another destination. See Call Forward on page 211.
[Chrg] Call Charge is relevant for Attendant Console only. This attendant feature shows the charges accumulated per station. The attendant may reset and print the Charge Table content. See Call Charge on page 221.
[tSet] Trunk Setup is relevant for Attendant Console only. Trunk Setup allows the attendant to define trunks for specific feature activation. See Trunk Setup Features on page 232.
Return Calls
Options
This class of calls typically indicates Return calls from busy or no answer stations, user errors, system errors or messages that are sent back to the attendant after an operation has succeeded or failed. Calls that are returned to the attendant generally require additional operations. To help you identify the type of return call that is pending, accompanying detailed messages are also shown on the console display.
Use the following guide to navigate through this topic:
Intercepted Calls (Attendant Station)
The attendant may be called upon to assist with intercepted calls to a station. A station’s call could be intercepted for the following reasons:
• Dial Fail: Incomplete number dialed.
• COS Fail: Class of Service denies the use of a certain feature. • Toll Barrier: Block on certain external numbers.
• Undefined Destination: The destination is not recognized by the system.
• Passcode Fail: Illegal Account Code. VFAC number is not recognized by the system.
Answering Intercept:
1. Answer the call. The intercepted caller number and its COS number are displayed on the first line of the display. The second system line displays a written fail message and the dialed number, feature code or outgoing destination number. 2. Ask the caller for the dialed number. If the number is incorrect or a denied feature, the attendant can transfer the call to
another destination.
INTCPT caller # COS #
DIAL/COS/T-BAR/UNDEFINED/FAIL dialed #
Ports Without Disconnect Supervision (Attendant Station)
When two Ports Without Disconnect Supervision (PWDS) are connected, the length of conversation allowed is predetermined. The attendant is called from time to time to control the connection.
Your phone rings
Connected parties hear break-in warning tone
Answering return calls – PWDS: 1. Answer the call.
2. The connected parties hear break-in warning tone. 3. Listen for conversation.
4. If the conversation has ended, press [fRls] (Forced Release).
Otherwise, press SPKR to continue the call for another period of time.
PWDS CALL your #
party #1 PWDS party #2
↓→ DND Mute FwdA eAll
BTO party #1 party #