IBM 5100
BASIC Introduction
ce
This manual introduces the IBM 5100 Portable Computer that can be programmed with the BASI C language. It is intended to provide persons using the 5100 with the information necessary to operate the 5100 using the BASIC language.
Related Publications
• IBM 5100 BASIC Reference Manual, SA21-9217
• IBM 5100 BASIC Reference Card, GX21-9218
• IBM 5100 Communications Reference Manual, SA21-9215
Second Edition (December 1975)
This is a major revision of, and obsoletes, the previous edition SA21-9216-0. Changes are continually made to the specifications herein; any such changes will be reported in subsequent revisions or technical newsletters.
Requests for copies of IBM publ ications should be made to your I BM
repre-o
o
o
Contents
o
CHAPTER 1. INTRODUCTION 1 CHAPTER 5. OTHER WAYS TO PUT VALUES
About This Manual INTO PROGRAMS 58
C~:I'
About BASI C . 1 The READ, DATA, and RESTORE Statements. 58About the 5100 3 The INPUT Statement 60
Alphameric Keys. 3 Prompting Your Input 61
Numeric Keys. 3 Entering Character Variables into Programs 62
Operati ng Keys 5 A. Review of What You've Done. 63
BASIC Command Keywords 6
C
~, BASIC Statement Keywords 6 CHAPTER 6. MAKING CHANGES TO YOURArithmetic Operator Keys. 6 PROGRAMS. 64
Getting Started 6 Correcting Keying Errors 64
Entering and Displaying Data. 7 I nserti ng New Li nes . 64
Correcting Keying Errors 11 Replacing One Line with Another 66
Removing a Line . 67
CHAPTER 2. HOW YOUR 5100 HANDLES Renumbering Statement Lines 68
ARITHMETIC 16
Arithmetic Operators 16 CHAPTER 7. MORE ABOUT THE PRINT
The Sequence of Arithmetic Operations 21 STATEMENT 69
Positive/Negative Operators 17 Making Headings . 70
Arithmetic Constants 22 Math Calculations in PR I NT Statements 71
Finding Square Roots 23
C
Variables Variables That Stand for Numbers 23 23 CHAPTER 8. SETTING UP YOUR OWN FORMAT-PRINT USING AND IMAGE STATEMENTS 72Variables That Stand for Characters. 27 Example of Printing. 74
Using Calculation Results 28
CHAPTER 9. MORE THI NGS YOU CAN DO
CHAPTER 3. ENTERING, RUNNING, AND WITH BASIC 77
STORING,A PROGRAM. 30 Some General System Functions. 77
Entering a Program 30 Conversion Functions and Constants 78
Correcting Your Keying Errors 31 Trigonometric Functions 78
Running the Program 31 Logarithms and Exponents. 79
Automatic Statement Numbering 35
Storing the Program. 35 CHAPTER 10. TAPE DATA FILES 80
Tape Preparations 35 Activating and Deactivating Files 80
SAVE Command. 38 Creating a Tape File. 81
C
LOAD Command. 39 Retrieving a File 81A Review of What You've Done 39 Repositioning Files 82
CHAPTER 4. HOW TO WRITE A PROGRAM 41 CHAPTER 11. ARRAYS 84
The LET Statement. 41 Defining an Array. 86
Using Remarks. 42 DIM Statement for One-Dimensional Arrays. 86
C
Listing Program Contents 44 DIM Statement for Two-Dimensional Arrays. 87Branches. 44 Elements of Arrays 87
The GOTO Statement 44 Assigning Values to Array Elements 88
The I F Statement. 44 Another Way to Assign Values to Arrays 91
Loops. 49 Assigning Values to an Entire Array at Once. 92
Working with EJements of Arrays 93
Printing Arrays. 93
Putting One-Dimensional Arrays Together in a
Program 94
;
Two-Dimensional Array. 95
Arithmetic with Arrays. 96
Addition and Subtraction with Arrays. 97
Multiplication and Division 97
Averaging Two Sets of One-Dimensional Arrays. 98
APPENDIX A. BASIC STATEMENTS AND
COMMANDS 100
BASI C Statements 100
BASI C System Commands 102
Editing Function. 102
, / --"
INDEX 103 i
o
c
o
o
Chapter 1. Introduction
ABOUT THIS MANUAL
This manual will show you how to operate the 5100 using the BASIC language. If you are already familiar with the BASIC language, you may be able to skip most of the language-only topics and simply learn how to operate the 5100. If you are not familiar with the BASIC language, you should read the manual from cover to cover while performing the suggested keying operations or examples on your 5100. Not all of the features and functions of the BASIC language are covered in this manual.
For more information about the 5100 or the BASIC language, see the
IBM 5100 BASIC Reference Manual, SA21-9217.
This manual assumes that your 5100 has been installed and checked out.
If it's not, use the setup procedure in the IBM 5100 BASIC Reference
Manual before continuing with this manual.
ABOUT BASIC
BASIC is an interactive computer language, that is, whatever you enter into the 5100 is processed immediately. BASIC has many built-in functions that allow you to effectively solve your problems. BASIC also allows you to write programs using BASIC language statements and facil ities. These programs can be stored on the tape cartridge for later use.
\\\\
~\l.Oc€.SS
\nd\CatO (
~~oc€.SS
Cr\E.C\<' \nd\CatOf 'C,ffOf
\\I\essaCle
f\£\lE.~S£
O\S?\",p-,<
S\N\tCh SP-S\CI
p..~L
S\N\tCh
~~~~~~
\,\SII'lO \'\t;1J',\.
S\N\tCh
o
c'
c
c
o
ABOUT THE 5100
The 5100 (Figure 1) is a portable computer designed to help you solve problems. The display screen and indicator lights communicate
information to you, and the keyboard and switches allow you to control the operations the 5100 will perform.
Before you begin to use the 51 00, you should become familiar with the keys and the control panel (Figure 1). The control panel consists of a series of switches, which will be explained later.
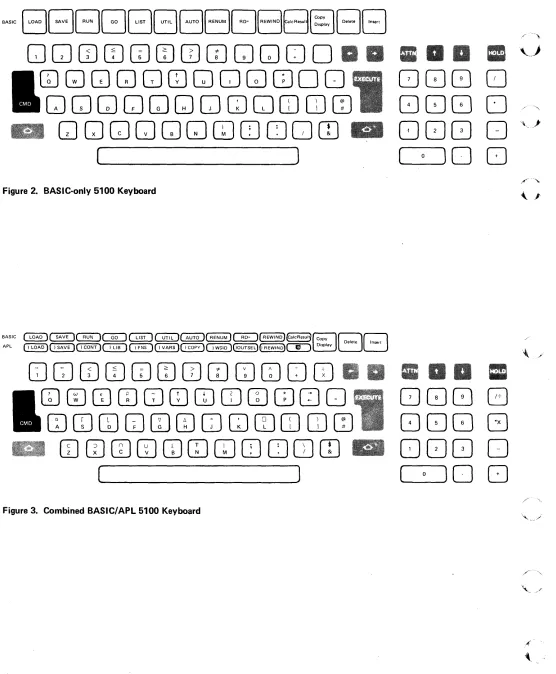
What follows is a brief description of the keys. How you use the keys will be described later. For now, familiarize yourself with the names and locations of keys on the 5100. Figure 2 shows a BASIC-only keyboard, and Figure 3 shows a combined BASIC/APL keyboard.
Alphameric Keys
The alpha keys are similar to those on a standard typewriter, except that there are no lowercase characters. The alpha characters are all uppercase, even though they are in the lower shift position on the key. Thus, you
do not use the shift key ( ) for alpha characters.
If you want to enter an upper shift special symbol, such as ?, you must
hold down the shift key, then press the key to enter the special symbol, just as you would to type an uppercase character on an ordinary
typewriter.
If your 5100 is equipped to operate either BASIC or APL programs, you may be unfamiliar with the symbols appearing at the top of some
of the alphameric keys (Figure 3). For BASIC operations, even on a
BASIC-only machine (Figure 2) where they are not shown on the key top, these symbols can be displayed or printed, although their AP L
functions do not apply to BASIC operations. See the IBM 5100 BASIC
Reference Card, GX21-9218, for the AP L characters and their locations.
Numeric Keys
Either the top row of alphameric keys or the ,special calculator
QCJCDCDCIJ(I)QJwGJGJOO
GJGJGJGJGJCD[JQG]ITJOO
Q[JGJGJGJGJ[JQCJOJOJ(I)
GJGJGJGJGJGJGJCDOOCO
(
)
Figure 2. BASIC-only 5100 Keyboard
BASIC ~~~~~~~(RENUM)~(REWIND)(CalcReSuI1 Copy
BB
Delete Insert
APL ()LOAD)~~~~~~~GOUTSEL)(JREWIND)C!:) Display
CJGJ
CD CD CIJ(I)QJw [DCDOCD
GJCDCIlOJGJCDrnCDCDITJQO
CDCOCDGJ[)[)C]QaJOJOJCD
(I)
(IJQJCDCDCDGJCDOOJCO
(
)
Figure 3. Combined BASIC/APL 5100 Keyboard
a a • ,, __
.i
CJQ8
CJ
(J GJ
GJ
0
/-~
008 0
"l,)"( 0
)0
[J
•
CJQ80
(JGJGJ
G
[J080
( 0
)0
[J
[image:8.612.50.606.53.727.2]o
(
'''' \1'1
c
c
c
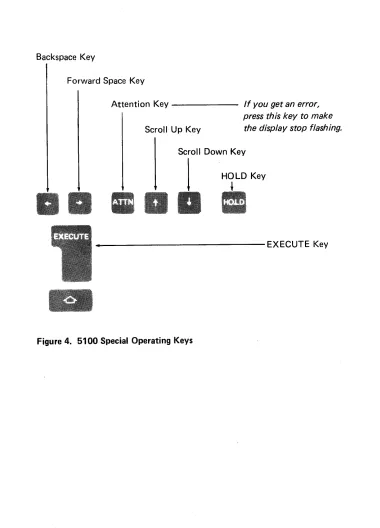
Operating Keys
The black key labeled
eM
D; the gray keys with the legend names EXECUTE, ATTN, and HO LD; and the gray keys with the arrows are special operating keys (Figure 4). The gray keys with the arrows and the spacebar (used to enter blank characters) automatically repeat the operation they perform when held down.Backspace Key
Forward Space Key
Attention Key - - - If you get an error, press this key to make Scroll Up Key the display stop flashing.
Scroll Down Key
I
HOLD KeyI
__ ---EXECUTEKey
[image:9.612.131.511.204.732.2]BASIC Command Keywords
The words listed above the top row of alphameric keys (1-0) are BASIC command keywords that you can enter by holding down the CMD key and then pressing the number below the desired command. For example, to enter the LOAD command keyword, hold down the CMD key and press 1. These commands and their use are described later.
BASIC Statement Keywords
The words printed on the front of some of the alphameric keys are BASIC statement keywords. The words will appear on the display screen if you press thekey while holding down the CMD key. This permits you to enter an entire word, etror-free, with one or two keystrokes.
Arithmetic Operator Keys
The four keys to the right of the calculator arrangement of numeric keys are the arithmetic operator keys that are used to perform division, multiplication, subtraction, and addition. There are also alphameric keys that perform the same functions. In BASIC the symbol/is used for division, and the symbol * is used for multiplication.
GETTING STARTED
Make sure the switches on your 5100 are set as follows:
Switch Setting
L32 64 R32 64
DISPLAY REGISTERS/NORMAL NORMAL
BASIC/APL (combined machines only)
BASIC
If your 5100 has the BASIC/APL switch, it can execute either BASIC or APL language statements. The language used is selected only during the
c
o
c
c·
If an error is detected during these checks, the PROCESS CHECK indicator may come on. If the PROCESS CHECK indicator comes on, press REST A RT. The 5100 will again perform the internal checks. If the light comes on again, call for service.
The I N PROCESS indicator comes on whenever the display screen is blank, which indicates that the 5100 is doing internal processing.
ENTERING AND DISPLAYING DATA
First, let's look at the display screen. Your display screen should look like this:
L(),qD I)
NNNNN
If the READY message does not appear, press REST A RT again, and wait a few seconds. If the READY message still does not appear, call for service.
The LOAD 0 (zero) message indicates that the 5100 has a clear work area. The flashing underline (_) between the LOAD 0 and READY messages is called a cursor. It tells you where the next character you enter will be displayed. The READY message indicates that the 5100 is ready to receive your instructions. The number in the lower right corner, indicated by the NNNNN on the display screen drawing, is the number of character
The display screen can contain up to 16 lines of data. The bottom line indicates the status of the 5100 and specifies the number of bytes available in the work area (NNNNN). The line next to the bottom displays the input you are entering from the keyboard. The remaining lines display the preceding 14 lines that have been entered and processed. When the data on the input line is processed, that line is moved up one line, leaving the input line empty so more data can be entered. Up to 64 characters of data can be entered per line.
Now let's enter some data into the 5100. Enter the following problem using the numeric keys and arithmetic operator keys:
[JOG]
Notice that the characters are displayed as each key is pressed. To process the data you just entered, you must 'press the EXECUTE key. Press EXECUTE now.
The display screen shows:
LOAD 0
Notice that the instruction you entered, 2+3, is on the left margin of the display screen, while the answer, 5, is indented one position from the left margin on the next line.
Enter and execute 125+75 by pressing the following keys:
o
c
c'
c
o
o
This display screen shows:
LDI~n 0 2+3
:I. 2~5+ 7~5
200
REf~DY
The appearance of your display can be changed by switches on the control panel. The REVERSE DISPLAY switch allows you to change from black characters on a white background to white characters on a black background, or vice versa. Change the switch and select the type of display you feel most comfortable with. You may have to adjust the
B RIG HTN ESS control switch as you change from one background to
the other.
Now watch the display as you set the L32 64 R32 switch to the L32 position. With the switch in this position, the leftmost 32 characters on each line are displayed with a space between each character. With the switch in the L32 position, your display screen shows:
L J] A D 0 :;.~ + 3
1::-.J
:I. ,.)
1::-+ .. .., ~.=:i
,: .. ,J 1
2 0 (I
I~
r·
f~1 It ... IReturn the switch to the 64 position, and notice that all characters are displayed without the space in between. For the exercises in the remainder of this book, keep the switch in the 64 position.
There are two gray keys with white arrows above the numeric keyboard. These keys move the display lines (except the status line) up or down. The scroll up k e y . moves the display lines up one line, and the scroll down key
a
moves the display lines down one line. Both keys con-tinue to move the display lines if they are held down. Now use the scroll down k e y . to move the display down two lines.The display screen shows:
I...n(~D 0 2+3
I::·
•• ..1
20 0 - . - - - T h e value 200 is now on the input line and
-PEt,D\(
can be used as input.
Use the forward space key and move the cursor to the right of 200. Notice that the cursor (the underline) is replaced by a flashing character as you space the cursor through the numeric characters. The flashing character serves the same function as the cursor; it indicates the position in the line where input from the keyboard will be displayed. Now, press the following keys:
o
C:
c
c
c
The display screen shows:
I::·
•••• 1
:I. 2 ~.:.:.i + .. ? ~.:.:.;
~? (} 0 + ~.;.:j 0
?!50
You are now familiar with the format of the display screen. From this point on, only the line or lines being discussed will be shown.
Correcting Keying Errors
The 5100 has a number of very useful functions that allow you to correct errors made while entering data. On a line-by-line basis, at any time, you can
1. Replace a character
2. Delete a character
3. I nsert a character
Replace a Character
To replace a character, move the cursor with the backspace key
or forward space k e y . until it is at the incorrect character. The
For example, you want to do the problem 22+12, but you press the following keys:
80000
The display screen shows:
;?;?+:I.:I ...
To correct this error, the cursor must be moved back one position (under the second 1) so that character can be rekeyed. Now, press the backspace key
II
once. To correct the keying error and execute the problem, press the following keys:o
Delete a Character
To delete a character, you also use the backspace key or the
forward space k e y . to move the cursor. Once the cursor is in the position of the character to be deleted (the character is flashing), hold down the
eM
D key and press the backspace key once. The character is then deleted, and any characters to the right are shifted one position to the left to close up the space left by the deletion.For example, you want to do the problem 13+45, but you press the
o
(
'" ~;,-'
0'
c
c
e'·
The display screen shows:
Press the backspace key to move the cursor (flashing character) back to the 2. Look at the labels that appear above the backspace and forward space keys: Delete and Insert. To perform the delete function, hold down the CM 0 key wh i Ie you press once.
The display screen shows:
1. ::5 + 1+ ~:.:.i
L
ThiS character is flashing.Now press EXECUTE to execute the problem. Pressing the EXECUTE key processes the entire line regardless of the position of the cursor.
I nsert a Character
10 insert a character, position the cursor using the backspace k e y . or the forward space key then hold down the CM D key and press the forward space key once. This operation moves the flashing character (and all other characters to the right of it) one position to the right, creating the space you need to insert one character. The cursor is not moved and is now displayed as an underline. To insert the character, simply press the character key. If a character is in the last (64th)
position of the I ine, the insert function is ignored.
For example, you want to do the problem 123*6, but you press the following keys:
OO[]8
The display screen shows:
To correct the error, press the backspace key to move the cursor (flashing character) back to the 3. Look at the labels that appear above the backspace and forward space keys: Delete and Insert. To perform the insert function with the cursor position at the 3, hold down the CMD key while you press once.
The display screen shows:
To correct the keying error and execute the problem, press the following keys:
There is one more way to correct a keying error. If you make several errors halfway through the line, you can backspace the cursor to the character following the last correct character and then press the ATTN
(attention) key. This causes everything from the cursor position to the end of the line to be cleared from the display screen.
o
(
",~. ii,-'
C
''''
~,,
c'
c
c'
For example, you want to do the problem 135+280, but you entered and executed 134+280. The display screen shows:
:I. : .. :~; q. -{ .. :.? U 0
1.j.:J. 1+
To correct the original input, press the scroll down key
a
three times to get the original input back to the input line. The display screen shows:
l:.":)I.j·+:.:.::no
L
ThiS character is flashing.Chapter 2. How Your 5100 Handles Arithmetic
The following examples show some common, simple arithmetic operations you can do on the 5100.
ARITHMETIC OPERATORS
Arithmetic
Before you begin these simple operations, you should know that some of the arithmetic signs (called operators) you are accustomed to using are different when you use the BASIC language. For example, the multiply sign (x) is not used in BASIC. Instead, the asterisk (*) is used for multiplication. Similarly, the divide sign (~) is replaced by the slash (/) in BASIC. The sign for exponentiation (raising to a power) in BASIC is t (the upper shift character on the Y key) or
* *.
Now enter these problems:You Press The Display Screen Shows
Add 5 and 8
GJOGJ
~.;j+B13
Su btract 8 from 5
GJOGJ
Multiply 5 times 8
I~EADY
!,:.:.i .•.• :::~
!:5')f8
1+ 0
c
( "',.0'
j"
o
c
c
Arithmetic You Press The Display Screen Shows
Divide 5 by 8
[JCJ8
5 to the power of 2
4 to the power of 2
[Jmo
/
(Hold down the shift key and press the Y key to get t symbol.)
0000
THE SEQUENCE OF ARITHMETIC OPERATIONS
~::.; .,. 2
~? ~:.:.;
1+*11:2 16
REI~~DY
BASIC has a prescribed order of arithmetic execution called arithmetic
hierarchy. When two or more operators such as +, -,
*, /,
or t are used,arithmetic is performed according to this hierarchy. That is, operators with higher priorities are performed first, while operators with the same priority are performed as they are encountered from left to right. The arithmetic hierarchy in BASIC is:
1. Operations enclosed in parentheses
2. Mathematical functions (for example, sine, cosine, or square root)
3. Exponentiation (t or * *)
4. Positive/negative operations, which are described later
5. Multiplication and division (*, /)
When an operation is enclosed in parentheses, it is performed first, even though the operator enclosed in the parentheses may have a lower priority than the operators outside the parentheses. As a result, the prescribed order of execution can be changed if you use parentheses. Operations enclosed in parentheses are executed in BASIC before operations outside parentheses, regardless of the hierarchy of the operators.
Some examples of arithmetic hierarchy are: 3+4/5
4/5+3
In both of these examples, the 4 is first divided by the 5 because the divide operation has the highest priority. The.8 result is then added to the 3, giving a final result of 3.8.
Another example is: (3+4)/5
I n this example, the 3 and 4 are first added because they are enclosed in parentheses. The result, 7, is then divided by 5, giving a final result
of 1.4.
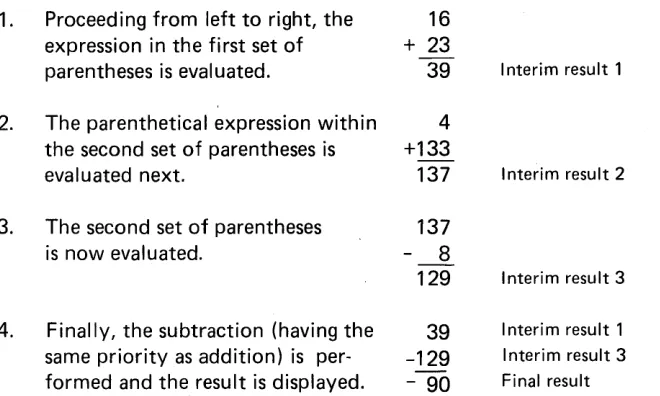
I n the expression 16+23-4+133-8
addition and subtraction occur from left to right in the following sequence:
16
+ 23
39
~
35 +133 168
8
160
I nterim result
Interim result
I nterim result
Final result
However, when parentheses are added, the sequence of operations can
c
c:
o
c
c
c
In this example, the operations occur in the following sequence:
1. Proceeding from left to right, the 16
expression in the first set of + 23
parentheses is evaluated. 39 I nterim result 1
2. The parenthetical expression within 4
the second set of parentheses is +133
evaluated next. 137 Interim result 2
3. The second set of parentheses 137
is now evaluated. 8
129 Interim result 3
4. Finally, the subtraction (having the 39 I nterim result 1
same priority as addition) is per- -129 Interim result 3
formed and the result is displayed. - 90 Final result
Although the numbers and operators in this expression are the same as those in the previous example, the parentheses completely change the order of the operations.
Now, determine the result of the following expression by entering the numbers, then pressing the EXECUTE key:
4t (3* (4-2))
The order of the arithmetic operations is: 4-2=2, 3x2=6, and 46
=4096.
The display screen shows:
1.\. "to ( :::) :.(. ( q ... ::? ) )
I.,. (I S)(~
[image:23.612.149.479.87.285.2]This is the Way it This is the Way
Looks as Arithmetic: it Looks in BASIC: This is What it Means:
a+b+c (A+B+C)/2 First add A, B, and C;
-2 divide the sum by 2.
a+b+c A+(B+C)/2 Add Band C, divide the
2 sum by 2; add the result
to A.
3a+4 3* A+4 Multiply A by 3; then
add 4.
3(a+4) 3*(A+4) Add A and 4; multiply
the sum by 3.
x2+7 Xt2+7 Square X and add 7.
(X+7)2 (X+7)t2 Add X and 7; square the
quantity.
(x+1 )2 (X+1 )t2/2 Add X and 1; square the
2 quantity; divide the
result by 2.
(x; ) (Xt2/2) * (X+Y)/3
Square X and divide by
(x+y) 2; add X and Y and multiply
3 by the previous result; divide
that result by 3.
Figure 5. Examples of Arithmetic and BASIC Expressions
As you can see, the more complicated the arithmetic expression looks, the more complicated the BASIC expression looks. When you are writing BASIC expressions, remember that parentheses must always be in balanced pairs-as many right parentheses as left parentheses. If a statement gets too complicated, you can usually break it down into several simpler statements.
c
'I'
C
'"
III,
(1'
c
c
c
Positive/Negative Operators
The plus (+) and minus (-) signs indicate that a number is positive or negative. When used for this purpose, the
+
and - signs have a higher priority in the arithmetic hierarchy than they have when used for addition and subtraction. In the following example:-2t2-3
the 2 is raised to the second power, and the minus is assigned to the result before the subtraction.
One rule that you must follow is that you cannot use two operators sequential/y, except * * which is the same as
t.
Sequential operators must be separated by parentheses. This rule applies to both thearithmetic operators (+,-, *,1, and t) and the positive/negative operators
(+ and -). For example, enter 7-3 as 7t-3. The flashing display screen
shows:
l7t
oo3
71"·· .. 3
"t EF{kc)l~ :1.00
The lower arrow indicates the syntax error. Press ATTN to stop the flashing screen, then enter the corrected expression, 7t (-3). A complete description of 5100 error messages is included in the IBM 5100 BASIC Reference Manual, SA21-9217. Short descriptions of the error messages are given on the pullout card above the display screen.
You must use parentheses to separate consecutive operators, as in the following examples:
Invalid Valid
6+-4 6+(-4)
3*-1.5 3*(-1.5)
8--4 8-(-4)
Try to solve the following problems using the 5100. Remember to press EXECUTE after entering each problem.
7~(·:3 I ~:5·-:I. . ?B
ARITHMETIC CONSTANTS
BASIC has three built-in arithmetic constants to represent the values of:
1. e (natural log)
=
2.718281828459 2. 1f (pi)=
3. 1415926535903.
~2
(square root of 2) = 1.414213562373For example, if you want to use 1f in an equation, you don't need to
type in 3.14 .... You just use the special BASIC constant. Here are the special symbols that BASIC recognizes for these constants:
For This Constant: Use This Symbol: e (natural log) &E
1f (pi) &PI
~2
(square root of 2) &SQR2You might use one of these constants in a program that calculates the, area of a circle (AREA
=
1f R2 is the formula). Your program statementwould read:
50 LET A
=
&PI* Rt2You can use these constants anywhere in your programs. In addition, there are special constants in BASIC that are used to convert pounds, inches, and gallons to metric kilograms, centimeters, and liters respectively. Normally, when you want to switch from the U.S. measuring system to the metric system, you multiply the measured quantity by a fixed constant to obtain the equivalent measurement in the metric system.
For example, 1 Ib equals 0.454 ... kg, so 2 Ibs equal 2*0.454 ... kg. With BASIC, instead of remembering what the conversion multipliers are, the 5100 can provide them for you. These constants are:
c
C'
, II0'
c
c
FINDING SQUARE ROOTS
You can determine square roots automatically with your 5100. Instead of writing your own formula for determining the square root of a number, you use the letters SOR, followed by the number whose square root you want to know enclosed in parentheses. For example, SOR (X) finds the square root of X, where X is 0 or a positive number.
You can use SOR in any of your arithmetic expressions, and the expressions inside the parentheses can involve any kind of arithmetic. For example:
~X+Y
is entered as SOR (X+Y)~x+~+z
is entered as SOR ((X+Y+Z)/5)~A+~
is entered as SOR(A+X/2)Other conversion and trigonometric functions and conversion constants in BASIC are discussed in Chapter 9.
VARIABLES
Algebraic formulas often contain variables to which you assign your
own values when using the formulas. In the formula 7r R2 , for example,
the R is a variable representing the radius. You must assign a value to R when you use the formu la.
Variables That Stand for Numbers
You can name a variable in BASIC with a single character of the extended
BASIC alphabet (A-Z, @, $, and #). A BASIC variable can also be named
Assigning Values to Variables
Variables are assigned values by using the equal (=) sign. After you assign a value to a variable, you can use the variable in a calculation.
For example, if you enter
you assign the numeric value of 12 to the variable named B4. To illustrate this, enter the following:
~
ttt~:~:~::
;.;.;.;.;.;.;.;.;.;.0 [] []
1 2A =
and
~oo
You have named variables A and B and assigned them values of 12 and 4 respectively. You can now use them in the following calculation:
c
(,
' ..(
"'~'J'"
o
C
~\./
c
The display screen shows:
f~=:::I. 2 :1.2
B::::I+
LJ·
i:~/B
Now press the following keys:
The answer is 64.
Notice that the second expression increases the value of C by 1. This method of changing the value of a variable is commonly used in programming for stepping through a process. This will be described in detail later.
Displaying Variable Values
To find the current value of any variable, you can simply enter the variable name and press EXECUTE. For example, key:
The display screen shows the variable and its current value:
c
A Note About Numbers
When you use numbers in BASIC, they can be: • Integers (whole nu mbers) such as:
2,-76,842,10000000,or999111 • Decimal numbers such as:
-1.5,3.7772,0.00081, or -457.25 • Numbers in exponential format such as:
o
C:
o
c
c
A Note About Names
'When you name variables in BASIC, they can be:
• A 'single character of the extended BASIC alphabet (A-Z, @, $, or #)
such as:
$, C, or V
• A single character of the extended BASIC alphabet (A-Z, @, $, and #)
followed by a single number such as:
A4,$6,$3,orT3
Variables That Stand for Characters
While you usually think of variables as standing for numbers, in BASIC you can let a variable stand for combinations of characters such as words or names. If a variable is going to represent a word or a name, it is called a character variable. You name character variables with one letter of the
extended BASIC alphabet (A-Z, @, $, and #) followed by a dollar sign
($). The dollar sign tells the 5100 that the variable is a character variable.
To assign a word or name to a character variable, you enclose the word or name in single quotation marks following the equal sign. For example:
A$='HARVEY SMITH '
Here are the general rules:
• A character variable is named by a single letter of the extended BASIC alphabet followed by a dollar sign ($).
• To assign a value to the character variable, enclose the words or names you are assigning in single quotation marks following the equal sign .
Using Calculation Results
When you are entering a series of expressions in which the result from
one expression is used in the next expression, you can use the
0
key (while holding down the CMD key) to insert the result of the last expression. This is the calc result function. Notice that Calc Result is
listed above the
0
key. For example, key the following:and
o
".
o
C
"~'!I
c
c
c
The display screen shows:
(~I :::: (~l
()
l:{::::'+
'+
C::::9
9
i:~')(-C
~7.i
4-:0
·)f ( ~.=51+)2:1.6
Notice that the 5100 inserted the result of A *C into the second expression.
The calc result function will always insert the result of the last calculator
expression (character expressions as well as arithmetic expressions). You
must'hold down the CMD key while you press
0
for the calc resultfunction. Arithmetic results are enclosed in parentheses to avoid any conflict with adjacent operators in case the result is negative. Character results are enclosed in single quotation marks, just as they were when they were assigned.
Up to this point, you have been operating the 5100 as a calculator. Any of the operations described thus far can be performed any time the 5100 is waiting for you to enter input, with two exceptions:
1. When a BASIC program is in operation and it stops for keyboard
input required by an I NPUT statement, you cannot perform any calcu lator operations.
2. When you are entering data to create a keyboard-generated data
file, you cannot perform any calculator operations.
Any time, other than the exceptions listed, you can enter any of the calcu lations described.
You can also stop a program during its operation, and change the values of variables, then continue the program. This is extremely useful when checking a program for proper operation.
Chapter 3. Entering, Running, and Storing a Program
A program is your way to communicate with the 5100 to solve a
problem. The key words in this statement are communicate and to
solve a problem. All programming is oriented toward problem solving.
Problems can only be solved by first analyzing the problem, then by formulating the solution. This involves communication. You can communicate with the 5100 using the BASIC or APL language, as opposed to your communicating with other people in the English language. Thus, a program is little more than a means of translating your instructions to solve a problem into a language that the 5100 understands.
ENTERING A PROGRAM
The following discussion shows you how to enter a BASIC program into the 5100, and then how to execute that program. Also in this chapter, you will learn how to save a program on a magnetic tape cartridge, then load the program back into the 5100 for execution again.
The program you will enter calculates the volume of a cylinder. The volume of a cylinder is found by multiplying the length of the cylinder times the area of the base. Enter the statements just as they are shown in the following example. Don't forget to press EXECUTE after entering each statement. You can enter the statements character-by-character or use the BASIC statement keyword keys with the CMD key. If the 5100 detects an error in a statement you have entered, the keyboard becomes inactive (except for ATTN and HOLD), and the display will flash. To stop the flashing display, press ATTN, then correct the error.
o
[1:1. 0 F=:Efo') C'{L., I NDE F~ VDI...I.../ME0020 PRINT 'DIAMETER?'
o
O::~)OINPUT
Ito
0 1.10 0 I F D :::: 0 G C)roo
11 0OO~o:o:jO PRIN°r 'LENGTH?'
OObO INPI...IT I...
0070
A=&PI*(D/2)t2
o ()
B 0 \l ::;: (:°1*'
Lc
c
c
c
Now read your entries on the display screen to see if you have entered the program correctly. If you find a keying error, the next paragraph describes how to correct the error before you run the program. If your
5100 has an attached printer, you can hold down the CM D key and
press the
CD
key below Copy Display to get a copy of the displayeddata. The copy display function provides you with printed copy of all 16 lines of data.
Correcting Your Keying Errors
To correct or change a statement line of a program already entered in the 5100, use the gray scroll keys ( • and • ) to position the incorrect I ine to be changed on the input line right above the READY message line. When pressed momentarily, these keys move all information
on the top 15 lines up or down one line position. When you hold these
keys down, the display lines will repeatedly move up or down. When the line you want to change is positioned correctly, which is easy to identify because the first character will be flashing, you can use the forward space or backspace key to position the cursor at the character to be corrected. You can then use the insert and delete functions to make the change. Remember, these functions are activated only when you hold down the
CMD key and press (Insert) or (Delete). After all changes
have been made to the line, press EXECUTE to reenter the line.
RUNNING THE PROGRAM
After you have entered the statement lines of the sample program, you are ready to run the program. To run the program, enter RUN, then press EXECUTE. Any error during execution causes the display to flash; the ATTN key must then be pressed. Press ATTN to stop the flashing screen, then correct the error. You will have to enter RUN again to execute the program. When you run the program, the display screen shows:
RUN
You will recognize the prompting message DIAMETER? as part of the second statement in the sample program. This is a PR I NT statement, which directs information to be displayed.
Note that the bottom question mark is flashing. The flashing question mark is a result of the I NPUT statement in the sample program. The I NPUT statement causes the question mark to be flashed to indicate that you are to enter information from the keyboard for the program.
Now respond to the request for data to be entered by keying a value for the diameter, then press EXECUTE. You can enter any number of digits you want. The maximum number of digits that can be assigned to any variable (your variable is D for diameter) is 13 digits. You can include a decimal point, which does not count as a digit entry, but you must not enter commas. (Commas indicate multiple variables to the 5100.)
If you enter a decimal number with more than six digits to the right of the decimal point, any digits beyond the sixth are rounded when the answer for volume is displayed. The 5100 is initialized to round numbers at the sixth decimal position. However, the rounding position can be changed to any position from 1 to 13 with the R D= command, wh ich sets the rounding position. To set the 5100 to round all displayed or printed resu Its and calcu lations at the second decimal position, you would enter: R D = 2.
The rounding command can also be included with the GO and RUN
commands as described in the IBM 5100 BASIC Reference Manual,
SA21-9217. Rememberthat whenever you turn the power on or press RESTART, the rounding position is set at 6.
All examples in this manual are run with the rounding position set to 6 digits (RD=6). If you change the rounding position, you will get different results.
You must remember that when using any programming language, including BASIC, you are communicating with the machine, telling it what you want it to do. Thus, you should define precisely what the machine does not know to avoid unnecessary problems.
You can enter values for the cylinder volume program as many times as you want. After you enter a value for the length in response to the flashing question mark and press EXECUTE, the 5100 will display the information you specified and compute the answer.
/
o
c
o
c
c
c
The statements in the sample program are described in the following paragraphs. In addition, Appendix A contains a short definition of all the BASIC statements used in the 5100.
Statement
10 REM CYLINDER VOLUME
20 PRINT 'DIAMETER?'
30lNPUTD
40 IF 0=0 GOTO 110
Meaning
The R EM (remark) statement can appear anywhere in the program, but has no effect on program execution. This statement is used to insert comments into the BASIC program.
This PRINT statement specifies that DIAMETER? be displayed. The single quotation marks
around DIAMETER? indicate that it is a character constant and that the enti re character stri ng is to be displayed.
The INPUT statement,allows you to assign values from the keyboard to variables when your program is running. In this example, the variable 0 will receive the value you enter. The 5100 displays a question mark in position 1 of the input line to indicate that keyboard input is expected.
Statement Meaning
50 PRINT 'LENGTH?' This statement displays the
character string LENGTH?
60 INPUT L Th is statement specifies that the
variable L will receive the value you enter for length. Again, a
question mark will be displayed <"
,
to indicate that keyboard input is expected.
70 A=&PI*(D/2)t2 This is an arithmetic expression
/
indicating that the variable A will
'~', )1'
receive the value of 1T times D
(your entry for diameter) divided by 2, and raised to the power of 2.
80 V=A* L This expression assigns a value to
a variable. In th is statement, the variable V will receive the value of the variable A times the variable
L (your entry for length).
90 PRINT 'THE VOLUME IS', V This statement indicates that the /
characters enclosed in single
"-quotation marks (TH E VO LU M E IS) are to be displayed, followed by the value of the variable V. The value of V was calculated in the preceding statement and is the volume.
100 GOTO 20 The G OTO statement transfers
control to a specified statement. In th is statement, control is
transferred to statement 20. Th is / "
provides for a number of volume
'~,. -"
calcu lations to be made repetitively.
110 END The END statement indicates the
o
0:
c
c
c
After you have computed your last volume calculation, you can end the program operation by entering 0 for the requested diameter and pressing EXECUTE.
The numbers preceding the statements are called statement numbers. They are necessary so the 5100 knows the proper sequence of your instructions. BASIC statement numbers in the 5100 can have values from 0001 through 9999. You can use consecutive numbers if you wish, but normally
expansion room is left between the statement numbers so that changes can be made more easily (see Making Changes to Your Program). When you enter statement numbers, you do not need to include the leading zeros. They will be added by the 5100 when the statement is entered.
Automatic Statement Numbering
Instead of manually entering the statement numbers in a BASIC program, you can instruct the 5100 to provide statement numbers for you. You can do this with the AUTO command. Simply enter AUTO and press EXECUTE. Notice that the word AUTO is displayed above statement number 0010. From this point on, the 5100 numbers your statements in increments of 10. Automatic numbering continues until you enter anything other than the last statement number (a command word, for example, LIST, in the input line). You can restore automatic numbering by entering AUTO NNNN where NNNN is the statement number you want to begi n with.
STORING THE PROGRAM
The 5100 magnetic tape cartridge allows you to conveniently store your programs (or data) and have them available for use by following the simple operations described in this section. Before using a tape cartridge, check the tape cartridge security arJOW in the corner of the cartridge.
Figure 6 shows the arrow pointing to SAFE. When the arrow is in this position, the tape cannot be written on. To be able to write on the tape, use a screw driver or a coin to turn the arrow away from SAF E. Figure 7 shows how a magnetic tape cartridge is loaded into the 5100. Press the cartridge in until it is firmly seated.
Tape Preparations
o
o
o
c
c·
To prepare a tape with one file of any size, or several files of the same size in the same operation, you enter a MA R K command. The MA R K command can be entered anytime that READY is indicated on the display screen. It will not interfere with your programs. For our exercise, we are assuming that you are beginning a new tape (no files have been marked). We will mark three files, each containing 2048 or 2K character positions (K is equal to 1024). Th is exercise provides enough space on tape to contain three programs (one in each file) of approximately 35 statements each. Tape files for the 5100 are numbered sequentially beginning with 1. Should you later decide to add more files, you can do so as long as you do not exceed the physical limits of the tape. A tape contains space for approximately 200K of storage, minus the leading and trailing data for each file, which equals 0.5K per file. Thus, a tape can contain approximately 132 1 K files, 44 4K files, or any combination of file sizes up to 200K, including the required 0.5K per file.
Note: If you are not using a new tape cartridge, you must first ensure
that your tape does not contain important data belonging to someone else. This is necessary because any existing data is erased when you remark the tape. The 5100 displays an error message when you attempt a MARK command to a file that is already marked. To continue marking the file, press ATTN to stop the flashing screen, press the scroll up, key once to move the display up one line, enter GO in positions 1 and 2, then press EXECUTE.
To mark the tape in our exercise, press the following keys:
SAVE Command
The cylinder volume program can be saved on tape with the SAVE command. To save the sample program, enter SAVE, then enter the number of the file you want to save it in. We will save the program in file 1, so press 1, then press EXECUTE. The READY message will be displayed to tell you when the program is saved on tape. (You needn't be concerned with the numbers following the READY message.) While the program is being saved, you will notice the tape in the cartridge moving back and forth. This is normal, because the 5100 is reading each segment of data after it is written. This ensures that the information is saved correctly.
To prove that the program has been stored on tape and that you can load it back into storage, the program stored in the machine must first be erased.
There are three ways to do this:
1. Enter LOADO and press EXECUTE. This clears machine storage and prepares it to accept input from the keyboard or programs loaded from tape. This is the recommended way to clear machine storage.
2. Press the R,EST ART switch. This restarts the machine to the same status as when the power was turned on. The internal diagnostics are performed again; thus, this method requires 10-15 seconds depending on the amount of storage in your machine. This method is recommended only when the PROCESS CHECK indicator comes on, or when you change from BASIC to APL or APL to BASIC. 3. Set the power switch to 0 F F , then set it back to ON. The same
diagnostics are performed as during REST ART.
To clear the machine, enter LOADO and press EXECUTE. To prove the program no longer exists in the machine, enter RUN and press EXECUTE. The 5100 will respond with an error message to let you know this
cannot be done because there is no program in storage. Press ATTN to continue.
I n order to run the program again, it must firs~ be loaded into storage from where it was stored on the tape. The LOAD command is used to place the program back into storage.
o
0'
c
c
c
LOAD Command
To load the cylinder volume program back into 5100 storage, enter LOAD, then enter the number of the file containing the program you want to load (file 1). Complete this sequence by pressing EXECUTE.
The READY message tells you that the pfogram is loaded and can be executed again. Run the program again by entering RUN, then pressing EXECUTE.
Practice the SAVE and LOAD commands by changing the file number when you again save the sample program on tape and load it back into the 5100.
The following commands have been discussed in this chapter:
AUTO Automatically numbers BASIC statements.
MARK Prepares a tape cartridge for data to be saved.
LOAD Loads the 5100 storage with data from tape or data.
from the keyboard.
SAVE Saves the BASIC program in 5100 storage on tape.
RD= Specifies rounding of decimal numbers.
RUN Executes a BASIC program.
A REVIEW OF WHAT YOU'VE DONE
After reading this far and doing the exercises described, you should be able to perform the following functions with your 5100:
• Use as a calculator: - Addition
- Subtraction - Multiplication
- Division
- Exponentiation
- Use of positive/negative operators
- Use of parentheses in arithmetic hierarchy
• Correct keying errors:
- Replace a character
- Delete a character
- I nsert a character
- Make corrections in a line
• Use variables:
- Assign values to variables - Display variable values
• Enter short, simple programs: - Change program lines
- Run programs
- Erase programs
- Store programs on tape
- Load programs from tape
• Clear the machine storage
o
c
c
o
c
Chapter 4. How to Write a Program
In the following pages, you are going to write more BASIC programs and learn to use some fundamental tools for writing programs. From this point on in the manual we will not show you the keys to press. We will just say to enter and then give you the data you should enter.
The LET Statement
A LET statement consists of four parts: a statement number, a symbol to the left of an equal sign, an equal sign, and a quantity or a computation (called an expression) to the right of the equal sign. In BASIC
programming, a LET statement means:
1. To evaluate the expression on the right side of the equal sign, and 2. Assign that value to the symbol on the left side of the equal sign.
In BASIC, you can have statements such as 0030 LET X=X+1
while you couldn't in math. In BASIC this statement means to take whatever value X now has, add 1 to it, and replace the old value of X with this new value.
Incidently, you can omit the word LET from a LET statement in a program. These two statements
0010 LET X=A+B 0010 X=A+B
mean exactly the same thing. In all our examples, we'll show the word LET, but it's not necessary to include it.
The following program uses simple arithmetic. Try to look at the program as a step-by-step method for solving a particular problem. Problem
What to Do
1;' Find the total dentist bill (call it D).
2. Subtract $15 to find the amount eligible for insurance (call it E). 3. Take 75% of the result (call it I). That's how much the insurance
pays.
4. Subtract the insurance money from the total bill D to find out how much money you owe (call this M).
5. Display how much you have to pay and how much the insurance will pay (M and I).
The following BASIC statements, which you will enter later, can be used to solve this problem:
0010 LET D=25+24 0020 LET E=D-15 0030 LET 1=.75*E 0040 LET M=D-I 0050 PRINT M,I 0060 END
Notice the PRINT statement. Sinc~ you want to know both your pay-ment and the insurance paypay-ment, you can specify both M and I in the same statement. Any time you want to display the value of more than one variable, you can use a single PR I NT statement if you list the variables and separate them with commas.
USING REMARKS
You can make your programs easier to work with, and easier for other people to use, if you include descriptions of what the statements do in the program. These descriptions are known as remark statements. You write remarks as if they were statements in the BASIC program, but they don't serve any function in the execution of the program. They are solely for information. You can insert them anywhere in a program.
o
C"
II~c
c
c
To include a remark in a program, you write a BASIC statement called REM. It has a line number like any other BASIC statement. Following the line number, you enter the letters R EM followed by any remark you want. Examples of R EM statements are:
40 REM THIS PROGRAM COMPUTES BATTING AVERAGES 70 REM AT THIS POINT, PRINT OUT THE RESULTS
10 REM DENTBI LL
You'll see other examples of R EM statements as you go through this manual.
You should now be ready to enter the program from the keyboard of your 5100. To enter and execute the program, follow the instructions below. Remember to press EXECUTE after each line is entered.
Instructions Clear storage
Enter the statements
Run the program
Display Screen Shows
LOAD 0
0010 F~[M DENTlJILI...
0020 L.ET D::::2!5+2'l
01]:3 0 LE'r [::::[1 .... :1. ~.;,;
0040
LET 1=.75*[
OO!.=:i (} LET j'1::::D-.. :t:
0060 PI~INT ,1,I
0070 END
PUN
Remember that the idea in this program, and any other programs you write, is to break down what you want to do into logical sequential steps. It may help to use this tactic: Ask yourself what is the very first thing I have to do? What is the next? And so on. You can make a list of what you have to do and then convert each item in the list to a BASIC statement. Thus, you will always have a sequence of statements that will solve the problem in an orderly step-by-step fashion.
The dentbill program is not a typical program because it works on only one set of data that is a part of the program. Most programs are
LISTING PROGRAM CONTENTS
Since the dentbill program is currently in the 5100 work area, we can now I ist the statements of the program on the display screen with the LIST system command. Enter LIST, then press EXECUTE. The statements of the dentbill program now appear on the display screen. A LIST command causes the first 14 lines of the program to be displayed. You can then use the scroll up and down keys to view additional lines of the program.
It isn't necessary to list the entire program each time you want to see a particular part of it. You can list any 14-line portion of the program by entering the last line number you want displayed after the command keyword LIST. For example, LIST 30 would display statement numbers 10, 20, and 30 of the dentbi II- program.
BRANCHES
The 5100 normally executes programs line by line according to the line numbers of the statements. However, you can vary this sequential
order and transfer control to a line number other than the next sequential one. This is called branching. Two of the statements you can use for branching are the GOTO and I F statements.
The GOTO Statement
This statement tells the 5100 to go to a specific I ine number. A GOTO statement at line 20 of a program that tells the 5100 to go to line number 60 would look like this:
0020 GOTO 0060
/
0
1c
c'
The I F Statement
An I F statement can test whether a variable is equal to, greater than, or less than another variable or constant of the same data type. The IF statement includes a GOTO statement. The I F statement operates this way:
1. The I F statement tests the condition you define.
2. If the answer to the test is yes, the condition is true; the 5100 will go to the I ine number that you entered in the I F statement.
3. I f the answer is
no, the 5100 ignores the rest of the I F statement
and goes directly to the next sequential line in the program.Here's an example of an I F statement:
0040 IF X=O GOTO 0080
In this statement, if X is 0, the 5100 goes to line 80. If X is
not 0, it goes
on to the next line in the program.The six tests you can make with the I F statement are:
1. Equal to,
=
2. Not equal to,
t=
or<>
3. Greater than,
>
4. Less than,
<
5. Greater than or equal to,
2
or>=
6. Less than or equal to, :::; or
<=
Some examples of I F statements are:
Th is I F Statement:
0130 IF X>10 GOTO 0040
0190 IF Y<21 GOTO 0010
0010 I F A lz5 GOTO 0060
0030 J F A2t= X GOTO 0075
Means:
If the value of X is greater than 10, go to line 40.
If the value of Y is less than 21, go to line 10.
If the value of A 1 is greater than or equal to 5, go to line 60.
If the value of A2 is not equal to the value of X, go to line 75.
The following program examples describe more about how to break down a problem into the BASI C statements required to use your 5100 to solve a problem. Again, as opposed to most typical programs, the sample programs will use data internal to the programs. After you've seen how data within a program can be manipulated, you'll be shown how to supply program data from outside the program.
Although it may not be necessary in all instances, it is a good idea to enter a LOADO command before entering any program statements. This ensures that the 5100 work area is clear. Remember also that you can use the AUTO command to provide automatic statement numbering.
Program Example 1
You are in charge of billing people for orders of dresses. There are two styles, one at $108 a dozen, and one at $136 a dozen. On orders of $500 or over, there is a 10% discount. For the account you are now working on, there are two dozen orders for the first dress, and three dozen orders for the second dress.
The program to determine the bill is:
001.0 F:~Et'l PI~~OGH(.~M TO FItJURE OUT DIBC()UNT~3 UN ORDEI:<f:>
o
0 2 (} LET ,~:::: 2 00 :.3 0 I...E·r B:::::30040
LET T=A*108+B*136
0050
IF
T<500 GOTD 0070o
o
c
c
o
This program solves the problem in the following steps:
1. It finds the total order (line 40).
2. It tests to see if the total is less than $500 (line 50). If it is, the
program goes to line 70 and displays the total. The discount D will be 0 in this case, and the totals will be displayed.
3. For orders of $500 or over, the program computes the 10% discount
on line 60. Then it continues to line 70 to display the total.
Note: D will be 0 when the order is less than $500 because each time the 5100 starts to execute a program after a RUN command, it automatically sets the value of all the variables in the program to O.
Character variables are set to blanks. This is called initialization. The
values remain zeros or blanks until a statement in the program assigns a different value. This means that you never have any problem with values being .Ieft over from the last time you ran the program. Variables
specifically stored in a reserved area of storage, however, retain the last value assigned to them. These values can be passed from one program
to another (see USE in the IBM 5100 BASIC Reference Manual,
SA21-9217).
Upon execution of this program, the display screen shows:
6~? I
'+
Thus, the total order is $624, the allowable discount is $62.40, and the amount to be billed is $561.60. The cents columns in the dollar figures do not print because the 5100 has no way of determining how many significant digits you want printed. You will be :shown how to have numbers printed in the exact format you want in a later chapter.
Program Example 2
You are moving. You get estimates from two movers and want to know which mover will be cheaper. Mover A charges $40 an hour and
and estimates the work will take 8 hours. If both movers cost the same, you'll hire mover B because he has a better reputation. Here is the program:
001.0 L.ET
f~::::5*·4·00020 LET
B=8*32,50030 F~EN 'I-EST TO SEE L~H() If:) CHE(:~PEI=<
OO~O IF A<B GOlD 0100
0050
REM GO HERE IF B CHEAPER
0060'B CHEAPER OR EGUAL
0070 PI~INT B
0080 STOP
0090 REM
GO HERE IF A CHEAPER
0100
PRINT 'A CHEAPER'
01:1.0 Pf<~INT f:~1
0:1.20 END
Here is how this program works:
1. I n lines 10 and 20, it figures the total cost for each mover. 2. In line 40, it tests to determine which one of two paths to take.
Either the program wi II go to line 100, or it wi II conti nue with lines 50, 60, 70, and 80. This test determines which mover is cheaper. 3. If Mover A is cheaper, the program goes to line 100. Line 100 lets
you know that Mover A has the contract and displays the total price. Notice line 100. It is a PRINT statement, but it has single quotation marks around the words A CHEAPER. You can write a PR I NT statement that displays the words entered if you enclose the words in single quotation marks. If line 100 is executed, the words A CH EAPE R will be displayed. Line 110 has no quotation marks. It is aPR I NT statement for variable A, and will display the value of variable A. After the PR I NT statements, the program ends at line 120.
4. If Mover B is cheaper, the program continues with line 50. Line 60 is a PRINT statement containing the words B CHEAPER OR
o
c
c
o
c
c
c
After you run the program, the display screen shows:
Loops
F~UN
A CHEl'-lPElx
200
Here is a new problem. You are a rug salesman. All your rugs come in rolls 12 feet wide. Your customers buy rugs in varying lengths
depending on how long their rooms are. You want to make a chart of how many square yards of rug are required for rooms of different lengths. The most popular room sizes start at 9 feet long (a 12 by 9 foot rug) and increase a foot at a time (12 by 10,12 by 11, and so on) until they reach 12 by 20.
You will write a program that computes the number of yards in a 12 by 9 rug, then a 12 by 10 rug, on up to a 12 by 20 rug.
To compute the number of square yards in each of the 12 different sized rugs, you have to find the number of square feet and divide by 9. The main computation step is:
0020 LET Y=( 12*X)/9
where Y is the number of square yards, and X is the length of each different rug. To display the value of Y, you would use this statement:
0030 PRINT Y
The value of X has to increase by 1, from 9 to 10 on up to 20. You could write a program like this:
0010 LET X=9
0020 LET Y=( 12*X)/9 0030 PRINT Y
0040 LET X=10 0050 LET Y=( 12*X)/9 0060 PRINT Y
This program uses a LET statement to increase the value of X. However, there is a better way. You can make a loop. A loop is just what it sounds like. It is a series of program steps that are repeated. It looks like this:
Start of loop
Carry out the instructions
End of loop
Go back and start again
Two things have to happen to this loop to make it work. It has to have some way to change the values it uses before it loops up to the top and starts again. And it has to have some way to know when to stop, or the program will run indefinitely.
First Loop Method
So far you have these program statements: 0020 LET Y=( 12* X)/9
0030 PRINT Y
You want to start with X equal to 9, so put a LET statement ahead of these two statements assigning 9 as the first value of X. It will also help if you print the value of X with the computed value of Y, so the table will be more self-explanatory. Now, the program looks like this:
o
c
c
c
Remember that while this statement looks peculiar in a mathematical sense, it's perfectly valid in BASIC. It says, " Assign the value of X to be equal to the old value of X plus 1 ".
By adding statement 40 to the program, you've changed the value of X and completed the steps required to make the loop operate once. Now you have to add a GOTO statement to go back to the beginning of the loop:
0050 GOTO 20
You go to line 20 because you only have to go back to the computation step, not to line 10 where you originally set X equal to 9.
After the 5100 goes to line 20, it computes and displays the yardage again, but this time for X equal to 10. It arrives at line 40 again and changes X to 11; then it goes back to line 20 to compute the next yardage. This process continues, increasing the value of X by 1 after each loop.
Ending a Loop
One thing is missing from an otherwise perfect loop. It never ends. Not at X=20, not at X=30, because X just keeps increasing. If you are sitting in front of your 5100 while this program is running, you can stop this loop whenever you want to by pressing ATTN. But this is obviously not an ideal method. You can make the loop stop automatically if you build in a test with an I F statement to see when you've processed enough values of X. In this program, you want the loop to stop when the value of X passes 20. Consider this I F statement:
0050 IF X>20 GOTO 70 Line 70 will be an END statement.
The I F test goes before the GOTO sta