585-300-213
Comcode 108356098
Issue 1
May 1999
DEFINITY
AUDIX
System
Release 4.0
All Rights Reserved, Printed in U.S.A. Notice
Every effort was made to ensure that the information in this book was complete and accurate at the time of printing. However, information is subject to change.
Your Responsibility for Your System’s Security
Toll fraud is the unauthorized use of your telecommunications system by an unauthorized party, for example, persons other than your com-pany’s employees, agents, subcontractors, or persons working on your company’s behalf. Note that there may be a risk of toll fraud associated with your telecommunications system and, if toll fraud occurs, it can result in substantial additional charges for your telecommunications services.
You and your system manager are responsible for the security of your system, such as programming and configuring your equipment to pre-vent unauthorized use. The system manager is also responsible for reading all installation, instruction, and system administration docu-ments provided with this product in order to fully understand the fea-tures that can introduce risk of toll fraud and the steps that can be taken to reduce that risk. Lucent Technologies does not warrant that this product is immune from or will prevent unauthorized use of com-mon-carrier telecommunication services or facilities accessed through or connected to it. Lucent Technologies will not be responsible for any charges that result from such unauthorized use.
Lucent Technologies Fraud Intervention
If you suspect you are being victimized by toll fraud and you need technical support or assistance, call the appropriate BCS National Cus-tomer Care Center telephone number. Users of the MERLIN®, PART-NER®, and System 25 products should call 1 800 628 2888. Users of the System 75, System 85, DEFINITY® Generic 1, 2 and 3, and DEFINITY® ECS products should call 1 800 643 2353. Customers outside the continental United States should contact their local Lucent representative, or call one of the above numbers in the following man-ner:
• Dial the International Access Code; for example, 011. • Dial the country code for the U.S., that is, 01.
• Lastly, dial either of the telephone numbers provided above.
Lucent Technologies Web Page
The world wide web home page for Lucent Technologies is: http://www.lucent.com
Federal Communications Commission Statement
Part 15: Class A Statement. This equipment has been tested and found to comply with the limits for a Class A digital device, pursuant to Part 15 of the FCC Rules. These limits are designed to provide rea-sonable protection against harmful interference when the equipment is operated in a commercial environment. This equipment generates, uses, and can radiate radio-frequency energy and, if not installed and used in accordance with the instructions, may cause harmful interfer-ence to radio communications. Operation of this equipment in a resi-dential area is likely to cause harmful interference, in which case the user will be required to correct the interference at his own expense.
This digital apparatus does not exceed the Class A limits for radio noise emissions set out in the radio interference regulations of Industry Canada.
Le Présent Appareil Nomérique n’émet pas de bruits radioélectriques dépassant les limites applicables aux appareils numériques de la class A préscrites dans le reglement sur le brouillage radioélectrique édicté par le Industrie Canada.
Trademarks
See the preface of this document.
Ordering Information
Call: Lucent Technologies BCS Publications Center
Voice 1 800 457-1235 International Voice 317 322-6791 Fax 1 800 457-1764 International Fax 317 322-6699 Write: Lucent Technologies BCS Publications Center
2855 N. Franklin Road Indianapolis, IN 46219 Order: Document No. 585-300-213
Comcode 108356098 Issue 1, May 1999
For additional documents, refer to the section in “About This Docu-ment” entitled “Related Resources.”
You can be placed on a standing order list for this and other documents you may need. For more information on standing orders, or to be put on a list to receive future issues of this document, contact the Lucent Tech-nologies Publications Center.
Obtaining Products
To learn more about Lucent Technologies products and to order prod-ucts, contact Lucent Direct, the direct-market organization of Lucent Technologies Business Communications Systems. Access their web site at www.lucentdirect.com. Or call the following numbers: custom-ers 1 800 451 2100, account executives 1 888 778 1880 (voice) or 1 888 778 1881 (fax).
Warranty
Lucent Technologies provides a limited warranty on this product. Refer to the “Limited Use Software License Agreement” card provided with your package.
European Union Declaration of Conformity
The “CE” mark affixed to the equipment means that it conforms to the following directives. Lucent Technologies Business Communications Systems declares that DEFINITY AUDIX System equipment specified in this document conforms to the referenced European Union (EU) Directives and Harmonized Standards listed below:
EMC Directive 89/336/EEC Low-Voltage Directive73/23/EEC
Acknowledgment
May 1999 Contents
iii
Contents
Contents iii
About This Document xiii
■ Intended Audience xiii
■ Organization xiv
■ How to Use This Document xv
■ Conventions Used in This Document xv
■ Related Resources xvi
■ Trademarks and Service Marks xvi
■ How to Make Comments About This Document xvi
1
Using the DEFINITY AUDIX Screens 1-1■ Using the DEFINITY AUDIX Screens 1-1
System Administration 1-1
System Maintenance 1-2
■ Screen Layout 1-3
Screen-Labeled Function Keys 1-4
Function Key Equivalents 1-5
■ The Command Line 1-5
Verb-Object Orientation 1-5
Command Line Verbs 1-6
Command Line Objects 1-6
Command Line Qualifiers 1-6
Command Line Help 1-7
Command Line Abbreviation 1-7
Command History and Command Line Editing 1-8
■ Working in the DEFINITY AUDIX Screen 1-9
Screen Help 1-9
Data Entry 1-10
Windowing on the 715 Terminal 1-11
2
Screen Organization 2-1■ Screens Organized by Verb 2-1
Screen Navigation 2-13
■ Screen Commands 2-14
May 1999 Contents
iv
Audit 2-15
Busyout 2-16
Change 2-16
Copy 2-17
Disable 2-17
Display 2-18
Enable 2-18
Help 2-19
List 2-20
Release 2-20
Remove 2-21
Reset 2-21
Save 2-22
Set 2-22
Status 2-23
Test 2-23
3
Screen Descriptions 3-1■ display Activity-Log 3-2
Field Descriptions 3-3
■ list Address-Ranges 3-5
Field Descriptions 3-5
■ display Administration-Log 3-6
Field Descriptions 3-8
Additional Specifications 3-8
■ disable/enable Alarm-Origination 3-9
Field Descriptions 3-9
status Alarm-Origination 3-10
Field Descriptions 3-10
test Alarm-Origination 3-11
Field Descriptions 3-12
Additional Specifications 3-13
■ display Alarms 3-14
Field Descriptions 3-15
■ add Announcement-Set 3-18
May 1999 Contents
v
copy Announcement Set 3-19
Field Descriptions 3-19
list Announcement-Sets 3-20
■ display Announcement Id 3-21
Field Descriptions 3-22
copy Announcement Id 3-22
Field Descriptions 3-23
save Announcements 3-24
Field Descriptions 3-24
Additional Specifications 3-25
■ list Attendants 3-26
Field Descriptions 3-26
■ Auto-Attendant 3-27
Field Description 3-28
change Auto-Attend-routing Business-Schedule 3-28
Field Description 3-29
change Auto-Attend Routing Holiday-Schedule 3-30
Field Description 3-31
display Auto-Attend-Routing
Routing-Table Schedule 3-32
Field Description 3-33
display Auto-Attend-Routing Menu-Tree 3-34
Field Description 3-34
■ list Auto-Attend-Schedules 3-35
■ Audit 3-36
Field Descriptions 3-36
Sample Tasks 3-36
Additional Specifications 3-36
■ display/restore Backups 3-37
Field Descriptions 3-38
Sample Tasks 3-40
■ test Board 3-41
Field Descriptions 3-43
Additional Specifications 3-43
■ list Configuration 3-44
May 1999 Contents
vi
■ display Class of Service (COS) 3-45
Field Descriptions 3-46
list COS 3-53
Field Descriptions 3-53
■ status Disk 3-54
Field Descriptions 3-55
■ display Errors 3-56
Field Descriptions 3-57
■ display Events 3-60
Field Descriptions 3-61
■ change Extensions 3-65
Field Descriptions 3-66
Additional Specifications 3-66
■ list Extensions 3-67
Field Descriptions 3-67
■ display Fragment 3-68
Field Descriptions 3-68
copy Fragment 3-69
Field Descriptions 3-69
■ Help 3-70
■ test LAN 3-71
Additional Specifications 3-72
■ display Machine 3-73
Field Descriptions 3-74
Additional Specifications 3-77
■ list Machines 3-78
Field Descriptions 3-78
■ Remote Machine 3-79
■ test Machine 3-83
Function Keys 3-84
■ audit Mailboxes 3-85
Field Descriptions 3-85
Sample Tasks 3-86
Additional Specifications 3-86
May 1999 Contents
vii
Field Descriptions 3-87
Sample Tasks/Additional Specifications 3-87
■ audit Maintenance-Logs 3-88
Field Descriptions 3-88
Sample Tasks/Additional Specifications 3-88
■ list Measurements Community Day 3-89
Field Descriptions 3-90
■ list Measurements Community Hour 3-91
Field Descriptions 3-92
■ list Measurements Feature Day 3-93
Field Descriptions 3-94
■ list Measurements Feature Hour 3-97
Field Descriptions 3-98
■ list Measurements Network-Load Day 3-101
Field Descriptions 3-101
■ list Measurements Network-Load Hour 3-103
Field Descriptions 3-104
■ list Measurements Load Day 3-105
Field Descriptions 3-106
■ list Measurements Load Hour 3-108
Field Descriptions 3-109
■ list Measurements Remote-Messages Day 3-111
Field Descriptions 3-112
■ list Measurements Remote-Messages Month 3-115
Field Descriptions 3-116
■ list Measurements Special-Features Day 3-119
Field Descriptions 3-120
■ list measurements Special-Features Hour 3-121
Field Descriptions 3-122
■ list Measurements Subscriber Day 3-123
Field Descriptions 3-125
■ list Measurements Subscriber Month 3-128
Field Descriptions 3-130
■ add/remove MO-Disk 3-133
May 1999 Contents
viii
Sample Tasks 3-135
■ status MO-Disk 3-136
Field Descriptions 3-137
■ test MO-Disk 3-138
Field Descriptions 3-139
Sample Tasks 3-139
status Test 3-140
Field Descriptions 3-140
Sample Tasks 3-140
Additional Specifications 3-140
■ audit Names 3-141
Field Descriptions 3-141
Sample Tasks/Additional Specifications 3-141
■ audit Network Data 3-142
Field Descriptions 3-142
■ change/display Network-Group 3-143
Field Descriptions 3-144
■ busyout Network-Port 3-145
Field Descriptions 3-146
Sample Tasks 3-146
■ test Network-Port 3-147
Field Description (display only) 3-148
■ save Nightly 3-149
Field Descriptions 3-150
Sample Tasks 3-150
Additional Specifications 3-150
■ change Password 3-151
Field Descriptions 3-151
■ audit Personal-Directories 3-152
Field Descriptions 3-152
Sample Tasks/Additional Specifications 3-152
■ busyout Port 3-153
Field Descriptions 3-154
Sample Tasks 3-154
May 1999 Contents
ix
Field Descriptions 3-156
Sample Tasks 3-156
Additional Specifications 3-157
■ list Remote-Extensions 3-158
Field Descriptions 3-159
■ add Remote-Subscriber 3-160
Field Descriptions 3-161
■ get Remote-Updates 3-163
Field Description 3-163
■ display Subscriber 3-164
Field Descriptions 3-166
■ audit Subscriber-Data 3-174
Field Descriptions 3-174
Sample Tasks/Additional Specifications 3-174
list Subscribers 3-175
Field Descriptions 3-175
■ display Switch-Link (CL Mode) 3-176
Field Descriptions 3-177
■ display Switch-Link (DS Mode) 3-179
Field Descriptions 3-180
busyout Switch-Link 3-181
Field Descriptions 3-181
status Switch-Link 3-182
Field Descriptions 3-182
test Switch-Link Long (CL Mode) 3-184
Field Descriptions 3-184
Sample Tasks 3-185
■ audit Switch-Names (DS Mode) 3-186
Field Descriptions 3-186
■ display Switch-Time-Zone 3-187
Field Descriptions 3-188
■ audit Switch-Translations 3-189
Field Descriptions 3-189
Sample Tasks/Additional Specifications 3-189
May 1999 Contents
x
Field Descriptions 3-192
Sample Tasks 3-192
Additional Specifications 3-192
■ reset System Reboot 3-193
Field Descriptions 3-195
Sample Tasks 3-195
Additional Specifications 3-195
■ reset System Restart 3-196
Field Descriptions 3-197
Sample Tasks 3-198
Additional Specifications 3-198
■ reset System Shutdown 3-199
Field Descriptions 3-201
Sample Tasks 3-201
Additional Specifications 3-201
■ display System-Parameters Activity Log 3-202
Field Descriptions 3-203
■ display System Parameters Analog Network 3-204
Field Descriptions 3-204
■ display System-Parameters Customer Options 3-206
Field Descriptions 3-207
■ display System-Parameters Features 3-209
Field Descriptions 3-211
■ display System-Parameters imapi-Options 3-217
Field Description 3-218
■ display System-Parameters Limits 3-220
Field Descriptions 3-221
■ display System-Parameters Link-Log
(CL Mode) 3-222
Field Descriptions 3-223
■ display System Parameters Maintenance 3-224
Field Descriptions 3-225
■ change/display System-Parameters Outcalling 3-228
Field Descriptions 3-230
■ change System-Parameters Password 3-231
May 1999 Contents
xi
■ display/change
System-Parameters-Sending Restrictions 3-232
Field Descriptions 3-232
■ display System-Parameters Thresholds 3-233
Field Descriptions 3-233
■ display Time 3-235
Field Descriptions 3-235
Sample Tasks 3-237
Additional Specifications 3-237
■ change/display Transfer-Dialplan 3-238
Field Description 3-238
■ save Voice 3-239
Field Descriptions 3-239
Sample Tasks 3-240
Additional Specifications 3-240
■ audit Voice Files 3-241
Field Descriptions 3-241
Sample Tasks/Additional Specifications 3-241
■ busyout Voice-Group 3-242
Field Descriptions 3-243
Sample Tasks 3-243
Additional Specifications 3-243
■ display Voice Group 3-244
Field Descriptions 3-245
Additional Specifications 3-245
■ status Voice-Group 3-246
Field Descriptions 3-246
■ save Weekly 3-248
Field Description 3-249
Sample Tasks 3-249
A
Administration Log Entries A-1ABB
Abbreviations ABB-1GL
Glossary GL-1May 1999 Contents
About This Document
xiii Intended Audience
May 1999
About This Document
This manual is a reference to the administration and maintenance screens for the DEFINITY® AUDIX® System Release 4.0. The screens described here can be used to fully administer the system from a low cost, screen-based terminal. You can administer and maintain the DEFINITY AUDIX System using the same terminal that you use to administer the switch, without changing options such as baud rate. Alternatively, you can use separate administration terminals for the DEFINITY AUDIX System and the switch.
This chapter describes the purpose, organization, and intended audience of this document, and provides suggestions on how to use the document. Information about the typographic conventions used in this document, the Trademarks and Service Marks referenced, and where to find additional related information. The screens described in this reference manual can be used to perform over 100 administrative and maintenance tasks. The command format and the screens are described in more detail in Chapter 1, ‘‘Using the DEFINITY AUDIX Screens’’. This chapter also lists the screen access commands.
Intended Audience
This document is designed for DEFINITY AUDIX customers, such as system administrators and maintenance engineers, and for Lucent Technologies
May 1999 About This Document
xiv Organization
Organization
The first two chapters provide introductory information about this document, and describe the screens and how to use them.
Chapter 1, ‘‘Using the DEFINITY AUDIX Screens’’, describes the screen layout and the commands used to access the screens. It also contains a summary of the set of DEFINITY AUDIX System administration and maintenance screens and their access commands. These tables can help you locate specific screen descriptions in this document.
Chapter 2, ‘‘Screen Organization’’, contains two tables that summarize the set of DEFINITY AUDIX administration and maintenance screens and their activation commands. These tables help you locate specific screen descriptions in this document.
Chapter 3, ‘‘Screen Descriptions’’, contains the screen descriptions organized alphabetically by screen name. The description of each screen contains the following information:
Appendix A, ‘‘Administration Log Entries’’ lists the codes and messages that can be used to solve problems that may be occurring with the DEFINITY AUDIX System, its features, or the switch.
Description
Summarizes the purpose of the screen.Commands
Shows all possible versions of the commands that can access the screen. Where appropriate,login permissions
and thestate
of the DEFINITY AUDIX System that can run the command are described in a note.Screen Layout
Shows the screen layout of the screen as it would appear on your terminal.Field Descriptions
Describes each field that appears on the screen. For data-entry fields, gives the valid entries and default values.Sample Tasks
For more complicated commands, lists the steps to accomplish typical tasks for which the screen is used.May 1999 About This Document
xv How to Use This Document
How to Use This Document
This document is a reference manual for the DEFINITY AUDIX System
administration and maintenance screens. The screen descriptions are arranged in alphabetical order by screen name. Commands precede each screen name exactly as written on the command line. Descriptions follow each screen name using the name as it appears on the screen. Use the following procedure to locate a screen:
More information about using the screens is given in Chapter 1, ‘‘Working in the DEFINITY AUDIX Screen’’.
Conventions Used in This Document
The following typographic conventions are used in this document:
■ Bold type is used to refer to characters that you type on your keyboard
exactly as shown, such as commands.
■
Italic
type is used to reference the titles of documents, chapters, sections,tables, and figures, and occasionally for emphasis.
■
Bold italic
type is used to refer to variable information that you type in,such as the variable
extension
in the command change subscriberextension
. In this example you would substitute an extension number forextension
when typing the command.■ Brackets, [ ], are used to enclose optional parts of a command.
!
SECURITY ALERT:
This icon and the words “Security Alert” indicate the presence of a toll fraud
security hazard. Toll fraud is the unauthorized use of your
telecommunications system by an unauthorized party (such as persons
other than your company’s employees, agents, subcontractors, or persons
working on your company’s behalf. Be sure to read “Your Responsibility for
Your System’s Security” on the inside front cover of this book.
If Then
You know the exact screen name
Look in Chapter 2, alphabetically, or look in the Contents
You don’t know the exact screen name but you know the command
Look in the Table 2-1, Screens Organized by Verb
You are not sure of the command or the screen name
Look in the Table 2-2, Screens Organized by Screen Name (Object)
You cannot find the screen by any of the above methods
May 1999 About This Document
xvi Related Resources
Related Resources
For a list of documents related to the DEFINITY AUDIX System, see the Lucent Technologies Product Publications Catalog website at
www.lucent.com/enterprise/documentation.
Trademarks and Service Marks
DEFINITY is a registered trademark of Lucent Technologies.
AUDIX is a registered trademark of Lucent Technologies.
How to Make Comments About This
Document
We are interested in your suggestions for improving this document. Please send your comments and suggestions to:
Lucent Technologies OMD Technical Publications Room 22-2X57
11900 North Pecos Street Denver, Colorado 80234
Send email comments to:
Using the DEFINITY AUDIX Screens
1-1 Using the DEFINITY AUDIX Screens
1
May 1999
1
Using the DEFINITY AUDIX Screens
This chapter describes how to access and how to use the DEFINITY AUDIX screens. It describes the layout of the screens, how to use help, how to move around the screen, and how to invoke or cancel a screen operation.
NOTE:
See the
DEFINITY AUDIX System Release 4.0 System Description,
585-300-214, for a list of the supported terminals and modems.
Using the DEFINITY AUDIX Screens
The DEFINITY AUDIX screens are used by two groups of people, system administrators and maintenance personnel. The responsibilities of each are briefly described below. For a more detailed description of system administration and maintenance, refer to
DEFINITY AUDIX System Administration
, 585-300-507, andDEFINITY AUDIX System Release 4.0 Maintenance, 585-
300-121.System Administration
Administration is the ongoing process of making the DEFINITY AUDIX System work to the satisfaction of each subscriber. The system administrator is
responsible for making the system work efficiently from both the system side and the subscriber side. During this ongoing process the administrator uses the DEFINITY AUDIX screens as tools to perform several tasks, including the following:
■ Setting up subscribers and customizing their service options
■ Recording voice fragments, including subscriber names and customized
May 1999 Using the DEFINITY AUDIX Screens
1-2 Using the DEFINITY AUDIX Screens
1
■ Determining which DEFINITY AUDIX features to make available to
subscribers, and enabling, disabling, modifying, or monitoring these features
■ Establishing and maintaining communication with the subscriber
community, responding to problems, and correcting misconceptions
■ Coordinating switch and DEFINITY AUDIX System administration when
new features are activated
■ Analyzing audits and traffic reports and taking corrective action when
appropriate
■ Maintaining and monitoring system security
■ Troubleshooting and fixing problems as they occur as well as anticipating
problems before they occur
System Maintenance
Maintaining the DEFINITY AUDIX System involves ensuring that the system is operating satisfactorily and, in many cases, performing preventative
maintenance. These tasks may be performed by the customer system
administrator. Other tasks are limited to the Technical Service Organization (TSO) Tier 3 engineers, and the Lucent Technologies Tier 1 technicians. Maintenance personnel use the DEFINITY AUDIX screens as tools to perform several tasks, including the following:
■ Monitoring and correcting system alarms and errors that occur during
system operation
■ Testing system components such as the MO drive, circuit pack, and
communication ports
■ Performing data backups
May 1999 Using the DEFINITY AUDIX Screens
1-3 Screen Layout
1
Screen Layout
The screen layout for the DEFINITY AUDIX administration screens is shown below. Each page of multiple-page screens has the same screen layout.
There are six areas of the screen used for the following purposes:
System Status Line Shows status indicator, number of current logins, and active alarms.
Command History Line
Displays the fully expanded command line. For multi-page screens, displays current page number and page count. Indicates if the activity window contains help instead of the screen itself.
Activity Window Contains:
— Data-entry fields for typing in new or changed data
— Display-only fields
— Reports displaying requested system information
— Screen and field help accessed by the Help or Choices keys
Help/Error Message Line
Displays short error messages and prompts.
Command Line Accepts and processes the command/screen name/identifier(s) that you enter to access a screen.
Function Key Labels
Identifies function keys F1 through F8.
Command History Line
Function Key Labels
Command Line Help/Error Message Line
May 1999 Using the DEFINITY AUDIX Screens
1-4 Screen Layout
1
Screen-Labeled Function Keys
The screen-labeled function keys are shown on the last line of the screen.
The purpose of each key is as follows:
Key Command Line Screen
(Cancel)
Erases the entire contents of the command line.
Halts the current activity and places the cursor on the command line. In a help screen, returns to the screen.
(Refresh)
N/A Repaints the screen.
(Enter)
Executes the command. Submits a completed screen for the action specified on the command line, such as add, display, or remove.
Executes the command. Moves the cursor forward from one field to the next.
(Clear Field)
Clears a single word. Clears an entire field.
(Help)
Displays a screen explaining the types of help available.
Requests screen help. Identical to the
help command.
(Choices)
Displays valid entries for the command, screen name, or identifier, if choices are available. Pressing this key again selects the highlighted item.
Requests field help which displays valid entries for the field. Pressing this key again selects the highlighted item.
(Next Page)
N/A Moves forward through multiple-page screens, reports, or help.
(Previous Page)
N/A Moves backward through
multiple-page screens, reports, or help.
May 1999 Using the DEFINITY AUDIX Screens
1-5 The Command Line
1
Function Key Equivalents
Keyboard equivalents are available for users whose terminals cannot accommodate the DEFINITY AUDIX function keys. Each function key and its control key combination is shown below:
The Command Line
This section describes the syntax for the screen activation commands.
Verb-Object Orientation
The screen activation commands for the DEFINITY AUDIX System follow a verb-object syntax. See Chapter 2, Screens Organized by VerbandScreens Organized by Screen Name (Object), for a complete list of the screen activation commands.
The structure of the DEFINITY AUDIX screen activation commands is:
VERB OBJECT-PHRASE QUALIFIERS
Each of these three command line elements is described below. Function
Key Screen Label Control Key Purpose
1 Cancel cntl-x Cancel current operation.
2 Refresh cntl-l Refresh (repaint) current screen.
3 Enter cntl-e Execute current command or enter current data.
4 Clear Fld cntl-k Clear data in current field.
5 Help cntl-w Get Screen Help.
6 Choices cntl-c Get Field help (and display field choices, if any).
7 Next Page cntl-n Go to next page (if any).
May 1999 Using the DEFINITY AUDIX Screens
1-6 The Command Line
1
Command Line Verbs
The first command line element is the verb, which specifies the type of action.
The DEFINITY AUDIX command line verbs are the following:
Each screen name can be preceded by one or more of these verbs (one at a time), and (possibly) followed by qualifiers, to compose a command that activates the screen.
Command Line Objects
The second command line element is the screen name, or object-phrase. The screen names consist of one or more words (nouns and adjectives) that identify the screen. The screen names are generally (but not always) the same as the title of the screen as it appears on your screen when activated. Examples of object phrases are alarms, measurements, remote-messages, and attendants.
Command Line Qualifiers
The third command line element is the qualifier. A command line qualifier can be a subscriber extension number (
12345
), a date (7/21/94
), a subscriber name, and other specific parameters.Wherever possible, the key that uniquely specifies an administrative record is entered on the command line rather than in the screen. For example, you enter change subscriber 12345 on the command line rather than just change subscriber followed by entry 12345 in the screen.
Most screens can be activated by more than one version of a command. The different versions of the screen activation command are distinguished by the verb that begins the command line and by the qualifiers that end the command line. For example, the Subscriber screen can be activated by four versions of the command which appear on the following page.
add copy get release save
audit disable help remove set
busyout
change
display
enable
list
logoff
reset
restore
status
May 1999 Using the DEFINITY AUDIX Screens
1-7 The Command Line
1
All of these commands activate the Subscriber screen, which displays information about the subscriber specified by
subscriber-id
. The display and remove versions of the command activate a display-only version of the screen. The add and change version of the command activate a data-entry version of the screen that allows you to make changes to the features assigned to the DEFINITY subscriber specified bysubscriber-id
.Command Line Help
When you enter a command, the (Choices) function key displays valid selections for the command part on which the cursor rests. You can select one of the displayed options by using (Tab), (Back tab), and arrow keys, or by typing the initial characters of menu entries.
Command Line Abbreviation
You may abbreviate most commands. For example, you could abbreviate change system-parameters sending-restrictions as ch sy s. You may abbreviate the verb, object, or qualifier(s) by typing the first few letters of each word, in the correct spelling order. (Two exceptions are announcement set, which is abbreviated annc, and class-of-service, which is abbreviated cos).
You can build a command one word at a time. For example, at the beginning of the command line you can press (Choices) to see a list of all valid command verbs. If you then type ch and press , the system expands ch to change and lists all valid words that can follow change. If you then type sy and press (Choices) the system expands the command line to change system-
parameters and lists all valid words that can follow.
By using (Choices), you can access all possible commands without any prior knowledge of specific commands, command components, or even of the command structure.
add subscriber subscriber-id
change subscriber subscriber-id
display subscriber subscriber-id
remove subscriber subscriber-id
F6
TAB ←ΤΑΒ
F6
RETURN
F6
May 1999 Using the DEFINITY AUDIX Screens
1-8 The Command Line
1
The system notifies you if you enter an invalid abbreviation. If you omit a required command qualifier (such as a subscriber name or extension, or a port address) the system will prompt you for the missing information.
NOTE:
The screen activation commands are listed in the screen descriptions in Chapter 3 as fully expanded commands.
Command History and Command Line Editing
The system maintains a command history of the 10 most recently entered commands. After a screen has been entered, the user can “scroll” back through previous commands by pressing the (up arrow) key. The (down arrow) key retrieves the
next
command in the command stack. You can press the following keys to move the cursor or edit the retrieved command line:NOTE:
Characters typed in the middle of the command line are inserted, shifting characters to the right of the cursor.
For example, you have just entered the following command and added information for a subscriber with extension 1000:
add subscriber 1000
If you now you want to add a subscriber with extension 2000. You could perform the following to access the Subscriber screen to add subscriber 2000:
■ Press (up arrow) to retrieve the previous command ■ Press (Clear Field) to remove 1000
■ Type 2000 ■ Press (Enter)
(Cancel) Erases the entire line.
(left arrow) Moves the cursor to the previous word.
(Tab) or (right arrow)
Moves the cursor to the next word.
Deletes the previous character.
(Clear Field) Erases a single word.
(Choices) Displays valid command-line entries for the portion of the command to the left of the cursor.
May 1999 Using the DEFINITY AUDIX Screens
1-9 Working in the DEFINITY AUDIX Screen
1
If you added a subscriber, then wanted to change the record you just added, you could:
■ Press to retrieve the previous command
■ Press several times to move to the beginning of the line ■ Press (Clear Field) to remove add
■ Type change in its place ■ Press the (Enter)
Working in the DEFINITY AUDIX
Screen
After you log on to the DEFINITY AUDIX System, a blank screen appears with the cursor on the command line. When you type a valid command on the command line and press (Enter), or , the requested screen replaces the blank screen.
Some screens have one or more fields into which you can enter data, such as subscriber extension numbers, announcement IDs, or class of service names. All other fields are display-only fields. You cannot enter data into display-only fields.
When you activate a screen, the cursor initially rests in the first data-entry field. If there are no data-entry fields, the cursor rests at the command line for a one page screen and rests on the help/error message line for multiple page screens.
Screen Help
For data-entry screens, the (Choices) function key displays information about the valid entries for the field where the cursor rests. If there are several valid entries, the activity menu displays these entries. You can select a choice by using (Tab), (Back tab), and arrow keys, or by typing the initial characters of menu entries.
F4
F3
F3 RETURN
F6
May 1999 Using the DEFINITY AUDIX Screens
1-10 Working in the DEFINITY AUDIX Screen
1
Data Entry
When a screen with data-entry fields is active, the following keys can be used for navigating through the screen and entering data in fields:
Typing in the fields replaces its original contents. If there are specific entries, the (Choices) key displays valid entries that field. The system also validates and expands fields according to the entries, when you change a field.
Key What it Does
or Moves the cursor to the next field. From the bottom field, wraps to the top field.
Moves to the previous field. From top field, wraps to the bottom field.
Moves to the next field. From bottom field, wraps to the top field.
Moves to the next field to the previous field. From top field, wraps to the bottom field.
Moves to the nearest field on the previous line. From top field, wraps to the bottom field.
Moves to the nearest field on the next line. From bottom field, wraps to the top field.
Deletes the last character entered in the current field.
(Clear Field) Clears the current field.
TAB RETURN
←ΤΑΒ
backspace F4
F6
May 1999 Using the DEFINITY AUDIX Screens
1-11 Working in the DEFINITY AUDIX Screen
1
Windowing on the 715 Terminal
If you are using the 715 terminal, you may use its windowing capabilities. You can use the 715 terminal to log on to both the switch and the DEFINITY AUDIX System to perform administration tasks and easily toggle back and forth between the two sessions. The windowing functions are controlled by the four function keys, F1, F2, F3, and F8 as described in the following table.
Key Operation
Ctrl+F3 Enables the windowing function keys and displays their labels
F1 Turns off the windowing function keys
F2 Switches between the DEFINITY AUDIX System window and the switch window
F3 Switches between split-screen and full-screen modes
May 1999 Using the DEFINITY AUDIX Screens
1-12 Working in the DEFINITY AUDIX Screen
Screen Organization
2-1 Screens Organized by Verb
2
May 1999
2
Screen Organization
This chapter provides two tables that show how administration and maintenance operations can be invoked by combining an action (verb) with a screen name (object) and qualifiers. The tables can also help locate the screen descriptions in Chapter 3.
The first table shows all possible screen access commands sorted alphabetically by verb, and screen name within each verb. The second table lists all screens sorted alphabetically by name.
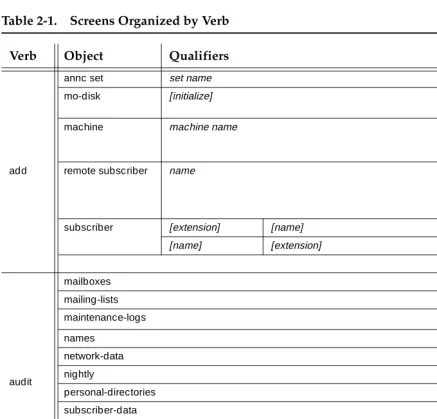
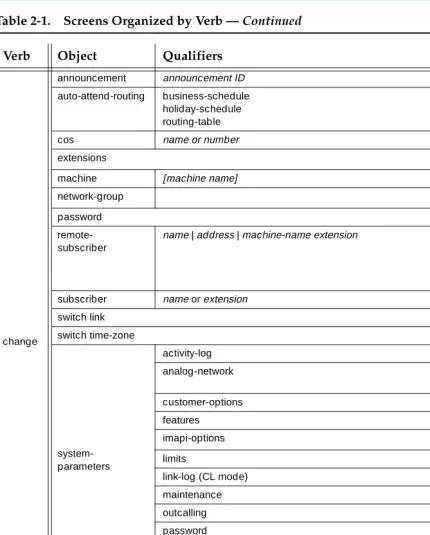
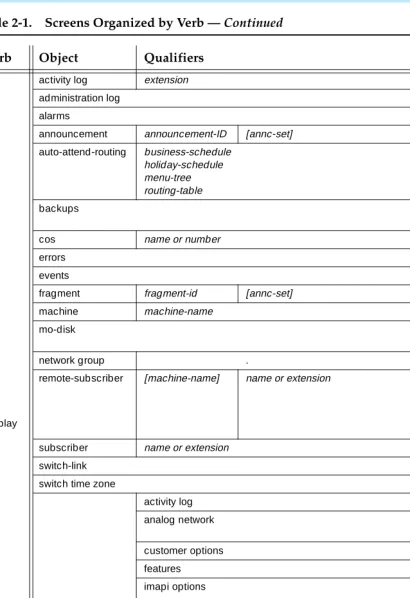
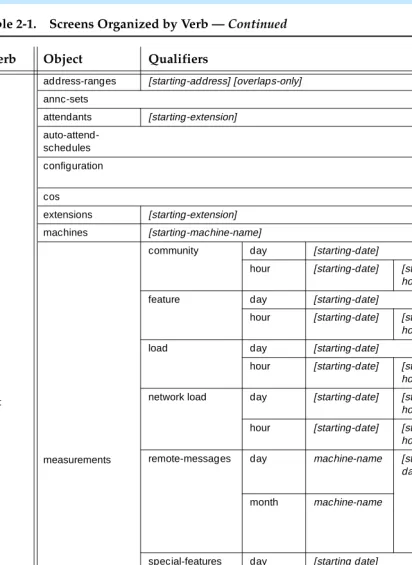
Screens Organized by Verb
Table 2-1, Screens Organized by Verb, lists the commands sorted alphabetically, followed by screen name and identifier. The table consists of the following four columns:
■ The Verbcolumn shows all valid verbs that can begin a command to
access a DEFINITY AUDIX administration and maintenance screen.
■ The Objectcolumn shows the objects on which the verbs can act. Each
object corresponds to a DEFINITY AUDIX administration and maintenance screen. Note that an object, or screen name, may consist of more than one word.
■ The Qualifierscolumn shows the command qualifiers. The qualifiers, if
May 1999 Screen Organization
2-2 Screens Organized by Verb
2
■ The Login/other column shows the login ID that can execute the
command. You may execute most commands with a
cust
(customer) login ID, however several commands require thecraft
login ID. All commands that can be executed withcust
can also be executed withcraft
. One command, change system-parameters customer options, requires theinit
login ID.■ The Login/other column also identifies the following restrictions that affect
the execution of a command:
— Blank indicates that you may run the command from the AUDIX state, but may not run it from the OA&M state described below. — OA&M indicates that these commands can be executed from the
Operations, Administration, and Maintenance state, at which time only a few core processes are running. These commands may also be run from AUDIX state as well, except for the restore backups command which may only be run from the OA&M state.
May 1999 Screen Organization
2-3 Screens Organized by Verb
2
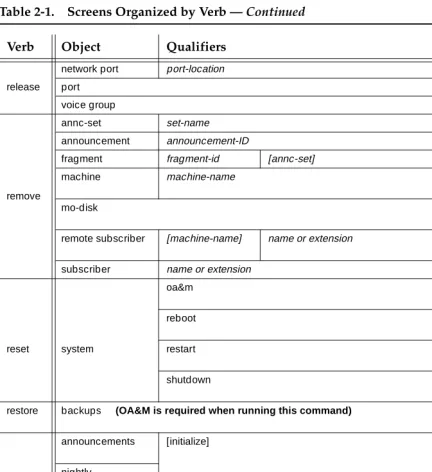
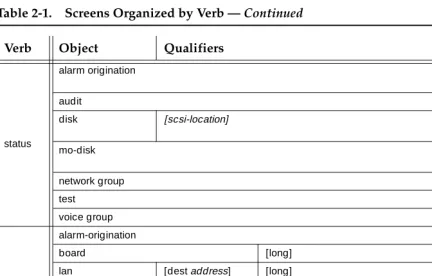
Table 2-1. Screens Organized by Verb
Verb Object Qualifiers Login/other
add
annc set set name cust
mo-disk [initialize] cust
O&AM
machine machine name cust/
AMIS or Digital Networking
remote subscriber name cust/
AMIS Digital Net working
subscriber [extension] [name] cust
[name] [extension] cust
audit
mailboxes cust
mailing-lists cust
maintenance-logs cust
names cust
network-data cust
nightly craft
personal-directories cust
subscriber-data cust
switch-names (DS mode) cust
switch-translations cust
voice-files cust
weekly craft
busyout
network-port port location or all cust
port port location cust
voice-group [forced] cust
May 1999 Screen Organization
2-4 Screens Organized by Verb
2
change
announcement announcement ID cust
auto-attend-routing business-schedule holiday-schedule routing-table
cust
cos name or number cust
extensions cust
machine [machine name] cust
network-group cust
password cust
remote-subscriber
name | address | machine-name extension cust/
AMIS
Digital Net working
subscriber name or extension cust
switch link cust
switch time-zone cust
system-parameters activity-log cust analog-network cust/ AMIS customer-options init features cust
imapi-options cust (imapi)
limits cust
link-log (CL mode) craft
maintenance craft outcalling cust password cust sending-restrictions cust thresholds cust transfer-dialplan cust voice-group cust copy annc-set cust announcement cust fragment cust
disable alarm origination craft
Table 2-1. Screens Organized by Verb — Continued
Verb Object Qualifiers Login/other
May 1999 Screen Organization
2-5 Screens Organized by Verb
2
display
activity log extension cust
administration log cust
alarms cust
announcement announcement-ID [annc-set] cust auto-attend-routing business-schedule holiday-schedule menu-tree routing-table cust backups cust/ OA&M
cos name or number cust
errors craft
events craft
fragment fragment-id [annc-set] cust
machine machine-name cust
mo-disk cust/
OA&M
network group . cust
remote-subscriber [machine-name] name or extension cust/ AMIS or Digital Networking is enabled
subscriber name or extension cust
switch-link cust
switch time zone cust
system-parameters
activity log cust
analog network cust/
AMIS
customer options cust
features cust
imapi options cust
limits cust
link log (CL mode) craft
maintenance cust/
OA&M
outcalling cust
sending restrictions cust
thresholds cust
time cust
transfer-dialplan cust
voice group cust
Table 2-1. Screens Organized by Verb — Continued
Verb Object Qualifiers Login/other
May 1999 Screen Organization
2-6 Screens Organized by Verb
2
enable alarm-origination craft
get remote-updates machine name cust
help cust
Table 2-1. Screens Organized by Verb — Continued
Verb Object Qualifiers Login/other
May 1999 Screen Organization
2-7 Screens Organized by Verb
2
list
address-ranges [starting-address] [overlaps-only] cust
annc-sets cust
attendants [starting-extension] cust
auto-attend-schedules cust configuration cust/ OA&M cos cust
extensions [starting-extension] cust
machines [starting-machine-name] cust
measurements
community day [starting-date] cust
hour [starting-date] [starting-
hour]
cust
feature day [starting-date] cust
hour [starting-date] [starting-
hour]
cust
load day [starting-date] cust
hour [starting-date] [starting-
hour]
cust
network load day [starting-date] [starting- hour
cust
hour [starting-date] [starting-
hour
cust
remote-messages day machine-name [starting-date]
cust/
AMIS or Digital Networking
month machine-name cust/
AMIS or Digital Networking is enabled
special-features day [starting date] cust
hour [starting date] starting-
hour]
cust
subscriber day name or extension
[starting-date]
cust
month cust
remote extensions machine name [starting extension]
[subscriber-type] cust/
AMIS or Digital Networking is enabled
subscribers [starting-name] cust
logoff cust
Table 2-1. Screens Organized by Verb — Continued
Verb Object Qualifiers Login/other
May 1999 Screen Organization
2-8 Screens Organized by Verb
2
release
network port port-location cust
port cust
voice group cust
remove
annc-set set-name cust
announcement announcement-ID cust
fragment fragment-id [annc-set] cust
machine machine-name cust/
AMIS
mo-disk cust/
OA&M
remote subscriber [machine-name] name or extension cust/ AMIS
subscriber name or extension cust
reset system oa&m cust/ OA&M reboot cust/ OA&M restart craft/ OA&M shutdown cust/ OA&M
restore backups (OA&M is required when running this command) cust/ OA&M
save
announcements [initialize] cust/
OA&M nightly cust/ OA&M voice cust/ OA&M weekly all locals-only [initialize] [initialize] [initialize] cust/ OA&M
set time cust/
OA&M
Table 2-1. Screens Organized by Verb — Continued
Verb Object Qualifiers Login/other
May 1999 Screen Organization
2-9 Screens Organized by Verb
2
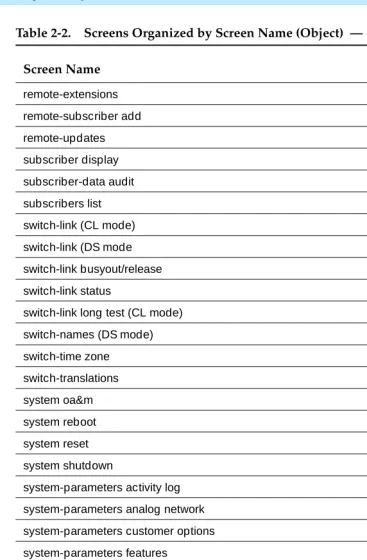
Table 2-2 lists the screen names in alphabetical order.
status
alarm origination cust/
OA&M
audit cust
disk [scsi-location] craft/
OA&M
mo-disk cust/
OA&M
network group cust
test cust
voice group cust
test
alarm-origination craft
board [long] craft
lan [dest address] [long] craft
machine name [network-port]
port location cust
mo-disk cust
network port port name cust
port port-location long [repeat n] craft
Table 2-2. Screens Organized by Screen Name (Object)
Screen Name
activity-log
address ranges
administration log
alarm origination
alarm-origination status
alarm origination test
alarm report
announcement set
announcement set copy
announcement sets list
Continued on next page
Table 2-1. Screens Organized by Verb — Continued
Verb Object Qualifiers Login/other
May 1999 Screen Organization
2-10 Screens Organized by Verb
2
announcement Id
announcement Id copy
announcement save
attendants list
auto-attendant
auto-attendant business schedule
auto-attendant holiday schedule
auto-attendant routing table
auto-attendant routing menu-tree
auto-attendant schedules
audit
backups
board test
configuration list
class of service (COS)
cos list
disk status
errors
event
extensions
extensions list
fragment
fragment copy
help
lan
machine profile
machine list
machine remote
machine test
mailboxes audit
Table 2-2. Screens Organized by Screen Name (Object) — Continued
Screen Name
May 1999 Screen Organization
2-11 Screens Organized by Verb
2
mailing lists
maintenance logs
measurements community day
measurements community hour
measurements feature day
measurements feature hour
measurements network-load day
measurements network-load hour
measurements load day
measurements load hour
measurements remote-messages hourly
measurements remote messages daily
measurements remote messages monthly
measurements special-features daily
measurements special-features hourly
measurements subscriber daily traffic
measurements subscriber monthly
mo-disk
mo-disk status
mo-disk test
names
network-data
network-group
network-port
network-port test
nightly save
password
personal directories
port
port test
Table 2-2. Screens Organized by Screen Name (Object) — Continued
Screen Name
May 1999 Screen Organization
2-12 Screens Organized by Verb
2
remote-extensions
remote-subscriber add
remote-updates
subscriber display
subscriber-data audit
subscribers list
switch-link (CL mode)
switch-link (DS mode
switch-link busyout/release
switch-link status
switch-link long test (CL mode)
switch-names (DS mode)
switch-time zone
switch-translations
system oa&m
system reboot
system reset
system shutdown
system-parameters activity log
system-parameters analog network
system-parameters customer options
system-parameters features
system-parameters imapi options
system-parameters limits
system-parameters link log (CL mode)
system-parameters maintenance
system-parameters outcalling
system-parameters password
system-parameters sending restrictions
system-parameters thresholds
Table 2-2. Screens Organized by Screen Name (Object) — Continued
Screen Name
May 1999 Screen Organization
2-13 Screens Organized by Verb
2
Screen Navigation
Navigating inside the DEFINITY AUDIX screens, except the display-only screens, is virtually the same for all screens. Commands for the screens are also similar and described below.
1. Type the command (such as add, list, change) and press (Enter). Alternatively press the RETURN or ENTER Key.
2. Once inside the screen, press the RETURN or ENTER key to move the cursor from field to field. The arrow keys will also move the cursor. 3. When a the cursor enters a field where a change is required, enter the new
value and press (Enter), or move to the next field, enter another value and so on. To save the new values, press the (Enter) key before exiting the screen. This will save the new data.
4. For multiple-page screens, press (Next Page) or (Previous Page) to move to the next or previous page.
All the possible options and the various screens associated with these options are listed on the following pages.
time
transfer-dialplan
voice save
voice-files
voice-group
voice-group change/display
voice-group status
weekly save
Table 2-2. Screens Organized by Screen Name (Object) — Continued
Screen Name
Continued on next page
F3
F3
F3
May 1999 Screen Organization
2-14 Screen Commands
2
Screen Commands
Commands for DEFINITY AUDIX screens are listed below:
The various tasks for these commands appear on the following screens. add
audit
copy
disable
exit1 get
logoff1 release
1. Not a screen. This is a command to exit the DEFINITY AUDIX System.
save
set
busyout display help remove status
May 1999 Screen Organization
2-15 Screen Commands
2
Add
May 1999 Screen Organization
2-16 Screen Commands
2
Busyout
May 1999 Screen Organization
2-17 Screen Commands
2
Copy
May 1999 Screen Organization
2-18 Screen Commands
2
Display
May 1999 Screen Organization
2-19 Screen Commands
2
May 1999 Screen Organization
2-20 Screen Commands
2
List
May 1999 Screen Organization
2-21 Screen Commands
2
Remove
May 1999 Screen Organization
2-22 Screen Commands
2
Save
May 1999 Screen Organization
2-23 Screen Commands
2
Status
May 1999 Screen Organization
2-24 Screen Commands
Screen Descriptions
3-1
3
May 1999
3
Screen Descriptions
This chapter contains descriptions of the screens arranged in alphabetical order by screen name. The screen name appears at the beginning of each screen description. The commands for each screen appear below each heading.
Each screen description contains the following:
■ Brief description of what the screen does ■ Command(s) used to access the screen
■ Information pertaining to screen permissions or other command
restrictions (if applicable)
NOTE:
Most screens require only the
cust
login. If a screen requirescraft
orinit
login, or has some other specific requirement, that is noted in the screen description.■ Screen example ■ Field descriptions
■ Sample task (for more complicated screens) ■ Additional specifications (optional)
May 1999 Screen Descriptions
3-2 display Activity-Log
3
display Activity-Log
The Activity-Log Report screen displays entries in the activity log that correspond to the subscriber extension entered on the command line. This screen may take several minutes to execute depending on the system load and the size of the log file.
display activity-log extension
The
extension
is a 3 to 10 digit extension of the local subscriber whose activity log is being displayed.The Activity-Log Report screen has two pages. The first page displays the extension entered on the command line and the corresponding subscriber’s name. If you want to view specific activity log entries, enter the date and time for the start of the activity-log entries on the first page.
The second page displays the activity-log entries. Press (Next Page) to view a next page.
May 1999 Screen Descriptions
3-3 display Activity-Log
3
Field Descriptions
Field Name Description Valid Entries Default
Page 1
Subscriber Extension
Extension entered on the command line.
display-only field
Subscriber Name Name of the subscriber corresponding to the extension entered on the command line.
display-only field
Starting Date Month Starting month for the activity log report.
blank 1 to 12
blank or month last entered
NOTE:
If the starting month is blank, all starting date and time fields must be blank. This displays the earliest available data for this
subscriber. If ending month is non-blank, the day and year fields must be non-blank.
Starting Date Day Day of the given month the activity log report should begin.
blank 1 to 31
blank or day last entered
Starting Date Year Year the activity log report should begin. A year < 70 is assumed to be in the 21st century.
blank 1 to 99
May 1999 Screen Descriptions
3-4 display Activity-Log
3
Starting Time Hour Starting hour of the activity log report.
blank 0 to 23
blank or hour last entered
Starting Time Minute Starting minute of the activity log report. If the hour field is non-blank, this field must be non-blank.
blank 0 to 59
blank or minute last entered
Ending Date Month Ending month for the activity log report.
blank 1 to 12
current month
NOTE:
If the ending month is blank, all ending date and time fields must be blank. This makes the ending date and time the current date and time. If the ending month is non-blank, the day and year fields must be non-blank.
Ending Date Day Day of the given month the activity log report should end.
blank 1 to 31
current day
Ending Date Year Year the activity log report should end.
A year < 38 is assumed to be in the 21st century.
blank 0 to 37 90 to 99
current year
Ending Time Hour Ending hour of the activity log report.
blank 0 to 23
current hour
Ending Time Minute Ending minute of the activity log report. If the ending hour field is non-blank, this field must be non-blank.
blank 0 to 59
current minute
PAGE 2
The following fields are display only.
DATE Date that the activity was logged.
TIME Time that the activity was logged.
ACTIVITY Activity identifier for each activity-log entry. The activity identifier is a 5- to 9-character string indicating the activity.
log-in, log-off, received, scheduled, canceled, status, mwi-on, mwi-off, or reset.
DESCRIPTION Description of the activity-log entry.
May 1999 Screen Descriptions
3-5 list Address-Ranges
3
list Address-Ranges
The Address Ranges screen displays a numerical list of address ranges that belong to all machines in the network.
list address ranges
Displays all ranges
list address ranges starting address
Display begins with the
starting address
. If thestarting address
includes alphabetic characters, they are converted to their Touch-Tone numeric equivalent. For example, the addressD2000
would be32000
.NOTE:
This screen can be activated only if the AMIS analog networking feature or digital networking feature has been activated on the System-Parameters Customer Options screen by Lucent Technologies personnel.
Field Descriptions
Field Name Description (display only)
From Starting address of the address range.
To Ending address of the address range.
May 1999 Screen Descriptions
3-6 display Administration-Log
3
display Administration-Log
The Administration Logscreen displays problems that can be solved by the administrator.
NOTE:
The administrator should monitor this log on a regular basis and correct the problems promptly. See Appendix A for a list of possible administration-log entries and suggested remedial actions.
display administration-log
The Administration Logscreen has two pages as shown below. The first page of the screen is used to select the administration alarm-entries to be displayed in the report. To display all alarms from the beginning of the log file, blank all fields on the first page using the (Clear Field) key. To select a subset of alarm entries to be displayed, enter values in the Start Date, Time, and/or Type fields.
May 1999 Screen Descriptions
3-7 display Administration-Log
3
The second page displays the selected alarms. Press (Next Page) to move to the next page of the list.
May 1999 Screen Descriptions
3-8 display Administration-Log
3
Field Description
sAdditional Specifications
Appendix A
contains a list of possible administration log entries and suggested remedial actions.Field Name Description Valid Entries Default
SELECTION PAGE
The first time this screen is used after installation, the fields on the selection page are blank. This screen-last-used date and time are preserved across restarts.
Start Date Beginning date for the log report. Any year < 70 is assumed to be the 21st century.
blank (displays all qualifying alarms) date in mm/dd/yy format
date last entered
Time Beginning hour and minute of the given day for the log report. The Start Date field must have valid entries before this field can be used.
blank (displays all alarms for the specified Start Date)
hh:mm format
time last entered
Type Administration alarm type the report should display. Refer to
Appendix A for valid admin. alarm types.
blank (reports all admin. alarm types).
four alphanumeric characters. If this field contains an alarm type, alarms of only that type are displayed.
blank
DISPLAY PAGE
The Administration Log Report displays the following fields for each alarm:
Date Date the admin. alarm was logged.
Time Time on the given date the admin. alarm was logged.
Type Four-character code
representing the admin. alarm type. Refer to Appendix A for valid admin. alarm types.
May 1999 Screen Descriptions
3-9 disable/enable Alarm-Origination
3
disable/enable Alarm-Origination
The Disable/Enable Alarm-Origination screens are used to temporarily disable (or reenable) the automatic alarm reporting feature, take status of any alarms, and test alarms. It is typically used by Lucent Technologies personnel to disable alarm reporting while troubleshooting and repairing the system. (Alarm
origination is automatically re-enabled when the login that disabled it logs off.)
enable alarm-origination disable alarm-origination status alarm-origination test alarm-origination
Pressing (Enter) after initially entering the screen will disable (or reenable) the alarm origination feature.
NOTE:
This command requires
craft
or higher-level login permissions.Field Descriptions
This is a display only screen. There are no data entry fields.
May 1999 Screen Descriptions
3-10 disable/enable Alarm-Origination
3
status Alarm-Origination
The Status Alarm-Originationscreen displays the current status of the alarm origination feature.
status alarm-origination
NOTE:
This screen can be accessed while the DEFINITY AUDIX System is in the OA&M state.
Field Descriptions
Field Name Description Valid Entries (display only)
alarm-origination Current alarm-origination state off (alarm origination is turned off)
active (an alarm call in progress)
enabled (alarm origination is enabled but currently idle)
disabled (alarm origination is temporarily disabled)
remote port status Current status of the remote access port.
Incoming, Outgoing, Idle
data rate Currently administered data transmission rate.
May 1999 Screen Descriptions
3-11 disable/enable Alarm-Origination
3
test Alarm-Origination
The Test Results Originationscreen initiates a demand alarm origination test and displays the results of the test.
test alarm-origination
■ Press (Enter) after initially entering the screen to start the test.
■ Press (Cancel) after initially entering the screen to return the user to the
command line without starting the test.
■ Press (Enter) after starting the test to put the test in the background
and return the user to the command line.
■ Press (Cancel) after starting the test to abort the test and return the
user to the command line.
NOTE:
This command requires the
craft
or higher-level login permissions.F3 F1
F3
May 1999 Screen Descriptions
3-12 disable/enable Alarm-Origination
3
Field Descriptions
Field Name Description Valid Entries (display only)
Date Date and time test was requested.
Resource Type of resource being tested.
Loc. Location of the alarm origination resource.
7 character string that indicates port network, carrier, slot, and port. For example, 01a0201 indicates
port-network=01, carrier=a, slot=02, port=01.
Test Name Name of test being executed.
Most Recent Test Result
Code indicating the results of the last tests run.
blank (test not executed)
R (test is running)
P (last test passed
F (last test failed)
A (last test aborted)
Test Result String Additional test result information.
Test Counters
Pass No. of times the test has passed since the test command was executed.
Fail No. of times the test has failed since the test command was executed.
May 1999 Screen Descriptions
3-13 disable/enable Alarm-Origination
3
Additional Specifications
While the test is running, you have three options:
1. Press (Cancel) to abort the test and return to the command line. 2. Wait for the test to complete.
3. Press (Enter) to put the test in the background and return to the command line.
Type status test to reconnect to the screen of a test running in background, or to display the results of the most recently completed test.
A one-minute delay is available to allow remote testing (test will fail busy if you are logged on remotely.) To use this test feature:
1. Start test.
2. Put in background. 3. Logoff.
4. Log back in after one minute. 5. Check log for pass/fail status.
F1
May 1999 Screen Descriptions
3-14 display Alarms
3
display Alarms
TheAlarm Reportscreen displays active or resolved DEFINITY AUDIX System alarms.
display alarms
May 1999 Screen Descriptions
3-15 display Alarms
3
The second page displays the requested alarm information.
Field Descriptions
Field Name Description Valid Entries
NOTE:
The first time this screen is used after a restart or reboot, the fields on the selection page of the screen are blank. Subsequently, each field on the selection page of the screen is populated with the value entered the last time the screen was used.
SELECTION PAGE
ALARM TYPES
Active? Displays active alarms in the alarm report. y (display active alarms) n (not display active alarms)
NOTE:
May 1999 Screen Descriptions
3-16 display Alarms
3
Resolved? Displays resolved alarms in the alarm report. y (display resolved alarms) n (not display resolved alarms)
NOTE:
You may request major alarm, minor alarm, warning, or any combination of these for a report.
Major? Displays major alarms in the alarm report. y (display major alarms) n (not display major alarms)
Minor? Displays minor alarms in the alarm report. y (display minor alarms) n (not display minor alarms)
Warning? Displays warnings in the alarm report. y (display warnings) n (not display warnings)
Start Date Beginning date for the alarm report.
yy < 70 is assumed to be the 21st century.
blank (displays all active or resolved alarms)
date in mm/dd/yy format
Time Beginning hour and minute of the given day for the alarm report. The Star