Part No. 060218-10, Rev. E December 2007
OmniSwitch
CLI Reference Guide
This user guide documents release 6.3.1 of the OmniSwitch 6800 Series, OmniSwitch 6850 Series, and OmniSwitch 9000 Series.
The functionality described in this guide is subject to change without notice.
Copyright © 2007 by Alcatel-Lucent. All rights reserved. This document may not be reproduced in whole or in part without the express written permission of Alcatel-Lucent.
Alcatel-Lucent® and the Alcatel-Lucent logo are registered trademarks of Alcatel-Lucent. Xylan®, OmniSwitch®, OmniStack®, and Alcatel-Lucent OmniVista® are registered trademarks of Alcatel-Lucent.
OmniAccess™, Omni Switch/Router™, PolicyView™, RouterView™, SwitchManager™, VoiceView™, WebView™, X-Cell™, X-Vision™, and the Xylan logo are trademarks of Alcatel-Lucent.
This OmniSwitch product contains components which may be covered by one or more of the following U.S. Patents:
• U.S. Patent No. 6,339,830 • U.S. Patent No. 6,070,243 • U.S. Patent No. 6,061,368 • U.S. Patent No. 5,394,402 • U.S. Patent No. 6,047,024 • U.S. Patent No. 6,314,106 • U.S. Patent No. 6,542,507 • U.S. Patent No. 6,874,090
26801 West Agoura Road Calabasas, CA 91301 (818) 880-3500 FAX (818) 880-3505
[email protected] US Customer Support—(800) 995-2696 International Customer Support—(818) 878-4507
Contents
About This Guide ... xxxv
Supported Platforms ... xxxv
Who Should Read this Manual? ... xxxvi
When Should I Read this Manual? ... xxxvi
What is in this Manual? ... xxxvi
What is Not in this Manual? ... xxxvii
How is the Information Organized? ... xxxvii
Text Conventions ... xxxvii
Documentation Roadmap ... xxxix Related Documentation ... xl User Manual CD ...xlii Technical Support ...xlii
Chapter 1 CMM Commands ...1-1 reload ...1-2 reload working ...1-4 copy running-config working ...1-6 write memory ...1-8 copy working certified ...1-10 copy flash-synchro ...1-12 takeover ...1-13 show running-directory ...1-15 show reload ...1-18 show microcode ...1-19 show microcode history ...1-21
reload pass-through ...2-22 power ni ...2-24 temp-threshold ...2-25 stack set slot ...2-26 stack clear slot ...2-28 show system ...2-30 show hardware info ...2-32 show chassis ...2-34 show cmm ...2-36 show ni ...2-39 show module ...2-42 show module long ...2-44 show module status ...2-46 show power ...2-48 show fan ...2-50 show temperature ...2-52 show stack topology ...2-54 show stack status ...2-57
Chapter 3 Chassis MAC Server (CMS) Commands ...3-1 mac-range eeprom ...3-2 mac-retention status ...3-4 mac-retention dup-mac-trap ...3-5 mac release ...3-6 show mac-range ...3-7 show mac-range alloc ...3-9 show mac-retention status ...3-11
Chapter 4 Power over Ethernet (PoE) Commands ...4-1 lanpower start ...4-3 lanpower stop ...4-5 lanpower power ...4-6 lanpower maxpower ...4-8 lanpower priority ...4-10 lanpower priority-disconnect ...4-12 lanpower slot-priority ...4-14 lanpower redundant-power ...4-16 lanpower capacitor-detection ...4-17 show lanpower ...4-18 show lanpower capacitor-detection ...4-22 show lanpower priority-disconnect ...4-23 show lanpower slot-priority ...4-24
show ntp client ...5-12 show ntp client server-list ...5-14 show ntp server status ...5-16 show ntp keys ...5-19
Chapter 6 Session Management Commands ...6-1 session login-attempt ...6-3 session login-timeout ...6-4 session banner ...6-5 session timeout ...6-7 session prompt ...6-9 session xon-xoff ...6-10 prompt ...6-11 show prefix ...6-13 alias ... 6-14 show alias ...6-16 user profile save ...6-17 user profile reset ...6-18 history size ...6-19 show history ...6-20 ! ...6-22 command-log ...6-24 kill ...6-25 exit ...6-26 whoami ...6-27 who ...6-30 show session config ...6-32 show session xon-xoff ...6-34 more size ...6-35 more ...6-36 show more ...6-37 telnet ...6-38 telnet6 ...6-40 ssh ...6-42 ssh6 ...6-44 ssh enforce pubkey-auth ...6-46 show ssh config ...6-47 show command-log ...6-49 show command-log status ...6-51
mv ...7-23 move ...7-25 chmod ...7-27 attrib ...7-28 freespace ...7-29 fsck ...7-30 newfs ...7-32 rcp ...7-33 rrm ...7-35 rls ...7-36 vi ...7-38 view ...7-39 tty ...7-40 show tty ...7-42 more ...7-43 ftp ...7-45 ftp6 ...7-47 scp-sftp ...7-49 show ssh config ...7-50 sftp ... 7-52 sftp6 ...7-54 rz ...7-56
Chapter 8 Web Management Commands ...8-1 http server ...8-2 http ssl ...8-3 http port ...8-4 https port ...8-5 debug http sessiondb ...8-6 show http ...8-8
Chapter 9 Configuration File Manager Commands ...9-1 configuration apply ...9-2 configuration error-file limit ...9-4 show configuration status ...9-6 configuration cancel ...9-8 configuration syntax check ...9-9 configuration snapshot ...9-11 show configuration snapshot ...9-14 write terminal ...9-17
snmp trap to webview ...10-19 snmp trap replay ...10-20 snmp trap filter ...10-22 snmp authentication trap ...10-24 show snmp trap replay ...10-25 show snmp trap filter ...10-27 show snmp authentication trap ...10-29 show snmp trap config ...10-30
Chapter 11 DNS Commands ...11-1 ip domain-lookup ...11-2 ip name-server ...11-3 ipv6 name-server ...11-5 ip domain-name ...11-7 show dns ...11-8
Chapter 12 Link Aggregation Commands ...12-1 static linkagg size ...12-3 static linkagg name ...12-5 static linkagg admin state ...12-6 static agg agg num ...12-7 lacp linkagg size ...12-9 lacp linkagg name ...12-11 lacp linkagg admin state ...12-12 lacp linkagg actor admin key ...12-14 lacp linkagg actor system priority ...12-15 lacp linkagg actor system id ...12-16 lacp linkagg partner system id ...12-17 lacp linkagg partner system priority ...12-19 lacp linkagg partner admin key ...12-20 lacp agg actor admin key ...12-21 lacp agg actor admin state ...12-24 lacp agg actor system id ...12-26 lacp agg actor system priority ...12-28 lacp agg partner admin state ...12-30 lacp agg partner admin system id ...12-32 lacp agg partner admin key ...12-34 lacp agg partner admin system priority ...12-36 lacp agg actor port priority ...12-38 lacp agg partner admin port ...12-40 lacp agg partner admin port priority ...12-42 show linkagg ...12-44 show linkagg port ...12-49
Chapter 14 802.1Q Commands ...14-1 vlan 802.1q ...14-2 vlan 802.1q frame type ...14-4 show 802.1q ...14-6
bridge cist slot/port restricted-role ...15-101 bridge 1x1 slot/port restricted-role ...15-103 bridge cist slot/port restricted-tcn ...15-105 bridge 1x1 slot/port restricted-tcn ...15-107 bridge cist txholdcount ...15-109 bridge 1x1 txholdcount ...15-110 bridge port 10gig os8800optimized ...15-111 bridge rrstp ...15-112 bridge rrstp ring ...15-113 bridge rrstp ring vlan-tag ...15-115 bridge rrstp ring status ...15-117 show spantree ...15-118 show spantree cist ...15-124 show spantree msti ...15-128 show spantree 1x1 ...15-133 show spantree ports ...15-137 show spantree cist ports ...15-146 show spantree msti ports ...15-150 show spantree 1x1 ports ...15-156 show spantree mst region ...15-162 show spantree msti vlan-map ...15-164 show spantree cist vlan-map ...15-166 show spantree map-msti ...15-168 show spantree mst port ...15-169 show bridge rrstp configuration ...15-171 show bridge rrstp ring ...15-172 bridge mode 1x1 pvst+ ...15-174 bridge port pvst+ ...15-175
Chapter 16 Source Learning Commands ...16-1 mac-address-table ...16-2 mac-address-table static-multicast ...16-4 mac-address-table aging-time ...16-6 source-learning chassis-distributed ...16-8 show mac-address-table ...16-9 show mac-address-table static-multicast ...16-12 show mac-address-table count ...16-15 show mac-address-table aging-time ...16-17 show source-learning chassis-distributed ...16-18
show port-security shutdown ...17-23
show interfaces hybrid flood rate ...18-108 show interfaces hybrid ifg ...18-110 debug interfaces set backpressure ...18-112 debug interfaces backpressure ...18-113
Chapter 19 Port Mobility Commands ...19-1 vlan dhcp mac ...19-2 vlan dhcp mac range ...19-4 vlan dhcp port ...19-6 vlan dhcp generic ...19-8 vlan binding mac-ip-port ...19-10 vlan binding mac-port ...19-12 vlan binding port-protocol ...19-14 vlan mac ...19-16 vlan mac range ...19-18 vlan ip ...19-20 vlan ipx ...19-22 vlan protocol ...19-24 vlan port ...19-26 vlan port mobile ...19-28 vlan port default vlan restore ...19-30 vlan port default vlan ...19-32 vlan port authenticate ...19-34 vlan port 802.1x ...19-35 show vlan rules ...19-37 show vlan port mobile ...19-39
Chapter 20 VLAN Management Commands ...20-1 vlan ...20-2 vlan stp ...20-4 vlan mobile-tag ...20-6 vlan authentication ...20-8 vlan router ipx ...20-10 vlan port default ...20-12 show vlan ...20-14 show vlan port ...20-17 show vlan router mac status ...20-20 show vlan gvrp ...20-22 show vlan ipmvlan ...20-25
show gvrp statistics ...21-20 show gvrp last-pdu-origin ...21-23 show gvrp configuration ...21-24 show gvrp configuration port ...21-26 show gvrp configuration linkagg/port ...21-28 show gvrp timer ...21-31
Chapter 22 VLAN Stacking Commands ...22-1 vlan svlan ...22-3 vlan svlan port ...22-5 vlan svlan port vendor-tpid ...22-7 vlan svlan port bpdu-treatment ...22-9 vlan svlan port accept-frame-type ...22-11 vlan svlan port lookup-miss ...22-13 vlan svlan port legacy-bpdu ...22-14 vlan svlan port svlan ...22-16 show vlan svlan ...22-18 show vlan svlan port-config ...22-20 show vlan svlan port-binding ...22-22 ethernet-service mode ...22-24 ethernet-service ...22-25 ethernet-service service-name ...22-27 ethernet-service svlan nni ...22-29 ethernet-service nni ...22-31 ethernet-service sap ...22-33 ethernet-service sap uni ...22-35 ethernet-service sap cvlan ...22-37 ethernet-service sap-profile ...22-39 ethernet-service sap sap-profile ...22-41 ethernet-service uni-profile ...22-43 ethernet-service uni uni-profile ...22-46 show ethernet-service mode ...22-48 show ethernet-service vlan ...22-49 show ethernet-service ...22-51 show ethernet-service sap ...22-54 show ethernet-service port ...22-56 show ethernet-service nni ...22-59 show ethernet-service uni ...22-61 show ethernet-service uni-profile ...22-63 show ethernet-service sap-profile ...22-65
ethoam endpoint priority ...23-23 ethoam endpoint lowest-priority-defect ...23-25 ethoam loopback ...23-27 ethoam linktrace ...23-29 ethoam fault-alarm-time ...23-31 ethoam fault-reset-time ...23-33 show ethoam ...23-35 show ethoam domain ...23-37 show ethoam domain association ...23-39 show ethoam domain association end-point ...23-41 show ethoam default-domain ...23-44 show ethoam remote endpoint domain ...23-46 show ethoam cfmstack ...23-48 show ethoam linktrace-reply domain ...23-50 show ethoam linktrace-tran-id ...23-52 show ethoam statistics ...23-54
Chapter 24 Port Mapping Commands ...24-1 port mapping user-port network-port ...24-2 port mapping ...24-4 port mapping ...24-6 show port mapping status ...24-8 show port mapping ...24-10
ip route-map set community ...25-55 ip route-map set local-preference ...25-57 ip route-map set level ...25-59 ip route-map set ip-nexthop ...25-61 ip route-map set ipv6-nexthop ...25-63 arp ...25-65 clear arp-cache ...25-67 arp filter ...25-68 clear arp filter ...25-70 icmp type ...25-71 icmp unreachable ...25-74 icmp echo ...25-76 icmp timestamp ...25-78 icmp addr-mask ...25-80 icmp messages ...25-82 ip dos scan close-port-penalty ...25-83 ip dos scan tcp open-port-penalty ...25-84 ip dos scan udp open-port-penalty ...25-85 ip dos scan threshold ...25-86 ip dos trap ...25-88 ip dos scan decay ...25-89 show ip traffic ...25-90 show ip interface ...25-93 show ip route ...25-98 show ip route-pref ...25-100 show ip redist ...25-102 show ip access-list ...25-104 show ip route-map ...25-106 show ip router database ...25-108 show ip emp-route ...25-111 show ip config ...25-113 show ip protocols ...25-114 show ip service ...25-116 show arp ...25-118 show arp filter ...25-120 show icmp control ...25-122 show icmp statistics ...25-124 show tcp statistics ...25-126 show tcp ports ...25-128 show udp statistics ...25-130 show udp ports ...25-131 show ip dos config ...25-132 show ip dos statistics ...25-134
Chapter 27 RDP Commands ...27-1 ip router-discovery ...27-2 ip router-discovery interface ...27-3 ip router-discovery interface advertisement-address ...27-5 ip router-discovery interface max-advertisement-interval ...27-7 ip router-discovery interface min-advertisement-interval ...27-9 ip router-discovery interface advertisement-lifetime ...27-11 ip router-discovery interface preference-level ...27-13 show ip router-discovery ...27-15 show ip router-discovery interface ...27-17
Chapter 29 RIP Commands ...29-1 ip load rip ...29-3 ip rip status ...29-4 ip rip interface ...29-5 ip rip interface status ...29-7 ip rip interface metric ...29-9 ip rip interface send-version ...29-10 ip rip interface recv-version ...29-12 ip rip force-holddowntimer ...29-14 ip rip host-route ...29-16 ip rip route-tag ...29-17 ip rip redist status ...29-18 ip rip redist metric ...29-19 ip rip redist-filter ...29-21 ip rip redist-filter effect ...29-23 ip rip redist-filter metric ...29-25 ip rip redist-filter route-tag ...29-27 ip rip redist-filter redist-control ...29-29 ip rip interface auth-type ...29-31 ip rip interface auth-key ...29-33 ip rip update-interval ...29-34 ip rip invalid-timer ...29-35 ip rip garbage-timer ...29-36 ip rip holddown-timer ...29-37 show ip rip ...29-38 show ip rip routes ...29-40 show ip rip interface ...29-43 show ip rip peer ...29-45 show ip rip redist-filter ...29-47
Chapter 31 VRRP Commands ...31-1 vrrp ...31-3 vrrp address ...31-6 vrrp track ...31-7 vrrp track-association ...31-9 vrrp trap ...31-10 vrrp delay ...31-11 vrrp interval ...31-12 vrrp priority ...31-14 vrrp preempt ...31-16 vrrp all ...31-18 vrrp set ...31-20 vrrp group ...31-22 vrrp group all ...31-24 vrrp group set ...31-26 vrrp group-association ...31-28 vrrp3 ...31-30 vrrp3 address ...31-33 vrrp3 trap ...31-34 vrrp3 track-association ...31-35 show vrrp ...31-36 show vrrp statistics ...31-39 show vrrp track ...31-42 show vrrp track-association ...31-44 show vrrp group ...31-46 show vrrp group-association ...31-48 show vrrp3 ...31-50 show vrrp3 statistics ...31-53 show vrrp3 track-association ...31-55
ip ospf interface auth-key ...32-36 ip ospf interface auth-type ...32-37 ip ospf interface dead-interval ...32-39 ip ospf interface hello-interval ...32-41 ip ospf interface md5 ...32-42 ip ospf interface md5 key ...32-44 ip ospf interface type ...32-46 ip ospf interface cost ...32-48 ip ospf interface poll-interval ...32-49 ip ospf interface priority ...32-50 ip ospf interface retrans-interval ...32-51 ip ospf interface transit-delay ...32-52 ip ospf restart-support ...32-53 ip ospf restart-interval ...32-54 ip ospf restart-helper status ...32-55 ip ospf restart-helper strict-lsa-checking status ...32-57 ip ospf restart initiate ...32-59 show ip ospf ...32-60 show ip ospf border-routers ...32-63 show ip ospf ext-lsdb ...32-65 show ip ospf host ...32-67 show ip ospf lsdb ...32-69 show ip ospf neighbor ...32-71 show ip ospf redist-filter ...32-74 show ip ospf redist ...32-76 show ip ospf routes ...32-78 show ip ospf virtual-link ...32-80 show ip ospf virtual-neighbor ...32-82 show ip ospf area ...32-85 show ip ospf area range ...32-88 show ip ospf area stub ...32-90 show ip ospf interface ...32-92 show ip ospf restart ...32-98
show ipv6 ospf ...33-25 show ipv6 ospf border-routers ...33-28 show ipv6 ospf host ...33-30 show ipv6 ospf lsdb ...33-32 show ipv6 ospf neighbor ...33-34 show ipv6 ospf routes ...33-36 show ipv6 ospf virtual-link ...33-38 show ipv6 ospf area ...33-40 show ipv6 ospf interface ...33-42
ip isis interface retransmit-interval ...34-72 ip isis interface default-type ...34-73 ip isis interface level hello-auth-type ...34-74 ip isis interface level hello-interval ...34-76 ip isis interface level hello-multiplier ...34-77 ip isis interface level metric ...34-78 ip isis interface level passive ...34-80 ip isis interface level priority ...34-81 show ip isis interface ...34-83 clear ip isis adjacency ...34-87 clear ip isis lsp-database ...34-89 clear ip isis spf-log ...34-90 clear ip isis statistics ...34-91
show ipv6 pim dense group ...36-98 show ipv6 pim interface ...36-100 show ipv6 pim neighbor ...36-104 show ipv6 pim static-rp ...36-108 show ipv6 pim group-map ...36-110 show ipv6 pim candidate-rp ...36-112 show ipv6 pim cbsr ...36-114 show ipv6 pim bsr ...36-116 show ipv6 pim groute ...36-118 show ipv6 pim sgroute ...36-122
Chapter 37 DVMRP Commands ...37-1 ip load dvmrp ...37-2 ip dvmrp status ...37-3 ip dvmrp flash-interval ...37-5 ip dvmrp graft-timeout ...37-6 ip dvmrp interface ...37-7 ip dvmrp interface metric ...37-8 ip dvmrp neighbor-interval ...37-9 ip dvmrp neighbor-timeout ...37-10 ip dvmrp prune-lifetime ...37-11 ip dvmrp prune-timeout ...37-12 ip dvmrp report-interval ...37-13 ip dvmrp route-holddown ...37-14 ip dvmrp route-timeout ...37-15 ip dvmrp subord-default ...37-16 ip dvmrp tunnel ...37-18 ip dvmrp tunnel ttl ...37-20 ip dvmrp debug-level ...37-22 ip dvmrp debug-type ...37-23 show ip dvmrp ...37-25 show ip dvmrp interface ...37-28 show ip dvmrp neighbor ...37-30 show ip dvmrp nexthop ...37-32 show ip dvmrp prune ...37-34 show ip dvmrp route ...37-36 show ip dvmrp tunnel ...37-38 show ip dvmrp debug ...37-40
Chapter 39 Port Mirroring and Monitoring Commands ...39-1 port mirroring source destination ...39-2 port mirroring ...39-5 port monitoring source ...39-7 port monitoring ...39-10 show port mirroring status ...39-11 show port monitoring status ...39-14 show port monitoring file ...39-16
Chapter 40 RMON Commands ...40-1 rmon probes ...40-2 show rmon probes ...40-4 show rmon events ...40-7
Chapter 41 Health Monitoring Commands ...41-1 health threshold ...41-2 health interval ...41-4 health statistics reset ...41-5 show health threshold ...41-6 show health interval ...41-8 show health ...41-9 show health all ...41-11 show health slice ...41-13 show health fabric ...41-15
Chapter 42 sFlow Commands ...42-1 sflow receiver ...42-3 sflow sampler ...42-5 sflow poller ...42-7 show sflow agent ...42-9 show sflow receiver ...42-11 show sflow sampler ...42-13 show sflow poller ...42-15
debug qos ...43-30 debug qos internal ...43-32 qos clear log ...43-34 qos apply ...43-35 qos revert ...43-36 qos flush ...43-37 qos reset ...43-39 qos stats reset ...43-40 qos port reset ...43-41 qos port ...43-42 qos port trusted ...43-44 qos port servicing mode ...43-46 qos port q minbw maxbw ...43-48 qos port maximum egress-bandwidth ...43-50 qos port maximum ingress-bandwidth ...43-52 qos port default 802.1p ...43-54 qos port default dscp ...43-56 qos port default classification ...43-58 show qos port ...43-60 show qos queue ...43-63 show qos slice ...43-66 show qos log ...43-68 show qos config ...43-70 show qos statistics ...43-73
show policy classify source interface type ...44-163 show policy classify destination interface type ...44-165 show policy classify 802.1p ...44-167 show policy classify source ip ...44-168 show policy classify destination ip ...44-170 show policy classify multicast ip ...44-172 show policy classify tos ...44-174 show policy classify dscp ...44-176 show policy classify ip protocol ...44-178 show policy classify source ip port ...44-180 show policy classify destination ip port ...44-182 show policy network group ...44-184 show policy service ...44-186 show policy service group ...44-188 show policy mac group ...44-190 show policy port group ...44-192 show policy map group ...44-194 show policy action ...44-196 show policy condition ...44-199 show active policy rule ...44-202 show policy rule ...44-205 show policy validity period ...44-208
Chapter 45 Policy Server Commands ...45-1 policy server load ...45-2 policy server flush ...45-3 policy server ...45-4 show policy server ...45-6 show policy server long ...45-8 show policy server statistics ...45-10 show policy server rules ...45-12 show policy server events ...45-14
ipv6 multicast querier-forwarding ...46-39 ipv6 multicast version ...46-41 ipv6 multicast static-neighbor ...46-43 ipv6 multicast static-querier ...46-45 ipv6 multicast static-group ...46-47 ipv6 multicast query-interval ...46-49 ipv6 multicast last-member-query-interval ...46-51 ipv6 multicast query-response-interval ...46-53 ipv6 multicast unsolicited-report-interval ...46-55 ipv6 multicast router-timeout ...46-57 ipv6 multicast source-timeout ...46-59 ipv6 multicast querying ...46-61 ipv6 multicast robustness ...46-63 ipv6 multicast spoofing ...46-65 ipv6 multicast zapping ...46-67 ipv6 multicast proxying ...46-69 show ip multicast ...46-71 show ip multicast forward ...46-76 show ip multicast neighbor ...46-78 show ip multicast querier ...46-80 show ip multicast group ...46-82 show ip multicast source ...46-84 show ip multicast tunnel ...46-86 show ipv6 multicast ...46-88 show ipv6 multicast forward ...46-93 show ipv6 multicast neighbor ...46-95 show ipv6 multicast querier ...46-97 show ipv6 multicast group ...46-99 show ipv6 multicast source ...46-101 show ipv6 multicast tunnel ...46-103
Chapter 47 IP Multicast VLAN Commands ...47-1 vlan ipmvlan ...47-2 vlan ipmvlan ctag ...47-4 vlan ipmvlan address ...47-6 vlan ipmvlan sender-port ...47-8 vlan ipmvlan receiver-port ...47-10 vlan svlan port translate ipmvlan ...47-12 show vlan ipmvlan c-tag ...47-14 show vlan ipmvlan address ...47-15 show vlan ipmvlan port-config ...47-17 show ipmvlan port-config ...47-19 show vlan ipmvlan port-binding ...47-21
ip slb cluster probe ...48-13 ip slb server ip cluster ...48-14 ip slb server ip cluster probe ...48-16 ip slb probe ...48-17 ip slb probe timeout ...48-19 ip slb probe period ...48-21 ip slb probe port ...48-23 ip slb probe retries ...48-25 ip slb probe username ...48-27 ip slb probe password ...48-28 ip slb probe url ...48-29 ip slb probe status ...48-30 ip slb probe send ...48-31 ip slb probe expect ...48-32 show ip slb ...48-33 show ip slb clusters ...48-35 show ip slb cluster ...48-37 show ip slb cluster server ...48-40 show ip slb servers ...48-43 show ip slb probes ...48-45
user password-history ...49-56 user password-min-age ...49-57 user lockout-window ...49-58 user lockout-threshold ...49-60 user lockout-duration ...49-62 user lockout unlock ...49-64 end-user profile ...49-65 end-user profile port-list ...49-67 end-user profile vlan-range ...49-69 aaa user-network-profile ...49-71 show aaa server ...49-72 show aaa authentication vlan ...49-75 show aaa authentication ...49-77 show aaa authentication 802.1x ...49-79 show aaa authentication mac ...49-81 show aaa accounting 802.1x ...49-82 show aaa accounting vlan ...49-83 show aaa accounting ...49-85 show user ...49-87 show user password-size ...49-91 show user password-expiration ...49-92 show user password-policy ...49-93 show user lockout-setting ...49-95 show avlan user ...49-97 show aaa avlan config ...49-99 show aaa avlan auth-ip ...49-101 debug command-info ...49-103 debug end-user profile ...49-105 show end-user profile ...49-107 show aaa user-network-profile ...49-109 show aaa priv hexa ...49-110
Chapter 50 802.1X Commands ...50-1 802.1x ...50-2 802.1x initialize ...50-5 802.1x re-authenticate ...50-6 802.1x supp-polling retry ...50-7 802.1x supplicant policy authentication ...50-9 802.1x non-supplicant policy authentication ...50-11 802.1x non-supplicant policy ...50-13 802.1x policy default ...50-15 show 802.1x ...50-17 show 802.1x users ...50-20 show 802.1x statistics ...50-23 show 802.1x device classification policies ...50-25 show 802.1x non-supplicant ...50-27
swlog clear ...51-9 show log swlog ...51-10 show swlog ...51-13
Chapter 52 Network Security Commands ...52-1 netsec group port ...52-2 netsec group anomaly ...52-4 show netsec summary ...52-7 show netsec traffic ...52-10 show netsec statistics ...52-13 show netsec config ...52-16 show netsec operation ...52-18 show netsec group port ...52-21
Chapter 53 UDLD Commands ...53-1 udld ...53-2 udld port ...53-3 udld mode ...53-5 udld probe-timer ...53-7 udld echo-wait-timer ...53-9 clear udld statistics port ...53-11 interfaces clear-violation-all ...53-12 show udld configuration ...53-13 show udld configuration port ...53-14 show udld statistics port ...53-16 show udld neighbor port ...53-18 show udld status port ...53-20
Appendix A Software License and Copyright Statements ......A-1 Alcatel-Lucent License Agreement ... A-1 ALCATEL-LUCENT SOFTWARE LICENSE AGREEMENT ... A-1 Third Party Licenses and Notices ... A-4 A. Booting and Debugging Non-Proprietary Software ... A-4 B. The OpenLDAP Public License: Version 2.4, 8 December 2000 ... A-4 C. Linux ... A-5 D. GNU GENERAL PUBLIC LICENSE: Version 2, June 1991 ... A-5 E. University of California ... A-10 F. Carnegie-Mellon University ... A-10 G. Random.c ... A-10 H. Apptitude, Inc. ... A-11 I. Agranat ... A-11 J. RSA Security Inc. ... A-11 K. Sun Microsystems, Inc. ... A-11 L. Wind River Systems, Inc. ... A-12 M. Network Time Protocol Version 4 ... A-12 CLI Quick Reference
About This Guide
This OmniSwitch CLI Reference Guide is a comprehensive resource to all Command Line Interface (CLI) commands available on the OmniSwitch 6800 Series, OmniSwitch 6850 Series, and OmniSwitch 9000 Series switches.
Supported Platforms
This information in this guide applies to the following products:
• OmniSwitch 9600
• OmniSwitch 9700
• OmniSwitch 9800
• OmniSwitch 6800 Series
• OmniSwitch 6850 Series
Note. This OmniSwitch CLI Reference Guide covers Release 6.3.1, which is supported on the OmniSwitch 6800 Series, OmniSwitch 6850 Series, and OmniSwitch 9000 Series switches. OmniSwitch 6600 Family, OmniSwitch 7700/7800, and OmniSwitch 8800 switches use Release 5.x. Please refer to the 5.x user guides for those switches.
Unsupported Platforms
The information in this guide does not apply to the following products:
• OmniSwitch (original version with no numeric model name)
• OmniSwitch 6600 Family
• OmniSwitch 7700/7800
• OmniSwitch 8800
• Omni Switch/Router
• OmniStack
Who Should Read this Manual?
The audience for this user guide is network administrators and IT support personnel who need to config-ure, maintain, and monitor switches and routers in a live network. Anyone wishing to gain knowledge on the details of all CLI commands available on the OmniSwitch will benefit from the material in this refer-ence guide. However, advanced users who have already familiarized themselves with the OmniSwitch CLI commands will benefit most from the detailed content in this guide.
When Should I Read this Manual?
Read this guide whenever you want detailed information on individual CLI commands. Although this guide provides helpful information during any stage of the configuration process, it is a good idea to first familiarize yourself with the software features available on the switch before investigating the detailed command information in this guide.
Overview information, procedures, and live network examples on switch software features may be found in the OmniSwitch 6800/6850/9000 Switch Management Guide, OmniSwitch 6800/6850/9000 Network Configuration Guide, and the OmniSwitch 6800/6850/9000 Advanced Routing Configuration Guide. Once you are familiar with the procedures and base CLI commands in these configuration guides you can obtain more detailed information on the individual commands in this guide.
What is in this Manual?
This reference guide includes information on every CLI command available in the switch. Command reference information is included for base software commands as well as commands associated with optional software packages, such as Advanced Routing (multicast routing protocols and OSPF). The infor-mation provided for each CLI command includes:
• Command description.
• Syntax.
• Description of all keywords and variables included in the syntax.
• Default values.
• Usage guidelines, which include tips on when and how to use the command.
• Examples of command lines using the command.
• Related commands with descriptions.
• Release history, which indicates the release when the command was introduced.
What is Not in this Manual?
Primarily a reference, this guide does not provide step-by-step instructions on how to set up particular features on the switch. It also does not provide overview or application examples on software features. For comprehensive information on how to configure particular software features in the switch, consult the appropriate configuration guide.
This guide also does not provide any information on the network management applications, WebView and OmniVista. Further information on WebView and OmniVista can be found in the context-sensitive on-line help available with those applications.
How is the Information Organized?
Each chapter in this guide includes reference material for all commands related to a single software feature, such as server load balancing or link aggregation. Typically commands in a single chapter will share a common prefix.
Text Conventions
The following table contains text conventions and usage guidelines for CLI commands as they are documented in this guide.
bold text Indicates basic command and keyword syntax. Example: show snmp station
italicized text Indicates user-specific information such as IP addresses, slot numbers, passwords, names, etc.
Example: no snmp station ip_address
Italicized text that is not enclosed with straight brackets ([ ]) indicates required information.
[ ] (Straight Brackets) Indicates optional parameters for a given command. Example: show aaa server [server_name]
Here, you can enter either of the following options: show aaa server
show aaa server server_name (where server_name is the user-specified server name, e.g., show aaa server myserver1)
Note that this example includes italicized text. The optional parameter in this case is a user-specified server name.
{ }(Curly Braces) Indicates that the user must choose between one or more parameters. Example: port mirroring {enable | disable}
Here, you must choose one of the following:
|(Vertical Pipes) Used to separate parameter choices within a command string. For example, the command string
show health threshold [rx | txrx | memory | cpu] separates the choices rx, txrx, memory, and cpu.
Examples:
show health threshold rx show health threshold txrx show health threshold memory show health threshold cpu
“ ”(Quotation Marks) Used to enclose text strings that contain spaces. The quotation marks are required input on the command line.
Documentation Roadmap
The OmniSwitch user documentation suite was designed to supply you with information at several critical junctures of the configuration process. The following section outlines a roadmap of the manuals that will help you at each stage of the configuration process. Under each stage, we point you to the manual or manuals that will be most helpful to you.
Stage 1: Using the Switch for the First Time Pertinent Documentation: Getting Started Guide
Release Notes
A hard-copy Getting Started Guide is included with your switch; this guide provides all the information you need to get your switch up and running the first time. This guide provides information on unpacking the switch, rack mounting the switch, installing modules, unlocking access control, setting the switch’s IP address, and setting up a password. It also includes succinct overview information on fundamental aspects of the switch, such as hardware LEDs, the software directory structure, CLI conventions, and web-based management.
At this time you should also familiarize yourself with the Release Notes that accompanied your switch. This document includes important information on feature limitations that are not included in other user guides.
Stage 2: Gaining Familiarity with Basic Switch Functions Pertinent Documentation: Hardware Users Guide
Switch Management Guide
Once you have your switch up and running, you will want to begin investigating basic aspects of its hard ware and software. Information about switch hardware is provided in the platform-specific Hardware Users Guide. This guide provide specifications, illustrations, and descriptions of all hardware compo-nents—chassis, power supplies, Chassis Management Modules (CMMs), Network Interface (NI) modules, uplink modules, stacking modules, and cooling fans. It also includes steps for common procedures, such as removing and installing switch components.
The Switch Management Guide for your switch platform is the primary user guide for the basic software features on a single switch. This guide contains information on the switch directory structure, basic file and directory utilities, switch access security, SNMP, and web-based management. It is recommended that you read this guide before connecting your switch to the network.
Stage 3: Integrating the Switch Into a Network Pertinent Documentation: Network Configuration Guide
Advanced Routing Configuration Guide
When you are ready to connect your switch to the network, you will need to learn how the OmniSwitch implements fundamental software features, such as 802.1Q, VLANs, Spanning Tree, and network routing protocols. The Network Configuration Guide for your switch platform contains overview information, procedures and examples on how standard networking technologies are configured in the OmniSwitch.
Anytime
The OmniSwitch CLI Reference Guide contains comprehensive information on all CLI commands supported by the switch. This guide includes syntax, default, usage, example, related CLI command, and CLI-to-MIB variable mapping information for all CLI commands supported by the switch. This guide can be consulted anytime during the configuration process to find detailed and specific information on each CLI command.
Related Documentation
The following are the titles and descriptions of all the related OmniSwitch 6800/6850/9000 user manuals:
• OmniSwitch 6800 Series Getting Started Guide
Describes the hardware and software procedures for getting an OmniSwitch 6800 Series switch up and running. Also provides information on fundamental aspects of OmniSwitch software and stacking architecture.
• OmniSwitch 6850 Series Getting Started Guide
Describes the hardware and software procedures for getting an OmniSwitch 6850 Series switch up and running. Also provides information on fundamental aspects of OmniSwitch software and stacking architecture.
• OmniSwitch 6800 Series Hardware Users Guide
Detailed technical specifications and procedures for the OmniSwitch 6800 Series chassis and compo-nents. Also includes comprehensive information on assembling and managing stacked configurations.
• OmniSwitch 6850 Series Hardware User Guide
Complete technical specifications and procedures for all OmniSwitch 6850 Series chassis, power supplies, and fans. Also includes comprehensive information on assembling and managing stacked configurations.
• OmniSwitch 9000 Series Getting Started Guide
Describes the hardware and software procedures for getting an OmniSwitch 9000 Series up and running. Also provides information on fundamental aspects of OmniSwitch software architecture.
• OmniSwitch 9000 Series Hardware Users Guide
Complete technical specifications and procedures for all OmniSwitch 9000 Series chassis, power supplies, fans, and Network Interface (NI) modules.
• OmniSwitch CLI Reference Guide
Complete reference to all CLI commands supported on the OmniSwitch 9000 Series. Includes syntax definitions, default values, examples, usage guidelines and CLI-to-MIB variable mappings.
• OmniSwitch 6800/6850/9000 Switch Management Guide
• OmniSwitch 6800/6850/9000 Network Configuration Guide
Includes network configuration procedures and descriptive information on all the major software features and protocols included in the base software package. Chapters cover Layer 2 information (Ethernet and VLAN configuration), Layer 3 information (routing protocols, such as RIP), security options (authenticated VLANs), Quality of Service (QoS), and link aggregation.
• OmniSwitch 6800/6850/9000 Advanced Routing Configuration Guide
Includes network configuration procedures and descriptive information on all the software features and protocols included in the advanced routing software package. Chapters cover multicast routing
(DVMRP and PIM-SM), and OSPF.
• OmniSwitch Transceivers Guide
Includes information on Small Form Factor Pluggable (SFPs) and 10 Gbps Small Form Factor Plugga-bles (XFPs) transceivers.
• Technical Tips, Field Notices
Includes information published by Alcatel-Lucent’s Customer Support group.
• Release Notes
User Manual CD
All user guides for the OmniSwitch are included on the User Manual CD that accompanied your switch. This CD also includes user guides for other Alcatel-Lucent data enterprise products. In addition, it contains a stand-alone version of the on-line help system that is embedded in the OmniVista network management application.
Besides the OmniVista documentation, all documentation on the User Manual CD is in PDF format and requires the Adobe Acrobat Reader program for viewing. Acrobat Reader freeware is available at www.adobe.com.
Note. In order to take advantage of the documentation CD’s global search feature, it is recommended that you select the option for searching PDF files before downloading Acrobat Reader freeware.
To verify that you are using Acrobat Reader with the global search option, look for the following button in the toolbar:
Note. When printing pages from the documentation PDFs, de-select Fit to Page if it is selected in your print dialog. Otherwise pages may print with slightly smaller margins.
Technical Support
1 CMM Commands
The Chassis Management Module (CMM) CLI commands allow you to manage switch software files in the working directory, the certified directory, and the running configuration.
MIB information for the CMM commands is as follows:
Filename: AlcatelIND1Chassis.mib
Module: ALCATEL-IND1-CHASSIS-MIB
Filename: AlcatelIND1ConfigMgr.mib
Module: ALCATEL-IND1-CONFIG-MGR-MIB DEFINITIONS
A summary of available commands is listed here:
reload
reload working
copy running-config working write memory
copy working certified copy working certified copy flash-synchro takeover
show running-directory show reload
reload CMM Commands
reload
Reboots the CMM to its startup software configuration.
reload [primary | secondary] [with-fabric] [in [hours:] minutes | at hour:minute [monthday | day month]]
reload [primary | secondary] [with-fabric] cancel
Syntax Definitions
primary | secondary Reboot the primary or secondary CMM to its startup software configu-ration. If the primary CMM is already running the startup version, a primary reboot will result in a secondary takover.
with-fabric Performs a complete CMM reload. This parameter is available only on OmniSwitch 9000 series switches only.
in [hours:] minutes Optional syntax. Schedules a reload of the software to take effect in the specified minutes or hours and minutes within the next 24 hours.
at hour:minute Optional syntax. Schedules a reload of the software to take place at the specified time using a 24-hour clock. If you do not specify the month and day, the reload takes place at the specified time on the current day provided the specified time is later than the time when the CLI
command is issued. If the specified time is earlier than the current time, the reload will take place on the following day.
monthday | day month The name of the month and the number of the day for the scheduled reload. Specify a month name and the day number. It is unimportant if the month or day is first. See examples below for further explanation.
cancel Cancels a pending time delayed reboot.
Defaults N/A
Platforms Supported OmniSwitch 6800, 6850, 9000
Usage Guidelines
• This command causes the specified CMM to reboot. If no CMM is specified, the primary CMM reboots.
• The CPM, CFM and CPU of CMM can be reset independently.
• If a reload command is issued and the local/remote fabric module is in up state, only the CPM will be reset.
CMM Commands reload
• If a reload command is issued, and another reload is currently scheduled, a message appears informing the user of the next reload time and asks for confirmation to change to the new reload time.
• If the switch has a redundant CMM and the primary CMM is rebooted, the switch will fail over to the secondary CMM. For more information on CMM failover, see “Managing CMM Directories” in the OmniSwitch 6800/6850/9000Switch Management Guide.
• If the switch is part of an OmniSwitch 6800 Series stack or an OmniSwitch 6850 Series stack with three or more switches, the next switch in “idle” mode becomes the secondary CMM, and the original primary CMM becomes “idle.” For more information on stacks, see “Managing Stacks” in the appro-priate Hardware Users Guide.The cancel keyword stops a pending reboot.
• This command can also be used on the secondary CMM.
Examples -> reload
-> reload primary
-> reload primary with-fabric -> reload primary in 15:25
-> reload primary at 15:25 august 10 -> reload primary at 15:25 10 august
Release History
Release 5.1; command was introduced.
Related Commands
MIB Objects
chasEntPhysicalTable csEntPhysicalIndex chasEntPhysAdminStatus chasControlRedundantTable
chasControlDelayedRebootTimer
reload working CMM Commands
reload working
Immediately reboots the primary CMM from the working directory. There is no CMM fail over during this reboot, causing a loss of switch functionality during the reboot. All NIs reboot as well, including the secondary CMM.
reload working {rollback-timeout minutes | no rollback-timeout} [in [hours:] minutes | at hour:minute]
Syntax Definitions
rollback-timeout minutes Sets a timeout period, in minutes. The switch immediately reboots from the working directory and then at the end of this time period, automati-cally reboots again from the certified directory. The range is 1–15.
no rollback-timeout Specifies no timeout to rollback. If the command is issued with this keyword, then the switch will continue to run from the working direc-tory until manually rebooted.
in [hours:] minutes Optional syntax. Schedules a reload of the working directory to take effect in the specified minutes or hours and minutes within the next 24 hours.
at hour:minute Optional syntax. Schedules a reload of the working directory to take place at the specified time using a 24-hour clock. If you do not specify the month and day, the reload takes place at the specified time on the current day provided the specified time is later than the time when the CLI command is issued. If the specified time is earlier than the current time, the reload will take place on the following day.
Defaults N/A
Platforms Supported OmniSwitch 6800, 6850, 9000
Usage Guidelines
• This command is used to reload the primary CMM from the working directory as opposed to the certi-fied CMM. The working directory reload takes place immediately unless a time frame is set using the in or at keywords.
• The in or at keywords allow you to schedule a working reload sometime in the future. A schedule working reboot is called an activate.
• If a reload or an immediate working reload is initiated before a scheduled activate is enacted, a
message appears displaying the number of seconds until the scheduled activate and if it should be over-ridden.
CMM Commands reload working
• If the switch is a part of an OmniSwitch 6800 Series stack or an OmniSwitch 6850 Series stack, using this command synchronizes the working directories of all the switches in the stack to the working directory of the primary CMM switch.
Examples
-> reload working rollback-timeout 5 -> reload working no rollback-timeout -> reload working no rollback-timeout in 50 -> reload working rollback-timeout 10 at 12:50
Release History
Release 5.1; command was introduced.
Related Commands
MIB Objects
chasControlModuleTable csEntPhysicalIndex
chasControlActivateTimeout
copy running-config working CMM Commands
copy running-config working
Copies the running configuration (RAM) to the working directory. [configure] copy running-config working
Syntax Definitions N/A
Defaults N/A
Platforms Supported OmniSwitch 6800, 6850, 9000
Usage Guidelines
• This command is used to copy the changes made using the CLI commands from the running configura-tion (RAM) to the working directory.
• This command is only valid if the switch is running from the working directory. Use the show running-directory command to check from where the switch is running.
• This command performs the same function as the write memory command.
Note. The saved boot.cfg file will be overwritten if the takeover command is executed after the copy running-config working or write memory commands, in an OmniSwitch set up with redundant CMMs.
Examples
-> configure copy running-config working
Release History
CMM Commands copy running-config working
Related Commands
MIB Objects
chasControlModuleTable csEntPhysicalIndex chasControlVersionMngt
write memory Copies the running primary RAM version of the CMM software to the working primary flash.
write memory CMM Commands
write memory
Copies the running configuration (RAM) to the working directory. [configure] write memory
Syntax Definitions N/A
Defaults N/A
Platforms Supported OmniSwitch 6800, 6850, 9000
Usage Guidelines
• This command is used to copy the changes made using the CLI commands from the running configura-tion (RAM) to the working directory.
• This command is only valid if the switch is running from the working directory. Use the show running-directory command to check from where the switch is running.
• This command performs the same function as the copy running-config working command.
Note. The saved boot.cfg file will be overwritten if the takeover command is executed after the copy running-config working or write memory commands, in an OmniSwitch set up with redundant CMMs.
Examples
-> configure write memory -> write memory
Release History
Release 5.1; command was introduced.
Related Commands
copy running-config working Copies the running primary RAM version of the CMM software to the working primary flash. Or copy the startup primary flash version of the CMM software to the working primary flash.
CMM Commands write memory
MIB Objects configManager
copy working certified CMM Commands
copy working certified
Copies the working directory version of the CMM software to the certified directory, on the primary CMM. This command also allows you to synchronize the primary and secondary CMMs.
[configure] copy working certified [flash-synchro]
Syntax Definitions N/A
Defaults N/A
Platforms Supported OmniSwitch 6800, 6850, 9000
Usage Guidelines
• This command is used to overwrite the contents of the certified directory with the contents of the work-ing directory. This should only be done if the contents of the workwork-ing directory have been verified as the best version of the CMM files.
• The flash-synchro keyword, when used with the copy certified working command, synchronizes the files between the primary and secondary CMMs by overwriting the contents of the secondary CMM certified directory with the contents of the primary CMM certified directory. If the switch is part of an OmniSwitch 6800 Series stack or an OmniSwitch 6850 Series stack, all switches in the stack are updated with the primary CMM files.
• In order for this command to work, the amount of free space in flash must equal the size of the files being copied. If there isn’t enough free space, the copy attempt will fail and an error message is gener-ated. Only image files, the boot.cfg file, and the certs.pem file should be kept in the working directory.
• This command will not work if the switch is running from the certified directory. To view where the switch is running from, see the show running-directory command.
Examples
-> copy working certified
-> copy working certified flash-synchro
Release History
CMM Commands copy working certified
Related Commands
MIB Objects
chasControlModuleTable csEntPhysicalIndex chasControlVersionMngt
copy working certified Copies the running primary RAM version of the CMM software to the working primary flash. Or copy the startup primary flash version of the CMM software to the working primary flash.
copy flash-synchro CMM Commands
copy flash-synchro
Copies the certified directory version of the primary CMM software to the certified directory of the secondary CMM.
[configure] copy flash-synchro
Syntax Definitions N/A
Defaults N/A
Platforms Supported OmniSwitch 6800, 6850, 9000
Usage Guidelines
• This command is used to synchronize the certified directories of the primary and secondary CMMs. The two CMMs must be in synchronization if a fail over occurs, otherwise switch performance is lost.
• If the switch is part of an OmniSwitch 6800 Series stack or an OmniSwitch 6850 Series stack, all switches in the stack are updated with the primary CMM files.
Examples
-> copy flash-synchro
-> configure copy flash-synchro
Release History
Release 5.1; command was introduced.
Related Commands
MIB Objects
chasControlModuleTable csEntPhysicalIndex chasControlVersionMngt
copy working certified Copies the running primary RAM version of the CMM software to the working primary flash. Or copies the startup primary flash version of the CMM software to the working primary flash.
CMM Commands takeover
takeover
The current secondary CMM assumes the role of primary CMM.
takeover [with-fabric]
Syntax Definitions
with-fabric Performs a complete CMM reload.
Defaults N/A
Platforms Supported OmniSwitch 6800, 6850, 9000
Usage Guidelines
• This command causes the secondary CMM to take over the functions of the primary CMM. After this command, the old primary CMM is the new secondary CMM.
• Before issuing the takeover command, be sure that the secondary CMM has all software (i.e., image and configuration files) required to continue CMM operations.
• For information on synchronizing the primary and secondary CMM software before issuing the takeover command, see the copy flash-synchro command.
• When the CMM modules switch primary and secondary roles, the console session to the new primary CMM is disconnected. To continue managing the switch, be sure that you have physical connections to both CMMs or local access to the switch in order to move your Ethernet or serial cable from one CMM to the other.
• The CPM, CFM and CPU of CMM can be reset independently.
• If a takeover command is issued and the local/remote fabric module is in up state, only the CPM will be reset.
• If a takeover command is issued and the local/remote fabric module is in a down state, then the complete CMM will be reloaded.
• This command can also be used on the secondary CMM.
• If the switch is part of an OmniSwitch 6800 Series stack or an OmniSwitch 6850 Series stack with three or more switches, the next switch in “idle” mode becomes the secondary CMM, and the original primary CMM becomes “idle.” For more information on stacks, see “Managing Stacks” in the Hard-ware Users Guide.
takeover CMM Commands
Examples -> takeover
-> takeover with-fabric
Release History
Release 5.1; command was introduced.
Related Command
MIB Objects
chasEntPhysicalTable csEntPhysicalIndex chasEntPhysAdminStatus
CMM Commands show running-directory
show running-directory
Shows the directory from where the switch was booted.
show running-directory
Syntax Definitions N/A
Defaults N/A
Platforms Supported OmniSwitch 6800, 6850, 9000
Usage Guidelines
• Once a switch has booted and is running, it will run either from the working or certified directory. If running from the certified, changes made to the running configuration using CLI commands cannot be saved. A switch must be running from the working directory in order to save the current running configuration.
• This command can also be used on the secondary CMM.
Examples
The following is an example of the display on OmniSwitch 9000 switches: -> show running-directory
CONFIGURATION STATUS
Running CMM : PRIMARY, CMM Mode : MONO CMM, Current CMM Slot : A,
Running configuration : WORKING, Certify/Restore Status : CERTIFY NEEDED SYNCHRONIZATION STATUS
Running Configuration : SYNCHRONIZED, NIs Reload On Takeover : NONE
show running-directory CMM Commands
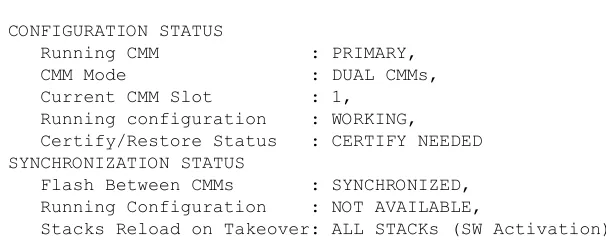
-> show running-directory
CONFIGURATION STATUS
Running CMM : PRIMARY, CMM Mode : DUAL CMMs, Current CMM Slot : 1,
Running configuration : WORKING, Certify/Restore Status : CERTIFY NEEDED SYNCHRONIZATION STATUS
Flash Between CMMs : SYNCHRONIZED, Running Configuration : NOT AVAILABLE,
Stacks Reload on Takeover: ALL STACKs (SW Activation)
output definitions
Running CMM The CMM currently controlling the switch, either PRIMARY or SECONDARY.
CMM Mode Displays whether the primary and secondary CMMs are synchronized. In the case that there is no secondary CMM, MONO-CMM-CHASSIS is shown.
Current CMM Slot The slot number of the primary CMM.
Running Configuration Where the switch is running from, either WORKING or CERTIFIED. A switch running from the certified directory will not be able to manip-ulate files in the directory structure.
Certify/Restore Status Indicates if the CM has been certified (i.e., the Working directory matches the Certified directory).
Flash Between CMMs Displays whether the Working and Certified directories are the same. NIs Reload On Takeover
Stacks Reload on Takeover
Displays how many Network Interface (NI) modules or switches in a stack will be reloaded in the event of a management module takeover. Options include NONE, ALL, or a list of specific NIs.
If there are no unsaved configuration changes and the flash directories on both the primary and secondary management modules have been synchronized via the copy flash-synchrocommand, no NIs will be reloaded if a management module takeover occurs. As a result, data flow is not interrupted on the NIs during the takeover.
If a configuration change is made to one or more NI modules (e.g., a VLAN is configured on several different interfaces), and the changes are not saved via the write memorycommand, the corresponding NIs will automatically reload if a management module takeover occurs. Data flow on the affected NIs will be interrupted until the reload is complete. Note that the NIs will reload whether or not the flash syn-chronization status shows SYNCHRONIZED. This is because the unsaved changes have occurred in the running configuration
(i.e., RAM), and have not been written to the flash directory’s configu-ration file. In this case, a list of only the affected NIs displays in the table output (e.g., 1 6 9 12).
CMM Commands show running-directory
Release History
Release 5.1; command was introduced.
Related Commands
MIB Objects
chasControlModuleTable chasControlRunningVersion chasControlActivateTimeout chasControlVersionMngt
chasControlDelayedActivateTimer chasControlCertifyStatus
chasControlSynchronizationStatus
reload Reboots the CMM to its startup software configuration.
write memory Copies the running configuration (RAM) to the working directory. copy flash-synchro Copies the certified directory version of the primary CMM software to
show reload CMM Commands
show reload
Shows the status of any time delayed reboot(s) that are pending on the switch.
show reload [status]
Syntax Definitions N/A
Defaults N/A
Platforms Supported OmniSwitch 6800, 6850, 9000
Usage Guidelines
• It is possible to preset a reboot on a CMM by using the reload command. If this is done, use the show reload command to see when the next scheduled reboot will occur.
• If the reload working command was used, and a rollback timeout was set, the time the rollback will occur is shown using the show reload command.
• This command can also be used on the secondary CMM.
Examples
-> show reload status
Primary Control Module Reload Status: No Reboot Scheduled, Secondary Control Module Reload Status: No Reboot Scheduled
Release History
Release 5.1; command was introduced.
Related Commands
reload Reboots the primary or secondary CMM to its startup software configura-tion.
CMM Commands show microcode
show microcode
Displays microcode versions installed on the switch.
show microcode [working | certified | loaded]
Syntax Definitions
working Specifies the switch’s working directory; only microcode information from the working directory will be displayed.
certified Specifies the switch’s certified directory; only microcode information from the certified directory will be displayed.
loaded Specifies that only loaded (i.e., currently-active) microcode versions will be displayed. Idle microcode versions will not be displayed.
Defaults N/A
Platforms Supported OmniSwitch 6800, 6850, 9000
Usage Guidelines
• If no additional parameters are entered (i.e., working, certified, or loaded), microcode information for the running configuration will be displayed.
• This command can also be used on the secondary CMM.
Examples
-> show microcode
Package Release Size Description
---+---+---+---Jbase.img 6.1.1.403.R01 10520989 Alcatel-Lucent Base Software
Jos.img 6.1.1.403.R01 1828255 Alcatel-Lucent OS
show microcode CMM Commands
Release History
Release 5.1; command was introduced.
Related Commands
output definitions
Package File name.
Release Version number.
Size File size.
Description File description.
CMM Commands show microcode history
show microcode history
Displays the archive history for microcode versions installed on the switch.
show microcode history [working | certified]
Syntax Definitions
working The history for the working directory’s microcode will be displayed. certified The history for the certified directory’s microcode will be displayed.
Defaults N/A
Platforms Supported OmniSwitch 6800, 6850, 9000
Usage Guidelines
If no additional parameters are entered (i.e., working or certified), the microcode history for the running directory will be displayed.
Examples
-> show microcode history
Archive Created 8/27/05 23:45:00
Release History
Release 5.1; command was introduced.
Related Commands
2 Chassis Management and
Monitoring Commands
Chassis Management and Monitoring commands allow you to configure and view hardware-related opera-tions on the switch. Topics include basic system information, as well as Network Interface (NI) module and chassis management.
Additional Information. Refer to your separate Hardware Users Guide for detailed information on chassis components, as well as managing and monitoring hardware-related functions.
MIB information for the Chassis Management and Monitoring commands is as follows:
Filename: AlcatelIND1Chassis.mib
Module: ALCATEL-IND1-CHASSIS-MIB
Filename: AlcatelIND1System.MIB
Module: ALCATEL-IND1-SYSTEM-MIB
Filename: AlcatelIND1StackManager.MIB
Chassis Management and Monitoring Commands
A summary of available commands is listed here:
Management Commands system contact system name system location system date system time
system time-and-date synchro system timezone
system daylight savings time update
update lanpower reload ni
reload all
reload pass-through power ni
temp-threshold stack set slot stack clear slot Monitoring Commands show system
show hardware info show chassis show cmm show ni show module show module long show module status show power
show fan
Chassis Management and Monitoring Commands system contact
system contact
Specifies the switch’s administrative contact. An administrative contact is the person or department in charge of the switch. If a contact is specified, users can easily find the appropriate network administrator if they have questions or comments about the switch.
system contact text_string
Syntax Definitions
text_string The administrative contact being specified for the switch. The system contact can range from 1 to 254 characters in length. Text strings that include spaces must be enclosed in quotation marks. For example, “Jean Smith Ext. 477 [email protected]”.
Defaults N/A
Platforms Supported OmniSwitch 6800, 6850, 9000
Usage Guidelines N/A
Examples
-> system contact "Jean Smith Ext. 477 [email protected]" -> system contact [email protected]
Release History
Release 5.1; command was introduced.
Related Commands
MIB Objects system
systemContact
system name Chassis Management and Monitoring Commands
system name
Modifies the switch’s current system name. The system name can be any simple, user-defined text descrip-tion for the switch.
system name text_string
Syntax Definitions
text_string The new system name. The system name can range from 1 to 19
characters in length. Text strings that include spaces must be enclosed in quotation marks. For example, “OmniSwitch 6850”.
Defaults N/A
Platforms Supported OmniSwitch 6800, 6850, 9000
Usage Guidelines N/A
Examples
-> system name "OmniSwitch 6850" -> system name OS-6850
Release History
Release 5.1; command was introduced.
Related Commands
MIB Objects system
systemName
system contact Specifies the switch’s administrative contact (e.g., an individual or a department).
Chassis Management and Monitoring Commands system location
system location
Specifies the switch’s current physical location. If you need to determine the switch’s location from a remote site, entering a system location can be very useful.
system location text_string
Syntax Definitions
text_string The switch’s physical location. For example, TestLab. The system location can range from 1 to 254 characters in length. Text strings that include spaces must be enclosed in quotation marks. For example, “NMS Test Lab”.
Defaults N/A
Platforms Supported OmniSwitch 6800, 6850, 9000
Usage Guidelines N/A
Examples
-> system location "NMS Test Lab" -> system location TestLab
Release History
Release 5.1; command was introduced.
Related Commands
MIB Objects system
systemLocation
system contact Specifies the switch’s administrative contact (e.g., an individual or a department).
system name Modifies the switch’s current system name.
system date Chassis Management and Monitoring Commands
system date
Displays or modifies the switch’s current system date.
system date [mm/dd/yyyy]
Syntax Definitions
mm/dd/yyyy The new date being specified for the system. Enter the date in the following format: mm/dd/yyyy, where mm is the month, dd is the day, and yyyy is the year. For example, 08/08/2005.
Defaults N/A
Platforms Supported OmniSwitch 6800, 6850, 9000
Usage Guidelines
• If you do not specify a new system date in the command line, the current system date will be displayed.
• For more information on setting time zone parameters (e.g., Daylight Savings Time), refer to the system timezone command on page 2-9.
Examples
-> system date 08/08/2005 -> system date
08/08/2005
Release History
Release 5.1; command was introduced.
Related Commands
MIB Objects systemServices
systemServicesDate
Chassis Management and Monitoring Commands system time
system time
Displays or modifies the switch’s current system time.
system time [hh:mm:ss]
Syntax Definitions
hh:mm:ss The new time being specified for the system. To set this value, enter the current time in 24-hour format, where hh is the hour, mm is the minutes, and ss is the seconds. For example, 14:30:00.
Defaults N/A
Platforms Supported OmniSwitch 6800, 6850, 9000
Usage Guidelines
If you do not specify a new system time in the command line, the current system time will be displayed.
Examples
-> system time 14:30:00 -> system time
15:48:08
Release History
Release 5.1; command was introduced.
Related Commands
MIB Objects systemServices
systemServicesTime
system time-and-date synchro Chassis Management and Monitoring Commands
system time-and-date synchro
Synchronizes the time and date settings between primary and secondary CMMs.
system time-and-date synchro
Syntax Definitions N/A
Defaults N/A
Platforms Supported OmniSwitch 6800, 6850, 9000
Usage Guidelines
• The system time-and-date synchro command applies only to switches with redundant CMM configurations.
• Synchronizing date and time settings is an important step in providing effective CMM failover for switches in redundant configurations. Be sure to periodically synchronize the primary and secondary CMMs using this command.
�