R
Re
ed
du
uc
ci
in
ng
g
t
t
he
h
e
F
F
oo
o
ot
t
pr
p
ri
in
nt
t
o
of
f
t
t
he
h
e
IC
I
CA
A
W
W
in
i
n3
32
2
W
W
eb
e
b
Cl
C
li
ie
en
nt
t
Notice
The information in this publication is subject to change without notice.
THIS PUBLICATION IS PROVIDED “AS IS” WITHOUT WARRANTIES OF ANY KIND, EXPRESS OR IMPLIED, INCLUDING ANY WARRANTIES OF MERCHANTABILITY, FITNESS FOR A PARTICULAR PURPOSE OR NON-INFRINGEMENT. CITRIX SYSTEMS, INC. (“CITRIX”), SHALL NOT BE LIABLE FOR TECHNICAL OR EDITORIAL ERRORS OR OMISSIONS CONTAINED HEREIN, NOR FOR DIRECT, INCIDENTAL, CONSEQUENTIAL OR ANY OTHER DAMAGES RESULTING FROM THE FURNISHING, PERFORMANCE, OR USE OF THIS PUBLICATION, EVEN IF CITRIX HAS BEEN ADVISED OF THE POSSIBILITY OF SUCH DAMAGES IN ADVANCE.
This publication contains information protected by copyright. Except for internal distribution, no part of this publication may be photocopied or reproduced in any form without prior written consent from Citrix.
The exclusive warranty for Citrix products, if any, is stated in the product documentation accompanying such products. Citrix does not warrant products other than its own.
Citrix and ICA are registered trademarks of Citrix Systems, Inc. Windows is a registered trademark of Microsoft Corp. WinZip is a registered trademark of WinZip Computing, Inc. and PKZIP is a registered trademark of PKWARE, Inc.
All other trademarks and registered trademarks are the property of their respective owners.
Copyright © 2001 Citrix Systems, Inc., 6400 NW 6th Way, Ft. Lauderdale, Florida 33309 U.S.A. All rights reserved.
Version History
April 30, 2001 Mike Stringer, Margaret Pucci Version 1.0
Table of Contents
OVERVIEW OF THE ICA WIN32 WEB CLIENT ...1
WORKING WITH ICA32T.EXE ...2
EXTRACTING THE FILES FROM ICA32T.EXE...2
REMOVING CLIENT COMPONENTS...2
REPACKAGING ICA32T.EXE...4
SIGNING YOUR CUSTOMIZED CLIENT PACKAGE...4
WORKING WITH WFICAT.CAB ...6
EXTRACTING THE FILES FROM WFICAT.CAB...6
REMOVING CLIENT COMPONENTS...6
REPACKAGING AND SIGNING WFICAT.CAB...6
Overview of the ICA Win32 Web Client
The ICA Win32 Web Client is packaged in the files ica32t.exe and wficat.cab. The ica32t.exe file is a signed, self-extracting executable, approximately 1.3MB in size.
This white paper contains instructions for reducing the size, or “footprint,” of the self-extracting executables that install the ICA Win32 Web Client, and for configuring the ICA Win32 Web Client for silent user installation. You can remove the components your users don’t need from the ICA Win32 Web Client executable, however, reducing the footprint of the executables comes at the expense of functionality.
This white paper:
Identifies the files that can be removed from the executables and defines the features associated with these files
Includes instructions for removing the files from ica32t.exe and wficat.cab
Includes instructions for configuring the ICA Win32 Web Client for silent user installation
For more detailed information about the ICA Win32 Web Client, see the Citrix ICA Win32 Clients Administrator’s Guide, in Adobe PDF format, available in the documentation directory on the Citrix ICA Client CD-ROM. You can also download the administrator’s guide from the Citrix Web site at http://www.citrix.com/download.
Important: This document describes ways to reduce the size of the ICA Win32 Web Client executables. However, Citrix does not support ICA client software that has been modified. Be sure to verify that the modified client
Working with ica32t.exe
Complete the following steps to modify the ICA Win32 Web Client executable. Each of these steps is explained in detail in this section.
1. Extract the files from ica32t.exe.
2. Remove the unwanted client components.
3. Repackage the executable, using third-party software.
4. Obtain a digital certificate and sign your customized ICA Win32 Web Client package.
You can configure the ICA Win32 Web Client for silent user installation at the same time you are removing the unwanted client components, as described in Step 2. See “Configuring the ICA Win32 Web Client
for silent user installation” on page 8 for more information.
Extracting the files from ica32t.exe
There are two methods for extracting files from ica32t.exe.
1. Use a third-party compression utility, such as Winzip or PKZIP, to open the executable.
2. Expand ica32t.exe to a temporary directory and then copy the files to a permanent directory. When you are done copying the files to the permanent directory, the client installation can be cancelled.
When you have extracted the files from ica32t.exe, you can remove select features to reduce the size of the executable.
Removing client components
If your users do not require all of the features supported in the ICA Win32 Client, you can remove these features to reduce the size of the executable.
The table below lists the files that can be removed and the functionality that the files provide.
Client Feature Component(s) Size (KB) Comments
Audio adpcm.dll audcvtn.dll vdcamN.dll 41 53 45 Audio mapping
Seamless Windows concentr.dll CONCENTR.hlp wfcrun32.exe
125 11 417
The Connection Center files are required for Seamless Windows functionality.
Wfcrun32.exe is required for Seamless Windows functionality.
COM interface ICAClobj.class 2 COM / VB
Encryption pdc0N.dll pdc40N.dll
89
Client Feature Component(s) Size (KB) Comments
pdc56N.dll pdc128N.dll
89 89
RSA 56-bit encryption RSA 128-bit encryption
Com port mapping vdcom30n.dll 65 Com port mapping functionality Printer M4 mapping vdcpm30N.dll 41 Printer mapping functionality
Zero latency VDZLCN.DLL
VDFON30N.DLL 93 65
Netscape plugin npicaN.dll 145 Netscape functionality
Automatic client update vdcmN.dll 57 Citrix Auto Client Update functionality
To remove components from the ICA Win32 Web Client executable: 1. Delete the unwanted files from the ICA Win32 Web Client directory.
2. Open the file ctxsetup.ini, located in the ICA Win32 Web Client directory. Because the deleted files are still called by the file ctxsetup.ini, you must modify ctxsetup.ini to reflect the changes.
3. In ctxsetup.ini, locate the lines of code associated with the feature(s) you removed.
4. Insert a semicolon at the beginning of each line of code associated with the feature you removed. This semicolon “comments out” the entries so that they are ignored when the ICA Win32 Web Client installation program is initialized.
For example, if you want to remove Netscape compatibility functionality, comment out the following Netscape-specific sections in [SetEnv.Win32]:
[NETSCAPEDIREX] [NETSCAPE6DIREX] [NETSCAPEPROGDIR] [NETSCAPEPLUGINDIR].
If you want to remove client audio support and Netscape functionality, comment out the appropriate entries in [AddFiles.WIN32], as shown below:
;adpcm.dll= ;audcvtn.dll ;npican.dll= ;plugin\npican.dll=
Repackaging ica32t.exe
Repackaging the modified client files into a self-extracting executable requires third-party software. There are several third-party programs you can use to repackage the ICA Win32 Web Client files into a 32-bit executable, including the PackageForTheWeb utility from InstallShield Software Corp.
When you have repackaged the modified client files, you must obtain a digital certificate and sign your customized package.
Signing your customized client package
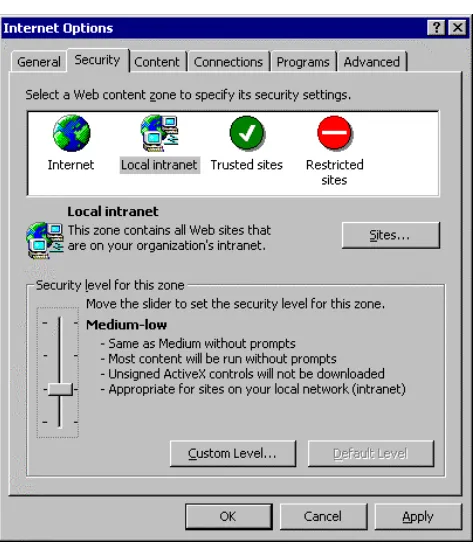
The ica32t.exe file supplied by Citrix is a signed, 32-bit self-extracting program. The file is signed to limit the spread of computer viruses. It is therefore not possible for your customized client package to be signed using Citrix’s digital certificate.
If your customized client package is not signed, only those Microsoft Internet Explorer (IE) users who have the security level set to “low” will be able to download it. This IE setting is displayed in Figure 1.
Some packaging programs allow you to sign your executable when you are creating it. For example, the
PackageForTheWeb utility prompts you to digitally sign your executable when you create a package, as shown in Figure 2.
Figure 2 – The PackageForTheWeb Digital Signature Screen
Working with wficat.cab
Complete the following steps to modify the ICA Win32 Web Client CAB file. Each of these steps is explained in detail in this section. This section also explains how to repackage and sign the CAB file using Microsoft’s CABARC utility found on the Microsoft Visual C++ CD-ROM in the CAB&SIGN directory.
1. Extract the files from wficat.cab.
2. Remove the unwanted client components.
3. Repackage and sign the CAB file, using third-party software.
Extracting the files from wficat.cab
There are two methods for extracting files from wficat.cab:
1. If you are using Microsoft Windows 2000, use the built-in extraction functionality to extract the files in wficat.cab (double-click the CAB file and follow the prompts).
2. Use a third-party compression utility, such as Winzip, to extract the files.
When you have extracted the files from wficat.cab, you can remove select features to reduce the size of the CAB file.
Removing client components
If your users do not require all of the features supported in the ICA Win32 Web Client, you can remove these features to reduce the size of the CAB file. To see which features can be removed from the CAB file, see “Removing client components” on page 2 of this document.
When you have removed the unwanted features, you must repackage the files into a signed CAB file for deployment to your end users.
Repackaging and signing wficat.cab
This section explains how to repackage and sign your customized CAB file using Microsoft’s CABARC utility found on the Microsoft Visual C++ CD in the CAB&SIGN directory.
Example usage:
C:\CAB&SIGN\CABARC -s 6144 n MyIcaClient.CAB required1.DLL required2.DLL MyIcaClient.OCX MyIcaClient.INF
CABARC creates a CAB file called MyIcaClient.CAB.
Run CABARC in the directory that contains your source files (the INF, OCX, and DLL files). The files to be archived in the CAB file should be listed on the command line in the same order they are listed in the INF file. In the example above, the INF file should list required1.DLL first, then required2.DLL, and then MyIcaClient.OCX.
Use the -s option to reserve space in the cabinet for code signing. Use the n command to specify that you want to create a CAB file.
Run the SIGNCODE utility (example: C:\CAB&SIGN\SIGNCODE) to start the Code Signing Wizard, which you can use to sign the custom CAB files and/or the DLLs and OCXs directly.
The advantages of using a CAB file are compression and, if used with an INF file, the bundling of all necessary code together.
You can add an INF file for CODEBASE versioning, as shown in the example below.
[Add.Code]
wfica.ocx=wfica.ocx
wfica32.exe=wfica32.exe
[wfica.ocx]
File=thiscab
Clsid={238f6f83-b8b4-11cf-8771-00a024541ee3}
FileVersion=4,2,910,0
DestDir=11
[wfica32.exe]
File=thiscab
FileVersion=4,21,910,0
Configuring the ICA Win32 Web Client
for silent user installation
Installing the ICA Win32 Web Client requires minimal end user interaction. A typical installation presents your end user with the following:
1. An initial prompt informing the user that the Citrix ICA Win32 Web Client is about to be installed. The user clicks
Yes to continue or No to stop setup.
2. A Citrix License Agreement. The user clicks Yes to accept or No to reject the agreement and stop setup. 3. An indication that the setup program is copying files to the client device. The default file location for the ICA
Win32 Web Client is Program Files\Citrix\icaweb32.
4. A message box informing the user that the Citrix ICA Web Client was installed successfully. The user must click
OK to clear the message.
5. If the user is running Netscape Navigator, the user must restart the browser.
You can further limit your end user’s required interaction with the setup program by suppressing the appearance of the initial user prompt (described in Step 1) and the Citrix License Agreement (described in Step 2). The
parameters that control the appearance of these prompts are contained in the file ctxsetup.ini.
To configure the ICA Win32 Web Client for silent user installation:
1. Extract the ICA Client files from ica32t.exe or wficat.cab. See “Extracting the files from ica32t.exe” on page 2 or “Extracting the files from wficat.cab” on page 6 for more information.
2. Locate the file ctxsetup.ini.
3. Open ctxsetup.ini in any text editor.
4. Locate the InitialPrompt parameter. Change the value of the setting from 1 to 0. 5. Locate the DisplayLicenseDlg parameter. Change the value of the setting from 1 to 0. 6. Save the file and exit the text editor.