Preface
Sending email and news messages anonymously has both pro and con arguments. Freedom of speech in America is a very coveted right that most citizens agree upon. Some people will argue that anonymous remailers will be used for evil purposes and therefore, no one should be allowed to use them. It is this authors position that no excuse should be embraced that interferes with our Constitutional rights, including our right to freedom of speech, including the freedom to speak anonymously.
Purpose of this document: This document will attempt to explain through step by step instructions how to set up the following programs that will anonymously: 1a. Send emails and 1b. post news to news groups using the QuickSilver program.
2. Read and post news to news groups using MesNews and send emails through remailers using QuickSilver through the secure tunnel Stunnel. 3. Manually set up a pseudo-anonymous email account on an nym server. 4. Post news to news groups and send emails through remailers using the news reader MesNews through the OmniMix switchbox program (also through Tor). All of these programs are excellent free clients, however, they can be somewhat intimidating for many users to set up on their own. OmniMix can be especially intimidating because it has many abilities that do not pertain to your needs. A word of caution: An adversary might have the ability to determine which news groups you are accessing with the 'MesNews with OmniMix' and 'Gravity with OmniMix' setup instructions. They will not be able, however, to determine which individual news articles your are viewing and/or replying to if you follow these setup instructions carefully. For completely anonymous access to news groups, see the instructions in the 'OmniMix with Tor' section.
+++++++++++++++++++++++++++++++++++++++++++++++++++++++++++++ The author of this document has done his best to make the content herein as accurate as possible. Some inquiries as to program functions were left unanswered, however. The author is not an expert on the remailer or Tor systems. Any suggested corrections are welcome and will be changed or included in future versions.
For further help with setting up these programs, or any questions concerning anonymous email, anonymous news posting, and remailers, inquire at the news group: alt.privacy.anon-server
QuickSilver Preparation and Installation Section
I. Send email messages anonymously
II. Send messages to newsgroups with anonymous mail2news messages Purpose of this document: This document will attempt to explain through step by step instructions how to set up the following programs that will anonymously send emails and post news to news groups using the QuickSilver and Mixmaster programs. These programs are excellent free clients, however, they can be somewhat intimidating for many users to set up on their own.
QuickSilver can be used to anonymous send email messages and news messages to news groups, but it does not have the capability of receiving mail or news. QuickSilver is a completely independent program and is not connected to the 'MesNews with OmniMix' programs or installation instructions.
Preparations:
Go to the link below and download the following program: ftp.quicksilvermail.net/pub/quicksilver
(Click on 'QS1.2.7.exe' to download the QuickSilver program. Do not download QuickSilver from any other site. The similarly named file that has the '.sig' appended to its end is the signature file that can be used to verify the '.exe' file. Verifying the file is beyond the scope of these setup instructions.)
Installations:
Step 1: Install QuickSilver by double clicking on the 'QS1.2.7.exe'. While going through the setup, you will be asked for your correct email address and SMTP host. You can enter these without any problem (or you can enter fake information). Finding your SMTP Host name will be covered later.
Step 2: You will download and install Mixmaster with the QuickSilver program. Start QuickSilver and a window will pop up concerning downloading Mixmaster. Click on the 'Get Mixmaster' button, click 'OK' on the next window, choose the 'ftp.quicksilver.net/pub/quicksilver' link in the drop down box, click the 'Next' button, click to highlight the line containing 'Mix29b39.zip', and then click 'Next' to download this Mixmaster file. Next click the 'Run Setup' button, then click 'Next', change the path where Mixmaster is to be installed if you so desire ['C:\Encryption\Mix'], click 'Next', and finally click 'Install'. Mixmaster is now installed on your computer and QuickSilver knows where to find it.
End of program installation section.
The following instructions will show you how to set up: QuickSilver Setup Section
QuickSilver Setup:
Step 1. Start the QuickSilver program. There are a few simple things that must be set for QuickSilver to work properly.
Step 2. Click on the 'Tools' menu item and click the 'Remailers' menu item. You are going to only use what is called the Mixmaster system so only the 'mlist.txt' and 'pubring.mix' check boxes need to be checked. The Vista operating system will not write out the required information properly unless the 'Error Check' check box is checked, so be sure it is checked. (If for any reason you do not check the 'Error Check' check box, then the 'type2.txt' check box must be checked.)
Step 3. Next click on the 'URL Manager' button. Click through the first three tabs, 'Mix List', 'Mix Keys', and 'Mix Type2', and replace the entries with the entries shown below.
http://pinger.bananasplit.info/mlist.html http://stats.melontraffickers.com/mlist.txt http://pinger.bananasplit.info/pubring.mix http://stats.melontraffickers.com/pubring.mix http://pinger.bananasplit.info/type2.list http://stats.melontraffickers.com/type2.list After making the entries, click 'OK'.
Step 4. Next select the respective 'pinger.bananasplit.info' addresses in the mlist.txt and pubring.mix drop down list if they are not already present. Then click on the 'Update' button. You must be connected to the internet when doing the update. You should then see the required information being downloaded. [If the data does not download as it should, then the bananasplit site could be experiencing problems. In that case, go to the drop down boxes and select the melontraffickers link locations.] Click 'OK' after the download ends to close out the window and get back to the QuickSilver main interface.
Step 5. Now you need to do a test to see if you need to do Steps 6 and 7. The test is to send a test email to yourself. Click on the the new message button and then click the 'Message' menu item.
Step 6. A small window will be placed inside of the QuickSilver main interface that is the mail window. Maximize this inner window for better viewing. Replace the lines that come with QuickSilver with the lines displayed below. Then modify the 'Host: ' line to your ISP's smtp address (see 'Step 8' below for more information on finding out what your ISP's smtp address is). Note that there must be a space between the colon ': ' and data entry of each parameter. Modify the 'From: ' line to your email address, which will only be passed to your ISP and is required. Normally you would put the email address of someone else in 'To: ', however, since you are sending a test email to yourself, place your own email address in the 'To: ' field. Now put in 'Subject: Test', and your email message. Note that there is a space before and '~~' after your message. Host: smtp.my-isp.net From: [email protected] Chain: *,*,*; copies=3 To: [email protected] Subject: Test
Test message to myself. ~~
Now click the 'Send' button to see if the message will be sent. If the
Step 7. (Skip Steps 7 and 8 if Step 6 worked.)
Click on the 'Tools' menu item and then click on the 'Smtp Authentication' menu item. The host window should be empty. After setting up the parameters, there should be an entry somewhat similar to the example below.
Step 8. Next click on the 'New' button which will bring up the following window.
You may need to put in your Internet Service Provider's smtp address¹ in the 'Host:' box. If you do not know what the address is, you can usually find it through your ISP's support web page concerning email account/client setup. You might need to simply call them and ask what the smtp address is. You may also need to put in your 'User Id:' and 'Password:'. Even if you are connect directly to a cable modem, you will need to find out from your ISP what these are if you don't know them. After making these entries, click the OK button.
Note: your 'User Id:' may be your short user ID (my-userid) or you might have to use your long user ID ([email protected]).
(¹ You might try smtp.my.internet.provider as your 'Host:' parameter. example: smtp.yahoo.com)
Further suggestions: Things can be different with different ISPs. If you still can not send messages after filling out the information in the above window, then try leaving out the 'User Id:' and 'Password:', leaving the 'Host:' name intact. Go back to Step 5 and 6 and try sending again after each of these modifications.
Step 9. Further QuickSilver instructions and examples:
QuickSilver must be updated at least once a day with current Pinger information. You can do this manually by clicking through the menu items 'Tools' / 'Remailers' and then click the 'Update' button. If you are not sending many emails, you can check the 'Update' check box on the QuickSilver main interface and the program will automatically update QuickSilver with the current Pinger information before each message is sent.
To send an email, use the following format. The 'To: ' field is the address of the recipient. Remember, there must be a space between the colon ': ' and the parameters.
Host: smtp.my-isp.net
From: [email protected] Chain: *,*,*; copies=3
To: someone@their_isp.com Subject: Email subject Message goes here. ~~
To send a message to a news groups with QuickSilver, use the following format. 'Newsgroups: ' should be the newsgroup you are sending a message to. You can specify multiple groups (although it is not a good practice) by placing a comma between the news group addresses.
Host: smtp.my-isp.net
From: [email protected] Chain: *,*,*; copies=3
Newsgroups: alt.privacy,alt.privacy.anon-server Subject: Subject of my news message
Message goes here. ~~
To send a reply to a news message in a news groups with QuickSilver, use the following format. You will have to find the 'Message ID:' line (it can be found in the MesNews article header that is displayed above the article) and place it in the 'References: ' line as shown below.
Example: Message ID: <[email protected]>
Host: smtp.my-isp.net From: [email protected] Chain: *,*,*; copies=3 To: [email protected] Newsgroups: alt.privacy References: <[email protected]> Subject: Re: Same subject line that you are replying to Message goes here.
~~
If you would like to keep a copy of the email and news messages you send, then place the 'Fcc: Outbox' parameter above the 'Host: ' line. Note that QuickSilver has been known to begin to malfunction if there are too many Fcc messages in the database, so you will need to clean it out periodically. This may be a Vista problem only. You can get to your mailboxes through the 'MailBox' menu item.
Fcc: Outbox Host: smtp.my-isp.net From: [email protected] Chain: *,*,*; copies=3 To: someone@their_isp.com Subject: Test
Message goes here. ~~
If you would like to keep templates for emails and news messages, build your template in a mail window and then save the template by clicking on the 'File' and 'Save as Template' menu items. To access your templates, click on the template button.
Step 10. QuickSilver format instructions and examples to send messages using Stunnel (see: 'QuickSilver and MesNews with Stunnel'). Notice that 'banana' must be the first remailer in the remailer chain.
Example for sending an anonymous email using QuickSilver with Stunnel:
Host: localhost:2525
From: [email protected] Chain: banana,*,*
To: someone@their_isp.com Subject: any subject you choose any message here
~~
Example for sending an anonymous news message using QuickSilver with Stunnel: Host: localhost:2525 From: [email protected] Chain: banana,*,* To: [email protected] Newsgroups: the.newsgroup.you.want.to.send.a.message.to Subject: any subject you choose
any message here ~~
End of QuickSilver setup section.
--+++++++++++++++++++++++++++++++++++++++++++++++++++++++++++++ See help topic: Communicating Anonymously
QuickSilver and MesNews with Stunnel Preparation and Installation Section
I. Send messages to News Groups (not completely anonymous) through MesNews/Stunnel (The MesNews program can also be used to download and read news when combined with Stunnel.)
II. Send Anonymous Emails and MailToNews Messages through the Remailer System through QuickSilver/Stunnel
Stunnel is an encryption tunneling program that can be used to securely connect to the news.mixmin.net news server and the drooper.mixmin.net mail server. Although the connections between your computer and these two servers are secure, nevertheless, your IP address is known by these servers. Therefore, all of your news traffic could be detected. There is nothing in a post header, however, that could link directly to you. (You should not use the MesNews mail client with this Stunnel setup.) Your QuickSilver remailer traffic is still secure, however, when using QuickSilver with Stunnel because it has been encrypted to be further routed through the remailer system. Purpose of this document: This document will attempt to explain through step by step instructions how to set up the following programs that will: 1. read and post (not completely anonymous) messages to news groups (your news posts will be anonymously displayed in all news groups); 2. send anonymous emails through the remailer system;
Preparations:
Go to the 'QuickSilver' topic in this help and install and set up QuickSilver according to the instructions. See Step 10 in the 'QuickSilver' topic for the message format you must use to send messages with QuickSilver through Stunnel.
Go to the links below and download the following programs:
www.mesnews.net
(Click on the flag identifying your language, click on the '.download' link on the left side of the page, and click the 'click here' button to download the
MesNews program. The download file should look something like: 'setup-mesnews-1.8.2.0.exe'.)
www.stunnel.org/download/binaries.html
(Click on the most current and actively developed branch of Stunnel to
download the Stunnel program. It should have the most recent date and look something like this:
'688870 Sep 20 13:49:31 2008 stunnel-4.26-installer.exe'
The similarly named file that has the '.asc' appended to its end is the signature file that can be used to verify the '.exe' file. Verifying the file is beyond the scope of these setup instructions.)
http://cdn.simtel.net/pub/simtelnet/win95/deskapp/PreWarn.zip
Installations:
Step 1: Install MesNews by double clicking on the '.exe'. I like to keep all my encryption programs in a special folder called 'C:\Encryption\', however, it shouldn't make any difference where you install any of these programs. Keep the programs in separate folders, however. You could use
'C:\Encryption\MesNews\' for the MesNews files.
Note: MesNews likes to put the downloaded news into a folder that is outside of the folder where MesNews is installed. I personally like to keep it in a folder within the MesNews folder as below. This suggestion will also help you more easily find these messages to clean them out. Cleaning out old messages will be covered later.
Step 2. Install Stunnel in the folder of you choice by double clicking on the Stunnel installation .exe.
Step 3: Install the PreWarn program in its own folder. Later you will be copying the PreWarn.exe to the QuickSilver and MesNews folders to keep the start parameters separate.
End of program installation section.
The following instructions will show you how to setup:
Stunnel , MesNews, and QuickSilver Setup Section
Stunnel Setup:
Step 1. Go to the Stunnel folder and create a file named 'banana-nntps.cfg' and 'banana-smtp.cfg'. You can usually do this using Notepad. If you need a file editor for this, this one will do:
http://www.lancs.ac.uk/staff/steveb/cpaap/pfe/ Save the 'banana-nntps.cfg' file with the following data therein:
client = yes #
[BANANA_NNTP] accept = 127.0.0.1:120
connect = news.mixmin.net:563
Save the 'banana-smtp.cfg' file with the following data therein:
RNDbytes = 2048 RNDfile = bananarand.bin RNDoverwrite = yes client = yes options = ALL # [BANANA_SMTP] protocol = smtp accept = 2525 connect = drooper.mixmin.net:2525 delay = no
Note: See 'QuickSilver/QuickSilver Setup:/Step 10' for the proper way to format an anonymous email and anonymous news message using Stunnel.
End of Stunnel setup section.
PreWarn Setup:
Step 1. Copy the PreWarn.exe from the folder it was installed in to your QuickSilver folder. Next, click on the PreWarn.exe to start it and copy and paste the lines below into the program's window and then click the Quit button:
QuickSilver/Stunnel
File:your path to this file\qs.exe
dosFile:your path to this file\stunnel.exe banana-smtp.cfg
Step 2. Copy the PreWarn.exe from the folder it was installed in to your MesNews folder. Next, click on the PreWarn.exe to start it and copy and paste the lines below into the program's window and then click the Quit button:
MesNews/Stunnel
File:your path to this file\MesNews2.exe
dosFile:your path to this file\stunnel.exe banana-nntps.cfg
Step 3. Now when you want to start QuickSilver to use with Stunnel or MesNews to use with Stunnel, you can simply start the PreWarn.exe within the corresponding folder and click on the 'Start and Quit' button to start everything at once. (If you have set up MesNews to have two servers, one for Stunnel and another for OmniMix, then you could add this additional line to the PreWarn window:
'File:your path to this file\OmniMix.exe')
End of PreWarn setup section.
MesNews Setup:
Step 1. Start Stunnel. The program will show up as an icon in the system tray. Step 2. Start MesNews and click the upper left corner menu item: 'File' and then 'Settings'. Click on the necessary tab and set the fields therein to:
Step 3. Next click on the menu item: 'Server' and 'New Server'. Set the fields therein to:
Use port 120 for the news port here. This will keep you from having any conflicts with OmniMix, if you are setting up this installation as another additional server with a MesNews / OmniMix installation.
After setting these fields, click 'Apply'.
Step 4. Now you need to download all the news groups. Do this by right clicking on the 'Mixmin via Stunnel' line and then click 'Show newsgrouplist'.
Step 5. Clicking on 'Show newsgrouplist' will bring up the window below. After the list is built, go down and click on the group you desire to monitor. After clicking on a group, then click the 'Subscribe' button to subscribe to that group. After making all of your selections, click the 'Close' button at the bottom of the interface.
Step 6a. There is one final step that has to be done to each of the newsgroups you have chosen. Right click on each of the news group names and then click the 'Group Properties (unique.group.name)' menu item. This will bring up the window in Step 6b.
Step 6b. Check the 'Download headers + bodies' check box found in the 'Synchronization' tab, and then click 'Apply'. Again, this needs to be done for each news group that you choose in Step 5, so now go back to Step 6a and do the same for any additional news groups that you have selected.
Note: A word of caution here. It is important that you check 'Download headers + body's'. It is also important that you allow MesNews to download the headers and message bodies. If you were to prematurely click on a news item before MesNews had downloaded it, you could reveal that you were interested in that particular news message
because you would cause it to download out of sequence. (Be informed that some messages may automatically download out of sequence, but this is not a problem.)
With the 'Download headers + body's' setting checked, your computer could accumulate quite a large number of old news messages. It would be a good idea to delete these old messages from time to time. You can do this by searching for folders that are within your MesNews folder (see: 'Installations:', 'Step 1:', 'Note:') that contain the same name as your chosen news groups. Once these folders are located, you can then delete some or all of the files within. The file names will look something like this: '20081108-1.news'. Use the file dates to determine which ones to delete.
After setting these fields, click 'Apply'.
Step 7. This modification is not required, but will reduce the header information so that you only see two header fields above news messages. Find the 'Options of display...' button on the MesNews interface and click it, then click the 'Header' and 'Custom headers to display' menu items which will bring up the window below. Check the 'Sujet (Subject:)' and
'Message ID (Message-ID:)' check boxes only, and then click 'Apply'. Go back through and click the 'Options of display...' button and 'Header' menu and check the 'Custom headers' menu item. If you ever need to view all headers, you can simply click on the 'All headers' menu item.
After making these changes, click 'Apply'.
You should now be ready to use MesNews with OmniMix to view and answer news articles. Be sure that OmniMix is running when you start MesNews.
Note: There is an altered english language file shipped in the zip file with this Help. It makes a few changes so as to keep various lines from over running some of the control descriptions in the MesNews
interface. Backup the mesnews2.gb.lang file found in the 'Language' folder that is within the folder where MesNews was installed. Then replace the mesnews2.gb.lang with the same file shipped with this Help.
End of MesNews setup section.
Pseudo-anonymous Email Preparation and Installation Section
I. Create a pseudo-anonymous email address to receive email messages anonymously at 'alt.anonymous.messages'
Purpose of this document: This document will attempt to explain through step by step instructions how to manually set up a pseudo-anonymous email account with an nym server. The instructions that follow will provide a way to receive messages send through your nym address at the news group:
Preparations:
1. Go to the 'QuickSilver' topic found in the help index and following the instructions on installing and setting up QuickSilver.
2. Next, go to the links below and download the following program:
http://www.gpg4win.org/download.html
(Click on the top wide orange box containing 'gpg4win 1.1.3' to download the GnuPG program (The version numbers could be different ('gpg4win ?.?.?')). 3. Next, get the nym's key by sending this email to the following nym server: [email protected]
Make the subject: remailer-key
The key will arrive back from: [email protected] and will look something like this (except it will be larger): ---BEGIN PGP PUBLIC KEY BLOCK---
Version: GnuPG v1.4.5 (GNU/Linux)
mQGiBEVp0UcRBAC+/Ct68pcaubMbOyrL3HWZdXKhfhPJdoznaLGiHxtieNrl0zm0 SgIbDAAKCRBWJhnCeCR8OwF8AJ0QYsivwLpNroJlFzRvWata4aYZMACfan/JxTy+ 8rX9ACvPpESyWwm6cjI=
=wma8
---END PGP PUBLIC KEY BLOCK---
4. You could also use a different nym by sending this email to its nym server: [email protected]
Make the subject: remailer-key
The key will arrive back from: [email protected]
Keep in mind that the instructions below pertain only to nym.mixmin.net. You can substitute nym.borked.net if you like.
Note: Of all the information that might be sent back to you from these nym servers, the only part you want to concern yourself with is
the key itself. The key is from the '---BEGIN PGP PUBLIC KEY BLOCK---' line through the '---END PGP PUBLIC KEY BLOCK---' line.
5. Next, get the nym's 'list of used nyms' by sending this email to the following nym server:
[email protected] Make the subject: list
You can also get the list from nym.borked.net: [email protected]
Installations:
Step 1: Install GnuPG by double clicking on the 'gpg4win-?.?.?.exe'. I suggest you install it in C:\GnuPG.
Step 2: This suggestion is not required but recommended. Open the 'gpg.conf' file found in the 'GnuPG\GnuPG Keyrings' folder. If you need a file editor to make this modification, this one should suffice:
http://www.lancs.ac.uk/staff/steveb/cpaap/pfe/
Place the line below, including the quote marks, without any leading or trailing blanks, as the last line behind any other data in this file: comment ""
End of program installation section.
The following instructions will show you how to set up: GnuPG Setup Section
GnuPG Setup:
Step 1. You now want to incorporate the key(s) you acquired above into GnuPG's key ring. Start the GnuPG program by double clicking on the WinPT.exe program that can be found in your 'C:\GnuPG\' folder. Copy the key you received by email into the clipboard. Remember the key is from the '---BEGIN PGP PUBLIC KEY BLOCK---' line through the '---END PGP PUBLIC KEY BLOCK---' line.
Step 2. Next, right click on the 'Windows Privacy Tray' tray icon and click on the 'Key Manager' menu item to bring up the Key Manager window. Now right click anywhere on the main list window and then click the
'Paste Key from Clipboard' menu item. Your nym's key has now been incorporate into GnuPG's key chain.
Step 3. You are now going to need to generate a public and private GnuPG key for yourself. On the 'Key Manager' interface, click the 'Key' menu item found at the top and then click the 'New' and 'Normal' menu items. A 'Key Generation Wizard' window will then appear. Where it says to enter 'Real name:', enter a FAKE name¹. You do not want to identify yourself in any way. This fake name can be anything (MyKey, etc). Use this same name where it says 'Email address:',
except append to the name the nym's address you are going to use. Example: [email protected]
Make sure that 'Prefer RSA keys' is not checked.
Next click 'OK' and an 'Enter Password' window will appear. Choose a password that you will always be able to remember. Twenty six
characters is the minimum length for exceptional strength. If this password is lost, you will not be able to decrypt messages coming to you from the nym server. You will be asked to re-enter the password again for verification. Then a 'Key Generation - Progress Dialog' window will appear and will then automatically close after your public and private keys have been generated. It is important to backup you keys
somewhere other than on your computer disk. Now you can close the 'Key Manager' window.
¹(Be sure that the name you choose is not in the 'list of used nyms' that you obtained in Preparations:/Step 5).
End of GnuPG Setup section.
Creating an Nym Setup Section
I. Create a pseudo-anonymous email address to receive email messages anonymously at 'alt.anonymous.messages'.
Nym Creation:
Config:
From: IHide@nym.mixmin.net
Nym-Commands: create +acksend +signsend name="IHide" Public-Key:
---BEGIN OF YOUR PGP PUBLIC KEY ---END OF YOUR PGP PUBLIC KEY BLOCK---Reply-Block:
::
Anon-To: [email protected] ##
Subject: Your alt.anonymous.messages static subject line. Newsgroups: alt.anonymous.messages
**
Step 1. Since messages sent to you through you nym email address are going to be sent to the news group 'alt.anonymous.messages', you only have to rely on one level of encryption. Sending you messages to this news group makes it very easy to set up an nym. All you are going to have to do is make a few modifications to the code above. The code must be exactly written and spaced as above with no leading spaces.
A. Change the two 'IHide' above to the name you want to give to your nym email address. Do not make it the same name as your
[email protected] that you created in GnuPG Setup: / Step 3 above. There is a way to accidentally give yourself away if these names are the same.
B. Start WinPT.exe again if it is not running. Right click on the
'Windows Privacy Tray' tray icon and click on the 'Key Manager' menu item to bring up the Key Manager window. Next right click on the (public/private) key you generated for yourself earlier in GnuPG
Setup: / Step 3. Then click on the 'Copy Key to Clipboard' menu item. This will place your public key (doesn't including your private key) into the clipbboard.
C. Replace the two lines below found just under the 'Public-Key:' label with your public key that you have just copied into the clipboard. ---BEGIN OF YOUR PGP PUBLIC KEY
---END OF YOUR PGP PUBLIC KEY
D. If you are using nym.mixmin.net as you nym (see 'From: ' statement in code), then change the
Anon-To: [email protected] statement to Anon-To: [email protected]
E. Now choose a static 'Subject: ' line whereby you will be able to identify any message(s) on 'alt.anonymous.messages' that are sent to you through your nym. Anytime someone sends an email to your chosen nym address (example: [email protected]), you will be able to identify it by this static 'Subject: 'line because it will never change.
F. (See Step J next.) Now copy everything above, from the 'Config: ' statement through the ** (double asterisks), into the clipboard. Right click the 'Windows Privacy Tray' tray icon and click on the 'Clipboard' and the 'Sign and Encrypt' menu items. Check the check box next the key with the User ID of 'Bananasplit Pseudonym Server ...'. Then check the check box at the bottom left corner of the interface entitled 'Select key for signing' and choose the public/private key you created (in GnuPG Setup: / Step 3) from the dropdown box. A window will pop up requesting the password you chose to use in GnuPG Setup: / Step 3. After clicking 'OK', a new encrypted block will have been placed back into the clipboard.
G. Next you need to send this encrypted block to the nym to be
processed. You could send it directly to the nym, however, it would be best to never go near the nym yourself. This way no one would know that you had ever had anything to do with this or any other nym. A. If you want to send your encrypted block directly to the nym using your personal email client, simply paste the encrypted block into the message window and send it to: [email protected] with a subject of 'config'.
B. If you want to safely send your encrypted block to the nym through the remailer system, then the sample QuickSilver coding below should be sufficient. Host: smtp.myisp.net From: [email protected] Chain: *,*,*; copies=3 To: [email protected] Subject: config
You encrypted block here ~~
H. Now you are going to have to watch 'alt.anonymous.messages' for your 'static subject' line and wait for the conformation telling you that your new address has been created. Once you see a message, copy the encrypted block (do not include the two asterisks at the top) to the clipboard, right click the 'Windows Privacy Tray' tray icon and click on the 'Clipboard' and the 'Decrypt/Verify' menu items. a 'Decryption' window will appear where you will need to enter your password (see: GnuPG Setup: / Step 3). Disregard the error box message that always pops up. Your decrypted message is now in the clipboard and can be pasted into a word processor for viewing.
There will be a message in this confirmation informing you that you will have to send an enclosed confirmation email back to the nym before it can be actually used. The confirmation email address will look something like this:
Send an email to the above confirmation address. You could use 'confirm' as the subject. Again, it would best to send to the 'confirm' address through the remailer system with QuickSilver.
Host: smtp.myisp.net From: [email protected] Chain: *,*,*; copies=3
To: [email protected] Subject: confirm
can leave message blank ~~
I. You will again receive a message at 'alt.anonymous.messages' telling you that your nym address is ready to use. Now you can communicate with someone anonymously by sending messages through the remailer system using QuickSilver directly to their email address. After you have given them your nym email address, they can send email messages directly to you via 'alt.anonymous.messages'. You will decrypt your messages again as described in step H. There is a way for you to send messages to others through your nym, however, it is best to stay completely away from your nym, so it will not be explained here. If you were to ever send a message directly to your nym email address yourself, you could thereby be tied to it. The nym is strictly for the convenience of others to use to send you messages.
Note: All nyms keep track of the addresses that have been set up on their system to determine if they are being regularly used. If an nym address goes without use for a period of time (usually 90 days), the nym server will send out a message informing you that you are about to be deleted. To keep this from happening, send your own nym an email once a month. However, be sure you send the message through the remailer system using QuickSilver.
J. There is one more level of encryption you can install above that you may not find necessary, so it was left out until last. When you decrypt any messages as described in Step H, you will see that your nym email address immediately shows up in the GunPG window. Your nym email address is embedded within the encrypted messages that are send to you through your nym server and can be extracted by anyone for viewing (the reason for Step1-A above). To prevent this, you will have to add another, different secret string to a field and add this parameter to your config parameters. You must be able to remember this secret string to be able to decrypt your messages. Add this parameter just below the 'Anon-To:' line:
Now when you decrypt you message as described in Step H, you will have to decrypt it twice. The first time you will decrypt the encrypted message with 'your_secret_string'. After doing this decryption, GnuPG will place a new encrypted block into the clipboard. Then you will decrypt this second encrypted block with your password (see: GnuPG Setup: / Step 3).
End of Creating an Nym Setup section.
OmniMix and MesNews Preparation and Installation Section
I. Send messages to News Groups Anonymously through MesNews/OmniMix (The MesNews program can also be used to download and read news when combined with OmniMix.)
II. Send Anonymous Email Messages through the remailer system through MesNews/OmniMix
MesNews is the news and email agent that connects to OmniMix, and OmniMix is the encrypting / sending agent.
Purpose of this document: This document will attempt to explain through step by step instructions how to set up the following programs that will:
1. (read - not anonymous) and post anonymous messages to news groups; 2. send anonymous emails through the remailer system;
with the MesNews mail/news client through the OmniMix switchbox program.
Preparations:
Go to the links below and download the following programs:
www.mesnews.net
(Click on the flag identifying your language, click on the '.download' link on the left side of the page, and click the 'click here' button to download the
MesNews program. The download file should look something like: 'setup-mesnews-1.8.2.0.exe'.)
www.danner-net.de/om.htm
(Scroll down the main web page to the 'Downloads' section. Click on the link to the right of 'Latest versions of OmniMix'. It should look something like: 'OmniMix 1.5.6 (sig)(installer with all necessary binaries)'. [The signature (sig) that can be used to verify the file's authenticity can also be downloaded, however, verifying it is beyond the scope of these setup instructions.] Do not download any other files from the OmniMix site. All the necessary files are contained in the 'Latest versions of OmniMix' downloaded file. The
download file should look something like: 'OmniMix_1.5.6_Uno_Setup.exe'.) Note: It is important to keep up with new OmniMix versions.
Installations:
Step 1: Install MesNews by double clicking on the '.exe'. I like to keep all my encryption programs in a special folder called 'C:\Encryption\', however, it shouldn't make any difference where you install MesNews. Keep the programs in separate folders, however. You could use
'C:\Encryption\MesNews\' for the MesNews files.
Note: MesNews likes to put the downloaded news into a folder that is outside of the folder where MesNews is installed. I personally like to keep it in a folder within the MesNews folder as below. This suggestion will also help you more easily find these messages to clean them out. Cleaning out old messages will be covered later.
Step 2: Install OmniMix by double clicking on the '.exe'. Check everything as pictured below. You could use 'C:\Encryption\OmniMix\' for the OmniMix files. Note: Be sure to install and use the Tor and Mixmaster that come in the OmniMix setup. There are certain parameters and one program modification in the included Tor and Mixmaster that OmniMix must use to function properly.
Note: (It may also be necessary to install OmniMix outside the 'Program Files' folder on Vista for the program to work properly.)
End of program installation section.
The following instructions will show you how to set up:
MesNews and OmniMix Setup Section
OmniMix Setup:
Step 1. Logon to the internet. Start the OmniMix (OmniMix.exe) program. As you can see, there are many tabs on the program's interface. You will need to click on the required tab to get to the various fields that need modifying. Set the parameters as they appear in the examples below or according to instructions.
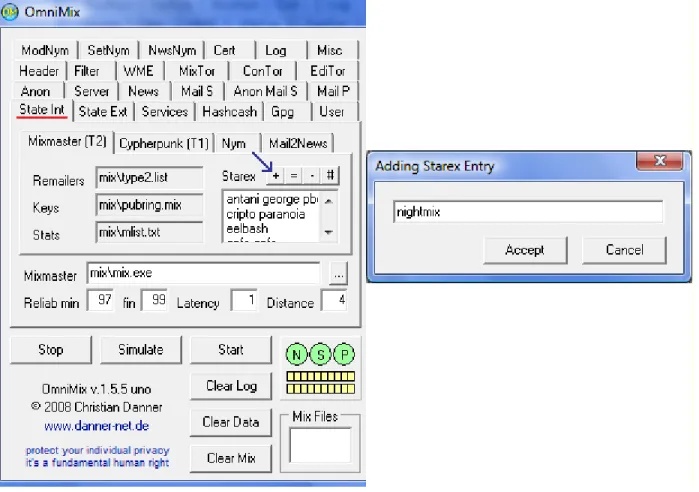
Step 2. Next click on the State Int tab and then the Mixmaster (T2) tab. A change to the parameters in the Starex box is suggested. Click on the + button and add 'nightmix'. If there is a problem with the results, click the # button to reset to the original parameters and start Step 2 over. No changes are necessary for the other sub tabs.
Step 3. Next click on the State Ext tab and then the Mixmaster (T2) tab and change it to the parameters displayed below. No changes are necessary for the other sub tabs. After setting the http addresses, click the
Update State Data button if it is enabled to force a statistics update. You will probably see some data being written in the window to the right of the tabs. Disregard the 'Finger error' messages on the log page.
http://pinger.bananasplit.info/type2.list http://pinger.bananasplit.info/pubring.mix http://pinger.bananasplit.info/mlist.html Suggested replacements: http://pinger.mixmin.net/type2.list http://pinger.mixmin.net/pubring.mix http://pinger.mixmin.net/mlist.txt http://stats.mixmaster.it/type2.list http://stats.mixmaster.it/pubring.mix http://stats.mixmaster.it/mlist.txt http://echolot.theremailer.net/type2.list http://echolot.theremailer.net/pubring.mix http://echolot.theremailer.net/mlist.txt http://anonymitaet-im-inter.net/echolot/type2.list http://anonymitaet-im-inter.net/echolot/pubring.mix http://anonymitaet-im-inter.net/echolot/mlist.txt http://www.tahina.priv.at/~cm/stats/type2.list http://www.tahina.priv.at/~cm/stats/pubring.mix http://www.tahina.priv.at/~cm/stats/mlist.txt http://stats.melontraffickers.com/type2.list http://stats.melontraffickers.com/mlist.txt http://stats.melontraffickers.com/pubring.mix
Note: The url addresses are addresses of what are called Pingers. These are sites that run these free services that are necessary to determine if individual remailers are up and running properly. The two groups of Pingers above have proven to be very reliable over a long time period and are recommended. This could change in the future, however, and this document will be updated if and when necessary. For now, use the bananasplit pinger as shown. If you have trouble with getting statistics downloaded, ask for advice in this news group:
Step 4. Next click on the User tab. Click on the OmniMix line to highlight it and then click the = button. Fill out the information as shown and click 'Accept'. (If there should not be an OmniMix line already present when you click the User tab, then create the line by clicking the + button.) Note: The 'Passwrd' is displayed in an encrypted form in the User tab.
Step 5. Next click on the Mail S tab. Type in your Internet Service Provider's smtp address¹ in the 'Host' box. If you do not know what the address is, you can usually find it through your ISP's support web page concerning email account/client setup. You might need to simply call them and ask what the smtp address is. You may also need to put in your 'User' (ID) and 'Passwd' (password). Even if you are connect directly to a cable modem, you will need to determine what these are from your ISP if you don't know them.
Note: your 'User' (ID) may be your short user ID (my-userid) or you might have to use your long user ID ([email protected]).
(¹ You might try smtp.my.internet.provider as your 'Host:' parameter. example: smtp.microsoft.com)
Further suggestions: Things can be different with different ISPs. If you still can not send messages after filling out the information in the above window, then try unchecking the 'Auth.' check box.
Note: You do not have to fill out the 'News' and 'Mail S' tabs. This way you can be assured that you are always using the anonymous mail smtp host ('Anon Mail S').
Step 6. Next clicking on the Server tab and set the parameters as displayed below. Be sure 'Ext.S.' is checked.
Note: N S P circles and background colors:
(N - News NNTP, S - Mail send SMTP, P - Mail receive POP3) When OmniMix is started, it starts in Start mode and displays the N S P circles in green. You can stop OmniMix by clicking the Stop button if desired (which will cause the N S P circles to become red), but stopping it should not be necessary. Note that when you change certain fields in some tabs, that OmniMix will cause the N S P
background to become red . If this happens, click the Start button to restart the servers in order to activate the new parameter.
Note: When a change to a parameter turns the N S P background red, it does not stop the server. The N S P background turns red just to indicate that the server needs to be restarted for the changes to be activated.
End of OmniMix setup section.
MesNews News Agent Setup :
Step 1. Start MesNews and click the upper left corner menu item: 'File' and then 'Settings'. Click on the necessary tab and set the fields therein as shown below:
Step 2. Next click on the menu item: 'Server' and 'New Server'. Set the fields therein to:
Step 3. Now you need to download all the news groups. Do this by right clicking on the 'Mixmin via OmniMix' line and then click 'Show newsgrouplist'.
Step 4. Clicking on 'Show newsgrouplist' will bring up the window below. After the list is built, go down and click on the group you desire to monitor. After clicking on a group, then click the 'Subscribe' button to subscribe to that group. After making all of your selections, click the 'Close' button at the bottom of the interface.
Step 5a. There is one final step that has to be done to each of the newsgroups you have chosen. Right click on each of the news group names and then click the 'Group Properties (unique.group.name)' menu item. This will bring up the window in Step 5b.
Step 5b. Type (or copy from below and paste) the information you see into the 'list box' window found in the 'Headers' tab, check the 'Download
headers + bodies' check box found in the 'Synchronization' tab, and then click 'Apply'. Again, this needs to be done for each news group that you choose in Step 4, so now go back to Step 5a and do the same for any additional news groups that you have selected.
O-Anon-Send: Yes O-Anon-From: Non O-Newsgate-Active: Yes O-Newsgate-Address: [email protected],[email protected],[email protected] O-Remailer-Chain: 0 0 0 0 O-Remailer-Copies: 4
Note: A word of caution here. It is important that you check 'Download headers + body's'. It is also important that you allow MesNews to download the headers and message bodies. If you were to prematurely click on a news item before MesNews had downloaded it, you could reveal that you were interested in that particular news message
because you would cause it to download out of sequence. (Be informed that some messages may automatically download out of sequence, but this is not a problem.)
With the 'Download headers + body's' setting checked, your computer could accumulate quite a large number of old news messages. It would be a good idea to delete these old messages from time to time. You can do this by searching for folders that are within your MesNews folder (see: 'Installations:', 'Step 1:', 'Note:') that contain the same name as your chosen news groups. Once these folders are located, you can then delete some or all of the files within. The file names will look something like this: '20081108-1.news'. Use the file dates to determine which ones to delete.
After setting these fields, click 'Apply'.
Step 6. This modification is not required, but will reduce the header information so that you only see two header fields above news messages. Find the 'Options of display...' button on the MesNews interface and click it, then click the 'Header' and 'Custom headers to display' menu items which will bring up the window below. Check the 'Sujet (Subject:)' and
'Message ID (Message-ID:)' check boxes only, and then click 'Apply'. Go back through and click the 'Options of display...' button and 'Header' menu and check the 'Custom headers' menu item. If you ever need to view all headers, you can simply click on the 'All headers' menu item.
After making these changes, click 'Apply'.
You should now be ready to use MesNews with OmniMix to view and answer news articles. Be sure that OmniMix is running when you start MesNews.
Note: There is an altered english language file shipped in the zip file with this Help. It makes a few changes so as to keep various lines from over running some of the control descriptions in the MesNews
interface. Backup the mesnews2.gb.lang file found in the 'Language' folder that is within the folder where MesNews was installed. Then replace the mesnews2.gb.lang with the same file shipped with this Help.
MesNews Email Setup:
Step 1. Click on the 'File' menu in the top left corner of the MesNews interface. Then click the 'Settings' menu item, then on the the Email tab, and set the parameters as shown below.
Note: These instructions pertaining to setting up the MesNews email client should apply to any other email client you might want to use.
After making these changes, click 'Apply'.
Now click on one of the news groups under your Mixmin via OmniMix Servers on the MesNews interface. This has to be done in order to get the news/mail creation window button to become enabled (upper left corner). The window will always come up to send to news groups. On the left side of the interface, you will see three vertical tabs: For+Mai, Mail, and Forum. Click the Mail tab and enter the receipent's email address, the subject, and the message to be sent through OmniMix to the remailers. Then click the 'Send (e-mail)' button.
Now experiment by sending yourself some emails through OmniMix. Remailer emails may take a few hours to reach their destination. End of MesNews setup section.
Gravity Preparation and Installation Section
I. Send messages to News Groups Anonymously through Gravity/OmniMix (The Gravity program can also be used to download and read news when combined with OmniMix. It cannot send email messages through the remailer system, however, as MesNews can.)
Purpose of this document: This document will attempt to briefly explain how to set up an additional free news client called Gravity. It is assumed that you have already downloaded, installed, and set up OmniMix as instructed in these sections:
MesNews with OmniMix - Preparations: Installations: OmniMix Setup:
Preparations:
Go to the link below and download the following program:
http://downloads.sourceforge.net/mpgravity
(Click on the latest build (Gravity 2.7.1 Build 4 as of 11-21-2008) to
download the Gravity program. The download file should look something like: 'setup-mpgravity-2.7.1b.4.exe'.)
Installation and Setup:
Step 1: Install Gravity by double clicking on the '.exe'. Step 2: Start OmniMix first.
Step 3: Start Gravity.
Step 4: In the 'MicroPlanet Gravity Server Setup' window, enter the following. Full name: anon
Organization: anon
e-mail address: [email protected]
Reply address for post: [email protected] Step 5: Then click on the Servers tab.
Step 6: News server nickname: Gravity Step 7: News server address: localhost Step 8: Check 'Log on using:'.
Step 9: Enter this line into the 'Name:' box without the quotes: "omnimix;ht=news.mixmin.net;pt=119;tl=e;to=no" Step 10: Enter this into the 'Password:' box: omnimix
Step 11: Click 'OK'.
Step 12: You should then see Gravity 'Receiving news group names' at the bottom of the program interface. Wait until it acquires these and the 'Subscribe to Newsgroup' window pops up. Then scroll down to the various news groups you want to subscribe to, click on the line, and then click the 'Add' button. There is a convenient search box in the top right corner to use also. After you have selected all of your groups, it is then very important that you highlight each news group in the 'Selected Groups:' window and then select 'save article bodies' from the 'Storage Mode:' drop down box (you can select them all at once by clicking the top line, hold down the shift key, and then press the end key). After selecting your news group(s), click 'Done'.
Step 13: Now right click on each new group you have selected and click the 'Properties...' menu item. Then click the 'Overrides' tab, check the 'Override custom headers' check box, and type or paste the following into the 'Custom headers' box:
O-Anon-Send: Yes O-Anon-From: Non O-Newsgate-Active: Yes O-Newsgate-Address: [email protected],[email protected],[email protected] O-Remailer-Chain: 0 0 0 0 O-Remailer-Copies: 4
Then click 'OK' and do this again for any remaining news groups you have chosen.
Step 14: Now double click on a news group line under 'Newsgroups' to start the news group download.
End of Gravity installation section.
OmniMix with Tor Setup Section
I. Receive and Send Messages to News Groups Completely Anonymously Through MesNews with OmniMix in Tandem with Tor
Purpose of this document: This document will attempt to explain how to set up the news agent MesNews to be used with OmniMix in tandem with Tor. It is assumed that you have already downloaded these programs as instructed in this section:
MesNews with OmniMix -Preparations: Installations:
(Note: There is a short note containing instructions for the Gravity news client.)
MesNews News Agent Modification:
There is one modification to the MesNews parameters that needs to be made. Step 1. Click on the menu item: 'Server' and 'New Server' menu item. Set the 'Login' fields therein to:
omnimix;ht=news.mixmin.net;pt=119;tl=e;to=5
With the exception of the above 'Login' string, set all other MesNews parameters according to the instructions found in the 'MesNews with OmniMix' / 'MesNews News Agent Setup:' section.
OmniMix Modifications:
Note: OmniMix can be installed multiple times. It may be easier to install and use a separate installation of OmniMix to use with Tor. This will keep you from having to make any modifications to OmniMix to switch in and out of Tor. Set up OmniMix to use with Tor by going through the examples below and setting the parameters identical to those in the graphics.
Step 1. Click on each line in the list box to highlight them, click on the '=' button, and set the Tor parameter as shown below.
Step 2.
Step 3.
Step 4. It is important that the 'Authent.' dropdown box be set to 'Cookies'.
After making the above modifications, close OmniMix and then restart it. Upon starting, you will see the Tor window appear and begin to set up a circuit. Once you see the message ending with '...circuit built!', you should be ready to open your news client and begin downloading news messages through OmniMix through a Tor circuit. All Tor messages in OmniMix will be displayed under the 'Tor' tab on the right side of the OmniMix interface. Using OmniMix with Tor should be quite secure, however, it will be slower in operation.
End of OmniMix with Tor modification section.
Communicating Anonymously
There are occasions when people might need to communicate anonymously with others, such as a woman who has had to go into hiding from an abusive mate and needs some ability to communicate with other family members. A good way to communicate anonymously is through the use of a newsgroup called 'alt.anonymous-messages'. This news group can be easily used as a drop box for messages. Parties can send messages to this group through QuickSilver. The parties would use the same 'Subject: ' line (with possibly slights variations) in order to easily identify their communication headers. Messages sent to
'alt.anonymous.messages' will have to be encrypted before being sent to the news group so that others will not be able to read your messages.
Below are two free encryption programs that can be easily set up and used to encrypt your messages.
EMail-Security using GnuPG for Windows http://www.gpg4win.org/
(Click the Download picture at the top of the page. Read the instructions on setting up the program and its use. Use the tray program WinPT.exe that comes with GnuPG to easily encrypt your data.)
PointCrypt (Blowfish 64 – strong but not as strong as the GnuPG.) http://cdn.simtel.net/pub/simtelnet/win95/secencr/PointCrypt.zip
A last note concerning communicating anonymously with the police. If you found this to be absolutely necessary, you could ascertain the email address of the police department involved through the web or by pay phone, and send them an email through the remailer system that contained the information you wanted to convey. At the bottom of the email, you could include a password and a 'Subject: ' of your making, and ask the police to contact you, if necessary, by sending their reply to the news group 'alt.anonymous-messages'. Ask them to use a particular 'Subject: ' and give them a password which they are to use to encrypt their reply, using one of the two encryption programs mentioned above. You would then continue to communicate with them through the remailer system while continuing to receive their replies via 'alt.anonymous-messages'.
¹At the bottom of your initial remailer email to the police, you could write: Please send any replies to the news group: alt.anonymous-messages Make your Subject line: whatever you decide
Encrypt your message with either of these programs: http://www.gpg4win.org
http://cdn.simtel.net/pub/simtelnet/win95/secencr/PointCrypt.zip
Use conventional (symmetrical) encryption using password: whatever you decide ¹(An alternate to this would be to create an nym as instructed under the title 'Pseudo-anonymous Email' in this help.)
For further help with setting up these programs, or any questions concerning anonymous email, anonymous news posting, and remailers, inquire at the news group: alt.privacy.anon-server
End of Communicating Anonymously section.
Hints and Tricks
1. To turn off the hints in OmniMix, go to the 'Misc' tab and then the 'Display' tab and set 'Hint Display Interval [s]' to 0 (zero).
2. QuickSilver error - 'can't load mixlib.dll': This is most likely
being caused as a result of Mixmaster having been installed twice on a computer and then the first Mixmaster installation has been subsequently deleted. When Mixmaster is first installed, it makes a registry entry that points to the folder wherein it is installed. If this installation is deleted and a new installation of Mixmaster is installed into a folder that is different from the folder the first Mixmaster was installed
in, Mixmaster does not change the original registry entry.
This causes any program (QuickSilver) that is trying to use the registry to find the location of Mixmaster, to not be able to locate it. Three fixes for this problem follow:
1. Use Regedit.exe to find where the Mixmaster registry entry says Mixmaster is located. The registry entry is located at HKEY_CURRENT_USER\Software\Mixmaster\MixDir.
Then create a folder corresponding to where this entry is pointing and move your Mixmaster files from within the current Mixmaster folder to there.
2. Use Regedit.exe to find where the Mixmaster registry entry says Mixmaster is located. The registry entry is located at HKEY_CURRENT_USER\Software\Mixmaster\MixDir. Change the path in the MixDir key name to the correct path wherein Mixmaster is actually located.
3. As a last resort, Delete the Mixmaster folder, the Mixmaster registry key, and reinstall Mixmaster.
Log of Changes to this document
:
New in version 1.2.41. QS and MN with Stunnel
MesNews Setup: (major corrections below) Step 2: - pictured information changed. Step 3: - first pictured information changed. Step 4: - text and pictured information changed. Step 5: - pictured information changed.
Step 6a: - pictured information changed.
2. MesNews with OmniMix
OmniMix Setup: Step 3: - step changed.
Step 5: - deleted, subsequent steps renumbered. MesNews News Agent Setup :
Step 1: - pictured information changed. MesNews Email Setup:
Step 1: - 'Technical note:' deleted.
3. Gravity with OmniMix
Installation and Setup: Step 4: - step changed.
New in version 1.2.3
1. Pseudo-anonymous Email
Nym Creation:
Step 1 A: - step changed.
New in version 1.2.2
1. QuickSilver
Stunnel Setup:
Step 1: - note added at bottom.
2. Hints and Tricks
New in version 1.2.1
1. Pseudo-anonymous Email
Nym Creation: Step J: - step added.
New in version 1.2.0
1. Inconsequential corrections.
New in version 1.1.9
1.QuickSilver
Step 10: - step added.
2. Pseudo-anonymous Email
Installations:
Step 2: - step added. Nym Creation:
Step 1H: - step changed. Step 1
I
: - step changed.New in version 1.1.8
1.Preface
Modified information.
2. Pseudo-anonymous Email
New in version 1.1.7
1.Preface
New information.
2. QS and MN with Stunnel
Completely new section.
3. MesNews with OmniMix
A. OmniMix and MesNews Preparation and Installation Section
Installations:
Step 1: - additional information added.
B. MesNews and OmniMix Setup Section
1. OmniMix Setup:
Step 5: - step changed. Step 6: - step added.
2. MesNews News Agent Setup :
Step 5b: - additional information added to step end. 3. MesNews Mail Agent Setup:
Completely new section.
4. Gravity with OmniMix
Completely new section.
5. OmniMix with Tor
Completely new section.
6. Change Log
Completely new section.
7. Disclaimer
Completely new section.
New in version 1.1.6
1. MesNews with OmniMix
MesNews and OmniMix Setup Section MesNews Setup:
Step 6: - step added.
End of Change Log section.
Disclaimer of Warranty
This documentation is provided solely "as is" and without warranty of any kind. The author specifically disclaims all warranties, expressed or implied, including, but not limited to, implied
warranties of function and fitness for any particular purpose with respect to defects in the documentation. Disclaimer
This documentation is distributed as freeware. It may not be sold in any way without the knowledge of the author. You may distribute this documentation in any way without the knowledge and permission of the author as long as it is not altered. All rights are reserved. Use this documentation at your own risk. The author cannot be held responsible for any damage done by this documentation. By downloading and using this documentation you agree with this disclaimer.
This documentation does not use or alter the registry in any way. (However, your operating system may automatically make an entry in the registry for every program that is installed.)
End of Disclaimer section.