L
A
TEX for Beginners
Workbook
Edition 5, March 2014
Document Reference: 3722-2014
Preface
This is an absolute beginners guide to writing documents in LATEX using
TeXworks. It assumes no prior knowledge of LATEX, or any other computing
language.
This workbook is designed to be used at the ‘LATEX for Beginners’ student
iSkills seminar, and also for self-paced study. Its aim is to introduce an absolute beginner to LATEX and teach the basic commands, so that they can
create a simple document and find out whether LATEX will be useful to them.
If you require this document in an alternative format, such as large print, please email [email protected].
Copyright cIS 2014
Permission is granted to any individual or institution to use, copy or redis-tribute this document whole or in part, so long as it is not sold for profit and provided that the above copyright notice and this permission notice appear in all copies.
Where any part of this document is included in another document, due ac-knowledgement is required.
Contents
1 Introduction 1
1.1 What is LATEX? . . . . 1
1.2 Before You Start . . . 2
2 Document Structure 3 2.1 Essentials . . . 3 2.2 Troubleshooting . . . 5 2.3 Creating a Title . . . 5 2.4 Sections . . . 6 2.5 Labelling . . . 7 2.6 Table of Contents . . . 8 3 Typesetting Text 11 3.1 Font Effects . . . 11 3.2 Coloured Text . . . 11 3.3 Font Sizes . . . 12 3.4 Lists . . . 13
3.5 Comments & Spacing . . . 14
3.6 Special Characters . . . 15 4 Tables 17 4.1 Practical . . . 18 5 Figures 21 5.1 Practical . . . 22 6 Equations 23 6.1 Inserting Equations . . . 23 6.2 Mathematical Symbols . . . 24 6.3 Practical . . . 26 7 Inserting References 27
7.1 Introduction . . . 27
7.2 The BibTeX file . . . 27
7.3 Inserting the bibliography . . . 28
7.4 Citing references . . . 29
7.5 Styles . . . 29
7.6 Practical . . . 30
Chapter 1
Introduction
1.1
What is L
ATEX?
LATEX (pronounced lay-tek) is a document preparation system for producing
professional-looking documents, it isnota word processor. It is particularly suited to producing long, structured documents, and is very good at type-setting equations. It is available as free software for most operating systems. LATEX is based on TEX, a typesetting system designed by Donald Knuth in
1978 for high quality digital typesetting. TEX is a low-level language that computers can work with, but most people would find difficult to use; so LATEX has been developed to make it easier. The current version of LATEX is
LATEX2e.
If you are used to producing documents with Microsoft Word, you will find that LATEX is a very different style of working. Microsoft Word is ‘What You
See Is What You Get’ (WYSIWYG), this means that you see how the final document will look as you are typing. When working in this way you will probably make changes to the document’s appearance (such as line spacing, headings, page breaks) as you type. With LATEX you do not see how the final
document will look while you are typing it — this allows you to concentrate on the content rather than appearance.
A LATEX document is a plain text file with a .tex file extension. It can be typed
in a simple text editor such as Notepad, but most people find it is easier to use a dedicated LATEX editor. As you type you mark the document structure
(title, chapters, subheadings, lists etc.) with tags. When the document is finished you compile it — this means converting it into another format. Several different output formats are available, but probably the most useful
is Portable Document Format (PDF), which appears as it will be printed and can be transferred easily between computers.
1.2
Before You Start
The following conventions are used throughout this workbook:
• Actions for you to carry out are bulleted with an arrow ò.
• Text you type is written in this font.
• Menu commands and button names are shown in bold.
Although the code in this workbook should work in any LATEX editor, specific
Chapter 2
Document Structure
2.1
Essentials
ò Start TeXworks.A new document will automatically open.
ò Go to the Format menu and select Line Numbers.
Line numbers are not essential, but will make it easier to compare your code with the screenshots and find errors.
ò Go to the Format menu and select Syntax Coloring, then LaTeX. Syntax colouring will highlight commands in blue and can make it easier to spot mistakes.
ò Type the following:
\documentclass[a4paper,12pt]{article}
\begin{document}
A sentence of text.
The \documentclass command must appear at the start of every LATEX
document. The text in the curly brackets specifies the document class. The
article document class is suitable for shorter documents such as journal articles and short reports. Other document classes includereport(for longer documents with chapters, e.g. PhD theses), proc (conference proceedings),
bookandslides. The text in the square brackets specifies options — in this case it sets the paper size to A4 and the main font size to 12pt.
The \begin{document} and \end{document} commands enclose the text and commands that make up your document. Anything typed before\begin {document} is known as the preamble, and will affect the whole document. Anything typed after \end{document} is ignored.
The empty lines aren’t necessary1, but they will make it easier to navigate
between the different parts of the document as it gets longer.
ò Click on theSave button.
ò Create a new folder calledLaTeX courseinLibraries>Documents.
ò Name your document Doc1 and save it as a TeX document in this folder.
It is a good idea to keep each of your LATEX documents in a separate folder
as the compiling process creates multiple files.
ò Make sure the typeset menu is set topdfLaTeX.
ò Click on theTypeset button.
There will be a pause while your document is being converted to a PDF file. When the compiling is complete TeXworks’ PDF viewer will open and display your document. The PDF file is automatically saved in the same folder as the .tex file.
1See section 3.5 on page 14 for information about how LA
TEX deals with empty space in the .tex file.
2.2
Troubleshooting
If there is an error in your document and TeXworks cannot create the PDF theTypesetbutton will change to red with a white X (Abort typesetting
button) and theConsole outputat the bottom of the screen will stay open. If this happens:
ò Click on theAbort typesetting button.
ò Read the Console output - the last line will probably include a line number and the command that caused the error.
ò Go to the line number in your document and fix the error.
ò Click on theTypeset button again.
2.3
Creating a Title
The \maketitle command creates a title. You need to specify the title of the document. If the date is not specified today’s date is used. Author is optional.
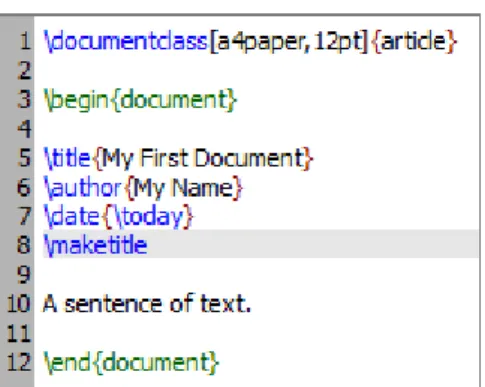
ò Type the following directly after the \begin{document} command:
\title{My First Document} \author{My Name}
\date{\today} \maketitle
Your document should now look like figure 2.1.
ò Click on theTypeset button and check the PDF. Points to note:
• \today is a command that inserts today’s date. You can also type in a different date, for example\date{November 2013}.
• Article documents start the text immediately below the title on the same page. Reports put the title on a separate page (like this work-book).
Figure 2.1: TeXworks screenshot showing the maketitle command.
2.4
Sections
You should divide your document into chapters (if needed), sections and sub-sections. The following sectioning commands are available for the article
class: • \section{...} • \subsection{...} • \subsubsection{...} • \paragraph{...} • \subparagraph{...}
The title of the section replaces the dots between the curly brackets. With the report and book classes we also have \chapter{...}.
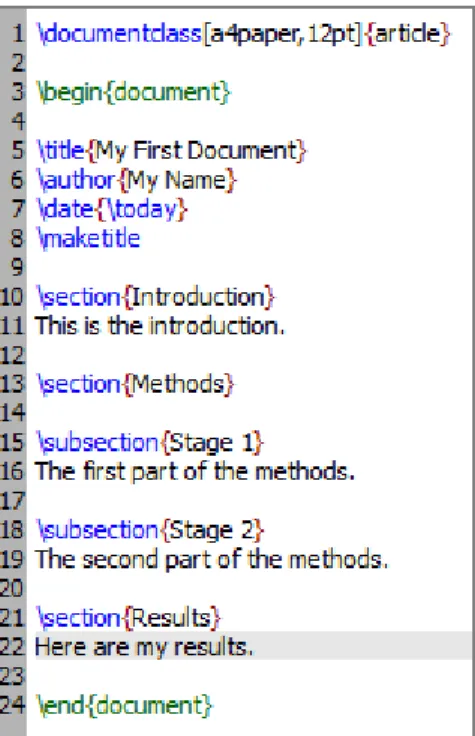
ò Replace “A sentence of text.” with the following:
\section{Introduction} This is the introduction.
\section{Methods}
\subsection{Stage 1}
\subsection{Stage 2}
The second part of the methods.
\section{Results} Here are my results.
Your document should now look like figure 2.2.
Figure 2.2: TeXworks screenshot of document with sections.
ò Click on theTypeset button and check the PDF.
2.5
Labelling
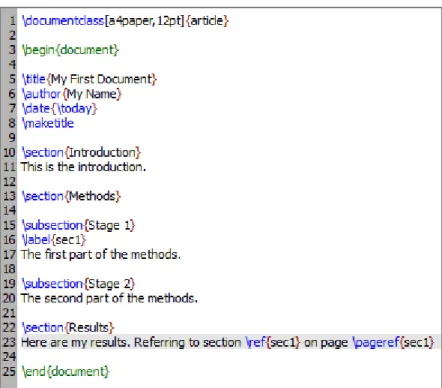
You can label any of the sectioning commands so they can be referred to in other parts of the document. Label the section with \label{labelname}. Then type \ref{labelname} or \pageref{labelname}, when you want to refer to the section or page number of the label.
ò TypeReferring to section \ref{sec1} on page \pageref{sec1}
in theResults section.
Your document should now look like figure 2.3.
Figure 2.3: TeXworks screenshot of document with labels.
ò Click on the Typeset button and check the PDF. You may need to typeset the document twice before the references appear in the PDF.
2.6
Table of Contents
If you use sectioning commands it is very easy to generate a table of contents. Type\tableofcontentswhere you want the table of contents to appear in your document — often directly after the title page.
You may also want to change the page numbering so that roman numerals (i, ii, iii) are used for pages before the main document starts. This will also ensure that the main document starts on page 1. Page numbering can be switched between arabic and roman using \pagenumbering{...}.
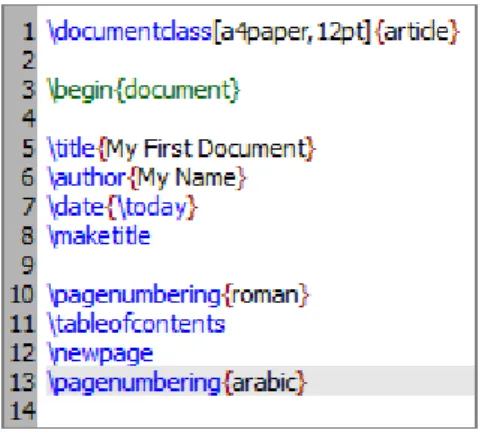
ò Type the following on a new line below \maketitle:
\pagenumbering{roman} \tableofcontents \newpage
\pagenumbering{arabic}
The\newpagecommand inserts a page break so that we can see the effect of the page numbering commands. The first 14 lines of code should now look like figure 2.4.
Figure 2.4: TeXworks screenshot of document showing table of contents com-mand.
Chapter 3
Typesetting Text
3.1
Font Effects
There are LATEX commands for a variety of font effects:
\textit{words in italics} words in italics
\textsl{words slanted} words slanted
\textsc{words in smallcaps} words in smallcaps \textbf{words in bold} words in bold
\texttt{words in teletype} words in teletype \textsf{sans serif words} sans serif words \textrm{roman words} roman words
\underline{underlined words} underlined words
ò Add some more text to your document and experiment with different text effects.
3.2
Coloured Text
To put coloured text in your document you need to use a package. There are many packages that can be used with LATEX to enhance its functionality.
Packages are included in the preamble (i.e. before the \begin{document}
command). Packages are activated using the\usepackage[options]{package}
command, where packageis the name of the package and optionsis an op-tional list of keywords that trigger special features in the package.
The basic colour names that \usepackage{color} knows about are black, red, green, blue, cyan, magenta, yellow and white:
Red, green, blue,cyan,magenta, yellow and white. The following code to produces coloured text:
{\color{colour_name}text}
Wherecolour_nameis the name of the colour you want, andtextis the text you want to be coloured.
ò Type\usepackage{color} on the line before\begin{document}.
ò Type{\color{red}fire} in your document.
ò Click on theTypeset button and check the PDF. The word ‘fire’ should appear in red.
It is possible to add options that allow\usepackage{color} to understand more colour names, and even to define your own colours. It is also possible to change the background colour of text (as for white and yellow in the example above), but this is beyond the scope of this workbook. If you want more information about see the Colors chapter in the LATEX Wikibook1.
3.3
Font Sizes
There are LATEX commands for a range of font sizes:
{\tiny tiny words} tiny words
{\scriptsize scriptsize words} scriptsize words
{\footnotesize footnotesize words} footnotesize words
{\small small words} small words
{\normalsize normalsize words} normalsize words
{\large large words}
large words
{\Large Large words}
Large words
{\LARGE LARGE words}
LARGE words
{\huge huge words}
huge words
1
ò Experiment with different font sizes in your document.
3.4
Lists
LATEX supports two types of lists: enumerateproduces numbered lists, while
itemize is for bulleted lists. Each list item is defined by \item. Lists can be nested to produce sub-lists.
ò Type the following to produce a numbered list with a bulleted sub-list:
\begin{enumerate} \item First thing \item Second thing \begin{itemize} \item A sub-thing
\item Another sub-thing \end{itemize}
\item Third thing \end{enumerate}
ò Click on theTypeset button and check the PDF. The list should look like this:
1. First thing 2. Second thing
• A sub-thing
• Another sub-thing 3. Third thing
It is easy to change the bullet symbol using square brackets after the \item, for example,\item[-]will give a dash as the bullet. You can even use words as bullets, for example, \item[One].
\begin{itemize} \item[-] First thing \item[+] Second thing \begin{itemize}
\item[Fish] A sub-thing
\item[Plants] Another sub-thing \end{itemize}
\item[Q] Third thing \end{itemize}
Produces:
- First thing + Second thing
Fish A sub-thing Plants Another sub-thing
Q Third thing
3.5
Comments & Spacing
Comments are created using %. When LATEX encounters a % character while
processing a .tex file, it ignores the rest of the line (until the [Return] key has been pressed to start a new line — not to be confused with line wrapping in your editor). This can be used to write notes in the input file which will not show up in the printed version.
The following code:
It is a truth universally acknowledged% Note comic irony in the very first sentence
, that a single man in possession of a good fortune, must be in want of a wife.
Produces:
It is a truth universally acknowledged, that a single man in pos-session of a good fortune, must be in want of a wife.
Multiple consecutive spaces in LATEX are treated as a single space. Several
empty lines are treated as one empty line. The main function of an empty line in LATEX is to start a new paragraph. In general, LATEX ignores blank
lines and other empty space in the .tex file. Two backslashes (\\) can be used to start a new line.
ò Experiment with putting comments and blank lines in to your docu-ment.
If you want to add blank space into your document use the \vspace{...}
command. This will add blank vertical space of a height specified in typo-graphical points (pt). For example,\vspace{12pt}will add space equivalent to the height of a 12pt font.
3.6
Special Characters
The following symbols are reserved characters which have a special meaning in LATEX:
# $ % ^ & _ { } ~ \
All of these apart from the backslash\ can be inserted as characters in your document by adding a prefix backslash:
\# \$ \% \^{} \& \_ \{ \} \~{}
Note that you need to type a pair of curly brackets {} after the hat ^ and tilde ~, otherwise these will appear as accents over the following character. For example, “\^ e” produces “ˆe”.
The above code will produce:
# $ % ˆ & { } ˜
The backslash character \ can not be entered by adding a prefix backslash,
\\, as this is used for line breaking. Use the \textbackslash command instead.
ò Type code to produce the following sentence in your document: Item #1A\642 costs $8 & is sold at a ˜10% profit.
Chapter 4
Tables
The tabular command is used to typeset tables. By default, LATEX tables
are drawn without horizontal and vertical lines — you need to specify if you want lines drawn. LATEX determines the width of the columns automatically.
This code starts a table:
\begin{tabular}{...}
Where the dots between the curly brackets are replaced by code defining the columns:
• l for a column of left-aligned text (letter el, not number one).
• r for a column of right-aligned text.
• c for a column of centre-aligned text.
• | for a vertical line.
For example, {lll} (i.e. left left left) will produce 3 columns of left-aligned text with no vertical lines , while{|l|l|r|}(i.e. |left|left|right|) will produce 3 columns — the first 2 are left-aligned, the third is right-aligned, and there are vertical lines around each column.
The table data follows the \begin command:
• & is placed between columns.
• \hline inserts a horizontal line.
• \cline{1-2} inserts a partial horizontal line between column 1 and column 2.
The command \end{tabular} finishes the table. Examples of tabular code and the resulting tables:
\begin{tabular}{|l|l|} Apples & Green \\ Strawberries & Red \\ Oranges & Orange \\ \end{tabular}
\begin{tabular}{rc} Apples & Green \\ \hline
Strawberries & Red \\ \cline{1-1}
Oranges & Orange \\ \end{tabular} \begin{tabular}{|r|l|} \hline 8 & here’s \\ \cline{2-2} 86 & stuff \\ \hline \hline 2008 & now \\ \hline \end{tabular} Apples Green Strawberries Red Oranges Orange Apples Green Strawberries Red Oranges Orange 8 here’s 86 stuff 2008 now
4.1
Practical
ò Write code to produce the following tables: Item Quantity Price ($)
Nails 500 0.34
Wooden boards 100 4.00 Bricks 240 11.50
Year
City 2006 2007 2008 London 45789 46551 51298 Berlin 34549 32543 29870 Paris 49835 51009 51970
Chapter 5
Figures
This chapter describes how to insert an image in to your LATEX document,
which requires the graphicx package. Images should be PDF, PNG, JPEG or GIF files. The following code will insert an image called myimage:
\begin{figure}[h] \centering \includegraphics[width=1\textwidth]{myimage} \caption{Here is my image} \label{image-myimage} \end{figure}
[h]is the placement specifier. hmeans put the figure approximately here (if it will fit). Other options aret (at the top of the page), b (at the bottom of the page) and p (on a separate page for figures). You can also add !, which overrides the rule LATEX uses for choosing where to put the figure, and makes
it more likely it will put it where you want (even if it doesn’t look so good).
\centeringcentres the image on the page, if not used images are left-aligned by default. It’s a good idea to use this as the figure captions are centred.
includegraphics{...}is the command that actually puts the image in your document. The image file should be saved in the same folder as the .tex file.
[width=1\textwidth] is an optional command that specifies the width of the picture - in this case the same width as the text. The width could also be given in centimeters (cm). You could also use [scale=0.5]which scales the image by the desired factor, in this case reducing by half.
\caption{...}defines a caption for the figure. If this is used LATEX will add
“Figure” and a number before the caption. If you use captions, you can use
\listoffigures to create a table of figures in a similar way to the table of contents (section 2.6, page 8).
\label{...} creates a label to allow you to refer to the table or figure in your text (section 2.5, page 7).
5.1
Practical
ò Add\usepackage{graphicx} in the preamble of your document (be-fore the\begin{document} command).
ò Find an image and save a copy to yourLaTeX course folder.
ò Type the following text at the point where you want your image in-serted:
\begin{figure}[h!] \centering
\includegraphics[width=1\textwidth]{ImageFilename} \caption{My test image}
\end{figure}
ReplaceImageFilename with the name of your image file, excluding the file extension. If there are any spaces in the file name enclose it in quotation marks, for example"screen 20".
Chapter 6
Equations
One of the main reasons for writing documents in LATEX is because it is really
good at typesetting equations. Equations are written in ‘math mode’.
6.1
Inserting Equations
You can enter math mode with an opening and closing dollar sign $. This can be used to write mathematical symbols within a sentence — for example, typing $1+2=3$produces 1 + 2 = 3.
If you want a “displayed” equation on its own line use $$...$$. For example, $$1+2=3$$ produces:
1 + 2 = 3
For a numbered displayed equation, use\begin{equation}...\end{equation}. For example, \begin{equation}1+2=3\end{equation} produces:
1 + 2 = 3 (6.1)
The number 6 refers to the chapter number, this will only appear if you are using a document class with chapters, such as report.
Use \begin{eqnarray}...\end{eqnarray} to write equation arrays for a series of equations/inequalities. For example —
a & = & b + c \\ & = & y - z \end{eqnarray} Produces: a = b+c (6.2) = y−z (6.3)
For unnumbered equations add the star symbol * after the equation or
eqnarraycommand (i.e. use {equation*}or {eqnarray*}).
6.2
Mathematical Symbols
Although some basic mathematical symbols (+ - = ! / ( ) [ ] :) can be accessed directly from the keyboard, most must be inserted using a command. This section is a very brief introduction to using LATEX to produce
mathe-matical symbols — the Mathematics chapter in the LATEX Wikibook is an
excellent tutorial on mathematical symbol commands, which you should refer to if you want to learn more. If you want to find the command for a specific symbol try Detexify1, which can recognise hand drawn symbols.
6.2.1
Powers & Indices
Powers are inserted using the hat ^ symbol. For example, $n^2$ produces
n2.
Indices are inserted using an underscore_. For example,$2_a$ produces 2a.
If the power or index includes more than one character, group them using curly brackets {...}, e.g. $b_{a-2}$ produces ba−2.
6.2.2
Fractions
Fractions are inserted using \frac{numerator}{denominator}.
1
$$\frac{a}{3}$$ produces:
a
3 Fractions can be nested —
$$\frac{y}{\frac{3}{x}+b}$$ produces:
y
3
x +b
6.2.3
Roots
Square root symbols are inserted using\sqrt{...}where...is replaced by the square root content. If a magnitude is required it can be added using optional square brackets[...].
$$\sqrt{y^2}$$ produces: q y2 $$\sqrt[x]{y^2}$$ produces: x q y2
6.2.4
Sums & Integrals
The command \sum inserts a sum symbol; \int inserts an integral. For both functions, the upper limit is specified by a hat ˆ and the lower by an underscore .
$$\sum_{x=1}^5 y^z$$produces:
5 X x=1 yz $$\int_a^b f(x)$$ produces: Z b a f(x)
6.2.5
Greek letters
Greek letters can be typed in math mode using the name of the letter pre-ceded by a backslash \. Many Greek capital letters are used in the Latin
alphabet — for those that are different capitalise the first letter of the name to produce a capital Greek letter.
For example — $\alpha$= α $\beta$= β $\delta, \Delta$= δ,∆ $\theta, \Theta$= θ,Θ $\mu$ =µ $\pi, \Pi$ =π,Π $\sigma, \Sigma$= σ,Σ $\phi, \Phi$= φ,Φ $\psi, \Psi$= ψ,Ψ $\omega, \Omega$= ω,Ω
6.3
Practical
ò Write code to produce the following equations:
e=mc2 (6.1) π= c d (6.2) d dxe x =ex (6.3) d dx Z ∞ 0 f(s)ds =f(x) (6.4) f(x) =X i = 0∞f (i)(0) i! x i (6.5) x= rx i z y (6.6)
Chapter 7
Inserting References
7.1
Introduction
LATEX includes features that allow you to easily cite references and create
bibliographies in your document. This document will explain how to do this using a separate BibTeX file to store the details of your references.
7.2
The BibTeX file
Your BibTeX file contains all the references you want to cite in your docu-ment. It has the file extension .bib. It should be given the same name as and kept in the same folder as your .tex file. The .bib file is plain text - it can be edited using Notepad or your LATEX editor (e.g. TeXworks). You should
enter each of your references in the BibTeX file in the following format:
@article{ Birdetal2001,
Author = {Bird, R. B. and Smith, E. A. and Bird, D. W.}, Title = {The hunting handicap: costly signaling in human foraging strategies},
Journal = {Behavioral Ecology and Sociobiology}, Volume = {50},
Pages = {9-19}, Year = {2001} }
Each reference starts with the reference type (@article in the example above). Other reference types include @book, @incollection for a chapter in an edited book and @inproceedings for papers presented at conferences1.
The reference type declaration is followed by a curly bracket, then the ci-tation key. Each reference’s citation key must be unique - you can use anything you want, but a system based on the first author’s name and year (as in the example above) is probably easiest to keep track of.
The remaining lines contain the reference information in the format
Field name = {field contents},.
You need to include LaTeX commands in your BibTeX file for any special text formatting - e.g. italics (\emph{Rattus norvegicus}), quotation marks (‘‘...’’), ampersand (\&).
Surround any letters in a journal article title that need to be capitalised with curly brackets {...}. BibTeX automatically uncapitalises any capital letters within the journal article title. For example, “Dispersal in the con-temporary United States” will be printed as “Dispersal in the concon-temporary united states”, but “Dispersal in the contemporary{U}nited {S}tates” will be printed as “Dispersal in the contemporary United States”.
You can type the BibTeX file yourself, or you can use reference management software such as EndNote to create it2 .
7.3
Inserting the bibliography
Type the following where you want the bibliography to appear in your doc-ument (usually at the end):
\bibliographystyle{plain} \bibliography{Doc1}
Where references is the name of your .bib file.
1See the Bibliography Management chapter in the LaTeX Wikibook
http://en. wikibooks.org/wiki/LaTeX/Bibliography_Management for a full list of the reference types that BibTeX knows about, and their required and optional fields.
2Instructions for using EndNote with LaTeX are available on the HowTo wiki
https: //www.wiki.ed.ac.uk/x/sZpKBg
7.4
Citing references
Type \cite{citationkey} where you want to cite a reference in your .tex document. If you don’t want an in text citation, but still want the reference to appear in the bibliography, use\nocite{citationkey}.
To include a page number in your in-text citation put it in square brackets before the citation key: \cite[p. 215]{citationkey}.
To cite multiple references include all the citation keys within the curly brack-ets separated by commas: \cite{citation01,citation02,citation03}.
7.5
Styles
7.5.1
Numerical citations
LATEX comes with several styles with numerical text citations, these
in-clude:
Plain The citation is a number in square brackets (e.g. [1]). The bibliog-raphy is ordered alphabetically by first author surname. All of the authors’ names are written in full.
Abbrv The same asplain except the authors’ first names are abbreviated to an initial.
Unsrt The same as plainexcept the references in the bibliography appear in the order that the citations appear in the document.
Alpha The same as plain except the citation is an alphanumeric abbrevi-ation based on the author(s) surname(s) and year of publicabbrevi-ation, surrounded by square brackets (e.g. [Kop10]).
7.5.2
Author-date citations
Use thenatbibpackage if you want to include author-date citations. Natbib uses the command \citep{...} for a citation in brackets (e.g. [Koppe,
2010]) and \citet{...} for a citation where only the year is in brackets (e.g. Koppe [2010]). There are lots of other ways that you can modify citations when using the natbib package - see the package’s reference sheet for full details3.
Natbib comes with three bibliography styles: plainnat, abbrvnatand un-srtnat. These format the bibliography in the same way as theplain,abbrv
and unsrt styles, respectively.
7.5.3
Other bibliography styles
If you want to use a different style (e.g. one provided by the journal you are submitting an article to) you should save the style file (.bst file) in the same folder as your .tex and .bib files. Include the name of the .bst file in the \bibliographystyle{...} commmand.
7.6
Practical
ò Create a new file in TeXworks (Filemenu >New).
ò Type your references in the correct format (see example at start of chapter).
ò Click the Savebutton, the Save Filewindow will open.
ò Give the file the same name as your .tex document (for example, Doc1) and save it as aBibTeX databasein the same folder as your .tex file.
ò Switch to your .tex document and insert \cite,\bibliographystyle
and \bibliography commands in the relevant places.
ò Typeset your .tex file.
ò Switch to your .bib file, choose BibTeX from the typeset menu and click the Typeset button.
ò Switch to your .tex file and typeset it twice. The in-text citations and reference list should be inserted.
3Reference sheet for natbib usage
http://mirror.ctan.org/macros/latex/contrib/ natbib/natnotes.pdf
Chapter 8
Further Reading
LATEX Project
http://www.latex-project.org/
Official website - has links to documentation, information about installing LATEX on your own computer, and information about where to look for help.
The Not So Short Introduction to LATEX2e
http://ctan.tug.org/tex-archive/info/lshort/english/lshort.pdf
A good tutorial for beginners.
LATEX Wikibook
http://en.wikibooks.org/wiki/LaTeX/
Comprehensive and clearly written, although still a work in progress. A downloadable PDF is also available.
Comparison of TEX Editors on Wikipedia
http://en.wikipedia.org/wiki/Comparison_of_TeX_editors
Information to help you to choose which LATEX editor to install on your own
computer.
TeX Live
http://www.tug.org/texlive/
“An easy way to get up and running with the TeX document production system”. Available for Unix and Windows (links to MacTeX for MacOSX users). Includes the TeXworks editor.
Workbook Source Files
http://edin.ac/17EQPM1