User Manual
Chapter Contents
Published: 12-Mar-15 at 09:36:48
Chapter 1 - Introduction ... 11
1.1 Introducing Forensic Explorer ... 12
1.2 Supported file formats ... 12
1.3 Supported file systems ... 12
1.4 Key program features ... 13
Chapter 2 - 30 Day Evaluation Version ... 15
2.1 30 day evaluation version... 16
2.2 Activating the 30 day evaluation version ... 16
Chapter 3 - Purchase ... 23
3.1 Purchase ... 24 3.2 License maintenance ... 25Chapter 4 - Installation ... 27
4.1 System requirements ... 29 4.2 Download ... 29 4.3 Installation ... 294.4 Uninstall Forensic Explorer ... 34
Chapter 5 - Dongle Activation ... 35
5.1 Dongle activation of the purchased version ... 36
5.2 Activate a Remote Computer ... 40
5.3 Applying maintenance updates to your Wibu dongle ... 42
Chapter 6 - Forensic Acquisition ... 43
6.1 Write block ... 44
6.2 GetData’s Forensic Imager ... 45
Chapter 7 - Forensic Explorer Interface ... 55
Copyright GetData Forensics Pty Ltd 2010 - 2015, All rights reserved.
7.2 Module data views ... 59
7.3 Customizing layouts ... 61
7.4 Task Processes List ... 62
7.5 Process Logging and Priority ... 63
7.6 Reference Library ... 64
Chapter 8 - Data Views... 69
8.1 Data views summary ... 71
8.2 Tree view ... 74 8.3 List view ... 77 8.4 Disk view ... 78 8.5 Gallery view ... 84 8.6 Hexview ... 86 8.7 Text view ... 88 8.8 Display view ... 89
8.9 Byte PlotandCharacter Distribution ... 91
8.10 Filesystem Record view ... 96
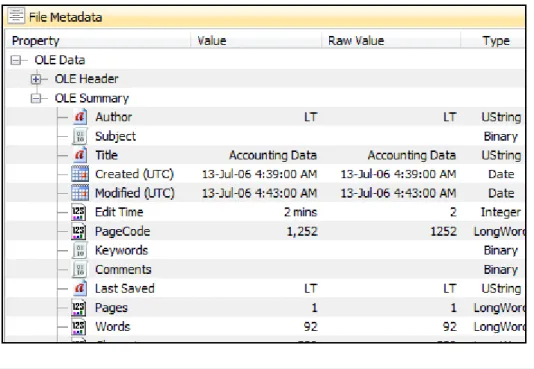
8.11 File Metadata ... 98
8.12 File Extent ... 100
Chapter 9 - Working with data ... 101
9.1 Working with data ... 102
9.2 Highlighted and checked items ... 102
9.3 Add and edit bookmarks ... 104
9.4 Open with ... 104
9.5 Expand compound file ... 105
9.6 Export... 105
9.7 Send to Module ... 110
9.8 Columns ... 110
5 | P a g e
Copyright GetData Forensics Pty Ltd 2010 - 2014, All rights reserved.
9.10 Flags ... 113
9.11 Filtering Data ... 114
9.12 Copy rows to clipboard ... 119
Chapter 10 - Evidence Module ... 121
10.1 Preview ... 122
10.2 New case ... 124
10.3 Open an existing case ... 127
10.4 Adding evidence ... 129
10.5 Evidence Processor ... 135
10.6 Adding additional evidence to a case ... 139
10.7 Saving a case ... 140
10.8 Closing a case ... 141
Chapter 11 - File System Module ... 143
11.1 File System module ... 144
11.2 Toolbar ... 144
11.3 Folders view ... 144
11.4 Categories view ... 146
11.5 File List view ... 147
11.6 Other data views ... 149
Chapter 12 - Keyword Search Module ... 151
12.1 Keyword search ... 152
12.2 Keyword management ... 153
12.3 Search results ... 160
12.4 Keyword result list ... 162
12.5 Keyword search data views ... 163
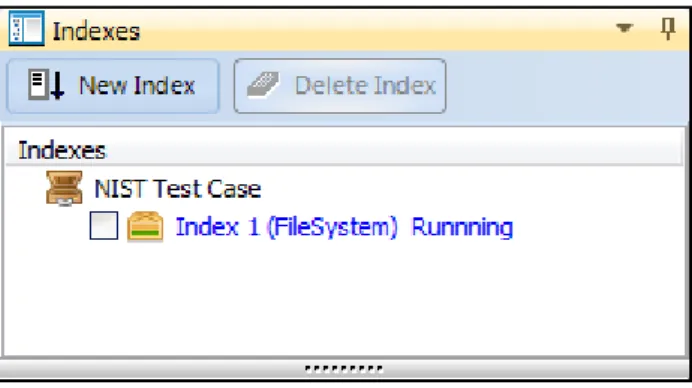
Chapter 13 - Index Search Module ... 165
13.1 Index search ... 166
Copyright GetData Forensics Pty Ltd 2010 - 2015, All rights reserved.
13.3 Creating an index ... 167
13.4 Searching an index ... 169
13.5 Search results... 172
13.6 Index Search Compound Files ... 173
13.7 Export Word List ... 173
Chapter 14 - Email Module ... 175
14.1 Email ... 176
14.2 Email module ... 176
14.3 Microsoft Outlook .PST email ... 176
14.4 Index Search the Email module ... 177
14.5 keyword Search the Email module ... 178
Chapter 15 - Registry Module ... 179
15.1 Registry module ... 180
15.2 Adding a REGISTRY FILE to the registry module ... 181
15.3 Registry Data Views ... 182
15.4 Deleted registry keys ... 183
15.5 Examining registry files using scripts ... 184
Chapter 16 - Bookmarks Module ... 187
16.1 Adding Bookmarks ... 188
16.2 Bookmarks Module ... 190
16.3 Identifying Bookmarked files other modules ... 193
Chapter 17 - Reports Module ... 194
17.1 Reporting & Bookmarks ... 195
17.2 The Reports Module ... 196
17.3 ReportS Tree ... 197
17.4 Report Editor ... 201
7 | P a g e
Copyright GetData Forensics Pty Ltd 2010 - 2014, All rights reserved.
Chapter 18 - Scripts Module ... 215
18.1 Scripts Module ... 216
18.2 Managing scripts in the scripts window ... 222
18.3 Introduction to Scripting ... 223
18.4 Startup.Pas ... 227
Chapter 19 – Custom Modules ... 231
19.1 About Custom Modules ... 232
19.2 Browser History Module ... 232
19.3 Phone Module ... 232
Chapter 20 - Date and Time ... 235
20.1 Date and time in computer forensics ... 236
20.2 FAT, HFS, CDFS file system date and time ... 236
20.3 NTFS, HFS+ file system date and time ... 236
20.4 Date and time information in the Windows registry ... 236
20.5 Daylight saving time (DST) ... 240
20.6 Adjusting Date in Forensic Explorer ... 241
Chapter 21 - Hashing ... 245
21.1 Hash Values ... 246
21.2 Hash Algorithms ... 246
21.3 Acquisition Hash ... 246
21.4 Verification Hash ... 247
21.5 Hashing files in a case ... 248
21.6 Hash sets ... 251
21.7 Download Hash Sets ... 252
21.8 Creating hash sets ... 252
21.9 Apply a Hash Set in a Case ... 256
Chapter 22 - File Signature Analysis ... 259
Copyright GetData Forensics Pty Ltd 2010 - 2015, All rights reserved.
22.2 Why run file signature analysis? ... 260
22.3 Running a file signature analysis ... 260
22.4 Examine the results of a file signature analysis ... 262
Chapter 23 - Data Recovery ... 263
23.1 DATA Recovery - Overview ... 264
23.2 FAT data recovery ... 265
23.3 NTFS data recovery ... 272
23.4 File carving ... 276
Chapter 24 - RAID ... 281
24.1 RAID - Introduction ... 282
24.2 Preparation ... 282
24.3 Adding a RAID to a case ... 283
Chapter 25 – Shadow Copy ... 287
25.1 Shadow Copy Introduction ... 288
25.2 Examining Shadow Copies With Forensic Explorer ... 293
Chapter 26 – Mount Image Pro ... 297
26.1 Mount Image Pro ... 298
Chapter 27
– Live Boot ... 301
27.1 Live Boot ... 302
27.2 Requirements ... 302
27.3 Compatibility ... 304
27.4 Live Boot Working Folder ... 304
27.5 How to Live Boot a Forensic Image... 305
27.6 Live Boot and Windows User Passwords ... 310
27.7 TroubleShooting Live Boot ... 313
Chapter 28 – Working With … ... 315
28.1 ITunes Backups ... 316
9 | P a g e
Copyright GetData Forensics Pty Ltd 2010 - 2014, All rights reserved.
28.3 Thumbnail in Forensic Explorer ... 327
Chapter 29 - Legal ... 331
29.1 This User Guide... 332
29.2 Copyright ... 332
29.3 License agreement ... 332
29.4 Disclaimer ... 334
Appendix 1 - Technical Support ... 335
Appendix 2 - Write Blocking ... 337
Appendix 3 - File carving ... 339
Appendix 4 - Summary of Date and Time ... 345
Appendix 5 - References ... 347
Appendix 6 - Definitions ... 351
Appendix 7 - Sample Script ... 363
Appendix 8 - Icon Key ... 365
C h a p t e r 1 - I n t r o d u c t i o n 11 | P a g e
Copyright GetData Forensics Pty Ltd 2010 - 2014, All rights reserved.
Chapter 1 - Introduction
In This Chapter
CHAPTER 1
- INTRODUCTION
1.1 Introducing Forensic Explorer ... 12
1.2 Supported file formats ... 12
1.3 Supported file systems ... 12
Copyright GetData Forensics Pty Ltd 2010 - 2015, All rights reserved.
1.1
INTRODUCING FORENSIC EXPLORER
Forensic Explorer is a computer forensics software program written by GetData Forensics Pty Ltd (www.forensicexplorer.com). Forensic Explorer is a tool for the analysis and presentation of electronic evidence. Primary users of this software are those involved in civil or criminal investigations.
Forensic Explorer combines a flexible graphic user interface (GUI) with advanced sorting, filtering, searching, previewing and scripting technology. It enables investigators to:
Access and examine all available data, including hidden and system files, deleted files, file and disk slack and unallocated clusters;
Automate complex investigational tasks;
Document a case and produce detailed reports; and,
Provide other parties with a simple to use tool to easily review evidence.
1.2
SUPPORTED FILE FORMATS
Forensic Explorer supports the acquisition of the following file formats: DD or RAW;
EnCase® .E01;
Forensic File Format .AFF
Forensics Explorer supports the analysis of the following file formats:
Type Extension
Apple DMG .DMG
DD or RAW .DD, .BIN, .RAW
EnCase® .E01, .Ex01, .L01, .Lx01
Forensic File Format .AFF
FTK® .E01, .AD1 ISO .ISO Microsoft VHD .VHD NUIX .MFS ProDiscover® .EVE Safeback® v2 .001 SMART .S01 VMWare® .VMD, .VMDK Xways Container .CTR
1.3
SUPPORTED FILE SYSTEMS
Forensic Explorer supports analysis of: Windows FAT12/16/32, exFAT, NTFS,
C h a p t e r 1 - I n t r o d u c t i o n 13 | P a g e
Copyright GetData Forensics Pty Ltd 2010 - 2014, All rights reserved.
Macintosh HFS, HFS+ (no journal processing) EXT 2/3/4 (no journal processing)
CD/DVD ISO, UDF
Hardware and Software RAID: JBOD, RAID 0, RAID 5
1.4
KEY PROGRAM FEATURES
Key Forensic Explorer features include:
Fully Customizable Interface: The forensic explorer interface has been designed for flexibility. Drag, drop and detach windows for a customized module. Save and load module configurations to suit investigative needs.
International Language Support: Forensic Explorer supports Unicode. Investigators can search and view data in native language format.
Complete Data Access: Access all areas of physical or imaged media at a file, text, or hex level. View and analyze system files, file and disk slack, swap files, print files, boot records, partitions, file allocation tables, unallocated clusters, etc.
Powerful Pascal Scripting language: Automate analysis using a provided script library, or write your own analysis scripts.
Fully Threaded: Run different analysis functions in separate threads. Data Views: Powerful data views including:
File List: Sort and multi sort files by attribute, including, extension, signature, hash, path and created, accessed and modified dates.
Category Views: Show files by extension, date etc.
Disk: Navigate a disk and its structure via a graphical view. Zoom in and out to graphically map disk usage.
Gallery: Thumbnail photos and image files.
Display: Display more than 300 file types. Zoom, rotate, copy, search. Filesystem Record: Easily access and interpret FAT and NTFS records. Text and Hexadecimal: Access and analyse data at a text or hexadecimal.
Automatically decode values with the data inspector.
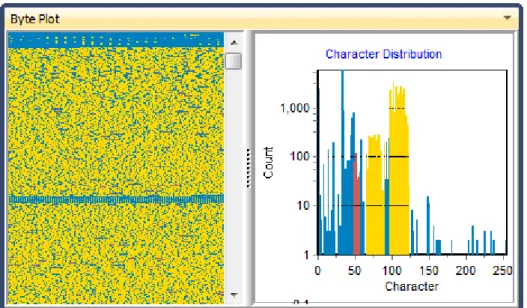
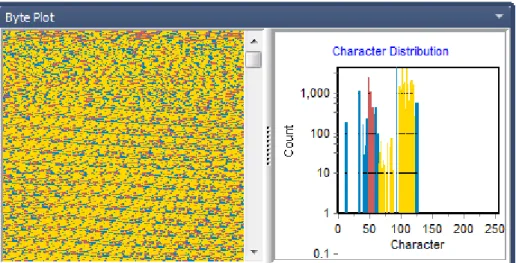
File Extent: Quickly locate files on disk with start and end sector runs. Byte Plot and Character Distribution: Examine individual files using Byte Plot
graphs and ASCII Character Distribution.
Copyright GetData Forensics Pty Ltd 2010 - 2015, All rights reserved.
RAID Support:
Work with physical or forensically imaged RAID media, including
software and hardware RAID, JBOD, RAID 0 and RAID 5.Hashing: Apply hash sets to a case to identify or exclude known files. Hash individual files for analysis.
Keyword search: Sector level keyword search of entire media using RegEx expressions. Keyword index: Built in DTSearch index and keyword search technology.
Bookmarks and Reporting: Add bookmarks to identify evidence and include bookmarks in a custom report builder.
Data Recovery and Carving: Recover folders and files. Use an inbuilt file carving tool to carve more than 300 known file types or script your own.
File Signature Analysis: Validate the signature against file extension.
C h a p t e r 2 - 3 0 D a y E v a l u a t i o n V e r s i o n 15 | P a g e
Copyright GetData Forensics Pty Ltd 2010 - 2014, All rights reserved.
Chapter 2 - 30 Day Evaluation Version
In This Chapter
CHAPTER 2
- 30 DAY EVALUATION VERSION
2.1 30 day evaluation version... 16
2.1.1 Installation ... 16
2.1.2 Limitations ... 16
2.2 Activating the 30 day evaluation version ... 16
2.2.1 Online Activation (30 DAY Evaluation) ... 16
Copyright GetData Forensics Pty Ltd 2010 - 2015, All rights reserved.
2.1
30 DAY EVALUATION VERSION
To request a 30 day evaluation version of Forensic Explorer, visit
http://www.forensicexplorer.com/request-evaluation-key.php and complete the online registration form. Download instructions and an evaluation versionsoftware activation key and will be sent to your email address.
Note: It is not possible to activate the evaluation version in Virtual Machine.
2.1.1 INSTALLATION
The Forensic Explorer 30 day evaluation version is a standalone program. It has: A separate installation file: “ForensicExplorer-Evaluation-Setup.exe” and; Is installed in its own path “C:\Program Files\GetData\Forensic Explorer
Evaluation vX\”.
The evaluation version is marked as “Evaluation” in the status bar at the bottom of the Evidence Module and in the program “About” tab.
2.1.2 LIMITATIONS
The 30 day evaluation version has the following limitations: Does not allow the saving of case files;
Does not allow the exporting of files from a case; and, Will expire after 30 days.
2.2
ACTIVATING THE 30 DAY EVALUATION VERSION
The 30 day evaluation version is activated by a software key only (a purchased version is activated by dongle only).
2.2.1 ONLINE ACTIVATION (30 DAY EVALUATION)
If you computer is connected to the internet, enter the 30 day evaluation version key into the field provided and click Next (as shown in Figure 1 below):
C h a p t e r 2 - 3 0 D a y E v a l u a t i o n V e r s i o n 17 | P a g e
Copyright GetData Forensics Pty Ltd 2010 - 2014, All rights reserved. Figure 1, Online activation, 30 day trial version
A successful activation message will display the following screen, as shown in Figure 2 below:
Figure 2, 30 day evaluation version successful activation message
Once the 30 day evaluation version is activated, the number of evaluation days remaining is shown on the program splash screen (see Figure 3 below). Click on the “Continue Evaluation” button to use the software, or the “Buy Online” button to visit the purchase page at www.forensicexplorer.com.
Copyright GetData Forensics Pty Ltd 2010 - 2015, All rights reserved. Figure 3, 30 day evaluation version splash screen
2.2.2 OFFLINE ACTIVATION (30 DAY EVALUATION)
Where the computer on which the software is being installed is not connected to the internet, a separate internet connected computer can be used to activate. The activation process involves:
Exporting a license file from the software;
Uploading the license file, together with your purchase email address and license key at a web site (using any internet connected computer); Downloading the validated license file and importing it back into the
software.
To activate an offline computer:
C h a p t e r 2 - 3 0 D a y E v a l u a t i o n V e r s i o n 19 | P a g e
Copyright GetData Forensics Pty Ltd 2010 - 2014, All rights reserved. Figure 4, Activation wizard
2. Click on the Export button to export and save the license file "GetData.GDActRequest":
Figure 5, Offline activation (evaluation version), export of license file
3. Using an web browser on any internet connected computer, go to "http://getdata.com/offline" (or https://secure.getdata.com/key/key-activation-wibu-offline.php) and enter the required details:
Copyright GetData Forensics Pty Ltd 2010 - 2015, All rights reserved. Figure 6, Offline activation (evaluation version), upload of license file and activation details
Click the Upload button to send the details to the activation server: The details are validated by the activation server and the file "GetData.GDActResponse" is returned to you.
Figure 7, Offline activation (evaluation version), download of license file
Save "GetData.GDActResponse" and take it back to the offline computer on which you will be activating the software.
Once the "GetData.GDActResponse" file is back on the offline computer, click the Import button to import the file into the software. The software is now activated:
C h a p t e r 2 - 3 0 D a y E v a l u a t i o n V e r s i o n 21 | P a g e
Copyright GetData Forensics Pty Ltd 2010 - 2014, All rights reserved. Figure 8, Successful software key activation of 30 day evaluation version
C h a p t e r 3 - P u r c h a s e 23 | P a g e
Copyright GetData Forensics Pty Ltd 2010 - 2014, All rights reserved.
Chapter 3 - Purchase
In This Chapter
CHAPTER 3
- PURCHASE
3.1 Purchase ... 24 3.1.1 Purchase Online ... 24 3.1.2 Purchase Orders... 24 3.1.3 Resellers ... 24 3.2 License maintenance ... 25 3.2.1 Purchase License Maintenance ... 25Copyright GetData Forensics Pty Ltd 2010 - 2015, All rights reserved.
3.1
PURCHASE
Forensic Explorer is dongle activated only. A dongle is provided for each license purchased.
Forensic Explorer is available for purchase online, via purchase order, or via forensic software resellers.
3.1.1 PURCHASE ONLINE
Forensic Explorer can be purchased online at http://www.forensicexplorer.com by following the purchase links. Please see the purchase page for pricing, volume discounts and software bundle options.
3.1.2 PURCHASE ORDERS
Purchase Orders can be placed by Government and Corporate entities by contacting GetData head office:
GetData Pty Ltd
Suite 204, 13A Montgomery Street Kogarah,
New South Wales, 2217 Australia
Ph: +61 2 82086053 Fax: +61 2 95881195 Email: [email protected] Or by secure post:
GetData Forensics Pty Ltd P.O. Box 71
Engadine, New South Wales, 2233 Australia
Or via your forensic reseller.
3.1.3 RESELLERS
For a list of approved resellers, please contact GetData via: [email protected] or via the contact details above.
C h a p t e r 3 - P u r c h a s e 25 | P a g e
Copyright GetData Forensics Pty Ltd 2010 - 2014, All rights reserved.
3.2
LICENSE MAINTENANCE
A Forensic Explorer license purchase includes 12 months maintenance giving access to updates and support.
When the maintenance for a dongle has expired, Forensic Explorer will continue to work, however you may only use the latest available version prior to the expiration of your maintenance period.
The expiration date for the maintenance of a dongle is displayed in the program splash screen, shown in Figure 9 below:
Figure 9, Forensic Explorer splash screen showing maintenance date
When the maintenance is nearing the expiration date an email is sent to the purchaser with the option to renew.
3.2.1 PURCHASE LICENSE MAI NTENANCE
To purchase additional Forensic Explorer maintenance online:
1. Visit the following web page: http://www.forensicexplorer.com/buy-forensic-explorer.php
2. Select the option to purchase maintenance renewal for existing Forensic Explorer dongles.
Copyright GetData Forensics Pty Ltd 2010 - 2015, All rights reserved.
Forensic Explorer maintenance is sold in increments of 1 year. A purchase of two years maintenance can be used to extend a single dongles maintenance by two years. To apply the maintenance update to your dongle, and follow the instructions in 5.3 - Applying maintenance updates to your Wibu dongle.
C h a p t e r 4 - I n s t a l l a t i o n 27 | P a g e
Copyright GetData Forensics Pty Ltd 2010 - 2014, All rights reserved.
Chapter 4 - Installation
In This Chapter
CHAPTER 4
- INSTALLATION
4.1 System requirements ... 29 4.2 Download ... 29 4.3 Installation ... 29 4.3.1 Installed files ... 31 4.3.2 Non English installation ... 33 4.4 Uninstall Forensic Explorer ... 34C h a p t e r 5 - D o n g l e A c t i v a t i o n 29 | P a g e
Copyright GetData Forensics Pty Ltd 2010 - 2014, All rights reserved.
4.1
SYSTEM REQUIREMENTS
Forensic Explorer requires:
Windows XP, 2003, Vista, Win 7, 2008; Pentium IV 1.4 GHz or faster processor; 1GB RAM;
32bit and 64bit compatible.
When processing large volumes of electronic evidence a high specification forensic workstation is recommended.
4.2
DOWNLOAD
Full purchased version:
Your email received at the time of purchase will contain download instructions for the software. 30 day evaluation version:
See Chapter 2- 30 Day Evaluation Version, for further information on the evaluation version.
4.3
INSTALLATION
IMPORTANT: Ensure that you have a separate and secure backup of case files before you make installation modifications.
To install Forensic Explorer:
Run the installation file ForensicExplorer-Setup.exe (or ForensicExplorer-Evaluation-Setup.exe if you are installing the 30 day evaluation version).
Follow the setup instructions.
The following windows will appear during the installation process:
1. Forensic Explorer License agreement. Answer the question and click Next; 2. Select the installation language. Click Next.
3. Enter the correct installation path or accept the default path (e.g. C:\Program Files\GetData\Forensic Explorer vX) and click Next;
Copyright GetData Forensics Pty Ltd 2010 - 2015, All rights reserved. Figure 10, Selecting the installation folder
1. Follow the setup instructions and confirm the setup summary by clicking the Install button;
Figure 11, Finalize installation
C h a p t e r 5 - D o n g l e A c t i v a t i o n 31 | P a g e
Copyright GetData Forensics Pty Ltd 2010 - 2014, All rights reserved. Figure 12, Finish installation
3. Run Forensic Explorer from the installed desktop icon:
Figure 13, Desktop icon
4.3.1 INSTALLED FILES
PROGRAM PATH
The default Forensic Explorer installation folder is:
C:\Program Files\GetData\Forensic Explorer vX\
WORKING PATH
The working path for a case is in the user profile documents folder; C:\Users\[user folder]\Documents\Forensic Explorer
Copyright GetData Forensics Pty Ltd 2010 - 2015, All rights reserved.
Cases Contains the investigator created case folders. Databases Holds case database files use to store case data,
investigator names, etc.
Filters Filters are created in the Scripts module and used in the Folder view of the File System module. See 8.2.2 - Tree view filter, for more information. Hash Sets Holds the database files used to store hash set
information.
Keywords This folder is used to store sample keyword search import lists. They can be imported in the Keyword Search module.
Previews A device or image can be previewed without fist creating a case. A unique preview working folder is created within this folder using a Global Unique Identifier (GUID, e.g. 8709A41C-38B6-4F9E-BA18-633B394721C5).
Scripts Holds Forensic Explorer scripts (created and/or used in the Scripts module). “.pas” are un-compiled. “.bin” are un-compiled.
Startup Holds the “startup.pas” script used to store button positions etc. (see the chapter on Scripts for further information).
CASE FILE FOLDER
The following folders are created within each case folder:
C:\Users\[user folder]\Documents\Forensic Explorer\Cases\[Case Name]\
Attached Evidence External files (photos, documents etc.) attached to the case.
DTSearchIndexes DT Search keyword indexes. Exported File export folder
Logs Program audit logs. CaseName.FEX Case file.
REGISTRY KEYS
At the time of installation Forensic Explorer registry keys are written to the HKEY_CURRENT_USER as shown in Figure 14 below:
C h a p t e r 5 - D o n g l e A c t i v a t i o n 33 | P a g e
Copyright GetData Forensics Pty Ltd 2010 - 2014, All rights reserved. Figure 14, Forensic Explorer registry keys
4.3.2 NON ENGLISH INSTALLA TION
The Forensic Explorer GUI has been translated into the following languages: Chinese (Simplified)
German
Indonesian (Bahasa) Spanish
Turkish
During the installation process, select the desired language:
IMPORTANT: It is recommended that a case be conducted in a single GUI language. Changing language mid case may affect modules which rely on path and field names, such as Scripts and Reports.
STARTUP LANGUAGE
The startup language is controlled by the registry setting:
HKCU\Software\GetData\ForensicExplorer v2\Configuration\DefaultLanguage
Where the key is set to: EN (default), DE, ID, ES, ZH, TR for the required language.
BOOKMARK FOLDER TRANSLATION
Bookmark folder translations are can be managed by using the “bookmark folder translations.txt” file located in the install folder. Currently the translations operate on the first level bookmark folder only.
Copyright GetData Forensics Pty Ltd 2010 - 2015, All rights reserved.
4.4
UNINSTALL FORENSIC EXPLORER
IMPORTANT: Ensure that you have a separate and secure backup of all evidence and case files before you make installation modifications.
There are two methods to start the uninstall process;
1. Select “Uninstall Forensic Explorer” in the Windows Start menu:
Figure 15, Uninstall from the Windows start menu
2. Or, open the Windows Control Panel and in the “Programs” section use the “Uninstall option. Either of the above options will start the uninstall process:
Figure 16, Uninstall process
A successful removal will show the following message:
C h a p t e r 5 - D o n g l e A c t i v a t i o n 35 | P a g e
Copyright GetData Forensics Pty Ltd 2010 - 2014, All rights reserved.
Chapter 5 - Dongle Activation
In This Chapter
CHAPTER 5
- DONGLE ACTIVATION
5.1 Dongle activation of the purchased version ... 36 5.1.1 Successful dongle activation ... 37 5.1.2 Troubleshooting Dongle Activation ... 37 5.2 Activate a Remote Computer ... 40 5.3 Applying maintenance updates to your Wibu dongle ... 42
Copyright GetData Forensics Pty Ltd 2010 - 2015, All rights reserved.
5.1
DONGLE ACTIVATION OF THE PURCHASED VERSION
Forensic Explorer is activated using a Wibu (www.wibu.com) USB hardware dongle which is delivered to you by courier following your purchase (see Chapter 3 - Purchase, for more information on purchasing Forensic Explorer).
Figure 18, Wibu USB hardware activation dongle
Your Wibu dongle has a unique identification number inscribed on the part of the dongle that is inserted into the USB port, as shown in Figure 19 below. Include this number in correspondence with GetData:
Figure 19, Unique Wibu dongle identification number
The Wibu dongle is driverless and requires no special installation. To run Forensic Explorer:
1. Ensure you have installed the full version of Forensic Explorer using the link provided in your purchase confirmation email (the dongle will not activate the evaluation version. See Chapter 2 - 30 Day Evaluation Version, for more information on the evaluation version);
C h a p t e r 5 - D o n g l e A c t i v a t i o n 37 | P a g e
Copyright GetData Forensics Pty Ltd 2010 - 2014, All rights reserved.
2. Insert your Wibu dongle into a USB port on your forensic workstation. Wait up to 30 seconds to ensure your forensic workstation has the time to detect that the dongle has been inserted;
3. Run forensic Explorer from the desktop icon.
5.1.1 SUCCESSFUL DONGLE ACTIVATION
When the dongle is successfully installed, the following screen will display on startup of the application:
The splash screen identifies:
1. The name, or company name, of the registered owner;
2. The date upon which the current maintenance license expires for that dongle (see page 25 for information on purchasing).
5.1.2 TROUBLESHOOTING DONGLE ACTIVATION
If the Wibu dongle is not detected on application startup, the splash screen will display “DONGLE NOT FOUND”, as shown in Figure 20 below:
Copyright GetData Forensics Pty Ltd 2010 - 2015, All rights reserved. Figure 20, Dongle not found error message
To troubleshoot dongle activation:
1. Press the “x” button to close the splash window 2. Remove and re-insert the Wibu dongle;
3. Ensure that your forensic workstation has sufficient time to detect that new hardware has been inserted. Wait for the Windows USB device message to show that new hardware has been recognized.
4. Re-run the software from the desktop icon.
WIBU CODEMETER RUNTIME FOR WINDOWS USER
If you are still unable to activate Forensic Explorer, download the Wibu CodeMeter Runtime for Windows: http://www.wibu.com/downloads-user-software.html When Wibu CodeMeter software is successfully installed, insert your Forensic Explorer Wibu dongle. Double click on the Wibu icon in the Windows task bar:
Figure 21, Wibu CodeMeter Windows task bar icon
C h a p t e r 5 - D o n g l e A c t i v a t i o n 39 | P a g e
Copyright GetData Forensics Pty Ltd 2010 - 2014, All rights reserved. Figure 22, Wibu CodeMeter Control Center
Confirm that your CmStick is identified by the CodeMeter Control Center and that it has an Enabled status. Click on Web Admin button, which will open your web browser. In the Web Admin page, select Content > Licenses. Confirm that your Wibu dongle contains Forensic Explorer activation, as shown in Figure 23 below:
Figure 23, Wibu web admin
Contact us via [email protected] (see Appendix 1 - Technical Support for full contact details) and provide:
1. Your dongle ID number;
2. A screenshot of the CodeMeter Control Center; 3. A screenshot of the Wibu Web Admin page. We will then contact you with further instructions.
Copyright GetData Forensics Pty Ltd 2010 - 2015, All rights reserved.
5.2
ACTIVATE A REMOTE COMPUTER
The Wibu Codemeter activation system enables you to use your local dongle to activate a remote internet connected computer:
On the local computer with the Forensic Explorer Codemeter dongle is inserted run the Network Server:
1. Download the latest Codemeter Runtime for Windows User from http://www.wibu.com/downloads-user-software.html
2. Run CodeMeter WebAdmin by browsing to http://localhost:22350/ConfigServer.html.
3. Select Configuration > Server from the menu, as shown in Figure 24 below:
Figure 24, CodeMeter WebAdmin
4. In the Sever window heck Run Network Server and press the Apply button. 5. Ensure that the selected Network Port 22350 is not blocked by your firewall. 6. Restart the CodeMeter Service.
a. Run the CodeMeter Control Center by clicking the CodeMeter icon in the Windows Task tray;
b. Select Processes > Stop CodeMeter Service; c. Then Start CodeMeter Service.
C h a p t e r 5 - D o n g l e A c t i v a t i o n 41 | P a g e
Copyright GetData Forensics Pty Ltd 2010 - 2014, All rights reserved.
The Wibu CodeMeter Network Server can also be configured using the following registry setting:
HKEY_LOCAL_MACHINE\SOFTWARE\WIBU-SYSTEMS\CodeMeter\Server\CurrentVersion IsNetworkServer=1
On the client computer:
7. Install Forensic Explorer full dongle version. Close Forensic Explorer. 8. Browse to http://localhost:22350/Configuration.html:
Figure 25, Wibu CodeMeter Local Host Configuration
9. Click the add button and add the IP address of Network Server and press Apply.
10. Start Forensic Explorer. It should detect the remote dongle license and activate.
The client computer can also be configured using the following registry key setting:
HKEY_LOCAL_MACHINE\SOFTWARE\WIBU-SYSTEMS\CodeMeter\Server\CurrentVersion\ServerSearchList\Server1 Address=192.168.100.10
Copyright GetData Forensics Pty Ltd 2010 - 2015, All rights reserved.
5.3
APPLYING MAINTENANCE UPDATES TO YOUR WIBU DONGLE
Once a maintenance update has been purchased, to update maintenance on your Wibu dongle:
1. On a computer which has internet access, insert your Wibu dongle into a USB port. Remove any other Wibu dongles that you may have for other products.
2. Run the GetData License Manager located in the installation folder of Forensic Explorer. The default location is: C:\Program Files\GetData\Forensic Explorer vx\License Manager.exe
3. The GetData License Manager will detect your Wibu dongle, as shown in Figure 26 below. The existing Maintenance expiration date is displayed in the Maintenance column:
Figure 26, GetData License Manager
4. Select “Forensic Explorer” from the product list and press the ADD button. 5. In the Add Licenses window, enter the “License” key that you received with
your renewal order. Press the Search key.
6. Select the renewal from the available product list. Then click the Apply button.
7. Return to the main screen of the License Manager. Click the refresh button to display the new maintenance date.
For further assistance in applying maintenance updates to your Forensic Explorer dongle, please contact [email protected] (see Appendix 1 - Technical Support for full contact details).
C h a p t e r 6 - F o r e n s i c A c q u i s i t i o n 43 | P a g e
Copyright GetData Forensics Pty Ltd 2010 - 2014, All rights reserved.
Chapter 6 - Forensic Acquisition
In This Chapter
CHAPTER 6
- FORENSIC ACQUISITION
6.1 Write block ... 44 6.2 GetData’s Forensic Imager ... 45 6.2.1 Installation ... 45 6.2.2 System Requirements ... 45 6.2.3 Protected Disk Areas - HPA and DCO ... 45 6.2.4 Running Forensic Imager ... 46 6.2.5 1. Selecting the source ... 47 6.2.6 2. Selecting the destination ... 48 6.2.7 3. Progress ... 53 6.2.8 4. Log file ... 53 6.2.9 Bad Sectors and error reporting ... 54
Copyright GetData Forensics Pty Ltd 2010 - 2015, All rights reserved.
6.1
WRITE BLOCK
IMPORTANT:
An accepted principal of computer forensics is that, wherever possible, source data to be analyzed in an investigation should not be altered by the investigator.
If physical media such as a hard drive, usb drive, camera card etc. is a potential source of evidence, it is recommended that when the storage media is connected to a forensics workstation it is done so using a Forensic write block device.
A Forensic write blocker is usually a physical hardware device (a write blocker) which sits between the target media and the investigators workstation. It ensures that it is not possible for the investigator to inadvertently change the content of the examined device.
There are a wide variety of forensic write blocking devices commercially available. Investigators are encouraged to become familiar with their selected device, its capabilities and its limitations.
Shown in Figure 27 below is a Tableau USB hardware write block. The source media, an 8 GB Kingston USB drive is attached and ready for acquisition:
C h a p t e r 6 - F o r e n s i c A c q u i s i t i o n 45 | P a g e
Copyright GetData Forensics Pty Ltd 2010 - 2014, All rights reserved.
6.2
GETDATA’S FORENSIC IMAGER
Installed with Forensic Explorer is the standalone forensic imaging tool “Forensic Imager”. Forensic Imager is a Windows based program that will acquire a forensic image into one of the following common forensic file formats (described in more detail later in this chapter):
DD /RAW (Linux “Disk Dump”) AFF (Advanced Forensic Format) E01 (EnCase®) [Version 6 format]
6.2.1 INSTALLATION
Forensic Imager is installed with Forensic Explorer into its installation folder: C:\Program Files\GetData\Forensic Explorer v1\ForensicImager.exe
6.2.2 SYSTEM REQUIREMENTS
Forensic Imager should be run as local Administrator to ensure that sufficient access rights are available for access to devices.
Forensic Imager requires the following minimum specification: Windows 7 or above;
32 and 64bit compatible;
Pentium IV 1.4 GHz or faster processor; 1GB RAM.
Forensic Imager does NOT support DOS acquisition. If acquisition from a DOS boot disk is required alternative forensic acquisition software should be used.
6.2.3 PROTECTED DISK AREAS - HPA AND DCO
Host Protected Area (HPA) and Device Configuration Overlay (DCO)
The HPA and DCO are two areas of a hard drive that are not normally visible to an operating system or an end user. The HPA is most commonly used by booting and diagnostic utilities. For example, some computer manufacturer’s use the area to contain a preloaded OS for install and recovery purposes. The DCO “allows system vendors to purchase HDDs from different manufacturers with potentially different sizes, and then configure all HDDs to have the same number of sectors. An example of this would be using DCO to make an 80 Gigabyte HDD appear as a 60 Gigabyte HDD to both the OS and the BIOS” (1)
Copyright GetData Forensics Pty Ltd 2010 - 2015, All rights reserved.
Whilst the HPA and DCOare hidden, it is technically possible for a user to access these areas and store/hide data. Forensic Imager does not currently support the acquisition of HPA or DCO areas.
6.2.4 RUNNING FORENSIC IMA GER
Forensic Imager is located in the Forensic Explorer installation folder as a stand-alone executable. When Forensic Imager is run the investigator is presented with 3 options: Acquire: The acquire option is used to take a forensic image (an exact copy) of
the target media into an image file on the investigators workstation; Convert: The convert option is used to copy an existing image file from one
image format to another, e.g. DD to E01;
Hash or verify The hash or verify option is used to calculate a hash value for a device or an existing image file.
As shown in Figure 28, Forensic Imager below:
Figure 28, Forensic Imager
When “Acquire” or “Convert” is selected, the subsequent work flow is: 1. Select source;
2. Select destination options; 3. Create the image;
C h a p t e r 6 - F o r e n s i c A c q u i s i t i o n 47 | P a g e
Copyright GetData Forensics Pty Ltd 2010 - 2014, All rights reserved.
4. Display and save event log.
When “Hash or Verify” is selected, the subsequent work flow is: 1. Select source;
2. Verify;
3. Display and save event log.
The workflow is discussed in more detail below:
6.2.5 1. SELECTING THE SOU RCE
When the “Acquire”, “Convert” or “Hash or Verify” button is selected, the source selection screen is displayed enabling selection of the source media:
When “Acquire” is selected, the source window shows the available physical devices (hard drives, USB drives, camera cards, etc.) and logical devices (partitions or volumes on the physical devices, e.g. "C:" drive) attached to the forensic workstation.
When “Convert” is selected, the source window allows the selection of the source image file. Click the “Add Image” button to add the required image file to the selection list.
When the “Hash or Verify” button is selected, the source window allows the selection of either a physical or logical drive, or an image file.
Figure 29, Forensic Imager - selecting the source device (Hash or Verify option shown)
Copyright GetData Forensics Pty Ltd 2010 - 2015, All rights reserved.
Label: Physical drives are listed with their Windows device number. Logical drives display the drive label (if no label is present then "{no label}" is used). Image files show the path to the image.
Size: The size column contains the size of the physical or logical device, or the size of the image file.
(Note that the reported size of a drive is usually smaller than the size printed on the drive label. This is because manufactures report the size in a decimal number of bytes while the Operating System reports the size in 1,024 chunks for each KB).
FS: The File System on the drive, e.g. FAT, NTFS or HFS;
Type: Describes the way in which the drive is connected to the computer. An image file will show the type of image (e.g. EnCase® or RAW). Acquisition of physical vs. logical device
In most situations, pending compliance with any overriding case specific legal requirements, an investigator is most likely to select an image a physical device. Imaging the physical device gives access to the content of the entire media, for example, the space between partitions. Carrier, 2005, observes: “The rule of thumb is to acquire data at the lowest layer that we think there will be evidence. For most cases, an investigator will acquire every sector of a disk”. (2 p. 48)
In specific circumstances, an investigator may need to acquire a range of sectors from the device. In this case, start and end sector information in entered in the sector range fields at the bottom of the source selection window.
To select the source:
1. Highlight the required device or image file using the mouse;
2. Click the “Next” button is clicked to proceed to the destination window.
6.2.6 2. SELECTING THE DESTIN ATION
The image destination screen, shown in Figure 30 below, is where the parameters for the image file are set, including type, compression, name, location etc.
C h a p t e r 6 - F o r e n s i c A c q u i s i t i o n 49 | P a g e
Copyright GetData Forensics Pty Ltd 2010 - 2014, All rights reserved. Figure 30, Setting destination options
1. SOURCE
The source field shows the device or image file selected in the previous window. This source field cannot be edited here. Select the back button if a change to the source is required.
2. IMAGE TYPE
The investigator has the choice of creating the forensic image in one of the following forensic file formats:
DD / RAW:
The DD / RAW format originate from the UNIX command line environment. A DD /RAW image is created from blocks of data read from the input source and written directly into the image file. The simplicity of a DD image makes it possible to compare the imaged data to the source, but the format lacks some of the features found in more modern formats, including error correction and compression.
Advanced Forensic Format (AFF):
AFF is “an extensible open format for the storage of disk images and related forensic metadata. It was developed by Simson Garfinkel and Basis Technology”. (3). Refer to http://afflib.org/ for further information.
EnCase®.E01
The EnCase® E01 evidence file format was created by Guidance Software Inc. It is widely accepted in the forensic community as the image file standard. Further
Copyright GetData Forensics Pty Ltd 2010 - 2015, All rights reserved.
information is available at www.guidancesoftware.com. The structure of the EnCase®.E01 format allows for case and validation information (CRC and MD5) to be stored within the image file. The structure of the EnCase® file format is shown below:
Source: (4)
3. FILE SEGMENT SIZE
Sets the segment size of the created forensic image file:
This setting enables the forensic image file to be broken into segments of a specific size. Setting an image segment size is primarily used when the forensic image files will later be stored on fixed length media such as CD or DVD.
For the EnCase®.E01 image format, Forensic Imager uses the EnCase® v6 standard and is not limited to a 2 GB segment size. However, if an investigator plans to use larger file segments they should give consideration to the limitations (RAM etc.) of the systems on which the image files will be processed.
4. OUTPUT FILENAME
Sets the destination path and file name for the image file:
The output file name is the name of the forensic image file that will be written to the investigators forensic workstation. Click on the folder icon to browse for the
destination folder.
5. HASH OPTIONS
Calculates an MD5 and/or SHA256 acquisition hash of the imaged data:
A hash value is a mathematical calculation that is used for identification, verification, and authentication of file data. A hash calculated by Forensic Imager during the acquisition of a device (the “acquisition hash”) enables the investigator, by recalculating the hash at a later time (the “verification hash”), to confirm the authenticity of the image file, i.e. that the file has not changed. Any change to the acquired image will result in a change to the hash value.
C R C C R C C R C Data Block Data Block Header: Case Information Block M D 5 Header CRC
C h a p t e r 6 - F o r e n s i c A c q u i s i t i o n 51 | P a g e
Copyright GetData Forensics Pty Ltd 2010 - 2014, All rights reserved.
Calculation of HASH values during the acquisition process requires CPU time and will increase the duration of an acquisition. However, it is recommended, in line with accepted best forensic practice, that an acquisition hash is always included when acquiring data of potential evidentiary value. It is also recommended that the investigator regularly recalculate the verification hash during the investigation to confirm the authenticity of the image.
Forensic Imager has three independent hash calculation options, MD5, SHA1 and SHA256. The investigator should select the hash option/s which best suits: MD5 (Message-Digest algorithm 5):
MD5 is a widely used cryptographic algorithm designed in 1991 by RSA (Ron Rivest, Adi Shamir and Len Alderman). It is a 128-bit hash value that uniquely identifies a file or stream of data. It has been extensively used in computer forensics since the late 1990’s.
In 1996 cryptanalytic research identified a weakness in the MD5 algorithm. In 2008 the United States Computer Emergency Readiness Team (USCERT) released vulnerability Note VU#836068 stating that the MD5 hash:
“…should be considered cryptographically broken and unsuitable for further use”. (5).
SHA1
In 1995 the Federal Information Processing Standards published the SHA1 hash specification which was adopted in favor of MD5 by some forensic tools. However, in February of 2005 it was announced that a theoretical weakness had been identified in SHA1, which suggests its use in this field may be short lived. (6)(7)
SHA-256:
From 2011, SHA-256 is expected to become the new hash verification
standard in computer forensics. SHA-2 is a set of cryptographic hash functions (SHA-224, SHA-256, SHA-384, and SHA-512) designed by the National Security Agency (NSA), and published by the USA National Institute of Standards and Technology.
For more detailed information on hashing and how the strength of a hash value applies to the forensic investigator suggested reading includes: “The Hash Algorithm Dilemma–Hash Value Collisions”, Lewis, 2009, Forensic Magazine,
www.foreniscmag.com.
Sector Hashing
The fourth option in the hash section is “Calculate SHA-256 for each sector”. When this option is selected a separate SHA-256 hash for each individual sector of the target device is created and stored in the same folder as the image file.
Copyright GetData Forensics Pty Ltd 2010 - 2015, All rights reserved.
Like the more commonly used “file hash”, a sector hash can be used to:
Reduce the volume of a data set by excluding known and trusted sectors from the case. For example, the hash of a blank sector can be used as the identifier to eliminate the need to search all blank sectors in the case; or
To locate fragments of known files. data in a case. For example, an investigator may search for a fragment of a known document or image file and positively identify the existance (or partial existance) of that file on a disk even if only one sector of that file remains on the disk.
For more information on sector hashing, refer to Yoginder Singh Dandass; Nathan Joseph Necaise; Sherry Reede Thomas, An Empirical Analysis of Disk Sector Hashes for File carving, Journal of Digital Forensic Practice, Volume 2, Number 2, 2008, 95-104.
6. ENCASE® COMPRESSION
Sets the compression level for the EnCase®forensic image file
The EnCase®.E01 file format supports compression of the image file during the acquisition process. Compressing a forensic image file during the acquisition process takes longer, but the file size of the forensic image on the investigators workstation will be smaller. The amount of compression achieved will depend upon the data being imaged. For example, with already compressed data such as music or video, little additional compression will be achieved.
AFF and DD/RAW image formats do not support compression.
7. VERIFY IMAGE HASH AFTER CREATION
During the acquisition of a device the “source” hash (MD5 and/or SHA1 and/or SHA256 as per the investigator selection) is calculated as the data is read from the source disk. Once the acquisition is complete, the source hash is reported in the event log in the format:
Source MD5Hash: 94ED73DA0856F2BAD16C1D6CC320DBFA
For EnCase®.E01 files the MD5 acquisition hash is embedded within the header of the image file.
When the “Verify image hash after creation” box is selected, at the completion of writing the image file Forensic Imager reads the file from the forensic workstation and recalculates the hash. The verification hash is reported in the event log in the format:
Verify MD5Hash: 94ED73DA0856F2BAD16C1D6CC320DBFA
At the conclusion of the verification process a comparison is made between the source and verification hash. An exact image of the source disk to the image file should result in a “match”:
C h a p t e r 6 - F o r e n s i c A c q u i s i t i o n 53 | P a g e
Copyright GetData Forensics Pty Ltd 2010 - 2014, All rights reserved.
Should the acquisition and verification hash not match, it is an indication that a problem has occurred and the device should be re-acquired.
8. DETAILS
For EnCase®.E01 files, information entered into the “Details” field are written into the image file header and stored with the image. DD/RAW and AFF files do not store this information as part of the image, however they are still required to be entered as for all formats the information is included in the Forensic Imager event log.
6.2.7 3. PROGRESS
The progress screen displays source information (the drive being acquired) and destination information (location where the forensic image files is being written). Progress information, including elapsed time, time remaining and transfer speed is displayed. The progress window is shown in Figure 32 below:
Figure 32, Forensic Imager Progress screen
The event log provides feedback to the investigator during the image process.
6.2.8 4. LOG FILE
The event log for each acquisition is automatically saved to the same folder as the image file/s. A typical event log contains the following type of information: Created with GetData Forensic Imager - v4.0.0(124)
Processing drive: \\.\PHYSICALDRIVE1
Image File Name: C:\Users\Graham\Desktop\My Acquisition Folder\Case-4285-USB1.E01
Copyright GetData Forensics Pty Ltd 2010 - 2015, All rights reserved.
Image File Type: Encase v.6.10 Compression Image Type: Best Case Name: 4285
Evidence Number: USB1
Unique Description: 2 GB USB drive located on office desk Examiner: Graham Henley
Notes: Case 4285 - 2 GB USB drive Image started at: 4/05/2011 11:45:50 PM Image finished at: 4/05/2011 11:50:25 PM Elapsed time: 00:04:34
GUID: {D6BF98CA-F3EA-4BBD-88A9-C5E5B07D8600}
Actual Source MD5Hash: 94ED73DA0856F2BAD16C1D6CC320DBFA Source SHA1Hash: d11d009c71c089dfcdb3dabad4c4014078c15183 Source SHA256Hash:
3370edc5662703534d3ad539d49bcc7f0ca86f559b7faa3c4dc7f7290056d039 Verify MD5Hash: 94ED73DA0856F2BAD16C1D6CC320DBFA
Verify SHA1Hash: d11d009c71c089dfcdb3dabad4c4014078c15183 Verify SHA256Hash:
3370edc5662703534d3ad539d49bcc7f0ca86f559b7faa3c4dc7f7290056d039 Acquisition completed!
MD5 acquisition and verification hash: Match SHA1 acquisition and verification hash: Match SHA256 acquisition and verification hash: Match 6.2.9 BAD SECTORS AND ERROR REPO RTING
Disk errors can occur during the image process due to a problem with the entire drive or a problem isolated to specific sectors. If a bad sector is identified, Forensic Imager writes 0’s for the data that cannot be read and logs the location of bad sectors in the event log as they are found.
C h a p t e r 7 - F o r e n s i c E x p l o r e r I n t e r f a c e 55 | P a g e
Copyright GetData Forensics Pty Ltd 2010 - 2014, All rights reserved.
Chapter 7 - Forensic Explorer Interface
In This Chapter
CHAPTER 7
- FORENSIC EXPLORER INTERFACE
7.1 Modules ... 56 7.1.1 Undocking and docking modules ... 57 7.2 Module data views ... 59 7.2.1 Undocking and docking data views... 59 7.3 Customizing layouts ... 61 7.3.1 Save a custom layout ... 61 7.3.2 Load a custom layout ... 61 7.3.3 Default layout ... 61
Copyright GetData Forensics Pty Ltd 2010 - 2015, All rights reserved.
7.1
MODULES
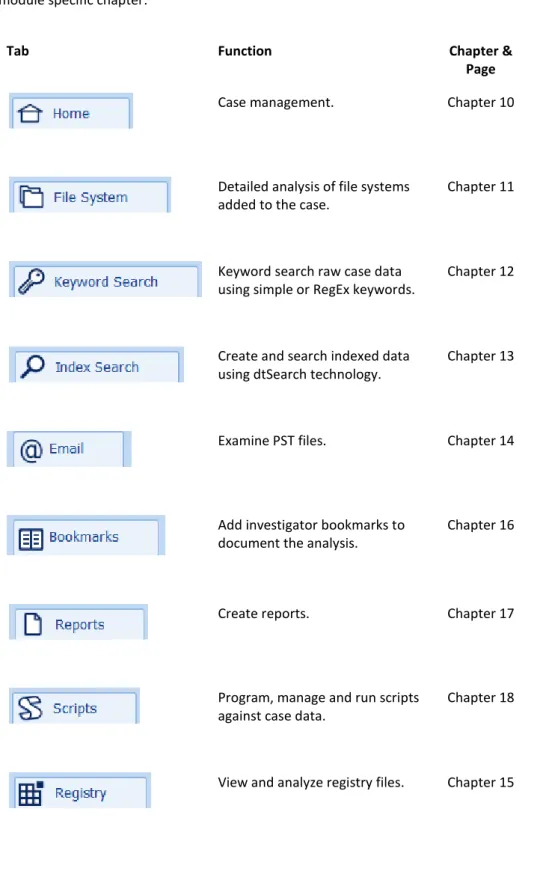
The Forensic Explorer interface is broken down in to a number of modules which separate the programs primary functions. Each module is accessed by a tab at the top of the main program screen. The functions of the module are summarized in the following table. More information about each tab can be found by referring to the module specific chapter:
Tab Function Chapter &
Page
Case management. Chapter 10
Detailed analysis of file systems added to the case.
Chapter 11
Keyword search raw case data using simple or RegEx keywords.
Chapter 12
Create and search indexed data using dtSearch technology.
Chapter 13
Examine PST files. Chapter 14
Add investigator bookmarks to document the analysis.
Chapter 16
Create reports. Chapter 17
Program, manage and run scripts against case data.
Chapter 18
C h a p t e r 7 - F o r e n s i c E x p l o r e r I n t e r f a c e 57 | P a g e
Copyright GetData Forensics Pty Ltd 2010 - 2014, All rights reserved.
Custom Modules: It is possible to create a custom module. See 18.6 - Custom Modules, for more information.
Hide Modules at Startup: It is possible to hide specific modules at program startup. This can be useful when you are providing Forensic Explorer to a non-technical investigator and wish only to show certain modules, such as Index Search and
Bookmarks. See 18.4 for more information.
7.1.1 UNDOCKING AND DOCKIN G MODULES
Forensic Explorer has been designed for use on forensic workstations with multiple monitors. Module tabs can beundocked from the main program window and moved across multiple screens.
To undock a module:
1. Select the module tab with the mouse;
2. Hold down the mouse and drag the module tab free of the bar, as shown in Figure 33 below:
Figure 33, Un-docking a module
To dock a module:
1. Select the top bar of the module window;
2. Drag and drop the module back into the module tab menu bar, as shown in Figure 34 below:
Copyright GetData Forensics Pty Ltd 2010 - 2015, All rights reserved. Figure 34, Re-dock a module tab
C h a p t e r 7 - F o r e n s i c E x p l o r e r I n t e r f a c e 59 | P a g e
Copyright GetData Forensics Pty Ltd 2010 - 2014, All rights reserved.
7.2
MODULE DATA VIEWS
Within each module are one or more “data views” which display the data in the case. Data views occupy the three lower panes of the Forensic Explorer module. They operate in a similar fashion to the layout to Microsoft’s Windows Explorer, with a tree (top left), list (top right) and display (bottom) window, as show in Figure 35 below:
Figure 35, Forensic Explorer module layout
Data views are conduits to the examined data. Each data view is designed to expose the investigator to specific information, whether it is lists of file attributes, displaying photos or graphics, detailing file metadata, or dealing with data at a sector or hex level. Data views also contain the tools that are used to display, sort, decode, search, filter, export and report.
More information about each data view is provided in Chapter 8, “Data Views”.
7.2.1 UNDOCKING AND DOCKIN G DATA VIEWS
Any data view window showing this icon can be undocked and used as a standalone window.
To undock a data view:
1. Click on the title bar or the data view tab;
2. Hold down the mouse and drag it away from its position, as shown in Figure 36 below:
Copyright GetData Forensics Pty Ltd 2010 - 2015, All rights reserved. Figure 36, Undocking a view using drag and drop
To dock a data view:
A data view can only be re-docked to its parent module. For example, the File List data view can only be re-docked inside the File System module. It can however be docked to any position inside its parent module, including inside another data view. To dock a data view:
Click on the data view header and drag and drop the header into next to the other data view tabs in the required position; or,
Drag and drop the data view over the required position arrow as detailed in Figure 37 below:
Figure 37, Dock positioning arrows
C h a p t e r 7 - F o r e n s i c E x p l o r e r I n t e r f a c e 61 | P a g e
Copyright GetData Forensics Pty Ltd 2010 - 2014, All rights reserved.
7.3
CUSTOMIZING LAYOUTS
The position of modules and data views can be saved to a file at any time. This allows the investigator to customize a module for different types of investigations. For example, the module layout for an investigation involving graphics may be different to fraud investigations involving documents.
7.3.1 SAVE A CUSTOM LAYOUT
To save a custom layout:
1. In the top right hand corner of any data view, click on the options drop down arrow and select “Save Layout”:
Figure 38, Layout menu
2. Enter the name of the .xml layout file and click the Save button.
7.3.2 LOAD A CUSTOM LAYOUT
To load a custom layout:
1. In the top right hand corner of any data view, click on the options drop down arrow and select “Load Layout” (as shown in Figure 38 above);
2. Select the desired .xml layout file and click the Open button.
7.3.3 DEFAULT LAYOUT To return to the default layout:
1. In the top right hand corner of any data view, click on the options drop down arrow and select Default Layout (as shown in Figure 38 above).
Copyright GetData Forensics Pty Ltd 2010 - 2015, All rights reserved.
7.4
TASK PROCESSES LIST
In a Forensic Explorer case numerous proessing tasks will be performed on the evdience. This includes:
administrative tasks: such as creating and saving case files; processing tasks: such as reading and displaying a file system; and investigations tasks: such as signature analysis, file hashing, file carving,
running scripts, create indexes etc.
Process are tracked in the processes list, accessed from any Forensic Explorer Module in the bottom right hand corner of the main program screen:
Figure 39, Forensic Explorer processes window
The purpose of the list is to:
Visually show the progress of running processes;
Identify processes which have completed, their duration and the time completed;
Cancel a running process. The cancel button terminates a thread gracefully. Terminate a thread that not responding to the cancel process:
Allow access to process logging (see 7.5 below).
C h a p t e r 7 - F o r e n s i c E x p l o r e r I n t e r f a c e 63 | P a g e
Copyright GetData Forensics Pty Ltd 2010 - 2014, All rights reserved.
7.5
PROCESS LOGGING AND PRIORITY
When a task is run in Forensic Explorer the investigator can set Logging and Priority options, as shown in Figure 41 below:
Figure 41, Setting Logging and Priority options
7.5.1 LOGGING
The “Logging” setting determines the detail of case process logging. Case log files are accessed by clicking the drop down arrow for the process in the process list (Note: If logging is set to “None” then the link to the log file will be greyed out):
Figure 42, Access Process Log Files
Case log files are stored in the path: “[User]\Documents\Forensic Explorer\[Case Name]\Logs\”.
Application log files are stored in the path: “[User]\Documents\Forensic Explorer\AppLogs\”.
7.5.2 PRIORITY
The priority setting is used to determine the number of computer processors allocated to the task. “Low Priority” is allocated a single processing core. “Normal” and above are allocated multi-processing cores (if available).
Important: The speed of multi-core process is influenced by computer hardware. With insufficient hardware resources multi-core can lead to data bottlenecking and be slower than single core process. It is recommended that users test the speed of their hardware to ensure maximum processing speed.
Copyright GetData Forensics Pty Ltd 2010 - 2015, All rights reserved.
7.6
REFERENCE LIBRARY
The purpose of the Reference Library is to put personal reference resources within easy reach of the investigator from within the Forensic Explorer interface. Reference information can be citation information only, or a link to an online resource or a local file.
Figure 43, Display of a Reference in Forensic Explorer
7.6.1 ADDING A REFERENCE LIBRARY TOOLBAR BUTTON To add the Reference Library toolbar button:
Select File System Module > Tools > Add Reference Library, as shown in Figure 44, adding a Reference Library button to the toolbar below:
Figure 44, adding a Reference Library button to the toolbar
A Reference Library button is then added to the File System module toolbar. By default, the drop down menu is populated with a sample reference item (this guide):
C h a p t e r 7 - F o r e n s i c E x p l o r e r I n t e r f a c e 65 | P a g e
Copyright GetData Forensics Pty Ltd 2010 - 2014, All rights reserved. Figure 45, Reference Library default listing
The reference is listed in the format: Title – Author (Year) – Type (if the reference has a link, a Link is added.
7.6.2 REFERENCE LIBRARY ITEMS
Reference items displayed in the drop down menu are dynamically generated by the content of the file:
[User]\Forensic Explorer\Reference Library\References.txt
Access to this folder and file using the Open Reference Library Folder menu option. References.txt is in BiBTex format. BiBTex is a common citation format used by many popular citation programs and websites, including sites such as Google Books. A BiBTex record has the following format (where @ indicates the start of the reference and }, indicates the end of the reference):
@book{carrier2005file,
title={File System Forensic Analysis}, author={Carrier, B.}, isbn={9780321268174}, url={https://books.google.com.au/books?id=I4gpAQAAMAAJ}, year={2005}, publisher={Addison-Wesley}, pages={121}, },
Additional information about the BiBTex structure can be found at: http://en.wikipedia.org/wiki/BibTeX, or;
https://www.cs.arizona.edu/~collberg/Teaching/07.231/BibTeX/bibtex.html 7.6.3 ADDING A REFERENCE T O THE REFERENCE LIBRARY