Not eXactly C
(NXC)
Programmer's Guide
Version 1.0.1 b33
October 10, 2007by John Hansen
1 Introduction... 1 2 The NXC Language ... 2 2.1 Lexical Rules ... 2 2.1.1 Comments ... 2 2.1.2 Whitespace... 2 2.1.3 Numerical Constants... 3
2.1.4 Identifiers and Keywords... 3
2.2 Program Structure ... 3 2.2.1 Tasks ... 3 2.2.2 Functions... 4 2.2.3 Variables ... 6 2.2.4 Structs ... 7 2.2.5 Arrays... 8 2.3 Statements ... 9 2.3.1 Variable Declaration ... 9 2.3.2 Assignment ... 10 2.3.3 Control Structures ... 10
2.3.4 The asm Statement... 13
2.3.5 Other Statements... 14 2.4 Expressions ... 15 2.4.1 Conditions ... 16 2.5 The Preprocessor... 16 2.5.1 #include... 16 2.5.2 #define... 17 2.5.3 ## (Concatenation)... 17 2.5.4 Conditional Compilation... 17 3 NXC API... 18 3.1 General Features ... 18 3.1.1 Timing Functions ... 18
3.1.2 Program Control Functions... 19
3.1.3 String Functions ... 21
3.1.4 Array Functions ... 22
3.1.5 Numeric Functions... 23
3.1.6 Low-level System Functions... 24
3.2 Input Module... 42
3.2.1 Types and Modes ... 43
3.2.2 Sensor Information... 46 3.2.3 IOMap Offsets ... 49 3.3 Output Module ... 49 3.3.1 Convenience Calls ... 53 3.3.2 Primitive Calls ... 58 3.3.3 IOMap Offsets ... 60 3.4 IO Map Addresses... 61
3.5.3 IOMap Offsets ... 65 3.6 IOCtrl Module... 66 3.6.1 IOMap Offsets ... 66 3.7 Display module ... 66 3.7.1 High-level functions... 67 3.7.2 Low-level functions ... 68 3.7.3 IOMap Offsets ... 70 3.8 Loader Module... 70 3.8.1 IOMap Offsets ... 75 3.9 Command Module ... 75 3.9.1 IOMap Offsets ... 75 3.10 Button Module ... 75 3.10.1 High-level functions... 76 3.10.2 Low-level functions ... 76 3.10.3 IOMap Offsets ... 78 3.11 UI Module... 78 3.11.1 IOMap Offsets ... 82 3.12 LowSpeed Module ... 83 3.12.1 High-level functions... 84 3.12.2 Low-level functions ... 86 3.12.3 IOMap Offsets ... 90 3.13 Comm Module ... 90 3.13.1 High-level functions... 91 3.13.2 Low-level functions ... 95 3.13.3 IOMap Offsets ... 105
3.14 HiTechnic API Functions ... 106
Table 1. NXC Keywords... 3
Table 2. Variable Types... 6
Table 3. Operators... 10
Table 4. ASM Keywords ... 14
Table 5. Expressions ... 15
Table 6. Conditions... 16
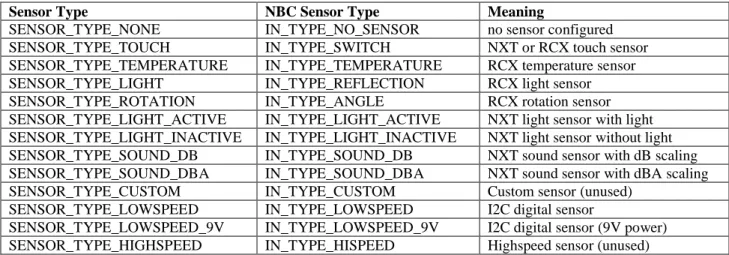
Table 7. Input Module Constants... 42
Table 8. Sensor Type Constants... 43
Table 9. Sensor Mode Constants ... 43
Table 10. Sensor Configuration Constants ... 44
Table 11. Sensor Field Constants... 44
Table 12. Input Module IOMap Offsets ... 49
Table 13. Output Module Constants ... 49
Table 14. Output Field Constants ... 52
Table 15. UpdateFlag Constants ... 53
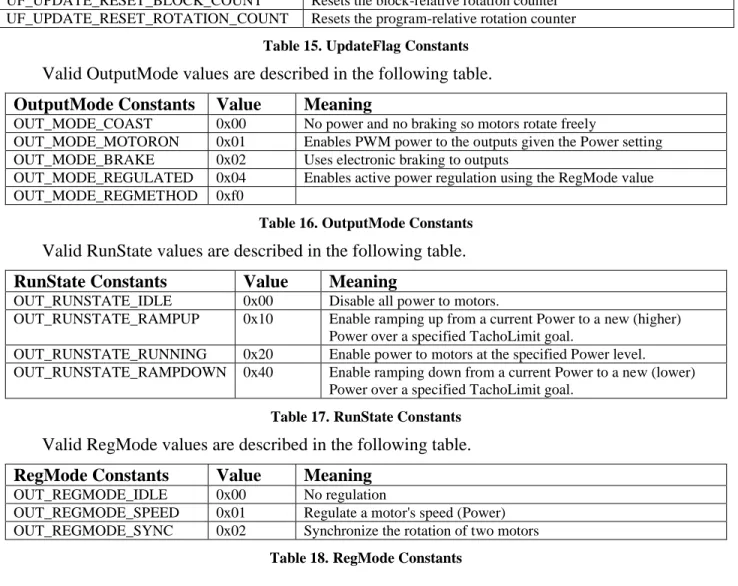
Table 16. OutputMode Constants ... 53
Table 17. RunState Constants ... 53
Table 18. RegMode Constants... 53
Table 19. Reset Constants... 54
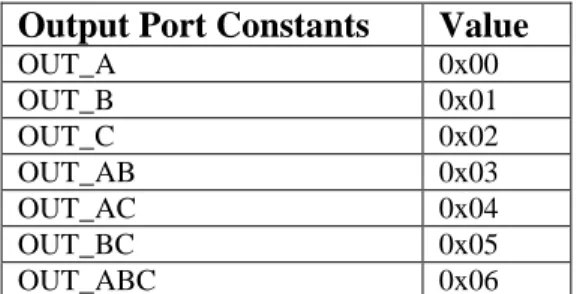
Table 20. Output Port Constants... 54
Table 21. Output Module IOMap Offsets... 61
Table 22. IOMA Constants ... 61
Table 23. Sound Module Constants ... 62
Table 24. Sound Flags Constants... 63
Table 25. Sound State Constants ... 63
Table 26. Sound Mode Constants ... 63
Table 27. Miscellaneous Sound Constants ... 64
Table 28. Sound Module IOMap Offsets... 65
Table 29. IOCtrl Module Constants... 66
Table 30. IOCtrl Module IOMap Offsets ... 66
Table 31. Display Module Constants... 66
Table 32. Display Flags Constants... 68
Table 33. Display Module IOMap Offsets ... 70
Table 34. Loader Module Constants... 71
Table 35. Loader Result Codes... 71
Table 36. Loader Module IOMap Offsets... 75
Table 37. Command Module Constants... 75
Table 38. Command Module IOMap Offsets ... 75
Table 39. Button Module Constants ... 75
Table 40. Button Constants... 76
Table 41. Button State Constants... 76
Table 42. Button Module IOMap Offsets ... 78
Table 47. UI Bluetooth State Constants... 79
Table 48. UI Module IOMap Offsets... 83
Table 49. LowSpeed Module Constants ... 83
Table 50. Lowspeed (I2C) Return Value Constants ... 84
Table 51. Low Speed State Constants... 86
Table 52. Low Speed Channel State Constants ... 86
Table 53. Low Speed Mode Constants ... 86
Table 54. Low Speed Error Type Constants... 87
Table 55. LowSpeed Module IOMap Offsets... 90
Table 56. Comm Module Constants ... 90
Table 57. Comm Miscellaneous Constants... 95
Table 58. Comm BtState Constants ... 96
Table 59. Comm BtStateStatus Constants ... 96
Table 60. Comm BtHwStatus Constants ... 96
Table 61. Comm HsFlags Constants... 96
Table 62. Comm HsState Constants ... 96
Table 63. Comm DeviceStatus Constants... 96
Table 64. Comm Module Interface Constants ... 97
1 Introduction
NXC stands for Not eXactly C. It is a simple language for programming the LEGO MINDSTORMS NXT product. The NXT has a bytecode interpreter (provided by LEGO), which can be used to execute programs. The NXC compiler translates a source program into NXT bytecodes, which can then be executed on the target itself. Although the preprocessor and control structures of NXC are very similar to C, NXC is not a general-purpose programming language - there are many restrictions that stem from limitations of the NXT bytecode interpreter.
Logically, NXC is defined as two separate pieces. The NXC language describes the syntax to be used in writing programs. The NXC Application Programming Interface (API) describes the system functions, constants, and macros that can be used by programs. This API is defined in a special file known as a "header file" which is, by default, automatically included when compiling a program.
This document describes both the NXC language and the NXC API. In short, it provides the information needed to write NXC programs. Since there are different interfaces for NXC, this document does not describe how to use any specific NXC implementation (such as the command-line compiler or Bricx Command Center). Refer to the
documentation provided with the NXC tool, such as the NXC User Manual, for information specific to that implementation.
For up-to-date information and documentation for NXC, visit the NXC website at http://bricxcc.sourceforge.net/nxc/.
2 The NXC Language
This section describes the NXC language itself. This includes the lexical rules used by the compiler, the structure programs, statements, and expressions, and the operation of the preprocessor.
NXC is a case-sensitive language just like C and C++. That means that the identifier "xYz" is not the same identifier as "Xyz". Similarly, the "if" statement begins with the keyword "if" but "iF", "If", or "IF" are all just valid identifiers – not keywords.
2.1
Lexical Rules
The lexical rules describe how NXC breaks a source file into individual tokens. This includes the way comments are written, the handling of whitespace, and valid characters for identifiers.
2.1.1 Comments
Two forms of comments are supported in NXC. The first form (traditional C comments) begin with /* and end with */. They may span multiple lines, but do not nest:
/* this is a comment */ /* this is a two
line comment */ /* another comment... /* trying to nest...
ending the inner comment...*/ this text is no longer a comment! */
The second form of comments begins with // and ends with a newline (sometimes known as C++ style comments).
// a single line comment
The compiler ignores comments. Their only purpose is to allow the programmer to document the source code.
2.1.2 Whitespace
Whitespace (spaces, tabs, and newlines) is used to separate tokens and to make programs more readable. As long as the tokens are distinguishable, adding or subtracting
whitespace has no effect on the meaning of a program. For example, the following lines of code both have the same meaning:
x=2;
x = 2 ;
Some of the C++ operators consist of multiple characters. In order to preserve these tokens whitespace must not be inserted within them. In the example below, the first line
uses a right shift operator ('>>'), but in the second line the added space causes the '>' symbols to be interpreted as two separate tokens and thus generate an error.
x = 1 >> 4; // set x to 1 right shifted by 4 bits x = 1 > > 4; // error
2.1.3 Numerical Constants
Numerical constants may be written in either decimal or hexadecimal form. Decimal constants consist of one or more decimal digits. Hexadecimal constants start with0x or
0X followed by one or more hexadecimal digits.
x = 10; // set x to 10
x = 0x10; // set x to 16 (10 hex)
2.1.4 Identifiers and Keywords
Identifiers are used for variable, task, function, and subroutine names. The first character of an identifier must be an upper or lower case letter or the underscore ('_'). Remaining characters may be letters, numbers, and an underscore.
A number of potential identifiers are reserved for use in the NXC language itself. These reserved words are call keywords and may not be used as identifiers. A complete list of keywords appears below:
__RETURN__ __RETVAL__ __STRRETVAL__ __TMPBYTE__ __TMPWORD__ __TMPLONG__ abs asm bool break byte case char const continue default do else false for goto if inline int long mutex priority repeat return safecall short sign start stop string struct sub switch task true typedef unsigned until void while Table 1. NXC Keywords
2.2
Program Structure
An NXC program is composed of code blocks and variables. There are two distinct types of code blocks: tasks and functions. Each type of code block has its own unique features, but they share a common structure.
2.2.1 Tasks
The NXT supports multi-threading, so a task in NXC directly corresponds to an NXT thread. Tasks are defined using the task keyword using the following syntax:
task name() {
// the task's code is placed here }
The name of the task may be any legal identifier. A program must always have at least one task - named "main" - which is started whenever the program is run. The maximum number of tasks is 256.
The body of a task consists of a list of statements. Scheduling dependant tasks using the Precedes or Follows API function is the primary mechanism supported by the NXT for starting other tasks concurrently. Tasks may also be started and stopped using the start
and stop statements. There is also an NXC API command, StopAllTasks, which stops
all currently running tasks. You can also stop all tasks using the Stop function. A task can stop itself via the ExitTo function or by task execution simply reaching the end of the task.
2.2.2 Functions
It is often helpful to group a set of statements together into a single function, which can then be called as needed. NXC supports functions with arguments and return values. Functions are defined using the following syntax:
[safecall] [inline] return_type name(argument_list) {
// body of the function }
The return type should be the type of data returned. In the C programming language, functions are specified with the type of data they return. Functions that do not return data are specified to return void.
The argument list may be empty, or may contain one or more argument definitions. An argument is defined by its type followed by its name. Commas separate multiple arguments. All values are represented as bool, char, byte, int, short, long, unsigned int, unsigned long, strings, struct types, or arrays of any type. NXC also supports passing argument types by value, by constant value, by reference, and by constant reference. When arguments are passed by value from the calling function to the callee the compiler must allocate a temporary variable to hold the argument. There are no restrictions on the type of value that may be used. However, since the function is working with a copy of the actual argument, the caller will not see any changes it makes to the value. In the example below, the function foo attempts to set the value of its argument to 2. This is perfectly legal, but since foo is working on a copy of the original argument, the variable y from main task remains unchanged.
void foo(int x) { x = 2; } task main() {
int y = 1; // y is now equal to 1 foo(y); // y is still equal to 1! }
The second type of argument, const arg_type, is also passed by value, but with the restriction that only constant values (e.g. numbers) may be used. This is rather important since there are a few NXT functions that only work with constant arguments.
void foo(const int x) {
PlaySound(x); // ok
x = 1; // error - cannot modify argument }
task main() {
foo(2); // ok
foo(4*5); // ok - expression is still constant foo(x); // error - x is not a constant
}
The third type, arg_type &, passes arguments by reference rather than by value. This allows the callee to modify the value and have those changes visible in the caller. However, only variables may be used when calling a function using arg_type &
arguments:
void foo(int &x) { x = 2; } task main() { int y = 1; // y is equal to 1 foo(y); // y is now equal to 2
foo(2); // error - only variables allowed }
The fourth type, const arg_type &, is rather unusual. It is also passed by reference, but with the restriction that the callee is not allowed to modify the value. Because of this restriction, the compiler is able to pass anything (not just variables) to functions using this type of argument. In general this is the most efficient way to pass arguments in NXC. Functions must be invoked with the correct number (and type) of arguments. The
void foo(int bar, const int baz) { // do something here... } task main() {
int x; // declare variable x foo(1, 2); // ok
foo(x, 2); // ok
foo(2, x); // error - 2nd argument not constant! foo(2); // error - wrong number of arguments! }
NXC functions may optionally be marked as inline functions. This means that each call to a function will result in another copy of the function's code being included in the program. Unless used judiciously, inline functions can lead to excessive code size. If a function is not marked as inline then an actual NXT subroutine is created and the call to the function in NXC code will result in a subroutine call to the NXT subroutine. The total number of non-inline functions (aka subroutines) and tasks must not exceed 256. Another optional keyword that can be specified prior to the return type of a function is the safecall keyword. If a function is marked as safecall then the compiler will
synchronize the execution of this function across multiple threads by wrapping each call to the function in Acquire and Release calls. If a second thread tries to call a safecall function while another thread is executing it the second thread will have to wait until the function returns to the first thread.
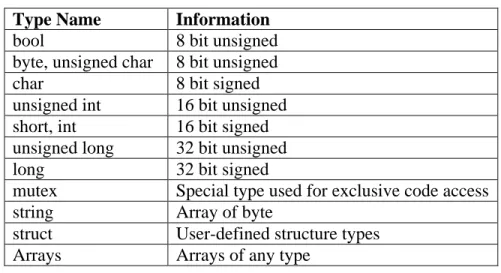
2.2.3 Variables
All variables in NXC are of the following types: Type Name Information bool 8 bit unsigned byte, unsigned char 8 bit unsigned char 8 bit signed unsigned int 16 bit unsigned short, int 16 bit signed unsigned long 32 bit unsigned long 32 bit signed
mutex Special type used for exclusive code access string Array of byte
struct User-defined structure types Arrays Arrays of any type
Table 2. Variable Types
Variables are declared using the keyword for the desired type followed by a comma-separated list of variable names and terminated by a semicolon (';'). Optionally, an initial
value for each variable may be specified using an equals sign ('=') after the variable name. Several examples appear below:
int x; // declare x
bool y,z; // declare y and z
long a=1,b; // declare a and b, initialize a to 1
Global variables are declared at the program scope (outside of any code block). Once declared, they may be used within all tasks, functions, and subroutines. Their scope begins at declaration and ends at the end of the program.
Local variables may be declared within tasks and functions. Such variables are only accessible within the code block in which they are defined. Specifically, their scope begins with their declaration and ends at the end of their code block. In the case of local variables, a compound statement (a group of statements bracketed by '{' and '}') is considered a block:
int x; // x is global task main()
{
int y; // y is local to task main x = y; // ok
{ // begin compound statement int z; // local z declared y = z; // ok
}
y = z; // error - z no longer in scope }
task foo() {
x = 1; // ok
y = 2; // error - y is not global }
2.2.4 Structs
NXC supports user-defined aggregate types known as structs. These are declared very much like you declare structs in a C program.
struct car { string car_type; int manu_year; }; struct person { string name; int age;
myType fred = 23; person myPerson;
After you have defined the structure type you can use the new type to declare a variable or nested within another structure type declaration. Members (or fields) within the struct are accessed using a dot notation.
myPerson.age = 40; anotherPerson = myPerson; fooBar.car_type = "honda"; fooBar.manu_year = anotherPerson.age;
You can assign structs of the same type but the compiler will complain if the types do not match.
2.2.5 Arrays
NXC also support arrays. Arrays are declared the same way as ordinary variables, but with an open and close bracket following the variable name.
int my_array[]; // declare an array with 0 elements
To declare arrays with more than one dimension simply add more pairs of square brackets. The maximum number of dimensions supported in NXC is 4.
bool my_array[][]; // declare a 2-dimensional array
Global arrays with one dimension can be initialized at the point of declaration using the following syntax:
int X[] = {1, 2, 3, 4}, Y[]={10, 10}; // 2 arrays
The elements of an array are identified by their position within the array (called an index). The first element has an index of 0, the second has index 1, etc. For example:
my_array[0] = 123; // set first element to 123
my_array[1] = my_array[2]; // copy third into second
Currently there are some limitations on how arrays can be used. Some of these limitations will likely be removed in future versions of NXC.
To initialize local arrays or arrays with multiple dimensions it is necessary to use the ArrayInit function. The following example shows how to initialize a two-dimensional array using ArrayInit. It also demonstrates some of the supported array API functions and expressions. task main() { int myArray[][]; int myVector[]; byte fooArray[][][];
ArrayInit(myArray, myVector, 10); // 10 vectors myArray ArrayInit(fooArray, myArray, 2); // 2 myArrays in fooArray myVector = myArray[1]; // okay as of b25
fooArray[1] = myArray; // okay as of b25 myVector[4] = 34;
myArray[1] = myVector; // okay as of b25 int ax[], ay[];
ArrayBuild(ax, 5, 6);
ArrayBuild(ay, 2, 10, 6, 43); int axlen = ArrayLen(ax);
ArraySubset(ax, ay, 1, 2); // ax = {10, 6}
if (ax == ay) { // array comparisons supported as of b25 }
}
NXC also supports specifying an initial size for both global and local arrays. The compiler automatically generates the required code to correctly initialize the array to zeros. If a global array declaration includes both a size and a set of initial values the size is ignored in favor of the specified values.
task main() {
int myArray[10][10]; int myVector[10];
// ArrayInit(myVector, 0, 10); // 10 zeros in myVector // ArrayInit(myArray, myVector, 10); // 10 vectors myArray /*
The calls to ArrayInit are not required since we specified the equivalent initial sizes above. In fact, the myVector array is not needed unless
we have a use for it other than to initialize myArray. */
}
2.3
Statements
The body of a code block (task or function) is composed of statements. Statements are terminated with a semi-colon (';').
2.3.1 Variable Declaration
Variable declaration, as described in the previous section, is one type of statement. It declares a local variable (with optional initialization) for use within the code block. The syntax for a variable declaration is:
name[=expression]
Arrays of variables may also be declared:
int array[n][=initializer for global one-dimension arrays];
2.3.2 Assignment
Once declared, variables may be assigned the value of an expression:
variable assign_operator expression;
There are nine different assignment operators. The most basic operator, '=', simply assigns the value of the expression to the variable. The other operators modify the variable's value in some other way as shown in the table below
Operator Action
= Set variable to expression += Add expression to variable -= Subtract expression from variable *= Multiple variable by expression /= Divide variable by expression
%= Set variable to remainder after dividing by expression &= Bitwise AND expression into variable
|= Bitwise OR expression into variable ^= Bitwise exclusive OR into variable ||= Set variable to absolute value of expression +-= Set variable to sign (-1,+1,0) of expression >>= Right shift variable by expression
<<= Left shift variable by expression
Table 3. Operators Some examples: x = 2; // set x to 2 y = 7; // set y to 7 x += y; // x is 9, y is still 7
2.3.3 Control Structures
The simplest control structure is a compound statement. This is a list of statements enclosed within curly braces ('{' and '}'):
{
x = 1; y = 2; }
Although this may not seem very significant, it plays a crucial role in building more complicated control structures. Many control structures expect a single statement as their body. By using a compound statement, the same control structure can be used to control multiple statements.
The if statement evaluates a condition. If the condition is true it executes one statement (the consequence). An optional second statement (the alternative) is executed if the condition is false. The two syntaxes for an ifstatement is shown below.
if (condition) consequence
if (condition) consequence else alternative
Note that the condition is enclosed in parentheses. Examples are shown below. Note how a compound statement is used in the last example to allow two statements to be executed as the consequence of the condition.
if (x==1) y = 2;
if (x==1) y = 3; else y = 4; if (x==1) { y = 1; z = 2; }
The while statement is used to construct a conditional loop. The condition is evaluated, and if true the body of the loop is executed, then the condition is tested again. This process continues until the condition becomes false (or a break statement is executed). The syntax for a while loop appears below:
while (condition) body
It is very common to use a compound statement as the body of a loop:
while(x < 10) {
x = x+1; y = y*2; }
A variant of the while loop is the do-while loop. Its syntax is:
do body while (condition)
The difference between a while loop and a do-whileloop is that the do-while loop always executes the body at least once, whereas the while loop may not execute it at all. Another kind of loop is the for loop:
for(stmt1 ; condition ; stmt2) body
A for loop always executes stmt1, then it repeatedly checks the condition and while it remains true executes the body followed by stmt2. The for loop is equivalent to:
stmt1; while(condition) { body stmt2; }
The repeat statement executes a loop a specified number of times:
repeat (expression) body
different from both the while and do-while loops which evaluate their condition each time through the loop.
A switch statement can be used to execute one of several different blocks of code depending on the value of an expression. One or more case labels precede each block of code. Each case must be a constant and unique within the switch statement. The switch statement evaluates the expression then looks for a matching case label. It will then execute any statements following the matching case until either a break statement or the end of the switch is reached. A single default label may also be used - it will match any value not already appearing in a case label. Technically, a switch statement has the
following syntax:
switch (expression) body
The case and default labels are not statements in themselves - they are labels that precede statements. Multiple labels can precede the same statement. These labels have the
following syntax
case constant_expression : default :
A typical switch statement might look like this:
switch(x) { case 1: // do something when X is 1 break; case 2: case 3:
// do something else when x is 2 or 3 break;
default:
// do this when x is not 1, 2, or 3 break;
}
NXC also supports using string types in the switch expression and constant strings in case labels.
The goto statement forces a program to jump to the specified location. Statements in a program can be labeled by preceding them with an identifier and a colon. A goto statement then specifies the label that the program should jump to. For example, this is how an infinite loop that increments a variable could be implemented using goto:
my_loop: x++;
goto my_loop;
The goto statement should be used sparingly and cautiously. In almost every case, control structures such as if, while, and switch make a program much more readable and maintainable than using goto.
NXC also defines the until macro which provides a convenient alternative to the
while loop. The actual definition of until is:
#define until(c) while(!(c))
In other words, until will continue looping until the condition becomes true. It is most often used in conjunction with an empty body statement:
until(SENSOR_1 == 1); // wait for sensor to be pressed
2.3.4 The asm Statement
The asm statement is used to define many of the NXC API calls. The syntax of the statement is:
asm {
one or more lines of assembly language }
The statement simply emits the body of the statement as NeXT Byte Codes (NBC) code and passes it directly to the NBC compiler backend. The asm statement can often be used to optimize code so that it executes as fast as possible on the NXT firmware. The
following example shows an asm block containing variable declarations, labels, and basic NBC statements as well as comments.
asm { // jmp __lbl00D5 dseg segment sl0000 slong sl0005 slong bGTTrue byte dseg ends mov sl0000, 0x0 mov sl0005, sl0000 mov sl0000, 0x1 cmp GT, bGTTrue, sl0005, sl0000 set bGTTrue, FALSE
brtst EQ, __lbl00D5, bGTTrue __lbl00D5:
}
A few NXC keywords have meaning only within an asm statement. These keywords provide a means for returning string or scalar values from asm statements and for using temporary integer variables of byte, word, and long sizes.
ASM Keyword Meaning
__RETURN__ Used to return a value other than __RETVAL__ or __STRRETVAL__
__RETVAL__ Writing to this 4-byte value returns it to the calling program
__STRRETVAL__ Writing to this string value returns it to the calling program
__TMPBYTE__ Use this temporary variable to write and return single byte values
Table 4. ASM Keywords
The asm block statement and these special ASM keywords are used throughout the NXC API. See the NXCDefs.h header file for several examples of how they can be put to use. To keep the main NXC code as "C-like" as possible and for the sake of better readability NXC asm block statements can be wrapped in preprocessor macros and placed in custom header files which are included using #include. The following example demonstrates using macro wrappers around asm block statements.
#define SetMotorSpeed(port, cc, thresh, fast, slow) \ asm { \
set theSpeed, fast \
brcmp cc, EndIfOut__I__, SV, thresh \ set theSpeed, slow \
EndIfOut__I__: \
OnFwd(port, theSpeed) \ __IncI__ \
}
2.3.5 Other Statements
A function call is a statement of the form:
name(arguments);
The arguments list is a comma-separated list of expressions. The number and type of arguments supplied must match the definition of the function itself.
Tasks may be started or stopped with the following statements.
start task_name; stop task_name;
You can adjust the priority of a task using the priority statement.
priority task_name, new_priority;
Within loops (such as a while loop) the break statement can be used to exit the loop and the continue statement can be used to skip to the top of the next iteration of the loop. The break statement can also be used to exit a switch statement.
break; continue;
It is possible to cause a function to return before it reaches the end of its code using the
return statement with an optional return value.
return [expression];
Many expressions are not legal statements. One notable exception is expressions involving the increment (++) or decrement (--) operators.
x++;
2.4
Expressions
Values are the most primitive type of expressions. More complicated expressions are formed from values using various operators. The NXC language only has two built in kinds of values: numerical constants and variables.
Numerical constants in the NXT are represented as integers. The type depends on the value of the constant. NXC internally uses 32 bit signed math for constant expression evaluation. Numeric constants can be written as either decimal (e.g. 123) or hexadecimal (e.g. 0xABC). Presently, there is very little range checking on constants, so using a value larger than expected may have unusual effects.
Two special values are predefined: true and false. The value of false is zero (0), while the value of true is one (1). The same values hold for relational operators (e.g. <): when the relation is false the value is 0, otherwise the value is 1.
Values may be combined using operators. Several of the operators may only be used in evaluating constant expressions, which means that their operands must either be
constants, or expressions involving nothing but constants. The operators are listed here in order of precedence (highest to lowest).
Operator Description Associativity Restriction Example abs() sign() Absolute value Sign of operand n/a n/a abs(x) sign(x)
++, -- Post increment, Post decrement
left variables only x++
-~ !
Unary minus
Bitwise negation (unary) Logical negation right right right -x ~123 !x *, /, % Multiplication, division, modulo left x * y
+, - Addition, subtraction left x + y
<<, >> Left and right shift left x << 4
<, >, <=, >=
relational operators left x < y
==, != equal to, not equal to left x == 1
& Bitwise AND left x & y
^ Bitwise XOR left x ^ y
| Bitwise OR left x | y
&& Logical AND left x && y
|| Logical OR left x || y
? : conditional value n/a x==1 ? y : z
Where needed, parentheses may be used to change the order of evaluation:
x = 2 + 3 * 4; // set x to 14 y = (2 + 3) * 4; // set y to 20
2.4.1 Conditions
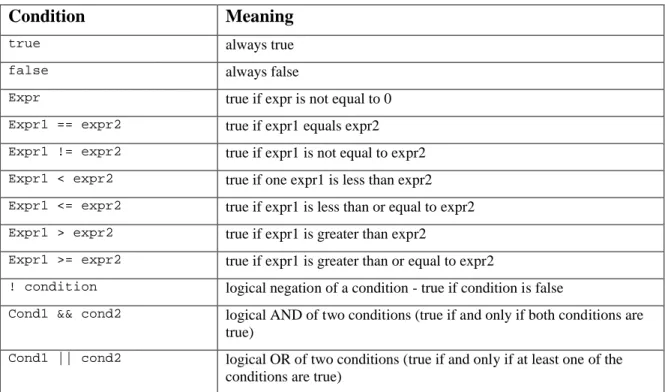
Comparing two expressions forms a condition. There are also two constant conditions
-true and false- that always evaluate to true or false respectively. A condition may be negated with the negation operator, or two conditions combined with the AND and OR operators. The table below summarizes the different types of conditions.
Condition Meaning
true always true
false always false
Expr true if expr is not equal to 0
Expr1 == expr2 true if expr1 equals expr2
Expr1 != expr2 true if expr1 is not equal to expr2
Expr1 < expr2 true if one expr1 is less than expr2
Expr1 <= expr2 true if expr1 is less than or equal to expr2
Expr1 > expr2 true if expr1 is greater than expr2
Expr1 >= expr2 true if expr1 is greater than or equal to expr2
! condition logical negation of a condition - true if condition is false
Cond1 && cond2 logical AND of two conditions (true if and only if both conditions are true)
Cond1 || cond2 logical OR of two conditions (true if and only if at least one of the
conditions are true)
Table 6. Conditions
2.5
The Preprocessor
The preprocessor implements the following directives: #include, #define, #ifdef,
#ifndef, #endif, #if, #elif, #undef, ##, #line, and #pragma. Its
implementation is fairly close to a standard C preprocessor, so most things that work in a generic C preprocessor should have the expected effect in NXC. Significant deviations are listed below.
2.5.1 #include
The #include command works as expected, with the caveat that the filename must be enclosed in double quotes. There is no notion of a system include path, so enclosing a filename in angle brackets is forbidden.
#include "foo.h" // ok #include <foo.h> // error!
NXC programs can begin with #include "NXCDefs.h" but they don't need to. This standard header file includes many important constants and macros which form the core NXC API. Current versions of NXC no longer require that you manually include the NXCDefs.h header file. Unless you specifically tell the compiler to ignore the standard system files this header file will automatically be included for you.
2.5.2 #define
The #define command is used for simple macro substitution. Redefinition of a macro is an error. The end of the line normally terminates macros, but the newline may be escaped with the backslash ('\') to allow multi-line macros:
#define foo(x) do { bar(x); \
baz(x); } while(false)
The #undef directive may be used to remove a macro’s definition.
2.5.3 ## (Concatenation)
The ## directive works similar to the C preprocessor. It is replaced by nothing, which causes tokens on either side to be concatenated together. Because it acts as a separator initially, it can be used within macro functions to produce identifiers via combination with parameter values.
2.5.4 Conditional Compilation
Conditional compilation works similar to the C preprocessor. The following preprocessor directives may be used:
#ifdef symbol #ifndef symbol #else #endif #if condition #elif
3 NXC API
The NXC API defines a set of constants, functions, values, and macros that provide access to various capabilities of the NXT such as sensors, outputs, and communication. The API consists of functions, values, and constants. A function is something that can be called as a statement. Typically it takes some action or configures some parameter. Values represent some parameter or quantity and can be used in expressions. Constants are symbolic names for values that have special meanings for the target. Often, a set of constants will be used in conjunction with a function.
3.1
General Features
3.1.1 Timing Functions
Wait(time)
Function
Make a task sleep for specified amount of time (in 1000ths of a second). The time argument may be an expression or a constant:
Wait(1000); // wait 1 second
Wait(Random(1000)); // wait random time up to 1 second
CurrentTick()
Value
Return an unsigned 32-bit value, which is the current system timing value (called a "tick") in milliseconds.
x = CurrentTick();
FirstTick()
Value
Return an unsigned 32-bit value, which is the system timing value (called a "tick") in milliseconds at the time that the program began running.
x = FirstTick();
SleepTime()
Value
Return the number of minutes that the NXT will remain on before it automatically shuts down.
x = SleepTime();
SleepTimer()
Value
Return the number of minutes left in the countdown to zero from the original SleepTime value. When the SleepTimer value reaches zero the NXT will shutdown.
ResetSleepTimer()
Function
Reset the system sleep timer back to the SleepTime value. Executing this function periodically can keep the NXT from shutting down while a program is running.
ResetSleepTimer();
SetSleepTime(minutes)
Function
Set the NXT sleep timeout value to the specified number of minutes.
SetSleepTime(8);
SleepNow()
Function
Turn off the NXT immediately.
SleepNow();
SetSleepTimer(minutes)
Function
Set the system sleep timer to the specified number of minutes.
SetSleepTimer(3);
3.1.2 Program Control Functions
Stop(bvalue)
Function
Stop the running program if bvalue is true. This will halt the program completely, so any code following this command will be ignored.
Stop(x == 24); // stop the program if x==24
StopAllTasks()
Function
Stop all currently running tasks. This will halt the program completely, so any code following this command will be ignored.
StopAllTasks(); // stop the program
StartTask(task)
Function
Start the specified task.
StartTask(sound); // start the sound task
StopTask(task)
Function
Stop the specified task. This requires the enhanced NBC/NXC firmware.
Acquire(mutex)
Function
Acquire the specified mutex variable. If another task already has acquired the mutex then the current task will be suspended until the mutex is released by the other task. This function is used to ensure that the current task has exclusive access to a shared resource, such as the display or a motor. After the current task has finished using the shared resource the program should call Release to allow other tasks to acquire the mutex.
Acquire(motorMutex); // make sure we have exclusive access // use the motors
Release(motorMutex);
Release(mutex)
Function
Release the specified mutex variable. Use this to relinquish a mutex so that it can be acquired by another task. Release should always be called after a matching call to Acquire and as soon as possible after a shared resource is no longer needed.
Acquire(motorMutex); // make sure we have exclusive access // use the motors
Release(motorMutex); // release mutex for other tasks
Precedes(task1, task2, ..., taskN)
Function
Schedule the specified tasks for execution once the current task has completed executing. The tasks will all execute simultaneously unless other dependencies prevent them from doing so. Generally this function should be called once within a task – preferably at the start of the task definition.
Precedes(moving, drawing, playing);
Follows(task1, task2, ..., taskN)
Function
Schedule this task to follow the specified tasks so that it will execute once any of the specified tasks has completed executing. Generally this function should be called once within a task – preferably at the start of the task definition. If multiple tasks declare that they follow the same task then they will all execute simultaneously unless other dependencies prevent them from doing so.
Follows(main);
ExitTo(task)
Function
Immediately exit the current task and start executing the specified task.
3.1.3 String Functions
StrToNum(str)
Value
Return the numeric value specified by the string passed to the function. If the content of the string is not a numeric value then this function returns zero.
x = StrToNum(strVal);
StrLen(str)
Value
Return the length of the specified string. The length of a string does not include the null terminator at the end of the string.
x = StrLen(msg); // return the length of msg
StrIndex(str, idx)
Value
Return the numeric value of the character in the specified string at the specified index.
x = StrIndex(msg, 2); // return the value of msg[2]
NumToStr(value)
Value
Return the string representation of the specified numeric value.
msg = NumToStr(-2); // returns "-2" in a string
FormatNum(fmtstr, value)
Value
Return the formatted string using the format and value. Use standard numeric sprintf format specifiers within the format string.
msg = FormatNum("value = %d", x);
StrCat(str1, str2, ..., strN)
Value
Return a string which is the result of concatenating all of the string arguments together.
msg = StrCat("test", "please"); // returns "testplease"
SubStr(string, idx, len)
Value
Return a sub-string from the specified input string starting at idx and including the specified number of characters.
msg = SubStr("test", 1, 2); // returns "es"
StrReplace(string, idx, newStr)
Value
Return a string with the part of the string replaced (starting at the specified index) with the contents of the new string value provided in the third argument.
Flatten(value)
Value
Return a string containing the byte representation of the specified value.
msg = Flatten(48); // returns "0" since 48 == ascii("0") msg = Flatten(12337); // returns "10" (little-endian)
FlattenVar(anytype)
Value
Return a string containing the byte representation of the specified variable.
stringValue = FlattenVar(myStruct);
UnflattenVar(string, anytype)
Function
Convert a string containing the byte representation of the specified variable back into the original variable type.
UnflattenVar(stringValue, myStruct);
ByteArrayToStr(arr)
Value
Convert the specified array to a string by appending a null terminator to the end of the array elements. The array must be a one-dimensional array of byte.
myStr = ByteArrayToStr(myArray);
ByteArrayToStrEx(arr, out str)
Function
Convert the specified array to a string by appending a null terminator to the end of the array elements. The array must be a one-dimensional array of byte.
ByteArrayToStrEx(myArray, myStr);
3.1.4 Array Functions
StrToByteArray(str, out arr)
Function
Convert the specified string to an array of byte by removing the null terminator at the end of the string. The output array variable must be a one-dimensional array of byte.
StrToByteArray(myStr, myArray);
ArrayLen(array)
Value
Return the length of the specified array.
x = ArrayLen(myArray);
ArrayInit(array, value, count)
Function
Initialize the array to contain count elements with each element equal to the value provided. To initialize a multi-dimensional array, the value should be an array of N-1 dimensions, where N is the number of dimensions in the array being initialized.
ArrayInit(myArray, 0, 10); // 10 elements == zero
ArraySubset(out aout, asrc, idx, len)
Function
Copy a subset of the source array starting at the specified index and containing the specified number of elements into the destination array.
ArraySubset(myArray, srcArray, 2, 5); copy 5 elements
ArrayBuild(out aout, src1 [, src2, …, srcN])
Function
Build a new array from the specified source(s). The sources can be of any type. If a source is an array then all of its elements are added to the output array.
ArrayBuild(myArray, src1, src2);
3.1.5 Numeric Functions
Random(n)
Value
Return an unsigned 16-bit random number between 0 and n (exclusive). N can be a constant or a variable.
x = Random(10); // return a value of 0..9
Random()
Value
Return a signed 16-bit random number.
x = Random();
Sqrt(x)
Value
Return the square root of the specified value.
x = Sqrt(x);
Sin(degrees)
Value
Return the sine of the specified degrees value. The result is 100 times the sine value (-100..100).
x = Sin(theta);
Cos(degrees)
Value
Return the cosine of the specified degrees value. The result is 100 times the cosine value (-100..100).
Asin(value)
Value
Return the inverse sine of the specified value 100..100). The result is degrees (-90..90).
deg = Asin(80);
Acos(value)
Value
Return the inverse cosine of the specified value (-100..100). The result is degrees (0..180).
deg = Acos(0);
bcd2dec(bcdValue)
Value
Return the decimal equivalent of the binary coded decimal value provided.
dec = bcd2dec(0x3a);
3.1.6 Low-level System Functions
There are several standard structures that are defined by the NXC API for use with calls to low-level system functions defined within the NXT firmware. These structures are the means for passing values into the system functions and for returning values from the system functions. In order to call a system function you will need to declare a variable of the required system function structure type, set the structure members as needed by the system function, call the function, and then read the results, if desired.
Many of these system functions are wrapped into higher level NXC API functions so that the details are hidden from view. Using these low-level API calls you can improve the speed of your programs a little.
If you install the NBC/NXC enhanced standard NXT firmware on your NXT all the screen drawing system function also supports clearing pixels in addition to setting them. To switch from setting pixels to clearing pixels just specify the
DRAW_OPT_CLEAR_PIXELS value (0x0004) in the Options member of the structures. This value can be ORed together with the DRAW_OPT_CLEAR_WHOLE_SCREEN value (0x0001) if desired. Also, some of the system functions and their associated structures are only supported by the NBC/NXC enhanced standard NXT firmware. These functions are marked with (+) to indicate this additional requirement.
The first two structures define types are used within several other structures required by the screen drawing system functions.
struct LocationType { int X; int Y; }; struct SizeType { int Width; int Height; };
SysDrawText(DrawTextType & args)
Function
This function lets you draw text on the NXT LCD given the parameters you pass in via the DrawTextType structure. The structure type declaration is shown below.
struct DrawTextType { char Result;
LocationType Location; string Text;
unsigned long Options; };
Declare a variable of this type, set its members, and then call the function, passing in your variable of this structure type.
DrawTextType dtArgs; dtArgs.Location.X = 0;
dtArgs.Location.Y = LCD_LINE1; dtArgs.Text = "Please Work";
dtArgs.Options = 0x01; // clear before drawing SysDrawText(dtArgs);
SysDrawPoint(DrawPointType & args)
Function
This function lets you draw a pixel on the NXT LCD given the parameters you pass in via the DrawPointType structure. The structure type declaration is shown below.
struct DrawPointType { char Result;
LocationType Location; unsigned long Options; };
Declare a variable of this type, set its members, and then call the function, passing in your variable of this structure type.
DrawPointType dpArgs; dpArgs.Location.X = 20; dpArgs.Location.Y = 20;
dpArgs.Options = 0x04; // clear this pixel SysDrawPoint(dpArgs);
SysDrawLine(DrawLineType & args)
Function
This function lets you draw a line on the NXT LCD given the parameters you pass in via the DrawLineType structure. The structure type declaration is shown below.
struct DrawLineType { char Result;
LocationType StartLoc; LocationType EndLoc; unsigned long Options; };
Declare a variable of this type, set its members, and then call the function, passing in your variable of this structure type.
DrawLineType dlArgs; dlArgs.StartLoc.X = 20; dlArgs.StartLoc.Y = 20; dlArgs.EndLoc.X = 60; dlArgs.EndLoc.Y = 60;
dlArgs.Options = 0x01; // clear before drawing SysDrawLine(dlArgs);
SysDrawCircle(DrawCircleType & args)
Function
This function lets you draw a circle on the NXT LCD given the parameters you pass in via the DrawCircleType structure. The structure type declaration is shown below.
struct DrawCircleType { char Result;
LocationType Center; byte Size;
unsigned long Options; };
Declare a variable of this type, set its members, and then call the function, passing in your variable of this structure type.
DrawCircleType dcArgs; dcArgs.Center.X = 20; dcArgs.Center.Y = 20;
dcArgs.Size = 10; // radius
dcArgs.Options = 0x01; // clear before drawing SysDrawCircle(dcArgs);
SysDrawRect(DrawRectType & args)
Function
This function lets you draw a rectangle on the NXT LCD given the parameters you pass in via the DrawRectType structure. The structure type declaration is shown below.
struct DrawRectType { char Result;
LocationType Location; SizeType Size;
unsigned long Options; };
Declare a variable of this type, set its members, and then call the function, passing in your variable of this structure type.
DrawRectType drArgs; drArgs.Location.X = 20; drArgs.Location.Y = 20; drArgs.Size.Width = 20; drArgs.Size.Height = 10;
drArgs.Options = 0x00; // do not clear before drawing SysDrawRect(drArgs);
SysDrawGraphic(DrawGraphicType & args)
Function
This function lets you draw a graphic image (RIC file) on the NXT LCD given the parameters you pass in via the DrawGraphicType structure. The structure type declaration is shown below.
struct DrawGraphicType { char Result;
LocationType Location; string Filename;
int Variables[];
unsigned long Options; };
Declare a variable of this type, set its members, and then call the function, passing in your variable of this structure type.
DrawGraphicType dgArgs; dgArgs.Location.X = 20; dgArgs.Location.Y = 20; dgArgs.Filename = "image.ric"; ArrayInit(dgArgs.Variables, 0, 10); // 10 zeros dgArgs.Variables[0] = 12; dgArgs.Variables[1] = 14; // etc...
dgArgs.Options = 0x00; // do not clear before drawing SysDrawGraphic(dgArgs);
SysSetScreenMode(SetScreenModeType & args)
Function
This function lets you set the screen mode of the NXT LCD given the parameters you pass in via the SetScreenModeType structure. The standard NXT firmware only supports setting the ScreenMode to SCREEN_MODE_RESTORE, which has a value of 0x00. If you install the NBC/NXC enhanced standard NXT firmware this system function also supports setting the ScreenMode to SCREEN_MODE_CLEAR, which has a value of 0x01. The structure type declaration is shown below.
struct SetScreenModeType { char Result;
unsigned long ScreenMode; };
Declare a variable of this type, set its members, and then call the function, passing in your variable of this structure type.
SetScreenModeType ssmArgs;
ssmArgs.ScreenMode = 0x00; // restore default NXT screen SysSetScreenMode(ssmArgs);
SysSoundPlayFile(SoundPlayFileType & args)
Function
This function lets you play a sound file given the parameters you pass in via the
or compressed ADPCM samples or it can be an NXT melody (RMD) file containing frequency and duration values. The structure type declaration is shown below.
struct SoundPlayFileType { char Result; string Filename; bool Loop; byte SoundLevel; };
Declare a variable of this type, set its members, and then call the function, passing in your variable of this structure type.
SoundPlayFileType spfArgs; spfArgs.Filename = "hello.rso"; spfArgs.Loop = false;
spfArgs.SoundLevel = 3; SysSoundPlayFile(spfArgs);
SysSoundPlayTone(SoundPlayToneType & args)
Function
This function lets you play a tone given the parameters you pass in via the SoundPlayToneType structure. The structure type declaration is shown below.
struct SoundPlayToneType { char Result;
unsigned int Frequency; unsigned int Duration; bool Loop;
byte SoundLevel; };
Declare a variable of this type, set its members, and then call the function, passing in your variable of this structure type.
SoundPlayToneType sptArgs; sptArgs.Frequency = 440; sptArgs.Duration = 1000; // 1 second sptArgs.Loop = false; sptArgs.SoundLevel = 3; SysSoundPlayTone(sptArgs);
SysSoundGetState(SoundGetStateType & args)
Function
This function lets you retrieve information about the sound module state via the SoundGetStateType structure. Constants for sound state are SOUND_STATE_IDLE,
SOUND_STATE_FILE, SOUND_STATE_TONE, and SOUND_STATE_STOP. Constants for sound flags are SOUND_FLAGS_IDLE, SOUND_FLAGS_UPDATE, and
SOUND_FLAGS_RUNNING. The structure type declaration is shown below.
struct SoundGetStateType { byte State;
byte Flags; };
Declare a variable of this type, set its members, and then call the function, passing in your variable of this structure type.
SoundGetStateType sgsArgs; SysSoundGetState(sgsArgs);
if (sgsArgs.State == SOUND_STATE_IDLE) {/* do stuff */}
SysSoundSetState(SoundSetStateType & args)
Function
This function lets you set sound module state settings via the SoundSetStateType structure. Constants for sound state are SOUND_STATE_IDLE, SOUND_STATE_FILE,
SOUND_STATE_TONE, and SOUND_STATE_STOP. Constants for sound flags are
SOUND_FLAGS_IDLE, SOUND_FLAGS_UPDATE, and SOUND_FLAGS_RUNNING. The structure type declaration is shown below.
struct SoundSetStateType { byte Result;
byte State; byte Flags; };
Declare a variable of this type, set its members, and then call the function, passing in your variable of this structure type.
SoundSetStateType sssArgs;
sssArgs.State = SOUND_STATE_STOP; SysSoundSetState(sssArgs);
SysReadButton(ReadButtonType & args)
Function
This function lets you read button state information via the ReadButtonType structure. The structure type declaration is shown below.
struct ReadButtonType { char Result;
byte Index; bool Pressed; byte Count;
bool Reset; // reset count after reading? };
Declare a variable of this type, set its members, and then call the function, passing in your variable of this structure type.
ReadButtonType rbArgs; rbArgs.Index = BTNRIGHT; SysReadButton(rbArgs);
if (rbArgs.Pressed) {/* do something */}
SysRandomNumber(RandomNumberType & args)
Function
This function lets you obtain a random number via the RandomNumberType structure. The structure type declaration is shown below.
struct RandomNumberType { int Result;
};
Declare a variable of this type and then call the function, passing in your variable of this structure type.
RandomNumberType rnArgs; SysRandomNumber(rnArgs);
int myRandomValue = rnArgs.Result;
SysGetStartTick(GetStartTickType & args)
Function
This function lets you obtain the tick value at the time your program began executing via the GetStartTickType structure. The structure type declaration is shown below.
struct GetStartTickType { unsigned long Result; };
Declare a variable of this type and then call the function, passing in your variable of this structure type.
GetStartTickType gstArgs; SysGetStartTick(gstArgs);
unsigned long myStart = gstArgs.Result;
SysKeepAlive(KeepAliveType & args)
Function
This function lets you reset the sleep timer via the KeepAliveType structure. The structure type declaration is shown below.
struct KeepAliveType { unsigned long Result; };
Declare a variable of this type and then call the function, passing in your variable of this structure type.
KeepAliveType kaArgs;
SysKeepAlive(kaArgs); // reset sleep timer
SysFileOpenWrite(FileOpenType & args)
Function
This function lets you create a file that you can write to using the values specified via the FileOpenType structure. The structure type declaration is shown below. Use the
FileHandle return value for subsequent file write operations. The desired maximum file capacity in bytes is specified via the Length member.
struct FileOpenType { unsigned int Result; byte FileHandle; string Filename; unsigned long Length; };
Declare a variable of this type, set its members, and then call the function, passing in your variable of this structure type.
FileOpenType foArgs;
foArgs.Filename = "myfile.txt";
foArgs.Length = 256; // create with capacity for 256 bytes SysFileOpenWrite(foArgs); // create the file
if (foArgs.Result == NO_ERR) {
// write to the file using FileHandle }
SysFileOpenAppend(FileOpenType & args)
Function
This function lets you open an existing file that you can write to using the values
specified via the FileOpenType structure. The structure type declaration is shown below. Use the FileHandle return value for subsequent file write operations. The available length remaining in the file is returned via the Length member.
struct FileOpenType { unsigned int Result; byte FileHandle; string Filename; unsigned long Length; };
Declare a variable of this type, set its members, and then call the function, passing in your variable of this structure type.
FileOpenType foArgs;
foArgs.Filename = "myfile.txt";
SysFileOpenAppend(foArgs); // open the file if (foArgs.Result == NO_ERR) {
// write to the file using FileHandle
// up to the remaining available length in Length }
SysFileOpenRead(FileOpenType & args)
Function
This function lets you open an existing file for reading using the values specified via the FileOpenType structure. The structure type declaration is shown below. Use the
FileHandle return value for subsequent file read operations. The number of bytes that can be read from the file is returned via the Length member.
struct FileOpenType { unsigned int Result; byte FileHandle; string Filename; unsigned long Length; };
Declare a variable of this type, set its members, and then call the function, passing in your variable of this structure type.
FileOpenType foArgs;
foArgs.Filename = "myfile.txt";
SysFileOpenRead(foArgs); // open the file for reading if (foArgs.Result == NO_ERR) {
// read data from the file using FileHandle }
SysFileRead(FileReadWriteType & args)
Function
This function lets you read from a file using the values specified via the FileReadWriteType structure. The structure type declaration is shown below.
struct FileReadWriteType { unsigned int Result; byte FileHandle; string Buffer;
unsigned long Length; };
Declare a variable of this type, set its members, and then call the function, passing in your variable of this structure type.
FileReadWriteType frArgs;
frArgs.FileHandle = foArgs.FileHandle;
frArgs.Length = 12; // number of bytes to read SysFileRead(frArgs);
if (frArgs.Result == NO_ERR) {
TextOut(0, LCD_LINE1, frArgs.Buffer); // show how many bytes were actually read NumOut(0, LCD_LINE2, frArgs.Length); }
SysFileWrite(FileReadWriteType & args)
Function
This function lets you write to a file using the values specified via the FileReadWriteType structure. The structure type declaration is shown below.
struct FileReadWriteType { unsigned int Result; byte FileHandle; string Buffer;
unsigned long Length; };
Declare a variable of this type, set its members, and then call the function, passing in your variable of this structure type.
FileReadWriteType fwArgs;
fwArgs.FileHandle = foArgs.FileHandle; fwArgs.Buffer = "data to write";
SysFileWrite(fwArgs);
if (fwArgs.Result == NO_ERR) {
NumOut(0, LCD_LINE1, fwArgs.Length); }
SysFileClose(FileCloseType & args)
Function
This function lets you close a file using the values specified via the FileCloseType structure. The structure type declaration is shown below.
struct FileCloseType { unsigned int Result; byte FileHandle; };
Declare a variable of this type, set its members, and then call the function, passing in your variable of this structure type.
FileCloseType fcArgs;
fcArgs.FileHandle = foArgs.FileHandle; SysFileClose(fcArgs);
SysFileResolveHandle(FileResolveHandleType & args)
Function
This function lets you resolve the handle of a file using the values specified via the FileResolveHandleType structure. The structure type declaration is shown below.
struct FileResolveHandleType { unsigned int Result;
byte FileHandle; bool WriteHandle; string Filename; };
Declare a variable of this type, set its members, and then call the function, passing in your variable of this structure type.
FileResolveHandleType frhArgs; frhArgs.Filename = "myfile.txt"; SysFileResolveHandle(frhArgs);
if (frhArgs.Result == LDR_SUCCESS) { // use the FileHandle as needed if (frhArgs.WriteHandle) { // file is open for writing }
else {
// file is open for reading }
}
SysFileRename(FileRenameType & args)
Function
This function lets you rename a file using the values specified via the FileRenameType structure. The structure type declaration is shown below.
string OldFilename; string NewFilename; };
Declare a variable of this type, set its members, and then call the function, passing in your variable of this structure type.
FileRenameType frArgs;
frArgs.OldFilename = "myfile.txt"; frArgs.NewFilename = "myfile2.txt"; SysFileRename(frArgs);
if (frArgs.Result == LDR_SUCCESS) { /* do something */ }
SysFileDelete(FileDeleteType & args)
Function
This function lets you delete a file using the values specified via the FileDeleteType structure. The structure type declaration is shown below.
struct FileDeleteType { unsigned int Result; string Filename; };
Declare a variable of this type, set its members, and then call the function, passing in your variable of this structure type.
FileDeleteType fdArgs;
fdArgs.Filename = "myfile.txt";
SysFileDelete(fdArgs); // delete the file
SysCommLSWrite(CommLSWriteType & args)
Function
This function lets you write to an I2C (Lowspeed) sensor using the values specified via the CommLSWriteType structure. The structure type declaration is shown below.
struct CommLSWriteType { char Result; byte Port; byte Buffer[]; byte ReturnLen; };
Declare a variable of this type, set its members, and then call the function, passing in your variable of this structure type.
CommLSWriteType args; args.Port = S1;
args.Buffer = myBuf; args.ReturnLen = 8; SysCommLSWrite(args);
SysCommLSCheckStatus(CommLSCheckStatusType & args) Function
This function lets you check the status of an I2C (Lowspeed) sensor transaction using the values specified via the CommLSCheckStatusType structure. The structure type
declaration is shown below.
struct CommLSCheckStatusType { char Result;
byte Port;
byte BytesReady; };
Declare a variable of this type, set its members, and then call the function, passing in your variable of this structure type.
CommLSCheckStatusType args; args.Port = S1;
SysCommLSCheckStatus(args); // is the status (Result) IDLE?
if (args.Result == LOWSPEED_IDLE) { /* proceed */ }
SysCommLSRead(CommLSReadType & args)
Function
This function lets you read from an I2C (Lowspeed) sensor using the values specified via the CommLSReadType structure. The structure type declaration is shown below.
struct CommLSReadType { char Result; byte Port; byte Buffer[]; byte BufferLen; };
Declare a variable of this type, set its members, and then call the function, passing in your variable of this structure type.
CommLSReadType args; args.Port = S1; args.Buffer = myBuf; args.BufferLen = 8; SysCommLSRead(args);
// check Result for error status & use Buffer contents
SysMessageWrite(MessageWriteType & args)
Function
This function lets you write a message to a queue (aka mailbox) using the values specified via the MessageWriteType structure. The structure type declaration is shown below.
struct MessageWriteType { char Result;
byte QueueID; string Message;
Declare a variable of this type, set its members, and then call the function, passing in your variable of this structure type.
MessageWriteType args;
args.QueueID = MAILBOX1; // 0 args.Message = "testing"; SysMessageWrite(args);
// check Result for error status
SysMessageRead(MessageReadType & args)
Function
This function lets you read a message from a queue (aka mailbox) using the values specified via the MessageReadType structure. The structure type declaration is shown below. struct MessageReadType { char Result; byte QueueID; bool Remove; string Message; };
Declare a variable of this type, set its members, and then call the function, passing in your variable of this structure type.
MessageReadType args;
args.QueueID = MAILBOX1; // 0 args.Remove = true;
SysMessageRead(args);
if (args.Result == NO_ERR) {
TextOut(0, LCD_LINE1, args.Message); }
SysCommBTWrite(CommBTWriteType & args)
Function
This function lets you write to a Bluetooth connection using the values specified via the CommBTWriteType structure. The structure type declaration is shown below.
struct CommBTWriteType { char Result;
byte Connection; byte Buffer[]; };
Declare a variable of this type, set its members, and then call the function, passing in your variable of this structure type.
CommBTWriteType args; args.Connection = 1; args.Buffer = myData; SysCommBTWrite(args);
SysCommBTCheckStatus(CommBTCheckStatusType & args) Function
This function lets you check the status of a Bluetooth connection using the values specified via the CommBTCheckStatusType structure. The structure type declaration is shown below. Possible values for Result include ERR_INVALID_PORT,
STAT_COMM_PENDING, ERR_COMM_CHAN_NOT_READY, and LDR_SUCCESS (0).
struct CommBTCheckStatusType { char Result;
byte Connection; byte Buffer[]; };
Declare a variable of this type, set its members, and then call the function, passing in your variable of this structure type.
CommBTCheckStatusType args; args.Connection = 1;
SysCommBTCheckStatus(args);
if (args.Result == LDR_SUCCESS) { /* do something */ }
SysIOMapRead(IOMapReadType & args)
Function
This function lets you read data from a firmware module's IOMap using the values specified via the IOMapReadType structure. The structure type declaration is shown below.
struct IOMapReadType { char Result;
string ModuleName; unsigned int Offset; unsigned int Count; byte Buffer[]; };
Declare a variable of this type, set its members, and then call the function, passing in your variable of this structure type.
IOMapReadType args;
args.ModuleName = CommandModuleName; args.Offset = CommandOffsetTick;
args.Count = 4; // this value happens to be 4 bytes long SysIOMapRead(args);
if (args.Result == NO_ERR) { /* do something with data */ }
SysIOMapWrite(IOMapWriteType & args)
Function
This function lets you write data to a firmware module's IOMap using the values specified via the IOMapWriteType structure. The structure type declaration is shown below.
struct IOMapWriteType { char Result;