EMC Data Domain Operating
System
Version 5.4Administration Guide
302-000-072 REV. 06Published September, 2014
EMC believes the information in this publication is accurate as of its publication date. The information is subject to change without notice.
The information in this publication is provided as is. EMC Corporation makes no representations or warranties of any kind with respect to the information in this publication, and specifically disclaims implied warranties of merchantability or fitness for a particular purpose. Use, copying, and distribution of any EMC software described in this publication requires an applicable software license.
EMC², EMC, and the EMC logo are registered trademarks or trademarks of EMC Corporation in the United States and other countries. All other trademarks used herein are the property of their respective owners.
For the most up-to-date regulatory document for your product line, go to EMC Online Support (https://support.emc.com).
EMC Corporation
Hopkinton, Massachusetts 01748-9103
1-508-435-1000 In North America 1-866-464-7381 www.EMC.com
Preface 11
Introducing the EMC Data Domain System 15
About EMC Data Domain Systems... 16
EMC Data Domain System Features... 16
Data Integrity... 16
Data Compression...17
Restore Operations... 17
EMC Data Domain Replicator...17
Multipath and Load Balancing...18
System Access... 18
Licensed Features... 18
How EMC Data Domain Systems Integrate into the Storage Environment... 19
Backup Software Requirements...21
Getting Started 23 About DD System Manager... 24
Using DD System Manager... 24
Logging In and Out of DD System Manager... 24
About the DD System Manager Interface...25
Using the Configuration Wizard... 28
Using the CLI... 28
Logging into the System Using the CLI... 28
Finding Online Help for Commands... 29
Managing Data Domain Systems 31 About Managing Data Domain Systems... 32
Managing System Availability...32
Adding a System to DD System Manager... 33
Removing a System from DD System Manager... 33
Rebooting a System... 34
Powering a Data Domain System On or Off ... 34
Working with Upgrade Images... 35
Viewing the Upgrade Package List...35
Obtaining Upgrade Packages... 35
Upgrading a Data Domain System... 36
Removing an Upgrade Image...37
Managing System Licenses... 37
Displaying Licenses... 37
Adding Licenses...37
Removing Licenses...38
Managing System Storage...38
Viewing System Storage Information... 38
Physically Locating a Disk... 42
Configuring Storage... 42
Managing Network Connections... 43
Configuring Network Interfaces ...43
Chapter 1
Chapter 2
Configuring Network Settings... 57
Configuring Routes...61
Managing Access to the System... 63
Managing Administrator Access... 63
Managing Local User Access to the System... 68
Managing NIS Servers and Workgroups... 75
Managing Windows Servers and Workgroups... 77
Managing General Configuration Settings...80
Working with Email Settings...80
Working with Time and Date Settings... 82
Working with System Properties... 83
Working with SNMP...83
Managing Reporting and Logging... 90
Managing Autosupport Reporting...90
Managing Support Bundles...92
Managing Log Files...93
Managing Remote System Power with IPMI...97
Getting Started with IPMI...98
Configuring IPMI for a Managed System... 98
Logging Into a Remote System for IPMI Power Management... 102
Managing Remote System Power After Login... 102
Monitoring Data Domain Systems 105 About Monitoring Data Domain Systems... 106
Monitoring Using the DD Network Summary... 106
Viewing the DD Network Status... 106
About the System Summary Statistics... 106
About the Space Usage Statistics...107
About Individual-System Statistics...107
Monitoring a Single System...108
Viewing the System Status Summary...108
Viewing System Details... 109
About the Fibre Channel View...109
About the Physical Resources View... 109
About the Access Groups View... 110
Monitoring Chassis Status...110
Fans ... 111
Temperature... 111
Power Supply... 112
PCI Slots... 112
NVRAM...112
Working with Alerts... 113
Working with the Current Alerts Tab...113
Working with the Alerts History Tab... 115
Working with the Notification View...116
Configuring the Daily Alert Summary Distribution List...118
Viewing Active Users... 119
Viewing System Statistics...119
About the Performance Statistics Graphs... 120
Working with Reports... 120
Types of Reports... 121
Creating a Report... 124
Viewing Saved Reports...125
Printing Saved Reports...125
Deleting Saved Reports... 125
Renaming Saved Reports... 126
Viewing the Task Log...126
Working with the File System 127 About the File System...128
How the File System Stores Data... 128
How the File System Reports Space Usage... 128
How the File System Uses Compression ...129
How the File System Implements Data Integrity... 130
How the File System Reclaims Storage Space with File System Cleaning... 130
Supported Interfaces ...131
Supported Backup Software ...131
Data Streams Sent to a Data Domain System ...131
File System Limitations... 133
Monitoring File System Usage... 134
Accessing the File System View... 134
Managing File System Operations... 140
Performing Basic Operations...140
Performing Cleaning...143
Modifying Basic Settings...144
Fast Copy Operations... 146
Perform a Fast Copy Operation... 146
Managing Encryption of Data at Rest 147 How Encryption of Data at Rest Works... 148
Configuring Encryption... 148
About Key Management... 149
Rectifying Lost or Corrupted Keys... 150
Key Manager Support...150
Working with the RSA DPM Key Manager... 151
How the Cleaning Operation Works... 153
Working with the Embedded Key Manager...153
Key Manager Setup... 154
RSA DPM Key Manager Encryption Setup... 154
Changing Key Managers after Setup... 157
Checking Settings for Encryption of Data at Rest...157
Enabling and Disabling Encryption of Data at Rest...157
Enable Encryption of Data at Rest...157
Disable Encryption of Data at Rest...158
Locking and Unlocking the File System...158
Locking the File System...158
Unlock the File System... 159
Changing the Encryption Algorithm... 159
Managing the Encryption Passphrase...160
Changing the Encryption Passphrase... 161
Working with DD Retention Lock 163 About DD Retention Lock Software... 164
DD Retention Lock Protocol... 165
DD Retention Lock Flow...165
Supported Data Access Protocols...166
Enabling DD Retention Lock on an MTree...167
Chapter 5
Chapter 6
Enabling DD Retention Lock Governance on an MTree... 167
Enabling DD Retention Lock Compliance on an MTree... 168
Client-Side Retention Lock File Control... 170
Setting Retention Locking on a File...171
Extending Retention Locking on a File... 173
Identifying a Retention-Locked File...173
Specifying a Directory and Touching Only Those Files... 174
Reading a List of Files and Touching Only Those Files... 174
Deleting or Expiring a File... 174
Using ctime or mtime on Retention-Locked Files...174
System Behavior with DD Retention Lock...175
DD Retention Lock Governance... 175
DD Retention Lock Compliance...176
Working with MTrees 185 About MTrees...186
Quotas...186
About the MTree Overview Panel... 186
About the Summary View... 187
About the Space Usage View...190
About the Daily Written View... 191
Monitoring MTree Usage...191
Managing MTree Operations...192
Create an MTree... 192
Configure and Enable/Disable MTree Quotas... 193
Delete an MTree... 194
Undelete an MTree... 195
Renaming an MTree...195
Replicating a System with Quotas to One Without... 195
Working with Snapshots 197 About Snapshots... 198
Monitoring Snapshots and Their Schedules...199
About the Snapshots View... 199
Managing Snapshots... 200
Create a Snapshot...200
Modify a Snapshot Expiration Date...201
Rename a Snapshot... 201
Expiring a Snapshot... 201
Managing Snapshot Schedules... 202
Create a Snapshot Schedule... 202
Modify a Snapshot Schedule...203
Delete a Snapshot Schedule... 204
Recover Data from a Snapshot...204
Working with CIFS 205 CIFS Overview... 206
Performing CIFS Setup...206
Prepare Clients for Access to Data Domain Systems... 206
Enabling CIFS Services... 207
Naming the CIFS Server... 207
Setting Authentication Parameters... 207
Disable CIFS Services... 210
Chapter 8
Chapter 9
Working with Shares... 210
Creating Shares on the Data Domain System...211
Modify a Share on a Data Domain System... 212
Creating a Share from an Existing Share... 213
Disable a Share on a Data Domain System... 213
Enable a Share on a Data Domain System... 213
Delete a Share on a Data Domain System...213
Performing MMC Administration...214
Connecting to a Data Domain System from a CIFS Client...214
Display CIFS Information ... 215
Managing Access Control... 215
Accessing Shares from a Windows Client... 216
Provide Domain Users Administrative Access... 216
Allow Access from Trusted Domain Users... 216
Allowing Administrative Access to a Data Domain System for Domain Users... 216
Restrict Administrative Access from Windows...217
File Access... 217
Monitoring CIFS Operation... 220
Display CIFS Status... 220
Display CIFS Configuration... 220
Display CIFS Statistics...222
Performing CIFS Troubleshooting...222
Display Clients Current Activity...222
Set the Maximum Open Files on a Connection...223
Data Domain System Clock... 223
Synchronizing from a Windows Domain Controller...223
Synchronize from an NTP Server...224
Working with NFS 225 About NFS... 226
Managing NFS Client Access to the Data Domain System...226
Enable NFS Services...226
Disable NFS Services...227
Create an Export...227
Modify an Export... 228
Creating an Export from an Existing Export... 229
Delete an Export...229
Displaying NFS Information... 230
View NFS Status... 230
View NFS Exports... 230
View Active NFS Clients... 230
Working with DD Boost 231 About Data Domain DD Boost Software... 232
Managing DD Boost with DD System Manager... 232
Set or Modify a DD Boost User Name...233
Enable DD Boost... 234
Disable DD Boost... 234
View DD Boost Storage Unit... 234
Delete a Storage Unit... 237
Clear DD Boost Statistics...238
DD Boost Options...238
About Interface Groups... 240
Chapter 11
Create Interface Groups...241
Delete an Interface Group...241
Enable/Disable an Interface Group...241
Modify an Interface Group’s Name/Interfaces...242
Delete a Client from the Interface Group... 242
Modify a Client’s Name or Interface Group...242
Destroy DD Boost... 243
Managing Fibre Channel Transport... 243
Set Fibre Channel Server Name... 243
Create Access Group... 244
Delete Access Groups... 244
Monitoring DD Boost... 245
About the DD Boost Tabs...245
Checking Interface Groups and Clients ... 247
Working with DD Virtual Tape Library 249 About EMC Data Domain Virtual Tape Library...250
Planning a VTL...250
Limitations of the VTL Feature... 251
Number of Supported Tape Drives...252
Number of Supported Data Streams... 252
About Tape Barcodes... 252
About LTO Tape Drive Compatibility...253
About the DD System Manager VTL View...254
Setting Up a VTL... 255
Working with the VTL Service Operations...255
Viewing the VTL Service Information Panel... 255
Working with Libraries...257
Working with a Library...260
Working with Tape Slots and CAPs... 273
Working with the Vault... 274
Working with Vault Pools...275
Working with Storage Pools...276
Viewing Storage Pools Information...276
Creating Storage Pools... 277
Converting a Directory Pool to an MTree Pool ...278
Renaming Storage Pools... 279
Deleting Storage Pools... 279
Replicating Storage Pools...279
Working with a Single Storage Pool... 280
Working with SCSI Target 281 About SCSI Target...282
Working with Access Groups... 283
Viewing Access Groups Information... 283
Configuring an Access Group...283
Deleting an Access Group...286
Working with an Access Group... 287
Viewing Access Group Information... 287
Configuring the NDMP Device TapeServer Group... 288
Working with Physical Resources...289
About Endpoints... 289
About Initiators... 294
Setting a Loop ID...296
Chapter 13
FC Link Monitoring ...296
Working with DD Replicator 297 About EMC Data Domain Replicator...298
Replication Types... 298
Directory Replication ... 299
MTree Replication ... 300
Collection Replication ... 300
Supported Replication Topologies ... 301
One-to-One Replication...301
Bi-Directional Replication...301
One-to-Many Replication...302
Many-to-One Replication...302
Cascaded Replication ...303
Using Encryption of Data at Rest with Replication... 304
Encryption on the Wire ... 304
Low Bandwidth Optimization ...305
Bandwidth Delay Settings ... 305
About the Replication View...305
Replication Status ... 305
Summary View... 306
DD Boost View... 308
Topology View...309
Performance View... 309
Advanced Settings View...309
Preparing to Configure Replication... 310
Limitations on Number of Contexts...310
Configuring Replication... 310
Creating a Replication Pair... 311
Enabling and Disabling a Replication Pair... 314
Deleting a Replication Pair... 314
Converting a Directory Replication Pair to an MTree... 314
Changing Host Connection Settings... 315
Managing Bandwidth with Throttling ... 316
Changing Network Settings... 317
Resynchronizing Data in a Replication Pair... 318
Resyncing a Directory, MTree, or Pool Replication Pair... 319
Recovering Data from a Replication Pair... 320
Recovering Directory Pool Data...320
Recovering Collection Replication Pair Data ...320
Recovering Directory Replication Pair Data ... 321
Aborting a Replication Pair Recovery... 321
Replication Seeding ... 321
Monitoring Replication ... 322
Checking Replication Status...322
Working with DD Extended Retention 325 About DD Extended Retention Software... 326
Getting Started...327
Accessing Data... 328
Supported Replication Types...328
Licenses...330
Using the DD System Manager... 331
Data Domain Provided Hardware...332
Chapter 15
Customer-Provided Infrastructure...334
Initial Setup... 334
Initial Configuration... 335
Configuring Data Movement... 337
Data Movement Policy...337
Administration... 339
Avoiding Common Sizing Errors...339
Cleaning and Snapshots... 339
Expanding an Active or Archive Tier... 339
Deleting a Retention Unit... 340
Expanding an Archive Unit... 340
Reclaiming Space in the Retention Tier...341
Upgrading Data Domain Systems for Extended Retention... 341
Changing Retention Tier Compression... 342
Upgrades and Recovery...343
Upgrading to DD OS 5.4 ... 343
Upgrading a Data Domain System Controller with the DD Extended Retention Software Option Enabled...343
Replacing Data Domain Systems... 343
Replication Recovery...344
Recovering a System with the DD Extended Retention Software Option Enabled... 344
Recovering from System Failures...345
As part of an effort to improve its product lines, EMC periodically releases revisions of its software and hardware. Therefore, some functions described in this document might not be supported by all versions of the software or hardware currently in use. The product release notes provide the most up-to-date information on product features.
Contact your EMC technical support professional if a product does not function properly or does not function as described in this document.
Note
This document was accurate at publication time. Go to EMC Online Support (https:// support.emc.com) to ensure that you are using the latest version of this document. Purpose
This guide explains how to manage the EMC Data Domain® systems with an emphasis on
procedures using the EMC Data Domain System Manager (DD System Manager), a browser-based graphical user interface (GUI). If an important administrative task is not supported in DD System Manager, the Command Line Interface (CLI) commands are described.
Note
u DD System Manager was formerly known as the Enterprise Manager.
u In some cases, a CLI command may offer more options than those offered by the corresponding DD System Manager feature. See the EMC Data Domain Operating System Command Reference Guide for a complete description of a command and its options.
Audience
This guide is for system administrators who are familiar with standard backup software packages and general backup administration.
Related documentation
The following Data Domain system documents provide additional information:
u Installation and setup guide for your system, for example, EMC Data Domain DD 2500
Storage System, Installation and Setup Guide
u EMC Data Domain Operating System USB Installation Guide u EMC Data Domain Operating System DVD Installation Guide u EMC Data Domain Operating System Release Notes
u EMC Data Domain Operating System Initial Configuration Guide u EMC Data Domain Product Security Guide
u EMC Data Domain Operating System Command Reference Guide u EMC Data Domain Operating System MIB Quick Reference
u EMC Data Domain Operating System Offline Diagnostics Suite User's Guide
u Hardware overview guide for your system, for example, EMC Data Domain DD4200,
u Field replacement guides for your system components, for example, Field Replacement
Guide, Data Domain DD4200, DD4500, and DD7200 Systems, IO Module and Management Module Replacement or Upgrade
u EMC Data Domain, System Controller Upgrade Guide
u EMC Data Domain Expansion Shelf, Hardware Guide (for shelf model ES20 or ES30) u EMC Data Domain Boost for OpenStorage Administration Guide
u EMC Data Domain Boost for Oracle Recovery Manager Administration Guide u EMC Data Domain Boost SDK Programmer's Guide
u Statement of Volatility for the Data Domain DD2500 System
u Statement of Volatility for the Data Domain DD4200, DD4500, or DD7200 System
If you have the optional RSA Data Protection (DPM) Key Manager, see the latest version of the RSA Data Protection Manager Server Administrator's Guide, available with the RSA Key Manager product.
Special notice conventions used in this document EMC uses the following conventions for special notices:
DANGER
Indicates a hazardous situation which, if not avoided, will result in death or serious injury.
WARNING
Indicates a hazardous situation which, if not avoided, could result in death or serious injury.
CAUTION
Indicates a hazardous situation which, if not avoided, could result in minor or moderate injury.
NOTICE
Addresses practices not related to personal injury. Note
Presents information that is important, but not hazard-related. Typographical conventions
EMC uses the following type style conventions in this document: Table 1 Typography
Bold Indicates interface element names, such as names of windows, dialog boxes, buttons, fields, tab names, key names, and menu paths (what the user specifically selects or clicks)
Italic Highlights publication titles listed in text
Monospace Indicates system information, such as: l System code
Table 1 Typography (continued)
l Pathnames, filenames, prompts, and syntax l Commands and options
Monospace italic Highlights a variable name that must be replaced with a variable value
Monospace bold Indicates text for user input
[ ] Square brackets enclose optional values
| Vertical bar indicates alternate selections—the bar means “or” { } Braces enclose content that the user must specify, such as x or y or z ... Ellipses indicate nonessential information omitted from the example
Where to get help
The following topics describe how to get more product information and contact technical support.
Product information
For documentation, release notes, software updates, or information about EMC products, go to EMC Online Support at https://support.emc.com.
EMC Data Domain product documentation
To view documentation for EMC Data Domain products, go to EMC Online Support and click Support by Product below the Search box. Type Data Domain in the Find a Product box, wait for those words to appear in the list of matches below the box, and click the words. Then click >>. In the list of categories under the Search box, click Documentation.
u The Product choices let you filter results by Data Domain system model number, such as DD990, or by DD OS software release.
u The Content Type choices let you filter results by category. Click More under Content Type to see all of the categories. The categories that contain end-user and compatibility documentation are:
l Manuals and Guides, for the software and hardware manuals for your system, and for integration guides that explain how to use EMC Data Domain systems with backup software and other products
l Release Notes, for specific versions of the EMC Data Domain Operating System and EMC Data Domain products
l Compatibility Document, for guides that show which EMC and third-party components are compatible
Technical support
Go to EMC Online Support and click Service Center. You will see several options for contacting EMC Technical Support. Note that to open a service request, you must have a valid support agreement. Contact your EMC sales representative for details about obtaining a valid support agreement or with questions about your account. Your comments
Your suggestions will help us continue to improve the accuracy, organization, and overall quality of the user publications. Send your opinions of this document to:
Introducing the EMC Data Domain System
This chapter includes:
u About EMC Data Domain Systems... 16 u EMC Data Domain System Features... 16 u How EMC Data Domain Systems Integrate into the Storage Environment... 19
About EMC Data Domain Systems
EMC Data Domain systems are disk-based inline deduplication appliances and gateways that provide data protection and disaster recovery (DR) in the enterprise environment. All systems run the EMC Data Domain Operating System (DD OS), which provides both a command-line interface (CLI) for performing all system operations, and the EMC Data Domain System Manager (DD System Manager) graphical user interface (GUI) for configuration, management, and monitoring.
Note
DD System Manager was formerly known as the Enterprise Manager.
Systems consist of appliances that vary in storage capacity and data throughput. Systems are typically configured with expansion shelves that add storage space. Note
Legacy Data Domain Gateway systems store all data on qualified third-party storage arrays through a Fibre Channel interface. See the list of qualified arrays in the Storage Array Compatibility List at https://support.emc.com.
EMC Data Domain System Features
The following sections describe how Data Domain systems ensure data integrity and provide multiple levels of data compression, reliable restoration, data replication, and multipath configuration.
u Data Integrity on page 16 u Data Compression on page 17 u Restore Operations on page 17
u EMC Data Domain Replicator on page 17 u Multipath and Load Balancing on page 18 u System Access on page 18
u Licensed Features on page 18
Data Integrity
The DD OS Data Invulnerability Architecture™ protects against data loss from hardware
and software failures.
u When writing to disk, the DD OS creates and stores checksums and self-describing metadata for all data received. After writing the data to disk, the DD OS then recomputes and verifies the checksums and metadata.
u An append-only write policy guards against overwriting valid data.
u After a backup completes, a validation process examines what was written to disk and verifies that all file segments are logically correct within the file system and that the data is identical before and after writing to disk.
u In the background, the online verify operation continuously checks that data on the disks is correct and unchanged since the earlier validation process.
u Storage in most Data Domain systems is set up in a double parity RAID 6 configuration (two parity drives). Additionally, most configurations include a hot spare in each enclosure, except the DD1xx series systems, which have eight disks. Each parity stripe has block checksums to ensure that data is correct. Checksums are constantly used during the online verify operation and while data is read from the Data Domain system. With double parity, the system can fix simultaneous errors on as many as two disks.
u To keep data synchronized during a hardware or power failure, the Data Domain system uses NVRAM (non-volatile RAM) to track outstanding I/O operations. An NVRAM card with fully charged batteries (the typical state) can retain data for a period of hours, which is determined by the hardware in use.
u When reading data back on a restore operation, the DD OS uses multiple layers of consistency checks to verify that restored data is correct.
Data Compression
Using Global Compression, a Data Domain system eliminates redundant data from each backup image and stores only unique data.
Duplicate data is stored only once. The storage of unique data is invisible to backup software.
DD OS data compression is independent of data format. Data can be structured, such as databases, or unstructured, such as text files. Data can derive from file systems or from raw volumes.
Typical compression ratios are 20-to-1, on average, over many weeks. This ratio assumes there are weekly full backups and daily incremental backups. A backup that includes many duplicate or similar files (files copied several times with minor changes) benefits the most from compression.
Depending on backup volume, size, retention period, and rate of change, the amount of compression can vary. The best compression happens with backup volume sizes of at least 10 MiB (MiB is the base 2 equivalent of MB).
To take full advantage of multiple Data Domain systems, a site that has more than one Data Domain system should consistently backup the same client system or set of data to the same Data Domain system. For example, if a full back up of all sales data goes to Data Domain system A, the incremental backups and future full backups for sales data should also go to Data Domain system A.
Restore Operations
With disk backup using the Data Domain system, incremental backups are always reliable and can be easily accessed. Furthermore, with a Data Domain system, you can perform full backups more frequently without the penalty of storing redundant data. With tape backups, a restore operation may rely on multiple tapes holding incremental backups. Also, the more incremental backups a site has on multiple tapes, the more time-consuming and risky the restore process. One bad tape can kill the restore. From a Data Domain system, file restores create little or no contention with backup or other restore operations. Unlike tape drive backups, multiple processes can access a Data Domain system simultaneously. A Data Domain system allows your site to offer safe, user-driven, single-file restore operations.
EMC Data Domain Replicator
The EMC Data Domain Replicator sets up and manages the replication of backup data between two Data Domain systems. After replication is started, the source Data Domain
system automatically sends any new backup data to the destination Data Domain system.
A Replicator pair deals with a complete data set, a directory, or an MTree from a source Data Domain system that is sent to a destination Data Domain system. An individual Data Domain system can be a part of multiple replication pairs and can serve as a source for one or more pairs and a destination for one or more pairs.
Multipath and Load Balancing
Multipath configuration and load balancing is supported on Data Domain systems that have at least two HBA ports. In a multipath configuration on a Data Domain system, each of two HBA ports on the system is connected to a separate port on the backup server. On a Data Domain gateway, each of two HBA ports are connected to a separate port on the array that the gateway uses as a backup destination. For more on multipath
configuration, see the EMC DD OS Initial Configuration Guide and the EMC DD OS Command Reference Guide.
System Access
The DD OS provides the following ways to access the system for configuration and management:
u CLI—A Data Domain system has a complete command set available to users in a command-line interface. Commands perform initial system configuration and
changes to individual system settings as well as display system and operation status. The command-line interface is available through a serial console or through Ethernet connections using SSH or Telnet.
u DD System Manager—A browser-based graphical user interface that is available through Ethernet connections. Use DD System Manager to perform initial system configuration, make configuration changes after initial configuration, display system and component status, and generate reports and charts. DD System Manager also provides centralized management for one or multiple systems.
Note
Some older systems support access using a keyboard and monitor attached directly to the system.
Licensed Features
A license is required to operate each of the following features on a Data Domain system. Consult with your EMC BRS Data Domain representative for more information and to purchase licensed features.
Table 2 Features Requiring Licenses
Feature/License Name Description
EMC Data Domain ArchiveStore Licenses Data Domain systems for archive use, such as file and email archiving, file tiering, and content and database archiving.
EMC Data Domain Boost Enables the use of a Data Domain system with the following applications: EMC Avamar, EMC NetWorker, Oracle RMAN, Quest vRanger, Symantec Veritas NetBackup (NBU), and
Table 2 Features Requiring Licenses (continued) Feature/License Name Description
Backup Exec. The managed replication feature of DD Boost also requires the DD Replicator license.
EMC Data Domain Encryption Allows data on system drives or external storage to be encrypted while being saved, and then locked before moving it to another location.
EMC Data Domain Expansion Storage
Allows external shelves to be added to the Data Domain system for additional capacity.
EMC Data Domain Extended Retention (formerly DD Archiver)
Licenses the Extended Retention storage feature. See About DD Extended Retention Software on page 326 for
additional information. EMC Data Domain I/OS (for IBM i
operating environments)
An I/OS license is required when VTL is used to backup systems in the IBM i operating environment. Apply this license before adding virtual tape drives to libraries. EMC Data Domain NDMP Tape
Server
Enables the use of a Data Domain system as a virtual tape library that supports backups of NAS devices over Ethernet/IP networks.
EMC Data Domain Replicator Adds DD Replicator for replication of data from one Data Domain system to another. A license is required on each system.
EMC Data Domain Retention Lock Compliance Edition
Meets the strictest data retention requirements from regulatory standards such as SEC17a-4.
EMC Data Domain Retention Lock Governance Edition
Protects selected files from modification and deletion before a specified retention period has expired. EMC Data Domain Shelf Capacity Enables a Data Domain system to expand the active tier
storage capacity beyond the entry capacity defined for that system.
EMC Data Domain Virtual Tape Library (VTL)
Enables the use of a Data Domain system as a virtual tape library over a Fibre Channel network.
Gateway Expanded Storage Level 2 Enables gateway systems to support additional usable capacity.
Gateway Expanded Storage Level 3 Enables gateway systems to support additional capacity greater than Expanded Storage Level 2 usable capacity.
See Managing System Licenses on page 37 for instructions on viewing and installing licenses.
How EMC Data Domain Systems Integrate into the Storage
Environment
EMC Data Domain systems integrate easily into existing data centers:
u All Data Domain systems can be configured as storage destinations for leading backup and archiving applications using NFS, CIFS, Boost, or VTL protocols.
u Consult the compatibility matrices at https://support.emc.com for information on the applications that work with the different configurations.
u The Data Domain gateway series uses external disk arrays for storage. Data Domain gateways work with Data Domain arrays and are also qualified with storage systems from several leading enterprise storage providers.
u Multiple backup servers can share one Data Domain system.
u One Data Domain system can handle multiple simultaneous backup and restore operations.
u Multiple Data Domain systems can be connected to one or more backup servers. For use as a backup destination, a Data Domain system can be configured either as a disk storage unit with a file system that is accessed through an Ethernet connection or as a virtual tape library (VTL) that is accessed through a Fibre Channel connection. The VTL feature enables Data Domain systems to be integrated into environments where backup software is already configured for tape backups, minimizing disruption.
Configuration is performed both in the DD OS, as described in the relevant sections of this guide, and in the backup application, as described in the backup application’s administrator guides and in Data Domain application-related guides and tech notes. u All backup applications can access a Data Domain system as either an NFS or a CIFS
file system on the Data Domain disk device.
u The following applications work with a Data Domain system using the DD Boost interface: EMC Avamar, EMC NetWorker, Oracle RMAN, Quest vRanger, Symantec Veritas NetBackup (NBU), and Backup Exec.
The following figure shows a Data Domain system integrated into an existing basic backup configuration.
Figure 1 Data Domain System Integrated into a Storage Environment
1. Primary storage 2. Ethernet 3. Backup server 4. SCSI/Fibre Channel
5. Gigabit Ethernet or Fibre Channel 6. Tape system
7. Data Domain system 8. Management
Figure 1 Data Domain System Integrated into a Storage Environment (continued) 10. Data Verification
11. Data Domain file system 12. Global compression 13. RAID
As shown in Figure 1, data flows to a Data Domain system through an Ethernet or Fibre Channel connection. Immediately, the data verification processes begin and are continued while the data resides on the Data Domain system. In the file system, the DD OS Global Compression™ algorithms dedupe and compress the data for storage. Data is
then sent to the disk RAID subsystem. When a restore operation is required, data is retrieved from Data Domain storage, decompressed, verified for consistency, and
transferred via Ethernet to the backup servers using Ethernet (for NFS, CIFS, DD Boost), or using Fiber Channel (for VTL and DD Boost).
Backup Software Requirements
This section provides information needed to set up a Data Domain system as a storage destination for an application. It includes:
u Application Compatibility Matrices and Integration Guides on page 21 u Viewing Data Domain Application-Related Documents on page 21 u Generic Application Configuration Guidelines on page 21
Application Compatibility Matrices and Integration Guides
The EMC support Web site provides compatibility matrices and integration documents on how to integrate Data Domain systems as storage destinations with qualified backup applications. Integration is generally easy and straightforward. The integration guides provide specific parameters and limitations that must be understood and followed for the applications to work with Data Domain systems.
To locate these documents, search at https://support.emc.com/documentation.
Viewing Data Domain Application-Related Documents
Procedure
1. Log into the EMC Support portal at https://support.emc.com/documentation. 2. Use the search function to locate documentation related to the application.
Generic Application Configuration Guidelines
The DD OS accommodates relatively large streams of sequential data from backup software and is optimized for high throughput, continuous data verification, and high compression. It also accommodates the large numbers of smaller files in nearline storage (DD ArchiveStore).
Data Domain system performance is best when storing data from applications that are not specifically backup software under these circumstances:
u Data is sent to the Data Domain system as sequential writes (no overwrites). u Data is neither compressed nor encrypted before being sent to the Data Domain
Getting Started
This chapter includes:
u About DD System Manager... 24 u Using DD System Manager... 24 u Using the Configuration Wizard... 28 u Using the CLI... 28
About DD System Manager
DD System Manager is a browser-based graphical user interface, available through Ethernet connections, for managing up to 20 systems (depending on the model) at any location. DD System Manager provides a single, consolidated management interface that allows for configuration and monitoring of many system features and system settings. DD System Manager provides real-time graphs and tables that allow you to monitor the status of system hardware components and configured features.
Additionally, a command set that performs all system functions is available to users at the command-line interface (CLI). Commands configure system settings and provide displays of system hardware status, feature configuration, and operation.
The command-line interface is available through a serial console or through an Ethernet connection using SSH or Telnet.
Note
Some older systems support access using a keyboard and monitor attached directly to the system.
Using DD System Manager
This section describes how to log into and out of DD System Manager and describes its graphical user interface. It includes:
u Logging In and Out of DD System Manager on page 24 u About the DD System Manager Interface on page 25
Logging In and Out of DD System Manager
Procedure
1. Open a web browser and enter the IP address or hostname to connect to DD System Manager. It must be:
l A fully qualified domain name (for example, http://dd01.emc.com) l A hostname (http://dd01)
l An IP address (http://10.5.50.5) Note
DD System Manager uses HTTP port 80 and HTTPS port 443. If your Data Domain system is behind a firewall, you may need to enable port 80 if using HTTP, or port 443 if using HTTPS to reach the system. The port numbers can be easily changed if security requirements dictate.
2. For HTTPS secure login, click Login using enhanced security.
When HTTPS is used, the browser warns if a certificate is not authorized. 3. Enter a username and password (assigned during the initial configuration).
See the EMC DD OS Initial Configuration Guide for details. 4. Click Login.
The Summary view appears in the Information panel. For details on this view, see DD Network Summary View on page 25.
5. To log out, click the Log Out link in the DD System Manager banner.
About the DD System Manager Interface
This section describes the main views of DD System Manager and its components. The following topics are covered:
u DD Network Summary View on page 25 u Single System View on page 25 u Navigation Panel on page 26 u Banner on page 26
u Information Panel on page 27 l Tab Bar on page 27
l More Tasks Menu on page 27 l Help Buttons and Menus on page 27
u View End User License Agreement (EULA) on page 28
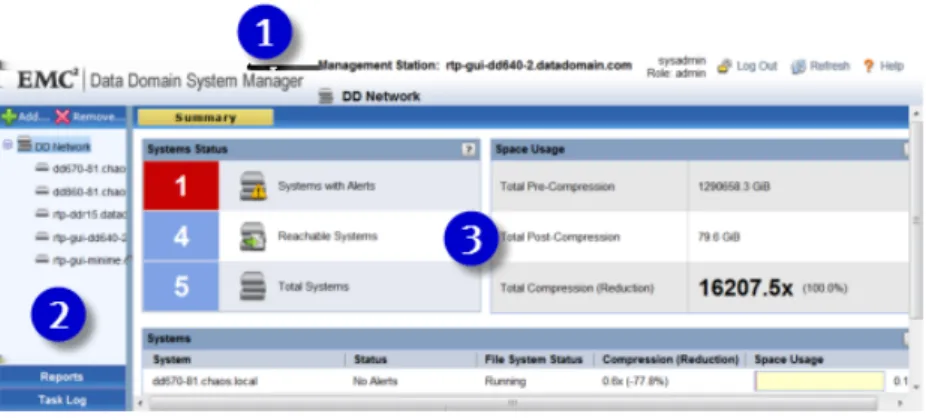
DD Network Summary View
After you log into DD System Manager, the default DD Network Summary view (see Figure 1) appears (if the default view does not appear, select DD Network in the navigation panel). This view presents a status overview of all systems managed by DD System Manager and summarizes key operating information. A tally of alerts and charts of disk space enable you to identify problems. See the section Monitoring Using the DD Network Summary on page 106 for more information about this view.
Click + in the navigation panel to display the systems that DD System Manager is managing.
Single System View
To display information about a single system, select the system in the Navigation panel. The Status Summary view displays important data about the selected system and displays a set of tabs at the top of the Information panel. You can use these tabs to configure and monitor the selected system. For more information on understanding this view, see Monitoring a Single System on page 108.
Page Elements
Figure 2 DD System Manager Page Components
1. Banner
2. Navigation Panel 3. Information Panel
Navigation Panel
The Navigation panel, always visible on the left edge of the page, displays a hierarchal tree of the systems managed by the DD System Manager and the Reports and Task Log buttons.
u Click the top-level DD Network icon to display the global Summary page.
u Click the Add or Remove icons to add or remove a system managed by the DD System Manager. See Adding a System to DD System Manager on page 33 and Removing a System from DD System Manager on page 33 for details.
u Expand the DD Network and select a system in the tree to open the Status Summary view, where tabs allow you to configure and monitor the selected system.
u Click Reports to open a report generator tool and provide access to saved reports for the selected system. Reports for file system and replication usage statistics can be generated. See Working with Reports on page 120 for more information.
u Click Task Log to show a history of tasks that have been performed on the system you are logged into. See Viewing the Task Log on page 126 for more information.
Banner
The DD System Manager banner appears above the Navigation and Information panels and displays:
u Management station host name. u Selected system host name. u DD OS version
u Selected system model number.
u User name and role for the current logged in user. u Log Out icon. Click to log out of the current session.
u Refresh icon. Click to refresh the DD System Manager display.
u Help icon. Click to view the top-level online help. See Help Buttons and Menus on
Information Panel
The Information panel displays information about the selected item in the Navigation panel (either the DD Network or a selected system).
At the top of the Information panel is a bar with information about the system or group selected in the Navigation panel, such as the full system name, uptime, model number, and the DD OS version number.
Tab Bar
When you select a single system in the Navigation panel, the Tab bar appears. Its tabs provide access to the configuration and monitoring tools for the system. Many of the these tabs have their own set of tabs. The top-level set of tabs are as follows:
u Status—displays important information about the system. Subtabs include Summary, Alerts, Active Users, and Stats.
u Data Management—contains subtabs for File System, MTree, Quota, Snapshots, CIFS, NFS, VTL, and DD Boost.
u Replication—provides data replication monitoring and management tools.
u Hardware—provides tabs for monitoring health and statistics of hardware for Storage, Network, Fibre Channel, and Chassis.
u System Settings—provides tabs for Licenses, Access Management, and General Configuration.
u Maintenance—provides tabs for System, Support, Logs, and IPMI. Working with Table View Options
Many of the views with tables of items contain controls for filtering, navigating, and sorting the information in the table.
How to use common table controls:
u Click the diamond icon in a column heading to reverse the sort order of items in the column.
u Click the < and > arrows at the bottom right of the view to move forward or backward through the pages. To skip to the beginning of a sequence of pages, click <<. To skip to the end, click >>.
u Use the scroll bar to view all items in a table.
u Enter text in the Filter By box to search for or prioritize the listing of those items. u Click Update to refresh the list.
u Click Reset to return to the default listing. More Tasks Menu
Some pages have a More Tasks menu at the top of the view that contains commands related to the current view.
Help Buttons and Menus
Help is available globally and from individual panes:
u Help icon—This icon is always visible on the right side of the DD System Manager banner. Click to display online help, which is derived from this guide.
The Help window includes navigation icons that show the guide contents, index, favorites, search field, and an option to send to printer. Use the directional arrows to page through the sections of the book.
u Context-sensitive help—Most windows and individual views have a Help icon, represented by a question mark (?). Click the icon to open online help for the current window. The tools described for the Help icon above are also available.
View End User License Agreement (EULA)
To view the End User License Agreement at any time, select EULA from the More Tasks menu on the Maintenance page.
Using the Configuration Wizard
The Configuration Wizard guides you through the initial configuration of your system. There are two wizards, one uses DD System Manager and the other uses the CLI. See the EMC DD OS Initial Configuration Guide for more information.
Using the CLI
The EMC DD OS Command Reference Guide provides information for using the commands to accomplish administration tasks.
Online help is available and provides the complete syntax for each command. To display CLI help, type the help command.
Any Data Domain system command that accepts a list, such as a list of IP addresses, accepts entries separated by commas, by spaces, or both.
The Tab key can be used:
u to complete a command entry when that entry is unique. Tab completion is supported for all keywords. For example, entering syst Tab shTab st Tab displays the
command system show stats.
u to show the next available option, if you do not enter any characters before pressing the Tab key.
u to show partial matched tokens or to complete a unique entry, if you enter characters before pressing the Tab key.
Logging into the System Using the CLI
After the initial configuration, use the SSH or Telnet (if enabled) utilities to access the system remotely and to use the CLI.
u From a serial console, use the communication settings: 9600 baud, 8 data bits, no parity, and 1 stop bit.
u From a directly attached keyboard and monitor, log into the Data Domain system at the login prompt.
u From a remote machine over an Ethernet connection, use SSH or Telnet to connect to the Data Domain system.
For SSH, use the following command (with the hostname you chose for the Data Domain system at initial configuration) and provide the sysadmin password: # ssh -l sysadminhostname
Data Domain OS 5.4.0.0-19899 Password:
Finding Online Help for Commands
There are several ways to find help for commands:
u To list Data Domain system commands, enter a question mark (?), or type the command help at the prompt.
u To list the options for a command, enter the command with no options at the prompt. u To find a keyword used in a command option when you do not remember which
command to use, enter a question mark (?) or the help command followed by the keyword.
For example, the question mark followed by the keyword password displays all Data Domain system command options that include password. If the keyword matches a command, such as net, an explanation of that command appears.
u To display a detailed explanation of a command, enter the help command followed by the command’s name.
u Use these keyboard shortcuts:
l Up and down arrow keys to move through a displayed command. l The q key to quit/exit.
l A slash character (/) followed by a pattern to use as search criteria. Matches are highlighted.
Managing Data Domain Systems
This chapter includes:
u About Managing Data Domain Systems... 32 u Managing System Availability...32 u Working with Upgrade Images... 35 u Managing System Licenses... 37 u Managing System Storage...38 u Managing Network Connections... 43 u Managing Access to the System... 63 u Managing General Configuration Settings...80 u Managing Reporting and Logging... 90 u Managing Remote System Power with IPMI...97
About Managing Data Domain Systems
Note
When processing a heavy load, a system might be less responsive than normal. In this case, management commands issued from either DD System Manager or the CLI might take longer to complete. When the duration exceeds allowed limits, a timeout error is returned, even if the operation completed.
The DD System Manager controls individual systems, which are listed in the Navigation panel and are referred to as managed systems.
Note
u A managed system should be managed by one management system at one time. u If you are an admin on the management system you become a global admin, which
means that you can configure and monitor all managed systems.
u If you are a user on the management system you become a global user, which means that you can monitor all managed systems.
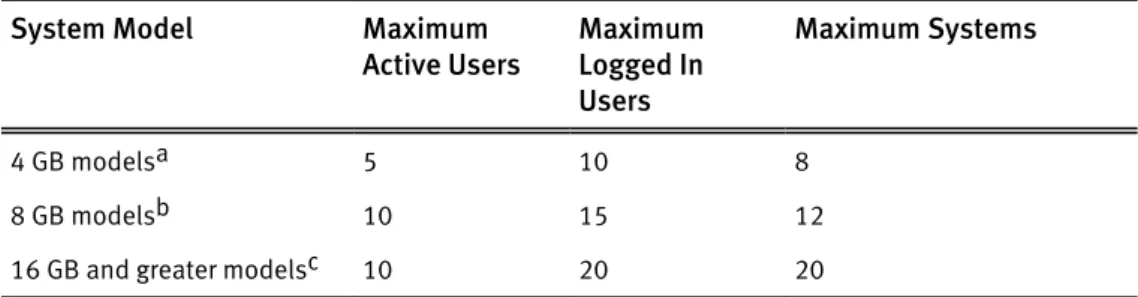
This table recommends the maximum number of systems and user sessions that can be managed by DD System Manager:
Table 3 Maximum Number of Systems and Users Managed by DD System Manager System Model Maximum
Active Users MaximumLogged In Users
Maximum Systems
4 GB modelsa 5 10 8
8 GB modelsb 10 15 12
16 GB and greater modelsc 10 20 20
a. Includes DD120, DD140, DD510, and DD530 b. Includes DD565, DD610, and DD630
c. Includes DD580, DD660, DD670, DD690, DD860, DD880, DD890, DD990, DD580g, DD690g, and DD880g
Managing System Availability
The topics in this section include how to:
u Adding a System to DD System Manager on page 33 u Removing a System from DD System Manager on page 33 u Rebooting a System on page 34
Adding a System to DD System Manager
NoteMake sure the system being added is running a DD OS version that is compatible with the DD System Manager. DD System Manager supports the management of systems running the previous version, the current version, and the next version when it becomes
available. To support replication, DD System Manager supports the addition of systems running the previous two versions, the current version and the next two versions as they become available. For Release 5.4, DD System Manager supports management of versions 5.2 to 5.5, and it supports the addition of systems for replication for DD OS Version 5.1 to 5.6.
Procedure
1. Click the Add icon (+) on the Navigation panel.
2. In the Add System dialog box, enter the hostname or IP address of the system to be added in the System Name box.
Note
A system should be added to and managed by only one DD System Manager. 3. In Administration Credentials, enter the sysadmin user name in the User Name box,
followed by the password.
4. Optionally, click Advanced to enter a proxy IP address (or system name) of a system that cannot be reached directly. If configured, enter a custom port instead of the default port 3009.
5. Click OK. Note
If the system is unreachable after adding it to DD System Manager, ensure the following:
l If a hostname (either a fully-qualified domain name (FQDN) or non-FQDN) is entered, make sure it is resolvable on the managed system. Either configure a domain name for the managed system, ensure a DNS entry for the system exists, or ensure a IP address to hostname mapping is defined).
l If an IP address or hostname is entered, ensure there is a route from the managing system to the system being added.
6. If the system certificate has not been verified, the Verify Certificate dialog box shows details about the certificate. Check the system credentials. Click OK if you trust the certificate, or click Cancel.
Removing a System from DD System Manager
This topic describe how to remove a system (other than the system that hosts DD System Manager) from DD System Manager.
Note
Removing a system removes it from the DD Network list. It does not delete any replication context configured to or from that system.
Procedure
1. Click the X (remove) icon on the navigation panel. 2. In the Remove System(s) dialog box:
l To remove all systems, select System.
l To remove one or more systems, select the system. 3. Click OK.
Note
If only the DD System Manager host system is present, clicking the X icon results in a message stating that no removable systems are found on DD System Manager.
Rebooting a System
Some configuration changes, such as changing the time zone, require that you reboot the system.
Procedure
1. Select a system in the navigation panel. 2. Select Maintenance > System.
3. From the More Tasks menu, select Reboot System. 4. Click OK to confirm.
Powering a Data Domain System On or Off
This topic describes how to power on or power off a Data Domain system. Procedure
1. Power on any expansion shelves before powering on the Data Domain controller. The ES30 powers on when plugged in. Wait approximately three minutes after all
expansion shelves are turned on. Note
The controller is the chassis and any internal storage. A Data Domain system refers to the controller and any optional external storage.
2. Plug in the power cord for your controller, and if the controller has a power button, press the controller’s power button (as shown in the Installation and Setup Guide for your Data Domain system).
3. To shut down power to a Data Domain system, use the system poweroff CLI command.
This command automatically performs an orderly shut down of DD OS processes and is available to administrative users only.
Results CAUTION
Do not use the chassis power switch to power off the system. Doing so prevents remote power control using IPMI. Use the system poweroff command instead. The system poweroff command shuts down the system and turns off the power.
Note
The IMPI Remote System Power Down feature does not perform an orderly shutdown of the DD OS. Use this feature only if the system poweroff command is unsuccessful.
Working with Upgrade Images
DD System Manager provides a link to the Data Domain Support Web site. When you upgrade your DD OS, download the image from the Support site to a local system. Then upload the image to the system to be upgraded.
This section covers the following topics:
u Viewing the Upgrade Package List on page 35 u Obtaining Upgrade Packages on page 35 u Upgrading a Data Domain System on page 36 u Removing an Upgrade Image on page 37
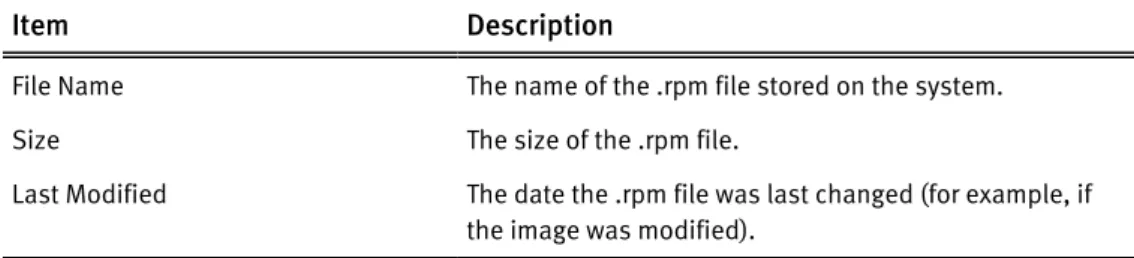
Viewing the Upgrade Package List
The Maintenance > System view provides a list of upgrade images (.rpm files) currently stored on the Data Domain controller. The Upgrade Packages Available on the Data Domain system list displays the following information for each image:
Table 4 Upgrade Package List Items
Item Description
File Name The name of the .rpm file stored on the system.
Size The size of the .rpm file.
Last Modified The date the .rpm file was last changed (for example, if the image was modified).
Obtaining Upgrade Packages
This topic describes how to connect to the Data Domain Support Web site and obtain an upgrade package.
Procedure
1. Expand DD Network in the navigation panel, and select a system. 2. Select Maintenance > System.
3. In the Upgrade Packages Available on the Data Domain System list, select Upload Upgrade Package.
A maximum of five upgrade packages can be uploaded using DD System Manager. To continue with this procedure, remove the excess images (see Removing an Upgrade Image on page 37.
There are no restrictions, other than space limitations, if you use FTP or NFS to copy an upgrade package to a system. FTP is disabled by default. To use NFS, /ddvar needs to be exported and mounted from an external host).
4. To obtain an upgrade package from the Data Domain Support site, click the Data Domain Support Portal link. Log into the site and use the Download Software link to navigate to the image recommended for your system by Support personnel. Save the upgrade image to a local computer with access to the system.
5. In the Upload Upgrade Package dialog box, click Browse to open the File Upload dialog box. Navigate to the system with the file, select the file, and click Open. 6. Click OK.
Progress on the status of the upload appears. Upon successful completion of the upload, the new .rpm is listed in Upgrade Packages Available on the Data Domain list.
Upgrading a Data Domain System
This topic describes how to perform a system upgrade with an image that resides on the Data Domain system.
Note
System upgrade files use the .rpm file extension. This topic assumes that you are updating only DD OS. If you make hardware changes, such as adding, swapping, or moving interface cards, you must update the DD OS configuration to correspond with the hardware changes.
Procedure
1. After reading the Release Notes for instructions for this DD OS upgrade, log into the system where the upgrade is to be performed.
Note
For most releases, upgrades are permitted from up to two prior major release
versions. For Release 5.4, upgrades are permitted from up to three prior major release versions.
You cannot select a system from the DD Network list while logged in on another system.
2. From the Upgrade Packages Available on this Data Domain System list, select the image to use for the upgrade.
3. Click Perform System Upgrade.
4. In the Upgrade System dialog box, verify the version of the target image (the upgrade image). Click OK.
5. After installation completes, the system automatically reboots unless the DD OS installation also included firmware upgrades, in which case the system powers down. l If the system powers down, you must power cycle (AC power) the system. Unplug
all of the power cables for 30 seconds and then plug them back in. The system powers on and reboots.
l If your system does not automatically power on and has a power button on the front panel, press the button.
6. Log into the system.
Removing an Upgrade Image
This topic describes how to remove a system upgrade image that resides on the Data Domain system.
Procedure
1. From the Upgrade Packages Available on this Data Domain System list, select the image to remove. One image can be removed at a time.
2. Click Remove Upgrade Package.
Managing System Licenses
Optional features for the Data Domain system are licensed and must be purchased separately. See Licensed Features on page 18 for a list of licensed products. The following procedures describe how to display and enable licenses.
u Displaying Licenses on page 37 u Adding Licenses on page 37 u Removing Licenses on page 38
Displaying Licenses
Procedure
1. In the navigation panel, expand DD Network and select a managed system. 2. Select System Settings > Licenses.
The Feature Licenses list displays license keys and feature names.
Adding Licenses
This topic describes how to add a feature license with DD Service Manager. Procedure
1. In the navigation panel, expand the DD Network and select a system. 2. Select System Settings > Licenses.
The Feature Licenses list displays license keys and feature names. 3. Click Add Licenses.
4. In the Add Licenses Key dialog box, type or paste one or more license keys in the License Key box. Type each key on its own line, or separate each key by a space or comma (and they will be automatically placed on a new line).
5. Click Add.
The added licenses display in the Added license list.
Any errors are listed in the error license list. Select a license with an error to edit it. Select Retry Failed License(s) to retry the key. Otherwise, click Done to ignore the errors and return to the Feature Licenses list.
Removing Licenses
This topic describes how to remove one or more feature licenses with DD Service Manager.
Procedure
1. In the navigation panel, expand the DD Network and select a system. 2. Select System Settings > Licenses.
The Feature Licenses list displays license keys and feature names.
3. In the Feature Licenses list, select one or more licenses to remove and click Delete Selected Licenses.
4. In the Warning dialog box verify the license(s) to delete and click OK. The licenses are removed from the license list.
Managing System Storage
The Storage view organizes the Data Domain system storage so that you can view disks by usage type (Active, Archive, Failed, and so on), operational status, and location. The system is automatically scanned and inventoried so that the status and inventory are shown for all enclosures, disks, and RAID groups.
The following topics are covered:
u Viewing System Storage Information on page 38 u Physically Locating a Disk on page 42
u Configuring Storage on page 42
Viewing System Storage Information
This topic describes how to view system storage information with DD System Manager. Procedure
1. Select a system in the navigation panel. 2. Select Hardware > Storage.
The Storage view Status area shows the current status of the storage, such as Operational or Non-Operational, and any active alerts, which can be clicked to view alert details.
Results
The Status area presents the following information. Table 5 Storage System Status
Item Description
Status Storage system status can be one of the following:
l Normal—System operational (green). All disks in the system are in good condition.
l Warning—System operational (yellow). The system is operational, but there are problems that need to be
Table 5 Storage System Status (continued)
Item Description
corrected. Warnings may result from a degraded RAID group, presence of foreign storage, or failed or absent disks. l Error—System non-operational (red). The system is not
operational.
Operational Drives Count of drives operating normally:
l Total—Total number of drives operating. l In-Use—Number of drives the system is using.
l Spare—Number of spare drives (that can be activated if an in-use disk fails).
Non-Operational Drives Count of drives that are not operating normally. l Total—Total number of non-operational drives. l Failed—Number of known failed drives. l Absent—Number of slots without drives.
l Foreign—Number of foreign or unsupported drives. l Unknown—Number of new disks in a shelf.
Below the Status area are tabs that organize how the storage inventory is presented.
Storage Overview
The Overview area displays information for all disks in the selected Data Domain system organized by type. The categories that display are dependent on the type of storage configuration in use. The Overview section lists the storage that is found, and can include the following sections. You can expand each of these sections to display detailed
information: u Active Tier
Disks in the Active Tier are currently marked as usable by the Data Domain file system. Sections are organized by Disks in Use and Disks Not in Use.
u Retention Tier
If the optional EMC Data Domain Extended Retention (formerly DD Archiver) license is installed, this section shows the disks that are configured for Extended Retention storage. Sections are organized by Disks in Use and Disks Not in Use. For more information, see the EMC Data Domain Extended Retention Administration Guide. u Usable Disks and Enclosures
For systems with optional enclosures, this section shows the disks and enclosures that can be added to the system.
u Fail/Foreign/Absent Disks (Excluding Systems Disks)
Shows the disks that are in a failed state; these cannot be added to the system Active or Retention tiers.
u Systems Disks
Shows the disks where the DD OS resides when the Data Domain controller does not contain data storage disks.
Each section heading displays a summary of the storage configured for that section. The Summary shows tallies for the total number of disks, disks in use, spare disks,
reconstructing spare disks, available disks, and known disks.
Clicking the plus (+) icon for a section shows information about the status and content of the storage that is present.
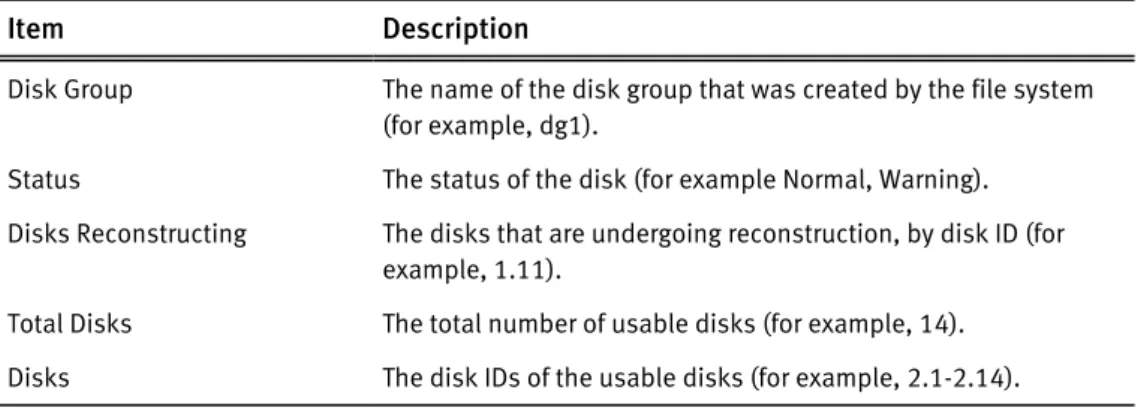
Sections with the Disks In Use section show the Disk Group Status tallies and a table with the following information:
Table 6 Disk Group Status
Item Description
Disk Group The name of the disk group that was created by the file system (for example, dg1).
Status The status of the disk (for example Normal, Warning). Disks Reconstructing The disks that are undergoing reconstruction, by disk ID (for
example, 1.11).
Total Disks The total number of usable disks (for example, 14). Disks The disk IDs of the usable disks (for example, 2.1-2.14). Sections with a Disks Not in Use section show the Disks Status tallies and a table with the following information:
Table 7 Disk Status
Item Description
Disk The disk identifier. It can be:
l The enclosure and disk number (in the form Enclosure.Slot). l A gateway disk (devn).
l A LUN.
Status The status of the disk, for example In Use, Available, Spare. Size The data storage capacity of the disk when used in a Data
Domain system.a
Manufacturer/Model The manufacturer’s model designation. The display may include a model ID or RAID type or other information depending on the vendor string sent by the storage array.
Firmware The firmware level used by the third-party physical-disk storage controller.
Serial Number The manufacturer’s serial number for the disk.
a. The Data Domain convention for computing disk space defines one gibibyte as 230 bytes, giving a different disk capacity than the manufacturer’s rating.
Status View
The Status view shows the Disks Status table and the Reconstructing table. The following table describes the entries in the Disks Status table.
Table 8 Disks Status
Item Description
Total The total number of inventoried disks in the Data Domain system (including enclosures and gateway storage).
In Use The number of disks currently in use by the file system. Spare The number of spare disks (available to replace failed disks). Spare (reconstructing) The number of disks that are in the process of data
reconstruction (spare disks replacing failed disks).
Available The number of disks that are available for allocation to an Active or Extended Retention storage tier.
Known The number of known unallocated disks. Unknown The number of unknown unallocated disks. Failed The number of failed disks.
Foreign The number of foreign disks. Absent The number of absent disks.
The following table describes the entries in the Reconstructing table. Table 9 Disk Reconstruction Status
Item Description
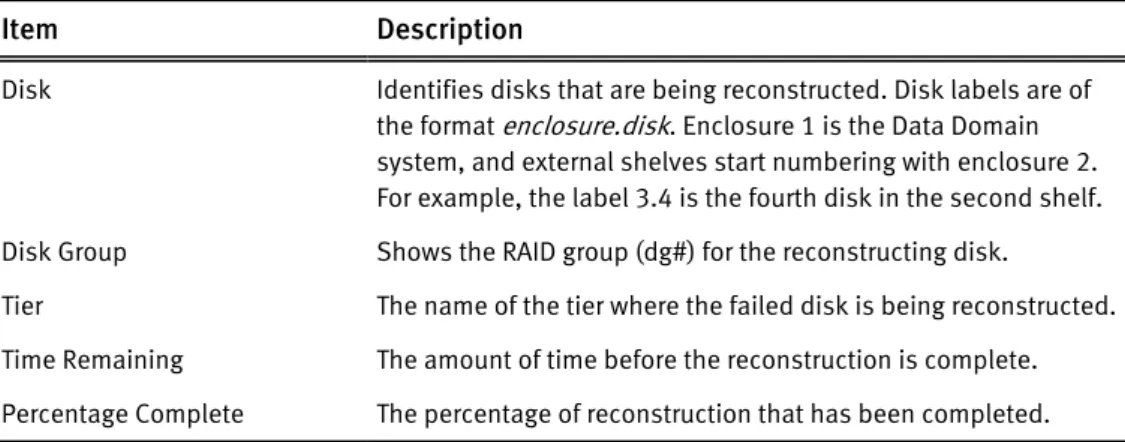
Disk Identifies disks that are being reconstructed. Disk labels are of the format enclosure.disk. Enclosure 1 is the Data Domain system, and external shelves start numbering with enclosure 2. For example, the label 3.4 is the fourth disk in the second shelf. Disk Group Shows the RAID group (dg#) for the reconstructing disk.
Tier The name of the tier where the failed disk is being reconstructed. Time Remaining The amount of time before the reconstruction is complete. Percentage Complete The percentage of reconstruction that has been completed. When a spare disk is available, the Data Domain file system automatically replaces a failed disk with a spare and begins the reconstruction process to integrate the spare into the RAID disk group. The disk use displays Spare and the status becomes
Reconstructing. Reconstruction is performed on one disk at a time.
Disks View
You can select how the disks are viewed: All Disks, by tier, or by disk group. The following table describes the entries in the Disks view.
Table 10 System Disks Status
Item Description
Disk The disk identifier, which can be: