ADO.NET Fundamentals
S
o far, you’ve learned that ASP.NET isn’t just a new way to create modern web applica-tions—it’s also part of an ambitious multilayered strategy called .NET. ASP.NET is only one component in Microsoft’s .NET platform, which includes new languages, a new philosophy for cross-language integration, a new way of looking at components and deployment, and a shared class library with components that allow you to do everything from handling errors to analyzing XML documents. In this chapter, you’ll discover that the .NET Framework has yet another surprise in store: ADO.NET, Microsoft’s latest data access model.ADO.NET allows you to interact with relational databases and other data sources. Quite simply, ADO.NET is the technology that .NET applications use to communicate with a database, whether they need to add a new customer record, log a purchase, or dis-play a product catalog.
In this chapter, you’ll learn about ADO.NET and the family of objects that provides its functionality. You’ll also learn how to put these objects to work by creating simple pages that use ADO.NET to retrieve information from a database and apply changes.
■
Note
ASP.NET 2.0 includes a new data binding framework that can hide the underlying ADO.NET plumbing in your web pages. You can skip to Chapter 14 to start learning about these features right away. However, to build scalable, high-performance web applications, you’ll need to write custom database code. That means you’ll need a thorough understanding of the concepts presented in this chapter.ADO.NET and Data Management
Almost every piece of software ever written works with data. In fact, a typical Internet application is often just a thin user interface shell on top of a sophisticated database pro-gram that reads and writes information from a database on the web server. At its simplest, a database program might allow a user to perform simple searches and display results in a formatted table. A more sophisticated ASP.NET application might use a database behind
453
the scenes to retrieve information, which is then processed and displayed in the appropri-ate format and location in the browser. The user might not even be aware (or care) that the displayed information originates from a database. Using a database is an excellent way to start dividing the user interface logic from the content, which allows you to create a site that can work with dynamic, easily updated data.
The Role of the Database
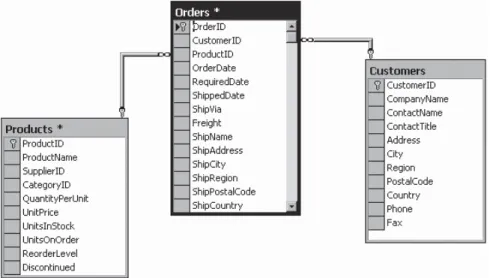
The most common way to manage data is to use a database. Database technology is particularly useful for business software, which typically requires hierarchical sets of related information. For example, a typical database for a sales program consists of a list of customers, a list of products, and a list of sales that draws on information from the other two tables. This type of information is best described using a relational model, which is the philosophy that underlies all modern database products, including SQL Server, Oracle, and even Microsoft Access. (In a relational model, information is broken down into its smallest and most concise units. For example, a sales record doesn’t store all the informa-tion about the products that were sold. Instead, it stores just a product ID that refers to a full record in a product table, as shown in Figure 13-1.)
Although it’s technically possible to organize data into tables and store it on the hard drive as an XML file, this wouldn’t be very flexible. Instead, a web application needs a full relational database management system (RDBMS), such as SQL Server. The RDBMS handles the data infrastructure, ensuring optimum performance and reliability. These products take the responsibility of providing data to multiple users simultaneously and making sure that certain rules are followed (for example, disallowing conflicting changes or invalid data types).
In most ASP.NET applications, you’ll need to use a database for some tasks. Here are some basic examples of data-driven ASP.NET applications:
• E-commerce sites involve managing sales, customers, and inventory information. This information might be displayed directly on the screen (as with a product cata-log) or used unobtrusively to record transactions or customer information.
• Online knowledge bases and customized search engines involve less structured databases that store vast quantities of information or links to various documents and resources.
• Information-based sites such as web portals can’t be easily scalable or manageable unless all the information they use is stored in a consistent, strictly defined format. Typically, a site like this is matched with another ASP.NET program that allows an authorized user to add or update the displayed information by modifying the cor-responding database records through a browser interface.
You probably won’t have any trouble thinking about where you need to use database technology in an ASP.NET application. What Internet application couldn’t benefit from a guest book that records user comments or a simple e-mail address submission form that uses a back-end database to store a list of potential customers or contacts? This is where ADO.NET comes into the picture. ADO.NET is a technology designed to let an ASP.NET program (or any other .NET program, for that matter) access data.
Database Access in the Internet World
Accessing a database in an Internet application is a completely different scenario than accessing a database in a typical desktop or client/server program. Most developers hone their database skills in the desktop world and run into serious problems when they try to apply what they have learned with stand-alone applications in the world of the Web. Quite simply, web applications raise a whole new set of considerations and potential problems.
Problems of Scale
A web application has the potential to be used by hundreds of simultaneous users. This means it can’t be casual about using server memory or limited resources such as database connections. If you design an application that acquires a database connection and holds it for even a few extra seconds, other users may notice a definite slowdown. And if you don’t carefully consider database concurrency issues, problems such as locked records and con-flicting updates can make it difficult to provide consistent data to all users.
dramatically lower. Database practices that might slightly hamper the performance of a client/server application can multiply rapidly and cause significant problems in a web application.
Problems of State
As you already know, HTTP is a stateless protocol. When a user browses to a page in an ASP.NET application, a connection is made, the code is processed, an HTML page is returned, and the connection is immediately severed. Although users may have the illusion that they are interacting with a continuously running application, they are really just receiving a string of static pages. (ASP.NET makes this illusion so convincing that it’s worth asking if it can really be considered an illusion at all.)
With data-driven web applications, the stateless nature of HTTP can be a thorny prob-lem. The typical approach is to connect to a database, read information, display it, and then close the database connection. This approach runs into difficulties if you want the user to be able to modify the retrieved information. In this scenario, the application requires a certain amount of intelligence in order to be able to identify the original record, build a SQL statement to select it, and update it with the new values.
Introducing ADO.NET
ADO.NET has a few characteristics that make it different from previous data access technologies (such as ADO, the database library that was used in classic ASP pages).
The DataSet
Many ADO.NET tasks revolve around a new object called the DataSet. The DataSet is a cache of information that has been queried from your database. The innovative features of the DataSet are that it’s disconnected (see the next section) and can store more than one table. For example, a DataSet could store a list of customers, a list of products, and a list of customer orders. You can even define all these relationships in the DataSet to prevent invalid data and make it easier to answer questions such as “What products did Joe Smith order?”
Disconnected Access
With previous database access technologies, it’s easy to hold open a connection with the database server while your code does some work. This live connection allows you to make immediate updates, and you can even see the changes made by other users in real time. Unfortunately, database servers can provide only a limited number of connections before they reject connection requests. The longer you keep a connection open, the greater the chance becomes that another user will be prevented from accessing the database. In a poorly written program, the database connection is kept open while other tasks are being performed. But even in a well-written program using an old data access technology such as ADO, the connection must be kept open until all the data is processed and the query results are no longer needed.
ADO.NET has an entirely different philosophy. In ADO.NET you still create a connection to a database, but you’re able to close the connection much faster. That’s because you’re able to fill a DataSet object with acopyof the information drawn from the database. You can then close the connection before you start processing the data. This means you can easily process and manipulate the data without worrying, because you aren’t using a valu-able database connection. (Of course, if you change the information in the DataSet, the information in the corresponding table in the database isn’t changed. You’ll need to reconnect to commit any changes.)
DISCONNECTED ACCESS RAISES NEW ISSUES
Disconnected access is a key requirement for Internet applications, and it’s also an approach that often requires additional consideration and precautions. Disconnected access makes it easy for users to create inconsistent updates, a problem that won’t be resolved (or even identified) until the update is committed to the original data source. Disconnected access can also require special considerations because changes aren’t applied in the order they were entered. This design can cause problems when you modify related records.
Fortunately, ADO.NET provides a rich set of features to deal with all these possibilities. However, you do need to be aware that the new disconnected model may introduce new considerations and require extra care.
XML Integration
SQL Server 2005 Express Edition
This chapter includes code that works with SQL Server 7 or later. If you don’t have a test database server handy, you may want to use SQL Server 2005 Express Edition, the free data engine included with some versions of Visual Studio and downloadable separately. SQL Server 2005 Express Edition is a scaled-down version of SQL Server 2005 that’s free to distribute. SQL Server 2005 Express Edition has certain limitations—for example, it can use only one CPU and a maximum of 1GB of RAM; databases can’t be larger than 4GB; and graphical tools aren’t included. However, it’s still remarkably powerful and suitable for many midscale websites. Even better, you can easily upgrade from SQL Server 2005 Express Edition to a paid version of SQL Server 2005 if you need more features later. For more information about SQL Server 2005 Express Edition, refer to the MSDN Help or the white paper at http://msdn.microsoft.com/library/en-us/dnsse/html/sseoverview.asp.
■
Note
This chapter, and the following chapters in this part, use examples drawn from the pubs and North-wind databases, which are sample databases included with many versions of Microsoft SQL Server. If you aren’t using SQL Server, or if you’re using SQL Server 2005, you won’t have these databases preinstalled. However, you can easily install them using the scripts provided with the online samples. See the readme for full instructions.Browsing and Modifying Databases in Visual Studio
As an ASP.NET developer, you may have the responsibility of creating the database required for a web application. Alternatively, it may already exist, or it may be the responsibility of a dedicated database administrator. If you’re using a full version of SQL Server, you’ll probably use a graphical tool such as SQL Server Management Studio (in the full version of SQL Server 2005) or Enterprise Manager (in earlier versions) to create and manage your databases. If you’re using SQL Server 2005 Express Edition, you won’t have any dedicated tools, so you’ll need to use the support that’s built into Visual Studio.
1. Right-click the Data Connections node, and choose Add Connection.
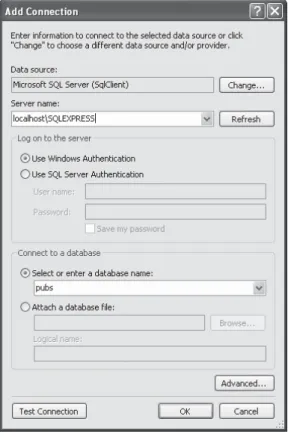
2. If you’re using a full version of SQL Server, enter localhostas your server name. This indicates the database server is the default instance on the local computer. (Replace this with the name of a remote computer if needed.) If you’re using SQL Server Express Edition, you’ll need to use the server name localhost\SQLEXPRESS instead, as shown in Figure 13-2. SQLEXPRESS indicates that you’re connecting to anamed instanceof SQL Server. This is the default for SQL Server 2005 Express Edition.
3. Click Test Connection to verify that this is the location of your database. If you haven’t installed a database product yet, and you didn’t choose to install SQL Server 2005 Express Edition when you installed Visual Studio, this step will fail. Otherwise, you’ll know that your database server is installed and running.
4. In the Select or Enter a Database Name list, choose the “pubs” database. If you’re using SQL Server 2005 Express Edition, you’ll begin with no databases at all, and you’ll need to install the pubs database using the script that’s included with the sample code. Sim-ilarly, the full version of SQL Server 2005 doesn’t include the pubs database.
■
Tip
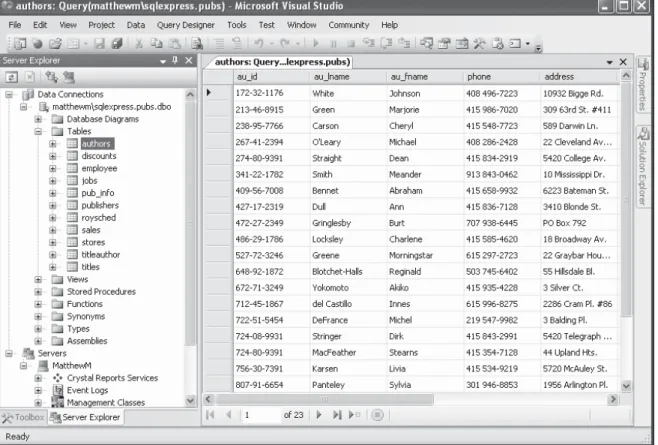
Alternatively, you can choose to create a new database by right-clicking the Data Connections node and choosing Create New SQL Server Database.5. Click OK. The database connection will appear in the Server Explorer window. You can now explore its groups to see and edit tables, stored procedures, and more. For example, if you right-click a table and choose Show Table Data, you’ll see a grid of records that you can browse and edit, as shown in Figure 13-3.
SQL Basics
When you interact with a data source through ADO.NET, you use SQL to retrieve, modify, and update information. In some cases, ADO.NET will hide some of the details for you or even generate required SQL statements automatically. However, to design an efficient database application with a minimal amount of frustration, you need to understand the basic concepts of SQL.
SQL (Structured Query Language) is a standard data access language used to interact with relational databases. Different databases differ in their support of SQL or add other features, but the core commands used to select, add, and modify data are common. In a database product such as SQL Server, it’s possible to use SQL to create fairly sophisticated SQL scripts for stored procedures and triggers (although they have little of the power of a full object-oriented programming language). When working with ADO.NET, however, you’ll probably use only the following standard types of SQL statements:
• A Select statement retrieves records.
• An Update statement modifies existing records.
• An Insert statement adds a new record.
• A Delete statement deletes existing records.
If you already have a good understanding of SQL, you can skip the next few sections. Otherwise, read on for a quick tour of SQL fundamentals.
■
Tip
To learn more about SQL, use one of the SQL tutorials available on the Internet, such as the one athttp://www.w3schools.com/sql. If you’re working with SQL Server, you can use its thorough Books Online help to become a database guru.
Running Queries in Visual Studio
If you’ve never used SQL before, you may want to play around with it and create some sample queries before you start using it in an ASP.NET site. Most database products provide some sort of tool for testing queries. If you’re using a full version of SQL Server, you can try SQL Server Management Studio or SQL Query Analyzer. If you’re using SQL Server 2005 Express Edition, or you just don’t want to use an extra tool, you can use the Server Explorer feature described earlier. Just follow these steps in Visual Studio:
1. Right-click your connection, and choose New Query.
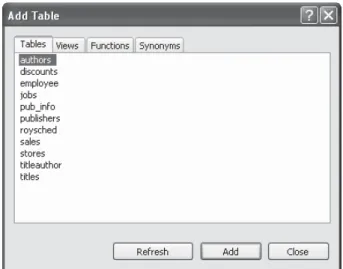
2. Choose the table (or tables) you want to use in your query from the Add Table dia-log box (as shown in Figure 13-4), and then click Close.
3. You’ll now see a handy query-building window. You can create your query by adding check marks next to the fields you want, or you can edit the SQL by hand in the lower portion of the window. Best of all, if you edit the SQL directly, you can type in anything—you don’t need to stick to the tables you selected in step 2, and you don’t need to restrict yourself to Select statements.
4. When you’re ready to run the query, select Query Designer ➤Execute SQL. Assuming your query doesn’t have any errors, you’ll get one of two results. If you’re selecting records, the results will appear at the bottom of the window (see Figure 13-5). If you’re deleting or updating records, a message box will appear informing you how many records were affected.
Figure 13-5. Executing a query
The Select Statement
To retrieve one or more rows of data, you use a Select statement. A basic Select statement has the following structure:
SELECT [columns] FROM [tables] WHERE [search_condition] ORDER BY [order_expression ASC | DESC]
This format really just scratches the surface of SQL. If you want, you can create more sophisticated queries that use subgrouping, averaging and totaling, and other options (such as setting a maximum number of returned rows). By performing this work in a query (instead of in your application), you can often create far more efficient applications.
The next few sections present sample Select statements. After each example, a series of bulleted points breaks the SQL down to explain how each part of it works.
A Sample Select Statement
The following is a typical (and rather inefficient) Select statement for the pubs database. It works with the Authors table, which contains a list of authors:
SELECT * FROM Authors
• The asterisk (*) retrieves all the columns in the table. This isn’t the best approach for a large table if you don’t need all the information. It increases the amount of data that has to be transferred and can slow down your server.
• The From clause identifies that the Authors table is being used for this statement.
• The statement doesn’t have a Where clause. This means all the records will be retrieved from the database, regardless of whether it has 10 or 10 million records. This is a poor design practice, because it often leads to applications that appear to work fine when they’re first deployed but gradually slow down as the database grows. In general, you should always include a Where clause to limit the possible number of rows (unless you absolutely need them all). Often, queries are limited by a date field (for example, including all orders that were placed in the last three months).
Improving the Select Statement
Here’s another example that retrieves a list of author names:
SELECT au_lname, au_fname FROM Authors WHERE State='MI' ORDER BY au_lname ASC
• Only two columns are retrieved (au_lname and au_fname). They correspond to the first and last names of the author.
• A Where clause restricts results to those authors who live in the specified state. Note that the Where clause requires apostrophes around the value you want to match (unless it is a numeric value).
• An Order By clause sorts the information alphabetically by the author’s last name.
An Alternative Select Statement
Here’s one last example:
SELECT TOP 100 * FROM Sales ORDER BY ord_date DESC
This example uses the Top clause instead of a Where statement. The database rows will be sorted, and the first 100 matching results will be retrieved. In this case, it’s the 100 most recent orders. You could also use this type of statement to find the most expensive items you sell or the best-performing employees.
The Where Clause
In many respects, the Where clause is the most important part of the Select statement. You can combine multiple conditions with the And keyword, and you can specify greater-than and less-greater-than comparisons by using the greater-greater-than (>) and less-greater-than (<)
operators.
The following is an example with a different table and a more sophisticated Where statement:
SELECT * FROM Sales WHERE ord_date < '2000/01/01' AND ord_date > '1987/01/01'
This example uses the international date format to compare date values. Although SQL Server supports many date formats, yyyy/mm/dd is recommended to prevent ambiguity.
String Matching with the Like Operator
The Like operator allows you to perform partial string matching to filter records where a par-ticular field starts with, ends with, or contains a certain set of characters. For example, if you want to see all store names that start with B, you could use the following statement:
SELECT * FROM Stores WHERE stor_name LIKE 'B%'
To see a list of all stores endingwith B, you would put the percent sign beforethe B, like this:
SELECT * FROM Stores WHERE stor_name LIKE '%B'
The third way to use the Like operator is to return any records that contain a certain char-acter or sequence of charchar-acters. For example, suppose you want to see all stores that have the word BOOKsomewhere in the name. In this case, you could use a SQL statement like this:
SELECT * FROM Stores WHERE stor_name LIKE '%book%'
By default, SQL is not case-sensitive, so this syntax finds instances of BOOK, book, or any variation of mixed case.
Finally, you can indicate one of a set of characters, rather than just any character, by listing the allowed characters within square brackets. Here’s an example:
SELECT * FROM Stores WHERE stor_name LIKE '[abcd]%'
This SQL statement will return stores with names starting with A, B, C, or D.
Aggregate Queries
The SQL language also defines special aggregate functions. Aggregate functions work with a set of values but return only a single value. For example, you can use an aggregate func-tion to count the number of records in a table or to calculate the average price of a product. Table 13-1 lists the most commonly used aggregate functions.
Table 13-1. SQL Aggregate Functions
Function Description
Avg(fieldname) Calculates the average of all values in a given numeric field
Sum(fieldname) Calculates the sum of all values in a given numeric field
Min(fieldname) and Max(fieldname) Finds the minimum or maximum value in a number field
Count(*) Returns the number of rows in the result set
For example, here’s a query that returns a single value—the number of records in the Authors table:
SELECT COUNT(*) FROM Authors
And here’s how you could calculate the total quantity of all sales by adding together the qty field in each record:
SELECT SUM(qty) FROM Sales
The SQL Update Statement
The SQL Update statement selects all the records that match a specified search expres-sion and then modifies them all according to an update expresexpres-sion. At its simplest, the Update statement has the following format:
UPDATE [table] SET [update_expression] WHERE [search_condition]
Typically, you’ll use an Update statement to modify a single record. The following example adjusts the phone column in a single author record. It uses the unique author ID to find the correct row.
UPDATE Authors SET phone='408 496-2222' WHERE au_id='172-32-1176'
This statement returns the number of affected rows. (See Figure 13-6 for an example in Visual Studio.) However, it won’t display the change. To do that, you need to request the row by performing another Select statement:
SELECT phone FROM Authors WHERE au_id='172-32-1176'
As with a Select statement, you can use an Update statement with several criteria:
UPDATE Authors SET au_lname='Whiteson', au_fname='John' WHERE au_lname='White' AND au_fname='Johnson'
You can even use the Update statement to update an entire range of matching
records. The following example modifies the phone number for every author who lives in California:
The SQL Insert Statement
The SQL Insert statement adds a new record to a table with the information you specify. It takes the following form:
INSERT INTO [table] ([column_list]) VALUES ([value_list])
You can provide the information in any order you want, as long as you make sure the list of column names and the list of values correspond exactly:
INSERT INTO Authors (au_id, au_lname, au_fname, zip, contract) VALUES ('998-72-3566', 'Khan', 'John', 84152, 0)
This example leaves out some information, such as the city and address, in order to provide a simple example. The earlier example shows the bare minimum required to cre-ate a new record in the Authors table.
Remember, database tables often have requirements that can prevent you from adding a record unless you fill in all the fields with valid information. Alternatively, some fields may be configured to use a default value if left blank. In the Authors table, some fields are required, and a special format is defined for the ZIP code and author ID.
One feature the Authors table doesn’t use is an automatically incrementing identity column. This feature, which is supported in most relational database products, assigns a unique value to a specified column when you perform an insert operation. When you insert a record into a table that has a unique incrementing ID, you shouldn’t specify a value for the ID. Instead, allow the database to choose one automatically.
AUTO-INCREMENT FIELDS ARE INDISPENSABLE
If you’re designing a database, make sure you add an auto-incrementing identity field to every table. It’s the fastest, easiest, and least error-prone way to assign a unique identification number to every record. Without an automatically generated identity field, you’ll need to go to considerable effort to create and maintain your own unique field. Often programmers fall into the trap of using a data field for a unique identifier, such as a Social Security number (SSN) or a name. This almost always leads to trouble at some inconvenient time far in the future, when you need to add a person who doesn’t have an SSN (for exam-ple, a foreign national) or you need to account for an SSN or name change (which will cause problems for other related tables, such as a purchase order table that identifies the purchaser by the name or SSN field). A much better approach is to use a unique identifier and have the database engine assign an arbi-trary unique number to every row automatically.
If you create a table without a unique identification column, you’ll have trouble when you need to select that specific row for deletion or updates. Selecting records based on a text field can also lead to problems if the field contains special embedded characters (such as apostrophes). You’ll also find it extremely awkward to create table relationships.
The SQL Delete Statement
The Delete statement is even easier to use. It specifies criteria for one or more rows that you want to remove. Be careful: once you delete a row, it’s gone for good!
DELETE FROM [table] WHERE [search_condition]
The following example removes a single matching row from the Authors table:
DELETE FROM Authors WHERE au_id='172-32-1176'
The Delete and Update commands return a single piece of information: the number of affected records. You can examine this value and use it to determine whether the oper-ation is successful or executed as expected.
ADO.NET Basics
ADO.NET relies on the functionality in a small set of core objects. You can divide these objects into two groups: those that are used to contain and manage data (such as DataSet, DataTable, DataRow, and DataRelation) and those that are used to connect to a specific data source (such as Connection, Command, and DataReader).
The data container objects are completely generic. No matter what data source you use, once you extract the data, it’s stored using the same DataSet class. Think of the DataSet as playing the same role as a collection or an array—it’s a package for data. The difference is that the DataSet is customized for relational data, which means it understands concepts such as rows, columns, and table relationships natively.
The second group of objects exists in several different flavors. Each set of data inter-action objects is called an ADO.NET data provider. Data providers are customized so that each one uses the best-performing way of interacting with its data source. For example, the SQL Server data provider is designed to work with SQL Server 7 or later. Internally, it uses SQL Server’s TDS (tabular data stream) protocol for communicating, thus guaranteeing the best possible performance. If you’re using Oracle, you’ll need to use the Oracle provider objects instead.
It’s important to understand that you can use any data provider in almost the same way, with almost the same code. The provider objects derive from the same base classes, implement the same interfaces, and expose the same set of methods and properties. In some cases, a data provider object will provide custom functionality that’s available only with certain data sources, such as SQL Server’s ability to perform XML queries. However, the basic members used for retrieving and modifying data are identical.
Microsoft includes the following four providers:
• SQL Server provider: Provides optimized access to a SQL Server database (version 7.0 or later).
• OLE DB provider: Provides access to any data source that has an OLE DB driver.
• Oracle provider: Provides optimized access to an Oracle database (version 8i or later).
• ODBC provider: Provides access to any data source that has an ODBC (Open Data-base Connectivity) driver.
In addition, third-party developers and database vendors have released their own ADO.NET providers, which follow the same conventions and can be used in the same way as those that are included with the .NET Framework.
for many years as part of ADO, so most data sources provide an OLE DB driver (including SQL Server, Oracle, Access, MySQL, and many more). In the rare situation that you can’t find a full provider or an OLE DB driver, you can fall back on the ODBC provider, which works in conjunction with an ODBC driver.
■
Tip
Microsoft includes the OLE DB provider with ADO.NET so you can use your existing OLE DB drivers. However, if you can find a provider that’s customized specifically for your data source, you should use it instead. For example, you can connect to SQL Server database using either the SQL Server provider or the OLE DB provider, but the first approach will perform best.To help understand the different layers that come into play with ADO.NET, refer to Figure 13-7.
Data Namespaces
The ADO.NET components live in seven namespaces in the .NET class library. Together, these namespaces hold all the functionality of ADO.NET. Table 13-2 describes each data namespace.
Table 13-2. ADO.NET Namespaces
Namespace Purpose
System.Data Contains fundamental classes with the core ADO.NET functionality. This includes DataSet and DataRelation, which allow you to manipulate structured relational data. These classes are totally independent of any specific type of database or the way you connect to it.
System.Data.Common Not used directly in your code. These classes are used by other data provider classes that inherit from them and provide versions customized for a specific data source.
System.Data.OleDb Contains the classes you use to connect to an OLE DB data source, including OleDbCommand and OleDbConnection.
System.Data.SqlClient Contains the classes you use to connect to a Microsoft SQL Server database (version 7.0 or later). These classes, such as SqlCommand and SqlConnection, provide all the same properties and methods as their counterparts in the System.Data.OleDb namespace. The only difference is that they are optimized for SQL Server and provide better performance by eliminating the extra OLE DB layer (and by connecting directly to the optimized TDS interface).
System.Data.SqlTypes Contains structures for SQL Server–specific data types such as SqlMoney and SqlDateTime. You can use these types to work with SQL Server data types without needing to convert them into the standard .NET equiv-alents (such as System.Decimal and System.DateTime). These types aren’t required, but they do allow you to avoid any potential rounding or conversion problems that could adversely affect data.
System.Data.OracleClient Contains the classes you use to connect to an Oracle database, such as OracleCommand and OracleConnection.
System.Data.Odbc Contains the classes you use to connect to a data source through an ODBC driver. These classes include OdbcCommand and OdbcConnection.
The Data Provider Objects
Regardless of which provider you use, your code will look almost the same. Often the only differences will be the namespace that’s used and the name of the ADO.NET data access objects (as listed in Table 13-3).
Each provider designates its own prefix for naming objects. Thus, the SQL Server provider includes SqlConnection and SqlCommand objects, and the Oracle provider includes OracleConnection and OracleCommand objects. Internally, these objects work quite differently, because they need to connect to different databases using different low-level protocols. Externally, however, these objects look quite similar and provide an identical set of basic methods because they implement the same common interfaces. This means your application is shielded from the complexity of different standards and can use the SQL Server provider in the same way the Oracle provider uses it. In fact, you can often translate a block of code for interacting with a SQL Server database into a block of Oracle-specific code just by renaming the objects.
Table 13-3. The ADO.NET Data Provider Objects
SQL Server OLE DB Oracle .NET ODBC .NET .NET Provider .NET Provider Provider Provider
Connection SqlConnection OleDbConnection OracleConnection OdbcConnection
Command SqlCommand OleDbCommand OracleCommand OdbcCommand
DataReader SqlDataReader OleDbDataReader OracleDataReader OdbcDataReader
DataAdapter SqlDataAdapter OleDbDataAdapter OracleDataAdapter OdbcDataAdapter
The examples in this chapter make note of any differences between the OLE DB and SQL Server providers. Remember, though the underlying technical details differ, the objects are almost identical. The only real differences are as follows:
• The names of the Connection, Command, DataReader, and DataAdapter classes are different in order to help you distinguish them.
• The connection string (the information you use to connect to the database) differs depending on what data source you’re using, where it’s located, and what type of security you’re using.
In the rest of this chapter, you’ll consider two ways to program web pages with ADO.NET. First, you’ll consider the most straightforward approach—direct data access. Then, you’ll consider disconnected data access, which allows you to retrieve data in the DataSet and cache it for longer periods of time. Both approaches complement each other, and in most web applications you’ll use a combination of the two.
Direct Data Access
The easiest way to access data is to perform all your database operations directly and not worry about maintaining disconnected information. This model is closest to traditional ADO programming, and it allows you to sidestep potential concurrency problems, which occur when multiple users try to update information at once. It’s also well suited to ASP.NET web pages, which don’t need to store disconnected information for long periods of time. Remember, an ASP.NET web page is loaded when the page is requested and shut down as soon as the response is returned to the user. That means a page typically has a lifetime of only a few seconds (if that).
With direct data access, a disconnected copy of the data isn’t retained. This means that data selection and data modifications are performed separately. Your program must keep track of the changes that need to be committed to the data source. For example, if a user deletes a record, you need to explicitly specify that record using a SQL Delete statement.
Direct data access is ideal if you need only to read information or if you need to perform only simple update operations, such as adding a record to a log or allowing a user to mod-ify values in a single record (for example, the customer information for an e-commerce site). Direct data access may not be as useful if you want to modify several different records or tables at the same time.
To retrieve information with simple data access, follow these steps:
1. Create Connection, Command, and DataReader objects.
2. Use the DataReader to retrieve information from the database, and display it in a control on a web form.
3. Close your connection.
4. Send the page to the user. At this point, the information your user sees and the information in the database no longer have any connection, and all the ADO.NET objects have been destroyed.
To add or update information, follow these steps:
1. Create new Connection and Command objects.
This chapter demonstrates both of these approaches. Figure 13-8 shows a high-level look at how the ADO.NET objects interact to make direct data access work.
Importing the Namespaces
Before continuing, make sure you import the ADO.NET namespaces. In this chapter, we assume you’re using the SQL Server provider, in which case you need these two name-space imports:
Imports System.Data
Imports System.Data.SqlClient
Creating a Connection
Before you can retrieve or update data, you need to make a connection to the data source. Generally, connections are limited to some fixed number, and if you exceed that number (either because you run out of licenses or because your database server can’t accommo-date the user load), attempts to create new connections will fail. For that reason, you should try to hold a connection open for as short a time as possible. You should also write your database code inside a Try/Catch error handling structure so you can respond if an error does occur, and make sure you close the connection even if you can’t perform all your work.
When creating a Connection object, you need to specify a value for its ConnectionString property. This ConnectionString defines all the information the computer needs to find the data source, log in, and choose an initial database. Out of all the details in the examples in this chapter, the ConnectionString is the one value you might have to tweak before it works for the database you want to use. Luckily, it’s quite straightforward. Here’s an example that uses a connection string to connect to SQL Server through the OLE DB provider:
Dim myConnection As New OleDbConnection()
myConnection.ConnectionString = "Provider=SQLOLEDB.1;Data Source=localhost;" & _ "Initial Catalog=Pubs;Integrated Security=SSPI"
For optimum performance, you should use the SqlConnection object from the SQL Server provider instead. The connection string for the SqlConnection object is quite similar and just omits the Provider setting:
Dim myConnection As New SqlConnection()
myConnection.ConnectionString = "Data Source=localhost;" & _ "Initial Catalog=Pubs;Integrated Security=SSPI"
And if you’re using SQL Server 2005 Express Edition, your connection string will include an instance name, as shown here:
Dim myConnection As New SqlConnection()
myConnection.ConnectionString = "Data Source=localhost\SQLEXPRESS;" & _ "Initial Catalog=Pubs;Integrated Security=SSPI"
The Connection String
The connection string is actually a series of distinct pieces of information separated by semicolons (;). In the preceding example, the connection string identifies the following pieces of information:
Data source: This indicates the name of the server where the data source is located. If the server is on the same computer that hosts the ASP.NET site, localhost is sufficient. The only exception is if you’re using a named instance of SQL Server. For example, if you’ve installed SQL Server 2005 Express Edition, you’ll need to use the data source localhost\SQLEXPRESS, because the instance name is SQLEXPRESS.
Integrated security: This indicates you want to connect to SQL Server using the Windows user account that’s running the web page code. Alternatively, you can supply a user ID and password that’s defined in the database for SQL Server authentication.
ConnectionTimeout: This determines how long your code will wait, in seconds, before generating an error if it cannot establish a database connection. Our example connec-tion string doesn’t set the Connecconnec-tionTimeout, so the default of 15 seconds is used. You can use 0 to specify no limit, but this is a bad idea. This means that, theoretically, the code could be held up indefinitely while it attempts to contact the server.
You can set some other, lesser-used options for a connection string. For more infor-mation, refer to the .NET Help files. Look under the appropriate Connection object (such as SqlConnection or OleDbConnection).
Windows Authentication
The previous example uses integrated Windows authentication, which is the default security standard for new SQL Server installations. You can also use SQL Server authentication. In this case, you will explicitly place the user ID and password information in the connection string. However, SQL Server authentication is disabled by default in SQL Server 2000 and SQL Server 2005, because it’s not considered to be as secure.
Here’s the lowdown on both types of authentication:
• With SQL Server authentication, SQL Server maintains its own user account infor-mation in the database. It uses this inforinfor-mation to determine whether you are allowed to access specific parts of a database.
• With integrated Windows authentication, SQL Server automatically uses the Windows account information for the currently logged-in process. In the database, it stores information about what database privileges each user should have.
For Windows authentication to work, the currently logged-on Windows user must have the required authorization to access the SQL database. This isn’t a problem while you test your websites, because Visual Studio launches your web applications using your user account. However, when you deploy your application to a web server running IIS, you might run into trouble. In this situation, all ASP.NET code is run by a more limited user account that might not have the rights to access the database. (See Chapter 12 for the full details.) In this case, you’ll need to grant database access to this account, or your web pages will receive a security error whenever they try to connect to the database.
Connection String Tips
Typically, all the database code in your application will use the same connection string. For that reason, it usually makes the most sense to store a connection string in a class member variable or, even better, a configuration file.
You can also create a Connection object and supply the connection string in one step by using a dedicated constructor:
Dim myConnection As New SqlConnection(connectionString)
' myConnection.ConnectionString is now set to connectionString.
You don’t need to hard-code a connection string. The <connectionStrings> section of the web.config file is a handy place to store your connection strings. Here’s an example:
<configuration xmlns="http://schemas.microsoft.com/.NetConfiguration/v2.0"> <connectionStrings>
<add name="Pubs" connectionString=
"Data Source=localhost;Initial Catalog=Pubs;Integrated Security=SSPI"/> </connectionStrings>
...
</configuration>
You can then retrieve your connection string by name from the WebConfigurationManager.ConnectionStrings collection, like so:
Dim connectionString As String = _
WebConfigurationManager.ConnectionStrings("Pubs").ConnectionString
Making the Connection
Before you can use a connection, you have to explicitly open it, as shown here:
myConnection.Open()
To verify that you have successfully connected to the database, you can try displaying some basic connection information. The following example writes some basic informa-tion to a Label control named lblInfo (see Figure 13-9).
Here’s the code with basic error handling:
' Define the ADO.NET Connection object. Dim connectionString As String = _
WebConfigurationManager.ConnectionStrings("Pubs").ConnectionString Dim myConnection As New SqlConnection(connectionString)
Try
' Try to open the connection. myConnection.Open()
lblInfo.Text = "<b>Server Version:</b> " & myConnection.ServerVersion lblInfo.Text &= "<br /><b>Connection Is:</b> " & _
myConnection.State.ToString() Catch err As Exception
' Handle an error by displaying the information. lblInfo.Text = "Error reading the database." lblInfo.Text &= err.Message
Finally
' Either way, make sure the connection is properly closed. ' (Even if the connection wasn't opened successfully, ' calling Close() won't cause an error.)
myConnection.Close()
Once you use the Open() method, you have a live connection to your database. One of the most fundamental principles of data access code is that you should reduce the amount of time you hold a connection open as much as possible. Imagine that as soon as you open the connection, you have a live, ticking time bomb. You need to get in, retrieve your data, and throw the connection away as quickly as possible in order to ensure your site runs efficiently.
Closing a connection is just as easy, as shown here:
myConnection.Close()
Another approach is to use the Using statement. The Using statement declares that you are using a disposable object for a short period of time. As soon as you finish using that object and the Using block ends, the common language runtime will release it imme-diately by calling the Dispose() method. Here’s the basic structure of the Using block:
Using object ... End Using
It just so happens that calling the Dispose() method of a connection object is equiva-lent to calling Close(). That means you can shorten your database code with the help of a Using block. The best part is that you don’t need to write a Finally block—the Using statement releases the object you’re using even if you exit the block as the result of an unhandled exception.
Here’s how you could rewrite the earlier example with a Using block:
Dim myConnection As New SqlConnection(connectionString)
Using myConnection
' Try to open the connection. myConnection.Open()
lblInfo.Text = "<b>Server Version:</b> " & myConnection.ServerVersion lblInfo.Text &= "<br /><b>Connection Is:</b> " & _
myConnection.State.ToString() End Using
lblInfo.Text &= "<br /><b>Now Connection Is:</b> " lblInfo.Text &= myConnection.State.ToString()
Defining a Select Command
The Connection object provides a few basic properties that supply information about the connection, but that’s about all. To actually retrieve data, you need a few more ingredients:
• A SQL statement that selects the information you want
• A Command object that executes the SQL statement
• A DataReader or DataSet object to access the retrieved records
Command objects represent SQL statements. To use a Command, you define it, specify the SQL statement you want to use, specify an available connection, and execute the command.
You can use one of the earlier SQL statements, as shown here:
Dim myCommand As New SqlCommand() myCommand.Connection = myConnection
myCommand.CommandText = "SELECT * FROM Authors"
Or you can use the constructor as a shortcut:
Dim myCommand As New SqlCommand("SELECT * FROM Authors", myConnection)
Using a Command with a DataReader
Once you’ve defined your command, you need to decide how you want to use it. The simplest approach is to use a DataReader, which allows you to quickly retrieve all your results. The DataReader uses a live connection and should be used quickly and then closed. The DataReader is also extremely simple. It supports fast-forward-only read-only access to your results, which is generally all you need when retrieving information. Because of the DataReader’s optimized nature, it provides better performance than the DataSet. It should always be your first choice for direct data access.
Before you can use a DataReader, make sure you’ve opened the connection:
myConnection.Open()
To create a DataReader, you use the ExecuteReader() method of the command object, as shown here:
' You don't need the new keyword, as the Command will create the DataReader. Dim myReader As SqlDataReader
myReader = myCommand.ExecuteReader()
These two lines of code define a variable for a DataReader and then create it by exe-cuting the command. Once you have the reader, you retrieve a single row at a time using the Read() method:
myReader.Read() ' The first row in the result set is now available.
You can then access the values in the current row using the corresponding field names. The following example adds an item to a list box with the first name and last name for the current row:
lstNames.Items.Add(myReader("au_lname") & ", " & myReader("au_fname"))
To move to the next row, use the Read() method again. If this method returns True, a row of information has been successfully retrieved. If it returns False, you’ve attempted to read past the end of your result set. There is no way to move backward to a previous row. As soon as you’ve finished reading all the results you need, close the DataReader and Connection:
Putting It All Together
The next example demonstrates how you can use all the ADO.NET ingredients together to create a simple application that retrieves information from the Authors table. You can select an author record by last name using a drop-down list box, as shown in Figure 13-10.
The full record is then retrieved and displayed in a simple label, as shown in Figure 13-11.
Filling the List Box
To start, the connection string is defined as a private variable for the page class and retrieved from the connection string:
Private connectionString As String = _
WebConfigurationManager.ConnectionStrings("Pubs").ConnectionString
The list box is filled when the Page.Load event occurs. Because the list box is set to persist its view state information, this information needs to be retrieved only once—the first time the page is displayed. It will be ignored on all postbacks.
Here’s the code that fills the list from the database:
Protected Sub Page_Load(ByVal sender As Object, _ ByVal e As EventArgs) Handles Me.Load
If Not Page.IsPostBack Then FillAuthorList()
End If End Sub
Private Sub FillAuthorList() lstAuthor.Items.Clear()
' Define the Select statement.
' Three pieces of information are needed: the unique id ' and the first and last name.
Dim selectSQL As String = "SELECT au_lname, au_fname, au_id FROM Authors"
' Define the ADO.NET objects.
Dim con As New SqlConnection(connectionString) Dim cmd As New SqlCommand(selectSQL, con) Dim reader As SqlDataReader
' Try to open database and read information. Try
con.Open()
reader = cmd.ExecuteReader()
' For each item, add the author name to the displayed
' list box text, and store the unique ID in the Value property. Do While reader.Read()
Dim newItem As New ListItem()
newItem.Text = reader("au_lname") & ", " & reader("au_fname") newItem.Value = reader("au_id").ToString()
lstAuthor.Items.Add(newItem) Loop
reader.Close()
Catch err As Exception
lblResults.Text = "Error reading list of names." lblResults.Text &= err.Message
Finally
con.Close() End Try
End Sub
This example looks more sophisticated than the previous bite-sized snippets in this chapter, but it really doesn’t introduce anything new. It uses the standard Connection, Command, and DataReader objects. The Connection is opened inside an error handling block so your page can handle any unexpected errors and provide information. A Finally block makes sure the connection is properly closed, even if an error occurs.
The unique ID (the value in the au_id field) is stored in the Value property of the list box for reference later. This is a crucial ingredient that is needed to allow the corresponding record to be queried again. If you tried to build a query using the author’s name, you would need to worry about authors with the same name. You would also have the additional headache of invalid characters (such as the apostrophe in O’Leary) that would invalidate your SQL statement.
Retrieving the Record
The record is retrieved as soon as the user changes the selection in the list box. To make this possible, the AutoPostBack property of the list box is set to True so that its change events are detected automatically.
Protected Sub lstAuthor_SelectedIndexChanged(ByVal sender As Object, _ ByVal e As EventArgs) Handles lstAuthor.SelectedIndexChanged
' Create a Select statement that searches for a record ' matching the specific author ID from the Value property. Dim selectSQL As String
selectSQL = "SELECT * FROM Authors "
selectSQL &= "WHERE au_id='" & lstAuthor.SelectedItem.Value & "'"
' Define the ADO.NET objects.
Dim con As New SqlConnection(connectionString) Dim cmd As New SqlCommand(selectSQL, con) Dim reader As SqlDataReader
' Try to open database and read information. Try
con.Open()
reader = cmd.ExecuteReader() reader.Read()
lblResults.Text = "<b>" & reader("au_lname")
Catch err As Exception
lblResults.Text = "Error getting author. " lblResults.Text &= err.Message
Finally
con.Close() End Try
End Sub
The process is similar to the procedure used to retrieve the last names. There are only a couple of differences:
• The code dynamically creates a SQL statement based on the selected item in the drop-down list box. It uses the Value property of the selected item, which stores the unique identifier. This is a common (and useful) technique.
• Only one record is read. The code assumes that only one author has the matching au_id, which is reasonable since this field is unique.
■
Note
This example shows how ADO.NET works to retrieve a simple result set. Of course, ADO.NET also provides handy controls that go beyond this generic level and let you provide full-featured grids with sorting and editing. These controls are described in Chapter 14 and Chapter 15. For now, you should concentrate on understanding the fundamentals about ADO.NET and how it works with data.Updating Data
Now that you understand how to retrieve data, it isn’t much more complicated to perform simple delete and update operations. Once again, you use the Command object, but this time you don’t need a DataReader because no results will be retrieved. You also don’t use a SQL Select command. Instead, you use one of three new SQL commands: Update, Insert, or Delete.
Enhancing the Author Page
To demonstrate how to update, insert, and delete simple information, the previous exam-ple has been enhanced. Instead of being displayed in a label, the information from each field is added to a separate text box. Two additional buttons allow you to update the record (Update) or delete it (Delete). You can also insert a new record by clicking Create New, entering the information in the text boxes, and then clicking Insert New. Figure 13-12 shows the updated web page.
The record selection code is identical from an ADO.NET perspective, but it now uses the individual text boxes:
Protected Sub lstAuthor_SelectedIndexChanged(ByVal sender As Object, _ ByVal e As EventArgs) Handles lstAuthor.SelectedIndexChanged
' Create a Select statement that searches for a record ' matching the specific author ID from the Value property. Dim selectSQL As String
selectSQL = "SELECT * FROM Authors "
selectSQL &= "WHERE au_id='" & lstAuthor.SelectedItem.Value & "'"
' Define the ADO.NET objects.
Dim con As New SqlConnection(connectionString) Dim cmd As New SqlCommand(selectSQL, con) Dim reader As SqlDataReader
' Try to open database and read information. Try
con.Open()
reader = cmd.ExecuteReader() reader.Read()
' Fill the controls.
txtID.Text = reader("au_id").ToString()
txtFirstName.Text = reader("au_fname").ToString() txtLastName.Text = reader("au_lname").ToString() txtPhone.Text = reader("phone").ToString() txtAddress.Text = reader("address").ToString() txtCity.Text = reader("city").ToString() txtState.Text = reader("state").ToString() txtZip.Text = reader("zip").ToString()
chkContract.Checked = CType(reader("contract"), Boolean) reader.Close()
lblResults.Text = ""
Catch err As Exception
lblResults.Text = "Error getting author. " lblResults.Text &= err.Message
Finally
con.Close() End Try
To see the full code, refer to the online samples for this chapter. If you play with the example at length, you’ll notice that it lacks a few niceties that would be needed in a pro-fessional website. For example, when creating a new record, the name of the last selected user is still visible, and the Update and Delete buttons are still active, which can lead to confusion or errors. A more sophisticated user interface could prevent these problems by disabling inapplicable controls (perhaps by grouping them in a Panel control) or by using separate pages. In this case, however, the page is useful as a quick way to test some basic data access code.
Adding a Record
To start adding a new record, click Create New to clear all the text boxes. Technically this step isn’t required, but it simplifies the user’s life:
Protected Sub cmdNew_Click(ByVal sender As Object, _ ByVal e As EventArgs) Handles cmdNew.Click
txtID.Text = ""
txtFirstName.Text = "" txtLastName.Text = "" txtPhone.Text = "" txtAddress.Text = "" txtCity.Text = "" txtState.Text = "" txtZip.Text = ""
chkContract.Checked = False
lblResults.Text = "Click Insert New to add the completed record." End Sub
The Insert New button triggers the ADO.NET code that inserts the finished record using a dynamically generated Insert statement:
Protected Sub cmdInsert_Click(ByVal sender As Object, _ ByVal e As EventArgs) Handles cmdInsert.Click
' Perform user-defined checks.
' Alternatively, you could use RequiredFieldValidator controls.
If txtID.Text = "" Or txtFirstName.Text = "" Or txtLastName.Text = "" Then lblResults.Text = "Records require an ID, first name, and last name." Return
' Define ADO.NET objects. Dim insertSQL As String
insertSQL = "INSERT INTO Authors ("
insertSQL &= "au_id, au_fname, au_lname, "
insertSQL &= "phone, address, city, state, zip, contract) " insertSQL &= "VALUES ('"
insertSQL &= txtID.Text & "', '"
insertSQL &= txtFirstName.Text & "', '" insertSQL &= txtLastName.Text & "', '" insertSQL &= txtPhone.Text & "', '" insertSQL &= txtAddress.Text & "', '" insertSQL &= txtCity.Text & "', '" insertSQL &= txtState.Text & "', '" insertSQL &= txtZip.Text & "', '"
insertSQL &= Val(chkContract.Checked) & "')"
Dim con As New SqlConnection(connectionString) Dim cmd As New SqlCommand(insertSQL, con)
' Try to open the database and execute the update. Dim added As Integer = 0
Try
con.Open()
added = cmd.ExecuteNonQuery()
lblResults.Text = added.ToString() & " records inserted." Catch err As Exception
lblResults.Text = "Error inserting record. " lblResults.Text &= err.Message
Finally
con.Close() End Try
' If the insert succeeded, refresh the author list. If added > 0 Then
FillAuthorList() End If
End Sub
Creating More Robust Commands
The previous example performed its database work using a dynamically pasted-together SQL string. This off-the-cuff approach is great for quickly coding database logic, and it’s easy to understand. However, it has two potentially serious drawbacks:
• Users may accidentally enter characters that will affect your SQL statement. For example, if a value contains an apostrophe (‘), the pasted-together SQL string will no longer be valid.
• Users might deliberatelyenter characters that will affect your SQL statement. Examples include using the single apostrophe to close a value prematurely and then following the value with additional SQL code.
The second of these is known as SQL injection attack, and it facilitates an amazingly wide range of exploits. Crafty users can use SQL injection attacks to do anything from returning additional results (such as the orders placed by other customers) or even exe-cuting additional SQL statements (such as deleting every record in another table in the same database). In fact, SQL Server includes a special system stored procedure that allows users to execute arbitrary programs on the computer, so this vulnerability can be extremely serious.
You could address these problems by carefully validating the supplied input and checking for dangerous characters such as apostrophes. One approach is to sanitize your input by doubling all apostrophes in the user input (in other words, replace ' with "). Here’s an example:
Dim authorID As String = txtID.Text.Replace("'", "''")
A much more robust and convenient approach is to use aparameterized command. A parameterized command is one that replaces hard-coded values with placeholders. The placeholders are then added separately and automatically encoded.
For example, this SQL statement:
SELECT * FROM Customers WHERE CustomerID = 'ALFKI'
would become this:
SELECT * FROM Customers WHERE CustomerID = @CustomerID
The syntax used for parameterized commands differs from provider to provider. For the SQL Server provider, parameterized commands use named placeholders with unique names. You can use any name you want, as long as it begins with the @ character. Usually, you’ll choose a parameter name that matches the field name (such as @CustomerID for the CustomerID value in the previous example). The OLE DB provider uses a different syntax. It requires that each hard-coded value is replaced with a question mark. Parameters aren’t identified by name but by their position in the SQL string.
SELECT * FROM Customers WHERE CustomerID = ?
In either case, you need to supply a Parameter object for each parameter, which you insert in the Command.Parameters collection. In OLE DB, you must make sure you add the parameters in the same order they appear in the SQL string. In SQL Server this isn’t a requirement, because the parameters are matched to the placeholders based on their name.
Protected Sub cmdInsert_Click(ByVal sender As Object, _ ByVal e As EventArgs) Handles cmdInsert.Click
' Perform user-defined checks.
If txtID.Text = "" Or txtFirstName.Text = "" Or txtLastName.Text = "" Then lblResults.Text = "Records require an ID, first name, and last name." Return
End If
' Define ADO.NET objects. Dim insertSQL As String
insertSQL = "INSERT INTO Authors ("
insertSQL &= "au_id, au_fname, au_lname, "
insertSQL &= "phone, address, city, state, zip, contract) "
insertSQL &= "VALUES ("
insertSQL &= "@au_id, @au_fname, @au_lname, "
insertSQL &= "@phone, @address, @city, @state, @zip, @contract)"
Dim con As New SqlConnection(connectionString) Dim cmd As New SqlCommand(insertSQL, con)
' Add the parameters.
cmd.Parameters.AddWithValue("@au_id", txtID.Text)
cmd.Parameters.AddWithValue("@au_fname", txtFirstName.Text) cmd.Parameters.AddWithValue("@au_lame", txtLastName.Text) cmd.Parameters.AddWithValue("@phone", txtPhone.Text) cmd.Parameters.AddWithValue("@address", txtAddress.Text) cmd.Parameters.AddWithValue("@city", txtCity.Text) cmd.Parameters.AddWithValue("@state", txtState.Text) cmd.Parameters.AddWithValue("@zip", txtZip.Text)
cmd.Parameters.AddWithValue("@contract", Val(chkContract.Checked))
' Try to open the database and execute the update. Dim added As Integer = 0
Try
con.Open()
added = cmd.ExecuteNonQuery()
lblResults.Text = added.ToString() & " records inserted." Catch err As Exception
Finally
con.Close() End Try
' If the insert succeeded, refresh the author list. If added > 0 Then
FillAuthorList() End If
End Sub
For basic security, it’s recommended that you always use parameterized commands. In fact, many of the most infamous attacks on e-commerce websites weren’t fueled by hard-core hacker knowledge but were made using simple SQL injection by modifying val-ues in web pages or query strings.
Updating a Record
When the user clicks the Update button, the information in the text boxes is applied to the database as follows:
Protected Sub cmdUpdate_Click(ByVal sender As Object, _ ByVal e As EventArgs) Handles cmdUpdate.Click
' Define ADO.NET objects. Dim updateSQL As String
updateSQL = "UPDATE Authors SET "
updateSQL &= "au_fname=@au_fname, au_lname=@au_lname, "
updateSQL &= "phone=@phone, address=@address, city=@city, state=@state, " updateSQL &= "zip=@zip, contract=@contract "
updateSQL &= "WHERE au_id=@au_id_original"
Dim con As New SqlConnection(connectionString) Dim cmd As New SqlCommand(updateSQL, con)
' Add the parameters.
cmd.Parameters.AddWithValue("@au_fname", txtFirstName.Text) cmd.Parameters.AddWithValue("@au_lname", txtLastName.Text) cmd.Parameters.AddWithValue("@phone", txtPhone.Text) cmd.Parameters.AddWithValue("@address", txtAddress.Text) cmd.Parameters.AddWithValue("@city", txtCity.Text) cmd.Parameters.AddWithValue("@state", txtState.Text) cmd.Parameters.AddWithValue("@zip", txtZip.Text)
cmd.Parameters.AddWithValue("@contract", Val(chkContract.Checked))
' Try to open database and execute the update. Try
con.Open()
Dim updated As Integer = cmd.ExecuteNonQuery()
lblResults.Text = updated.ToString() & " records updated." Catch err As Exception
lblResults.Text = "Error updating author. " lblResults.Text &= err.Message
Finally
con.Close() End Try
End Sub
The update code is similar to the record selection code. The main differences are as follows:
• No DataReader is used, because no results are returned.
• A dynamically generated Update command is used for the Command object. This command finds the current author record in the database and changes all the fields to correspond to the values entered in the text boxes.
• The ExecuteNonQuery() method returns the number of affected records. This infor-mation is displayed in a label to confirm to the user that the operation was successful.
Deleting a Record
When the user clicks the Delete button, the author information is removed from the database. The number of affected records is examined, and if the delete operation was successful, the FillAuthorList() function is called to refresh the page.
Protected Sub cmdDelete_Click(ByVal sender As Object, _ ByVal e As EventArgs) Handles cmdDelete.Click
' Define ADO.NET objects. Dim deleteSQL As String
deleteSQL = "DELETE FROM Authors " deleteSQL &= "WHERE au_id=@au_id"
Dim con As New SqlConnection(connectionString) Dim cmd As New SqlCommand(deleteSQL, con)
' Try to open the database and delete the record. Dim deleted As Integer = 0
Try
con.Open()
deleted = cmd.ExecuteNonQuery() lblResults.Text &= "Record deleted." Catch err As Exception
lblResults.Text = "Error deleting author. " lblResults.Text &= err.Message
Finally
con.Close() End Try
' If the delete succeeded, refresh the author list. If deleted > 0 Then
FillAuthorList() End If
End Sub
To get around this limitation, you can use the Create New and Insert New buttons to add a new record and then delete this record. Because this new record won’t be linked to any other records, its deletion will be allowed.
Disconnected Data Access
With disconnected data, you need to code a little differently. First, you’ll make your changes through the DataSet rather than with direct commands. Also, you’ll need to watch for the problems that can occur if more than one user attempts to make conflict-ing changes at the same time, or if you need to commit changes to multiple tables. In this simple one-page scenario, disconnected data access won’t present much of a problem. If, however, you use disconnected data access to make a number of changes and commit them all at once, you’re more likely to run into trouble.