JBoss Developer Studio 3.0
Struts Tools Reference Guide
Provides information relating to the Struts T ools module.
Edition 1.0
Anatoly Fedosik Olga Chikvina Svetlana Mukhina
Legal Notice
Copyright © 2010 Red Hat.The text of and illustrations in this document are licensed by Red Hat under a Creative Commons Attribution–Share Alike 3.0 Unported license ("CC-BY-SA"). An explanation of CC-BY-SA is available at http://creativecommons.org/licenses/by-sa/3.0/. In accordance with CC-BY-SA, if you distribute this document or an adaptation of it, you must provide the URL for the original version.
Red Hat, as the licensor of this document, waives the right to enforce, and agrees not to assert, Section 4d of CC-BY-SA to the fullest extent permitted by applicable law.
Red Hat, Red Hat Enterprise Linux, the Shadowman logo, JBoss, MetaMatrix, Fedora, the Infinity Logo, and RHCE are trademarks of Red Hat, Inc., registered in the United States and other countries. Linux® is the registered trademark of Linus Torvalds in the United States and other countries. Java® is a registered trademark of Oracle and/or its affiliates.
XFS® is a trademark of Silicon Graphics International Corp. or its subsidiaries in the United States and/or other countries.
MySQL® is a registered trademark of MySQL AB in the United States, the European Union and other countries.
All other trademarks are the property of their respective owners.
Abstract
The Struts Tools Reference Guide explains how to use the Struts Tools to create high-quality web applications.
Table of Contents
Preface1. Document Conventions
1.1. Typographic Conventions 1.2. Pull-quote Conventions 1.3. Notes and Warnings 2. We Need Feedback! 1. Introduction
1.1. Key Features of Struts Tools
1.2. Other relevant resources on the topic 2. Projects
2.1. Creating a New Struts Project
2.2. Importing an Existing Struts Project with Any Structure 2.3. Adding Struts Capability to an Existing Web Application 2.4. Relevant Resources Links
3. Editors
3.1. Web.xml Editor
3.2. Graphical Editor for Struts Configuration Files 3.2.1. Diagram View
3.2.2. Tree View 3.2.3. Source View
3.3. Graphical Editor for Tiles Files 3.3.1. Create New Tiles File 3.3.2. Tree View
3.3.3. Diagram View 3.3.4. Source
3.4. Graphical Editor for Struts Validation Files 4. Modules
4.1. When Importing a Struts Project 4.2. Editing Modules in an Existing Project 4.3. Adding New Modules
5. Code Generation
6. Struts Configuration File Debugger 7. Customizable Page Links Recognizer 8. Struts Project Verification
9. Relevant Resources Links A. Revision History
Index
Preface
1. Document Conventions
This manual uses several conventions to highlight certain words and phrases and draw attention to specific pieces of information.
In PDF and paper editions, this manual uses typefaces drawn from the Liberation Fonts set. The
Liberation Fonts set is also used in HTML editions if the set is installed on your system. If not, alternative but equivalent typefaces are displayed. Note: Red Hat Enterprise Linux 5 and later includes the
Liberation Fonts set by default.
1.1. Typographic Conventions
Four typographic conventions are used to call attention to specific words and phrases. These conventions, and the circumstances they apply to, are as follows.
Mono-spaced Bold
Used to highlight system input, including shell commands, file names and paths. Also used to highlight keycaps and key combinations. For example:
To see the contents of the file m y_next_bestselling_novel in your current working directory, enter the cat m y_next_bestselling_novel command at the shell prompt and press Enter to execute the command.
The above includes a file name, a shell command and a keycap, all presented in mono-spaced bold and all distinguishable thanks to context.
Key combinations can be distinguished from keycaps by the plus sign that connects each part of a key combination. For example:
Press Enter to execute the command.
Press Ctrl+Alt+F2 to switch to a virtual terminal.
The first paragraph highlights the particular keycap to press. The second highlights two key combinations (each a set of three keycaps with each set pressed simultaneously).
If source code is discussed, class names, methods, functions, variable names and returned values mentioned within a paragraph will be presented as above, in m ono-spaced bold. For example:
File-related classes include filesystem for file systems, file for files, and dir for directories. Each class has its own associated set of permissions.
Proportional Bold
This denotes words or phrases encountered on a system, including application names; dialog box text; labeled buttons; check-box and radio button labels; menu titles and sub-menu titles. For example:
Choose System → Preferences → Mouse from the main menu bar to launch Mouse
Preferences. In the Buttons tab, click the Left-handed m ouse check box and click Close to switch the primary mouse button from the left to the right (making the mouse suitable for use in the left hand).
To insert a special character into a gedit file, choose Applications → Accessories →
Character Map menu bar, type the name of the character in the Search field and click Next. The character you sought will be highlighted in the Character T able. Double-click this highlighted character to place it in the T ext to copy field and then click the Copy button. Now switch back to your document and choose Edit → Paste from the gedit menu bar.
The above text includes application names; system-wide menu names and items; application-specific menu names; and buttons and text found within a GUI interface, all presented in proportional bold and all distinguishable by context.
Mono-spaced Bold Italic or Proportional Bold Italic
Whether mono-spaced bold or proportional bold, the addition of italics indicates replaceable or variable text. Italics denotes text you do not input literally or displayed text that changes depending on
circumstance. For example:
To connect to a remote machine using ssh, type ssh username@ domain.name at a shell prompt. If the remote machine is exam ple.com and your username on that machine is john, type ssh john@ exam ple.com.
The m ount -o rem ount file-system command remounts the named file system. For example, to remount the /hom e file system, the command is m ount -o rem ount /hom e. To see the version of a currently installed package, use the rpm -q package command. It will return a result as follows: package-version-release.
Note the words in bold italics above — username, domain.name, file-system, package, version and release. Each word is a placeholder, either for text you enter when issuing a command or for text displayed by the system.
Aside from standard usage for presenting the title of a work, italics denotes the first use of a new and important term. For example:
Publican is a DocBook publishing system.
1.2. Pull-quote Conventions
Terminal output and source code listings are set off visually from the surrounding text. Output sent to a terminal is set in m ono-spaced rom an and presented thus:
books Desktop documentation drafts mss photos stuff svn books_tests Desktop1 downloads images notes scripts svgs
Source-code listings are also set in m ono-spaced rom an but add syntax highlighting as follows:
package org.jboss.book.jca.ex1;
import javax.naming.InitialContext;
public class ExClient {
public static void main(String args[]) throws Exception
{
InitialContext iniCtx = new InitialContext();
Object ref = iniCtx.lookup("EchoBean"); EchoHome home = (EchoHome) ref;
Echo echo = home.create(); System.out.println("Created Echo");
System.out.println("Echo.echo('Hello') = " + echo.echo("Hello")); }
}
1.3. Notes and Warnings
Finally, we use three visual styles to draw attention to information that might otherwise be overlooked.
Note
Notes are tips, shortcuts or alternative approaches to the task at hand. Ignoring a note should have no negative consequences, but you might miss out on a trick that makes your life easier.
Important
Important boxes detail things that are easily missed: configuration changes that only apply to the current session, or services that need restarting before an update will apply. Ignoring a box labeled 'Important' will not cause data loss but may cause irritation and frustration.
Warning
Warnings should not be ignored. Ignoring warnings will most likely cause data loss.
2. We Need Feedback!
If you find a typographical error in this manual, or if you have thought of a way to make this manual better, we would love to hear from you! Please submit a report in JIRA against JBoss Developer Studio: https://jira.jboss.org/jira/secure/CreateIssue.jspa?pid=12310500&issuetype=1
When submitting a bug report, be sure to mention the manual's name and to select the "documentation" component.
If you have a suggestion for improving the documentation, try to be as specific as possible when
describing it. If you have found an error, please include the section number and some of the surrounding text so we can find it easily.
Chapter 1. Introduction
If you prefer to develop web applications using Struts technology JBoss Tools also meet your needs. The professional developer toolset provides all necessary editors and wizards for creating Struts resources that enhances the process of building high-quality web applications.
Note:
Note that JBoss Tools support the Struts 1.1, 1.2.x versions.
In this guide you will learn how to take advantage of Struts support that JBoss Tools provide.
1.1. Key Features of Struts Tools
For a start, we propose you to look through the table of main features of Struts Tools:
Table 1.1. Key Functionality for Struts Tools
Feature Benefit Chapter
Struts Support Step-by-step wizards for creating a new struts project with a number of predefined templates, importing existing ones and adding struts capabilities to non-struts web projects.
struts support
Support for Struts Configuration File
Working on file using three modes: diagram, tree and source. Synchronization between the modes and full control over the code. Easy moving around the diagram using the Diagram Navigator. Working with struts projects that have multiple modules. Possibility to use Struts configuration file debugger allowing to set break points on struts diagram and then launch the server in debug mode.
graphical editor for struts configuration file debugger
Support for Struts modules
A Struts module (struts-config.xml) is
automatically created while creating a new project. There is also possibility to add new ones or edit already existing modules in your existing project or while importing Struts project.
modules
Verification and Validation
All occurring errors will be immediately reported by verification feature, no matter in what view you are working. Constant validation and errors checking allows to catch many of the errors during development process that significantly reduces development time.
verification and validation
1.2. Other relevant resources on the topic
All JBoss Developer Studio/JBoss Tools documentation you can find onJBoss Tools project page . The latest documentation builds are available onnightly docs page.
Chapter 2. Projects
JBoss Tools provide the following functionality when working with Struts: Create new Struts projects
Import (open) existing Struts projects. You can import any project structure Add Struts capabilities to any existing Eclipse project
Import and add Struts capabilities to any existing project created outside Eclipse. Now, we'll focus on all these points more fully.
2.1. Creating a New Struts Project
JBoss Tools provides a New Struts Project Wizard that radically simplifies the process for getting started with a new Struts project. You just need to follow these steps:
Select File > New > Project... from the menu bar. Then, select JBoss Tools Web > Struts > Struts Project in this dialog box. Click Next:
Figure 2.1. Selecting Struts Wizard
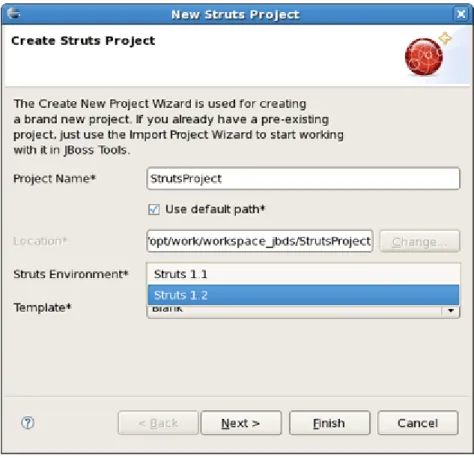
On this form, provide the Project Name. You can also select where to create the project or use the default path.
Next to Struts Environment set which Struts version to use.
Figure 2.2. Creating Struts Project
Tip:
Don't put spaces in project names since some OS could experience problems with their processing and searching these files.
You can select the KickStart template, then the project created will include a simple Hello World type application that is ready to run.
Figure 2.3. Choosing Struts Template
Next, you register this application with the current servlet container defined for your workspace (JBoss AS, by default) in order to allow you to test your application more easily while still developing it. A new entry will be added in the servlet container configuration file to enable running the
application in-place (called null deployment or link deployment). Uncheck the "Target Server" check box if for some reason you don't want to register your application at this point.
Figure 2.4 . Registering The Project at Server
On the next form, you can select the TLD files to include in this project:
Figure 2.5. Selecting Tag Libraries
After the project is created, you should have the following project structure (if you used the KickStart template):
Figure 2.6. Project Structure
Tip:
If you want to hide the jar files from Web App Libraries in view, select the down-pointing arrow in the upper right corner, select Filters..., check the box next to Name filter patterns (matching names will be hidden), and type *.jar into the field. Then, click OK.
2.2. Importing an Existing Struts Project with Any Structure
For detailed information on migration projects to JBoss Developer Studio see Migration Guide.2.3. Adding Struts Capability to an Existing Web Application
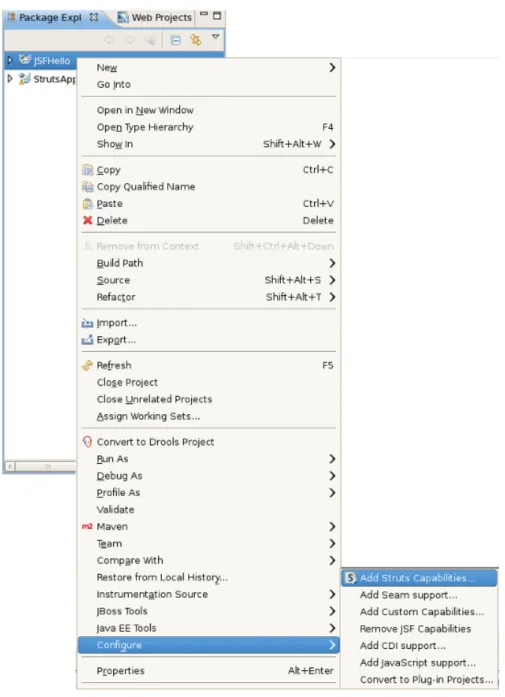
Here, we'll consider how to add Struts functionality (Struts libraries, tag libraries and a Struts configuration file) to any existing Web application project in your Eclipse workspace.By adding a Struts Nature to your project, you can now edit files using JBoss Tools editors, such as the Struts configuration editor and the JBoss Tools JSP editor. To take advantage of this just right-click the project and select JBoss Tools > Add Struts Capabilities from the context menu. This will start the process of adding all necessary libraries and files to make a Web Struts project from your one.
Figure 2.7. Adding Struts Capabilities
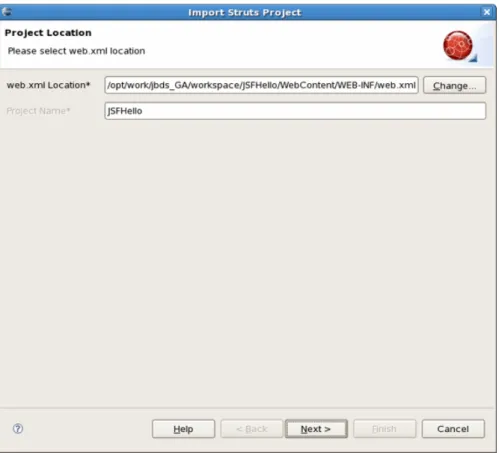
In the wizard you should point to location of your deployment descriptor file web.xml and name of the project.
Figure 2.8. Choosing Project Location
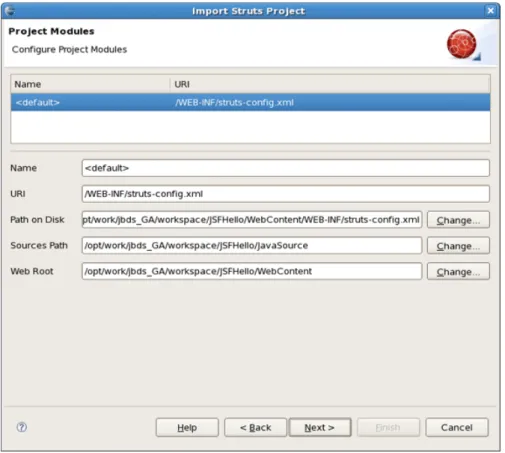
After hitting Next, you will see the following screen. This screen simply means that you need to add at least one Struts module to your project to make this project a Struts project. Adding a Struts module means that a new struts-config.xml will be added to your project and registered in the web.xml file. In addition, all required Struts libraries will be added. To add a Struts module, select the Add Struts Support button.
Figure 2.9. Project Modules
Here you can select what Struts Version, Servlet Class, URL Pattern and TLDs to add to this project.
Figure 2.10. Selecting Struts Support Options
When done, you will see the default Struts module configuration information. See how to Edit Struts modules.
Figure 2.11. Project Configuration Information
On the last screen you can set the different folders for your project as well as register this application with a servlet container. If you want the libraries (.jar files) will be automatically added to your project, click on the checkbox Add Libraries.
Figure 2.12. Registering the Project at Server
18
Chapter 2. ProjectsWhen done, you can open end edit the struts-config.xml file using useful Struts configuration file editor provided by JBDS. (The Struts configuration is shown below in the Tree viewer).
Figure 2.13. Struts-config.xml File
2.4. Relevant Resources Links
You can find more in-depth explanation on how to work with special wizards, editors and views that can be used in various scenarios while developing Struts applications in our Visual Web Tools guide.
Chapter 3. Editors
In this chapter we'll introduce you to featured graphical editors for specific Struts files such as Struts Configuration files, Tiles files, Struts Validation files and web.xml.
3.1. Web.xml Editor
The web.xml file inside the WEB-INF folder is a deployment descriptor file for a Web Application. It describes the servlets and other components and deployment properties that make up your application. JBoss Tools add the web.xml file to created Struts project automatically and provides a special editor for its editing. See the Visual Web Tools guide that gives a descriptive information on the web.xml editor.
3.2. Graphical Editor for Struts Configuration Files
First, let's dwell on the Struts Configuration file editor.
This editor has three views with different representation of struts-config.xml: Diagram, Tree and Source. The views can be selected via the tabs at the bottom of the editor. Any changes made in one view are immediately visible when you switch to any other view.
Now, we'll consider every view in more detail.
3.2.1. Diagram View
The Diagram view graphically displays the Web flow of the application defined in the Struts configuration file.
Figure 3.1. Diagram View
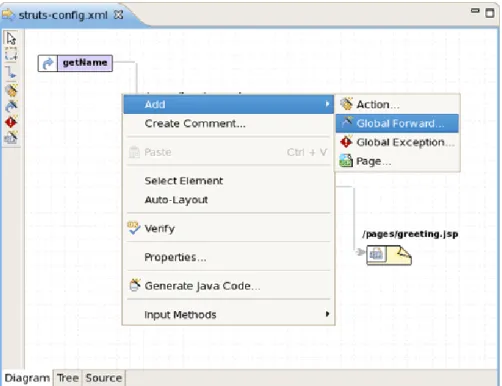
The Diagram view allows to edit navigation in your Struts application. Just by right-clicking anywhere on the diagram, you can use a context menu to create the building blocks of a Struts application:
Actions
Global forwards Global exceptions JSP Pages
Figure 3.2. Diagram Context Menu
Along the upper-left side of the editor is a stack of seven icons for changing the behavior of the cursor in the diagram.
Figure 3.3. Editor Icons
The first icon switches to the default regular selection cursor, the second to the marquee selection cursor and the third to the new connection cursor. The last four icons switch the cursor to an insert cursor for each type of Struts build block listed above (and in the order listed).
For instance, clicking on the first of these four icons (the one with the gears) will switch the cursor to insert actions. Clicking anywhere in the diagram with this cursor has the same effect as right-click and selecting Add > Action... from the context menu with the regular cursor active. It's just more efficient to use this cursor if you're adding more than one action at once.
3.2.2. Tree View
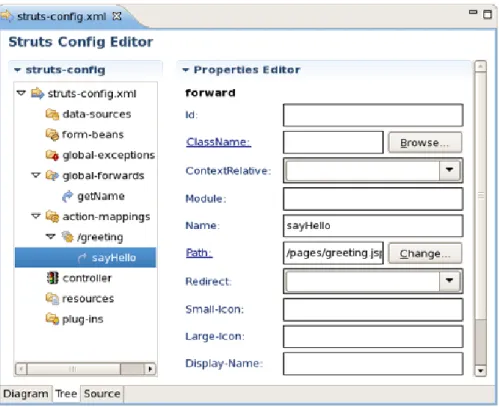
The Tree view represents the different elements of the Struts application that are organized into functional categories on the left-hand side and a form for editing the properties of currently selected items on the right-hand side.
Figure 3.4 . Tree View
You can right-click on any node in the category tree and perform appropriate operations through a context menu. For instance, by right-clicking on the action-mappings category node, you can add new actions to the application.
Figure 3.5. Tree Context Menu
Let's consider the tree on the left more closely.
Under the data-sources node you can create a Data Source object that will be configured and made available as a servlet context attribute.
The form-beans node is meant for creating a set of form bean descriptors for this module. Every created element under this node is a JavaBean that implements the
org.apache.struts.action.ActionForm class. Use the Properties editor on the right to adjust properties specific to every created form-bean.
The global-exceptions node is intended for registering the handlers for the exceptions that might be thrown by an Action object.
Use the global-forwards node to add, edit or delete a global forwards that represent ActionForward objects available to all Action objects as a return value.
The controller node allows you to configure the controller properties. Under the resources node you can add, delete, or edit message resources.
Under the plug-ins node you can define a Struts plug-in. Right-click the node, select Create Plug-in and specify the plug-ib Id and ClassName by pointing to the Java class which implements the org.apache.struts.action.PlugIn interface.
3.2.3. Source View
In the Source view, you have complete editing control of the underlying XML coding.
Figure 3.6. Source View
When working in Source view, you always have all the following features available: Content Assist
Open On Selection File Folding
Figure 3.7. Code Assist
The editor will also immediately flag any errors.
Figure 3.8. Errors in Source View
Finally, you can use the Outline view with the editor to easily navigate through the file.
Figure 3.9. Outline View
24
Chapter 3. EditorsFind more information about editor features in the editor features chapter.
3.3. Graphical Editor for Tiles Files
Here, you'll know how to make use of the special graphical editor for Tiles configuration files.
The editor has three main views: Tree, Diagram and Source. The views can be selected via the tabs at the bottom of the editor. Any changes made in one view are immediately visible when you switch to any other view.
Before we consider each view of the editor, let's look at the way of creating new Tiles files.
3.3.1. Create New Tiles File
To create new Tiles files, right click any folder and select New > Tiles File.
Figure 3.10. Creating a New Tiles File
3.3.2. Tree View
The Tree view represents the different elements of the Tiles file that are organized into functional categories on the left-hand side and a form for editing the properties of currently selected items on the right-hand side.
Figure 3.11. Tree View
To edit the file, simply right click any node and select among the available actions.
Figure 3.12. Editing in Tiles Editor
3.3.3. Diagram View
The Diagram view allows you to create complex Tiles files in the form of a diagram.
Figure 3.13. Diagram Mode
To create new definitions, simply right click anywhere in the diagram.
Figure 3.14 . Creating New Definition
You can also use the Diagram toolbar to make editing easier.
It contains four icons for changing the cursor state. The first one is the default cursor state for selecting existing nodes. The second icon is marquee selector. The third is used for creating new connections and the last one is for adding definition template to the content.
3.3.4 . Source
The other view of the Tiles editor is the Source view that gives you full control over the source. Any changes here will immediately appear in other modes when you switch to them.
When working in Source view, you always have all following features available: Content Assist
Open On Selection
Figure 3.16. Source View
Code assist is available in the Source mode.
Figure 3.17. Code Assist
Any errors are immediately reported as shown below:
Figure 3.18. Errors Reporting
You can also use the Outline view together with the editor's Source mode. It provides an easier navigation through the file.
Figure 3.19. Outline View
3.4. Graphical Editor for Struts Validation Files
Providing full support for development Struts applications JBoss Tools comes with a visual validation editor. To open the editor double-click on the validation file or if you don't have it create a new one. To create a new validation file, right click any folder in Project Explorer and select File > New > Other... from the context menu and then JBoss Tools Web > Struts > Validation File.
Figure 3.20. Creating New Validation File
The validation editor works with five modes: Formsets, Validators, Constants and standard Tree and Source that you can easily switch over using tabs at the bottom of the editor.
The Formsets view shows forms and their elements on the left side and the dialogue for defining their validation rules on the right side.
Figure 3.21. Formsets View
The Constants view let you set constant values for your validation rules.
Figure 3.22. Constansts View
Figure 3.23. Tree View
At any point you have full control over the source by switching to the Source view. Any editing in this view will immediately be available in other views of the editor.
Figure 3.24 . Source View
You can also open your own custom or Struts-standard validation-rules.xml file.
The Validators view shows the validation rules for a selected validator. You can of course add your own rules.
Figure 3.25. Validators View
Here are the validation rules shown in the Source mode.
Chapter 4. Modules
JBoss Tools support working with Struts projects that have multiple modules. You can easily do the following:
Add new modules
Edit modules for an existing project or during Struts project import Now, let's discuss this functionality in more detail.
4.1. When Importing a Struts Project
During Struts project import, if the project has multiple modules, you will see a screen with all existing modules. You can select each module and edit its details.
Figure 4 .1. Configuring Project Modules
4.2. Editing Modules in an Existing Project
To edit modules in an existing project, right click the project and select JBoss Tools > Modules Configuration.
Figure 4 .2. Choosing Modules Configuration
You will see the same screen as above where you will be able to select a module and edit its details.
Figure 4 .3. Modules Configuration
4.3. Adding New Modules
Adding a new module is very simple. First switch to Web Project view. Expand your project to the Configuration folder. Under that folder you should see the current modules. Right click on Configuration and select New > Struts Config.
Figure 4 .4 . Adding New Modules
You will see the screen below. You can specify a new module name and also add the new Struts configuration file to web.xml file.
Figure 4 .5. Adding New Modules
36
Chapter 4. ModulesChapter 5. Code Generation
JBoss Tools comes with a code generation feature. You can generate stub code for Struts Actions, FormBeans, Forwards and Exceptions.
The code generation that JBoss tooling provides is based on Velocity templates which can be modified for your use. The templates are located at {JBossStudioHome} > templates > codegeneration.
There are a number of ways to invoke code generation. One is simply right-clicking the Struts diagram and selecting Generate Java Code....
Figure 5.1. Selecting Generate Java Code
On this screen you can select for which elements to generate code. If you select Next you will be able to specify more options for each of the categories you selected.
Figure 5.2. Generate - Step 1
Please be careful not to override your existing files.
When generation is complete, a result window will appear letting you know how many classes were generated:
Figure 5.3. Generation Finished
You don't always have to generate code for all elements at once. You can invoke generation for just an individual Struts artifact as well. Right-click an element on the diagram of the Struts configuration file and select Generate Java Code... from the context menu.
Figure 5.4 . Generation For Individual Struts Artifact
The same can be done from within the Tree viewer for the editor of the Struts configuration file.
Chapter 6. Struts Configuration File Debugger
JBoss Tools come with Struts configuration file debugger. It allows you to set break points on Struts diagram and then simply launch the server in debug mode.
Simply right click an Action or a page and select Add Breakpoint.
Figure 6.1. Adding Breakpoint
Chapter 7. Customizable Page Links Recognizer
Custom page links allow you to define custom Struts page links that will be recognizable in the Struts application diagram. You can define these links by selecting Window > Preferences from the menu bar and then selecting JBoss Tools > Web > Struts > Customization from the Preferences dialog box.
Chapter 8. Struts Project Verification
In this section we'll consider one more functionality that JBoss Tools provide for Struts projects, namely adjusting projects verification.
To configure Struts project verification select Window > Preferences from the menu bar, select JBoss Tools > Web > Verification from the Preferences dialog box and then expand the Struts Rules node.
Figure 8.1. Struts Rules
Suppose you are working in the Source viewer for a Struts configuration file as shown below:
Figure 8.2. Struts Configuration File
While typing a class name or entering it from the graphical editor, you might make a minor typo (like "sample.GreetingAction1" instead of "sample.GreetingAction" ). After saving the file, verification checks to make sure everything is correct and finds the error below:
Figure 8.3. Error Reporting
Notice that the Package Explorer View shows a marked folder and a marked file where the error is. You can place the cursor over the line with the error to view a detailed error message:
Figure 8.4 . Error Message
The verification also checks to make sure you have specified the correct JSP page for the forward:
Figure 8.5. JSP Page Verification
Once you place the cursor over the line, you can see the error message:
Figure 8.6. Error Message
You can always invoke the verification by switching to the Diagram viewer, right-clicking and selecting Verify from the context menu:
Figure 8.7. Verify Command
4 4
Chapter 8. Struts Project VerificationChapter 9. Relevant Resources Links
Find out necessary information on Struts technology if you don't know enough.
In summary, this reference should help you to get familiar with those parts of JBoss Tools which are meant for development with Struts technology. If you've carefully gone through the document, you should know now how to create/import Struts project or enable Struts capabilities for an existing web project as well as organize and edit all necessary staff for your Struts application using a set of views and editors provided by JBoss Tools.
If you'd like to contribute your feedback is always appreciated. You can leave your questions and suggestions on our Forum.
We hope, this guide helped you to get started with the JBoss Struts Tools. Besides, for additional information you are welcome on JBoss forum.
Revision History
Revision 1.0-2.33 July 24 2012 Ruediger Landmann
Rebuild for Publican 3.0
Revision 0-0 Fri Nov 20 2009 Isaac Rooskov
Initial creation of book by publican
Index
F
feedback
- contact information for this manual, We Need Feedback!