IBM Unica Campaign
Version 8 Release 6
May 25, 2012
Data Migration Guide
Note
Before using this information and the product it supports, read the information in “Notices” on page 49.
This edition applies to version 8, release 6, modification 0 of IBM Unica Campaign and to all subsequent releases and modifications until otherwise indicated in new editions.
Contents
Chapter 1. Overview of data migration. . 1
What is data migration? . . . 1
Which versions of Campaign require data migration? 1 What is data re-migration?. . . 1
Re-migration modes . . . 1
About the data migration stages . . . 2
Data migration limitations . . . 2
System compatibility . . . 3
File system accessibility. . . 3
System table accessibility and permissions . . . . 3
Knowledge requirements . . . 4
Required upgrades and installations . . . 4
Chapter 2. Preparing the data migration
environment . . . 5
Install the required software versions . . . 5
Map the system tables . . . 5
Create the required partitions on the target system . 5 Set environment variables . . . 5
Environment variables required for data migration 6 Set database ID limits . . . 11
Guidelines for setting database ID limits. . . . 11
Set code formats on the target system . . . 11
Create required audience levels on the target system 12 Create additionally tracked fields on the target system . . . 12
Verify system table compatibility . . . 12
Create the pathmap file (Campaign 6.2.x or earlier versions only) . . . 12
Entries required in the pathmap file . . . 13
Database driver requirements for migrating data from 32-bit to 64-bit versions . . . 13
Preparing a distributed environment on multiple operating systems . . . 13
For source systems with Affinium Security Manager 6.x . . . 14
For source systems with Affinium Manager 7.x 14
Chapter 3. Migrating data . . . 17
About web application server status during data migration . . . 17
About migrating multiple partitions . . . 17
About the data migration log . . . 18
Cancelling data migration . . . 18
Run the data migration scripts . . . 18
Guidelines for running the data migration scripts 18 Stage 1 – Setup . . . 19
Stage 2 – Consistency checks . . . 21
Stage 3 – File system artifacts . . . 22
Stage 4 – Database artifacts . . . 23
Stage 5 – Offer, campaign, and session artifacts 23 Stage 6 – Finish data migration . . . 24
Import the Platform configuration file (distributed environment on multiple operating systems with Verify data migration . . . 25
About migration results . . . 25
Chapter 4. Data migration reference . . 27
Campaigns . . . 27
Cells. . . 27
Configuration settings . . . 27
Contact and response history . . . 28
Control groups . . . 30
Cubes and strategic segments . . . 30
Custom attributes . . . 31
Custom macros . . . 32
Derived fields . . . 32
Dimension hierarchies . . . 33
Flowcharts. . . 33
Flowchart templates . . . 34
Folders . . . 34
Initiatives . . . 34
Offers . . . 34
Offer templates . . . 35
Offer versions . . . 36
Processes . . . 36
Security . . . 38
Sessions . . . 39
Table catalogs . . . 39
Triggers . . . 40
Chapter 5. Troubleshooting . . . 41
Snapshot process that accepts a Score output cell as input appears unconfigured after it is migrated . . 41
New folders on the source system do not appear on the target system after data re-migration. . . 41
Inferred response history records are migrated as direct responses . . . 41
Stage 2 error after re-running Stage 5 . . . 42
Stage 2 consistency check fails for a campaign or session when the lock file is missing . . . 42
Stage 3 fails to create default offer template . . . 42
Stage 5 fails to migrate contact and response history records prior to year 2000 . . . 43
Error when migrating or re-migrating flowcharts . . 44
AGFs associated with retired features and migrated through a template fail to run . . . 44
Warning when migrating data from Campaign 5.1.1 44 Users cannot create new campaigns or run migrated flowcharts . . . 45
Appendix. Customizing data migration
47
Example custom data migration tasks . . . 47Implementing a custom task. . . 47
To add a custom task to a data migration stage 47 Information required for adding data migration tasks. . . 48
Removing a custom task from a data migration stage . . . 48
Running a customized data migration stage script 48 Sample Java classes for implementing data
migration tasks . . . 48
Notices
. . . 49
Trademarks . . . 51
Contacting IBM Unica technical
Chapter 1. Overview of data migration
This section provides an overview of the data migration process for Campaign.
Important: For best results, engage with IBM®Unica®Consulting Services before performing any data migration tasks in Campaign.
What is data migration?
Data migration refers to the moving of data from a source version to a new target installation of Campaign in a different location. You migrate data by running a set of data migration scripts provided with your IBM Unica Marketing installation. When you perform data migration, the configuration settings, files, and data are copied from your source Campaign system to the new target system. The data migration process does not modify any source data or configuration files.
For details on migration of specific object types, see the topic for each object type in the Data Migration Reference chapter.
Which versions of Campaign require data migration?
Data migration is required to move from Affinium Campaign 5.1+ or 6.x to Campaign. Before you can perform data migration, you must successfully install the new version of Campaign in a different location from your source version. For details, see the installation documentation. There is no option to perform an in-place upgrade from a pre-7.x version of Affinium Campaign to Campaign. If your source version of Campaign is 7.x, you do not need to migrate your data to upgrade to Campaign. To upgrade from a 7.x source version to Campaign, perform an in-place installation of Campaign over your source version. There is no option to install an empty instance of Campaign and perform data migration of objects from Affinium Campaign 7.x.
What is data re-migration?
Data re-migration refers to the migration of the same object(s) from the source system to the target system multiple times. This process might be required if any objects (campaigns, sessions, flowcharts, or offers) cannot immediately be made production-ready in the new system, and must continue to operate and be modified in a source system until another data migration attempt is made. The migration of most content is one-time only (for example, users, groups,
configuration, templates, table catalogs, and so on).
For details on re-migration of specific object types, see the topic for each object type in the Chapter 4, “Data migration reference,” on page 27 chapter.
Re-migration modes
When you select an object for re-migration, you can choose one of the following modes:
system. If treatments exist in the target system for an offer, that offer will not be re-migrated and a warning is written to the migration log.
v Skip (preserve)- Only new objects are migrated. Objects selected for
re-migration that already exist in the target system are not overwritten in the target system. This mode allows you to continue using the source system while you validate the target system. When you are sure that the target system is working, you can migrate any new objects to the target system before you take the source system offline.
Important: If an object selected for re-migration has been edited in the target system, changes to the object in the target system will be lost if theOverwrite
mode is selected. To preserve these changes, select the Skipmode.
About the data migration stages
The Campaign data migration process consists of six distinct stages, each one executed by a separate script. The scripts are installed in thetools/migration/ 5.1+To8.6 folder when you run the Campaign Utility Tools installer. For details, see the IBM Unica Campaign Installation Guide.
For each partition in your environment, run the scripts in sequence to migrate system table data and all of the corresponding underlying objects.
Before running any of the scripts, be sure that you understand the purpose of each stage of migration and you know which scripts can be run multiple times.
Stage 2 can be run multiple times for the same partition, but not after Stages 3 or 4 have run. Alternatively, Stage 2 can be run from within Stage 5.
Stage 5 can be run multiple times for the same partition to re-migrate objects, but only after running Stage 4 and before running Stage 6.
All other stages can be run only once, except in the case where the script fails to complete. Do not run Stage 6 until you are sure you have successfully completed data migration for the partition.
The six stages are as follows: v Stage 1. Setup
v Stage 2. Perform consistency checks
v Stage 3. Copy file system artifacts and system configurations v Stage 4. Copy database artifacts
v Stage 5. Copy offer, campaign, and session artifacts
v Stage 6. Finish data migration and clean up temporary files
In addition to the default tasks provided in the data migration stages, Campaign provides a utility to customize the workflow of migration Stages 2 through 5 by adding or removing data migration tasks. For details, see “Customizing data migration,” on page 47.
Data migration limitations
v It does not support “in place” data migration; that is, data is not migrated within the same instance of IBM Unica Campaign. Use the data migration tool only if you installed the new version of Campaign in a different location from your existing version.
v It does not copy database configuration from the source to the target system tables. In particular, the following configurations are not migrated:
– Database-specific scaling and performance features (such as DB2®partitions). – Existing constraints/indexes on system tables in the source database. You
must re-create the constraints/indexes manually if you want them in the target tables.
v It does not copy any folders other than those originally installed by a Campaign installation to<CAMPAIGN_HOME>/partitions/partition[n].
v It does not allow changes to the policy ID of objects between data re-migration runs. All objects will be migrated with the single policy ID chosen during Stage 1. For this reason, no changes should be made (directly or implicitly) to policy IDs assigned to various objects.
Some types of data, including object types, files, and configuration settings, also have specific migration limitations and requirements. For details, see the specific topics in the Chapter 4, “Data migration reference,” on page 27 chapter.
System compatibility
Your source and target Campaign installations must match in the following ways: v They must be installed on the same type of operating system.
v They must use the same database type and version for their system tables. v Their database tables must be in the same database instance.
v They must be deployed on the same type of web application server.
If you need to change any of these components (for example, upgrade the
database), you must perform the upgrade on the source system prior to beginning data migration, or after data migration is complete.
File system accessibility
The Campaign source file system must be visible from the target Campaign system. Therefore, either both versions of Campaign must be hosted on the same machine, or both the Campaign and Affinium Security Manager 5.1+/6.x root directories must be added as a shared drive/NFS mount on the machine where you run the IBM Unica Campaign data migration scripts.
System table accessibility and permissions
The Campaign system tables have the following accessibility and permission requirements:
v The target Campaign system tables must be in the same database and database server instance as the source Campaign system tables. That is, it must be possible toSELECTfrom the source tables andINSERTinto the target tables. v The database login you provide to the data migration scripts must be able to
SELECTfrom the source system tables andSELECTfrom and INSERTinto the target system tables. For example, on an Oracle database, the equivalent of a statement such asGRANT SELECT ON UA_SrcTableName TO UC8DbUser must be executed for
all of the Campaign system tables (for example,UA_Folder) in the source Campaign system database before you perform data migration.
v The data migration tool creates temporary tables in the same schema as the system tables in the target partition you specify. These temporary tables are used throughout the data migration and are then dropped in the final step, after you have finished migrating all data for the selected partition. The database login you provide to the data migration scripts must have the same or greater privileges as the user who created the target Campaign system tables.
Knowledge requirements
The instructions in this guide assume that the person performing the data migration has an understanding of the following:
v General IBM Unica Campaign functionality and components, including the structure of the file system.
v The installation and configuration process for the source and target versions of Campaign.
v The installation and configuration process for the source version of Affinium Security Manager and for the IBM Unica Marketing Platform.
v The functionality and usage of Affinium Security Manager on the source system. v How to manage configurations in IBM Unica Marketing Platform.
v The installation and configuration process for IBM Unica reporting, if you are using IBM Unica reports.
v Viewing and working with database tables.
Required upgrades and installations
You must perform the following tasks before migrating data to Campaign. v Upgrade to Marketing Platform. To upgrade from Affinium Security Manager,
you must first upgrade to Affinium Manager 7.5.1, and then upgrade to
Marketing Platform. For instructions, see theMarketing Platform Installation Guide. v Install, deploy, and configure Campaign. Install Campaign in a different
location from your Affinium Campaign source system. For instructions, see the Campaign Installation Guide.
v Install the data migration utilities.For instructions, see theCampaign Installation Guide.
Chapter 2. Preparing the data migration environment
This section describes the tasks required for preparing the source and target systems for migrating data.
Install the required software versions
Before you can migrate data to Campaign, the following upgrades and installations must be performed:
v Upgrade from Affinium Security Manager to Affinium Manager 7.5.1 before upgrading to IBM Unica Marketing Platform. This is required because you can upgrade to IBM Unica Marketing Platform only from Affinium Manager 7.5.x. To upgrade from Affinium Security Manager, see the instructions for upgrading from 7.3.1 and earlier versions of Affinium Manager in theIBM Unica Marketing Platform Installation Guide.
v Upgrade from Affinium Manager 7.5.1 to IBM Unica Marketing Platform. For details, see theIBM Unica Marketing Platform Installation Guide.
v Install the Campaign target system in a different location from the source version. Ensure that the target system has full access to the source system. For details, see theIBM Unica Campaign Installation Guide.
v Install the data migration tools using the Campaign Utility Tools installer. For details, see theIBM Unica Campaign Installation Guide.
Map the system tables
1. Ensure that all of the system tables on the source system have been mapped, including any that have not been used.
2. Map all of the system tables on the target system.
Note: eMessage and Optimize tables can be left unmapped if eMessage and Optimize are not installed.
For information on mapping tables, see theIBM Unica Campaign Administrator’s Guide.
Create the required partitions on the target system
If your source system has multiple partitions, create the same number of partitions on the target system.
For information on creating and configuring multiple partitions, see the installation documentation.
Set environment variables
Edit the setenvfile on the target system to set environment variables required by the data migration scripts. The setenvfile is located in thetools/migration/ 5.1+To8.6 directory in the path where you installed the data migration tools on the target system.
Note: YESand NOvalues for environment variables must be entered in uppercase.
UNIX only: After editing the setenvfile, run the file using the following command to set the variables:
. ./setenv
Environment variables required for data migration
The following environment variables must be set on the Campaign target system. Many of these variables are set by the Campaign installer; however, you should review thesetenvfile before upgrading to verify that each setting is correct for your specific upgrade scenario. The instruction comments contained in thesetenv file describe each setting and can help you complete any values relevant to your installation.
Table 1. Environment variables required for data migration
Variable Description
UNICA_PLATFORM_HOME Root directory of the IBM Unica Marketing Platform
installation. Examples:
Windows
set UNICA_PLATFORM_HOME="C:\IBM\Unica\Platform"
UNIX
UNICA_PLATFORM_HOME='/IBM/Unica/Platform' export UNICA_PLATFORM_HOME
CAMPAIGN_HOME Home directory of your IBM Unica Campaign
installation. Examples:
Windows
set CAMPAIGN_HOME="C:\IBM\Unica\Campaign"
UNIX
CAMPAIGN_HOME='/IBM/Unica/Campaign' export CAMPAIGN_HOME
Table 1. Environment variables required for data migration (continued)
Variable Description
JAVA_HOME Root directory of the JDK used by your Campaign
installation.
For WebLogic 10gR3 or higher, which uses JDK1.6, you must provide theJAVA_HOMEpath to JDK1.6; the upgrade tool utility fails if provided with aJAVA_HOMEother than
JDK1.6. Examples:
Windows
set JAVA_HOME="C:\Program Files\bea\jdk150_14"
UNIX
JAVA_HOME='/bea/jdk150_14' export JAVA_HOME
LOG_TEMP_DIR Directory where you want the data migration scripts to
create log files. Examples:
Windows
set LOG_TEMP_DIR=C:\temp
UNIX
LOG_TEMP_DIR='/var/tmp' export LOG_TEMP_DIR
ERROR_MSG_LEVEL Preferred logging level. Valid values, listed from most to
least verbose, are:
DEBUG INFO ERROR FATAL
JDBCDRIVER_CLASSPATH Full path for the JDBC drivers, including the complete file name of the .jar file.
For both Weblogic and WebSphere®
, the path needs to include the.jarfile.
For DB2 9.1, you must specifydb2jcc.jarand db2jcc_license_cu.jar.
MIGRATE_FLOWCHART_ TYPES
Types of flowcharts to migrate. Keep the default value set toBatch.
Valid values are"Batch", "Event Processing"and
"Batch,Event Processing"(quotation marks are required for Event Processing). However, migration of event processing (interactive) flowcharts is not currently supported. These values are for future compatibility only.
IsPartitionsSupported Indicates whether the source installation of Campaign supports partitions. Valid values areYESandNO.
Table 1. Environment variables required for data migration (continued)
Variable Description
IsSkipEnvironmentVars Prompt
For source installations of Campaign that do not support partitions, theIsSkipEnvironmentVarsPromptcontrols
whether the Stage 1 script prompts you for environment variables. Valid values areYESandNO. If set toYES, the
Stage 1 script does not prompt for these values, and the default values are used.
If theIsPartitionsSupportedvariable is set toYES, this
setting is ignored.
STRING_MAP_INFO_FILE Location of the locale-specific message mapping file. Examples:
Windows
set STRING_MAP_INFO_FILE="C:\IBM\Unica\Campaign\ tools\migration\5.1+To8.6\stringsmap.xml"
UNIX
set STRING_MAP_INFO_FILE='\IBM\Unica\Campaign\tools\ migration\5.1+To8.6\stringsmap.xml'
export STRING_MAP_INFO_FILE
IGNORE_SES_TEMP_FILES Indicates whether temporary session files (indicated by an underscore character at the beginning of the file name) will be copied. AYESsetting specifies that these files will not be copied. The default value isNO.
SOURCE_SYSTEM_VERSION Version number of your Campaign source system (for example, 5.2.2, 6.4.10).
Table 1. Environment variables required for data migration (continued)
Variable Description
OFFER_VERSION_COUNT_ SEPARATOR
Change this property only if your source system data uses the underscore character in offer codes or offer version codes. The default value is underscore (_). You can set this property to any character or character combination that is not used in either the offer codes or the offer version code values in the source system tables. Before using the data migration scripts, it is important to confirm in advance that the chosen separator character does not exist in the source system tables. The SQL statement in the following example for a DB2 database checks for the existence of the underscore character in offer codes and offer version codes:
SELECT COUNT(*) FROM UA_Offer WHERE OfferCode1 LIKE '%\_%' ESCAPE '\' OR OfferCode2 LIKE '%\_%' ESCAPE '\' OR OfferCode3 LIKE '%\_%' ESCAPE '\' OR OfferCode4 LIKE '%\_%' ESCAPE '\' OR OfferCode5 LIKE '%\_%' ESCAPE '\' OR VersionCode LIKE '%\_%' ESCAPE '\'
If the SQL example above returns no matching rows, then the default offer version count separator character may be used. If matching rows are found, then this statement should be modified to check for other characters until a suitable character is found.
PATH(all UNIX versions only) Add the Campaignbindirectory and the migration tools directory to thePATHvariable. The following example shows the path with tools installed in a directory called Migration at the root directory:
PATH=${CAMPAIGN_HOME}/bin:/Migration/tools/ migration/5.1+To8.6:${PATH}
Table 1. Environment variables required for data migration (continued)
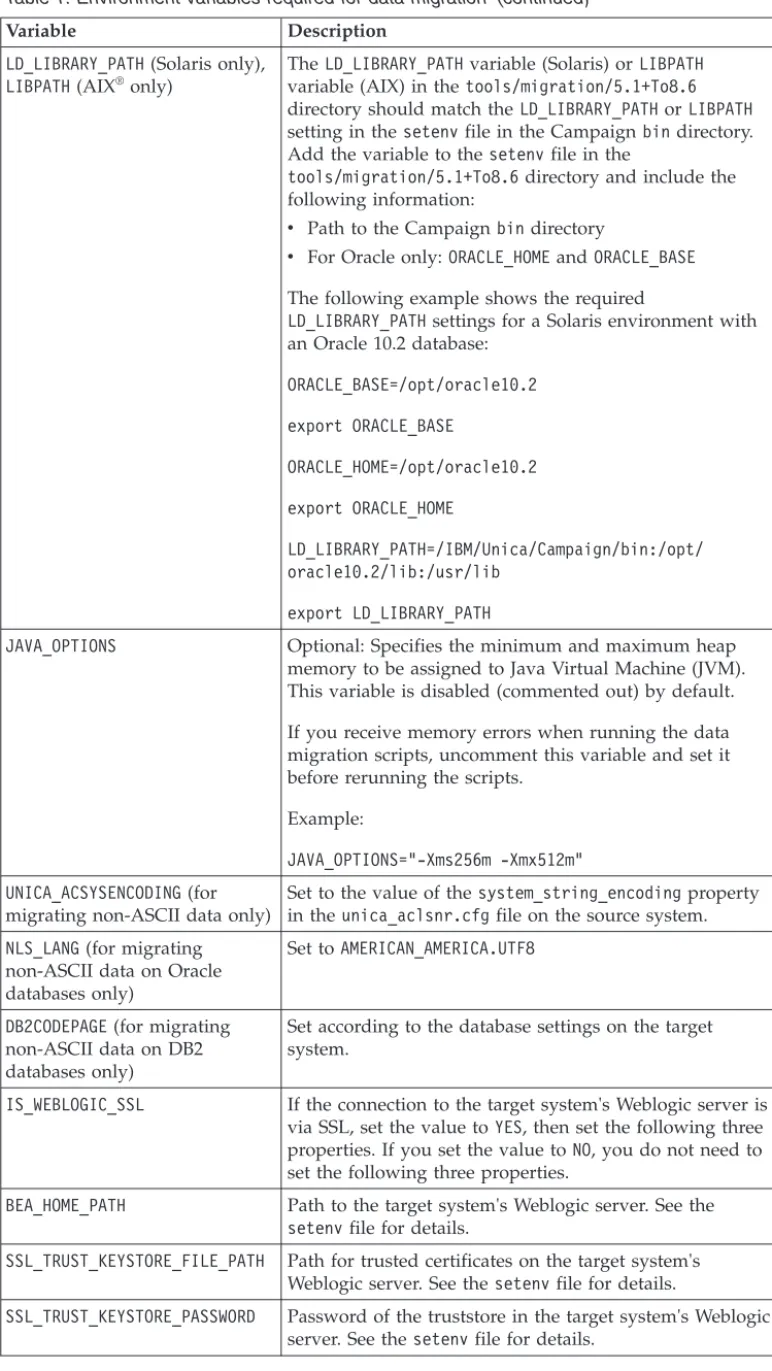
Variable Description
LD_LIBRARY_PATH(Solaris only),
LIBPATH(AIX® only)
TheLD_LIBRARY_PATHvariable (Solaris) orLIBPATH
variable (AIX) in thetools/migration/5.1+To8.6
directory should match theLD_LIBRARY_PATHorLIBPATH
setting in thesetenvfile in the Campaignbindirectory.
Add the variable to thesetenvfile in the
tools/migration/5.1+To8.6directory and include the
following information:
v Path to the Campaignbindirectory
v For Oracle only:ORACLE_HOMEandORACLE_BASE
The following example shows the required
LD_LIBRARY_PATHsettings for a Solaris environment with an Oracle 10.2 database:
ORACLE_BASE=/opt/oracle10.2 export ORACLE_BASE ORACLE_HOME=/opt/oracle10.2 export ORACLE_HOME LD_LIBRARY_PATH=/IBM/Unica/Campaign/bin:/opt/ oracle10.2/lib:/usr/lib export LD_LIBRARY_PATH
JAVA_OPTIONS Optional: Specifies the minimum and maximum heap memory to be assigned to Java Virtual Machine (JVM). This variable is disabled (commented out) by default. If you receive memory errors when running the data migration scripts, uncomment this variable and set it before rerunning the scripts.
Example:
JAVA_OPTIONS="-Xms256m -Xmx512m" UNICA_ACSYSENCODING(for
migrating non-ASCII data only)
Set to the value of thesystem_string_encodingproperty in theunica_aclsnr.cfgfile on the source system.
NLS_LANG(for migrating non-ASCII data on Oracle databases only)
Set toAMERICAN_AMERICA.UTF8
DB2CODEPAGE(for migrating
non-ASCII data on DB2 databases only)
Set according to the database settings on the target system.
IS_WEBLOGIC_SSL If the connection to the target system's Weblogic server is
via SSL, set the value toYES, then set the following three properties. If you set the value toNO, you do not need to set the following three properties.
BEA_HOME_PATH Path to the target system's Weblogic server. See the
setenvfile for details.
SSL_TRUST_KEYSTORE_FILE_PATH Path for trusted certificates on the target system's Weblogic server. See thesetenvfile for details.
SSL_TRUST_KEYSTORE_PASSWORD Password of the truststore in the target system's Weblogic
Set database ID limits
To prevent ID conflicts, the range of IDs in the source and target systems must not overlap. IDs from the source system are copied over directly, and the data
migration also creates some new objects that require IDs.
Set the database ID limits for each partition using the internalIdLowerLimitand internalIdUpperLimitproperties on the Configuration page.
For information on setting configuration properties, see the installation documentation.
Guidelines for setting database ID limits
Follow these guidelines for data migration when setting the database ID limit properties for the source and target systems.
Source system
Property Guidelines
internalIdLowerLimit Optional
internalIdUpperLimit This property must:
v be higher than the lower ID limit;
v be higher than the highest ID used in the source system
tables; and
v allow some unused IDs for new objects to be created (if
the source system remains in use after initial data migration).
Target system
Property Guidelines
internalIdLowerLimit This property must be higher than the upper ID limit in the source system.
internalIdUpperLimit Optional. If you set this property, it must:
v be higher than the lower ID limit in the target system; v be higher than the highest ID that will be used in the
target system tables; the default largest value ( 4294967295) is sufficient in most cases
Set code formats on the target system
Code formats for generated codes in the target Campaign system (cell codes, offer codes, and campaign codes) must be the same as, or compatible with, the
generated code formats in your source Campaign installation.
Note: For Affinium Campaign 6.4 and previous versions, the default value of cellCodeFormatisAnnn. If you are using this default value on the source system, make sure to change the value on the target system toAnnn(the default value of cellCodeFormaton the target Campaign system isAnnnnnnnnn).
Create required audience levels on the target system
All audience levels referenced in templates must first be manually created in the target Campaign environment. Follow these guidelines:
v Make sure that all necessary system tables are configured and mapped for each audience level before you move the templates to the target system.
v Set up the audience levels and their required database tables and table mappings to match the audience levels on the source system.
v If you have multiple audience levels mapped to the same contact or response history table, you must use views that contain only the rows used by the individual audience levels.
For information on creating audience levels, see the Campaign Administrator's Guide.
Create additionally tracked fields on the target system
The data migration scripts do not add user-defined additionally tracked fields to any database tables. Before performing data migration, you must ensure that all user-defined additionally tracked fields in the source system are defined in the target system. Create and map the fields on the target system using the names and types that match those on the source system.
For more information on additionally tracked fields, see the Campaign User's Guide.
Verify system table compatibility
Ensure compatibility between the Campaign system tables on your source and target systems:
v User-defined fields in the Campaign system tables on your target system (for example, in your contact history, response history and product tables) must be compatible with the equivalent fields in your source Campaign installation. They must have the same data type and width.
v The contact history and response history tables on your target system must contain either user-defined columns or a column namedUserDefinedField. v The login that you specify in your application server’s JDBC data source
configuration (either in Weblogic’s JNDI specification, or directly using the input prompts in the data migration scripts) must be able to access the system tables in both your source installation and your Campaign target installation.
Create the pathmap file (Campaign 6.2.x or earlier versions only)
If your source version of Campaign is 6.2.x or earlier, you must create a pathmap file to map Campaign directories from your source system to your target system. Each line in the pathmapfile contains two directory paths (source system path and target system path) separated by a single<tab>. Save the file with the file name pathmap (no extension) to the<CAMPAIGN_HOME>/partitions/partition[n]/conf directory on your target system.
Entries required in the pathmap file
Thepathmap file must contain the following entries:
UNICA_UDICATDIR <partition home>/<partition[n]>/catalogs UNICA_ACCUBEDIR <partition home>/<partition[n]>/cubes UNICA_ACFTPDIR <partition home>/<partition[n]>/ftp UNICA_ACSEGDIR <partition home>/<partition[n]>/segments UNICA_ACTPLDIR <partition home>/<partition[n]>/templates
UNICA_CAMPAIGNROOTDIR <partition home>/<partition[n]>/campaigns UNICA_SESSIONROOTDIR <partition home>/<partition[n]>/sessions UNICA_UDICATDIR <partition home>/<partition[n]>/catalog UNICA_ACLOGDIR <partition home>/<partition[n]>/logs
If you have subdirectories under the above directories, you must list them as well. For example, if you haveQ1,Q2,Q3andQ4directories under
UNICA_CAMPAIGNROOTDIR, add the following entries to thepathmapfile:
<UNICA_CAMPAIGNROOTDIR>/Q1 <partition home>/<partition[n]>/campaigns/Q1 <UNICA_CAMPAIGNROOTDIR>/Q2 <partition home>/<partition[n]>/campaigns/Q2 <UNICA_CAMPAIGNROOTDIR>/Q3 <partition home>/<partition[n]>/campaigns/Q3 <UNICA_CAMPAIGNROOTDIR>/Q4 <partition home>/<partition[n]>/campaigns/Q4
Database driver requirements for migrating data from 32-bit to 64-bit
versions
If you are moving from a 32-bit to a 64-bit version of IBM Unica Campaign, your environment must meet the following requirements:
v The database drivers for your Campaign data sources must be 64-bit. v All relevant library paths (for example, startup or environment scripts) must
correctly reference the 64-bit versions of your database drivers.
Preparing a distributed environment on multiple operating systems
If your Campaign web application, Campaign analytical server (containing the Campaign listener), and the Marketing Platform are installed on different operating systems (for example, Campaign web application and Platform on Windows and Campaign analytical server on UNIX), you must perform additional steps to prepare your environment for data migration. These steps vary depending upon whether your source system has been upgraded from Affinium Security Manager 6.x to Affinium Manager 7.x.
For source systems with Affinium Security Manager 6.x
1. Install the data migration tools on the Campaign analytical server target system. For instructions, see theIBM Unica Campaign Installation Guide.
Note: All data migration tasks are performed on the Campaign analytical server. The migration tools are not required on the Campaign web application server.
2. Copy the database templates for all of the database types in your Campaign environment (for example, DB2Template.xml, OracleTemplate.xml,
SQLServerTemplate.xml) from the<CAMPAIGN_HOME>/confdirectory on the Campaign web application target system to the<CAMPAIGN_HOME>/confdirectory on the Campaign analytical server target system. These template files are required for migration Stage 3.
3. Make the following changes to thesetenvfile in the<MIGRATION_TOOLS_HOME>/ tools/migration/5.1+To8.6directory:
a. Set theJAVA_HOMEproperty to the JRE on the Campaign analytical server target system (<CAMPAIGN_HOME>/jre).
b. Set theUNICA_PLATFORM_HOMEproperty to the same directory as CAMPAIGN_HOME.
4. Create anauthorization/confdatadirectory under the<CAMPAIGN_HOME> directory on your Campaign analytical server target system.
5. Copy theaffinium_config.xmlfile from Affinium Security Manager to the <CAMPAIGN_HOME>/authorization/confdata directory that you created on the Campaign analytical server target system. This file is required for migration Stages 1 and 3.
For source systems with Affinium Manager 7.x
1. Use theconfigToolutility on your Marketing Platform system to export the <PLATFORM_HOME>/conf/Manager_config.xmlfile to a different location. This step is required because the migration stages overwrite your Platform settings with the settings in theaffinium_config.xmlfile. (You will add the affinium_config.xmlfile to your Campaign analytical server in a later step.) To restore your configuration settings after completing data migration, you will import your savedManager_config.xmlfile.
For information about using theconfigToolutility, see theIBM Unica Marketing Platform Administrator's Guide.
2. Install the data migration tools on the Campaign analytical server target system. For information about installing the data migration tools, see theIBM Unica Campaign Installation Guide.
Note: All data migration tasks are performed on the Campaign analytical server. The migration tools are not required on the Campaign web application server.
3. Copy the database templates for all of the database types in your Campaign environment (for example,DB2Template.xml,OracleTemplate.xml,
SQLServerTemplate.xml) from the<CAMPAIGN_HOME>/confdirectory on the Campaign web application target system to the<CAMPAIGN_HOME>/confdirectory on the Campaign analytical server target system. These template files are required for migration Stage 3.
4. Make the following changes to thesetenvfile in the<MIGRATION_TOOLS_HOME>/ tools/migration/5.1+To8.6directory:
a. Set theJAVA_HOME property to the JRE on the Campaign analytical server target system (<CAMPAIGN_HOME>/jre).
b. Set theUNICA_PLATFORM_HOME property to the same directory as CAMPAIGN_HOME.
5. Create anauthorization/confdatadirectory under the<CAMPAIGN_HOME> directory on your Campaign analytical server target system.
6. Obtain a copy of theaffinium_config.xmlfile from Affinium Security Manager (this file does not exist in Affinium Manager 7.x). This file is required for migration Stages 1 and 3.
You can obtain this file from a backup of Affinium Security Manager 6.x or from IBM Unica technical support. If you create your own file, you must ensure that it is compatible with Affinium Security Manager authentication. For more information, see the Affinium Security Manager 6.x documentation.
7. Copy theaffinium_config.xmlfile to the<CAMPAIGN_HOME>/authorization/ confdatadirectory that you created on the Campaign analytical server target system.
Note: You can ignore the settings in theaffinium_config.xmlfile; after data migration, you will overwrite them with the contents of your saved
Chapter 3. Migrating data
This section describes the procedures for migrating your existing data from any 5.1+ to 6.x version of Campaign to Campaign. These tasks assume that you have successfully completed the installation tasks detailed in the installation
documentation, and that you are aware of data migration concepts and
prerequisites as described in Chapter 1, “Overview of data migration,” on page 1 and Chapter 2, “Preparing the data migration environment,” on page 5.
In addition, we recommend that you read the following before migrating data: v All of the topics in this section.
v Topics in the Chapter 4, “Data migration reference,” on page 27 chapter that describe the expected results for the types of data you want to migrate.
About web application server status during data migration
Follow these guidelines for the web application servers during data migration:
Source system
The source system web application server can be in any state (running or shut down) during the data migration process. However, if the source system is running and available for use, any changes made by users to source system data during data migration may not be migrated correctly. Moreover, it is possible that changes made to the source system may cause data to be migrated in an inconsistent state to the target system. Therefore, the best practice is to shut down the source system web application server and listener to prevent use during data migration. If this practice is not followed, IBM Unica technical support may not be able to properly support the migrated system without starting the data migration process again with a clean target system.
Target system
The target system web application server must always remain running and its listener should be stopped. This server provides access to the JDBC database drivers used for data migration. Also, the Marketing Platform web application must be deployed and active during data migration, as some of the configuration information from the source system is stored on the Configuration page in Marketing Platform.
About migrating multiple partitions
Follow these guidelines for migrating multiple partitions:
v If your source system has multiple partitions, make sure that you have set up the same number of partitions on the target system.
v For each partition in your environment, run the six scripts in sequence to
migrate system table data and all of the corresponding underlying objects. When you start the data migration at Stage 1, you must choose an initial partition to migrate. If only one partition exists, it is automatically selected.
v You cannot change the name of a partition while migrating data; the partition name must match on the source and target systems.
v You must complete the data migration for each partition before beginning the process for another partition; you cannot resume an incomplete data migration after you have switched to a new partition.
About the data migration log
After you run each data migration stage, the scripts write processing details, warnings, or errors to a log file named migration.log. You set the log’s location and level of verbosity in thesetenvscript file, as specified in “Set environment variables” on page 5. When a stage completes, it displays the location of the log file.
Details from each stage are appended to the log after the details for the previous stage. If you prefer that details for each data migration stage are captured in a separate file, rename the log file with a different name after each stage completes, so that logging details from the next data migration stage you run are captured in a new log file without the details from the previous stage.
For example, after you run Stage 1, renamemigration.log tostage1.log. Logging details for Stage 2 will be written to migration.log.
Cancelling data migration
You can abort the data migration at any prompt during any stage by typing abort.
Run the data migration scripts
Run the data migration scripts to migrate Campaign data and files to the target system.
The data migration scripts are located in thetools/migration/5.1+To8.6directory in the path where you installed the data migration tools on the target system. The script files are named for the stage they run, as follows:
v stage1 v stage2 v stage3 v stage4 v stage5 v stage6
The scripts prompt you to provide passwords for your web application server or JDBC database login for the target system. Passwords are not saved by data migration scripts.
Guidelines for running the data migration scripts
The following guidelines apply to all of the data migration scripts:
v The data migration scripts create files that are required for the migration to execute correctly. These files are located in the same directory that you specified for themigration.log file using theLOG_TEMP_DIRparameter. Do not delete any of the files in this directory during the migration process.
v UNIX only: Run the data migration scripts as root to ensure access to files with multiple levels of ownership or permissions.
v UNIX only: Verify that the path to the shell specified at the start of each data migration script is correct for your system. If it is not correct, modify it before running the script.
v After running any of the data migration stages, we recommend that you check themigration.log file for errors, even if no errors are reported.
v If any errors are reported, correct the errors and re-run the script.
Stage 1 – Setup
The stage1script performs the following actions:
v Gathers information about the source and target system
v Sets up database connections to the source and the target system v Creates or updates temporary migration tables in the target system
Guidelines for running Stage 1
Run the stage1script only once for each partition that you are migrating. However, if the script fails to complete, you must run it again.
Important: After Stage 1 of the data migration is complete, do not change any Marketing Platform user names or Campaign system table mappings. Any users that are added to Marketing Platform after you run Stage 1 will not be known to the data migration scripts in any later stage. Stage 1 constructs an internal mapping of user names to user IDs, which is then referenced by all later data migration stages. New users added after running Stage 1 may cause errors in data migration, for example, if objects owned by a new user are migrated during later stages.
Information required for Stage 1
This section describes the information that thestage1script prompts you to provide. In most cases, the script attempts to detect the information, and either presents options for you to select or, if it cannot find the infomation, prompts you to provide it.
Information required Description
Root installation directory of target system
The root installation directory of the target system (PLATFORM_HOME). The script provides a default based on
the value ofPLATFORM_HOMEyou set in thesetenvscript. Partition details Partition— The script attempts to detect the partitions in
the source Campaign system. If only one partition is defined, it is automatically selected for data migration. If more than one partition is defined, you must choose an initial partition to migrate.
Security policyfor PolicyID fields
Default user name for CreateBy fields
Information required Description
Connection details to source system tables database
The script prompts you to select a connection method to the system tables in both the source and target systems. If you use WebLogic as the web application server, you can select WebLogic or JDBC. If you use WebSphere as the web application server, you must select JDBC.
Select one of the options:
WebLogic— If you select this option, the script prompts you to enter the following details:
v Host name — for example,mymachine v Port number — for example,7001
v Web application server username and password v Full path (including filename) to the Web application
server’s library.jarfile — for example:
C:\bea\weblogic81\server\lib\weblogic.jar
JDBC— If you select this option, the script prompts you to enter the following details:
v Driver class name — for example, oracle.jdbc.driver.OracleDriver
v URL including host, database name, and port — for
example,jdbc:oracle:thin:@machinename:1521:orcl v Database username and password
Source system tables information
Catalog/database (depending on your database system’s terminology) — the script detects the available options for you to select.
Schema/owner (depending on your database system’s terminology) — the script detects the available options for you to select.
Target system tables information
Catalog/database (depending on your database system’s terminology) — the script detects the available options for you to select.
Schema/owner (depending on your database system’s terminology) — the script detects the available options for you to select.
Configuration file directory on the source system
The full path to the directory containing the
affinium_config.xmlfile on the source system. Do not include the file name. For example,
C:\Affinium\authorization\confdata
Campaign installation directory on the source system
The path to the Campaign installation directory on the source system. For example,C:\Affinium\Campaign
Partition’s parent directory on the source system
The path to the selected partition’s parent directory on the source system. For example,
Information required Description
Database ID limits for the source and target systems
Enter new values or change existing values for lower and upper ID limits in your source system.
If during data migration you define ID range values that are different from existing values in the source system’s configuration, you must manually update your source system’s configuration to correspond with the new ID range values you specified during data migration.
Otherwise, if the source system remains in production, new objects created there might be assigned IDs that fall outside the specified range, and might not be migrated by the data migration process. The data migration scripts do not automatically modify any source data or files, including configuration files.
For instructions on setting database ID limits, see “Set database ID limits” on page 11.
Stage 2 – Consistency checks
Thestage2script performs the following actions:
v Performs database and file system consistency checks on the source system and reports errors.
v Validates internal ID ranges on both the source and the target system. IDs from the source system are copied over directly, and the data migration also creates some new objects requiring IDs. For that reason, the ID range for both systems must not overlap. For details, see “Set database ID limits” on page 11.
v Checks if theAssignOffer macro exists in any stored derived fields. Fields that use this macro cannot be migrated (theAssignOffermacro is no longer
supported).
v Identifies whether the audience levels from the source have also been created and mapped on the target, including the same fields and data types.
v Identifies whether there is more than one row in contact or response history having the same combination ofCustomerID,OfferTrackID, andContactDate. If redundant rows are found, the records are logged in the CHRH.log file, which is located in the same directory as themigration.log file. Redundant rows must be removed from the contact and response history tables before migrating data. v Identifies whether the source system has contact and response history records
populated from session flowcharts. Offending items are identified in the
CHRH.log file, which is located in the same directory as themigration.log file. Session flowcharts must be removed before migrating data.
v Identifies whether the target system is empty (clean).
Guidelines for running Stage 2
Follow these guidelines for running Stage 2:
v Stage 2 can be run multiple times for the same partition, but not after Stages 3 or 4 have run. Running Stage 2 after Stage 3 or Stage 4 will cause the Clean Target Checks task to fail. If you need to run Stage 2 multiple times, you must run it after Stage 1 and before Stage 3. Alternatively, you can run Stage 2 from within Stage 5, but you cannot run Stage 2 explicitly after you have run Stage 3 or Stage 4.
v You may need to make adjustments to your source database system or file system to correct any dependency violations or other errors noted in the log after each run of Stage 2.
Stage 3 – File system artifacts
The stage3script performs the following actions:
v Copies artifacts on the source file system to the target system.
v Copies configuration settings from the following files to the Configuration page on the target system:
– affinium_config.xml – dbconfig.lis
– unica_aclnsr.cfg – unica_acsvr.cfg
The following files from pre 6.4.x versions of Campaign are not migrated: v udisvr.cfg
v Campaign_config.xml
Note: The stage3 script does not migrate any folders other than those originally installed by a Campaign installation in <CAMPAIGN_HOME>/partitions/
partition[n].
Prerequisites for Stage 3
Ensure that the following prerequisites are met before you run thestage3script: v The target server partition must be free of any Campaign objects (for example,
folders, campaigns, or offers) before you run thestage3script. If any Campaign data exists in the partition, remove it before running thestage3script.
v In thedbconfig.lisfile on the source system, remove any entries for databases that are not supported by Campaign, or for which there are no database
templates on the target system. These entries will cause Stage 3 to fail if they are not removed. (If you are migrating from version 5.2.1, you must remove the entry for Redbrick.) The data source templates on the target system are located in the <CAMPAIGN_HOME>/conf directory.
Guidelines for running Stage 3
Run the stage3script only once for each partition that you are migrating. However, if the script fails to complete, you must initiate it again. Manual
intervention might be required before you can re-run this script successfully after a failure.
Information required for Stage 3
The stage3script prompts you for the following information:
v Passwords for your web application server or JDBC database login for the target system. Passwords are not saved by data migration scripts.
v Name of the source version system tables data source (for example, AC_SYSTEM_TABLE).
Stage 4 – Database artifacts
Thestage4script performs the following actions:
v Migrates data that is not associated with a specific campaign or session from the source system table database into the target system database.
v Migrates as a whole all stored objects referenced by flowcharts in campaigns (custom macros, triggers, and stored derived fields) from the source system to the target system. These objects cannot be individually specified for data migration.
Guidelines for running Stage 4
Run the stage4script only once for each partition that you are migrating. However, if the script fails to complete, you must initiate it again. Manual
intervention might be required before you can re-run this script successfully after a failure.
Note: If you create any new custom macros, triggers or derived fields after you run the stage4script, you must manually recreate these objects in the target system.
Stage 5 – Offer, campaign, and session artifacts
Thestage5script performs the following actions:
v Migrates any campaigns or sessions that you specify, including their associated offers.
v Allows you to choose whether to migrate the associated contact history and response history data for campaigns.
v Allows you to select, for the item type selected, whether you migrate: – Individual items: the script prompts you to enter the item name. – A folder of items: the script prompts you to enter the folder name. All
contents of its subfolders are also migrated. – All available items of this type.
v Allows you to specify an individual flowchart to re-migrate.
Prerequisites for Stage 5
Ensure that the following prerequisites are met before you run thestage5script. v If you choose to migrate the contact history and response history data, ensure that you have created and mapped all audience level tables in both the source and target systems.
v If any of the flowcharts you are migrating has flat files as a data source, the flat files must be manually copied from the source system to the target system in the appropriate corresponding location.
v Before migrating sessions, remove all contact processes from session flowcharts. v Make sure that contact history or response history tables from your source
system do not contain multiple records with the same customer, date, and offer. For more information, see “Contact and response history” on page 28.
v Make sure that the default audience level Customer is mapped in the target system, even if the Customer audience level is not used in the source system. v Thestage5script does not verify that campaign and flowchart names contain
restricted. See theIBM Unica Campaign User’s Guidefor details about special characters and ensure that campaign and flowchart names contain only legal characters before migrating these objects.
Guidelines for running Stage 5
Follow these guidelines for running the stage5script:
v Stage 5 can be run multiple times for the same partition to re-migrate objects or to migrate new objects.
v Each time this script finishes migrating a selected item or group of items, you can choose whether to migrate more data. You can repeat the data migration steps within the script for all items that you want to migrate, before the script completes.
v Migrating contact and response history may take a long time depending on the amount of data to be migrated. You may want to migrate the campaign and its flowcharts without contact history first and subsequently migrate just the contact and response history.
Information required for Stage 5
The stage5script prompts you for the following information:
v Passwords for your web application server or JDBC database login for the target system. Passwords are not saved by data migration scripts.
v For migrating contact or response history data: A user name with administrative privileges in Campaign. If you are running thestage5script for multiple
partitions, make sure that you enter a user name that has administrative privileges for the partition you are currently migrating.
Stage 6 – Finish data migration
The stage6script cleans up and removes temporary data migration tables from the target system.
Important: When you run Stage 6, temporary tables created during data migration are deleted. Therefore, you cannot perform further data migration on the same partition after running Stage 6. To perform a new cycle of data migration, you must start again from Stage 1, on a clean installation of Campaign.
Prerequisites for Stage 6
Run Stage 6 only if you are completely finished with all data migration and re-migration for the current partition and no longer need any of the partition’s content from the source system.
Important: If any of the campaigns or sessions fail to migrate in Stage 5, the stage6script will fail to execute. If you want to execute Stage 6 without taking further action on any failed campaigns or sessions, change the status of taskid 501 in theMigConfig_Statustable from0 to1.
Import the Platform configuration file (distributed environment on
multiple operating systems with Affinium Manager 7.x only)
After completing data migration, if your Campaign web application, Campaign analytical server, and the Marketing Platform are installed on different operating systems (for example, web application and Marketing Platform on Windows and Campaign analytical server on UNIX), and your source system has been upgraded to Affinium Manager 7.x, use the Marketing PlatformconfigToolutility to import theManager_config.xmlfile that you exported before performing data migration. For information on using theconfigToolutility, see theIBM Unica Marketing Platform Adminstrator's Guide.
Verify data migration
After executing the six data migration stages, verify that the data migration was completed successfully.
1. Restart the Campaign server(s).
2. Log in to the target installation of Campaign and verify that you can perform the following tasks:
v View and open flowcharts and process boxes v Test run flowcharts
About migration results
Most of the objects that you migrate to Campaign successfully do not require further action to complete migration. However, you should be aware of the exceptions listed in the following topics.
For more information about migrating these and other Campaign objects, see Chapter 4, “Data migration reference,” on page 27.
Objects that may require manual steps to complete migration
v Control groups
v Dimension hierarchy tables
v Flowcharts that create cubes or strategic segments v Files or scripts started by triggers
v The following processes: – Contact
– Create Seg – Optimize – Response – Snapshot – Track
Processes that are migrated but not supported
The following processes are migrated as part of flowcharts in which they exist, but are no longer supported in Campaign. You must manually delete these processes from flowcharts before they can be run successfully in the new version of Campaign.
v Decision v eMessage v EventIn v EventOut v Recommend
Processes that are not migrated or supported
v Evaluate v SelectOpt v TestOpt
Configuration settings files from pre-6.4.x versions of Campaign
that are not migrated
Chapter 4. Data migration reference
This section provides details about the requirements and limitations for migrating specific types of data in Campaign, including object types, files, and configuration settings. Before migrating data from your source system to the target system, refer to the topics in this section to gain an understanding of the expected results for the type of data that you want to migrate.
Campaigns
Migration
Campaigns can be migrated individually or as part of a specified folder. Associated offers and flowcharts are migrated as part of each campaign. When you migrate a campaign, you can choose to include the associated contact and response history, or you can migrate the contact and response history at a later time. For details, see “Contact and response history” on page 28.
Re-migration
Campaigns can be re-migrated individually or as part of a specified folder. Associated offers and flowcharts are re-migrated as part of the campaign.
When you re-migrate campaigns, you can specify how objects already in the target system are handled by choosing either OverwriteorSkipmode. Campaigns that are re-migrated into an existing folder ignore any specified security policy during migration and use the security policy of the destination folder specified in the target system.
Any new flowcharts in the target system that do not exist in the source system are not affected or changed when the campaign is re-migrated.
Cells
Cells are migrated and re-migrated with processes in flowcharts. For details, see “Processes” on page 36.
Configuration settings
Migration
Settings from the following configuration files are migrated to the Configuration page in Marketing Platform:
v affinium_config.xml v dbconfig.lis
v unica_aclnsr.cfg v unica_acsvr.cfg
The following files from pre 6.4.x versions of Campaign are not migrated: v udisvr.cfg
v Campaign_config.xml
Re-migration
Configuration files cannot be re-migrated.
Contact and response history
Migration
You can select whether to migrate contact history and response history when you select campaigns for migration. You can only migrate both contact history and response history together; you cannot migrate only one and not the other.
Be aware of the following limitations when migrating contact and response history: v Sessions: IBM Unica Campaign does not allow migration or re-migration of
contact or response history records from sessions. Before migrating or
re-migrating sessions to Campaign, you must remove any contact processes from session flowcharts.
v Date and time fields: Contact and response history records in Campaign now contain both date and time fields; contact and response history records from pre-7.x versions of Campaign contain the date but not the time. The combination of offer, date, and customer must be unique for each of these records in
Campaign. If the contact history or response history tables from your source system contain multiple records with the same customer, date and offer, data migration will fail and thestage2script will detect the condition and flag it as an error.
To work around this issue, choose one of the following options: – Clean up the contact history records by deleting redundant entries. – Create a view on contact history where rows are normalized by audience
keys, offer, and date. Map this view as the contact history system table. v Inferred response history records: The data migration script cannot determine
whether a migrated response was direct or inferred, so by default all of these records are migrated as direct responses.
As an alternative, you can set all migrated records to be inferred instead of direct. To do this, after migrating response history records, update response records to inferred by changing the value of theDirectResponsefield in the UA_ResponseHistorytable to 0.
Re-migration
The following requirements and limitations apply to re-migrating contact and response history:
v You can choose whether or not to re-migrate contact history and response history when you select campaigns for re-migration. You can choose to migrate only the history, leaving the campaign (and any subsequent changes that have been made on the target system) intact. You can only re-migrate both contact history and response history together; you cannot re-migrate one and not the other.
v Contact and response history records that were generated on the same date as records already in the target system tables cannot be re-migrated.
v When re-migrating contact and response history, the data migration script checks contact and response history records on the target system based on date.
Records from the source system that do not have the same dates as records in the target system are inserted into the target system tables. However, if contact and response history records from the source system share dates with records already in the target system, these records are not migrated. This situation might arise if flowcharts that generate contact or response history were run multiple times on the same date. If your source system contains such data, you must remove the redundant records from the target system before attempting to re-migrate contact and response history.
v If you delete and reconfigure a Response process on the source system, the ResponseIDin theUA_Response table is deleted and a newResponseIDis inserted, corresponding to the sameOfferTrackID. Any response history records
corresponding to the deletedResponseIDare now "orphaned" (that is, they have no associatedOfferTrackIDs). If response history records are generated for a new date, the records are inserted for the newResponseID. The data migration script cannot migrate the orphaned response history records; only the response history records corresponding to the newResponseIDare migrated.
v If you make changes to a migrated flowchart in Affinium Campaign 6.x that result in changes to OfferTrackIDs, the old OfferTrackIDs are deleted and the associated contact history records are "orphaned" (that is, they have no
associated OfferTrackIDs). If you re-migrate the modified flowchart and contact history, only the OfferTrackIDs and associated contact history records from the current configuration are migrated. Any orphaned contact history records are not migrated.
v To re-migrate the contact and response history, you must also re-migrate the modified flowchart. If you re-migrate only the contact and response history without re-migrating the flowchart, the contact history will not be migrated.
Re-migrating contact and response history only
Option 1 of Stage 5 allows you to choose to migrate contact and response history only. This section describes the results of re-migrating only contact and response history data under two scenarios.
Scenario 1
1. Migrate a flowchart from the source system to the target system, without contact and response history.
2. Run the flowchart on the source system.
3. Modify the flowchart on the target system.
4. Re-migrate only the contact and response history from the source system to the target system.
Result:The modified flowchart on the target system is unchanged (not
overwritten). All contact and response history from the source system is moved to the target system. If you then run the modified flowchart on the target system, the new contact and response history data from that flowchart run will be added to the target system and the migrated contact and response history data on the target system will remain unchanged.
Scenario 2
1. Migrate a flowchart from the source system to the target system, including contact and response history.
2. Re-run the flowchart on the source system.
4. Re-migrate only the contact and response history from the source system to the target system.
Result:The modified flowchart on the target system is unchanged (not
overwritten). All contact and response history from the source system is moved to the target system, including any updates to individual contact history records that may have been made with the Track process (for example, changes to contact date). If you then run the modified flowchart on the target system, the new contact and response history data from that flowchart run will be added to the target system and the migrated contact and response history data on the target system will remain unchanged.
Control groups
Control groups are not migrated to the Campaign target system due to significant differences in control group functionality between the current version of Campaign and earlier versions of Campaign.
In the current version of Campaign, all controls are: v no-contact controls,
v never output in contact lists, and v never rolled up in performance reports.
If you have controls in earlier versions of Campaign you must manually re-create them in the target system.
Cubes and strategic segments
Migration
Although flowcharts containing the Cube or Create Seg processes are migrated, the actual underlying cube or strategic segment files are not migrated.
You must re-run these flowcharts after migration to re-create the cubes or strategic segments before the cubes or strategic segments can be used in the target system. Cubes configured with multiple input segments are not supported in Campaign. If you migrate a cube with multiple input segments to a Campaign target system, the cube will be unconfigured on the target system after migration.
In addition, if any of the cubes that you migrate are based on dimension
hierarchies that use flat files as tables for input, you must move those flat files to the target system and remap them as they were on the source system. If a cube process still fails to run on the target system after moving and remapping the associated flat files, delete the cube process and create a new one, configuring it exactly the same as the deleted one, and then run the new cube process.
Re-migration
Flowcharts containing the Cube or Create Seg processes can be re-migrated, but cube or strategic segment files are not migrated or re-migrated.