Simba XMLA Provider for Oracle
OLAP 2.0
Linux Administration Guide
April 23, 2013Copyright © 2013 Simba Technologies Inc. All Rights Reserved.
Information in this document is subject to change without notice. Companies, names and data used in examples herein are fictitious unless otherwise noted. No part of this publication, or the software it describes, may be reproduced, transmitted, transcribed, stored in a retrieval system, decompiled, disassembled, reverse-engineered, or translated into any language in any form by any means for any purpose without the express written permission of Simba Technologies Inc.
Trademarks
Simba, the Simba logo, and Simba XMLA Provider for Oracle OLAP 2.0 are registered trademarks of Simba Technologies Inc. All other trademarks and/or servicemarks are the property of their respective owners.
Contact Us
Simba Technologies Inc. 938 West 8th Avenue
Vancouver, BC Canada V5Z 1E5
www. s im b a . c o m
Telephone: +1 (604) 633-0008 Sales: Extension 2
Support: Extension 3 Fax: +1 (604) 633-0004
Information and Product Sales: [email protected] Technical Support: [email protected]
Table of Contents
Introduction ... 1
Software Requirements ... 1
Installing the ODBC Driver ... 1
Installation ... 2
Using JBoss ... 2
Using Tomcat ... 3
Upgrading an Existing Installation ... 3
Configuration ... 4
Configuring the Data Source ... 4
Configuring XMLA Service Properties ... 5
Configuring Environment Variables ... 5
Configuring JVM Memory Usage ... 7
Running the Web Server and XMLA Service ... 7
Starting and Stopping JBoss ... 8
Starting and Stopping Tomcat ... 8
Testing Your Installation ... 9
Monitoring the XMLA Service ... 9
Monitoring Using JBoss ... 9
Monitoring Using Tomcat ... 10
Attributes JConsole Monitors ... 11
Uninstallation... 12
Appendix: Troubleshooting ... 13
Web Server Does Not Start ... 13
Browsing to the XMLA Service Start Page Displays an Error ... 13
Introduction
The Simba XMLA Provider for Oracle OLAP 2.0 allows you to connect from XMLA-compatible Business Intelligence (BI) clients to an Oracle® OLAP® cube. The Simba XMLA Provider for Oracle OLAP 2.0 directly connects familiar BI applications such as SAP BusinessObjects Analysis®, Cognos® Software and MicroStrategy® to your Oracle OLAP database, enabling powerful query and analysis of your multi-dimensional data.
The Linux Administration Guide describes how to install and configure Simba XMLA Provider for Oracle OLAP 2.0 on computers running the SUSE Linux distribution and one of the supported Web application servers: JBoss or Apache Tomcat.
Software Requirements
Simba XMLA Provider for Oracle OLAP 2.0 is supported on the following operating system, applications and libraries:
SUSE Linux Enterprise Server 11 (x86_64) Service Pack 2
Oracle Instant Client ODBC Driver Version 11.2 (64-bit)
Java® SE Development Kit (JDK) 6 Update 35 or later (64-bit)
JBoss Application Server 7.1.1 OR
Apache Tomcat 7.0.37 or later
Note: Both JBoss and Tomcat require that you install a JDK, rather than a Java Runtime Environment (JRE).
Installing the ODBC Driver
Simba XMLA Provider for Oracle OLAP 2.0 communicates with the database using an Open Database Connectivity (ODBC) interface. Simba recommends the 64-bit Oracle Instant Client Version 11.2.
Note: Simba XMLA Provider for Oracle OLAP 2.0 uses 64-bit architecture, so the ODBC driver must use 64-bit architecture as well.
To install the 64-bit Oracle Instant Client Version 11.2: 1. In your Web browser Address field, type
http://www.oracle.com/technetwork/topics/linuxx86-64soft-092277.html, and then press ENTER
2. Download the most recent versions of Instant Client Package – Basic and Instant Client Package – ODBC
3. Follow the steps in the Readme document included in the Instant Client Package – ODBC to install Instant Client; add a DSN to the Oracle database on which analysis is to be performed; and, configure environment variables.
Note: For further details on using unixODBC, see http://www.unixodbc.org/
Installation
Simba XMLA Provider for Oracle OLAP 2.0 is delivered in a ZIP archive having the name M4OXmlaWebService_Version_linux.zip where Version is the version number of the XMLA Provider.
The archive contains the following file and folder structure:
sxo
o DatasetSchema.xml o DataSources.xml o tracesettings.conf
M4OXmlaWebService.war
Note: M4OXmlaWebService.war is a Web Archive File—a compressed archive used to distribute Web applications.
M4OXmlaWebService.war.dodeploy
Note: M4OXmlaWebService.war.dodeploy is an empty text file that indicates to JBoss to deploy the Web application in the M4OXmlaWebService.war archive. The .DODEPLOY file is not used when installing the XMLA Web service on Tomcat.
If you are installing Simba XMLA Provider for Oracle OLAP 2.0 using the JBoss Application Server, then follow the installation instructions in the section Using JBoss on page 2. If you are using the Apache Tomcat Web server, then follow the installation instructions in the section
Using Tomcat on page 3.
Using JBoss
To install Simba XMLA Provider for Oracle OLAP 2.0:
1. Ensure that the computer where you install Simba XMLA Provider for Oracle OLAP 2.0 meets the Software Requirements on page 1.
2. In a convenient location, create a new folder, then copy the ZIP archive containing Simba XMLA Provider for Oracle OLAP 2.0 into the folder, and then extract the contents of the ZIP archive into the folder.
3. In the folder JBOSS_HOME/standalone/deployments, create a folder named webapps if the folder does not exist.
Note: For the remainder of the Simba XMLA Provider for Oracle OLAP 2.0 Windows Administration Guide, the name JBOSS_HOME is used to refer to the full pathname of the directory where JBoss is installed.
4. In the /webapps folder created in step 3, create a folder named M4OXmlaWebService.war 5. Copy the M4OXmlaWebService.war archive from the folder you created in step 2 to the
/M4OXmlaWebService.war folder created in step 4.
6. In the /M4OXmlaWebService.war folder, rename the M4OXmlaWebService.war archive to M4OXmlaWebService.zip, and then extract the contents of the archive. After
extracting the contents, delete the M4OXmlaWebService.zip archive from the /M4OXmlaWebService.war folder.
7. Copy the M4OXmlaWebService.war.dodeploy file from the folder you created in step 2 into the folder JBOSS_HOME/standalone/deployments/webapps
8. In the /etc folder, create a folder named mdxprovider
9. Copy the sxo folder, including the folder contents, from the folder you created in step 2 into the folder /etc/mdxprovider
10. In the /etc/mdxprovider/sxo folder, create a folder named logs 11. Delete the folder that you created in step 2.
Using Tomcat
To install Simba XMLA Provider for Oracle OLAP 2.0:
1. Ensure that the computer where you install Simba XMLA Provider for Oracle OLAP 2.0 meets the Software Requirements on page 1.
2. In a convenient location, create a new folder, then copy the ZIP archive containing Simba XMLA Provider for Oracle OLAP 2.0 into the folder, and then extract the contents of the ZIP archive into the folder.
3. Copy the M4OXmlaWebService.war archive from the folder you created in step 2 into the folder CATALINA_HOME/webapps
Note: For the remainder of the Simba XMLA Provider for Oracle OLAP 2.0 Linux Administration Guide, the name CATALINA_HOME is used to refer to the full pathname of the directory where Tomcat is installed.
4. In the /etc folder, create a folder named mdxprovider
5. Copy the sxo folder, including the folder contents, from the folder you created in step 2 into the folder /etc/mdxprovider
6. Delete the folder you created in step 2.
Upgrading an Existing Installation
To upgrade from Version 2.0.0.1 or higher of the XMLA Provider to the latest version: 1. Stop your Web server.
Note: For details on stopping your Web server, see Running the Web Server and XMLA Service on page 7.
2. In the /webapps folder where you installed Simba XMLA Provider for Oracle OLAP 2.0, delete any of the following files or folders that exist:
M4OXmlaWebService.war
M4OXmlaWebService.war.deployed
M4OXmlaWebService
3. In the etc/mdxprovider folder, rename the folder /sxo to /sxo_old
4. If you are using JBoss, then follow the procedure in Using JBoss on page 2 to install the latest version of the XMLA Provider.
OR
If you are using Tomcat, then follow the procedure in Using Tomcat on page 3.
5. Update the DataSources.xml file in the etc/mdxprovider/sxo folder based on the settings in the DataSources.xml file in the etc/mdxprovider/sxo_old folder as needed using the procedure in Configuring the Data Source on page 4.
6. Delete the /sxo_old folder you created in step 3.
Important: If you install the /sxo folder in a location other than /etc/mdxprovider, then complete the procedure in Configuring XMLA Service Properties on page 5.
7. Start your Web server.
Configuration
To configure Simba XMLA Provider for Oracle OLAP 2.0, you need to set:
The data source
XMLA Service properties
Environment variables
Memory options
Configuring the Data Source
The DataSources.xml file specifies the data source name (DSN) that Simba XMLA Provider for Oracle OLAP 2.0 uses.
To edit the DataSources.xml file:
1. In a text editor, open the file /etc/mdxprovider/sxo/DataSources.xml
2. In the <DataSourceName> element, type a name for the data source. In the
<DataSourceDescription> element, type relevant details related to the data source. 3. In the <DataSourceInfo> element, provide the connection string for the data source
using the syntax <DataSourceInfo>Data Source=DataSourceName;User ID=UserID;Password=Password</DataSourceInfo> where:
o DataSourceName is the name of the DSN that you created in step 3 of the procedure to install the Oracle Instant Client on page 2.
o Password is the password corresponding with the UserID specified in the connection string.
For example:
<DataSourceInfo>Data Source=Simba_DSN;User ID=simbaxmla; Password=xmla123</DataSourceInfo>
Note: If the client application provides credentials for accessing the data source, then the credentials provided by the client are used. When using most client applications, specifying credentials in the connection string is not necessary.
4. In the <URL> element, type the URL to the XMLA Service virtual folder to indicate to JBoss how to access the service’s deployed files. For example, if your JBoss installation uses the default port and you bind JBoss to the default IP address 127.0.0.1:
<URL>http://localhost:8080/M4OXmlaWebService/</URL>
Note: See Running the Web Server and XMLA Service on page 7 for more information on binding your Web server to an IP address.
5. Save and close the DataSources.xml file.
Important: If you configure Simba XMLA Provider for Oracle OLAP 2.0 when the XMLA Service is running, then you must stop and start the service to apply changes. See Running the Web Server and XMLA Service on page 7 for further details.
Configuring XMLA Service Properties
If you do not install Simba XMLA Provider for Oracle OLAP 2.0 in the default location, then you must configure properties for the XMLA Service.
To configure XMLA Service properties:
1. In a text editor, open the file WebServiceInstallation /M4OXmlaWebService.war/WEB-INF/classes/com/customer/xmla.properties where WebServiceInstallation is the folder where you copied the M4OXmlaWebService.war archive in the procedure to install Simba XMLA Provider for Oracle OLAP 2.0 in the section Installation on page 2. 2. Set the DatasourcesURI property to the absolute path of the DataSources.xml file. For
example:
DatasourcesURI=/etc/mdxprovider/sxo/DataSources.xml
3. Set the DatasetSchemaURI property to the absolute path of the DatasetSchema.xml file. For example:
DatasetSchemaURI=/etc/mdxprovider/sxo/DatasetSchema.xml 4. Save and close the xlma.properties file.
Configuring Environment Variables
Important: For changes to environment variables to take effect, you must log out of the operating system, and then log in again.
The JAVA_HOME environment variable must specify the folder where the Java Development Kit is installed on the computer where you are installing Simba XMLA Provider for Oracle OLAP 2.0.
Note: For the remainder of the Simba XMLA Provider for Oracle OLAP 2.0 Linux Administration Guide, the name JAVA_HOME is used to refer to the full pathname of the directory where the JDK is installed.
To set the JAVA_HOME environment variable: 1. In a text editor, open the file /etc/profile.local
Note: If the file /etc/profile.local does not exist, then create the file. 2. In the profile.local file, add the following line:
export JAVA_HOME=”JDKRootFolder”
JDKRootFolder represents the path to the root folder of the Java Development Kit installation on the computer. For example, the path may be /usr/java/jdk1.7.0_17. Note: Do not set the value of the JAVA_HOME environment variable to the path of the /bin subfolder.
3. Save the updated profile.local file.
JBoss
If you are using JBoss, then set the JBOSS_HOME environment variable to specify the folder where the JBoss Application Server is installed.
To set the JBOSS_HOME environment variable: 1. In a text editor, open the file /etc/profile.local 2. In the profile.local file, add the following line:
export JBOSS_HOME=”JBossRootFolder”
JBossRootFolder represents the path to the root folder of the JBoss Application Server installation on the computer.
3. Save the updated profile.local file.
Tomcat
If you are using Tomcat, then set the CATALINA_HOME environment variable to specify the folder where Tomcat is installed.
To set the CATALINA_HOME environment variable: 1. In a text editor, open the file /etc/profile.local 2. In the profile.local file, add the following line:
TomcatRootFolder represents the path to the root folder of the Tomcat installation on the computer.
3. Save the updated profile.local file.
Configuring JVM Memory Usage
If you are using JBoss, then configure JVM memory use as needed following the procedure described in Setting Memory Usage for JBoss on page 7. If you are using Tomcat, then follow the procedure in Setting Memory Usage for Tomcat on page 7.
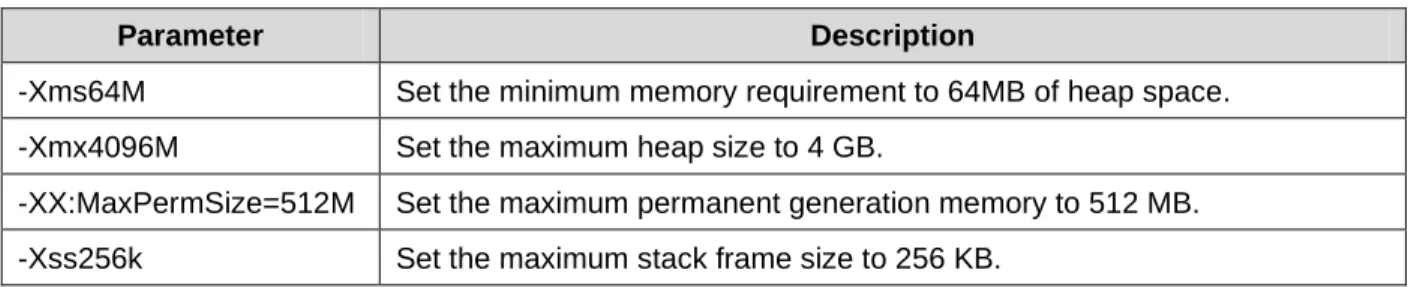
Table 1 lists parameters to set for allocating your Web server JVM memory.
Parameter Description
-Xms64M Set the minimum memory requirement to 64MB of heap space.
-Xmx4096M Set the maximum heap size to 4 GB.
-XX:MaxPermSize=512M Set the maximum permanent generation memory to 512 MB.
-Xss256k Set the maximum stack frame size to 256 KB.
Table 1 JVM Memory Allocation Parameters to Set
Setting Memory Usage for JBoss
To set JVM memory use for JBoss:
1. In a text editor, open the file JBOSS_HOME/bin/standalone.conf
2. As needed, update the line of code defining memory usage via the JAVA_OPTS variable. For example:
JAVA_OPTS="-Xms64M -Xmx4096M -XX:MaxPermSize=512M -Xss256k" 3. Save and close the standalone.conf file.
Setting Memory Usage for Tomcat
To set JVM memory use for Tomcat:1. In a text editor, open the file CATALINA_HOME/bin/startup.sh
2. As needed, add or update the line of code defining memory usage via the CATALINA_OPTS variable. For example:
export CATALINA_OPTS="Xms64M Xmx4096M XX:MaxPermSize=512M -Xss256k"
3. Save and close the startup.sh file.
Running the Web Server and XMLA Service
During testing, you can start and stop Simba XMLA Provider for Oracle OLAP 2.0 by starting and stopping your Web server using the command line. In a production system, administering
your Web server using the tools that the Web server provides allows you to administer Simba XMLA Provider for Oracle OLAP 2.0 without stopping the Web server.
Note: For more information about administering JBoss Application Server 7.1.1, see JBoss documentation at https://docs.jboss.org/author/display/AS71/Documentation. For details on administering Tomcat, see http://tomcat.apache.org/tomcat-7.0-doc/
Starting and Stopping JBoss
To start JBoss:
Execute the following command:
$JBOSS_HOME/bin/standalone.sh
Note: Running standalone.sh without any parameters binds JBoss to the localhost IP address 127.0.0.1. As a result, the XMLA Service is not accessible from remote computers. For testing purposes, you can start JBoss by typing standalone.sh –b 0.0.0.0 to bind to all IP addresses, making the XMLA Service accessible from all remote computers. Binding JBoss to all IP addresses is not recommended for production systems due to a lack of security. See JBoss documentation at
https://community.jboss.org/wiki/JBossRunParameters for full details on run script parameters.
Typically, JBoss starts within 30 seconds. To stop JBoss:
In the Terminal window where you started JBoss, press CTRL+C OR
Execute the following command:
$JBOSS_HOME/bin/jboss-cli.sh --connect --command=:shutdown
Starting and Stopping Tomcat
To start Tomcat:
Execute the following command as root user: $CATALINA_HOME/bin/startup.sh
Note: By default, Tomcat binds to all IP addresses. Binding Tomcat to all IP addresses is not recommended for production systems due to a lack of security. See
http://tomcat.apache.org/tomcat-7.0-doc/config/index.html for full details on Apache Tomcat server configuration.
To stop Tomcat:
Execute the following command as root user: $CATALINA_HOME/bin/shutdown.sh
Testing Your Installation
Test your installation to confirm that the Web server and Simba XMLA Provider for Oracle OLAP 2.0 Web service run.
To confirm that the Web server runs:
1. Start your Web server by following the appropriate procedure for your Web server in the section Running the Web Server and XMLA Service on page 7.
2. Open a Web browser.
3. In the Address field, type a URL including the IP address to which your Web server is bound, then type a colon (:), then type the port where the Web server is listening, and then press ENTER. For example, if your Web server uses the default port and you bound the Web server to the IP address 127.0.0.1, then type http://localhost:8080/ If you successfully installed your Web server, then the browser displays a page informing you that the Web server is running.
To confirm that the XMLA Service runs:
1. If your Web server is not running, then start your Web server.
2. In your Web browser, append the text M4OXmlaWebService/ to the URL that you typed in the procedure to confirm that the Web server is running, and then press ENTER. For example, if the Web server uses the default port and you bound the Web server to the IP address 127.0.0.1, then type http://localhost:8080/M4OXmlaWebService/
If the Web server successfully deployed the XMLA Service, then the browser displays the XMLA Service Start page listing Execute and Discover methods under the heading XmlaWebService.
Monitoring the XMLA Service
The JConsole monitoring tool provides information about the performance and resource consumption of applications running on the Java platform.
Monitoring Using JBoss
JBoss provides a version of JConsole that clients can use to monitor the XMLA Service. Important: To monitor the XMLA Service on JBoss, you must use the JConsole tool provided with JBoss. Therefore, each client monitoring the XMLA Service requires JBoss installed on the local computer. Do not use the JConsole tool provided with the JDK. Also, be sure to start JConsole by running jconsole.sh so that the correct class paths are constructed. For more information, see https://community.jboss.org/wiki/UsingJconsoleToConnectToJMXOnAS7 To use JConsole to monitor the XMLA Service on JBoss:
1. In a Terminal window, browse to the folder JBOSS_HOME/bin 2. Type sh jconsole.sh, and then press ENTER
3. In the JConsole: New Connection dialog, select the Remote Process radio button. In the field below the radio button, type a URL following the syntax service:jmx:remoting-jmx://HostName:PortNum where HostName is the IP address of the computer running JBoss and PortNum is the port where the JBoss Native management interface is
listening (9999 by default).
4. In the Username field, type the user name for logging into the JMX agent.
5. In the Password field, type the password corresponding to the user name you typed in step 4.
6. Click Connect
7. Close the JConsole: Output window, and then click the MBeans tab in the Java Monitoring & Management Console window.
8. In the left pane, expand the MDX Provider for Oracle XMLA branch, then expand the XMLA branch, and then expand the Attributes branch.
9. Select an attribute to view attribute details.
Monitoring Using Tomcat
Clients can use the JConsole tool provided with the JDK to monitor the XMLA Service on Tomcat.
Important: Each client monitoring the XMLA Service requires the JDK installed on the local computer.
To use JConsole to monitor the XMLA Service on Tomcat: 1. In a Terminal window, browse to the folder JAVA_HOME/bin 2. Type jconsole, and then press ENTER
3. In the JConsole: New Connection dialog, select the Remote Process radio button. In the field below the radio button, type a URL following the syntax HostName:PortNum
where HostName is the IP address of the computer running Tomcat and PortNum is the port number configured for monitoring.
4. In the Username field, type the user name for logging into the JMX agent.
5. In the Password field, type the password corresponding to the user name you typed in step 4.
6. Click Connect
7. In the Java Monitoring & Management Console window, click the MBeans tab.
8. In the left pane, expand the MDX Provider for Oracle XMLA branch, then expand the XMLA branch, and then expand the Attributes branch.
Attributes JConsole Monitors
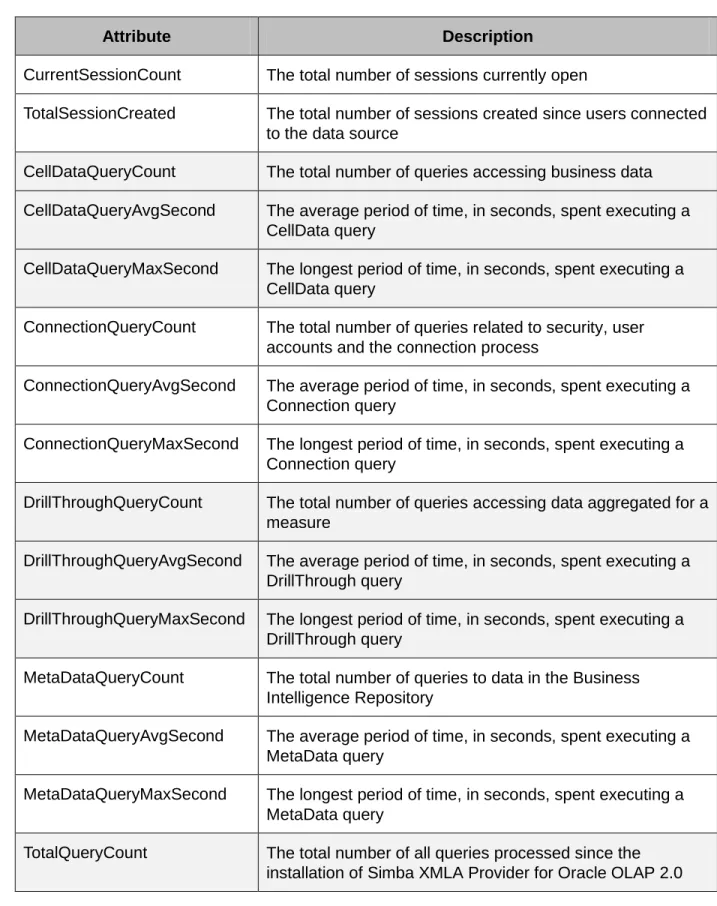
Table 2 lists and describes the attributes that JConsole monitors for Simba XMLA Provider for Oracle OLAP 2.0.
Attribute Description
CurrentSessionCount The total number of sessions currently open
TotalSessionCreated The total number of sessions created since users connected to the data source
CellDataQueryCount The total number of queries accessing business data CellDataQueryAvgSecond The average period of time, in seconds, spent executing a
CellData query
CellDataQueryMaxSecond The longest period of time, in seconds, spent executing a CellData query
ConnectionQueryCount The total number of queries related to security, user accounts and the connection process
ConnectionQueryAvgSecond The average period of time, in seconds, spent executing a Connection query
ConnectionQueryMaxSecond The longest period of time, in seconds, spent executing a Connection query
DrillThroughQueryCount The total number of queries accessing data aggregated for a measure
DrillThroughQueryAvgSecond The average period of time, in seconds, spent executing a DrillThrough query
DrillThroughQueryMaxSecond The longest period of time, in seconds, spent executing a DrillThrough query
MetaDataQueryCount The total number of queries to data in the Business Intelligence Repository
MetaDataQueryAvgSecond The average period of time, in seconds, spent executing a MetaData query
MetaDataQueryMaxSecond The longest period of time, in seconds, spent executing a MetaData query
TotalQueryCount The total number of all queries processed since the
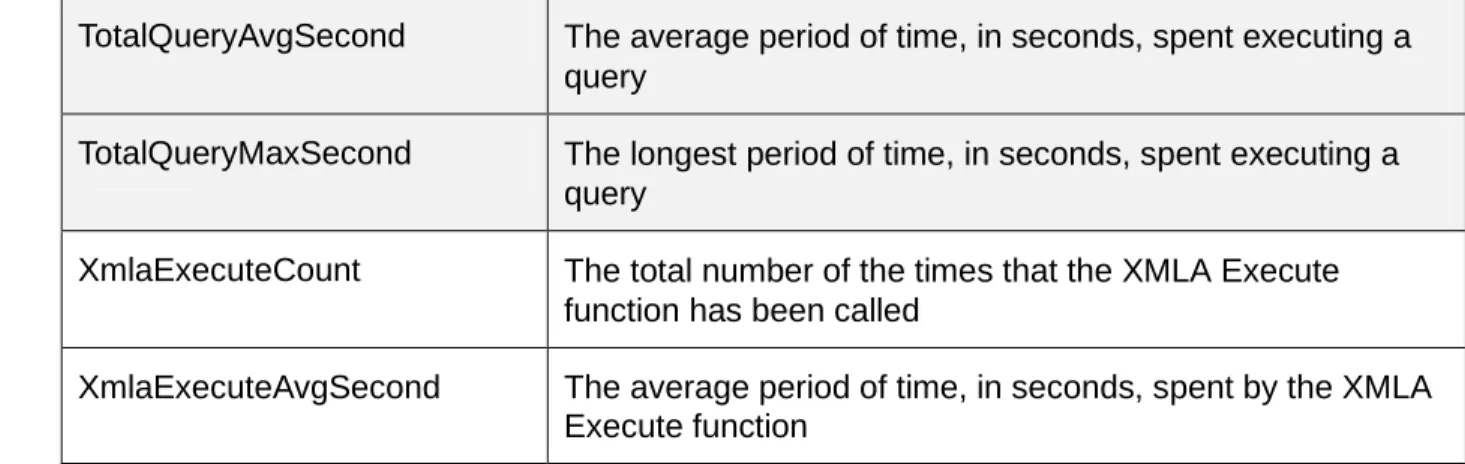
TotalQueryAvgSecond The average period of time, in seconds, spent executing a query
TotalQueryMaxSecond The longest period of time, in seconds, spent executing a query
XmlaExecuteCount The total number of the times that the XMLA Execute function has been called
XmlaExecuteAvgSecond The average period of time, in seconds, spent by the XMLA Execute function
Table 2 Simba XMLA Provider for Oracle OLAP 2.0 Attributes Monitored in JConsole
Uninstallation
To uninstall Simba XMLA Provider for Oracle OLAP 2.0:
7. If no Web services are running other than the XMLA Service, then you can stop your Web server. See Running the Web Server and XMLA Service on page 7 for details. 8. Remove the DSN that you created in the section Installing the ODBC Driver on page 1. 9. Delete the folder named /etc/mdxprovider
10. If you are using JBoss, then delete the M4OXmlaWebService.war archive and the M4OXmlaWebService.war.deployed file from the folder
JBOSS_HOME/standalone/deployments/webapps OR
If you are using Tomcat, then delete the M4OXmlaWebService.war archive from the folder CATALINA_HOME/webapps
Appendix: Troubleshooting
To resolve issues during the installation of Simba XMLA Provider for Oracle OLAP 2.0, refer to the troubleshooting guidelines below.
Creating log files as described in Using Logging to Troubleshoot MDX and SQL Issues on page 13 can help Technical Support assist in resolving issues. For technical support, contact the organization from which you purchased the XMLA Provider.
Web Server Does Not Start
Confirm that the JAVA_HOME, and JBOSS_HOME or CATALINA_HOME environment variables are set to the correct installation locations as described in the section Configuring Environment Variables on page 5.
Browsing to the XMLA Service Start Page Displays an Error
If attempting to open the XMLA Service Start page in your Web browser displays an error page, then troubleshoot as follows:
1. In your Web browser Address field, confirm that the URL to access the XMLA Service Start page ends with a slash mark (/).
2. The ZIP archive that contains Simba XMLA Provider for Oracle OLAP 2.0 is named M4OXmlaWebService_Version_linux.zip where Version is the version number of the XMLA Provider. The ZIP archive, as well as files and folders included in the archive, are named beginning with MDX Provider for Oracle (M4O). The third letter is the letter O— not the number zero (0). Ensure that you typed the correct letter throughout the installation process.
3. Confirm that all software listed in the section Software Requirements on page 1 is installed on the computer where you want to install Simba XMLA Provider for Oracle OLAP 2.0.
4. Confirm that the DatasetSchema.xml and DataSources.xml files are available in the location specified in the xmla.properties file. See Installation on page 2 and Configuring XMLA Service Properties on page 5 for more details.
5. Confirm that the ODBC DSN that you configured in the DataSources.xml file exists. See
Installing the ODBC Driver on page 1 and Configuring the Data Source on page 4 for more details.
6. Confirm that your Web server is bound to the appropriate IP address so that remote hosts can access the server. See Running the Web Server and XMLA Service on page 7 for more details.
Using Logging to Troubleshoot MDX and SQL Issues
When connecting to or analyzing an external OLAP source, error messages might not contain enough information to troubleshoot problems. To help troubleshoot issues, it may be necessary
to turn on logging in the Provider. Once logging is enabled, repeat the steps that are causing the error.
Important: Only turn on logging long enough to capture a problem. Logging slows down the Provider and can consume a large quantity of disk space.
Turning On Logging
To turn on logging:1. Ensure that the client program that you are troubleshooting is not running. For example, the client may be Microsoft Excel®.
2. Ensure that the XMLA Provider is not running.
3. In a text editor, open the configuration file named /etc/mdxprovider/sxo/tracesettings.conf 4. Edit the line LogEx.Enabled=false to LogEx.Enabled=true
5. Save the file.
6. Restart the XMLA Provider. 7. Restart the client program.
The log files are saved using names like OracleMdxProvider.<timestamp>.log and are automatically split into 5MB files, so there may be a number of consecutive log files.
Note: The configuration file sets the path where the log files are saved. The default path is /etc/mdxprovider/sxo/logs. To change the path, edit the line in the configuration file starting LogEx.LogWriter.LogFile.Path=
Turning Off Logging
To turn off logging:1. Ensure that the client program that you are troubleshooting is not running. 2. Ensure that the XMLA Provider is not running.
3. In a text editor, open the configuration file named /etc/mdxprovider/sxo/tracesettings.conf 4. Edit the line LogEx.Enabled=true to LogEx.Enabled=false
5. Save the file.
6. Restart the XMLA Provider. 7. Restart the client program.