P
ayPal offers many different tools to meet your business needs. You already know that PayPal is the world’s favorite online payment service, with over 25 million members worldwide, but you may not know just how many features your PayPal account contains. This manual will serve as an introduction to the different tools PayPal offers to help keep your payment processing running smoothly. It is divided into 3 main sections, to help you find the information you need:1 Getting Started (Page 4) - Find out how to set up your PayPal Business account and prepare to begin receiving payments - all in five easy steps! 2 Using Your PayPal Merchant Account (Page 7) - Learn about PayPal’s main
Merchant Tools, and find easy ways to maximize the value you receive from your PayPal account.
3 Additional PayPal Services (Page 17) - Discover PayPal’s tools for merchants with several employees, doing business internationally, selling on auctions, and more.
The PayPal website provides additional information not covered in this manual. Just go to https://www.paypal.com/ and click on the Merchant Tools tab for detailed information on the features covered in this manual, or click on the Help Center link in the upper right-hand corner of the page to search for more frequently asked questions and additional information.
Insert Text
Getting Started
You can start accepting payments
with PayPal in 5 easy steps:
1. Sign Up
Go to https://www.paypal.com/ and click on the “Sign Up” link in the upper right-hand corner of the page. Click on the “Business” link to sign up for a Business account. Make sure to write down the email address you use and the password you choose; in the future, you will use them to login to your PayPal account. After completing the 2-page sign-up, PayPal will send you an email to confirm your email address.
2. Confirm Email Address
Open your email and click on the link in the email we sent you. You will be taken to a PayPal page and asked to enter your password.
Once you have successfully entered your password, your email address will be confirmed.3. Add Credit Card
Log in to your PayPal account and click on the “Profile” subtab of the “My Account” tab. Click on the “Credit Cards” link in the “Financial Information” column. On the Credit Cards page, click the “Add” button. The credit card, you added will become your Primary credit card, meaning it is the default credit card used on your PayPal account. If you decide to add additional credit cards to your PayPal account, you can change any of them to be your Primary card. In addition, the credit card billing address you entered when you added your credit card is now a Confirmed Address. Many sellers require that buyers use their Confirmed Address as their shipping address when they pay with PayPal.
Business Account Sign Up.
Confirmed Addresses: At this time, only U.S. members can have Confirmed Addresses. PayPal hopes to offer non-U.S. buyers the ability to
Email Address Confirmation.
Insert Text
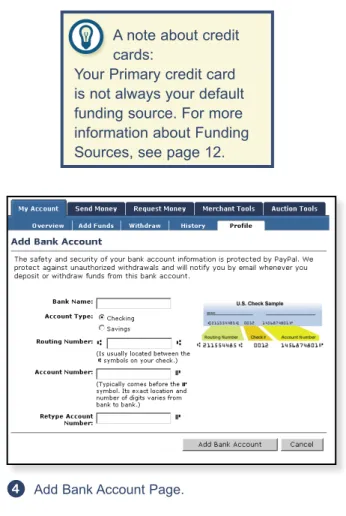
you can qualify for protection under PayPal’s Seller Protection Policy. For more information, see page 16.4. Add Bank Account
While you can now use your PayPal account to accept payments, your only method of withdrawing funds is by check, which can take 1-2 weeks and costs $1.50 per withdrawal. By adding a bank account, you will be able to withdraw funds to your bank account in 3-4 business days via electronic funds transfer, which will make you a Verified member of PayPal.
Before you add your bank account, you will need a check or deposit slip for that bank account. Log in to your PayPal account and click on the “Profile” subtab of the “My Account” tab. Click on the “Bank Accounts” link in the “Financial Information” column. On the Bank Accounts page, click the “Add” button. Once you have added your bank account it will become your Primary bank account. If you decide to add additional bank accounts to your PayPal account, you can change any of them to be your Primary account. When you add your bank account, PayPal will send two small deposits, each of less than $1.00, to your bank account. Check your bank statement in 3-4 business days for the amounts of the two deposits. After getting the deposit amounts, log in to your PayPal account and click on the “Confirm Bank Account” link in the “Activate Account” box on your Account Overview. Enter the amounts of each of the deposits on the page and your bank account will be confirmed and you will become Verified.
Add Bank Account Page.
A note about credit cards:
Your Primary credit card is not always your default funding source. For more information about Funding Sources, see page 12.
Verification
PayPal buyers are clear: they prefer doing business with Verified sellers (i.e. sellers who have a confirmed bank account). Why? Because it means that the seller has passed a bank’s verification checks. Everyone’s heard horror stories about doing business online; Verification just lets your buyer know that there’s a legitimate seller on the other side of the computer screen…and that builds trust and sales.
Insert Text
5. Start Receiving Payments
Now that you’ve set up everything in your PayPal account, you’re ready to start receiving payments. Just add a PayPal Website Payments button to your website or use the PayPal logo in your auction listings. Your customers can just click on the button or logo to send you payment.
More Information: To learn more about the PayPal Website Payments, go to page 8.
To learn more about PayPal Auction Logos, go to page 21.
Start collecting payments with PayPal Website Payments buttons on your website
Using Your PayPal
Merchant Account
Account Profile
You can use your Profile to manage all of the information in your PayPal account. To go to your Profile, log in to your PayPal account and click on the “Profile” subtab of the “My Account” tab.
Your Profile is organized in three columns for managing your account information:
Account Information Column
Use the Account Information column to perform basic account maintenance, including updating your password, adding and confirming email addresses, and managing your Business information.
Financial Information Column
Use the Financial Information column to organize and maintain all of the financial instruments associated with your PayPal account, including adding credit cards and bank accounts, activating and managing your PayPal Debit Card, maintaining your Multiple Currency Balances, and viewing your Monthly Account Statements.
Selling Preferences Column
Use the Selling Preferences column to organize the way you sell with your PayPal account, including editing your Payment Receiving Preferences, maintaining your Reputation, and managing your different auction accounts.
Profile Summary Page
More Information: To learn more about the PayPal Debit Card, go to page 18.
To learn more about Currency Balances & Multiple Currencies, go to page 19.
Website Payments
Turn page views into dollars with PayPal Website Payments. PayPal provides a variety of tools to help you grow your business: Buy Now Buttons, PayPal Shopping Cart, Subscriptions and Recurring Payments, and Donations.
Buy Now Buttons
Make it even easier for your customers to pay: add a PayPal payment button anywhere you use HTML. With Buy Now Buttons, you can create customized payment buttons to sell individual items on your website. Your buyers will be able to make their purchases quickly and securely on PayPal-hosted payment pages.
Here’s how it works:
1. Click on the Buy Now Buttons link on the Merchant Tools tab to create a payment button for your website.
2. Enter the optional item details, then select a button or use your own image to customize the look of your button.
3. Click Add More Options if you want to enterinformation about shipping, sales tax, your logo, and the page users are sent to after payment. Or, you can let your buyer fill in the appropriate fields during purchase.
4. PayPal will generate HTML code which includes all details of your payment. Follow the on-screen instructions to paste this HTML code onto your website or into your email.
5. You can insert pay buttons right on your product pages.
6. Customers clicking on your Buy Now Button will be taken to a secure PayPal page to complete the payment.
Place the button on your website
Create your payment button in the Buy Now Button Factory
PayPal Shopping Cart
The PayPal Shopping Cart provides an easy way for you to create an online store. Customers are able to add multiple items to the PayPal Shopping Cart, continue shopping, and check out through PayPal.
Here’s how it works:
1. Click on the PayPal Shopping Cart link on the Merchant Tools tab to create buttons for your website.
2. For each item you are selling, enter the item’s details and choose which button your customers will click to add the item to their shopping carts. You can even use your own button.
3. Click Add More Options to customize your pages. You can maintain the look of your store on PayPal’s payment pages by changing the background color, including your logo, or specifying the URL of a success page that PayPal can return your customers to when after they have completed their payments.
4. PayPal uses the information you enter for this item to create HTML codes for your “Add to Cart” and “View Cart” buttons. Follow the on-screen instructions to paste these codes where you want the buttons to appear on your website.
5. As your customers shop, they can additems to the shopping cart by clicking on the Add to Cart buttons on your website. 6. When buyers check out and pay with
PayPal, the payment will be sent directly to your PayPal account. You will receive a payment confirmation via email, and a record of the transaction will appear in your Account History. Just ship the items and you’re done!
Create your Add to Cart button in the Shopping Cart Button Factory
Copy both the Add to Cart and the View Cart codes to place on your website
Subscriptions and Recurring
Payments
PayPal Subscriptions and Recurring Payments lets you accept recurring payments for
your service. Your subscribers will be able to subscribe quickly and securely from PayPal-hosted payment pages, where they can make initial payments (if necessary) and set up any future payments for the subscription.
Here’s how it works:
1. Click on the Subscriptions and Recurring Payments link on the Merchant Tools tab to specify your subscription terms. Recurring periods can be as little as 1 day or as long as 5 years. An optional initial trial period can also be set up that is different from the recurring period.
2. You can place Subscribe buttons right onyour website pages or emails.
3. When your customers click on theSubscribe button, they are taken to a secure PayPal payment page. After the payment is sent, your customers will see a Confirmation page with an “Access Subscription” link that returns them to your website.
4. When your subscribers return to your website, you can tell them how to access their new subscription.
Donations
PayPal Donations makes it easy for you to collect secure donations from your website. After inserting simple HTML code, you can collect your donations via secure PayPal payment pages.
Use the Subscriptions and Recurring Payments Button Factory to create your Subscribe button.
Place the Subscribe button on your website to start collecting payments immediately!
More Information: Learn more about PayPal Website Payments by reading our manuals. To get started, just go to:
Receiving Payments
Now that you’ve set up your PayPal account, you’re ready to start receiving payments. But first, you should know the following.
Payment Receiving Preferences
Your Payment Receiving Preferences let you manage the types of payments you receive. To edit your Payment Receiving Preferences, log in to your PayPal account and click on the “Profile” subtab of the “My Account” tab. Click on the “Payment Receiving Preferences” link in the “Selling Preferences” column.While you are on the Payment Receiving Preferences page, you can update your Credit Card Statement Name, which is the name that will be displayed on your customers’ credit card statements when they use PayPal to pay you with your credit card. The name will appear as PAYPAL *YOURNAMEHERE and can be up to 11 alphanumeric characters. By making sure your Credit Card Statement Name is meaningful to your buyers, you can lower the risk of your buyers filing chargebacks against you. For more information on chargebacks, see page 16.
Reputation and Verification
You can see your Status on your Account Overview page. The number in parentheses next to your Verification status is your Seller Reputation Number. This shows the number of unique Verified buyers who have paid you. New transactions are added after 30 days, and only transactions of more than $5 will count towards your Seller Reputation Number. When a buyer confirms the details of a payment he is making, your Verification Status and Seller Reputation Numbers are shown. By clicking on them, the buyer will see your Member Reputation Box,
which provides the buyer with additional information about your PayPal account. When buyers are deciding to complete a transaction, buyers often use the information in your Member Reputation Box to decide whether or not they want to continue with the transaction.
Payment Receiving Preferences
In addition, your Seller Reputation Number will be displayed by your Shop Name if you decide to list your website in PayPal Shops. For more information, click on the “Shops” link in the footer of any PayPal page. If you would like to, you can cap your Seller Reputation Number at 1000. To do this, log in to your PayPal account and click on the “Profile” subtab of the “My Account” tab. Click on the “Reputation” link in the “Selling Preferences” column to cap your number.
Buyer Funding Sources
In addition to using their PayPal balance, your buyers can fund their payments with Instant Trasfer
, eCheck , or a credit card .Shipping and Sales Tax
You can also use your Profile to automatically manage the amount of shipping and sales tax you charge your customers. You can enter a different tax rate for each of the 50 states. In addition, you can charge Shipping costs as a fixed rate based on the amount of the total purchase or as a percentage of the purchase price. Please keep in mind that currently these settings only work with payments sent by U.S. Buyers via the PayPal Shopping Cart, Buy Now Buttons, or PayPal Donations.
Limits
Every new PayPal account has a Sending Limit, which is the total amount of money you can send using PayPal before becoming Verified. The Sending Limit for most U.S. accounts is $2,000. If one of your buyers will exceed his Sending Limit by making a payment, he will be required to become Verified (by adding and confirming a bank account) before completing the payment. Sending Limits and the methods of raising those limits vary for non-U.S. accounts.
In addition, each new PayPal account is limited to withdrawing $500 per month until they have completed two of our three authentication steps
Instant Transfer Funding Source
With Instant Transfer, PayPal debits the payment from the buyer’s bank account, and the recipient will receive the funds instantly. If the bank transfer fails, the back-up funding source (usually the buyer’s Primary credit card) will be charged to complete the payment.
What is Instant Transfer?
eCheck Funding Source
the buyer’s bank account, but no back-up funding source is used. Therefore, eCheck payments may take 3-4 business days to clear, and will not be credited to the recipient’s PayPal balance until the bank transfer has succeeded. Because eCheck payments can be cancelled if the bank transfer fails, you should never ship an item until you have received notification that the payment has cleared. This usually takes 3-4 business days.
What is an eCheck?
Credit Card Funding Source
a traditional credit card processing service. If your buyers pay with a credit card and then file a chargeback, you may be responsible for the charges. For more information about chargebacks, see page 16.
To view or remove your PayPal Limits, log in to your PayPal account and click on the “View Limits” link next to the balance box on your Account Overview.
Refunds
You can easily refund payments you receive, including all transaction fees, within 30 days of the payment. To refund a payment, log in to your account and click on the “History” subtab of the “My Account” tab. Find the payment in your transaction history and click on the “Details” link to go to the Transaction Details page. To refund the payment, go to the bottom of the page and click on the “Refund Payment” link.
If you decide to refund a payment more than 30 days after it was sent, you will need to use the Send Money tab to send the refund. In this case, your transaction fees will not be refunded. Refunds and
the Money Back Guarantee:
If your buyer purchased a Money Back Guarantee with a payment you refunded, that fee will not be refunded.
History
To view your history transaction log, which includes every PayPal transaction since you opened your PayPal account, log in to your PayPal account and click on the “History” subtab of the “My Account” tab.
Basic Search
You can use the Basic Search to view sub-sections of your transaction history - such as payments received or Money Requests sent - using the “Show” drop-down menu and the “Within” and “From” radio buttons.
Advanced Search
You can use the Advanced Search to view your transaction history by Transaction ID, auction number, or your buyer’s email address or last name. To use Advanced Search, click the “Advanced Search” link from the History subtab.
Transaction Details
You can view the Transaction Details, which include in-depth information such as shipping address and related transactions, for any entry in your transaction history by clicking on the “Details” link for that entry.
When you go to the Transaction Details page, you can also complete actions related to that transaction, including providing a refund, accepting or denying the payment, and creating a packing slip for the item purchased.Monthly Account Statements
You can view and print summaries of the latest three months of your transaction history by choosing a month from the drop-down menu on the History page. The Monthly Account Statement gives you a daily summary of transaction activiites, such as Payments Received and Fees Charged, for each currency your account holds.
Basic Search
Advanced Search
Merchant Sales Reports
With PayPal’s Merchant Sales Reports, you can analyze your revenue sources to better understand your customers’ buying behavior. Every week, you’ll receive a valuable analysis of your sales by channel and currency. Merchant Sales Reports cover the most recent week, from Saturday through Friday.
Only one week’s information is available at a time, but you can download your Merchant Sales Reports to view them later.
To start using PayPal’s Merchant Sales Reports, log in to your PayPal account and click on the “Merchant Sales Report” link under the Merchant Tools tab.
Downloadable Log
To download your transaction history log, go to the “History” subtab and click the “Download My History” link to go to the Download History page. In additions to choosing which transactions to include in your download, you can also choose the file format (comma-delimited, Quicken, or QuickBooks) and customize your download.
Once you’ve downloaded your history, you can use the information to gather customer email addresses (for a targeted mailing list), track seasonal business trends, or just reconcile your business accounts.
Seller Protection
Chargebacks and the Seller
Protection Policy
A chargeback occurs when your buyer contests a charge through his credit card company and the credit card company reverses the charge. Unfortunately, this often leaves the seller responsible for 100% of the transaction liability. When you use PayPal to receive payments, you can protect yourself against chargebacks by following the guidelines of the Seller Protection Policy (SPP).
When you follow these guidelines, PayPal will protect you from chargebacks. While we know that sometimes it isn’t possible to follow all of the above guidelines, you can mitigate your risk by following most of them. If you decide to ship internationally, you should still retain proof-of-shipment, ship promptly, and only accept a single payment from a single PayPal account.
Seller Protection Policy guidelines
Get chargeback coverage from the Seller Protection Poicy by following these guidelines:
1. Have a Verified U.S. or Canadian Premier or Business PayPal account 2. Ship to the buyer’s Confirmed
Address
3. Ship within 7 days of the payment
4. Retain reasonable proof-of-shipment that can be tracked online
5. Ship tangible goods
6. Only accept a single payment from a single PayPal account
7. Respond to PayPal’s investigation of the transaction in a timely manner Qualifying for the Seller Protection Policy
Learn More:
For additional information on the Seller Protection Policy and mitigating your risk, visit PayPal’s Security Center by going to the “Security Center” link in the footer of any PayPal page.
Additional PayPal
Services
Multi-User Access
PayPal’s Multi-User Access feature allows you to set up multiple logins and access levels, so your employees only have access to the parts of your Paypal account that they need to complete their jobs, letting you so you run your business smoothly and securely.
To get started with Multi-User Access:
1. Log in to your PayPal Business account. 2. Go to your Profile and click the Multi-User
Access link.
3. Specify your Administrative Contact email address, which is the email address that will receive notifications about your account activity.
4. Add up to 200 separate logins to your account. For every login, select a User ID and password, and specify what account privileges the user has permission to access (e.g. Refunds, Send and Request Money).
You may want to establish a separate login for each employee who accesses your PayPal account, and grant each user the minimum access necessary. If an employee forgets or loses a password, you can always log in and reset it. 5. You can create additional logins, edit an
existing user’s privileges, or delete a login at anytime from your Profile.
Adding a Multi-User Access login Multi-User Access Overview
Insert Text
PayPal Debit Card
The PayPal MasterCard ATM/Debit Card offers you instant access to the money in your PayPal account. Withdraw cash at an ATM or use it anywhere MasterCard is accepted.
The PayPal Debit Card is open to members who meet the following criteria:
1. Have been a PayPal member for at least 60 days.
2. Have a U.S. PayPal account.
3. Have registered a credit card where the monthly statement is sent to a physical street address (not a P.O. Box).
4. Are Verified (have added and confirmed a bank account).
5. Have upgraded to a Premier or Business account.
6. Are an active PayPal member in good standing.
To learn more, or request your PayPal Debit Card, log in to your account and click on the “ATM/Debit Card” link in the Enhance Account box of your Account Overview.
Insert Text
- Anguilla - Argentina - Australia - Austria - Belgium - Brazil - Canada - Chile - China- Costa Rica - Denmark
- Dominican Republic - Finland
- France - Germany - Greece - Hong Kong - Iceland - India - Ireland - Israel - Italy - Jamaica - Japan - Luxembourg - Mexico - Netherlands - New Zealand - Norway - Portugal - Singapore - South Korea - Spain - Sweden - Switzerland - Taiwan
- United Kingdom - United States
PayPal is available in the following countries:
Selling Internationally
It’s easy to sell internationally with PayPal. With over 25 million users in 38 countries, PayPal can help you reach buyers from almost anywhere in the world, so you can continue to grow your business globally.
You can always withdraw funds in your PayPal account to a U.S. bank account, and PayPal also accepts withdrawals to local bank accounts in 24 countries. In addition, PayPal’s Multiple Currencies feature lets you accept payments in a variety of currencies, helping you to do business internationally.
Multiple Currencies
You can use your current PayPal account to accept payments in U.S. Dollars, Canadian Dollars, Euros, Pounds Sterling, and Yen.
Here’s how it works:
1. When you receive a payment in a currency in which you do not already hold a balance, PayPal will prompt you to open a balance for that currency, convert it to your primary balance, or deny the payment.
Payments in currencies for which you hold a balance will automatically be applied to the correct balance.
2. You will see a summary of each currency balance in your My Account Overview page.
3. You can manage your currency balances in your account Profile. This includes opening and closing balances, as well as transferring between balances.
4. Transferring funds between different currency balances is easy and instant. A foreign exchange calculator is provided to help you determine the exact amount prior to completing the transfer.
- Accept payments directly in your selected currency
- Enjoy no currency exchange costs when you withdraw funds to your local bank account
- Manage multiple currency payments using your existing PayPal account
- Hold one currency balance and still accept payments in multiple currencies
Insert Text
Your buyers may be offerred the Money Back Guarantee when they send you money.
5. You can auto-convert payments to your primary currency via a Payment Receiving Preference in your account Profile. This is useful if you wish to display prices in different currencies, but only do business in a single currency.
PayPal Money Back Guarantee
PayPal now offers buyers the opportunity to purchase a guarantee on eligible tangible goods transactions of less than $1000. This guarantee is a contract between PayPal and the buyer, and allows your buyer to return the merchandise to PayPal if they are dissatisfied, at no additional cost or liability to you. This does not replace any optional insurance you may already offer your buyers. If you would like to, you can opt out of offering the Money Back Guarantee to your buyers. To do this, log in to your PayPal account and click on the “Profile” subtab of the “My Account” tab. Click on the “Guarantee Preferences” link in the “Selling Preferences” column to opt out.Insert Text
Selling on an Auction
PayPal offers a full-suite of auction tools to assist you in managing your auctions and eBay listings. You’ll be able to stay on top of your items, from sales to invoicing to payment collection. You can view all of PayPal’s auction products from the Auction Tools tab, located at the top of every PayPal page.
Logo Insertion
Make payments even easier for your buyers: add a PayPal payment logo to your listings, so your buyers can pay you directly from your items.
To add a PayPal logo to all your new listings:
1. Log in to your PayPal account.
2. Click on the Automatic Logos link on the Auction Tools tab.
3. Enter your eBay User ID and password, and PayPal will automatically add a Smart Logo to your new listings every day.
You can also add a PayPal logo to your listings manually. Simply log in to your PayPal account and click the Manual Logos link on the Auction Tools tab.
Winning Buyer Notification (WBN)
Sign up for PayPal’s free Winning Buyer Notification (WBN) service and we will
automatically notify your winning buyers within one hour of your eBay item’s closing. You’ll get your money faster when you invoice your buyers instantly.
Smart.Logo after auction ends - a PayPal Pay Now button
Smart Logo before auction ends - a PayPal Referral Logo
When you use a Smart Logo on your eBay listings, the logo changes depending on the state of your listing. It begins as a standard
referral logo,
then becomes a Pay Now button as soon as your listing has ended, so your buyer can pay you instantly.Insert Text
WBN emails include all of the information your winning buyers will need, including a link back to the item listing and a PayPal payment button. Each email includes:
- A link to a secure PayPal payment page with the item details already filled in
- Your instructions on shipping, handling, and payment
- A customized message from you - Your logo and email address
To get started with WBN:
1. Log in to your PayPal account
2. Click the Winning Buyer Notification link on the Auction Tools tab.
3. Enter your eBay User ID and password. You can also customize the email notification your buyers will receive.
Post-Sale Manager
PayPal’s Post-Sale Manager is your one-stop resource for managing all of your end-of-sale activities for items sold on eBay. With Post-Sale Manager, you can manage payments, invoices, shipments, and feedback from one easy location, so it’s easy to keep track of your eBay listings.
To start using Post-Sale Manager:
1. Log in to your PayPal account
2. Click the Post-Sale Manager link on the Auction Tools tab
3. Enter your eBay User ID and password The next time you log in, click the Post-Sale Manager link on the Auction Tools tab to view and manage your eBay items sold in the past 30 days.
Learn More: You can explore all of PayPal’s Auction Tools by logging into your PayPal account and clicking on the “Auction Tools” tab
Insert Text
Instant Payment Notification (IPN)
PayPal’s Instant Payment Notification (IPN) service notifies you immediately whenever you receive a payment. You can use IPN to integrate PayPal payments with your website’s back-end operations, helping you save time, keep your inventory updated, and automate fulfillment.
To get started with IPN:
1. Log in to your PayPal account.
2. Click on the Instant Payment Notification link on the Merchant Tools tab.
3. You’ll be taken to the IPN Center where youcan view a demo, read the manual, and sign up for IPN.
IPN works with all of PayPal’s Website
Payments solutions (Buy Now Buttons, PayPal Shopping Cart, Subscriptions and Recurring Payments, and Donations), as well as with regular PayPal “Send Money” payments.
Note: Using IPN requires custom programming by your web development team to interface with a back-end database. Alternately, some third party vendors offer products to help you manage your PayPal payments.
To learn more, go to the PayPal Developer Network (PDN) by clicking on the
“Developers” link in the footer of any PayPal page.
- Customize your website’s response to customer purchases in real-time
- Track customers through the notification’s “pass through” variables
- Automate your fulfillment operations - Store transaction information in your own database
Insert Text
Mass Pay
Replace checks with instant email payments! PayPal lets you avoid the slow, tedious process of writing and disbursing checks to large numbers of people. And Mass Pay is inexpensive: a fee of just 2% of the payment amount, up to a $1 cap, will be added to each payment.
How it works:
1. All you need is the recipient’s email address and the payment amount. Create a simple tab-delimited text file that lists the email address in the first column and the payment amount in the second column. An optional third column allows you to list a unique identifier for each recipient for tracking and reconciliation purposes.
2. Click on the “Mass Pay” link in the footer and then click on “Make a Mass Payment” on the Overview page. You will be prompted to upload your Mass Payment file and customize the email notification that is sent to your recipients. Click “Continue” to confirm your
payment, and then click “Send Money” to complete your transaction.
3. Your recipients can claim their money by clicking on a link within their payment email notification.
Note: There must be sufficient funds in your account to cover the Mass Payments and applicable fees. You cannot use a credit card for this service.
- Affiliate commissions - Customer rebates - Employee benefits - Lottery prizes - Survey incentives Use PayPal Mass Pay for: