L
L
e
e
s
s
s
s
o
o
n
n
2
2
Managing Windows
Server 2008 R2
Objective Domain Matrix
Skills/Concepts
Objective Domain
Description
Objective
Domain
Number
Managing Devices and Device Drivers
Understand device drivers.
1.1
Managing Services
Understand services.
1.2
Using the Control Panel
Understand remote access.
2.3
Key Terms
Administrative Tools
Computer Management console Control Panel
device drivers device manager domain
Initial Configuration Tasks
Microsoft Management Console (MMC) Plug and Play (PnP)
registry
Remote Assistance Remote Desktop
Server Management console secure desktop
services signed driver workgroup
You just installed several computers for the Acme Corporation. Now, you have to get
each server connected to the network and add each computer to the domain. You then
need to install the network services that each server is going to host.
Performing Initial Configuration Tasks
THE BOTTOM LINE
Because configuring Windows servers can be time consuming, Windows Server 2008 and Windows Server 2008 R2 include Initial Configuration Tasks that automatically launch when you first log on to Windows after an installation. With the Initial Configuration Tasks, you can activate Windows, set the time zone, configure networks, provide computer name and domain, update Windows, add roles and features, enable remote desktop, and configure the Windows Firewall.
Although Initial Configuration Tasks can be accessed within the Control Panel, because it launches automatically it acts as a reminder and a quick method to access key options so that you can quickly get your Windows server up and running with minimal effort. See Figure 2-1. The Initial Configuration Tasks will appear every time you log on until you select the Do not show this window at logon at the bottom of the window.
Figure 2-1
Initial Configuration Tasks
Using the Control Panel
THE BOTTOM LINE
As with previous versions of Windows, the main graphical utility to configure the Windows environment and hardware devices is the Control Panel.
You can also display the Control Panel in any Windows Explorer view by clicking the leftmost option button in the Address bar and selecting Control Panel.
To access the Control Panel, you can click the Start button on the taskbar and select Control Panel. See Figure 2-2. Of the 8 categories that are listed, each
frequently performed tasks for the category. Clicking a category link provides a list of utilities in that category. Each utility listed within a category includes a link to open the utility, and under this link are several of the most frequently performed tasks for the utility.
Figure 2-2
Windows Server 2008 R2 Control Panel in Category View
As with current and previous versions of Windows, you can change from the default category view to classic view (large icon view or small icon view). Icon view is an alternative view that provides the look and functionality of Control Panel in Windows 2000 and earlier versions of Windows where all options are displayed as applets or icons (see Figure 2-3).
Figure 2-3
Understanding User Account Control
User Account Control (UAC) is a feature that started with Windows Vista and is included with Windows Server 2008 that helps prevent unauthorized changes to your computer. If you are logged in as an
administrator, UAC asks you for permission, and if you are logged in as a standard user, UAC asks you for an administrator password before performing actions that can potentially affect your computer’s operation or that change settings that affect other users. Because the UAC is designed to make sure that unauthorized changes are not made, especially by malicious software that you may not know you are running, you need to read the warnings carefully, and then make sure the name of the action or program that’s about to start is one that you intended to start.
As a standard user, in Windows Server 2008 R2, you can do the following without requiring administrative permissions or rights:
•
Install updates from Windows Update.•
Install drivers from Windows Update or those that are included with the operating system.•
View Windows settings.•
Pair Bluetooth devices with the computer.•
Reset the network adapter and perform other network diagnostic and repair tasks.When an application requests elevation or is run as administrator UAC will prompt for confirmation and, if consent is given, allow access as an administrator.
UAC cannot be enabled or disabled for any individual user account. Instead, you enable or disable UAC for the entire computer. If you disable UAC for user accounts, you lose the additional security protections UAC offers and put the computer at risk. However, if you perform a lot of administrative tasks on a computer, the UAC prompts can be annoying and can stop you from performing certain actions including saving to the root directory of a drive.
Enable or Disable UAC
GET READY. To enable or disable UAC for a particular user account,
follow these steps:
1. In Control Panel, click User Accounts.
2. On the User Accounts page, click User Accounts.
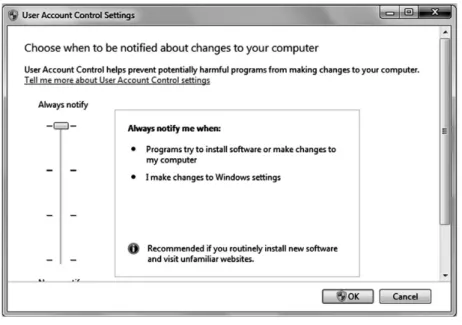
3. Click the Change User Account Control settings. See Figure 2-4.
4. Then slide the slider to the appropriate option level as shown in
Table 2-1.
5. When prompted to restart the computer, click Restart Now or Restart
Later as appropriate for the changes to take effect.
Figure 2-4
UAC Settings
Table 2-1
UAC Settings
Setting Description Security Impact
Always notify You will be notified before programs make changes to your computer or to Windows settings that require the permission of an administrator.
When you're notified, your desktop will be dimmed, and you must either approve or deny the request in the UAC dialog box before you can do anything else on your computer.
The dimming of your desktop is referred to as the secure desktop because other programs can't run while it's dimmed.
This is the most secure setting.
When you are notified, you should carefully read the contents of each dialog box before allowing changes to be made to your computer.
Notify me only when programs try to make changes to my computer
You will be notified before programs make changes to your computer that require the permission of an administrator.
You will not be notified if you try to make changes to Windows settings that require the permission of an administrator. You will be notified if a program outside of Windows tries to make changes to a Windows setting.
It's usually safe to allow changes to be made to Windows settings without you being notified. However, certain programs that come with Windows can have commands or data passed to them, and malicious software can take advantage of this by using these programs to install files or change settings on your computer. You should always be careful about which programs you allow to run on your computer.
Notify me only when programs try to make changes to my computer (do not dim my desktop)
You will be notified before programs make changes to your computer that require the permission of an administrator.
You will not be notified if you try to make changes to Windows settings that require
This setting is the same as "Notify only when programs try to make changes to my computer," but you are not notified on the secure desktop.
the permission of an administrator. You will be notified if a program outside of Windows tries to make changes to a Windows setting.
secure desktop with this setting, other programs might be able to interfere with the dialog's visual appearance. This is a small security risk if you already have a malicious program running on your computer. Never notify You will not be notified before any changes
are made to your computer. If you are logged on as an administrator, programs can make changes to your computer without you knowing about it.
If you are logged on as a standard user, any changes that require the permission of an administrator will automatically be denied.
If you select this setting, you will need to restart the computer to complete the process of turning off UAC. Once UAC is off, people that log on as administrator will always have the permission of an administrator.
This is the least secure setting. When you set UAC to never notify, you open up your computer to potential security risks.
If you set UAC to never notify, you should be careful about which programs you run, because they will have the same access to the computer as you do. This includes reading and making changes to protected system areas, your personal data, saved files, and anything else stored on the computer. Programs will also be able to communicate and transfer information to and from anything that your computer connects with, including the Internet.
Introducing System Settings
Some of the most important configuration settings for a server administrator are the system settings within the Control Panel. These include gathering generation information about your system, changing the computer name, adding the computer to a domain, accessing the device manager, configuring remote settings, configuring startup and recovery options, and configuring overall performance settings.
To access the system settings, you can do one of the following:
•
If you are in Category view, click System and Security, and click System or click View amount of RAM and processor speed.•
If in classic view, double click the System applet.•
Right click Computer and select Properties.In Windows, there are often several ways to do the same thing.
At the top of the screen you see the Windows edition you have and the system type. Because Windows Server 2008 R2 comes only in bit, it will show 64-bit Operating System in the middle of the screen. Toward the bottom of the screen you will see the computer name and domain (if any), if Windows is activated and the Product ID. See Figure 2-5.
Figure 2-5
Control Panel system settings
Changing Computer Name and Domain Settings
To help identify computers, you should name a computer with a meaningful name. This can be done within the System settings within the Control Panel. You can also add a computer to a domain or workgroup.
Every computer must have a unique computer name assigned to a network. If two computers have the same name, one or both of the computers will have trouble communicating on the network. To change the computer name, open System from the Control Panel. Then click the Change Settings option in the Computer name, domain, and workgroup settings. When the System Properties box appears with the Computer Name tab selected, you then click the Change button. See Figure 2-6. Any changes to the computer name or
workgroup/domain name will require a reboot.
Figure 2-6
By default, a computer is part of a workgroup. A workgroup is usually
associated with a peer-to-peer network in which user accounts are decentralized and stored on each individual computer. If several users need to access the computer (while requiring unique usernames and passwords), you will need to create a user account for each user. If you want those users to access another stand-alone computer, you will have to create the same computer accounts and password on that computer as well. As you can imagine, with several computers, this can become a lot of work as you keep creating and managing accounts on each individual computer.
A domain is a logical unit of computers that define a security boundary, and it is usually associated with Microsoft’s Active Directory. The security of the domain is generally centralized and controlled by Windows servers acting as domain controllers. As a result, you can manage the security much easier for multiple computers while providing better security.
If a computer is added to a domain, a computer account is created to represent the computer. In addition, information stored on the computer is used to uniquely identify the computer. When these items match, it shows that a computer is who it says is, which contributes to a more secure work environment.
To add the computer to the domain, open System Properties and click the Change button. You will then select the Domain option and type in the name of the domain. Next, click the OK button. It will prompt you to log in with a domain account that has the ability to add computers to the domain. This is typically a domain administrator or account administrator. After you enter the credentials (username and password), a Welcome dialog box appears. Click OK to close the Welcome dialog box. When you close the System Properties dialog box, it will prompt you to reboot the computer.
To remove a computer from a domain, join an existing workgroup, or create a new workgroup, you select the workgroup option and type in the name of the workgroup and click OK. If you are removing yourself from the domain, you will be asked for administrative credentials so that it can delete the account from Active Directory. If you don’t specify administrative credentials, it will still remove the computer from the domain, but the computer account will still remain within Active Directory.
Configuring Remote Settings
As with most enterprise versions of Windows including Windows Server 2008 and Windows Server 2008 R2, you can remotely connect to a server using Remote Assistance and Remote Desktop.
Certification Ready
How do you manage a server from your desk?—2.3
With Remote Assistance and Remote Desktop, you can access a computer running Windows with another computer that is connected to the same network or over the Internet just as if you were sitting in front of the server. You will be able to use your mouse and keyboard to access the desktop, taskbar, and Start menu. You will be able to run programs and access all of the configuration tools. Remote Assistance is designed for support personnel to connect to an active login session to assist or troubleshoot a problem. Unlike Remote Desktop,
seeing the same computer screen. If you decide to share control of your computer with your remote user, you both will be able to control the mouse cursor.
To keep the system secure and to make sure you want the option available, you must first install Remote Assistant as a feature. It must also be enabled in the Remote tab of the System properties dialog box. Next, you will have to invite the person using email or an instant message. You can also reuse an invitation that you sent before. After the person accepts the invitation, a two-way encrypted connection will be created.
To start a Remote Assistance session and to create an invitation, open the Start Menu, click All Programs, Select Maintenance, and click Windows Remote Assistance. See Figure 2-7.
Take Note
Before you can use Remote Assistance with Windows Server 2008 R2, you must first install the Remote Assistance feature.
Figure 2-7
Windows Remote Assistance
Remote Desktop allows a user running the Remote Desktop program to access a server remotely. By default, Windows Server 2008 R2 supports two remote desktop connections (three if you also count the console mode, which is the active connection as if you were actually sitting in front of the server keyboard and monitor).
Unlike Remote Assistance, Remote Desktop is installed but must be enabled before you connect to the server. To enable Remote Desktop, open the System Properties and select one of the following settings:
•
Allow connections from computer running any version of Remote Desktop (less secure)•
Allow connections running Remote Desktop with Network Level Authentication (more secure).Take Note
Before you can use Remote Desktop, you must first enable it using System Properties. In addition, by default, administrators and users are members of the Remote Desktop users group and have access to Remote Desktop.
Network Level Authentication is an authentication method that completes user authentication before you establish a full Remote Desktop connection and the logon screen appears. The Allow connections running Remote Desktop with Network Level Authentication (more secure) option is available to the Remote Desktop program that is included with Windows 7 or you may download a newer version of Remote Desktop from Microsoft. To determine if your version of Remote Desktop supports Network Level Authentication, start a Remote Desktop Connection (under Accessories), click the icon in the upper-left corner of the Remote Desktop Connection dialog box, and then click About. If it supports Network Level Authentication, it will say “Network Level Authentication supported.”
By default, administrators and users are members of the Remote Desktop Users. Therefore, for someone to connect to a computer running Remote Desktop, you should add his or her user account to one of these groups.
Changing Date and Time
One of the simplest but most essential tasks is making sure that the server has the correct date and time. This is essential for logging purposes and for security. If a secure packet is sent with the wrong date or time, the packet may be automatically denied because the date and time is used to determine if the packet is legitimate.
To access the date and time settings, do one of the following:
•
Click Clock, Language, and Region in the Control Panel while in Category view and click Set the time and date.•
Double click Date and Time while in Icon view.•
If the date and time show in the Notification area, double click the date and time.Set the Clock
GET READY. To set the clock, do the following:
1. Click the Date and Time tab, and then click Change date and time.
2. To change the hour, minutes, and seconds, double click the hour,
minutes, or seconds, and then click the arrows to increase or decrease
the value.
3. When you are finished changing the time settings, click OK. See
Figure 2-8.
Figure 2-8
Changing date and time
To change the time zone, click Change time zone and click your current time zone in the drop-down list. Then click OK.
If you are part of a domain, the server should be synchronized with the domain controllers. If you have a stand-alone server, you can synchronize with an Internet time server by clicking the Internet Time tab and selecting the check box next to Synchronize with an Internet time server. Then select a time server and click OK.
Configuring IP Address Settings
THE BOTTOM LINE
For a server to serve other clients, it will need connect to and communicate over the network. Therefore, you need to know how to connect the server and configure the TCP/IP properties.
Although servers may use wireless cards to connect to the network, most servers use wired connections to communicate. The cable connections will be faster, more reliable, and more secure. In either case, you need to configure the following on a computer running Windows Server 2008 R2:
•
IP address and its corresponding subnet mask (uniquely identifies the computer using a logical address)•
Default gateway (nearest router that connects to the other networks or the Internet)•
One or more DNS servers provide name resolution (domain/host name to IP address).The IP address, subnet mask, default gateway, and DNS servers can be configured manually or automatically via a DHCP server. Because servers provide services to multiple clients, the network addresses are manually assigned and don’t change much.
Configure the IP
GET READY. To configure the IP in Windows Server 2008 R2, do the
following:
1. Open the Control Panel.
2. To access the network connection properties, do one of the
following:
•
While in Category view, click Network and Internet, then click
Network and Sharing Center, and finally, click Change adapter
settings.
•
If you are in Icon view, double click Network and Sharing
Center, and then click Change adapter settings.
•
Right click the network icon in the notification area, select Open
Network and Sharing Center (Figure 2-9), and then click Change
adapter settings.
Figure 2-9
Network and Sharing Center
3. Right click the connection that you want to change, and then click
Properties.
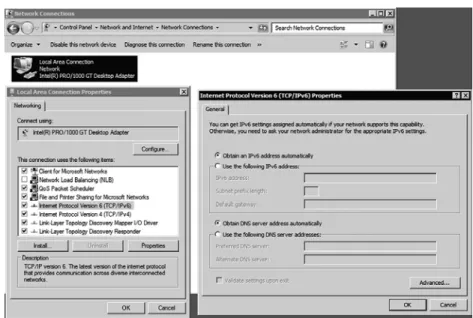
4. Under the Networking tab, click either Internet Protocol Version 4
(TCP/IPv4) or Internet Protocol Version 6 (TCP/IPv6), and then
click Properties.
To specify IPv4 IP address settings, do one of the following:
•
To obtain IP settings automatically from a DHCP server, click Obtain an IP address automatically, and then click OK.•
To specify an IP address, click Use the following IP address, and then, in the IP address, Subnet mask, Default gateway, Preferred DNS server, and Alternate DNS server boxes, type the appropriate IP address settings. See Figure 2-10.Figure 2-10
Configuring IPv4
To specify IPv6 IP address settings, do one of the following:
•
To obtain IP settings automatically, click Obtain an IPv6 address automatically, and then click OK.•
To specify an IP address, click Use the following IPv6 address, and then, in the IPv6 address, Subnet prefix length, and Default gateway boxes, type the IP address settings. See Figure 2-11.Figure 2-11
Cross-Reference
For more information about IP Configuration, see Appendix B Understanding TCP/IP.
Before moving on to the next section, you should understand how proxy settings affect your access to the network or the Internet. A proxy server is a server that is used to translate between public and private networks using Network Address Translation (NAT). It is usually placed on the edge of a corporate network. With NAT, you can have a single public address and multiple private addresses. A proxy server hides the internal addresses and allows you to have a multitude of private addresses.
When you purchase a wireless router for your house, you connect your cable or DSL modem to the wireless router, which will be assigned a public external address. You can then connect multiple computers or hosts inside your house, which are assigned private addresses. The router will then translate between the public address and the private addresses.
Usually when you go to the Internet within a corporation, you need to specify the address and port of the proxy server. If not, while you may be able to access internal resources, you will not be able to access resources on the Internet. To change the proxy settings for Internet Explorer (which is also used for other applications), you can do one of the following:
•
Start Internet Explorer. Then select the Connections tab and click the LAN settings button.•
While in Category view in the Control Panel, click network and Internet, then click Internet Options. Next select the Connections tab and click the LAN settings button.•
While in Icon view, double click Internet Options. Then select the Connections tab and click the LAN settings button.Most corporations should have servers that automatically configure the proxy settings when you have Automatically detect settings enabled. However, if you need to use a different proxy server, you will need to deselect the Automatically detect settings and select the Use a proxy server for your LAN option. You will then specify an address and port number for your proxy server. Common ports are 80, 8080, and 3128. Because you don’t want to go through the proxy server for your internal servers, you should select the Bypass proxy server for local address box. See Figure 2-12.
Figure 2-12
Proxy settings in Internet Explorer
Managing Devices and Device Drivers
THE BOTTOM LINE
Because a computer running Windows Server 2008 R2 can have a wide array of devices, it can sometimes be a challenge to make all devices operate correctly, especially because servers often have nonstandard hardware that may require you to manually install or update drivers.
Certification Ready
How do you manage device drivers in Windows?—1.1
Device drivers are programs that control a device. You can think of them as a translator between the device and the operating system and programs that use the device. Programmers write code that accesses generic commands, such as sending sound, and the device driver will translate those generic commands to specific commands understood by the device, such as a specific sound card. Although Windows Server 2008 R2 includes many drivers (built-in or included on the installation DVD), some drivers come with the device. Becuase these drivers are software, there may be times when you need to go to the
manufacturer’s Web site to retrieve newer drivers (although sometimes older drivers work better than newer drivers) or download them through Microsoft’s updates.
To prevent you from constantly inserting the Windows Server 2008 R2 installation DVD, Windows Server 2008 R2 includes a driver store with an extensive library of device drivers. Drivers will be located either in the C:\Windows\System32\DriverStore. In the DriverStore folder, you will find subfolders with located driver information such as en-US for U.S. English,
which will have hundreds of different drivers. When you add a hardware device, Windows can check the Driver Store for the correct driver.
Understanding Plug and Play Devices
For years, Windows has benefited from Plug and Play (PnP) where you install or connect a device, and the device is automatically recognized and configured, and the appropriate driver is installed. Today, this technology has been expanded beyond expansion cards to include other technologies.
Intel and Microsoft released Plug and Play in 1983. As a computer technician, PnP made life a lot easier because you did not have to worry about setting DIP switches or jumpers on the card. Now, most devices are PnP, and it has been expanded beyond expansion cards to include USB, IEEE 1394 (also known as Firewire), and SCSI devices. Today, if you use PnP hardware combined with a PnP operating system such as Windows, you can plug in the hardware, and Windows will automatically recognize the device, load the appropriate driver, and configure it to work without interfering with other devices. When a driver cannot be found, Windows will prompt you to provide a media or path to the driver, or it may even ask if you want to connect to the Internet in an attempt to find one. You can also open the Control Panel, click Hardware, and select Add a device under the Devices and Printers section. It will then search for any devices that are not currently recognized by Windows. Eventually, the device driver will be added to the driver store.
As part of the configuration process, Windows assigns the following system resources to the device you are installing so that the device can operate at the same time as other expansion cards:
•
Interrupt request (IRQ) line numbers: A signal sent by a device to getthe attention of the processor when the device is ready to accept or send information. Each device must be assigned a unique IRQ number.
•
Direct memory access (DMA) channels: Memory access that does notinvolve the processor.
•
Input/output (I/O) port addresses: A channel through which data istransferred between a device and the processor. The port appears to the processor as one or more memory addresses that it can use to send or receive data.
•
Memory address ranges: A portion of computer memory that can beallocated to a device and used by a program or the operating system. Devices are usually allocated a range of memory addresses.
Understanding Signed Drivers
Windows was designed to work with a large array of devices. Unfortunately, in the past, there were times when a device was added and a driver was loaded, the driver caused problems with Windows. As a result, Microsoft started using signed drivers to help fight faulty drivers. Although signed drivers will not fix a faulty driver, they make sure the publisher of the driver is identified, the driver has not been altered, and the driver has been thoroughly tested to be reliable so that it will not cause a security problem.
A signed driver is a device driver that includes a digital signature, which is an electronic security mark that can indicate the publisher of the software and information that can show if a driver has been altered. When Microsoft signs it, the driver has been thoroughly tested to make sure that the driver will not cause problems with the system’s reliability and not cause a security problem.
Drivers that are included on the Windows installation DVD or downloaded from Microsoft’s update Web site are digitally signed. A driver that lacks a valid digital signature, or was altered after it was signed, cannot be installed on 64-bit versions of Windows. If you have problems with a device driver, you should download only drivers that are from Microsoft’s update Web site or the manufacturer’s Web site.
Take Note
You cannot install a driver that lacks a valid digital signature or that has been altered after it was signed on Windows Server 2008 R2.
Windows Server 2008 R2 is delivered only in 64-bit versions; all drivers must be signed for Windows Server 2008. If you are using a newer version of Windows that is not a 64-bit version, you can use the File Signature Verification program (Sigverif.exe) to check whether unsigned device drivers are in the system area of a computer.
Using Devices and Printers
Starting with Windows Server 2008 and Windows Vista, Windows includes the Devices and Printers folder to quickly allow users to see all the devices connected to the computer and to configure and troubleshoot these devices. It also allows you to view information about the make, model, and manufacturer and gives you detailed information about the sync capabilities of a mobile phone or other mobile devices.
The Devices and Printers folder gives you a quick view of devices connected to your computer that you can connect or disconnect from your computer through a port or network connection. This includes mobile devices such as music players and digital cameras, USB devices, and network devices. See Figure 2-13. It does not include items installed inside your computer such as internal disk drives, expansion cards, or RAM, and it will not display legacy devices such as keyboards and mice connected through a PS/2 or serial port.
Figure 2-13
To open the Devices and Printers, open the Control and click View devices and printers under Hardware while in Category view or double click Devices and Printers in Icon view. You can also open Devices and Printers by clicking the Start button and clicking Devices and Printers.
When you right click a device icon in the Devices and Printers folder, you can select from a list of tasks that vary depending on the capabilities of the device. For example, you might be able to see what’s printing on a network printer, view files stored on a USB flash drive, or open a program from the device manufacturer. For mobile devices that support the new Device Stage feature in Windows, you can also open advanced, device-specific features in Windows from the right click menu, such as the abilities to sync with a mobile phone or change ringtones.
Using Device Manager
Device Manager provides you with a graphical view of the hardware (internal and external) that is installed on your computer and gives you a way to manage and configure your devices. With Device Manager, you can determine whether Windows recognizes a device and if the device is working properly. You can also enable, disable, or uninstall the device; roll back the previous version of the driver; and identify the device driver including its version and change hardware configuration settings.
To open the Device Manager, you can do one of the following:
•
Open the Control Panel in Category view, click Hardware, and click Device Manager.•
Open the Control Panel in Icon view and double click Device Manager.•
Open the System Properties and click Device Manager.•
Open the Computer Management console and click Device Manager.•
Open the Server Manager and click Device Manager under Diagnostics.•
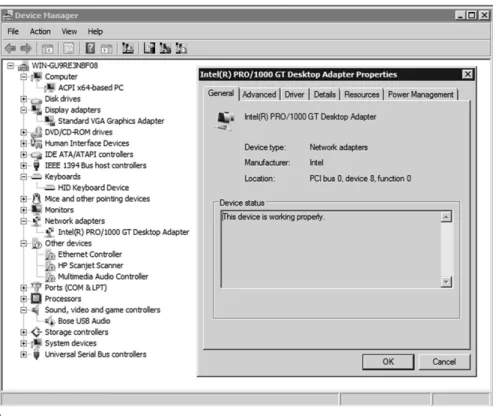
Start Search box or Run box and execute the following command from a command prompt: mmc devmgmt.msc.If you are logged on as the built-in Administrator account, Device Manager opens. If you are logged on as the user that is a member of the Administrator group and you have User Account Control enabled, you will have to click Continue to open Device Manager. See Figure 2-14.
Figure 2-14
Device Manager
If you locate and double click a device or right click a device and select
properties, you can view the details of the driver in the General tab including the status of the device. The Details tab will give you detailed settings of various properties assigned to the hardware device. As a server administrator, most of the items you will need are located at the Driver tab:
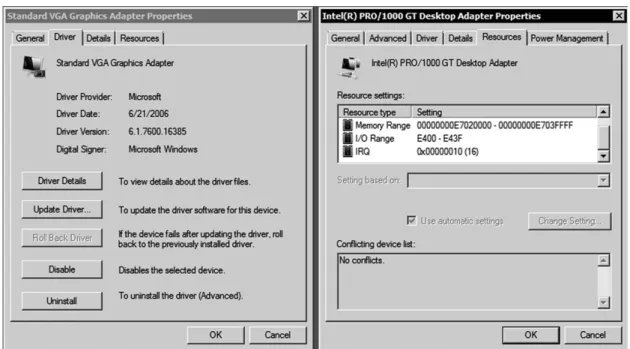
1. Driver Details: Shows the driver file(s) and their location, the provider of the driver, the version of the file, and the digital signer of the file.
2. Update Driver: Allows you to update the driver software for a device. 3. Roll Back Driver: Used to roll back a driver if problems exist when you
update a device driver. If there’s no previous version of the driver installed for the selected device, the Roll Back Driver button will be unavailable. 4. Disable/Enable: Instead of uninstalling the driver, you can use the Device
Manger to disable the device.
5. Uninstall: Used to remove the driver software from the computer.
Additional tabs such as Advanced, Resources (Memory Range, I/O Range, IRQ, and DMA), and Power Management may be shown depending on the type of device. See Figure 2-15. If there is conflict for your resources, you can try to use Device Manager to change the memory range, I/O range, IRQ, or DMA of the device). In addition, if you right click a device in Device Manager, you can update driver software, disable the device, uninstall the device, or scan for hardware changes.
Figure 2-15
Device Properties
When you use the Device Manager that comes with Windows Vista, Windows 7, and Windows Server 2008, you should note the following:
•
A down black arrow indicates a disabled device. A disabled device is a device that is physically present in the computer and is consuming resources, but does not have a driver loaded.•
A black exclamation point (!) on a yellow field indicates the device is in a problem state.•
You also need to check whether any devices are listed under Other devices or have a generic name such as Ethernet Controller or PCI SimpleCommunications Controller, which indicates that the proper driver is not loaded.
Using Microsoft Management Console and
Administrative Tools
THE BOTTOM LINE
The Microsoft Management Console (MMC) is one of the primary administrative tools used to manage Windows and many of the network services provided by Windows. It provides a standard method to create, save, and open the various administrative tools provided by Windows. When you open Administrative Tools, most of these programs are an MMC.
To start an empty MMC, go to the command prompt, Start Search box or Run box, type mmc or mmc.exe. Every MMC has a console tree that displays the hierarchical organization of snap-ins or pluggable modules) and extensions (a snap-in that requires a parent snap-in). By adding and deleting snap-ins and extensions, users can customize the console or access tools that are not located in Administrative Tools. You can add snap-ins to a MMC by opening the File menu and selecting Add/Remove Snap-ins. See Figure 2-16.
Figure 2-16
Adding snap-ins to a blank MMC
Administrative Tools is a folder in the Control Panel that contains tools for system administrators and advanced users. To access the Administrative Tools, open the Control Panel, open Administrative Tools by clicking Start, Control Panel, System, and Security while in Category View or double click the Administrative Tools applet while in Icon view. There is also a quick link on Windows Servers that can be accessed by clicking the Start button.
Some common administrative tools in this folder include the following:
•
Component Services: Configure and administer Component Object Model(COM) components. Component Services is designed for use by developers and administrators.
•
Computer Management: Manage local or remote computers by using asingle, consolidated desktop tool. Using Computer Management, you can perform many tasks, such as monitoring system events, configuring hard disks, and managing system performance.
•
Data Sources (ODBC): Use Open Database Connectivity (ODBC) to movedata from one type of database (a data source) to another.
•
Event Viewer: View information about significant events, such as aprogram starting or stopping, or security errors, that are recorded in event logs.
•
iSCSI Initiator: Configure advanced connections between storage deviceson a network.
•
Local Security Policy: View and edit Group Policy security settings.•
Performance Monitor: View advanced system information about theprocessor, memory, hard disk, and network performance.
•
Print Management: Manage printers and print servers on a network and•
Security Configuration Wizard: A wizard that walks you through how to create a security policy that you can apply to any server on the network.•
Server Manager: A console that allows you to manage and secure multipleserver roles including managing the server’s identity, system information; displaying server status; identifying problems with the server role configuration; and managing all roles installed on the server.
•
Services: Manage the different services that run in the background on your computer.•
Share and Storage Management: A centralized location for you tomanage folders and volumes that are shared on the network and volumes in disks and storage subsystems.
•
Storage Explorer: Used to view and manage Fibre Channel and iSCSIfabrics that are available in your storage area network (SAN).
•
System Configuration: Identify problems that might be preventingWindows from running correctly.
•
Task Scheduler: Schedule programs or other tasks to run automatically.•
Windows Firewall with Advanced Security: Configure advanced firewallsettings on both this computer and remote computers on your network.
•
Windows Memory Diagnostics: Check your computer’s memory to seewhether it is functioning properly.
•
Windows PowerShell Modules: A task-based command-line shell andscripting language designed especially for system administration.
•
Windows Server Backup: Use to back up and restore the server.When you use these tools, you might assume that they are used only to manage the local computer. However, many of them can be used to manage remote computers as well. For example, you can use the Computer Management and Server Management console to connect to and manage other computers, assuming you have administrative rights to the computer.
Using Computer Management Console and Server
Management Console
The Computer Management console and Server Management console are two of the primary tools to manage a Windows server, and they include the most commonly used MMC snap-ins.
The Computer Management console is available in Windows Server 2003, Windows Server 2008, Windows XP, Windows Vista, and Windows 7. It includes multiple snap-ins including Task Scheduler, Event Viewer, Shared Folders, Local Users and Groups, Performance, Device Management, Routing and Remote Access, Services, and WMI Control. See Figure 2-17. If you are using Windows Server 2003, Windows XP, Windows Vista, or Windows 7, you can access the Computer Management console through the Administrative Tools or by right clicking Computer/My Computer and clicking Manage. If you are running Windows Server 2008 or Windows Server 2008 R2, you can access only it from the Administrative Tools folder.
Figure 2-17
Computer Management console
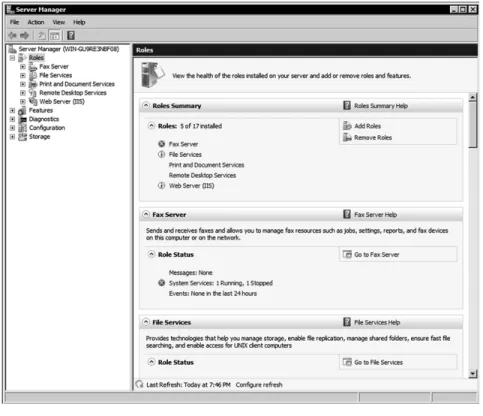
If you right click Computer on a computer running Windows Server 2008 or Windows Server 2008 R2, you will open theServer Management console instead. Also when you log in to a computer running Windows Server 2008 or Windows Server 2008 R2 as an administrator, Server Manager will
automatically open by default. The Server Manager allows you to install Windows server Roles and Features; view the Event Viewer logs; access performance monitoring tools, Device Manager, Task Scheduler, Windows Firewall with Advanced Security, Services, Local Users and Groups, Windows Server Backup and Disk management. See Figure 2-18.
Figure 2-18
Server Manager console
The Remote Server Administration Tools pack is a feature available with Windows Server 2008 R2 that enables remote management of Windows Server 2008 R2, Windows Server 2008, and Windows Server 2003 from a computer running Windows Server 2008 R2, by allowing you to open and run
management tools and snap-ins to manage roles, role services, or features on a remote computer.
The Remote Server Administration Tools include tools for the following roles:
•
Active Directory Certificate Services Tools•
Active Directory Domain Services (AD DS) and Active Directory Lightweight Directory Services (AD LDS) Tools•
Active Directory Rights Management Services (AD RMS) Tools•
DHCP Server Tools•
DNS Server Tools•
Fax Server Tools•
File Services Tools•
Hyper-V Tools•
Network Policy and Access Services Tools•
Print and Document Services Tools•
Remote Desktop Services Tools•
Web Server (IIS) Tools•
Windows Deployment Services Tools•
BitLocker Drive Encryption Administration Utilities•
BITS Server Extensions Tools•
Failover Clustering Tools•
Network Load Balancing Tools•
SMTP Server Tools•
WINS Server ToolsInstalling Programs, Roles, and Features
THE BOTTOM LINE
By default, most of the roles and features that are available for Windows Server 2008 must be installed or enabled before you can use them. This is to reduce the surface attack that hackers or malicious software can utilize. When managing servers, if you don’t need a service or program running, you should not install or enable it.
Managing Programs
Windows Server 2008 R2 includes many roles and features to provide a wide range of network services. However, you will often have to install programs. Some of these programs such as SQL Server or
Exchange come from Microsoft, while many others do not. Therefore, you will need to know how to install and uninstall these applications.
If you need to install a program in Windows such as an antivirus software package, Microsoft Exchange, Microsoft SQL Server, or any other program that does not come with Windows Server, you usually insert the disk, usually a CD or DVD, into the drive and the installation program will automatically start. With other programs, you may need to run a command, download and install using your browser, or double click on an executable file with an .exe or msi extension.
Most Windows programs allow you to uninstall a program from your computer if you no longer use it or if you want to free up space on your hard disk. For Windows Server 2008, you can use Programs and Features to uninstall programs or to change a program’s configuration by adding or removing certain options. Before Windows Server 2008, you would use Add/Remove Programs from the Control Panel.
Uninstall or Change a Program
GET READY. To uninstall a program or change a program in Windows
Server 2008 R2, perform the following:
1. Open the Control Panel.
2. If you are in Category View, click Programs and click Programs and
Features. If you are in Icon view, double click Programs and
Features.
Figure 2-19
Programs and features
If the program you want to uninstall isn’t listed, it might not have been written for Windows. You should check the documentation for the software.
Some programs include the option to repair the program in addition to uninstalling it, but many simply offer the option to uninstall. To change the program, click Change or Repair. If you are prompted for an administrator password or confirmation, type the password or provide confirmation.
Managing Roles and Features
As mentioned in Lesson 1, a server is designed to provide network services and resources. Windows Server 2008 R2 has organized the most common services into server roles. Typically, you would install those roles using Server Manager. In addition, Windows Server 2008 R2 includes many features that are not directly part of a role or that are used to support or augment the functionality of one or more roles or enhance the functionality of the entire server.
A server role is a set of software programs that, when installed and properly configured, enables a computer perform a specific function for multiple users or computers within a network. Many of these roles were listed in Lesson 1. Role services are software programs that provide the functionality of a role or service. When you install a role, you can choose which services the role provides for other users and computers in your enterprise. Some roles, such as DNS Server, have only a single function and do not have available role services. Other roles, such as Remote Desktop Services, have several role services that can be installed, depending on the remote computing needs of your organization. To add roles, open Server Manager, click Roles in the left pane, and click Add Roles. See Figure 2-20. Roles can also be added using the Initial Configuration Tasks window. To remove a role, click the Remove Roles. To manage a specific role that has already been installed, you can scroll down to the service or click on the link in the Roles Summary. If there are any problems with the roles, you will see Red circles with an X or Red circles with exclamation points.
Figure 2-20
Managing Roles
Also mentioned in Lesson 1, features are software programs that are not directly part of a role. Instead, they can support or augment the server. Similar to installing and removing roles, you would install and remove features with Server Manager console or by using the Initial Configuration Tasks window. See Figure 2-21.
Figure 2-21
Managing Services
THE BOTTOM LINE
A service is a program, routine, or process that performs a specific system function to support other
programs or to provide a network service. A service runs in the system background without a user interface. Some examples include web serving, event logging, and file serving.
Certification Ready
How does a service run in Windows?—1.2
To manage services, use the Services console located under Administrative Tools. The Services snap-in is also included in the Computer Management and Server Manager consoles. You can also execute mmc services.mmc from a command prompt, Start Search box, or Run box. See Figure 2-22.
Figure 2-22
The Services console
To start, stop, pause, resume, or restart services, right click on the service and click on the desired option. To the left of the service name is a description. To configure a service, right click the service and click on the Properties option or double click the service. See Figure 2-23. On the General tab, under the start-up type pull-down option, set the following:
•
Automatic: Specifies that the service should start automatically when the system starts.•
Automatic (Delayed Start): Specifies that the service should start automatically after the services marked as automatic have started (which is approximately 2 minutes).•
Manual: Specifies that a user or a dependent service can start the service. Services with manual start-up do not start automatically when the system•
Disable: Prevents the service from being started by the system, a user, or any dependent service.Figure 2-23
Managing an individual service
If you like doing things at the command prompt or you have a need use a script to start or stop a service, you would use the sc command to communicate with the Service Control Manager and Services. The scconfig command is used to modify a service entry in the registry and Service Database. You can also use the net start and net stop commands to start and stop services.
When you configure a service, you need to configure what account the service runs under. You can use the built-in accounts included with Windows or you can use a service account that you create locally or on the domain. The built-in accounts include:
•
Local System: Highly privileged account that can access most resources onthe local computer.
•
NT Authority\LocalService: Has the same privileges of the local Usersgroup on the computer. When it accesses Network resources, it uses no credentials and a null session.
•
NT Authority\NetworkService: Has the same level of access as the Usersgroup on the local computer. When it accesses network resources, it does so under the context of the local computer account.
You should always take care when changing the Startup parameters for a service including the Startup Type and Log On As settings because these changes might prevent key services from running correctly. In addition, Microsoft recommends that you do not change the Allow service to interact with desktop settings because this will allow the service to access any information displayed on the interactive user’s desktop. A malicious user can then take control of the service or attack it from the interactive desktop. If you specify an account that does not have permission to log on as a service, the Services snap-in automatically grants
the appropriate permissions to that account on the computer that you are managing. If you use a local or domain account, make sure that you use a strong password and that the account uses a password that does not expire.
As a general rule, you should use the account with minimum rights and permissions for the service to operate. In addition, you should use different service accounts for different services. So if you install Exchange and SQL on a server, you should have a service account for Exchange and a different service account for SQL. Of course, for you to put SQL and Exchange on the same server should occur only for small businesses that have a handful of employees. If you enable or disable a service and a problem occurs, you can try to start the service manually to see what happens. You can also check the Event Viewer for more information on some of the errors. If the system does not boot because of the enabled or disabled service, you should try to start the computer in Safe mode, which starts only the core services needed to operate, load only the necessary drivers to operate, and load in 640x480 screen resolution with the minimum number of colors. By using Safe mode, you should have an opportunity to fix the problem.
If you are new to Windows, particularly in administering and configuring Windows, you should take some time, click on each service, and read the description. You will learn that many service names are very descriptive. For now, let’s cover two specific services:
•
Server: Supports file, print, and named-piped sharing over the network. If the Services service is not started, you will not be able to access shared folders including administrative shares such as C$ and IPC$.•
Workstation: Creates and maintains client network connections to removeservers using the SMB protocol. Without this service, you will not be able to access shared folders on other computers.
Understanding the Registry
THE BOTTOM LINE
The registry is a central, secure database in which Windows stores all hardware configuration information, software configuration information, and system security policies. Components that use the registry include the Windows kernel, device drivers, setup programs, hardware profiles, and user profiles.
Most of the time, you will not need to access the registry because programs and applications typically make all the necessary changes automatically. For
example, when you change your desktop background or change the default color for Windows, you access the Display settings within the Control Panel, and it saves the changes to the registry.
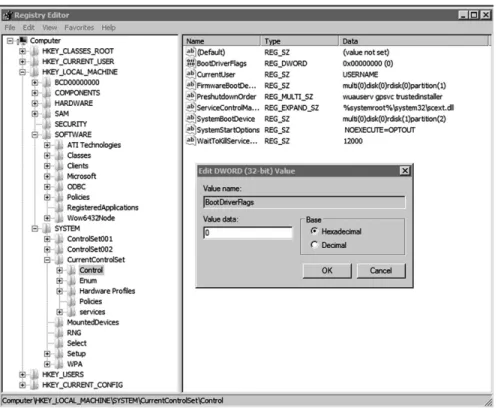
If you do need to access the registry to make changes, you should follow the instructions from a reputable source closely because an incorrect change to your computer’s registry can render your computer inoperable. However, there may be a time when you need to make a change in the registry because there is no interface or program to make the change. To view and manually change the registry, you use the Registry Editor (Regedit.exe), which can be executed from the command prompt, Start Search box, or Run box. See Figure 2-24.
Figure 2-24
The Registry Editor
The Registry is split into a several logical sections, often referred to as hives, which are generally named by their Windows API definitions. The hives begin with HKEY and are often abbreviated to a three- or four-letter short name starting with “HK.” For example, HKCU is HKEY_CURRENT_USER and HKLM is HKEY_LOCAL_MACHINE. Windows Server 2008 R2 has five Root Keys/HKEYs:
•
HKEY_CLASSES_ROOT: Stores information about registeredapplications, such as the file association that tells which default program opens a file with a certain extension.
•
HKEY_CURRENT_USER: Stores settings that are specific to thecurrently logged-in user. When a user logs off, the HKEY_CURRENT_USER is saved to HKEY_USERS.
•
HKEY_LOCAL_MACHINE: Stores settings that are specific to the localcomputer.
•
HKEY_USERS: Contains subkeys corresponding to theHKEY_CURRENT_USER keys for each user profile actively loaded on the machine.
•
HKEY_CURRENT_CONFIG: Contains information gathered at run time.Information stored in this key is not permanently stored on disk, but rather regenerated at the boot time.
Registry keys are similar to folders, which can contain values or subkeys. The keys within the registry follow a syntax similar to a Windows folder or file path using backslashes to separate each level. For example:
HKEY_LOCAL_MACHINE\Software\Microsoft\Windows refers to the subkey “Windows” of the subkey “Microsoft” of the subkey “Software” of the HKEY_LOCAL_MACHINE key.
Registry values include a name and a value. There are multiple types of values. Some of the common key types are shown in Table 2-2.
Table 2-2
Common Registry key types
Name Datatype Description
Binary value REG_BINARY
Raw binary data. Most hardware component information is stored as binary data and is displayed in Registry Editor in hexadecimal format.
DWORD value REG_DWORD
Data represented by a number that is 4 bytes long (a 32-bit integer). Many parameters for device drivers and services are this type and are displayed in Registry Editor in binary, hexadecimal, or decimal format.
Expandable string
value REG_EXPAND_SZ
A variable-length data string. This datatype includes variables that are resolved when a program or service uses the data.
Multi-string value REG_MULTI_SZ
A multiple string. Values that contain lists or multiple values in a form that people can read are generally this type. Entries are separated by spaces, commas, or other marks.
String value REG_SZ A fixed-length text string.
QWORD value REG_QWORD
Data represented by a number that is a 64-bit integer. This data is displayed in Registry Editor as a binary value, and it was introduced in Windows 2000.
Reg files (also known as Registration entries) are text files used for storing portions of the registry. They have a .reg filename extension. If you double click a reg file, it will add the registry entries into the registry. You can export any registry subkey by right clicking the subkey and choosing Export. You can back up the entire registry to a reg file by right clicking Computer at the top of Regedit and selecting export, or you can back up the system state with Windows Backup.
Managing Server Core
THE BOTTOM LINE
As mentioned in Lesson 1, the Server Core installation provides a minimal environment with no Windows Explorer shell for running specific server roles and no Start button. It should be noted that while you would usually use commands to manage server core, these commands will also work with a full Windows installation.
To discover the available server roles, open a command prompt and type the following:
oclist
To shut down or restart Windows Server 2008 Server Core, you need to use the shutdown.exe file. To shut down the computer, you use the following command:
shutdown /r /t 0 or shutdown /r
The /r specifies reboot while the /t 0 (short for 0 seconds) indicates a reboot immediately.
To log off, use: shutdown /l
To open the Date and Time applet, type the following command at the command prompt:
controltimedate.cpl
To change the International settings including changing your keyboard for different layouts, type the following at the command prompt:
controlintl.cpl
To change the computer name, you must first know the current computer name. To find the current name, you can use the hostname or ipconfig command. Then use the following command to change the computer name:
netdomrenamecomputer<ComputerName> /NewName:<NewComputerName> Then restart the computer.
To join a domain, use the following command:
netdom join <ComputerName> /domain:<DomainName> /userd:<Admin_UserName> /passwordd:*
You are prompted for the admin password. Next, restart the computer.
If you need to add a domain user account to the local Administrators group, type the following command:
netlocalgroup administrators /add <DomainName>\<UserName> Setting up IP configuration is a little bit more complicated because it is done at the command prompt. To view the IP configuration, you can execute the following command:
ipconfig /all
To view your interfaces, execute the following command: netsh interface ipv4 show interfaces
When you view the output of the netsh command, you need to note of the number shown in the Idx column for your network adapter.
To set a static IP address and default gateway, you would use the following command:
netsh interface ipv4 set address name="<ID>" source=static
address=<StaticIP> mask=<SubnetMask> gateway=<DefaultGateway> To set the static DNS address, use the following command:
netsh interface ipv4 add dnsserver name=<name of primary DNS server> address=<IP address of the primary DNS server> index=1
For each DNS server that you want to set, increment the index= number each time. Therefore, the first DNS server, index number would be 1. For the second DNS server, index number would be 2.
To change a server to the DHCP-provided IP address from a static IP address, use the following command:
netsh interface ipv4 set address name=“<ID>” source=dhcp where ID is the number of the network adapter.
Besides running these commands, there are a few simple but essential programs that are still available including:
•
Notepad (notepad.exe)•
Task Manager (taskmgr.exe) command or pressing the Ctrl+Alt+Del keys.•
Registry Editor (regedit.exe)•
System Information (msinfo32.exe)You can use cscript.exe to run scripts. For example to verify the current automatic settings, execute the following command:
cscript scregedit.wsf /AU /v
To enable automatic updates, execute the following command: cscript scregedit.wsf /AU /4
To disable automatic updates, execute the following command: cscript scregedit.wsf /AU /1
After the server is communicating on the network, you can connect to the server remotely using administrative tools based on the Microsoft Management Console including Computer Management and Server Manager consoles.
Manage a Server Core Server Using an MMC Snap-In
GET READY. To manage a server core server using an MMC snap-in,
do the following:
1. Log on to a remote computer.
2. Start an MMC snap-in, such as Computer Management or Server
Manager console.
3. In the left pane, right click the top of the tree and click Connect to
another computer. For example, in the Computer Management, you
would right click Computer Management (Local).
4. On another computer, type the computer name or IP address of the
server running a Server Core installation and click OK. See Figure
2-25.
Figure 2-25
Accessing a remote computer using Computer Management console
To use the Disk Management MMC snap-in remotely on a Server Core computer, you must start the Virtual Disk Service on the Server Core computer by typing the net start VDS command at the command prompt.
Summary Skill Matrix
In this lesson you learned:
•
The Initial Configuration Tasks acts as a reminder and a method to access key options so that you can quickly get your Windows server up and running with minimal effort.•
Every computer on a network must have a unique computer name assigned to it.•
A workgroup is usually associated with a peer-to-peer network on which user accounts are decentralized and stored on each individual computer.•
A domain is a logical unit of computers that defines a security boundary and is usually associated with Microsoft’s Active Directory.•
The security of the domain is generally centralized and controlled by Windows servers acting as domain controllers.•
With Remote Assistance and Remote Desktop, you can access a computer running Windows with another computer that is connected to the same network or over the Internet just as if you were sitting in front of the server.•
Make sure that the server has the correct date and time. It is essential for logging purposes and security.•
Device drivers are programs that control a device. You can think of them as a translator between the device and the operating system and programs that use that device.•
Plug and Play (PnP) allows you to install or connect a device; the device is automatically recognized, automatically configured and the appropriate driver is installed.•
An interrupt is a signal sent by a device to get the attention of the processor when the device is ready to accept or send information. Each device must be assigned a unique IRQ number.•
A signed driver is a device driver that includes a digital signature, which is an electronic security mark that can indicate the publisher of the software and show if a driver has been altered.•
A driver that lacks a valid digital signature, or was altered after it was signed, cannot be installed on 64-bit versions of Windows.•
The Devices and Printers folder gives you a quick view of devices connected to your computer, which you can connect or disconnect from your computer through a port or network connection.•
Device Manager provides you with a graphical view of the hardware (internal and external) that is installed on your computer and gives you a way to manage and configure your devices.•
A black down arrow in Device Manager indicates a disabled device.•
A black exclamation point (!) on a yellow field in Device Manager indicates the device is in a problem state.•
Administrative Tools, including Computer Management console and Server Manager console, is a folder in the Control Panel that contains tools for system administrators and advanced users.•
To install Roles and Features in Windows Server 2008, you would use the Server Manager console or the Initial Configuration Task window.•
A service is a program, routine, or process that performs a specific system function to support other programs or to provide a network service. It runs in the system background without a user interface.•
The registry is a central, secure database in which Windows stores all hardware configuration information, software configuration information, and system security policies.Knowledge Assessment
Fill in the Blank
Complete the following sentences by writing the correct word or words in the blanks provided.
1. The primary tool used to configure the Windows environment and hardware is the________.
2. _____________
3. Every computer in a network should have a
is a feature that helps prevent a program making a change without you knowing about it.
________
4. A
computer name assigned to it.
_________ is a logical unit of computers that share the same security database and is usually associated with Microsoft’s Active Directory.
5. ________
6. For many security mechanisms to work, your computer needs to have the correct __________________.
allows you to connect to a server remotely to run programs just as if you were sitting in front of the computer.
7. _______
8.
are programs that control a device and act as a translator between the device and the operating system and programs that use the device. _______
9. A
allows you to install or connect a device, and the operating system will automatically recognize, configure, and install the appropriate drivers for the device.
_____________
10.
is a device driver that includes a digital signature proving who published the device driver and whether the device driver has been altered.
_______
Multiple Choice
provides you with a graphical view of the hardware that is installed your computer and gives you a way to manage and configure your devices.
Circle the letter that corresponds to the best answer.
1. Which tool allows support personnel to interact with your session to help troubleshoot problems?
a. Remote Desktop b. Remote Assistance c. Credential Manager d. Control Panel
2. If you connected to your internal network, what should you check if you cannot connect to web servers on the Internet?
a. UAC
b. Administrative rights c. Proxy settings d. NTFS permissions
3. What technology automatically configures IRQs, DMA channels, I/O port addresses, and memory address ranges for an expansion card?
a. Credential Manager b. Signed drivers c. Services Manager d. Plug and Play
4. Which built-in account gives full access to the computer system? a. Local System
b. Local Service c. Network Service d. Local User
5. What is a central secure database that stores all hardware configuration information, software configuration information, and system security configuration policies?