NCDware Reference Manual
Part Number 9300584 Rev. A
October, 1997
Network Computing Devices, Inc. 350 North Bernardo Avenue Mountain View, California 94043 Telephone (650) 694-0650
Copyright
Copyright©1997 by Network Computing Devices, Inc. The information contained in this docu-ment is subject to change without notice. Network Computing Devices, Inc. shall not be liable for errors contained herein or for incidental or consequential damages in connection with the furnish-ing, performance, or use of this material. This document contains information which is protected by copyright. All rights are reserved. No part of this document may be photocopied, reproduced, or translated to another language without the prior written consent of Network Computing Devices, Inc.
Trademarks
Explora, Explora Pro, ECX, HMX, HMXpro, HMXpro24, WinCenter, WinCenter Pro, WinCenter Connect, NCDnet, and NCDware are trademarks of Network Computing Devices, Inc. XRemote is a registered trademark of Network Computing Devices, Inc.
All trademarks and service marks are the trademarks and service marks of their respective companies.
All terms mentioned in this book that are known to be trademarks or service marks have been appropriately capitalized. NCD cannot attest to the accuracy of this information. Use of a term in this book should not be regarded as affecting the validity of any trademark or service mark. Revisions
Revision history of this document:
Part Number Revision Date Description
iii
Contents
Chapter 1
About this Manual
Intended Audience 1-1Purpose 1-1
Contents of this Manual 1-2 Other NCD Manuals 1-4
Conventions Used in this Manual 1-5 Comments on the Manual 1-6
Chapter 2
Booting Defaults
Summary of Booting Alternatives 2-1
Chapter 3
Booting—Address Discovery
Summary of Address Discovery Protocols 3-1Changing the Order of Network Information Requests 3-2 Using BOOTP/DHCP for Address Discovery 3-3
Making Sure that BOOTP Is Enabled 3-4
Adding Options for NCD Terminals to the bootptab File 3-5 bootptab Format and Options 3-5
Adding Terminal Entries to the bootptab File 3-7 Configuring the Gateway Device and Terminal for Booting through a Gateway 3-8
Contents
iv
Setting the Broadcast Address 3-12
Configuring Subnet Mask Discovery 3-13
Using ICMP to Discover the Subnet Mask 3-14 Setting the Subnet Mask in NVRAM 3-14 Communicating with Multi-Homed Hosts 3-15
Using a Reverse Name Request 3-15
Chapter 4
Booting—X Server Loading
Configuring the Default X Server Loading Sequence 4-1
Disabling Automatic Booting 4-4
Disabling Broadcast Requests for an X Server 4-4 Disabling the MOP Request for an X Server 4-5
Disabling Selected TFTP or NFS Requests for an X Server 4-5 Specifying a Non-Standard X Server Filename 4-7
Specifying a Non-Standard X Server Directory 4-7
Keeping the Terminal from Entering the Boot Monitor at Boot Time 4-7
Configuring the Sequence of X Server Loading Methods 4-8 Configuring X Server Module Loading 4-10
Changing X Server Module Load Policy 4-10 Changing the X Server Module Location 4-11 Using TFTP for X Server Downloading 4-12
Making Sure TFTP is Enabled 4-12
Specifying a Custom X Server Directory 4-12 Using NFS for X Server Downloading 4-13
Making Sure NFS is Available 4-13
Contents
v
Specifying Boot Hosts 4-16
Specifying the Initial Boot Host 4-16 Specifying Backup Boot Hosts 4-16 Booting Manually from the Boot Monitor 4-17
Manual Boot from a PCMCIA Card 4-18 Manual Boot Using TFTP or NFS 4-18
Chapter 5
Configuring Network Services
Which Network Services Are Used by NCD Terminals 5-1
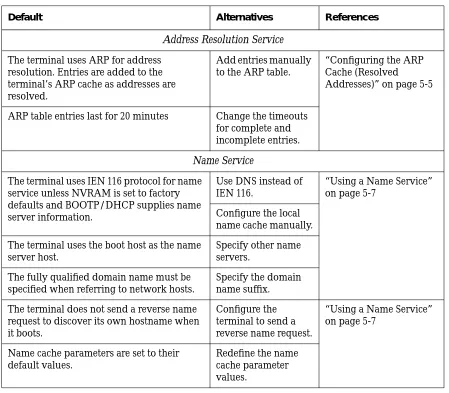
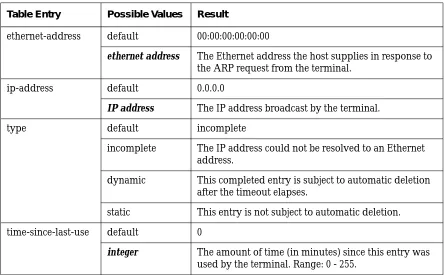
Summary of Network Service Defaults and Alternatives 5-3 Configuring the ARP Cache (Resolved Addresses) 5-5
Using a Name Service 5-7
Making Sure a Name Service is Running on the Local Network 5-7
Making Sure the Terminal Uses the Name Service 5-7 Selecting the Name Service Protocol 5-8
Specifying Name Server Hosts 5-8
Specifying the Default Domain Suffix for DNS 5-9
Configuring the Name Translation Table (Local Name Cache) 5-10
Setting the Name Cache Entry Lifetime 5-10 Setting the Name Cache Size 5-11
Setting Name Service Timeouts 5-11
Discovering the Terminal’s Hostname when Booting (Reverse Name Request) 5-12
Configuring How a Terminal Accesses Files 5-13
Configuring the Initial File Servers 5-13 Configuring the File Service Table 5-15
Contents
vi
Configuring File Access through TFTP 5-20 Secure versus Non-Secure TFTP 5-20
Make Sure TFTP Is Enabled on the Host 5-21 Configuring File Access through NFS 5-22
Configuring the Host for NFS File Access 5-22 Setting User and Group IDs for NFS File Access 5-22 Setting the Unmount Timer for NFS File Access 5-23 Changing the Timeout for Failed File Servers 5-24 Issuing Extended File Service Diagnostic Messages 5-24 Configuring Routing (Accessing Remote Networks) 5-25
Specifying Default Gateways 5-25 The IP Routing Table 5-26
Finding Routes to Hosts through Proxy ARP 5-29 Discovering Neighboring Gateways through Router Discovery 5-30
Setting TCP Performance Parameters 5-31
Adjusting the TCP Send and Receive Buffers 5-31 Specifying the TCP Timeout 5-32
Specifying TCP Maximum Retransmissions 5-33 Specifying the TCP Linger Time 5-33
Allowing Larger Segment Sizes 5-33
Chapter 6
Terminal Configuration Methods
Configuration Methods Overview 6-2Contents
vii
Access Control for Terminal Configuration Data 6-5 Parameter Types and Groups 6-5
Read/write, Read-only, and Write-only Parameters 6-5 Parameter Groups 6-6
The Configuration Language 6-8
Configuration Language Summary 6-8
Assigning Values to Configuration Parameters 6-11 Simple Assignment Statements 6-11
Tables and Rows 6-11 Types of Values 6-12 Syntax Rules 6-13 Comments 6-14
Assigning Parameters More than Once 6-14 Listing Commands in Order 6-14
Saving Parameters in NVRAM 6-15 Creating Remote Configuration Files 6-16
Using the Sample Configuration File 6-17 Configuration File Size 6-18
Creating a File from the Setup Clients 6-18 Nesting Configuration Files 6-19
Including the User’s Settings in Remote Configuration Files 6-20
Specifying Hosts for Loading Configuration Files 6-21 Enabling Persistent Loading of the Configuration File 6-22
Using Optional Names for Configuration Files 6-23 Suggested Uses for Configuration Filenames 6-25
Disabling Specific Configuration File Download Attempts 6-25
Contents
viii
Disabling All Remote Configuration File Downloads 6-27
Specifying the File for Loading Configuration Defaults 6-27 Changing the Ports for Accessing Configuration Daemons 6-28
Changing Ports for Access to All Configuration Data 6-28 Changing Ports for Access to User Preferences Data Only 6-29 Setting Up Host-Based Access Control for Configuration Data 6-30
Allowing Access from Specified Hosts 6-30 Preventing All Remote Access to the Terminal’s Configuration Data 6-31
Protecting Configuration Parameters 6-32 Using the protect Command 6-32 Using the get-protect Command 6-33 Using the set-protect Command 6-33 Removing Parameter Protection 6-33
Disabling the Configuration Utilities or the Console 6-34
Configuring the Apply Command 6-34 Protocols for Auto-Save 6-35
Configuring Auto-Save to NVRAM 6-35 Configuring Auto-Save to a File 6-36
Disabling Auto-Save 6-36
Contents
ix
Chapter 7
Bitmap Fonts and the Font Server
Font Use Overview 7-1Font Access Sequence 7-2 Font Names 7-2
Wildcards in Font Names 7-4
Bitmap and Outline Font Naming 7-4 Specifying Fonts for Clients 7-4 Obtaining Fonts 7-5
Font Download Methods 7-6
Considerations in Using Downloaded Fonts 7-6 Problems with Client Font Requests 7-6
The Font Path 7-6 Font Formats 7-7
Font Directories and Files 7-8 Font Directories 7-8 Font Files 7-8
Font Management Files 7-9 NCD Font Management Utilities 7-10 Built-In Fonts Summary 7-11
Alternative Methods of Changing the Current Font Path 7-11 Changing the Current Font Path—Using TELNET 7-11 Changing the Current Font Path—Using the xset Client 7-13 Setting the Default Font 7-13
Changing the Size of the Font Cache 7-14 Renaming the Font Management Files 7-15
Specifying Font Path Aliases 7-16
Contents
x
Getting Font Information 7-17
Viewing the Font Path—xset 7-18
Listing the Available Fonts—xlsfonts 7-18 Displaying the Characters in a Font—xfd 7-18
Displaying Samples of a Font and XLFD Names—xfontsel 7-19
Font Server Issues 7-19
How the Font Server Accesses Fonts 7-19 Usable Font Formats with a Font Server 7-20 Font Server Configuration Issues 7-21
Network Considerations 7-21 Host Considerations 7-21 Default Font Specifications 7-23 Error Logging 7-23
Example NCD Font Server Configuration File 7-23 Configuring Font Server Timeouts 7-25
Getting Information about the Font Server 7-26
Getting Information about Fonts from the Font Server 7-27 Displaying Font Server Fonts 7-27
Chapter 8
Login and X Session Management
XDM Default Actions 8-2XDM Overview 8-3
Components of XDM 8-4
XDMCP Queries and Host Responses 8-4 XDM and the DISPLAY Variable 8-5 The NCD Login Chooser 8-5
Contents
xi
Configuring XDM Hosts 8-5
Installing the XDM Binary File 8-6 Installing XDM Configuration Files 8-6
Configuring the System-Wide XDM Session Management File 8-7
The Default Xsession File 8-8
Example Xsession File for the Local NCD Window Manager 8-9
Sample Xsession File for OpenWindows 8-10 Individual XDM Session Management Files 8-11 Configuring the XDM Xaccess File 8-11
Contents of an Xaccess File Entry 8-11 Types of Xaccess File Entries 8-12
Direct and Broadcast Entries in the Xaccess File 8-12 Indirect Entries in the Xaccess File 8-13
Configuring the xdm-config File 8-13 Configuring the Polling Interval 8-14 Configuring the Version of xrdb to Use 8-14 Configuring the XDM Xresources File 8-14 The XDM Error Logging File 8-14
Starting XDM Manually 8-15 XDM Access Control 8-15
If XDM Cannot Write to a User’s Home Directory 8-16 Configuring Terminals for XDM 8-17
Configuring the Login Chooser Redisplay 8-17
Configuring the Terminal’s Action when XDM Terminates 8-17
Contents
xii
Chapter 9
Using Configuration Menus
Using Change Quick Setup 9-1Components of the Change Quick Setup Window 9-1 Contents of the Change Quick Setup Hide Boxes 9-3
Booting Parameters 9-3 Files Parameters 9-3 Fonts Parameters 9-4 Licenses Parameters 9-5 Network Parameters 9-5 Session Parameters 9-6 Using Change Setup Parameters 9-7
Components of the Change Setup Parameters Window 9-7 Contents of the Change Setup Parameters Hide Boxes 9-8
Access Control Parameters 9-9 ARP Parameters 9-13
Booting Parameters 9-13 Browser Parameters 9-16
Commands and Startup Parameters 9-18 Configuration Parameters 9-18
Diagnostics Parameters 9-20 Display PostScript Parameters 9-21 File Manager Parameters 9-21 File Service Parameters 9-22 Fonts Parameters 9-23
Input Devices Parameters 9-24 IP Parameters 9-25
Java Parameters 9-27 LAT Parameters 9-27 Licenses Parameters 9-28
Contents
xiii
Login Parameters 9-29 NCDnet Parameters 9-31
NCDnet Name Service Parameters 9-32 Network Interfaces Parameters 9-32 Parallel Parameters 9-33
PEX Parameters 9-33 PEX Color Parameters 9-34 PPP and SLIP Parameters 9-35 Serial Parameters 9-35
TCP Parameters 9-36
TCP/IP Name Service Parameters 9-37 Time Parameters 9-38
Unit Parameters 9-38 Video Parameters 9-39
VT320 Terminal Emulation Parameters 9-39 WinCenter Parameters 9-40
X and Graphics Parameters 9-40 XRemote Parameters 9-41
3270 Terminal Emulation Parameters 9-42 Using Change User Preferences 9-43
Components of the Change User Preferences Window 9-43 Components of the Change User Preferences Hide Boxes 9-44
Audio Preferences 9-44 Bell Preferences 9-45
Compatibility Preferences 9-45
Console and Utilities Preferences 9-46 Environment Variables Preferences 9-47 Font Preferences 9-47
Contents
xiv
Pointing Devices Preferences 9-51 Power Management Preferences 9-52 Screen Background Preferences 9-52 Screen Saver Preferences 9-53
X, SIE, and Graphics Preferences 9-54
Chapter 10
Statistics Menus
Accessing Statistical Parameters 10-1
Components of the Show Statistics Window 10-1 Contents of the Statistics Hide Boxes 10-2
Ethernet Statistics 10-2 Font Usage Statistics 10-3 ICMP Statistics 10-3 IP Statistics 10-6
Loadable Modules Statistics 10-8 NCDnet Statistics 10-9
NCDnet Name Service Statistics 10-10 Network Buffers Statistics 10-11 Network Interfaces Statistics 10-13 NFS Statistics 10-13
Parallel Daemon Statistics 10-16 Serial Statistics 10-17
Serial Daemons Statistics 10-17 SNMP Statistics 10-18
TCP Statistics 10-21
TCP/IP Name Service Statistics 10-24 TFTP Statistics 10-25
Token-Ring Statistics 10-26 UDP Statistics 10-26
Unit Statistics 10-27
Contents
xv
XRemote Statistics 10-30
Chapter 11
Boot Monitor and NVRAM
Boot Monitor Versions 11-1Boot Monitor Functions 11-2
Automatic Boot Monitor Functions 11-2 Self Tests and Commands for Testing 11-2
Keyboard Controller and Supported Keyboards 11-3 Address Discovery 11-3
X Server Downloading 11-4 Display Blanking 11-5
Interactive Boot Monitor Functions 11-5 Using Boot Monitor Commands 11-6
Starting the Boot Monitor Utility 11-6
Issuing Commands to the Boot Monitor 11-7 Updating the Boot Monitor on Explora Terminals 11-11
Using Boot Monitor Setup Menus to Configure Terminals 11-12
Starting Boot Monitor Setup 11-12 Navigating in Boot Monitor Setup 11-13 Setting the Keyboard Type 11-13
Setting Monitor Resolution and Dots Per Inch 11-13 The Monitor Resolution Window 11-14
The Dots Per Inch Window 11-14 Setting Network Parameters 11-14 Setting Booting Parameters 11-16
Finishing the Boot Monitor Setup Session 11-17
Contents
xvi
Using the NVRAM Utility to Configure Terminals 11-20
Starting the NVRAM Utility 11-20 NVRAM Utility Commands 11-20 Sample NVRAM Utility Sessions 11-21
Changing Contents Byte by Byte 11-21 Changing Individual Bits in a Byte 11-23 NVRAM Contents 11-24
Keyboard Type Settings 11-32
Parameters Saved in the Tagged Strings Area 11-37
Remote Configuration Parameters Saved in NVRAM 11-38
Chapter 12
Configuring the NCD Terminal Emulator
Other Sources of Information on the Terminal Emulator 12-1 Configuring Local Services in the Terminal Host Chooser 12-2Configuring a Terminal for Serial Terminal Emulation 12-3 Configuring Key Translations 12-4
Configuring the Terminal Emulator Window and Menus 12-5 Terminal Emulator Fonts 12-5
Terminal Emulator Scroll Bars 12-6 Terminal Emulator Menus 12-6
The File Menu 12-6 The Options Menu 12-8 The Fonts Menu 12-10 The Cursors Menu 12-11 The Keys Menu 12-11 Selecting in the Window 12-12
Configuring the Window Disconnect Delay 12-12
Contents
xvii
Using VT320 Terminal Emulator Escape Sequences 12-13
Configuring the Status Line 12-27
Programming Function Keys on N-108LK Keyboards 12-28
Configuring Window and Icon Titles 12-30 Configuring Color Text 12-30
Using Keyboard Escape Sequences 12-34
N-101/N-102 Keyboard Escape Sequences 12-35
N-108LK (VT220-Style) Keyboard Escape Sequences 12-38 N-97/N-Kana Keyboard Escape Sequences 12-42
Using Compose Key Sequences 12-44
Support for Dead Keys 12-44 Typing Compose Sequences 12-44 Compose Sequence Table 12-45
VT320 Character Coding Conventions 12-51 Character Sets 12-51
Character Code Tables 12-52
Chapter 13
Configuring Display PostScript
DPS Overview 13-1DPS Requirements 13-2 Using DPS Support Files 13-3
The PostScript Resource File 13-3
Sections in the PostScript Resource File 13-3
Creating or Updating the PostScript Resource File 13-5 The Virtual Memory File 13-7
Contents
xviii
Configuring the DPS Resource Path 13-10
Configuring DPS Font Access by X Clients 13-11 Freeing the DPS Cache 13-12
Troubleshooting DPS 13-12
If the DPS Extension Fails to Start 13-12 File Service Problems 13-12
DPS Applications on Solaris Systems 13-13 Running AnswerBook 13-13
Running ImageTool 13-14 Running PageView 13-15
Chapter 14
Configuring PEX
PEX Overview 14-1The PEX X Server Module 14-2 PEX Fonts 14-2
PEX Requirements 14-3
Setting PEX Configuration Parameters 14-3
Setting the Parameters Listed in Change Setup Parameters 14-3
PEX Color Parameters 14-5
Setting the Parameters Listed in Change User Preferences 14-9
Specifying the Nominal Line Width 14-9 Specifying the Nominal Edge Width 14-9 Specifying the Nominal Marker Size 14-10 Specifying Surface Dithering 14-10
Specifying Surface Interior Style, Shading, and Lighting 14-11
Contents
xix
Troubleshooting PEX 14-14
If the PEX Client Does Not Run 14-14 If the PEX Client Looks Different 14-14
Chapter 15
Configuring Serial and Parallel Ports
Ports Overview 15-1Serial Ports 15-1 Parallel Port 15-2
Configuring Port Operating Characteristics 15-2
Identifying Serial Port Numbers 15-2
Specifying Physical Serial Port Attributes 15-2 Specifying Serial Port Software Characteristics 15-6 Configuring the Parallel Port 15-8
Configuring a Terminal for Use as a System Console 15-9 Controlling Access to Serial and Parallel Ports 15-10
Chapter 16
Using SNMP for Terminal Management
SNMP Overview 16-1SNMP Components 16-1 How SNMP Works 16-2 MIB Contents 16-2
SNMP Host Requirements 16-3
Controlling Access to Terminals through SNMP 16-3 Configuring Read/Write Access 16-4
Configuring Read-Only Access 16-5
Contents
xx
Using SNMP to Read and Write Variables 16-7
Reading a Terminal’s SNMP Variables 16-7 Using SNMP Management Software 16-7 Using the ncdquery Utility 16-7
Writing SNMP Variables—Configuring Terminals 16-9 Using SNMP Remote Reset/Reboot 16-10
Configuring a Host for SNMP Remote Reset 16-10 Configuring a Terminal for SNMP Remote Reset 16-11 Resetting Session and Rebooting Terminals 16-11
Using the ncdreset Utility for Remote Reset 16-11
Using unit-administrative-status for SNMP Remote Reset 16-12
Chapter 17
Keyboards and Downloadable Keyboard
Definitions
Specifying the Keyboard Type 17-2
N-97 Keyboard Details 17-4 N-101 Keyboard Details 17-13
VT220-Compatible and N-108 Keyboard Details 17-21 VT220-Compatible Keyboard 17-21
N-108 Keyboard 17-21
N-107 Sun Type 4-Compatible Keyboard Details 17-36
N-123 Sun Type 5-Compatible Keyboard Details 17-44 Using Downloadable Keyboard Description Files 17-54
Contents
xxi
Chapter 18
X Server Messages
Messages and Modules Overview 18-1The Format of Messages 18-2 Displaying Messages 18-4
Viewing Messages in the Console Window 18-4 Viewing Messages through TELNET 18-4 Logging Messages to a File 18-5
Configuring Message Logging 18-5
Configuring Message Time Stamps 18-5 Changing the Message Buffer Size 18-6 Enabling Extended Diagnostics 18-6 Messages Common to All Modules 18-7 CALIBLIGHTPEN Messages 18-15
CALIBTOUCH Messages 18-16 CONFIGD Messages 18-17
CONFUI Messages 18-30 CONSOLE Messages 18-33
DESKTOP Messages 18-36 DHCP Messages 18-37
DIAGD Messages 18-38 DOS Messages 18-38
DTR Messages 18-40 EXECD Messages 18-40
FILED Messages 18-44 FONT Messages 18-48
Contents
xxii
KBM Messages 18-58
KEYMAPPER Messages 18-67 LICENSE Messages 18-67
LOADB Messages 18-74 LOCALDEV Messages 18-77
LOGIN Messages 18-78 MIRRORD Messages 18-81
MPEGPLAY Messages 18-82 MWM Messages 18-83
NCD Mosaic Browser Messages 18-84 NCDDM Messages 18-86
NETD Messages 18-87 NETFILE Messages 18-87
NETSRV Messages 18-93 OPENGL Messages 18-94
PPPD Messages 18-96 PRINTAPIS Messages 18-99
RTLD Messages 18-103 SERIALD Messages 18-106
SIE Messages 18-108 SNMPD Messages 18-108
TERM Messages 18-109
TOKENRING Messages 18-122
UI Messages 18-125
VIDEO, VIDEODECODER, and VIDEOPLAYER Messages 18-127
Contents
xxiii
WM Messages 18-133
XREMOTE Messages 18-136 XRPRINTD Messages 18-138
XSERVER Messages 18-139 XT Messages 18-141
Contents
About this Manual 1-1
1 About this Manual
This chapter provides information about this manual and otherNCD publications.
Intended Audience
This manual is intended for system administrators and network administrators who are responsible for:
❏ Setting upNCD network computers (also calledNCD terminals in this manual) for networked use
❏ Setting up the user’s work environment
The manual assumes familiarity with theUNIX operating system, the X Window System (X),TCP/IP, and local area networks—Ethernet or Token-Ring.
If you are not familiar with X,NCD recommends the series of books published by O’Reilly & Associates, Inc. The series includes books for users and for system administrators.
Purpose
In most cases, thencdinstall program is the most efficient way to prepare a terminal for booting and to make sure that necessary network services and files are available. Besides placing NCDware on the boot host,ncdinstall
prepares terminals for booting, enables network services, add terminals to network databases, and makes host-resident files (such as configuration files and fonts) available to terminals.
While the NCDware System Administrator’s Guide for UNIX Systems describes the most common terminal configuration tasks, this manual describes how to further customize all aspects of terminal operation. This manual also
Contents of this Manual
1-2 About this Manual
Contents of this Manual
This manual contains up-to-date reference information about the current release ofNCDware. A brief description of each chapter follows.
❏ Chapter 1, About this Manual, describes the audience, purpose and contents of this manual, otherNCD manuals, and conventions used in this manual.
❏ Chapter 2, Booting Defaults, lists the default actions of the terminal as it boots, including discovering network addresses and other information, loading an X server, loading a configuration file, reading font directories, and displaying a login prompt. For each of these actions, alternatives are listed and references are given to the chapters and other manuals where defaults and alternatives are described.
❏ Chapter 3, Booting—Address Discovery, describes methods of discovering or specifying network addresses and other network information needed by the terminal when it boots.
❏ Chapter 4, Booting—X Server Loading, describes the default X server loading sequence and alternatives, loading server modules, booting manually, setting the broadcast address, and setting the Token-Ring speed onHMX terminals.
❏ Chapter 5, Configuring Network Services, summarizes the protocols and other network services normally required byNCD terminals and provides details about configuring address resolution, name services, file access, communication with multi-homed hosts, routing, and settingTCP performance parameters.
❏ Chapter 6, Terminal Configuration Methods, gives an overview of terminal configuration methods, describes configuration parameters and configuration language commands, provides options for creating
configuration files, and describes optional filenames and directories for configuration files.
Contents of this Manual
About this Manual 1-3
host, including the font server configuration file, starting the font server, remote configuration parameters for the font server, and getting
information about fonts.
❏ Chapter 9, Using Configuration Menus, describes the controls, menus, and fields in the three configuration utilities accessed through the Console: Change Quick Setup, Change Setup Parameters, and Change User Preferences. The chapter includes a brief description of each field and the name of the corresponding remote configuration parameter. ❏ Chapter 10, Statistics Menus, describes the controls, menus, and fields in
the Show Statistics utility. The chapter includes a brief description of each statistical field and the name of the corresponding remote configuration parameter.
❏ Chapter 11, Boot Monitor and NVRAM, describes the functions and commands of the Boot Monitor, how to use the Boot Monitor Setup menus to quickly configure a terminal, how to use theNVRAM nv utility to read and change parameters that are stored inNVRAM, and information about the configuration data stored inNVRAM.
❏ Chapter 8, Login and X Session Management, provides details aboutXDM (X Display Manager) components and files, how to startXDM manually, andXDM access control.
❏ Chapter 12, Configuring the NCD Terminal Emulator, describes the components of the VT320 terminal emulator, the menus and controls, configuring the emulator with X resources, escape sequences, compose key sequence, and character coding.
❏ Chapter 13, Configuring Display PostScript, describesDPS features, requirements, support files, fonts, configuration parameters, and suggestions for troubleshooting.
❏ Chapter 14, Configuring PEX, describesPEX (PHIGS extension to X, support for 3D graphics applications) and includes information aboutPEX fonts, requirements, configuration parameters, input devices, and
suggestions for troubleshooting.
❏ Chapter 15, Configuring Serial and Parallel Ports, describes the ports on NCD terminals, setting port attributes, and controlling host access to ports. ❏ Chapter 16, Using SNMP for Terminal Management, describes host
Other NCD Manuals
1-4 About this Manual
configuration parameters forSNMP, reading and writingSNMP variables, and usingSNMP to remotely reset sessions and reboot terminals.
❏ Chapter 17, Keyboards and Downloadable Keyboard Definitions,
describesNCD keyboards and how to use downloadable keyboard files to use unsupported keyboards.
❏ Chapter 18, X Server Messages, describes X server messages and message logging.
Other NCD Manuals
This Reference Manual and the following manuals contain up-to-date information about this version ofNCDware:
❏ NCDware System Administrator’s Guide for UNIX Systems—procedures for managingNCD terminals
❏ NCDware Release Notes—description of new features added since NCDware 4.1, known problems, and problems fixed
❏ NCDwareCD Insert—instructions for usingNCD installation scripts to installNCDware onUNIX and WinCenter hosts
❏ NCDware User’s Guide—introductory manual providing information to assist users in becoming productive with theirNCD terminals.
❏ Remote Configuration Parameter Quick Reference—description of remote configuration parameters (for terminal configuration)
❏ NCDware Publications Roadmap—high-level index of major topics inNCD manuals; points the reader to the documents or chapters in which the topics are addressed
❏ FLEXlm End User Manual—a detailed description of how to use and configureFLEXlm license management software
❏ Using the 3270 Terminal Emulator—how to use and configureNCD’s 3270 terminal emulation software
❏ Installing Your PCMCIA Card—how to install and use aPCMCIA card with your terminal
Conventions Used in this Manual
About this Manual 1-5
For documents describingNCD’s WinCenter software, see the WinCenter manuals accompanying the WinCenter software. (See the NCDware System Administrator’s Guide for UNIX Systems, the index of this manual and the NCDware Publications Roadmap for references to configuringNCDware for use with WinCenter.)
Conventions Used in this Manual
The following typographical conventions are used in this manual.
Other conventions used in this manual are:
❏ When you should press two keys at the same time, they are shown as in this example:
Ctrl-Z Press the Control and z key together ❏ You should press Return after all commands.
❏ Movement through menus in the Console is shown as a series of arrows. For example, Setup⇒ Change Setup Parameters⇒ Serial means to display the Setup menu, select the Change Setup Parameters menu item and open theSerial hide box.
Text in This Format Indicates ...
display text Text displayed on the screen or text in a file, for example, a field in the Setup menus
input text Text to be typed as shown
variable Portion of a command line or line in a file where you provide the value; for example, a terminal’s IP address
filename The name of a system file, directory, or pathname
emphasized text An especially important word or phrase or explanatory text parameter name The name of a remote configuration parameter
Comments on the Manual
1-6 About this Manual
Comments on the Manual
Booting Defaults 2-1
2 Booting Defaults
This chapter provides a summary of the default booting process of anNCD terminal:
❏ Address discovery
❏ Loading and executing the X server ❏ Loading configuration files
❏ Obtaining fonts
❏ Displaying a login prompt
For each default action, the alternatives (if any) are listed, followed by references that provide information about customizing each action.
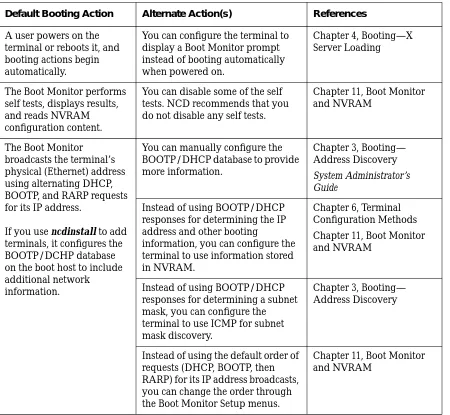
Summary of Booting Alternatives
Table 2-1 lists the default booting actions of anNCD terminal and the alternatives to each action. When you add a terminal to the network using
ncdinstall, the defaults are in effect.
Caution
Summary of Booting Alternatives
[image:32.612.44.494.88.503.2]2-2 Booting Defaults
Table 2-1 Chronological Summary of Default Booting Actions and Alternatives
Default Booting Action Alternate Action(s) References
A user powers on the terminal or reboots it, and booting actions begin automatically.
You can configure the terminal to display a Boot Monitor prompt instead of booting automatically when powered on.
Chapter 4, Booting—X Server Loading
The Boot Monitor performs self tests, displays results, and reads NVRAM configuration content.
You can disable some of the self tests. NCD recommends that you do not disable any self tests.
Chapter 11, Boot Monitor and NVRAM
The Boot Monitor broadcasts the terminal’s physical (Ethernet) address using alternating DHCP, BOOTP, and RARP requests for its IP address.
If you use ncdinstall to add terminals, it configures the BOOTP/DCHP database on the boot host to include additional network information.
You can manually configure the BOOTP/DHCP database to provide more information.
Chapter 3, Booting— Address Discovery
System Administrator’s Guide
Instead of using BOOTP/DHCP responses for determining the IP address and other booting
information, you can configure the terminal to use information stored in NVRAM.
Chapter 6, Terminal Configuration Methods Chapter 11, Boot Monitor and NVRAM
Instead of using BOOTP/DHCP responses for determining a subnet mask, you can configure the terminal to use ICMP for subnet mask discovery.
Chapter 3, Booting— Address Discovery
Instead of using the default order of requests (DHCP, BOOTP, then RARP) for its IP address broadcasts, you can change the order through the Boot Monitor Setup menus.
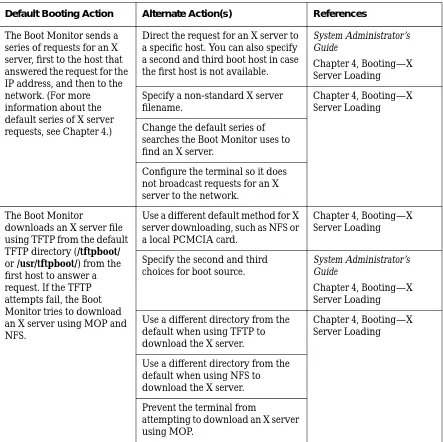
Summary of Booting Alternatives
Booting Defaults 2-3
The Boot Monitor sends a series of requests for an X server, first to the host that answered the request for the IP address, and then to the network. (For more information about the default series of X server requests, see Chapter 4.)
Direct the request for an X server to a specific host. You can also specify a second and third boot host in case the first host is not available.
System Administrator’s Guide
Chapter 4, Booting—X Server Loading Specify a non-standard X server
filename.
Chapter 4, Booting—X Server Loading Change the default series of
searches the Boot Monitor uses to find an X server.
Configure the terminal so it does not broadcast requests for an X server to the network.
The Boot Monitor
downloads an X server file using TFTP from the default TFTP directory (/tftpboot/ or /usr/tftpboot/) from the first host to answer a request. If the TFTP attempts fail, the Boot Monitor tries to download an X server using MOP and NFS.
Use a different default method for X server downloading, such as NFS or a local PCMCIA card.
Chapter 4, Booting—X Server Loading
Specify the second and third choices for boot source.
System Administrator’s Guide
Chapter 4, Booting—X Server Loading Use a different directory from the
default when using TFTP to download the X server.
Chapter 4, Booting—X Server Loading
Use a different directory from the default when using NFS to download the X server. Prevent the terminal from
[image:33.612.63.506.88.530.2]attempting to download an X server using MOP.
Table 2-1 Chronological Summary of Default Booting Actions and Alternatives
Summary of Booting Alternatives
2-4 Booting Defaults
If the Boot Monitor does not find an X server, it displays its prompt and waits for the user to type a manual boot command.
Set the Boot Monitor to continue attempting to download an X server until the booting process is
manually interrupted. When the booting process is interrupted, the terminal displays the Boot Monitor prompt.
Chapter 4, Booting—X Server Loading
The Boot Monitor executes the X server, and the X server takes control of the terminal, displaying the name of the X server file and the IP address and hostname of the terminal.
None None
The X server loads a configuration file from the boot host’s default
configuration directory, /usr/lib/X11/ncd/configs. The X server searches for two default configuration filenames: a terminal-specific file named with the hexadecimal equivalent of the terminal’s IP address and a generic file named ncd_std.
Set the X server to download the configuration file from a host other than the boot host by specifying an initial file server host and a
secondary file server host.
Specifying an initial file server host also allows terminals booted from a local PCMCIA card to download configuration files from a host.
Chapter 5, Configuring Network Services
Use a configuration file with a non-standard or custom filename.
Chapter 6, Terminal Configuration Methods
If the terminal does not find a configuration file, it continues to boot without one.
Prevent the terminal from booting without a configuration file.
Chapter 6, Terminal Configuration Methods
Table 2-1 Chronological Summary of Default Booting Actions and Alternatives
Summary of Booting Alternatives
Booting Defaults 2-5
The X server reads the font directories in its default font path on its boot host.
You can configure the terminal to use a custom font path.
Chapter 7, Bitmap Fonts and the Font Server Instead of, or in addition to reading
font directories directly, you can configure the terminal to use a font server.
Chapter 7, Bitmap Fonts and the Font Server
If a specified font cannot be found, the terminal uses its default font. You can specify a different default font.
Chapter 7, Bitmap Fonts and the Font Server
The X server reads the default keysym database file.
Specify an alternate keysym file (xserver-keysym-file parameter).
Remote Configuration Parameter Quick Reference
The X server reads the default color database file.
Specify an alternate color database file (xserver-rgb-file parameter).
Remote Configuration Parameter Quick Reference
The Console and a Login Chooser appear for the user to select a login host. The Login Chooser displays all the hosts that responded to XDMCP requests from the terminal.
You can specify a customized set of local clients that appear at startup.
System Administrator’s Guide
You can configure a customized Login Chooser or specify that only a login banner appears.
Chapter 8, Login and X Session Management
System Administrator’s Guide
You can configure the terminal to display a Terminal Host Chooser for the user to log in through the NCD Terminal Emulator.
Chapter 12, Configuring the NCD Terminal Emulator
System Administrator’s Guide
Table 2-1 Chronological Summary of Default Booting Actions and Alternatives
Summary of Booting Alternatives
Booting—Address Discovery 3-1
3 Booting—Address Discovery
This chapter describes alternative methods of obtaining the network information necessary for the terminal to boot and to participate on the network. The following topics are covered in this chapter:
❏ “Summary of Address Discovery Protocols” on page 3-1
❏ “Changing the Order of Network Information Requests” on page 3-2 ❏ “Using BOOTP/DHCP for Address Discovery” on page 3-3
❏ “Using RARP for Address Discovery” on page 3-10 ❏ “Storing Addresses in NVRAM” on page 3-11 ❏ “Setting the Broadcast Address” on page 3-12 ❏ “Configuring Subnet Mask Discovery” on page 3-13 ❏ “Communicating with Multi-Homed Hosts” on page 3-15 ❏ “Using a Reverse Name Request” on page 3-15
Summary of Address Discovery Protocols
When anNCD terminal powers up, it knows only its Ethernet or Token-Ring address, which is set inNVRAM at the factory. To participate on a network, a terminal must be able to discover its network address. Depending on your network setup, the terminal may need other information. The three ways for the terminal to discover addresses and other information before loading the X server are:
❏ DHCP (Dynamic Host Configuration Protocol) andBOOTP (Bootstrap Protocol)—DHCP andBOOTP are widely available protocols, and are the recommended methods of address discovery. By default, anNCD terminal broadcasts alternatingDHCP,BOOTP, andRARP requests when it boots. These requests contain the terminal’s Ethernet or Token-Ring address. A host running theDHCP orBOOTP daemon and configured with
Changing the Order of Network Information Requests
3-2 Booting—Address Discovery
Depending upon the protocol implementation and the information in the host’s database, it can return other addresses and permit the terminal to boot from a host on a different subnet. It can also specify the X server that each terminal boots.
For more information aboutDHCP andBOOTP, see “Using BOOTP/DHCP for Address Discovery” on page 3-3.
❏ RARP (Reverse Address Resolution Protocol)—RARP is another widely available address discovery protocol. By default, anNCD terminal automatically broadcasts alternatingDHCP,BOOTP, andRARP requests when it boots. These requests contain the terminal’s Ethernet address or Token-Ring address. A host running theRARP daemon and configured with information about the terminal responds with theIP address of the terminal.
UnlikeBOOTP/DHCP,RARP supplies only the address of the terminal and the address of the host that responded to the terminal’s request for an X server. This method is recommended if you do not haveBOOTP/DHCPon your network.
For more information aboutRARP, see “Using RARP for Address Discovery” on page 3-10.
❏ NVRAM—You can save all of the necessary network addresses inNVRAM, where they remain even when the terminal is powered off. This method is recommended if:
— You have no address discovery protocol (BOOTP/DHCPor RARP). — You are booting from a host on a different network through a router
that cannot pass on the boot request.
— You are managing a small group of terminals.
For more information about saving addresses inNVRAM, see “Storing Addresses in NVRAM” on page 3-11 and Chapter 11, Boot Monitor and NVRAM.
Changing the Order of Network Information Requests
Using BOOTP/DHCP for Address Discovery
Booting—Address Discovery 3-3
Using BOOTP/DHCP for Address Discovery
This section describes preparations for usingBOOTP/DHCP. ForBOOTP, you can use the native software on the boot host or the software included in the NCDware distribution.
If you are usingDHCP to provide network information, the terminal configuration is the same as forBOOTP, and the terminal must have Boot Monitor version 2.8 or later.
If you are not usingncdinstall to prepare hosts and terminals for BOOTP/DHCP service, you need to perform the tasks described in the following subsections. The commands and steps may vary from those outlined in this section depending on your host, yourBOOTP/DHCP implementation, and your network. These instructions are guidelines; they are not precise procedures.
NCD terminals sendBOOTP/DHCP requests by default; consequently,
terminal configuration is unnecessary unless you want to change the order in which the terminal sends requests for network information or specify a second or third source. The default order is firstDHCP, thenBOOTP, then RARP.
Note Information provided byBOOTP (for example, the subnet mask) is passed to the X server and may be stored inNVRAM,
overwriting previous values.
TheBOOTP protocol is implemented through daemon programs, such as
bootpd(8), and a database file, such as/etc/bootptab. Hosts configured to use NCD’s dynamicIP address allocation for terminals use an additional database file,/etc/bootptab.cfg.
For specific instructions on usingBOOTP, refer to the following sources:
For Information About: Refer to:
NCD’s BOOTP implementation
The bootpd man page in the NCDware distribution
The native BOOTP already installed on your host
Using BOOTP/DHCP for Address Discovery
3-4 Booting—Address Discovery
For instructions on usingDHCP, refer to your host system’s documentation.
Making Sure that BOOTP Is Enabled
To verify that BOOTP is enabled on your boot host, check the following: ❏ To find out ifbootpdis running, enter aps(1) command. For example:
# ps -axc | grep bootp
On some systems, the command is:
# ps -ef | grep bootp
❏ Host operating systems based on the 4.3BSD UNIX operating system (such as SunOS) require an entry in the/etc/inetd.conf file forBOOTP. Often, these entries exist, but are rendered ineffective by a comment symbol (#) at the beginning of the entry. If this is the case, remove the #. For example, for SunOS:
bootps dgram udp wait root /usr/etc/bootpd bootpd
❏ Make sure thatTCP/IP ports are reserved for thebootpdserver and client processes in the/etc/services file.
The usual entries in/etc/servicesare:
bootps 67/udp bootpc 68/udp
Remove any comment symbols (#) at the beginning of these entries. ❏ If you make any changes in the/etc/inetd.conf or/etc/services file, restart the
inetddaemon.
To restart the daemon, find theinetd processID and send a hangup signal as shown in the following example. This causes the daemon to read the configuration file and use the new information. For example:
# ps -axc | grep inetd 17601 ? I 0:12 inetd # kill -HUP 17601
BOOTP/DHCP options recognized by NCD terminals
Table 3-1 page 3-6
Dynamic IP address allocation using BOOTP
Using BOOTP/DHCP for Address Discovery
Booting—Address Discovery 3-5
On some systems, the command for finding the processID is:
# ps -ef | grep inetd
Adding Options for NCD Terminals to the bootptab File
If you do not usencdinstall to add terminals to the network, you must add BOOTP options for each terminal to the/etc/bootptab database file on the boot host.
bootptab Format and Options
ForBOOTP configuration on your boot host, see your vendor documentation. The normal rules for/etc/bootptabfile entries are:
❏ A colon (:) indicates the end of a field, and a backslash (\) indicates that the entry is continued on the next line.
❏ Spaces are not permitted between the characters on a line.
❏ Fields consist of a tag followed by an equals sign (=) and a value. Each tag identifies a unique parameter.
❏ The Ethernet address has no internal punctuation, such as periods or dashes.
The typical file structure is one or more template entries, containing information common to all terminals or a group of terminals, followed by individual entries, each containing information about a specific terminal:
# Template entry
template.name:\
tag=value:\
. . .
tag=value
# Entry for an NCD terminal
hostname:\
tc=template.name:\
tag=value:\
. . .
Using BOOTP/DHCP for Address Discovery
3-6 Booting—Address Discovery
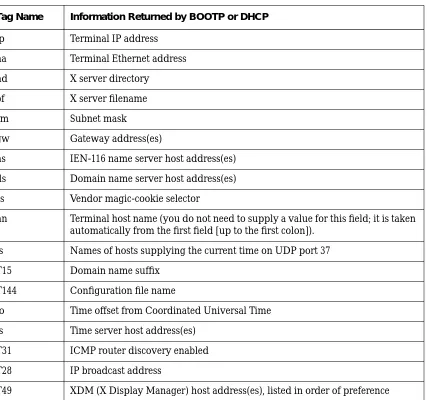
The tags recognized byNCD terminals and supported by the version ofbootpd
provided in theNCDware distribution are listed in Table 3-1. The table lists the normal two-letter tag name or a tag number and a description of the
[image:42.612.53.480.173.573.2]information provided by the tag. Although some versions ofbootpd may provide additional information, only information listed in the table is used by NCD terminals.
Table 3-1 BOOTP/DHCP Tags Used by NCD Terminals
Tag Name Information Returned by BOOTP or DHCP
ip Terminal IP address ha Terminal Ethernet address hd X server directory
bf X server filename
sm Subnet mask
gw Gateway address(es)
ns IEN-116 name server host address(es) ds Domain name server host address(es) cs Vendor magic-cookie selector
hn Terminal host name (you do not need to supply a value for this field; it is taken automatically from the first field [up to the first colon]).
ts Names of hosts supplying the current time on UDP port 37 T15 Domain name suffix
T144 Configuration file name
to Time offset from Coordinated Universal Time ts Time server host address(es)
T31 ICMP router discovery enabled T28 IP broadcast address
Using BOOTP/DHCP for Address Discovery
Booting—Address Discovery 3-7
A fragment of an examplebootptab file follows, with comments identifying the fields.
Adding Terminal Entries to the bootptab File
The required and optional entries in thebootptab file are:❏ One or more template, or global, entries for the information common to all terminals or groups of terminals (optional)
❏ An entry for each terminal containing at least the terminal’s Ethernet address andIP address or its Token-Ring address andIP address If you do not supply the address and the terminal cannot determine its address through other means (usingRARP or reading the address from NVRAM) the terminal will be unable to boot.
Note If the terminal has aTRP board, the current Token-Ring address (also called the active address) is different from the built-in Token-Ring address (also called the static address). When configuringBOOTP, use the current address.
Both addresses are printed on the sticker on the terminal base and on the packing box. The built-in address always begins with 00:00:a7 (for example, 00:00:a7:11:2a:4b). The current address is a bit-reversed version of the built-in address (for example, 00:00:e5:88:54:d2).
# Template entry
global:\ Template entry name gw=192.43.153.1:\ Gateway address sm=255.255.255.000:\ Subnet mask
hd=/tftpboot:\ X server file directory ht=ether Interface name # Entry for an individual NCD terminal
Using BOOTP/DHCP for Address Discovery
3-8 Booting—Address Discovery
The current address is displayed by the Boot Monitor during booting. Both the current address and the built-in address are displayed in Statistics⇒ Show Version. The current address is also displayed in Statistics⇒ Show Statistics⇒ Network Inter-faces⇒ Interfaces Table and in Statistics⇒ Show Statistics⇒ Token-Ring⇒ Interface Table.
❏ If you useBOOTP/DHCP to specify the X server to be downloaded by the terminal, add the X server filename (and the X server directory name, if not specified in the global, or template, entry).
If you do not specify the X server in the/etc/bootptab file, the Boot Monitor uses the default X server download sequence. For information about this sequence, see Chapter 4, Booting—X Server Loading.
If you specify an X server file in/etc/bootptab andbootpd cannot locate the file, the terminal cannot download an X server. In that situation, the Boot Monitor displays its prompt and waits for a manual boot command. Syntax errors in the file may also prevent the terminal from booting. ❏ If the terminal is booting through a gateway (that is, servers are installed
on a host located on a remote network), make sure the gateway to the boot host and subnet mask (if used) are specified in thebootptabfile. See the next section for more information about booting through a gateway.
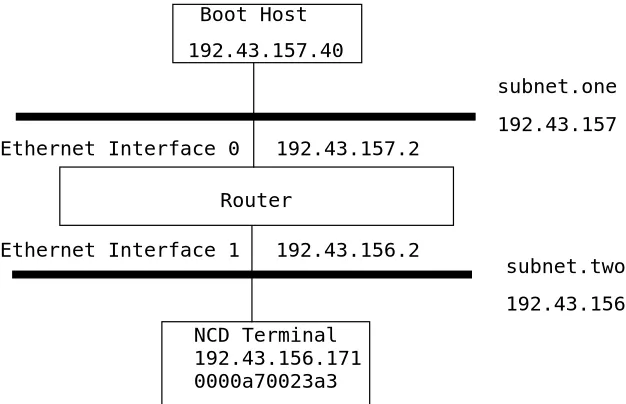
Configuring the Gateway Device and Terminal for Booting through
a Gateway
For booting through a gateway, the device serving as the gateway and the bootptabfile on the boot host must be properly configured.
This section provides an example setup (illustrated in Figure 3-1) for a Cisco router, which is a commonly used gateway device.
TheIP addresses of the gateway’s Ethernet interfaces are:
TheIP address of the boot host is 192.43.157.40.
192.43.157.2 Ethernet Interface 0—for the remote network where the boot host is located.
Using BOOTP/DHCP for Address Discovery
Booting—Address Discovery 3-9
TheIP address of theNCD terminal is 192.43.156.171. Its Ethernet address is 0000a70023a3.
On the router, set the helper address to the address of the remote boot host by entering the following command:
ip helper-address 192.43.157.40
On the boot host, thebootptab file contains the following entries for this example:
# Template entry - every host uses this information global.dummy:\
:sm=255.255.255.0:\ Subnet mask
:hd=/tftpboot/Xncd.4.2.0: X server file directory
# Entries for each subnet
subnet.one:\ Include the template and :tc=global.dummy:gw=192.43.157.2: specify the gateway address
Ethernet Interface 0 192.43.157.2
Ethernet Interface 1 192.43.156.2 Boot Host
192.43.157.40
Router
NCD Terminal 192.43.156.171 0000a70023a3
subnet.one 192.43.157
[image:45.612.181.494.99.301.2]subnet.two 192.43.156
Using RARP for Address Discovery
3-10 Booting—Address Discovery
Using RARP for Address Discovery
You can useRARP instead ofBOOTP/DHCP to determine addresses; however, RARP returns only theIP address of the terminal and the boot host. You must set other addresses needed by the terminal, such as the gateway and subnet mask, inNVRAM. For information about configuring addresses inNVRAM, see “Storing Addresses in NVRAM” on page 3-11.
You cannot useRARP to specify the X server file to load; instead, the terminal uses the default download sequence to locate an X server. For information about the download sequence, see “Booting—X Server Loading” on page 4-1.
RARP is implemented through a daemon program,rarpd(8) that runs on the boot host and a database file called/etc/ethers.
Complete the following tasks if you are usingRARP for address discovery: 1. To verify thatRARP is available, check the relevant host startup file. For
example, on SunOS systems, the startup file to check is/etc/rc.local. The entry forRARP is similar to:
rarpd rarpd -a
2. If the entry is disabled by a comment symbol (#) at the beginning of the line, remove the comment symbol. Then, start the daemon manually by typing the startup command. For example:
subnet.two:\ Include the template and :tc=global.dummy:gw=192.43.156.2: specify the gateway address
# Entry for an NCD terminal
Storing Addresses in NVRAM
Booting—Address Discovery 3-11
# rarpd # rarpd -a
3. If you are not runningNIS (Network Information Service), add each terminal’s Ethernet address and hostname to the/etc/ethers file. For example:
00:00:A7:00:00:AE ncd1
The Ethernet address is entered intoNVRAM at the factory. You can display the address through the Console (Statistics ⇒Show Version). The Ethernet address also appears on a label on the bottom of the terminal base.
4. If you are runningNIS, add the terminal to theethers map and update the map. For example:
# cd /var/yp # make ethers
Storing Addresses in NVRAM
You can manually set all the addresses the terminal needs inNVRAM. This is useful if you have just a few terminals to configure or if address resolution protocols are not running on the boot host. This method is less flexible than discovering addresses from the network because if you move the terminal to another network, you must reconfigure the addresses.
You can place other information inNVRAM, such as the name of an X server to download.
To configure a terminal to obtain addresses fromNVRAM, set the following in Setup⇒ Change Setup Parameters:
Note You can also set addresses in the Boot Monitor Setup menus. 1. In theIP hide box:
a. Turn off theUse Address Discovery toggle so the terminal does not
attempt to discover addresses from the network. b. Enter the addresses you need:
Setting the Broadcast Address
3-12 Booting—Address Discovery
If the terminal is booting through a gateway, set theSubnet Mask, Initial Default Gateway 1, andInitial Gateway 2 (if you have
more than one gateway). The terminal uses the boot host as a gateway if these fields are left at 0.0.0.0 (the default).
If desired, set the Broadcast Address. The default address of 255.255.255.255 works, although the Boot Monitor displays error messages as the terminal boots.
2. In the Booting hide box:
a. Make surePrimary Boot Source is set toTFTPorNFS.
b. SetTCP/IP Desired Server to the network address of the boot host.
Set theSecondary andTertiary Server fields, if desired, to
designate backup boot servers.
3. Click onApply to save addresses inNVRAM.
The next time the terminal boots, the Boot Monitor uses the addresses stored inNVRAM.
For more information about saving configuration settings set through the Setup menus or remote configuration files toNVRAM, see the System Administrator’s Guide for UNIX Systems.
Setting the Broadcast Address
Whenever the terminal broadcasts to the network, for example, when
discovering itsIP address or broadcasting for an X server, it uses its broadcast address.
The default broadcast address is 255.255.255.255. If this address is not the correct address for your network and the terminal broadcasts for the X server, the server download succeeds but a warning message is displayed.
To prevent the warning message display, the broadcast address must be set to reflect the subnet mask, if any, and the host portion of the address.
Configuring Subnet Mask Discovery
Booting—Address Discovery 3-13
For example, in a class B network with the network address 191.40.0.0 and a subnet mask of 0xFFFF0000 (255.255.000.000), the broadcast address setting is:
ip-broadcast-address = 191.40.255.255
Configuring Subnet Mask Discovery
Subnets are used to extend the network portion ofIP addresses. This allows you to divide a physical network into separate subnets. The subnet mask distinguishes the subnet from the rest of the address. If subnetting is used on the local network, the terminal must be able to discover the subnet mask.
If a bit is on in the subnet mask, the equivalent bit in theIP address is
interpreted as a network bit. If a bit is off in the mask, the equivalent bit in the IP address is interpreted as part of the host address. Therefore, the subnet mask has 1s in the network and subnet portions of the address and 0s in the host portion.
Subnet masks can be written as hexadecimal numbers or as decimalIP addresses.
For example, if the network portion of a class B address is extended by one byte, the subnet mask is 255.255.255.0. The first two bytes of the address define the class B network address, the third byte defines the subnet portion, and the fourth byte defines the host address.
There are three methods for making sure the terminal can discover the subnet mask:
❏ Set the subnet mask in thebootptabfile (for information about using BOOTP to set the subnet mask, see “Using BOOTP/DHCP for Address Discovery” on page 3-3)
Table 3-2 ip-broadcast-address Parameter
Possible Values Result
default 255.255.255.255 or 0xFFFFFFFF
Configuring Subnet Mask Discovery
3-14 Booting—Address Discovery
❏ UseICMPto obtain the subnet mask from the network (see “Using ICMP to Discover the Subnet Mask” on page 3-14)
❏ Set the subnet mask explicitly in a remote configuration file, the Console Setup menus, or the Boot Monitor Setup menus and save it inNVRAM (see “Setting the Subnet Mask in NVRAM” on page 3-14)
Using ICMP to Discover the Subnet Mask
As an alternative to setting the subnet mask throughBOOTP/DHCP or a terminal configuration parameter, the terminal can discover its subnet mask at boot time throughICMP(Internet Control Message Protocol). ICMP is included in theTCP/IP protocol family.
In this method of discovering the subnet mask, anICMP message is sent to the broadcast address to determine the appropriate subnet mask when the terminal boots.
To discover the subnet mask throughICMP, set the boot-send-broadcast-icmp-for-subnet-maskparameter to “true.” This option can produce a lot of network traffic, so you should use it only on networks with a small number of NCD terminals. This parameter is saved inNVRAM.
(Setup⇒ Change Setup Parameters⇒ Booting [TCP/IP Boot Options section] ⇒ Send BroadcastICMP for Subnet Mask).
Setting the Subnet Mask in NVRAM
Use theip-subnet-maskparameter to set the subnet mask explicitly (Setup⇒ Change Setup Parameters⇒IP⇒ Subnet Mask). This parameter takes effect immediately and is saved inNVRAM.
Table 3-3 boot-send-broadcast-icmp-for-subnet-mask Parameter
Possible Values Results
default false
false The terminal does not use an ICMP message to determine the appropriate subnet mask.
Communicating with Multi-Homed Hosts
Booting—Address Discovery 3-15
Note You can also set the subnet mask in the Boot Monitor Setup menus.
Communicating with Multi-Homed Hosts
If the terminal communicates with hosts that have more than one Ethernet interface on the same subnet, place all of the host addresses or hostnames in theip-equivalent-addressestable. Each row in the table lists the network addresses or hostnames of the interfaces on a given host. This parameter is not saved inNVRAM.
Rows in theip-equivalent-addresses table consist of the addresses or
hostnames for all the interfaces on a given host. For example, on a network with two multi-homed hosts:
ip-equivalent-addresses = {
{ eagle1 eagle2 eagle3 } { peregrine1 peregrine2 } }
Using a Reverse Name Request
Theunit-query-for-name-at-bootparameter controls whether, at boot time, the terminal sends a reverse name request to the name servers to discover the terminal’s hostname.
Using a reverse name request is useful in situations in which the terminal’s hostname must be known at boot time; for example, if the terminal should download a configuration file named for its hostname. This parameter is saved inNVRAM.
Table 3-4 ip-subnet-mask Parameter
Possible Values Result
default 0xFFFFFF00 (255.255.255.0)
Using a Reverse Name Request
3-16 Booting—Address Discovery
Note TheDNS name service must be running for a reverse name request to succeed.
Table 3-5 unit-query-for-name-at-boot Parameter
Possible Values Result
default none
none The terminal does not attempt a reverse name query at boot.
tcpip The terminal tries a reverse query to the name server hosts. If no name servers are defined, the terminal tries the TCP/IP boot server, if the boot server is defined.
Booting—X Server Loading 4-1
4 Booting—X Server Loading
This chapter describes the defaults and alternatives for loading and executing the X server and X server modules. The following topics are covered in the chapter:
❏ “Configuring the Default X Server Loading Sequence” on page 4-1 ❏ “Configuring X Server Module Loading” on page 4-10
❏ “Using TFTP for X Server Downloading” on page 4-12 ❏ “Using NFS for X Server Downloading” on page 4-13 ❏ “Linking X Server Files” on page 4-14
❏ “Specifying Boot Hosts” on page 4-16
❏ “Booting Manually from the Boot Monitor” on page 4-17
Configuring the Default X Server Loading Sequence
The default sequence for finding an X server and loading it intoRAM allows the terminal to load an X server the first time it is powered on.
The Boot Monitor first attempts to download an X server from the following sources:TFTP(Trivial File Transfer Protocol), MOP (Maintenance Operations Protocol),NFS(Network File Service),local (PCMCIA card). If aPCMCIA card is installed in the terminal,NVRAM is still set to factory defaults, and the terminal has never booted from the network, the default order is local,TFTP, MOP,NFS.
If all attempts to load an X server fail, the Boot Monitor displays its prompt (>); you can enter a manual boot command.
The default X server loading sequence (listed in Table 4-1) automatically loads the first X server found in the defaultTFTPdirectory (usually/tftpboot). The default directory is defined by your implementation ofTFTP.
Configuring the Default X Server Loading Sequence
4-2 Booting—X Server Loading
[image:54.612.42.493.144.567.2]Although the sequence uses predefined pathnames, you can use it to boot an X server located in another directory by linking one of the default pathnames to the X server’s true location. For information about linking, see “Linking X Server Files” on page 4-14.
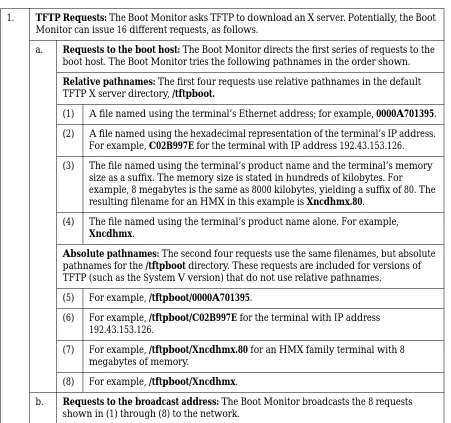
Table 4-1 Default Server Loading Sequence
1. TFTP Requests:The Boot Monitor asks TFTP to download an X server. Potentially, the Boot Monitor can issue 16 different requests, as follows.
a. Requests to the boot host:The Boot Monitor directs the first series of requests to the boot host. The Boot Monitor tries the following pathnames in the order shown. Relative pathnames:The first four requests use relative pathnames in the default TFTP X server directory, /tftpboot.
(1) A file named using the terminal’s Ethernet address; for example, 0000A701395. (2) A file named using the hexadecimal representation of the terminal’s IP address.
For example, C02B997E for the terminal with IP address 192.43.153.126. (3) The file named using the terminal’s product name and the terminal’s memory
size as a suffix. The memory size is stated in hundreds of kilobytes. For example, 8 megabytes is the same as 8000 kilobytes, yielding a suffix of 80. The resulting filename for an HMX in this example is Xncdhmx.80.
(4) The file named using the terminal’s product name alone. For example, Xncdhmx.
Absolute pathnames:The second four requests use the same filenames, but absolute pathnames for the /tftpboot directory. These requests are included for versions of TFTP (such as the System V version) that do not use relative pathnames.
(5) For example, /tftpboot/0000A701395.
(6) For example, /tftpboot/C02B997E for the terminal with IP address 192.43.153.126.
(7) For example, /tftpboot/Xncdhmx.80 for an HMX family terminal with 8 megabytes of memory.
(8) For example, /tftpboot/Xncdhmx.
Configuring the Default X Server Loading Sequence
Booting—X Server Loading 4-3
Using remote configuration parameters, you can change the default download sequence. The configurable actions are:
❏ Disabling automatic booting ❏ Disabling all broadcast attempts ❏ Disabling theMOP request
❏ Disabling some of theTFTP orNFS requests ❏ Specifying a non-standard X server filename ❏ Specifying a non-standard X server directory
❏ Configuring the terminal to persist in trying to boot without going to the Boot Monitor when all attempts fail
❏ Configuring the sequence of boot protocols used (sources)
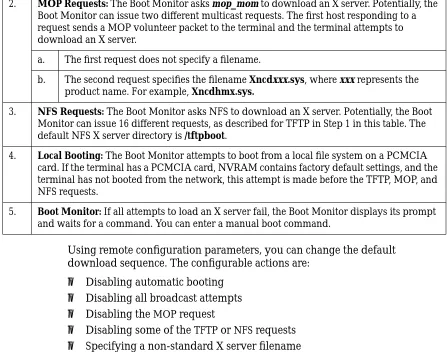
2. MOP Requests: The Boot Monitor asks mop_mom to download an X server. Potentially, the Boot Monitor can issue two different multicast requests. The first host responding to a request sends a MOP volunteer packet to the terminal and the terminal attempts to download an X server.
a. The first request does not specify a filename.
b. The second request specifies the filename Xncdxxx.sys, where xxx represents the product name. For example, Xncdhmx.sys.
3. NFS Requests:The Boot Monitor asks NFS to download an X server. Potentially, the Boot Monitor can issue 16 different requests, as described for TFTP in Step 1 in this table. The default NFS X server directory is /tftpboot.
4. Local Booting: The Boot Monitor attempts to boot from a local file system on a PCMCIA card. If the terminal has a PCMCIA card, NVRAM contains factory default settings, and the terminal has not booted from the network, this attempt is made before the TFTP, MOP, and NFS requests.
[image:55.612.59.506.96.448.2]5. Boot Monitor: If all attempts to load an X server fail, the Boot Monitor displays its prompt and waits for a command. You can enter a manual boot command.
Configuring the Default X Server Loading Sequence
4-4 Booting—X Server Loading
Disabling Automatic Booting
To prevent the terminal from booting automatically, set theboot-automatically parameter to “false” (Setup⇒ Change Setup Parameters⇒ Booting⇒ Boot automatically at power up). If automatic booting is disabled, the terminal displays the Boot Monitor prompt instead of loading an X server. This parameter is saved inNVRAM.
Disabling Broadcast Requests for an X Server
If the boot host does not respond, the Boot Monitor directs X server download requests to the broadcast address.
To prevent broadcasting for an X server, set the boot-tcpip-broadcast-boot-requestparameter to “false” (Setup⇒ Change Setup Parameters⇒ Booting⇒ TCP/IP Broadcast Boot Request). This parameter is saved inNVRAM.
Table 4-2 boot-automatically Parameter
Possible Values Result
default true
true The Boot Monitor attempts to download an X server.
false The Boot Monitor does not attempt to download an X server.
Table 4-3 boot-tcpip-broadcast-boot-request Parameter
Possible Values Result
default true
true The Boot Monitor attempts to download an X server by broadcasting.
Configuring the Default X Server Loading Sequence
Booting—X Server Loading 4-5
Disabling the MOP Request for an X Server
By default, after trying all of theTFTP requests, the Boot Monitor tries to download an X server using theMOP protocol.
To preventMOP download requests, set theboot-mop parameter to “false” (Setup⇒ Change Setup Parameters⇒ Booting [NCDnet Boot Options section]⇒ TryMOP). This parameter is saved inNVRAM.
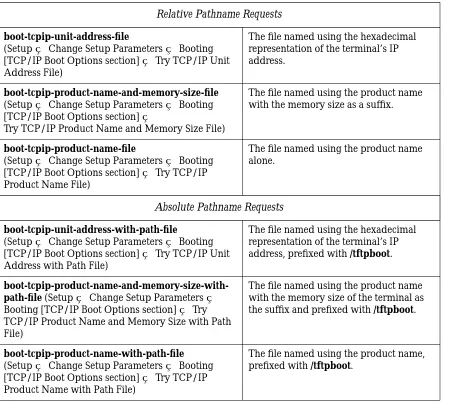
Disabling Selected TFTP or NFS Requests for an X Server
The parameters listed in Table 4-5 control the X server filenames that the Boot Monitor requests viaTFTP orNFS during the default X server download sequence.
All parameters are “true” by default and are savedNVRAM. To disable a request, set its parameter to “false.” For example:
boot-tcpip-unit-address-with-path-file = false
Note There are no