xPrintServer Office Edition
Print Server User Guide
Intellectual Property
© 2015 Lantronix, Inc. All rights reserved. No part of the contents of this book may be transmitted or reproduced in any form or by any means without the written permission of Lantronix.
Lantronix and xPrintServer are registered trademarks of Lantronix, Inc. in the U.S. and certain other countries. U.S. Patent 7,698,405; 8,024,446; 8,219,661; 8,504,740; 8,922,813. Additional patents pending.
Windows, Active Directory and Internet Explorer are registered trademarks of Microsoft
Corporation. Mozilla and Firefox are registered trademarks of the Mozilla Foundation. Google is a registered trademark and Google Cloud Print, Chrome, Chrome OS, Android, and Google Play are trademarks of Google Inc. Apple, Mac, OS X, Safari, iTunes, Bonjour, iPod, iPad and iPhone are registered trademarks of Apple Inc. AirPrint is a trademark of Apple Inc. Wi-Fi is a trademark of Wi-Fi Alliance Corporation. iOS is a registered trademark of Cisco Technology, Inc. All other trademarks and trade names are the property of their respective holders.
Contacts
Lantronix, Inc. Corporate Headquarters
7535 Irvine Center Drive Suite 100
Irvine, CA 92618, USA Toll Free: 800-526-8766 Phone: 949-453-3990 Fax: 949-453-3995
Technical Support
Online: www.lantronix.com/support
Sales Offices
For a current list of our domestic and international sales offices, go to the Lantronix web site at
www.lantronix.com/about/contact.
Disclaimer & Revisions
All information contained herein is provided “AS IS.” Lantronix undertakes no obligation to update the information in this publication. Lantronix does not make, and specifically disclaims, all
warranties of any kind (express, implied or otherwise) regarding title, non-infringement, fitness, quality, accuracy, completeness, usefulness, suitability or performance of the information
provided herein. Lantronix shall have no liability whatsoever to any user for any damages, losses and causes of action (whether in contract or in tort or otherwise) in connection with the user’s access or usage of any of the information or content contained herein. The information and specifications contained in this document are subject to change without notice.
Revision History
Date Rev. Comments
November 2012 A Initial document for firmware release 3.0.0-16. September 2013 B Updated firmware information.
June 2015 C Updated for AirPrint certified firmware release 5.0.0. This update includes Google Cloud Print capability, security functions, quick setup page, help link, geolocation, supply level information, and the ability to import/export user information.
Table of Contents
Intellectual Property ______________________________________________________ 2 Contacts _______________________________________________________________ 2 Disclaimer & Revisions ___________________________________________________ 2 Revision History _________________________________________________________ 2 List of Figures __________________________________________________________ 7 List of Tables ___________________________________________________________ 8
1: Introduction
9
Office, Home, and Network Editions _________________________________________ 9 Key Features ___________________________________________________________ 9 Supported Devices _____________________________________________________ 10 Supported Printers and Printer Protocols ____________________________________ 10 Supported DHCP Configuration ___________________________________________ 10 Supported Browsers ____________________________________________________ 10 Product Information _____________________________________________________ 10 Serial Number ______________________________________________________ 11 IP Address _________________________________________________________ 11
2: Installation
12
Package Contents ______________________________________________________ 12 User-Supplied Items ____________________________________________________ 12 Hardware Components __________________________________________________ 13 Ethernet LEDs ______________________________________________________ 13 Status LEDs _______________________________________________________ 14 Hardware Installation Steps _______________________________________________ 14 Topology Support ______________________________________________________ 16
3: Navigation and Printing
17
Finding the xPrintServer IP Address ________________________________________ 17 System Status on the Home Page _________________________________________ 19 Logging In ____________________________________________________________ 21 Local Authentication Login ____________________________________________ 21 Remote Authentication Login __________________________________________ 21 Logging Off ___________________________________________________________ 22 Navigation ____________________________________________________________ 22 Printing from an iOS Device ______________________________________________ 24 Printing from a Mac OS X Lion Desktop _____________________________________ 25 Setting Up Printing from a Windows 7 Desktop _______________________________ 26
Performing Add Printer Setup __________________________________________ 26 Configuring a Default Printer ___________________________________________ 28 Setting Up Printing from a Windows 8 Desktop _______________________________ 28 Performing Add Printer Setup __________________________________________ 28 Configuring a Default Printer ___________________________________________ 30
4: Configuration
31
User Administration _____________________________________________________ 31 Account Translation _________________________________________________ 32 Changing Passwords ________________________________________________ 32 Adding a New User __________________________________________________ 33 Deleting a User _____________________________________________________ 34 Exporting Users _____________________________________________________ 34 Importing Users _____________________________________________________ 35 Downloading a Sample CSV ___________________________________________ 36 Printer Access Control (Protecting Printer Access) _____________________________ 37 Viewing Configured Printers ______________________________________________ 39 Configuring Printers _____________________________________________________ 40 Enabling or Disabling Discovery ________________________________________ 40 Configuring Printers through Auto Discovery ______________________________ 41 Configuring Printers through Discovery __________________________________ 41 Deleting All Configured Printers ___________________________________________ 42 Setting Real Time Clock _________________________________________________ 43 Assigning a Static IP Address to the xPrintServer Device _______________________ 44 Admin Printer Configuration Options ________________________________________ 44 Printing a Test Page _________________________________________________ 44 Purging Job History __________________________________________________ 45 Deleting a Printer ___________________________________________________ 45 Changing Printer Description __________________________________________ 46 Changing Printer Location ____________________________________________ 46 Changing Printer Geolocation __________________________________________ 47 Showing Shared Printer Information _____________________________________ 47 Sharing a Printer ____________________________________________________ 48 Hiding a Printer _____________________________________________________ 48 Setting Printer Options _______________________________________________ 48 Showing Marker Supply Levels _________________________________________ 50 Updating Discovery Printer IP Addresses ____________________________________ 51 Viewing and Exporting Print Jobs __________________________________________ 52 Renaming the xPrintServer Device _________________________________________ 53 Resetting the xPrintServer Unit to Factory Defaults ____________________________ 54 Via the User Interface ________________________________________________ 54 Via the Hardware Reset Button ________________________________________ 55
Restarting the xPrintServer Device _________________________________________ 55 Viewing Logs __________________________________________________________ 55 Printer Drivers _________________________________________________________ 56 Downloading Printer Drivers from the Internet _____________________________ 56 Exporting Printer Drivers ______________________________________________ 58 Downloading Printer Drivers from a USB Flash Drive _______________________ 59 Managing Active Directory ________________________________________________ 60 Updating Active Directory Configuration __________________________________ 60 Testing Remote User Authentication ____________________________________ 61 Saving Configuration ____________________________________________________ 62 Restoring Configuration __________________________________________________ 63 Proxy Server Configuration _______________________________________________ 64 Testing Proxy Server Connectivity ______________________________________ 65 Managing Security Certificates and SSL/TLS Keys ____________________________ 65 Generating a Private Key and Self-Signed Certificate _______________________ 66 Generating a Certificate Signing Request_________________________________ 66 Uploading a Private Key and Signed Certificate ____________________________ 67
5: Google Cloud Print
68
Establishing a Google Cloud Print Connection ________________________________ 68 Installing the Google Cloud Print App on Android Devices _______________________ 71 Printing from an Android-based Phone or Tablet ______________________________ 72 Printing from Chrome OS and Chromebook Devices ___________________________ 76 Deleting and Adding a Google Email Account ________________________________ 77 Supplementary Google Cloud Accessing Google Cloud Print Administrative Features Online _____________________________________________________________________ 79
Google Cloud Print Administrative Options _______________________________ 79 Accessing Google Cloud Print Administrative Features Online ________________ 80 Sharing a Printer through Google Cloud Print Service _______________________ 80
6: Updating Firmware
81
Updating Firmware via the Lantronix Web Services Website _____________________ 81 Updating Firmware via a Local USB Port ____________________________________ 82
7: Advanced Options
83
Modifying USB Time-out _________________________________________________ 84 Modifying NTP Server Address ____________________________________________ 84 Disabling Internet Access ________________________________________________ 84
8: Technical Specifications
85
A:
Technical Support
86
Diagnostic Support _____________________________________________________ 86 Lantronix Technical Support ______________________________________________ 87
B:
Troubleshooting
88
Problems and Error Messages ____________________________________________ 88
C:
Compliance
89
Declaration of Conformity ________________________________________________ 89 RoHS Notice __________________________________________________________ 90
D:
Warranty
91
List of Figures
Figure 1-1 xPrintServer Office Edition Print Server _______________________________________ 9 Figure 1-2 Sample Product Information Label (Type 1) ___________________________________ 10 Figure 1-3 Sample Product Information Label (Type 2) ___________________________________ 11 Figure 1-4 Sample Serial Numbers on Hardware Devices _________________________________ 11 Figure 2-1 xPrintServer LEDs _______________________________________________________ 13 Figure 2-2 Sample xPrintServer Mounting Options ______________________________________ 15 Figure 2-3 Quick Connect Diagram __________________________________________________ 16 Figure 3-1 Serial Number __________________________________________________________ 17 Figure 3-2 Redirected to Login Prompt ________________________________________________ 18 Figure 3-3 System Status Information on the Home Page _________________________________ 19 Figure 3-4 Login Prompt ___________________________________________________________ 21 Figure 3-5 Navigating the xPrintServer User Interface ____________________________________ 22 Figure 3-6 Tabs Available for Users __________________________________________________ 23 Figure 3-7 Sample View of Buttons on iOS devices ______________________________________ 24 Figure 3-8 Sample View of Native Print Menu __________________________________________ 24 Figure 3-9 Sample View of Printer Options _____________________________________________ 24 Figure 4-1 Non-Admin User Access __________________________________________________ 31 Figure 4-2 User Account Translation Workflow _________________________________________ 32 Figure 4-3 Changing Own Password _________________________________________________ 33 Figure 4-4 Changing Other User Passwords (Admin User Only) ____________________________ 33 Figure 4-5 Adding or Deleting a User (Admin User Only) __________________________________ 34 Figure 4-6 Exporting Users _________________________________________________________ 35 Figure 4-7 Sample CSV File ________________________________________________________ 36 Figure 4-8 Printer Access Control ____________________________________________________ 37 Figure 4-9 Printer Details and Pop-Up Command Menu __________________________________ 39 Figure 4-10 Printer Discovery Page __________________________________________________ 40 Figure 4-11 Sample Printer Auto Discovery Report ______________________________________ 41 Figure 4-12 Expanding Detected Printers Information ____________________________________ 42 Figure 4-13 Admin Menu (Defaults to Time-zone Link) ___________________________________ 43 Figure 4-14 New Printer Description __________________________________________________ 46 Figure 4-15 New Printer Location ____________________________________________________ 46 Figure 4-16 Show Share Info Pop-up _________________________________________________ 47 Figure 4-17 Sample Printer Options __________________________________________________ 49 Figure 4-18 Show Supply Levels ____________________________________________________ 50 Figure 4-19 Printer IP Address Page _________________________________________________ 51 Figure 4-20 Print Job Details________________________________________________________ 52 Figure 4-21 Changing the xPrintServer Name __________________________________________ 53 Figure 4-22 Logs _________________________________________________________________ 56 Figure 4-23 Drivers List Tab ________________________________________________________ 57 Figure 4-24 Export Drivers Button ___________________________________________________ 58 Figure 4-25 Loaded Drivers Tab _____________________________________________________ 59 Figure 4-26 Active Directory Configuration _____________________________________________ 60 Figure 4-27 Saving Configuration ____________________________________________________ 62 Figure 4-28 Restoring Configuration __________________________________________________ 63 Figure 4-29 Configuring Proxy Server ________________________________________________ 64 Figure 4-30 SSL/TLS Key and Certificate Management ___________________________________ 65 Figure 5-1 Start Quick Setup________________________________________________________ 69 Figure 5-2 Google Cloud Print Printer Confirmation ______________________________________ 70 Figure 5-3 Quick Setup Complete ____________________________________________________ 70 Figure 5-4 Google Account _________________________________________________________ 77 Figure 5-5 Adding a Google Account _________________________________________________ 78
Figure 5-6 Finishing Printer Registration ______________________________________________ 79 Figure 5-7 Google Cloud Print Administrative Features ___________________________________ 79 Figure 6-1 Firmware Update Options _________________________________________________ 81 Figure 7-1 Advanced Options _______________________________________________________ 83
List of Tables
Table 2-1 Status LED, Top of Device _________________________________________________ 14 Table 4-1 Comparing Admin and Non-Admin User Privileges ______________________________ 31 Table 8-1 Technical Specifications ___________________________________________________ 85
1: Introduction
The Lantronix® xPrintServer® Office Edition print server, which is compatible with Apple Inc.’s AirPrint™ technology, provides wireless printing capabilities for iPad®, iPhone®and other Apple devices with iOS®-enabled AirPrint applications for unlimited network printers and eight USB printers (USB hub not included). xPrintServer Office Edition print server also enables printing to USB printers from Mac® OS X® (Lion or later) operating system and Windows® (Windows 7 or later) operating system. Additionally, the xPrintServer Office Edition print server supports Google Cloud Print supported platforms such as Chrome OS™ and Android™ platforms. Simply plug the xPrintServer into your network (router or switch with wireless access point), then plug your USB printer(s) into the xPrintServer. Within seconds the xPrintServer auto-discovers your network and USB connected printers to enable printing from mobile phones and tablet devices.
Note: Apple Inc. AirPrint™ technology enables you to wirelessly print photos, e-mail, Web pages, and documents from your iPad, iPhone, and iPod touch without the need to install a driver. A registered Google account is required to establish a Google Cloud Print connection.
Figure 1-1 xPrintServer Office Edition Print Server
Office, Home, and Network Editions
The xPrintServer comes in Network, Home and Office Editions. This user guide documents the features and functionality of the xPrintServer Office Edition print server.
Key Features
No additional software is needed on the iOS device Simple configuration
Supports up to 8 USB printers via USB hub and an unlimited number of network-attached printers.
Note: Up to 10 network-attached printers is recommended for optimal performance. Print jobs process one at a time regardless of the number of configured printers. The xPrintServer includes one USB port as a part of the unit; an additional USB hub for connecting additional USB printers is not included.
Automatic printer discovery and configuration (for supported printers) Security features
External LED status indicator Configuration via browser (HTTP)
Supported Devices
The Lantronix xPrintServer print server supports all iOS AirPrint enabled and Google Cloud Print enabled Chrome OS and Android devices. Apple AirPrint technology is included in all newer generation Apple devices with iOS 4.2 and later. Google Cloud Print is included in all Chrome OS and Android devices with iOS 2.3.3 and later.
iPad (all versions) iPhone (3GS or later)
iPod Touch (3rd generation or later) All Chrome OS devices
All Android devices.
Note: Chrome and Android devices require installation of a Google app with Google Cloud Print web printing service functionality
Supported Printers and Printer Protocols
See http://www.lantronix.com/xprintserver-supported-printers for the latest list of all supported printers. This list is periodically updated with new printers.
Supported DHCP Configuration
xPrintServer print server supports both DHCP and static IP address assignments.
Supported Browsers
Lantronix supports the latest versions of Internet Explorer®, Mozilla® Suite, Mozilla® Firefox®, Safari®, and Chrome® web browsers.
Product Information
You will need the QR code or the serial number of your xPrintServer device when setting up your xPrintServer user interface. The serial number can be found on the product information label adhered to your device. One of two types of product information labels are adhered to your xPrintServer device (see Figure 1-2 or Figure 1-3 below).
Figure 1-2 Sample Product Information Label (Type 1)
Bar Code
Product Revision Serial Number
Part Number
Manufacturing Code Date Country of Origin
Figure 1-3 Sample Product Information Label (Type 2)
Serial Number
A serial number is a unique, identifying number specific to each hardware device including an xPrintServer print server, printer or any Mac, PC, mobile phone or tablet.
Figure 1-4 Sample Serial Numbers on Hardware Devices
IP Address
Every device connected to an IP network must have a unique IP address. The xPrintServer device gets a unique IP address from the DHCP server on your network (default method) or can be manually configured with a static IP address.
00-80-A3-8E-00-63 or 00:80:A3:8E:00:63 or 0080A38E0063 Manufacturing
Code Date Product Revision
Country of Origin QR Code
Part Number
Serial Number
2: Installation
This chapter describes how to install your xPrintServer print server.
Chapter 5: Google Cloud Print provides instructions for establishing a connection, installation and printing related to Google Cloud Print.
Package Contents
Your xPrintServer product package includes the following: One (1) xPrintServer print server
One (1) Quick Start Guide
One (1) RJ-45 Ethernet Cable (3 ft)
One (1) Power Supply with Regional Adapters Mounting Bracket with Two (2) Screws Four (4) Rubber Feet
User-Supplied Items
You also need the following items to install and operate your xPrintServer device: A working power outlet
Internet connection (with outbound port 80; or ports 443 and 5222 if utilizing Google Cloud Print features)
Network-attached printer (wired or wireless) USB Printer (if any)
Your device (e.g., PC, tablet, or smartphone) with connection to the network via Wi-Fi A Google® email account (must be logged in to be able to setup and print through Google
Hardware Components
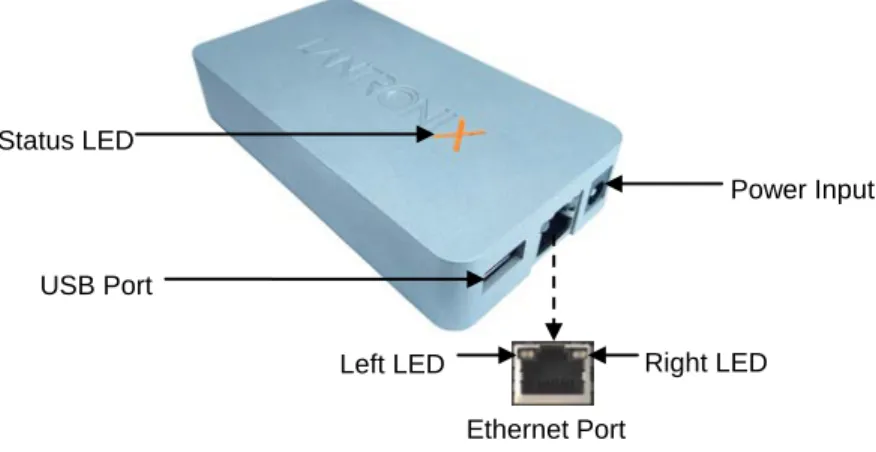
There is one USB port, one power input, one Ethernet port, and two types of LED indicators on the xPrintServer print server. The LEDs provide information about device activity and status.
Figure 2-1 xPrintServer LEDs
Ethernet LEDs
There are two LEDs located on the upper left and right corners of the Ethernet socket (see Figure 2-1). These indicate the status of the connection.
Left LED
Green ON, 100Mbps Ethernet Link Green Blinking, 100Mbps Activity Orange ON, 10Mbps Ethernet Link Orange Blinking, 10Mbps Activity OFF, No Ethernet Link
Right LED
Always OFF
The Ethernet port can connect to an Ethernet (10Mbps) or Fast Ethernet (100Mbps) network. Power Input
USB Port Status LED
Ethernet Port
Right LED Left LED
Status LEDs
The Status LED on the xPrintServer device is incorporated into the “X” letter of the Lantronix logo on the top of the device. The behavior of this LED indicates the type of activity occurring in the xPrintServer device. The Status LED color is orange when lit, and unique display patterns indicate the specific type of activity. The LED may display a solid light, display no light, slowly glow on, slowly glow off, or flash on/off.
Table 2-1 Status LED, Top of Device Orange “X” LED Description
Solid A continuous solid light indicates the power is on or the device is booting. OFF No light indicates the power is off.
Blinking Even blinking pattern indicates the device is printing. Glow/Dim
(Repeating Pattern)
Pulsating pattern of glowing and dimming light cycle occurring once every three seconds. Indicates the device is booted, idle and waiting for a job.
Code 1 A repeating pattern of a single flash followed by two seconds of
no light indicates the device is obtaining the DHCP address. Note:through 7 Codes 1
indicate a grouped number of flashes in the Orange “X” LED separated by a two second interval where the light is off. The specific code/number of flashes
separated by a two second no-light interval indicates a specific status as described in the grey cells to the left.
Code 2 A repeating pattern of two flashes followed by two seconds of no light indicates there are no configured printers.
Code 3 A repeating pattern of three flashes followed by two seconds of no light indicates a factory default reset.
Code 4 A repeating pattern of four flashes followed by two seconds of no light indicates a successful firmware update.
Code 5 A repeating pattern of five flashes followed by two seconds of no light indicates a failed firmware update.
Code 6 A repeating pattern of six flashes followed by two seconds of no light indicates a printing error.
Code 7 A repeating pattern of seven flashes followed by two seconds of no light indicates printer discovery is in process.
Code 8 A repeating pattern of eight flashes followed by two seconds of no light indicates USB device (printer or flash drive) discovery is in progress.
Hardware Installation Steps
With all xPrintServer package contents and the requisite user-supplied items listed above, you may begin installation.
1. Make sure of the following:
- Your devices (smartphone, tablet or PC) are on the same Wi-FI® or wired network as your xPrintServer unit.
- Printing from your Windows or Mac computer (from which the USB printer is directly attached) is working, before proceeding. If you are installing a new USB printer, this may require downloading and installing printer drivers to your desktop form the printer
2. Position the xPrintServer device. The xPrintServer print server can simply be placed as it is on a desk or other secure flat surface. Here are additional options:
- To install the rubber feet on the xPrintServer device (for added grip and stability on a flat surface), peel to unveil the adhesive strip on each rubber foot and press one foot onto each of all four bottom corners of the xPrintServer device.
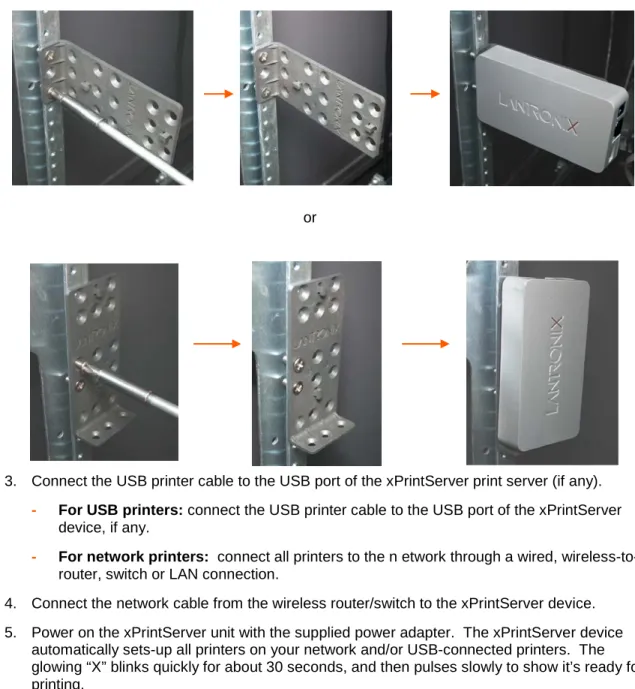
- To secure the xPrintServer device into a server rack, utilize the included mounting bracket and screws. There are a variety of ways to mount the bracket and then the xPrintServer unit, including the two sample methods in Figure 2-2.
Figure 2-2 Sample xPrintServer Mounting Options
or
3. Connect the USB printer cable to the USB port of the xPrintServer print server (if any). - For USB printers: connect the USB printer cable to the USB port of the xPrintServer
device, if any.
- For network printers: connect all printers to the n etwork through a wired, wireless-to-router, switch or LAN connection.
4. Connect the network cable from the wireless router/switch to the xPrintServer device. 5. Power on the xPrintServer unit with the supplied power adapter. The xPrintServer device
automatically sets-up all printers on your network and/or USB-connected printers. The glowing “X” blinks quickly for about 30 seconds, and then pulses slowly to show it’s ready for printing.
6. Monitor the LEDs on the xPrintServer print server for activity and status information (see Ethernet LEDs and Status LEDs).
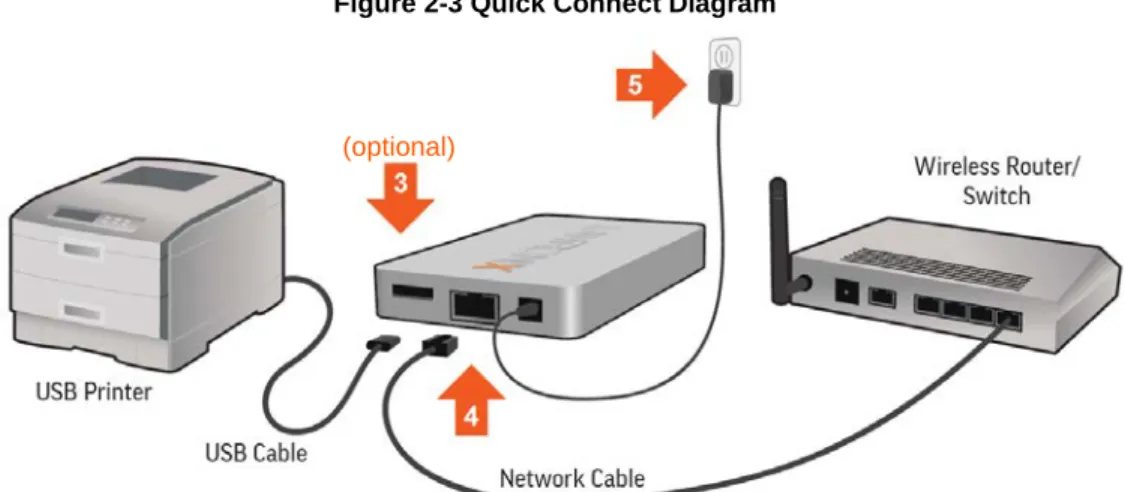
Figure 2-3 Quick Connect Diagram
Topology Support
The xPrintServer print server is hardwired (via standard CAT-5) cabling to a router, switch or hub. The system requires an Access Point (A/P) which can also be hardwired and connected to the network. The connecting device (e.g., a tablet or smartphone) associates with the A/P and communicates to the xPrintServer device when a print job is ready to be processed. The
xPrintServer unit communicates with network attached printer(s); the printers may either be wired or wirelessly connected to the network.
For the xPrintServer print server to auto-detect printers on bootup, the xPrintServer device and printers must be on the same subnet. After auto-detection has been completed, the xPrintServer device can then be relocated to a different subnet (Wi-Fi connected subnet that devices are connected to) assuming that subnet can route to the previous subnet.
The xPrintServer device uses Apple® Bonjour® or Zeroconf networking technology to advertise print services to the iOS device(s) and requires either one or both of the following:
Both the connecting device and the xPrintServer print server are on the same subnet. The connecting device and xPrintServer devices are on different subnets but multicast traffic
is communicated between the subnets.
Multicast configuration and support can be found in the Lantronix knowledgebase. You may perform word searches, such as for “multicast”, at http://www.lantronix.com/resources/.
3: Navigation and Printing
This chapter explains how to navigate and use your xPrintServer user interface including
directions on how to login and log out, how to change your password, and most importantly, how to print from your PC, smartphone or tablet device. Refer to Establishing a Google Cloud Print Connection for one-time directions needed to initially set up the xPrintServer device with Google Cloud Print.
Note: If your iOS device is running iOS 7 or later, please update your xPrintServer firmware to version 3.2.0 or later.
Finding the xPrintServer IP Address
Use these directions to find your device IP address through which you may log into your xPrintServer device. Internet access is required.
Note: If you have gone through the directions, Establishing a Google Cloud Print Connection, an IP address was assigned to your xPrintServer unit.
Every xPrintServer device has a unique, identifying serial number that can be found on the product information label (see Figure 1-2). As part of the initialization/boot up process, the xPrintServer device automatically registers its IP address and associated serial number with the Lantronix Web Services website (http://www.findmyxps.com) which in turn provides the unique IP address of the xPrintServer device. You may then use the xPrintServer IP address to log into the user interface for printing management.
Use these directions to find the IP address of a new xPrintServer device. 1. Open an Internet web browser. See Supported Browsers.
2. Enter http://www.findmyxps.com into the web browser address bar.
3. Press Enter on the keyboard. You are prompted for the xPrintServer serial number.
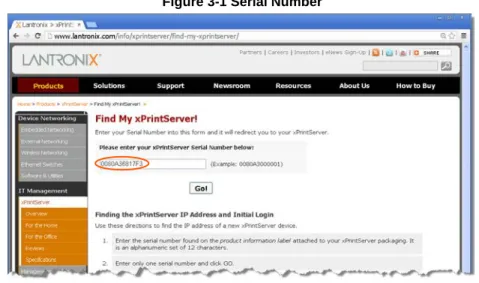
4. Enter the serial number of your xPrintServer print server. The serial number can be found on the product information label attached to your xPrintServer packaging
(see Figure 1-2). It is an alphanumeric set of 12 characters. Figure 3-1 Serial Number
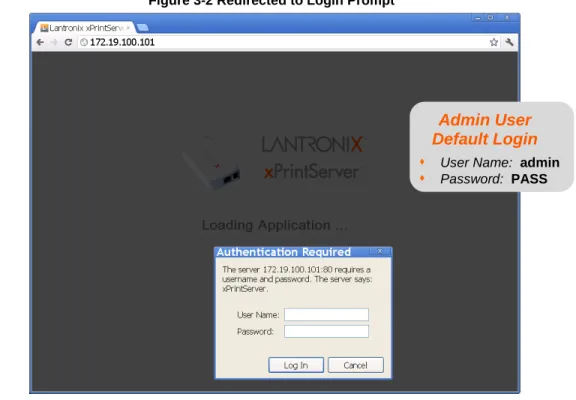
5. Click the Go! button. You are redirected to your xPrintServer URL, after which a login prompt appears.
Figure 3-2 Redirected to Login Prompt
6. Enter the default Admin user login information. User Name: admin
Password: PASS
You are redirected to your xPrintServer URL where you can see the System Status on the Home Page.
7. Take note of the IP address of your xPrintServer device for all future logins.
Note: Your xPrintServer IP address is assigned by DHCP by default, however, you can manually configure a static IP address. See Assigning a Static IP Address to the xPrintServer Device.
Note: Upon initial login, modify the default “PASS” password as soon as possible for security reasons. See Changing Passwords.
Admin User
Default Login
User Name: adminSystem Status on the Home Page
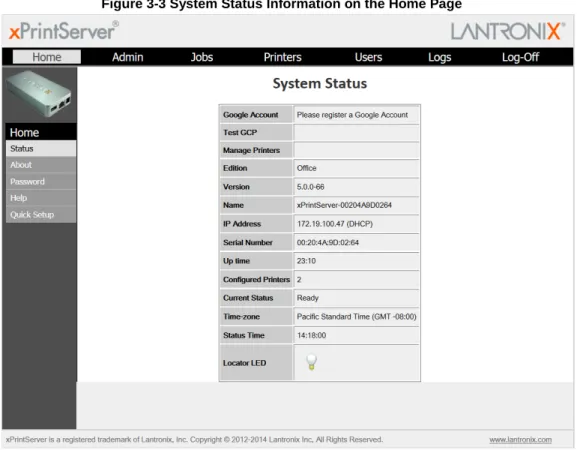
You can see your xPrintServer System Status information on the Home page whenever you log into your xPrintServer URL.
Figure 3-3 System Status Information on the Home Page
The System Status information includes the unit’s IP address along with other important system status information:
Google Account
Indicates the Google email account address used to link the xPrintServer device to Google Cloud Print.
Test GCP
Print a test page from Google Cloud Print web printing services. Manage Printers
Access connected printers through Google Cloud Print management page accessed online.
Edition
The edition of xPrintServer device (Office Edition). Version
The current version of your firmware. Name
The configurable host name for the xPrintServer device. The default host name is
IP Address
The unique IP address associated with your xPrintServer device. This IP address may be used to browse directly to the xPrintServer device’s Web Manager from a supported browser.
Serial Number
The unique serial number associated with the xPrintServer device which should match what is on the product information label.
Up time
The amount of time the xPrintServer device has been operational since powered on or last restarted.
Configured Printers
The number of printers successfully provisioned. Current Status
The current status of the xPrintServer print server. Time-zone
The configured time zone (can be changed through the Admin page). Status Time
The time at which the system status information you see on the screen was captured. Locator LED
Clicking the light bulb causes the “X” LED on top of the xPrintServer unit to blink rapidly. Clicking the light bulb again turns off this feature. This feature is useful in situations where you wish to identify a specific xPrintServer device amongst multiple units.
Logging In
Once the xPrintServer device is installed (see Installation Steps) and the IP address discovered (see Finding the xPrintServer IP Address), you may follow these directions to login to the xPrintServer print server via Local or Remote Authentication at any time.
Note: The xPrintServer device does not use the MS Active Directory® services for xPrintServer GUI authentication. It only uses the locally configured user database for the xPrintServer GUI authentication.
Figure 3-4 Login Prompt
To Login:
1. Open an Internet web browser.
2. Enter the IP address of your xPrintServer device.
Note: If Bonjour networking technology is installed on your Windows or Mac computer, you may also access the user interface by entering xPrintServer-serialnumber.local where “serialnumber” is replaced by your xPrintServer unit’s unique serial number (for example, xPrintServer-0080A3123456.local).
3. Enter your login information when prompted.
Note: See Finding the xPrintServer IP Address for the default user name and password (if the password has not yet been changed.
User Name Password
You are logged into the xPrintServer user interface when you see System Status on the Home Page.
Local Authentication Login
Local Authentication Login uses a local database of manually added user accounts for authentication into the xPrintServer device's Web Manager.
Remote Authentication Login
Remote authentication allows authentication of users through Microsoft Active Directory. This is a feature that can be enabled by the Admin user. If Active Directory is enabled, the xPrintServer print server communicates with a remote server to authenticate user passwords (see Managing Active Directory). The Admin user must first establish a remote authentication user name and password in Microsoft Active Directory. Once established, users using remote authentication can follow the same steps under Local Authentication Login to login. Remote authentication is disabled by default.
Note: Though the xPrintServer print server supports remote authentication using MS Active Directory, it is only used for authenticating print jobs sent to xPrintServer-protected printers. The xPrintServer GUI access only authenticates against the xPrintServer-configured local user database.
Logging Off
1. Click the Log-Off tab located at the top far right of any xPrintServer user interface page. You are prompted to close out of your browser window.
2. Close out of your browser to completely log off.
Navigation
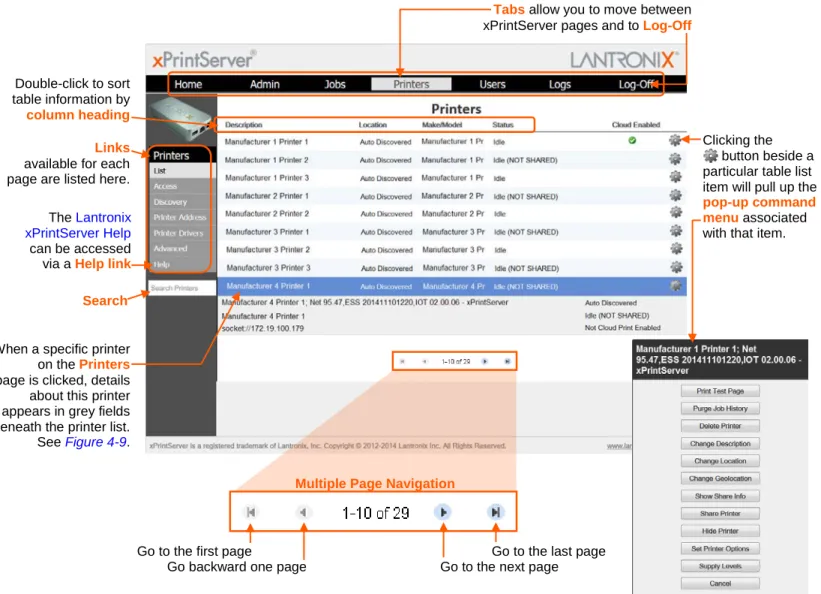
Navigation features for the xPrintServer user interface are outlined in this section. Figure 3-5 Navigating the xPrintServer User Interface
Double-click to sort table information by column heading
Links available for each page are listed here.
When a specific printer on the Printers pageis clicked, details
about this printer appears in grey fields beneath the printer list. See Figure 4-9. Search
Clicking the button beside a particular table list item will pull up the pop-up command menuassociated with that item. Tabs allow you to move between
xPrintServer pages and to Log-Off
Go to the first page Go to the last page Go backward one page… Go to the next page The Lantronix
xPrintServer Help can be accessed via a Help link
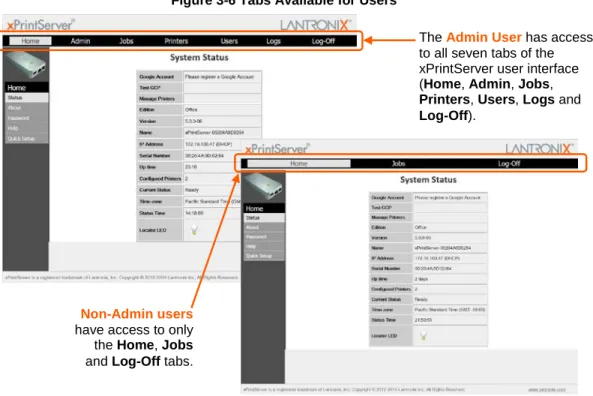
As illustrated above, navigation features for the xPrintServer user interface include the following: Tabs
All the functionality of your xPrintServer user interface is divided between the Home, Admin,
Jobs, Printers, Logs and Log-Off tabs located across the top of the user interface. Only the Admin user has full access to the functionality of all tabs within the xPrintServer user
interface. Non-Admin users only have access to the Home, Jobs and Log-Off tabs. See Figure 3-6 to compare Admin user and Non-Admin user access. Access these pages by clicking the same-named tab along the top of the screen. For instance, click the Jobs tab to get to the Jobs page or click Home to get to the Home page.
Figure 3-6 Tabs Available for Users
Links
Click to select from the links/commands available for each page. All links available for a particular web page are displayed along the left side. For instance, links to Active,
Completed and All jobs are available on the left side of the Jobs page. Search
A Search field is available for the Jobs, Printers and Users tabs. The search field features dynamic filtering that provides results based on the search string entered into the search field. The results dynamically update according to the search parameters entered in the search field. Deleting all contents of the Search field removes the filter and shows all results. Button
This button may be found beside all items listed on the Jobs and Printers pages. Click the button beside a particular print job or printer on these pages to pull up a pop-up command menu with commands that are available for that item.
Log-Off Tab
A Log-Off tab located at the far upper right of every xPrintServer user interface page allows you to logout easily.
Multiple Page Navigation
Arrows facilitating navigation between multiple pages become available when a larger number of items span multiple pages on the Printers, Jobs, Users, or Logs pages.
Non-Admin users have access to only
the Home, Jobs and Log-Off tabs.
The Admin User has access to all seven tabs of the xPrintServer user interface (Home, Admin, Jobs, Printers, Users, Logs and Log-Off).
Printing from an iOS Device
Note: If your iOS device is running iOS 7 or later, please update your xPrintServer firmware to version 3.2.0 or later.
This section explains how to print from your iOS device (e.g., iPad, iPod or iPhone). Use these steps to print from your iPad, iPhone or other iOS device.
1. Connect your xPrintServer print server according to Hardware Installation Steps.
2. Using your iPad, iPhone or other iOS device, open web page, email, photo, etc. you wish to print and choose the icon to open the native print menu.
Figure 3-7 Sample View of Buttons on iOS devices or
Figure 3-8 Sample View of Native Print Menu
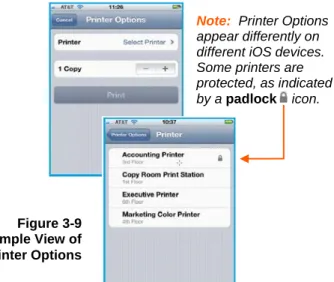
3. Choose Printer in the Printer Options menu that appears. All available networked printers display on your iOS device, including protected printers (see Figure 3-9 below).
4. Select the appropriate printer.
5. Login, as necessary. User authentication is required when a protected printer is selected (see Figure 3-9).
6. Select the number of copies to print.
7. Click Print. Your print job is sent to the selected printer
Note: A list of available commands will appear on the native print menu and will differ in appearance according to the type of Apple device and iOS version.
Note: The appearance of iOS
device buttons will differ in appearance according to the type of Apple device and iOS version.
Figure 3-9 Sample View of Printer Options
Note: Printer Options appear differently on different iOS devices. Some printers are protected, as indicated by a padlock icon.
Printing from a Mac OS X Lion Desktop
This section explains how to print from your Mac Operating System (OS) desktop. To print, the Mac OS device needs to be online and on the same subnet as the xPrintServer unit. The xPrintServer Office Edition print server supports desktop printing from Mac OS X Lion and newer versions.
Use these steps to setup printing from your Mac OS through the xPrintServer print server. 1. Connect your xPrintServer device according to Hardware Installation Steps.
2. Go to System Preferences > Hardware. 3. Click on Print & Scan.
5. Select the printer you wish to add.
6. Click on the Add button. The printer is now added in your available list of printers and is ready to print.
Setting Up Printing from a Windows 7 Desktop
This section explains how to prepare your Windows 7 desktop for printing. xPrintServer Office Edition supports desktop printing from Windows 7 and Windows 8 Operating Systems through Bonjour Print Services. You need to download Bonjour Print Services for Windows v2.0.2 or higher.
Performing Add Printer Setup
1. Connect your xPrintServer print server according to Hardware Installation Steps.
2. Download Bonjour Print Services at http://support.apple.com/kb/DL999, following prompts as instructed.
3. Launch Bonjour Printer Wizard:
Through Windows Start Menu by clicking Start > Control Panel > Bonjour Print Services > Bonjour Print Wizard.
By double-clicking the Bonjour Print Wizard icon on your desktop. The Bonjour Printer Wizard appears with a list of discovered printers.
4. Click on printer you wish to install.
5. Search and select your printer by
Manufacturer and Model, and click Next.
6. Click Finish to complete the installation.
Configuring a Default Printer
This section provides instructions on setting an installed printer on your network as the default printer.
1. Click Start > Control Panel on your desktop. 2. Double-click to select Devices and Printers.
3. Right-click the printer to be set as default and select Set as default printer. The selected printer is now set as the default printer.
Setting Up Printing from a Windows 8 Desktop
This section explains how to prepare your Windows 8 desktop for printing. xPrintServer Office Edition print server supports desktop printing from Windows 8 and Windows 7 Operating Systems through Bonjour Print Services. You need to download Bonjour Print Services for Windows v2.0.2 or higher. .
Performing Add Printer Setup
1. Connect your xPrintServer print server according to Hardware Installation Steps.
2. Download Bonjour Print Services at http://support.apple.com/kb/DL999, following prompts as instructed.
3. Launch Bonjour Printer Wizard:
Through Window’s Start Menu by clicking Start > Bonjour Print Services > Bonjour Print Wizard.
By double-clicking the Bonjour Printer Wizard icon on your desktop. The Bonjour Printer Wizard appears with a list of discovered printers.
4. Click on printer you wish to install.
5. Search and select your printer by Manufacturer and Model,and click Next.
6. Click Finish to complete the installation.
Note: Up to two instances of the same network printer may appear during discovery (one instance reported by the Bonjour Print Wizard and the other by the xPrintServer). You may select either printer.
Configuring a Default Printer
This section provides instructions on setting an installed printer on your network as the default printer.
1. Click Start > Windows System > Control Panel on your desktop. 2. Double-click to select Printers and Faxes.
3. Right-click the printer to be set as default and select Set as default printer. The selected printer is now set as the default printer.
4: Configuration
This chapter describes how to configure your xPrintServer print server using the xPrintServer user interface.
Admin user: the default and permanent master user login for the xPrintServer device. The Admin user has complete access of the xPrintServer user interface functionality including user, printer and job management and configuration capabilities as compared to non-Admin users who can only change their own password, have access to their own print jobs and view basic
xPrintServer information.
Table 4-1 Comparing Admin and Non-Admin User Privileges Non-Admin User Privileges Admin User Privileges
Access to functionality in the Home and Jobs tab in the xPrintServer user interface. Change user password. View and modify own print
jobs (not the print jobs of other users).
View basic information about the xPrintServer system status.
Access to Home, Admin, Jobs, Printers, Users and Logs tab pages which includes all the functionality available through the xPrintServer user interface.
Change all user passwords.
View and manage information about all print jobs, printers and user logins.
Ability to update firmware, reset device to default settings, add/delete printers and users, manage printer access, modify time zone, restart the device, view and send diagnostic information, update the name of the xPrintServer unit, and monitor logs.
User Administration
Note: The printer* depicted in Figure 4-2 represents models with authentication and /or account tracking capability.
The upcoming user admin subsections, including Adding a New User, Deleting a User, Exporting Users, Importing Users, Downloading a Sample CSV and portions of Changing Passwords are only available to Admin users to facilitate the assignment of Google Cloud accounts to
usernames and passwords stored on authenticating and/or account tracking printers. Non-Admin users, if created, can print and monitor their own print jobs and will have access to the information and functionality within the Home, Jobs and Log-Off tabs. See Figure 4-1.
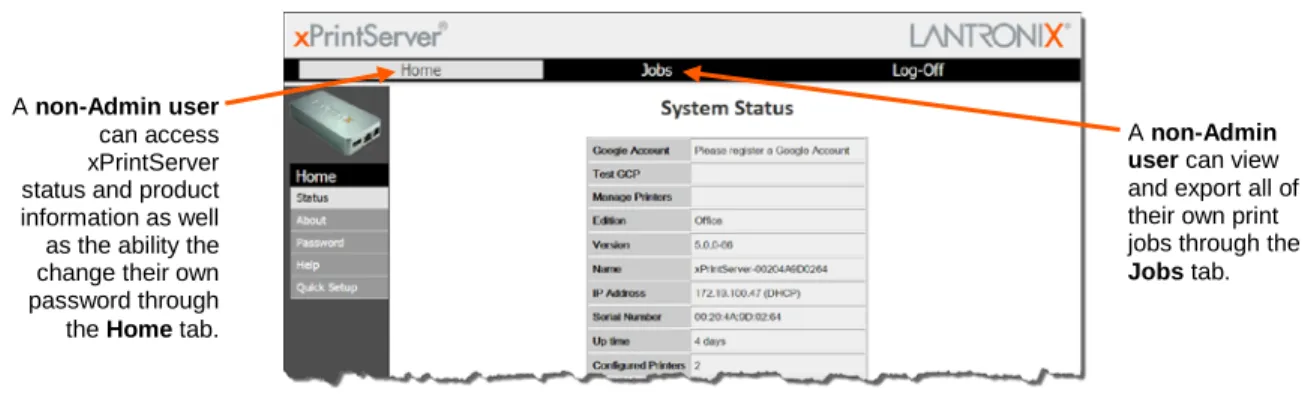
Figure 4-1 Non-Admin User Access
A non-Admin user
can access xPrintServer status and product information as well as the ability the change their own password through the Home tab.
A non-Admin
user can view and export all of their own print jobs through the
Account Translation
xPrintServer user administration supports account translation, an authentication and account tracking feature that works with Google Cloud Print and the built-in authentication and/or account tracking databases of certain printers. Such printers require the matching of Google Cloud Print accounts to pre-assigned username(s) and passwords(s) stored on the printer database for authentication and/or account tracking purposes. Only print jobs sent from a Google Cloud Print account which matches an existing printer username and password are allowed to print.
xPrintServer user administration provides different ways to manage and assign matching
usernames and passwords between Google Cloud Print accounts and usernames and passwords stored on the printer database. All xPrintServer user administration functionality is found under the User tab.
Note:Chapter 5: Google Cloud Print provides instructions for establishing a connection, installation and printing related to Google Cloud Print.
Figure 4-2 User Account Translation Workflow
Changing Passwords
The Admin user and non-Admin users may use the To change your password directions below to change their user password. Only the Admin user may use the To change a non-Admin user password as the Admin directions below to change the password for any non-Admin user. Password changes are effective immediately.
To change your password:
1. Login to the xPrintServer user interface as Admin user (see Logging In.)
2. Click the Password link on the left side of the Home page. The Change Password page appears displaying the User for which the password change is being made.
3. Complete the following fields: Current Password New Password
Re-enter new Password 4. Click Change Password.
5. Click OK in the confirmation pop-up that appears. Your password is changed.
Note: You will be asked to login again if you attempt to navigate to a different user interface page.
Note: Passwords are case-sensitive and may include up to 32 characters. All printable characters may be used with the exception of single and double quotation marks such as: ‘ or “.
Figure 4-3 Changing Own Password
To change a non-Admin user password as the Admin:
1. Login to the xPrintServer user interface as Admin user (see Logging In.) 2. Click the Users tab to access the Users page. All users are listed here. 3. Utilize Search as necessary to find a particular user.
4. Click Password button to the right of the User ID to be changed. 5. Enter the new password into both fields:
Password
Re-enter Password 6. Click Change Password.
7. Click OK in the confirmation pop-up that appears. User password is changed.
Note: If the Admin user password is changed, you will be asked to login again if you attempt to navigate to a different user interface page.
Figure 4-4 Changing Other User Passwords (Admin User Only)
Adding a New User
The Admin user can use these steps to create new users.
1. Login to the xPrintServer user interface as Admin user (see Logging In.) 2. Click the Users tab to access the Users page. All users are listed here. 3. Click Add User…
Note: Passwords are case-sensitive and may include up to 32 characters. All printable characters maybe used with the exception of single and double quotation marks such as: ‘ or “.
Note: The Full Name of a new user is case sensitive and may include up to 32 alpha and/or numeric characters.
4. Enter the following fields for the new user: Username
Password
Re-enter Password Full Name
GCP Account (optional)
5. Click Add User (or Cancel if you want to cancel this action.) The new user immediately displays on the Users page.
Figure 4-5 Adding or Deleting a User (Admin User Only)
Deleting a User
The Admin user can use these steps to delete users.
1. Login to the xPrintServer user interface as Admin user (see Logging In.) 2. Click the Users tab to access the Users page. All users are listed here. 3. Utilize Search as necessary to find a particular user.
4. Click the Delete button to the right of the User ID to be deleted.
5. Click Yes in the confirmation pop-up that appears (or No if you want to cancel this action.) . The deleted user is immediately removed from the list of users on the Users page.
Exporting Users
The Admin user can use these steps to export users. The user information is exported as a downloaded CSV file that can then be saved to specific chosen location (e.g., a flash drive or a designated place on the hard drive.) This exported user information can be imported into other xPrintServer units. The information within the spreadsheet can also be modified and saved before import into other xPrintServer units. See Importing Users below for directions as necessary. 1. Login to the xPrintServer user interface as Admin user (see Logging In.)
2. Click the Users tab to access the Users page. All users are listed here.
3. Click the Export Users button. A pop-up window appears with the choice to open or save the file. The name of this file is xps-users.csv by default. This file contains the
username, full name, password, GCP Account and Admin information of all non-Admin users. See Figure 4-6 below.
Note: When establishing a new user, please note
that the iOS device browser capitalizes the first character of the User ID. Make sure the User ID is correct prior to submitting your request to add user.
Figure 4-6 Exporting Users
4. Click Save File option and OK.
5. Save this file to a known location to import the file to another xPrintServer unit.
6. Click Yes if this Microsoft Excel window appears.
Importing Users
The Admin user can use these steps to import user information from one xPrintServer device to another xPrintServer device. A previously downloaded CSV file needs to be available in order to import user information. See Exporting Users for directions for downloading user data from a separate xPrintServer unit. Importing a blank CSV file (see Downloading a Sample CSV) can also be done to erase all user information.
1. Login to the xPrintServer user interface as Admin user (see Logging In.) 2. Click the Users tab to access the Users page. All users are listed here. 3. Click the Import Users… button. The Import Users page appears.
4. Click the Browse… button to browse to and open the file of exported users. The file name appears on the Import Users page.
5. Click the Import button.
7. Click OK to dismiss the pop-up window describing the activities in the import.
Note: Repeating the steps above to import a separate user list causes you to override any pre-existing user list.
Downloading a Sample CSV
The Admin user can use these steps to download a sample CSV file. This is a blank file without user data showing the categories of information that would be listed per user. User information can be directly entered and saved into this spreadsheet file, then imported onto an xPrintServer unit. Importing a blank CSV file can also be done to erase all user information.
1. Login to the xPrintServer user interface as Admin user (see Logging In.) 2. Click the Users tab to access the Users page. All users are listed here.
3. Click the Download Sample CSV button. A pop-up window appears with the choice to open or save the file. The name of this file is
xps-users.csv
by default. This file contains the username, full name, password, GCP Account and Admin information of all non-Admin users. See Figure 4-7 below.Figure 4-7 Sample CSV File
4. Click Save File option and OK.
Printer Access Control (Protecting Printer Access)
Access to a specific printer can be controlled so that a user must be authenticated before printing is allowed. The user is prompted for a username and password when selecting a printer with a padlock icon. Users are then authenticated via printer access control through the xPrintServer local user database and potentially the MS Active Directory (if enabled.)
The Admin user can use the steps below to change local user access to a specific printer. If the Admin user enables MS Active Directory printer access, the steps below additionally
configure the xPrintServer print server to use MS Active Directory services as a remote authentication server. See Managing Active Directory for instructions to enable MS Active Directory.
Note: Printer access control does not apply to MS Windows OS printing, since MS Windows printing does not currently support a mechanism for prompting users for print job authentication challenges.
To configure printer access control:
1. Login to the xPrintServer user interface (see Logging In).
2. Enable MS Active Directory printer access control (see Managing Active Directory) as desired:
- If not enabled, the following steps pertain only to printer access utilizing the xPrintServer Local User Database.
- If enabled, the following steps pertain to both printer access using the xPrintServer Local User Database and MS Active Directory.
3. Click the Printers tab to access the Printers > List page (see Figure 4-9).
4. Click the Access link to the left of the Printers page. A list of configured printers on the network is listed here.
5. Utilize Search as necessary to find a particular printer.
6. Click the button to the right of the specific printer with user access to be viewed or modified. The Disable access control checkbox is checked by default, allowing all users access to this printer.
7. To allow all users access to this printer, check the Disable access control checkbox at the top of the screen. Individual User ID checkboxes that may have specified user access disappear.
8. To allow specific users access to this printer, uncheck the Disable access control checkbox at the top of the screen. Individual User ID checkboxes appears to allow you to select users allowed access to this printer. In addition, all valid Active Directory accounts will be allowed. Check the User ID checkbox of users to be granted printer access to this printer. Uncheck the User ID checkbox of users to not be granted printer access to this printer.
9. Click Save (or Cancel if you want to cancel this action). The Printer Access Control page list of printers re-appear with the Allowed Users column immediately updated to show your latest modification.
Viewing Configured Printers
The Admin user may utilize these instructions to view provisioned printers. 1. Login to the xPrintServer user interface (see Logging In) as Admin user.
2. Click the Printers tab to access the Printers > List page. The Description, Location,
Make/Model, the last known Status, and Cloud Enabled status of all currently configured printers is listed on this page.
3. Utilize Navigation as necessary in situations where there are multiple pages of printers. 4. Utilize Search as necessary to find a particular printer.
5. Click on any printer in the list to retrieve additional information on that printer. In Figure 4-9 below, the fourth printer in the list was clicked and the associated printer details displayed in a grey field at the bottom of the list of printers.
Figure 4-9 Printer Details and Pop-Up Command Menu
6. Click the button to the right of a specific printer to access a pop-up command menu of options available for that printer. Each of these options is explained in greater detail under Admin Printer Configuration Options.
Pop-Up Command Menu for selected printer
Details of Selected Printer Description
Name
IP Address
Location Status
Configuring Printers
Note: Discovery of the xPrintServer device from a PC requires Apple’s Bonjour print services, which may be installed via Apple’s iTunes® or Safari web browser or Bonjour Print Helper available at http://support.apple.com/kb/DL999.
All printers are added and configured to the xPrintServer device via discovery where the xPrintServer unit discovers and provisions printers. Discovery happens in one of two ways: Auto Discovery: This is the automatic method of printer discovery and provisioning. Auto
discovery is enabled by default so that each time the xPrintServer device starts up or a printer is connected to the USB port, the Discovery protocol automatically runs one time, discovering and provisioning all printers connected since the last start up. This automatic feature can be disabled. See instructions below.
Discovery: This is the Admin user-activated method of discovering and provisioning printers that can be initiated after the xPrintServer print server is up and running. This method is useful in situations where printer(s) have been added since the last startup of the xPrintServer device. A user may wish to discover and provision the printer(s) at a particular moment rather than waiting until the auto discovery opportunity at the next startup of the xPrintServer device.
Note: Only printers listed among the Lantronix xPrintServer print server published list of printers is auto-provisioned after Discovery (see http://www.lantronix.com/xprintserver-supported-printers). Configuration options to manually add a printer, modify advanced printer settings and restart the printer publisher are available under Printers > Advanced. Use these advanced options only if instructed to do so by Lantronix Technical Support.
Enabling or Disabling Discovery
The auto discovery utility of the xPrintServer print server is enabled by default so that whenever you start up your xPrintServer device, auto discovery automatically runs one time. Auto
discovery can be disabled or re-enabled at any time. The Admin user may utilize these instructions to access where you may disable or re-enable auto discovery. Users may also perform manual discovery by utilizing the Re-Run Discovery button.
1. Login to the xPrintServer user interface (see Logging In) as Admin user. 2. Click the Printer tab to access the Printers > List page (see Figure 4-9).
3. Click the Discovery link to the left of the page to reach the Printer Discovery page. The current auto discovery mode is displayed at the top of the page.
4. Check Enabled or Disabled to enable or disable printer, as desired. The auto discovery mode automatically adjusts to your selection in a few seconds and your mode choice is preserved during subsequent xPrintServer device startups. Auto discovery occurs during device bootup and when a USB device is connected.
Configuring Printers through Auto Discovery
Auto discovery of printers happens automatically each time you startup xPrintServer device, as long as auto discovery is enabled prior to the startup.
1. Make sure auto discovery is enabled (see Enabling or Disabling Discovery above).
2. Startup and login to the xPrintServer user interface (seeLogging In) as usual. The Discovery protocol runs one time automatically upon startup.
3. Click the Printer tab to access the Printers > List page (see Figure 4-9). All printers which were auto discovered at this startup is listed here with “Auto Discovered” listed under the
Location column.
4. Click the Discovery link to the left of the page to reach the Printer Discovery page. A Printer Auto Discovery Report appears showing the current date and time the xPrintServer print server automatically discovered and configured printers and associated downloaded drivers.
Figure 4-11 Sample Printer Auto Discovery Report
Configuring Printers through Discovery
The Admin user may run Discovery anytime after the xPrintServer device is started up. Utilize these instructions to discover and provision network printers connected after the xPrintServer device last started up or printers on other networks if their IP addresses have been added (see Updating Discovery Printer IP Addresses).
Note: If utilizing Google Cloud Print and Deleting All Configured Printers was recently performed, first verify all printers have been de-registered on Google Cloud Print management interface. Reference steps in Deleting All Configured Printers.
1. Login to the xPrintServer user interface (see Logging In) as Admin user. 2. Click the Printer tab to access the Printers > List page (see Figure 4-9).
3. Click the Discovery link to the left of the page to reach the Printer Discovery page. A message stating “Printer Auto Discovery has not yet been run” appears if printers are available for discovery. If new printers are not available for discovery, you will see a Printer Auto Discovery Report (see Figure 4-11).
4. Click the Re-run Discovery button located directly above the Printer Auto Discovery Report, to manually check for any new printers. After a few minutes, a new Printer Auto Discovery Report appears showing the current date and time of the current discovery and configuration of printers and associated downloaded drivers.
5. Expand the SNMP field to see configuration information about the discovered printer(s). An example of what you may see in the SNMP field:
Figure 4-12 Expanding Detected Printers Information
6. Expand the Detected Printers field and further expand additional available subcategories (indicated with a icon to the left) to see a list of discovered printers and the status of the provisioning results.
Note: If you expand the Printer Auto Discovery Report, you may need to use the up-down scroll bar to see the entire contents of your report.
Deleting All Configured Printers
The auto discovery feature of the xPrintServer device is enabled by default so that whenever you power up your xPrintServer device, discovery automatically runs one time. The Admin user may also use the steps below to remove all configured printers in the xPrintServer.
1. Login to the xPrintServer user interface (see Logging In).
2. Click the Printer tab to access the Printers > List page (see Figure 4-9).
3. Click the Discovery link to the left of the page to reach the Printer Discovery page. 4. Click the Remove all printers button to remove all configured printers, as desired. 5. Click Yes in the confirmation pop-up that appears (or No to cancel action).